

CTH407
V. 02 – 22/06/2021 2 ©Velleman nv

CTH407
V. 02 – 22/06/2021 3 ©Velleman nv
USER MANUAL
1. Introduction
To all residents of the European Union
Important environmental information about this product
This symbol on the device or the package indicates that
disposal of the device after its lifecycle could harm the
environment. Do not dispose of the unit (or batteries) as
unsorted municipal waste; it should be taken to a
specialized company for recycling. This device should be
returned to your distributor or to a local recycling service. Respect
the local environmental rules.
If in doubt, contact your local waste disposal authorities.
Thank you for choosing Perel! Please read the manual thoroughly
before bringing this device into service. If the device was damaged in
transit, do not install or use it and contact your dealer.
2. Safety Instructions
Read and understand this manual and all safety signs
before using this appliance.
Indoor use only.
Class 2 appliance.
Switch of micro-gap construction.
Risk of electroshock when opening the cover. Be very
careful during the installation: touching live wires can
cause life-threatening electroshocks.

CTH407
V. 02 – 22/06/2021 4 ©Velleman nv
• This device can be used by children aged from 8 years and above,
and persons with reduced physical, sensory or mental capabilities
or lack of experience and knowledge if they have been given
supervision or instruction concerning the use of the device in a
safe way and understand the hazards involved. Children shall not
play with the device. Cleaning and user maintenance shall not be
made by children without supervision.
3. General Guidelines
Refer to the Velleman® Service and Quality Warranty on the last
pages of this manual.
• Familiarise yourself with the functions of the device before actually
using it.
• All modifications of the device are forbidden for safety reasons.
Damage caused by user modifications to the device is not covered
by the warranty.
• Only use the device for its intended purpose. Using the device in
an unauthorised way will void the warranty.
• Damage caused by disregard of certain guidelines in this manual
is not covered by the warranty and the dealer will not accept
responsibility for any ensuing defects or problems.
• Do not use outside the technical specifications.
• Keep this manual for future reference.
4. Overview
Refer to the illustrations on page 2 of this manual.
1
on-off switch
4
SET knob
2
working LED
5
PROGRAM button
3
program LED
5. Installation
WARNING
Make sure to cut off the mains power supply
before installing the thermostat.
1. Choose your installation spot. Install the thermostat in a well-
ventilated place and about 1.5 m (5 feet) above the floor, away
from direct sunlight, heat and interference sources.

CTH407
V. 02 – 22/06/2021 5 ©Velleman nv
2. Remove the front cover using an appropriate screwdriver.
3. Mount the thermostat on a flat surface. Drill two 6 mm holes and
insert a nylon anchor plug in each hole. Drill two 2.6 mm holes
when mounting the thermostat on a wooden surface.
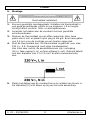
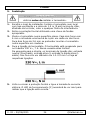
4. Wire the thermostat. The thermostat is designed for maximum
230 V~, 7 A. Never exceed these limits!
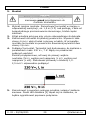
From left to right, the connection terminals are: neutral
input (N in), live input (L in) and live output (L out). Use wires
with diameter of 1.0-2.5 mm² and connect accordingly.
5. Replace the front cover and switch on the mains power supply.
The working LED [2] will turn blue to indicate proper connection.
6. Operation
6.1 Setting the Temperature
1. Slide the on-off switch [1] to the HEAT position. The thermostat
will switch on and enter the temperature control status.
2. Turn the temperature SET knob [4] to the desired room
temperature. The working LED [2] will light.
3. Slide the on-off switch to the OFF position to switch off the
thermostat.
Note
Due to the built-in delay, the thermostat will not respond
immediately when the temperature setting is changed.
6.2 Setting the Eco Mode
The eco mode is an energy-saving mode, which temperature is 5 °C
lower than the set temperature.
How to set the eco mode:

CTH407
V. 02 – 22/06/2021 6 ©Velleman nv
1. Press the PROGRAM knob [5] to activate the eco mode. The
program LED [3] turns orange.
2. The thermostat returns to comfort mode six hours after setting
the eco mode. The program LED [3] turns green.
3. At the same time next day, the eco mode is automatically
activated.
4. Press the PROGRAM knob to cancel the eco mode. The program
LED will switch off.
7. Cleaning and Maintenance
There are no user-serviceable parts inside the device. Refer to an
authorized dealer for service and/or spare parts.
Occasionally wipe with a damp cloth to keep it looking new. Do not
use harsh chemicals, cleaning solvents or strong detergents.
8. Technical Specifications
temperature range .......................................... 5 °C - 30 °C
Tmax. ..................................................................... 40 °C
control switch .................................................. relay switch
rated power ..................................... 230 V~, 50 Hz, 7(3) A
size ............................................................ 106 x 166 mm
weight .....................................................................157 g
Use this device with original accessories only. Velleman nv
cannot be held responsible in the event of damage or injury
resulting from (incorrect) use of this device. For more info
concerning this product and the latest version of this manual,
please visit our website www.velleman.eu. The information in
this manual is subject to change without prior notice.
© COPYRIGHT NOTICE
The copyright to this manual is owned by Velleman nv. All
worldwide rights reserved. No part of this manual may be copied,
reproduced, translated or reduced to any electronic medium or
otherwise without the prior written consent of the copyright holder.

CTH407
V. 02 – 22/06/2021 7 ©Velleman nv
HANDLEIDING
1. Inleiding
Aan alle ingezetenen van de Europese Unie
Belangrijke milieu-informatie betreffende dit product
Dit symbool op het toestel of de verpakking geeft aan dat, als het na
zijn levenscyclus wordt weggeworpen, dit toestel schade
kan toebrengen aan het milieu. Gooi dit toestel (en
eventuele batterijen) niet bij het gewone huishoudelijke
afval; het moet bij een gespecialiseerd bedrijf
terechtkomen voor recyclage. U moet dit toestel naar uw
verdeler of naar een lokaal recyclagepunt brengen. Respecteer de
plaatselijke milieuwetgeving.
Hebt u vragen, contacteer dan de plaatselijke autoriteiten
betreffende de verwijdering.
Bedankt voor uw aankoop! Lees deze handleiding grondig voor u het
toestel in gebruik neemt. Werd het toestel beschadigd tijdens het
transport, installeer het dan niet en raadpleeg uw dealer.
2. Veiligheidsvoorschriften
Lees en begrijp deze handleiding en de
veiligheidsinstructies vóór ingebruikname.
Uitsluitend voor gebruik binnenshuis.
Dit toestel behoort tot klasse II.
Schakelapparaten met relais met microcontactopening.
Elektrocutiegevaar bij het openen van het toestel. Wees
voorzichtig bij de installatie: raak geen kabels aan die
onder stroom staan, om dodelijke elektroshocks te
vermijden.

CTH407
V. 02 – 22/06/2021 8 ©Velleman nv
• Dit toestel is geschikt voor gebruik door kinderen vanaf 8 jaar,
door personen met fysieke, zintuiglijke of verstandelijke
beperkingen, of door personen met gebrek aan ervaring en
kennis, op voorwaarde dat dit onder toezicht gebeurt van een
persoon die verantwoordelijk is voor hun veiligheid of hun
aanwijzingen heeft gegeven, hoe zij het toestel moeten gebruiken
en zich bewust zijn van de risico's die het gebruik van het toestel
met zich meebrengt. Kinderen mogen niet met het toestel spelen.
Reiniging en onderhoud mogen niet worden uitgevoerd door
kinderen zonder toezicht.
3. Algemene richtlijnen
Raadpleeg de Velleman® service- en kwaliteitsgarantie
achteraan deze handleiding.
• Leer eerst de functies van het toestel kennen voor u het gaat
gebruiken.
• Om veiligheidsredenen mag u geen wijzigingen aan het apparaat
aanbrengen. Schade door wijzigingen die de gebruiker heeft
aangebracht valt niet onder de garantie.
• Gebruik het toestel enkel waarvoor het gemaakt is. De garantie
vervalt automatisch bij ongeoorloofd gebruik.
• De garantie geldt niet voor schade door het negeren van bepaalde
richtlijnen in deze handleiding en uw dealer zal de
verantwoordelijkheid afwijzen voor defecten of problemen die hier
rechtstreeks verband mee houden.
• Overschrijd nooit de waarden vermeld in de technische specificaties.
• Bewaar deze handleiding voor verdere raadpleging.
4. Omschrijving
Raadpleeg de afbeeldingen op pagina 2 van deze handleiding.
1
aan/uit-schakelaar
4
instelknop
2
statusled
5
programmaknop
3
programmaled

CTH407
V. 02 – 22/06/2021 9 ©Velleman nv
5. Montage
WAARSCHUWING
Schakel eerst de stroom uit voordat u de
thermostaat installeert.
1. Kies een geschikte montageplaats. Installeer de thermostaat in
een goed geventileerde ruimte en op ongeveer 1.5 m hoogte.
Vermijd direct zonlicht, hitte- en storingsbronnen.
2. Verwijder het deksel aan de voorkant met een geschikte
schroevendraaier.
3. Monteer de thermostaat op een effen oppervlak. Boor twee
gaten van 6 mm en plaats nylon plug in elk gat. Boor twee gaten
van 2.6 mm voor de montage op een houten oppervlak.
4. Sluit de thermostaat aan. De thermostaat is geschikt voor max.
230 V~, 6 A. Overschrijd nooit deze limietwaarden!
Van links naar rechts, de aansluitklemmen zijn: nulingang
(N in), fase-ingang (L in) en fase-uitgang (L out). Gebruik kabels
met een diameter van 1.0-2.5 mm² en sluit overeenkomstig
aan.
5. Plaats het deksel aan de voorkant terug en schakel de stroom in.
De statusled [2] licht blauw op bij een correcte aansluiting.

CTH407
V. 02 – 22/06/2021 10 ©Velleman nv
6. Gebruik
6.1 De temperatuur instellen
1. Schuif de aan/uit-schakelaar [1] naar HEAT. De thermostaat
schakelt in en gaat over naar de instelmodus.
2. Draai de temperatuurinstelknop [4] naar de gewenste
kamertemperatuur. De statusled [2] licht op.
3. Schuif de aan/uit-schakelaar naar OFF om de thermostaat uit te
schakelen.
Opmerking
Door de ingebouwde vertraging reageert de thermostaat niet
onmiddellijk wanneer de temperatuurinstelling verandert.
6.2 De eco-modus instellen
De eco-modus is een energiebesparende modus, waarbij de
temperatuur 5 °C lager is dan de ingestelde temperatuur.
Om de eco-modus in te stellen:
1. Druk op de programmaknop [5] om de eco-modus te activeren.
De programmaled [3] licht oranje op.
2. Zes uur na het instellen van de eco-modus keert de thermostaat
terug naar de comfortmodus. De programmaled [3] licht groen
op.
3. De volgende dag om dezelfde tijd wordt de eco-modus
automatisch geactiveerd.
4. Druk op de programmaknop om de eco-modus te deactiveren.
De programmaled gaat uit.
7. Reiniging en onderhoud
De gebruiker mag geen onderdelen vervangen. Contacteer uw
verdeler voor eventuele reserveonderdelen.
Reinig het toestel af en toe met een vochtige doek. Gebruik geen
bijtende chemische producten, reinigingsmiddelen of sterke
detergenten.

CTH407
V. 02 – 22/06/2021 11 ©Velleman nv
8. Technische specificaties
temperatuurbereik .......................................... 5 °C - 30 °C
Tmax. ..................................................................... 40 °C
controleschakelaar .................................................... relais
nom. vermogen ................................ 230 V~, 50 Hz, 7(3) A
afmetingen ................................................. 106 x 166 mm
gewicht ...................................................................157 g
Gebruik dit toestel enkel met originele accessoires. Velleman
nv is niet aansprakelijk voor schade of kwetsuren bij
(verkeerd) gebruik van dit toestel. Voor meer informatie over
dit product en de laatste versie van deze handleiding, zie
www.velleman.eu. De informatie in deze handleiding kan te
allen tijde worden gewijzigd zonder voorafgaande
kennisgeving.
© AUTEURSRECHT
Velleman nv heeft het auteursrecht voor deze handleiding.
Alle wereldwijde rechten voorbehouden. Het is niet toegestaan
om deze handleiding of gedeelten ervan over te nemen, te kopiëren,
te vertalen, te bewerken en op te slaan op een elektronisch medium
zonder voorafgaande schriftelijke toestemming van de
rechthebbende.

CTH407
V. 02 – 22/06/2021 12 ©Velleman nv
MODE D'EMPLOI
1. Introduction
Aux résidents de l'Union européenne
Informations environnementales importantes concernant ce
produit
Ce symbole sur l'appareil ou l'emballage indique que l'élimination
d'un appareil en fin de vie peut polluer l'environnement.
Ne pas jeter un appareil électrique ou électronique (et des
piles éventuelles) parmi les déchets municipaux non
sujets au tri sélectif; une déchetterie traitera l'appareil en
question. Renvoyer cet appareil à votre fournisseur ou à
un service de recyclage local. Il convient de respecter la
réglementation locale relative à la protection de l'environnement.
En cas de doute, contacter les autorités locales pour
élimination.
Nous vous remercions de votre achat ! Lire attentivement le présent
mode d'emploi avant la mise en service de l’appareil. Si l'appareil a
été endommagé pendant le transport, ne pas l’installer et consulter
votre revendeur.
2. Consignes de sécurité
Lire et comprendre ce mode d'emploi et toutes les
consignes de sécurité avant d'utiliser l'appareil.
Utiliser cet appareil uniquement à l'intérieur.
Appareil de classe 2.
Interrupteur à faible distance d'ouverture des contacts.
Risque d’électrocution lors de l’ouverture du boîtier. Être
prudent lors de l'installation : Toucher un câble sous
tension peut causer des électrochocs

CTH407
V. 02 – 22/06/2021 13 ©Velleman nv
• Cet appareil peut être utilisé par des enfants âgés de 8 ans et plus
et des personnes manquant d’expérience et de connaissances ou
dont les capacités physiques, sensorielles ou mentales sont
réduites, si elles ont été formées et encadrées quant à l'utilisation
de l'appareil d'une manière sûre et connaissent les risques
encourus. Ne pas laisser les enfants jouer avec l'appareil. Le
nettoyage et l’entretien ne doivent pas être effectués par des
enfants sans supervision.
3. Directives générales
Se référer à la garantie de service et de qualité Velleman® en
fin de ce mode d'emploi.
• Se familiariser avec le fonctionnement de l'appareil avant de
l'utiliser.
• Il est interdit de modifier l'appareil pour des raisons de sécurité.
Les dommages occasionnés par des modifications par le client ne
tombent pas sous la garantie.
• N’utiliser l'appareil qu’à sa fonction prévue. Un usage interdit peut
annuler d'office la garantie.
• Les dommages occasionnés par des modifications à l'appareil par
le client, ne tombent pas sous la garantie et votre revendeur
déclinera toute responsabilité pour les problèmes et les défauts
qui en résultent.
• Respecter les spécifications techniques.
• Garder ce mode d'emploi pour toute référence ultérieure.
4. Description
Se référer aux illustrations en page 2 de ce mode d'emploi.
1
interrupteur on/off
4
bouton de réglage
2
LED d'état
5
bouton de
programme
3
LED de programme

CTH407
V. 02 – 22/06/2021 14 ©Velleman nv
5. Installation
AVERTISSEMENT
S'assurer de débrancher l'alimentation
électrique avant d'installer le thermostat.
1. Choisir l'emplacement de montage. Installer le thermostat dans
un endroit bien ventilé et à environ 1.5 m du sol. Eviter le soleil
direct, les sources de chaleur et d'interférences.
2. Retirer le couvercle frontal avec un tournevis approprié.
3. Monter le thermostat sur une surface plane. Percer deux trous de 6
mm et insérer une cheville en nylon dans chaque trou. Percer deux
trous de 2.6 mm lors d'un montage sur une surface en bois.
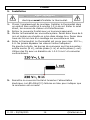
4. Relier le thermostat. Le thermostat est conçu pour max. 230 V~,
6 A. Ne jamais dépasser les valeurs limites indiquées !
De gauche à droite, les bornes de connexion sont les suivantes :
entrée neutre (N in), entrée phase (L in) et sortie phase (L out).
Utiliser des fils avec un diamètre de 1.0-2.5 mm² et connecter
conformément.
5. Remettre le couvercle frontal et brancher l'alimentation
électrique. La LED d'état [2] s'allume en bleu pour indiquer que
la connexion est correcte.

CTH407
V. 02 – 22/06/2021 15 ©Velleman nv
6. Emploi
6.1 Régler la température
1. Faire glisser l'interrupteur on/off [1] sur HEAT. Le thermostat
s'allume et passe en mode de réglage de température.
2. Tourner le bouton de réglage [4] sur la température ambiante
souhaitée. La LED d'état [2] s'allume.
3. Faire glisser l'interrupteur on/off sur OFF pour éteindre le
thermostat.
Remarque
Suite au délai intégré, le thermostat ne réagit pas immédiatement
lorsque le réglage de température a changé.
6.2 Régler le mode éco
Le mode éco est un mode d'économie d'énergie, dont la température
est 5 °C plus basse que la température réglée.
Pour régler le mode éco :
1. Appuyer sur le bouton de programme [5] pour activer le mode
éco. La LED de programme [3] s'allume en orange.
2. Le thermostat retourne en mode confort six heures après le
réglage du mode éco. La LED de programme [3] s'allume en
vert.
3. Le lendemain à la même heure, le mode éco est activé
automatiquement.
4. Appuyer sur le bouton de programme pour désactiver le mode
éco. La LED de programme s'éteint.
7. Nettoyage et entretien
L'appareil ne contient aucune pièce réparable par l'utilisateur.
Commander des pièces de rechange éventuelles chez votre revendeur.
Nettoyer occasionnellement l'appareil avec un chiffon humide. Ne pas utiliser
d'agents chimiques agressifs, de solvants ni de détergents puissants.

CTH407
V. 02 – 22/06/2021 16 ©Velleman nv
8. Spécifications techniques
plage de température ...................................... 5 °C - 30 °C
Tmax. ..................................................................... 40 °C
bouton de contrôle .................................................... relais
puissance nominale ........................... 230 V~, 50 Hz, 7(3) A
dimensions ................................................. 106 x 166 mm
poids .......................................................................157 g
N'employer cet appareil qu’avec des accessoires d’origine.
Velleman SA ne peut, dans la mesure conforme au droit
applicable être tenue responsable des dommages ou lésions
(directs ou indirects) pouvant résulter de l’utilisation de cet
appareil. Pour plus d’informations concernant cet article et la
dernière version de ce mode d'emploi, visiter notre site web
www.velleman.eu. Les spécifications et le continu de ce mode
d'emploi peuvent être modifiés sans notification préalable.
© DROITS D’AUTEUR
Velleman SA est l’ayant droit des droits d’auteur de ce mode
d'emploi. Tous droits mondiaux réservés. Toute reproduction,
traduction, copie ou diffusion, intégrale ou partielle, du contenu de ce
mode d'emploi par quelque procédé ou sur tout support électronique
que ce soit est interdite sans l’accord préalable écrit de l’ayant droit.

CTH407
V. 02 – 22/06/2021 17 ©Velleman nv
MANUAL DEL USUARIO
1. Introducción
A los ciudadanos de la Unión Europea
Importantes informaciones sobre el medio ambiente
concerniente a este producto
Este símbolo en este aparato o el embalaje indica que, si tira las
muestras inservibles, podrían dañar el medio ambiente.
No tire este aparato (ni las pilas, si las hubiera) en la
basura doméstica; debe ir a una empresa especializada
en reciclaje. Devuelva este aparato a su distribuidor o a la
unidad de reciclaje local. Respete las leyes locales en
relación con el medio ambiente.
Si tiene dudas, contacte con las autoridades locales para
residuos.
¡Gracias por elegir Perel! Lea atentamente las instrucciones del
manual antes de usar el aparato. Si ha sufrido algún daño en el
transporte no lo instale y póngase en contacto con su distribuidor.
2. Instrucciones de seguridad
Lea y comprenda este manual y todas las instrucciones
de seguridad antes de usar el aparato.
Utilice el aparato sólo en interiores.
Este aparato pertenece a la clase de protección 2.
Interruptor de micro distancia de abertura entre los
contactos.
Riesgo de descargas eléctricas al abrir la caja. Cuidado
durante la instalación: puede sufrir una peligrosa
descarga eléctrica al tocar un cable conectado a la red
eléctrica.

CTH407
V. 02 – 22/06/2021 18 ©Velleman nv
• Este aparato no es apto para niños menores de 8 años ni para
personas con capacidades físicas, sensoriales o mentales
reducidas ni para personas con una falta de experiencia y
conocimientos del producto, salvo si están bajo la vigilancia de
una persona que pueda garantizar la seguridad. Asegúrese de que
los niños no jueguen con este dispositivo. Nunca deje que los
niños limpien o manipulen el aparato sin supervisión.
3. Normas generales
Véase la Garantía de servicio y calidad Velleman® al final de
este manual del usuario.
• Familiarícese con el funcionamiento del aparato antes de utilizarlo.
• Por razones de seguridad, las modificaciones no autorizadas del
aparato están prohibidas. Los daños causados por modificaciones
no autorizadas, no están cubiertos por la garantía.
• Utilice sólo el aparato para las aplicaciones descritas en este
manual Su uso incorrecto anula la garantía completamente.
• Los daños causados por descuido de las instrucciones de seguridad
de este manual invalidarán su garantía y su distribuidor no será
responsable de ningún daño u otros problemas resultantes.
• Respete las especificaciones.
• Guarde este manual del usuario para cuando necesite consultarlo.
4. Descripción
Véase las figuras en la página 2 de este manual del usuario.
1
interruptor ON/OFF
4
selector
2
LED de
funcionamiento
5
botón de programa
3
LED de programa

CTH407
V. 02 – 22/06/2021 19 ©Velleman nv
5. Instalación
ADVERTENCIA
Desenchufe el aparato antes de instalar el
termostato.
1. Seleccione un lugar de montaje. Instale el termostato en un lugar
bien ventilado y aproximadamente 1.5 m encima del suelo. No lo
exponga a la luz solar directa, calor y fuentes de interferencia.
2. Quite la tapa frontal con un destornillador adecuado.
3. Instale el termostato en una superficie plana. Taladre dos
agujeros de 6 mm e introduzca un taco de nylon en cada orificio.
Taladre dos agujeros de 2.6 mm al montar el termostato en una
superficie de madera.
4. Cablee el termostato. El termostato ha sido diseñado para máx.
230 V~, 7 A. ¡Nunca sobrepase estos límites!
Los terminales de izquierda a derecha: entrada de neutro (N in),
entrada de fase (L in) salida de fase (L out). Utilice cables con
un diámetro de 1.0-2.5 mm² y conéctelos correctamente.
5. Vuelva a poner la tapa frontal y enchufe el termostato. El LED de
funcionamiento [2] se iluminará en azul (= conexión correcta).

CTH407
V. 02 – 22/06/2021 20 ©Velleman nv
6. Funcionamiento
6.1 Ajustar la temperatura
1. Ponga el interruptor ON/OFF [1] en la posición HEAT. El
termostato se activará y entrará en el estado de control de la
temperatura.
2. Seleccione la temperatura ambiente deseada con el selector [4].
El LED de funcionamiento [2] se iluminará.
3. Ponga el interruptor ON/OFF [1] en la posición OFF para
desactivar el termostato.
Observación
El termostato no reaccionará inmediatamente después de haber
cambiado la temperatura porque incorpora una temporización de
activación.
6.2 Ajustar el modo eco
El modo eco es un modo de ahorro de energía: la temperatura es
5 °C inferior que la temperatura seleccionada.
Ajustar el modo eco:
1. Pulse el botón de programa [5] para activar el modo eco. El LED
de programa [3] se iluminará en naranja.
2. Seis horas después de haber seleccionado el modo eco, El
termostato volverá al modo confort. El LED de programa [3] se
iluminará en verde.
3. El modo eco volverá a activarse al día siguiente en la misma hora.
4. Pulse el botón programa para desactivar el modo eco. El LED de
programa se apagará.
7. Limpieza y mantenimiento
El usuario no habrá de efectuar el mantenimiento de ninguna pieza.
Contacte con su distribuidor si necesita piezas de recambio.
Limpie el aparato de vez en cuando con un paño húmedo. No utilice
químicos abrasivos, detergentes fuertes ni disolventes de limpieza
para limpiar el aparato.
Seite wird geladen ...
Seite wird geladen ...
Seite wird geladen ...
Seite wird geladen ...
Seite wird geladen ...
Seite wird geladen ...
Seite wird geladen ...
Seite wird geladen ...
Seite wird geladen ...
Seite wird geladen ...
Seite wird geladen ...
Seite wird geladen ...
Seite wird geladen ...
Seite wird geladen ...
Seite wird geladen ...
Seite wird geladen ...
Seite wird geladen ...
Seite wird geladen ...
Seite wird geladen ...
Seite wird geladen ...
Seite wird geladen ...
Seite wird geladen ...
Seite wird geladen ...
-
 1
1
-
 2
2
-
 3
3
-
 4
4
-
 5
5
-
 6
6
-
 7
7
-
 8
8
-
 9
9
-
 10
10
-
 11
11
-
 12
12
-
 13
13
-
 14
14
-
 15
15
-
 16
16
-
 17
17
-
 18
18
-
 19
19
-
 20
20
-
 21
21
-
 22
22
-
 23
23
-
 24
24
-
 25
25
-
 26
26
-
 27
27
-
 28
28
-
 29
29
-
 30
30
-
 31
31
-
 32
32
-
 33
33
-
 34
34
-
 35
35
-
 36
36
-
 37
37
-
 38
38
-
 39
39
-
 40
40
-
 41
41
-
 42
42
-
 43
43


in anderen Sprachen
- español: Perel CTH407 Manual de usuario
- Nederlands: Perel CTH407 Handleiding
- português: Perel CTH407 Manual do usuário
- polski: Perel CTH407 Instrukcja obsługi
Verwandte Artikel
-
Perel CTH407 Benutzerhandbuch
-
Perel CTH406 Benutzerhandbuch
-
Perel TC78009N Benutzerhandbuch
-
Perel FT120C Benutzerhandbuch
-
Perel TC78020N Benutzerhandbuch
-
-
Perel FH0002 Benutzerhandbuch
-
Perel TC78011N Benutzerhandbuch
-
Perel TC78007 Benutzerhandbuch
-
Perel TC78070 Electric Fan Heater Benutzerhandbuch