Megasat Digital 1 HD Benutzerhandbuch
- Kategorie
- TV-Set-Top-Boxen
- Typ
- Benutzerhandbuch
Dieses Handbuch eignet sich auch für

Satmessgerät HD 1
user manual
English
Brillantes FernsehenBrillantes Fernsehen

ENGLISH ENGLISH
02
03
Megasat Werke GmbH | Industriestraße 4a | D-97618 Niederlauer | www.megasat.tv | [email protected]
1. Guide ..........................................................................................................................................4
1.1 Important Safety Instructions ............................................................................ 4
1.2 Unpacking Equipment ...........................................................................................4
1.3 Product overview & illustration ........................................................................5
1.4 Installation of meter .................................................................................................7
2. Outline.......................................................................................................................................7
3. The Menu OSD Instruction ....................................................................................... 7
3.1 Search ...............................................................................................................................8
3.1.1 Satellite .............................................................................................................. 8
3.1.2 LNB type ........................................................................................................... 8
3.1.3 LOW FREQ / HIGH FREQ..........................................................................8
3.1.4 TP Num ..............................................................................................................8
3.1.5 Frequency ........................................................................................................9
3.1.6 Symbrate .......................................................................................................... 9
3.1.7 Pol ......................................................................................................................... 9
3.1.8 NIT Search ........................................................................................................9
3.1.9 LNB Power .......................................................................................................9
3.1.10 LNB 22KHZ ...................................................................................................9
3.1.11 DisEqc type & Input ................................................................................9
3.1.12 Motor ............................................................................................................... 9
3.1.0.1 Quick Search ..............................................................................................10
3.2 Spectrum ........................................................................................................................ 11
3.2.1 Satellite .............................................................................................................. 12
3.2.2 LNB type ........................................................................................................... 12
3.2.3 Low frequency / High frequency ......................................................12
3.2.4 Pol ......................................................................................................................... 12
3.2.5 Center Freq .....................................................................................................12
3.2.6 Bandwidth .......................................................................................................12
3.2.7 LNB 22 KHz ......................................................................................................12
3.2.8 DisEqc type & Input ...................................................................................12
3.2.9 Unicable SCR .................................................................................................12
3.2.0.1 Analyzer ........................................................................................................12
3.2.0.2 Analyzer of Unicable SCR ...................................................................13
3.3 Constellation ................................................................................................................14
3.4 TP Manager ...................................................................................................................14
3.5 Multimedia ....................................................................................................................14
3.5.1 Music ..................................................................................................................15
3.5.2 Video ...................................................................................................................16
3.5.3 Picture ................................................................................................................16
3.5.4 Upgrade ............................................................................................................17
3.6 System Setting ............................................................................................................18
3.6.1 Language ......................................................................................................... 18
3.6.2 Screen format ................................................................................................18
3.6.3 Light setting ................................................................................................... 18
3.6.4 Factory reset ...................................................................................................18
3.6.5 Longitude & Latitude; Location & Hemisphere ........................ 18
3.6.6 Time Zone .......................................................................................................18
3.6.7 TV/Radio ...........................................................................................................18
3.6.8 Mode, SW VER, Release Time ...............................................................18
4. Channel.....................................................................................................................................19
4.1 Manager Channel ......................................................................................................19
4.1.1 Rename Channel ........................................................................................19
4.1.2 Del Channel ....................................................................................................20
4.1.3 Lock Channel ................................................................................................. 20
4.1.4 Skip Channel ..................................................................................................20
4.2 Favorite Manager ....................................................................................................... 21
4.2.1 Rename ............................................................................................................. 22
4.2.2 Sort order ......................................................................................................... 22
4.2.3 Favorite set ...................................................................................................... 22
4.2.4 Favorite Sort ................................................................................................... 22
4.2.5 TV/Radio ...........................................................................................................22
4.2.6 Sat sort ...............................................................................................................23
4.3 EPG .....................................................................................................................................23
4.4 Program List ..................................................................................................................24
4.5 Subtitle ............................................................................................................................. 24
5. Technical Specication ................................................................................................25
6. Trouble Shooting ..............................................................................................................26
Table of contents

1.1 Important Safety Instructions
Thank you for choosing our product. Before installation, we would like to remind you
some notes, which is very important for operating safely and properly, as follows:
• Be sure to read this user manual before starting your operation.
• You must install the dish with correct direction and angle. If the dish is not working
properly, contact your local dealer.
• When the unit is suddenly moved to a hot area from a cold area, it may cause some
problems. In that case, turn off the power, and turn on again after 1-2 hours.
• Keep meter placed in clean space with sufficient ventilation.
• Do not cover the meter with or place it on a unit that emits heat.
• Clean the case by a soft cloth with a little washing liquid.
• Do not remove the cover.
• Do not let the unit exposed to extreme heat, cold or humid conditions.
• No liquids or any other materials to come inside of the unit.
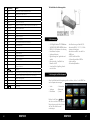
1.2 Unpacking Equipment
Open the package and make sure it includes all below items, if anything is missing,
please contact the reseller for replacement.
1. Digital Satellite Meter
2. User’s manual
3. AV cable
4. Car charger cable
5. Adaptor
6. F-Connector
7. Carrying case
8. Strap of carrying case
ENGLISH ENGLISH
04
05
1. Guide
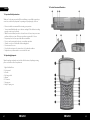
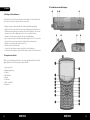
1.3 Product Overview & Illustration

ENGLISH ENGLISH
06
07
No. Description Function
1 LNB IN Connect to satellite antenna cable
2 AV OUT Connect to AV port for TV
3 AV IN Connect to AV port for meter
4 Power switch Turn on/off meter
5 USB Port Connect to USB memory
6 DC Slot Connect to Adaptor Input
7 Torch LED Night lighting
8 Speaker Speaker Integrated
9 LCD Screen Video display
10 Power Power indicator light
11 22KHZ 22Khz indicator light
12 13V/18v Vertical /Horizontal polarization voltage output light
13 LOCK Signal lock indicator light
14 Charger (Note1) Charger indicator light
15 F1(Note 2) Shows the Subtitle menu ;TV/Radio switch
16 F2 Shows the EPG menu
17 F3(Note 3) Shows the Favorite Manager menu
18 F4 Shows Manager Channel menu
19 INFO To display channel status or various program information of current channel
20 MENU Show the main menu on the screen or jump back to previous menu in
sub-menu setting conditions
21 Control the torch on/off
22 NEVIGATION KEY Volume Control or move cursor, channel or change, confirm etc
23 EXIT Escape from present menu and save the settings
24 0-9 Select channels or enter programming
25 MUTE Enable or disable the audio output
26 SCAN ‘Quick Search’ menu shortcut key
27 When power on the meter ,displays the battery level
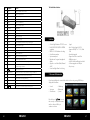
• 4.3 Inch High Definition TFT LCD Screen
• Fully DVB-S/DVB-S2, MPEG-2/MPEG4
compliant
• MPEG-2 / H.264 Hardware decoding
• Constellation analyzer
• Spectrum analyzer
• Digital meter for signal strength and
quality
• Supports scan of Auto ,Blind, Manual
or NIT
• Sound and Light Alarm for Locking
Signal
• Auto Calculate Angle of AZ ,EL
• Supports DISEQC 1.0/1.1/1.2 ,22khz
Tone
• Speaker Integrated
• Support both AV out and AV in
• LNB short protect
• 8.4V/3000mAh Lion Battery Included
• Software upgrade via USB port
• Easy to carry
• Search
• Spectrum
• Constellation
• SatManage
• Multimedia
• System
If you have installed and connected the cables to the meter, pressing MENU key to
display the Main Menu.
Press the keys of to move
the cursor up or down in the menu
interface, then use OK key to
confirm a selection.
1.4 Installation of meter
2. Outline
3. The menu OSD instruction

ENGLISH ENGLISH
08
09
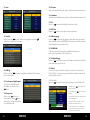
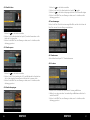
3.1 Search
3.1.1 Satellite
3.1.2 LNB type
3.1.3 Low Freq / High Freq
3.1.4 TP Num
3.1.5 Frequency
Frequency of the current transport, Input the value by using the numeric keys.
3.1.6 Symbrate
Symbol rate of the current transport, Input the value by using the numeric keys.
3.1.7 Pol
Press key to change Vertical or horizontal of polarization.
3.1.8 NIT Search
Press key to turn on or off NIT Search.
3.1.9 LNB Power
Press key to select the desired option. If your meter is connected to another recei-
ver through LOOP THROUGH support, in case the other receiver is directly connected to
the LNB, then select OFF.
3.1.10 LNB 22KHZ
22 KHz control is automatically set for each LNB alternative. If “Universal” is selected, 22
KHz control should be “off state”.
3.1.11 DisEqc type & Input
Press key to set the port type or number, which get the RF signal from the LNB, if
the LNB is connected to DiSEqC switching box.
3.1.12 Motor
If you use the equipment of motor, According to your motor category, the meter provi-
des DiSEqC1.2/USALS, This will make you have exact information to direct your antenna
toward a satellite.
USALS SET
Press key to select Motor type, then press OK key into interface of motor setting
Press key enter the satellite list. Use key to move the cursor, then press OK key
to select the satellite that you want.
Press key, you can select single/Universal/ UnicableSCR etc, according to your
physical LNB type.
Enter the proper LNB frequency referring
to your LNB using the numeric keys or
pressing key.
Press key into the TP list. Use
key to move the cursor then press OK
key to select the satellite that you want.
• Satellite: Press key to select the desired
satellite.
• Frequency: Press key to select the TP.
• Satellite Pos: Position of satellite, Input the value by
using the numeric keys.
• My Longitude & My Latitude : Position of local,
Input the value by using the numeric keys.
• Pos Command: Check the signal locked, the motor
moves correct position, press OK key to store the
present position

ENGLISH ENGLISH
10
11
DiSEqC1.2 SET
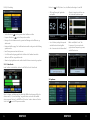
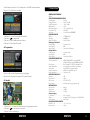
3.1.0.1 Quick Search
3.2 Spectrum
• Satellite: Press key to select the desired satellite.
• Frequency: Press key to select the TP.
• Move Step: The satellite can now be turned into the desired direction using the arrow
buttons
• Continuous Move: The satellite can be continuous moved to the desired direction.
• Set Limit: Set limits for the antenna.
• Go to Reference: A starting point for the satellite search function can be selected by
pressing the OK key.
• If the signal is locked, the present position is automatic stored.
• S/Q: Enlarge showing of the signal
strength and quality
• Scan : According to the current TP,
search channel
• Auto : According to the user db of
satellite, search channel
• Blind search :Blind search all frequency.
The first, scan all TP, According to these
TPs, auto scan programs
• Monitor: Using level to show the
strength and quality
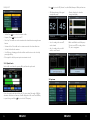
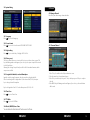
In the satellite search interface, pressing OK key will enter the quick search.
If you set Longitude and Latitude Under the “3.6 system setting”, the angle of LNB, the
orientation and elevation of antenna, all will be displayed on the screen. Press BEEP key
to open locking sound. Press key to select the TP frequency.
Press key to select S/Q, Monitor, Scan, Auto, Blind, then press OK key into function.

• Press key to modify the biggest PWR value.
• Press key to change frequency of scr.
• Press key to modify the biggest PWR value.
• Press key to change centre frequency.
• Press F1 key to change the bandwidth.
• Press F2 key to change Polar.
• Press F3 key to change 22k tone.
• Press F4 Key to scan local frequency, if the signal is locked, will scan TP.
ENGLISH ENGLISH
12
13
3.2.1 Satellite
Press key into the satellite list. Use key to move the cursor, then press OK key
to select the satellite that you want.
3.2.2 LNB type
Press key, you can select single/universal/unicable etc, according to your physical
LNB type.
3.2.3 LOW FREQ / HIGH FREQ
Enter the proper LNB frequency referring to your LNB using the numeric keys or pres-
sing key.
3.2.4 Pol
Vertical or Horizontal polarization
3.2.5 Center Freq
Input the value by using the numeric keys.
3.2.6 Bandwidth
Press key to change showing of the bandwidth.
3.2.7 LNB 22KHZ
22 KHz control is automatically set for each LNB alternative.
3.2.8 DisEqc type Input
Press key to set the port type or number, which get the RF signal from the LNB, if
the LNB is connected to DiSEqC switching box.
3.2.9 UnicableSCR
In “3.2.2 LNB type”, if you select UnicableSCR, spectrum will check the SCR frequency.
Press key to select keep or Reset.
Keep: Don’t send SCR dictate. In the spectrum you can check the work status of the
current SCR
Reset: the SCR passage will re- establish. In the spectrum you can check the centre
frequency of SCR.
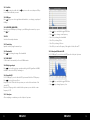
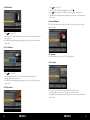
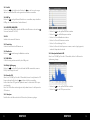
3.2.0.1 Analyzer
After completing a constitution, press the ok key into Spectrum
In “3.2.2 LNB type”, if you select UnicableSCR, press the ok key into Spectrum
3.2.0.2 Analyzer OF UnicableSCR

ENGLISH ENGLISH
14
15
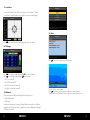
3.3 Constellation
It’s same with “Satellite Search”, Please make reference to constitution of “Satellite
Search”. In the Constellation interface, Press OK key to enter Constellation graph.
3.5.1 Music
Press key to change satellite .Pressing OK/ key, switch to TP select
Press key to change satellite .Pressing key to select tp.
3.4 TP Manager
3.5 Multimedia
Press key to select Refresh or Exit. Refresh graph, or exit constellation
Press key to select song, then press OK key to play.
Press F1/F2 key to control volume.
Press key to move the cursor, then press OK key to operate function.
There are functions of Play/Pause, Previous song, Next song and stop and so on.
• Press F1 key to add TP
• Press F2 /OK key to edit TP
• Press F3 key to delete the current TP
• Press F4 Key to search the current TP
The meter intergrates USB port, which support the following device:
• USB portable harddisk
• USB memory
It will appear “storage device is inserted ” when USB device is inserted to the USB port
that means the usb device has been recognized and can be used.Otherwise will appear
“USB Device Not Found”.

ENGLISH ENGLISH
16
17
3.5.2 Video
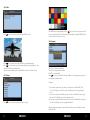
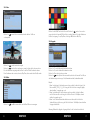
3.5.3 Picture
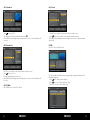
3.5.4 Upgrade
Press key to select the video file, then press OK key to play.
Press MENU key to appear playing bar. Press key to move the cursor, then press OK
key to operate function. There are functions of Rotating, Delay setting, ZOOM, Play/Pau-
se, Previous Picture, Next picture, Stop.
Press F1 key to dump user database.
Press F2 key to dump default database.
Press F3 key to dump flash.
Press key to select update file, then press OK key to select upgrade part: app code;
user database; default database.
Example:
1. If you want to update main code, please select the main code file like BT_CP09_
V1_39_SA~N.img, the size of file is about a few Mbytes, then select upgrade app
code.
2. If you want to update user database, please select the user db file like user db. img,
the size of file is 256k bytes, then select upgrade user db
3. If you want to update default database, please select the default file like asia. img, the
size of file is128k bytes, then select upgrade default db.
Warning: while updating meter software data, should not power off and must wait for
finish write data.
Press key to select picture, then press OK key to play.
Press key to control volume. Press MENU key to appear playing bar.
Press key to move the cursor, then the tip will appear on upper right of screen,
then press OK key to operate function.
These functions are Backward, Forward, Play/Pause, Previous file, Next file, Stop.

ENGLISH ENGLISH
18
19
3.6 System Setting
4.1 Manager Channel
Press F4 key into the manager channel interface
1. Press F1 key. You will notice the Keyboard menu in screen.
2. Press the arrow keys to Input channel name.
3. Press F3 key to switch caps lock; press F1 key to backspace; press F4 key to complete
the edit.
4. Press MENU key ,the Warning window will appear, if you select yes, the modification
will be saved.
4.1.1 Rename Channel
3.6.1 Language
Press key to select language.
3.6.2 Screen format
Press key to select Screen format: 4:3PS/4:3LB/16:9PS/16:9LB.
3.6.3 Light setting
Press key to control delay of key light: off/5s/10s/20s.
3.6.4 Factory reset
The factory default allows user to restore the factory-reset values, when you press OK
key, the Warning window will appear, if you select yes, the system setup will be restored
to the default values.
Warning: On selecting factory default you will lost all of data and information, which
was previous installed.
3.6.5 Longitude & Latitude; Location &Hemisphere
Input the value by using the numeric; the value must be not higher than180;
If the location longitude A is higher than 180, the value will be (360-A), then press
key to change location/Hemisphere
Exp: Local longitude is East 200. You should input west (360-200)=160
3.6.6 Time Zone
Press key to set Time Zone.
3.6.7 TV/Radio
Press key to select TV/Radio.
3.6.8 Mode, SW VER, Release Time
You can look into information of hardware and software.
4. Channels

ENGLISH ENGLISH
20
21
4.1.2 Del channel
4.2 Favorite Manager
4.1.3 Lock channel
4.1.4 Skip channel
1. Press key to select TV.
2. Press F2 key, the TV will be marked with the symbol “X”, marking all channels that you
need to delete.
3. Press MENU key, the Warning window will appear, if you select yes, the modification
will be saved.
1. Press key to select TV.
2. Press F3 key, then input “0000”, the TV will be marked with the symbol lock,
marking all TV that you need to lock.
3. Press MENU key, the Warning window will appear, if you select Yes, The modification
will be saved.
1. Press F2 key, you will notice the sub-menu with sort order in screen.
2. Select the desired one of the four sort order in screen and press OK.
3. Press MENU key, the Warning window will appear, if you select yes, the modification
will be saved.
1. Press key to select TV.
2. Press F4 key, the TV will be marked with the symbol “ ”.
3. Press key to skip TV, Press F4/OK key to confirm, skip all TV that you need.
4. Press MENU key, the Warning window will appear, if you select yes, the modification
will be saved.
Press F3 key into the manager channel sort interface, then press menu key to return
favorite manager.
4.2.2 Sort order
4.2.1 Rename
Please make reference to rename of “4.1.1 Rename channel

ENGLISH ENGLISH
22
23
4.2.3 Favorite set
4.2.4 Favorite Sort
Press key to select TV.
Press OK key, the TV will be marked with the symbol ‘ ’.
Press MENU key, the Warning window will appear, if you select yes, the modification will
be saved.
1. Press F4 key, you will notice the sub-menu with sort order in screen.
2. Press key to select satellite sort, the channel list will be changed.
3. Press MENU key, the Warning window will appear, if you select yes, the modification
will be saved.
The Guide supplies information such as program listing, starting and ending items for
alll available programs.
1. Press key to change current channel.
2. Press keys to view the information in 7 days.
3. Press F2 key to view the booked items data.
Press F3 key, you will notice the sub-menu with sort order in screen.
Press key to select sort.
Favorite setting will be put into this sort.
Press MENU key, the Warning window will appear, if you select yes, the modification will
be saved.
4.2.5 TV/Radio
Press TV/Radio key to switch TV or radio list.
4.3 EPG
Press the F2 key to show EPG menu.
4.2.6 Sat sort

ENGLISH ENGLISH
24
25
In the booked items menu, press F1 key to cancle the current item,press menu to return.
Press F1 key to items setecting.
1. Press F1 key, return to channel select.
2. Press key to select item.
3. Press F4 key to change detail information page.
4. Press F2 key to book the current item,and enter the booked items menu.
1. Press F1 key, you will notice the sub-menu with sort order in screen.
2. Press key to change subtiltle.
3. Press OK key to confirm.
Press OK key into program list interface.
Please make reference to “4.2 Favorite Manager”.
4.4 Program List
4.5 Subtitle
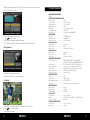
5. Technical Specication
TRANSMISSION STANDARDS
DVB-S2/S
SATELLITE INPUT/DEMODULATION
Connector Type ...................................................F Type
Input Frequency ..................................................950 to 2150 MHz
Signal Input Level ...............................................- 65 to -25 dBm
Band Switch Control .........................................22KHz
LNB Supply .............................................................13 V / 18 V, IMax 400 mA
Demodulation Type ..........................................QPSK, 8PSK
Symbol Rate ........................................................... 2 <Rs <45 M band(SCPC/MCPC)
LCD FEATURES
LCD Type ..................................................................TFT TRANSMISSIVE
Number of Dots ...................................................480(RGB) x 272
Active area (W x H) ............................................95.04 x 53.86 mm
AV output interface
Connector Type ...................................................3.5 mm jack
Video Output .........................................................CVBS
Audio output .........................................................Stereo Audio L/R output
AV input interface
Connector Type ...................................................3.5 mm jack
Video input .............................................................CVBS
Audio input ............................................................Stereo Audio L/R input
AUDIO/VIDEO PROCESSING
Video decompression .....................................MPEG-2 MP@HL, MPEG-1 Decoding,MPEG-4
........................................................................................ASP@L5 HD resolution,H.264 MP&HP@L4,HW JPEG
Resolving rate .......................................................PAL-25 frame@720*576,NTSC-30 frame@720*480
Signal compatibility ..........................................Support conversion for different video formats
Video Format ......................................................... 4:3,16:9,By Pan & Scan and Letter Box conversion
Audio decompression .....................................MPEG-1 Layer I/II, MPEG-2 Layer I/II
Audio output mode ..........................................Stereo, Mono, R/L
DATA SERVICE PORT
Connector ...............................................................USB
Data protocol ........................................................USB2.0 interface
File management system ..............................NTFS, FAT32, FAT16
file format ................................................................wma, mp3, mp4, avi, jpg, jpeg, bmp, img
MICROPROCESSOR
Microprocessor ....................................................Amlogic
Clock Frequency ..................................................180 MHz
SDRAM Memory ..................................................512 Mbit
Power SUPPLY
Li_Ion Battery ........................................................8.4 V / 3000 mAh
Adapter .....................................................................OUTPUT: DC12V/1.5A, INPUT: 100-240VAC 50/60Hz
Power consumption .........................................Max. 10 W
PHYSICAL CHARACERSTICS
Size (W x D x H) .................................................... 12.5 x 20.5 x 4.5 cm
Net Weight ..............................................................0.66 kg

ENGLISH ENGLISH
26
27
6. Trouble Shooting Notes
Problem Possible Causes What To Do
No display light up Power switch is not on Run
out of batteries
Check to make sure power
on. Even on adapter
No sound or picture, but
the front panel power light
is ON.
AV IN jack insert, but no
video input
Pull out AV IN cable
No sound or picture The satellite dish is not
pointing at the satellite.
Adjust the dish. Check the
Bad picture/Blocking Error No signal or weak signal Signal Level in the
Antenna Setup Menu
The satellite dish in not
pointing at the satellite
Adjust the dish.
Signal is too strong Connect a signal attenua-
tor to the LNB input
Satellite dish is too small Change to a larger dish
LNB noise factor too high. Change to an LNB with
lower noise factor
The LNB is faulty. Change the LNB
AV out No picture(Video) The system is connected
by SCART cable and TV is
not in AV mode.
Check the UHF channel
fixed in your system and
tune the UHF properly.
The key is not working. Out of battery Even on adapter
key blocks make sure no blocks
between the front panel
Note: If you still cannot resolve the problem with above reference. Please contact the local
dealer or their after-sales service center.

Status: v1.0 January 2013
Satmessgerät HD 1
Bedienungsanleitung
Deutsch
Brillantes FernsehenBrillantes Fernsehen

DEUTSCH DEUTSCH
02
03
Megasat Werke GmbH | Industriestraße 4a | D-97618 Niederlauer | www.megasat.tv | [email protected]
1. Leitfaden .................................................................................................................................4
1.1 Wichtige Sicherheitshinweise ............................................................................ 4
1.2 Auspacken des Gerätes .........................................................................................4
1.3 Produktübersicht und Abbildungen ............................................................. 5
1.4 Installation des Satmessgerätes .......................................................................7
2. Erläuterungen ..................................................................................................................... 7
3. Anleitung für das Bildschirmmenü ..................................................................7
3.1 Suche ................................................................................................................................8
3.1.1 Satellit.................................................................................................................8
3.1.2 LNB Typ .............................................................................................................8
3.1.3 Low Frequenz / High Frequenz .........................................................8
3.1.4 Transponder ................................................................................................... 8
3.1.5 Frequenz...........................................................................................................9
3.1.6 Symbolrate ......................................................................................................9
3.1.7 Pol ......................................................................................................................... 9
3.1.8 NIT Suche ......................................................................................................... 9
3.1.9 LNB Versorgung ...........................................................................................9
3.1.10 LNB 22 KHz ...................................................................................................9
3.1.11 DisEqc & Eingang ..................................................................................... 9
3.1.12 Motor ............................................................................................................... 9
3.1.0.1 Schnellsuche ..............................................................................................10
3.2 Spektrum ........................................................................................................................11
3.2.1 Satellit.................................................................................................................12
3.2.2 LNB Typ .............................................................................................................12
3.2.3 Low Frequenz / High Frequenz .........................................................12
3.2.4 Pol ......................................................................................................................... 12
3.2.5 Mittelfrequenz ..............................................................................................12
3.2.6 Bandweite .......................................................................................................12
3.2.7 LNB 22 KHz ......................................................................................................12
3.2.8 DisEqc Typ & Eingang...............................................................................12
3.2.9 Unicable SCR .................................................................................................12
3.2.0.1 Analyzer ........................................................................................................12
3.2.0.2 Analyzer of Unicable SCR ...................................................................13
3.3 Konstellation .................................................................................................................14
3.4 TP Manager ...................................................................................................................14
3.5 Multimedia ....................................................................................................................14
3.5.1 Musik ..................................................................................................................15
3.5.2 Video ...................................................................................................................16
3.5.3 Bilder ................................................................................................................... 16
3.5.4 Upgrade ............................................................................................................17
3.6 System Einstellungen .............................................................................................18
3.6.1 Sprache .............................................................................................................18
3.6.2 Bildschirmformat .........................................................................................18
3.6.3 Beleuchtungseinstellung ....................................................................... 18
3.6.4 Werkseinstellung ......................................................................................... 18
3.6.5 Längengrad & Breitengrad; Lage und Hemisphere ...............18
3.6.6 Zeitzone ............................................................................................................ 18
3.6.7 TV/Radio ...........................................................................................................18
3.6.8 Mode, SW VER, Release Time ...............................................................18
4. Kanäle ........................................................................................................................................19
4.1 Kanalmanager .............................................................................................................19
4.1.1 Kanäle umbenennen ................................................................................19
4.1.2 Kanäle löschen .............................................................................................20
4.1.3 Kanäle sperren .............................................................................................. 20
4.1.4 Kanäle überspringen ................................................................................20
4.2 Favoritenmanager ..................................................................................................... 21
4.2.1 Umbenennen ................................................................................................22
4.2.2 Sortieren ........................................................................................................... 22
4.2.3 Favoriten einstellen ...................................................................................22
4.2.4 Favoriten sortieren ..................................................................................... 22
4.2.5 TV/Radio ...........................................................................................................22
4.2.6 Satelliten sortieren .....................................................................................23
4.3 EPG .....................................................................................................................................23
4.4 Programliste .................................................................................................................. 24
4.5 Untertitel .........................................................................................................................24
5. Technische Daten .............................................................................................................25
6. Fehlerbehebung ...............................................................................................................26
Inhaltsverzeichnis

1.1 Wichtige Sicherheitshinweise
Vielen Dank, dass Sie sich für unser Produkt entschieden haben. Vor der Inbetriebnah-
me möchten wir Sie bitten, folgende Hinweise zu beachten:
• Befolgen Sie bitte vor Inbetriebnahme die Schritte der Bedienungsanleitung.
• Wenn das Gerät von einen kalten in einem warmen Raum gebracht wird, kann es zu
Problemen durch Kondenswasser kommen. In diesem Fall schalten Sie das Gerät aus
und warten Sie bis dieses akklimatisiert ist, bevor Sie es wieder Einschalten.
• Vermeiden Sie Schmutz und achten Sie auf ausreichender Belüftung.
• Legen Sie das Messgerät auf kein Objekt das Wärme abgibt. Decken SIe es auch nicht
mit einem Tuch oder sonstiges ab, damit sich keine Wärme aufstauen kann.
• Reinigen Sie das Gehäuse mit einem weichen Tuch.
• Entfernen Sie nicht die Abdeckung.
• Setzen Sie das Gerät keiner extremen Hitze, Kälte oder Feuchtigkeit aus.
• Es dürfen keine Flüssigkeiten oder andere Materialien ins Innere des Geräts kommen.
1.2 Auspacken des Gerätes
Öffnen Sie die Verpackung und prüfen Sie, die unten aufgeführten Artikel auf vollstän-
digkeit. Wenden Sie sich bei Fragen bitte an Ihren Händler.
1. Satmessgerät HD1
2. Bedienungsanleitung
3. AV Kabel
4. KFZ Ladekabel
5. Adapter
6. F-Verbinder
7. Silikon Schutzhülle
8. Tragetasche
DEUTSCH DEUTSCH
04
05
1. Leitfaden
1.3 Produktübersicht und Abbildungen

DEUTSCH DEUTSCH
06
07
Nr. Beschreibung Funktion
1 LNB IN Verbindung mit einem Koaxialkabel zum LNB
2 AV OUT Verbindung AV-Anschluss zum TV
3 AV IN Verbindung AV-Anschluss zum Satmessgerät
4 Netzschalter Ein / Aus
5 USB Port Anschluss eines USB Sticks
6 DC Anschluss Anschluss des Ladekabels 12VDC (Adappter 230VAC/12VDC/1,5A)
7 LED Lampe LED Licht (bei Dunkelheit)
8 Speaker Lautsprecher
9 LCD Display Display
10 Power Betriebskontrollleuchte
11 22KHZ 22 Khz Kontrollleuchte
12 13V/18v Vertikal /Horizontal Polarisation Kontrollleuchte
13 LOCK Signal Kontrollleuchte
14 Charge Lade Kontrollleuchte
15 F1 Zeigt das Untertitel Menü; TV/Radio umschalten
16 F2 Zeigt das EPG Menü
17 F3 Zeigt das Favoriten Menü
18 F4 Zeigt das Kanal Menü
19 INFO Programmstatus oder weitere Infos des aktuellen Programms abzurufen
20 MENU Zeigt das Hauptmenü auf dem Bildschirm oder zurück zum vorherigen
Menü (im Untermenü)
21 Licht ein/aus
22 Navigationstasten Lautstärkeregelung oder Cursor bewegen, Kanal oder Änderung bestätigen
23 EXIT Verlassen des aktuellen Menüs und speichern der Einstellungen
24 0-9 Auswählen der Programme
25 MUTE Aktivieren und deaktivieren des Lautsprechers
26 SCAN Schnellsuche
27 Batterieanzeige
• 4,3-Zoll-High-Definition-TFT-LCD-Bildschirm
• Voll DVB-S/DVB-S2, MPEG-2/MPEG4 konform
• MPEG-2 / H.264 Hardware decodierung
• Konstellation-Analysator
• Spektrum Analysator
• Digitale Anzeige zur Signalstärke und-
qualität
• Unterstützt Auto Scan, Blind Scan,
Manuell oder NIT
• Sound und Licht Signal bei gefunde-
nem Satelliten
• Auto Berechnung von Winkel AZ, EL
• Unterstützt DiSEqC 1.0/1.1/1.2, 22 KHz
• Lautsprecher Integriert
• Unterstützt sowohl AV out und AV-in
• LNB Schutz
• 8.4V/3000mAh Lion Akku
• Software-Upgrade über USB-Port
• Leicht zu tragen
• Taschenlampenfunktion
• Suche
• Spektrum
• Konstellation
• Sat Verwalten
• Multimedia
• System
Wenn Sie die Kabel an das Messgerät angeschlossen haben, drücken Sie die MENÜ Taste
um das Hauptmenü anzuzeigen.
Drücken Sie die Tasten um
den Cursor nach oben oder unten im
Menü zu bewegen, drücken Sie dann
die Taste OK, um die Auswahl
zu bestätigen.
1.4 Installation des Satmessgerätes
2. Erläuterungen
3. Anleitung für das Bildschirmmenü

DEUTSCH DEUTSCH
08
09
3.1 Suche
3.1.1 Satellit
3.1.2 LNB Typ
3.1.3 Low Frequenz / High Frequenz
3.1.4 Transponder
3.1.5 Frequenz
Frequenz des aktuellen Transponders, geben Sie den Wert mit den Nummerntasten ein.
3.1.6 Symbolrate
Symbolrate des aktuellen Transponders, geben Sie den Wert mit den Nummerntasten ein.
3.1.7 Pol
Drücken Sie um zwischen Vertikal und Horizontal zu wechseln.
3.1.8 NIT Suche
Drücken Sie um NIT Suche zu aktivieren oder zu deaktivieren.
3.1.9 LNB Versorgung
Drücken Sie um die gewünschte Option zu wählen. Wenn das Satmessgerät mit
einem anderen Receiver durch LOOP THROUGH verbunden ist, und der Receiver direkt
an das LNB angeschlossen ist, wählen Sie AUS.
3.1.10 LNB 22 KHz
22 KHz Steuerung wird automatisch für jedes LNB auf alternative gesetzt.
Wenn „Universal“ gewählt wird, sollte 22 KHz AUS sein.
3.1.11 DisEqc & Eingang
Drücken Sie um den Anschlusstyp oder die Nummer zu wählen, wenn das LNB an
einem Multischalter angeschlossen ist.
3.1.12 Motor
Falls Sie den Spiegel mit einem Motor betreiben, verwenden Sie je nach Motor-Typ
DiSEqC1.2/USALS, so bekommen Sie genaue Informationen und die Antenne auf den
richtigen Satelliten zu drehen.
USALS Einstellung
Drücken Sie um den Motor-Typ zu wählen, bestätigen Sie anschließend mit OK
Drücken Sie die Taste um in die Satelliten-Liste zu gelangen. Mit der Taste
wählen Sie den Satelliten den Sie möchten.
Drücken Sie die Taste und wählen Sie Single/Universal/UnicableSCR, je nachdem
was Sie installiert haben.
Geben Sie die richtige LNB Frequenz
ihres LNBs ein oder drücken Sie die
Tasten
Drücken Sie die Tasten in der
Transponder Liste. Mit den Tasten
wählen Sie den Satelliten aus. Bestätigen
Sie anschließend mit OK.
• Satellit: Drücken Sie um den gewünschten
Satelliten zu wählen
• Frequenz: Drücken Sie um den Transponder
zu wählen.
• Satelliten Position: Position des Satelliten, Eingabe
mit den Nummerntasten.
• Längengrad und Breitengrad: Geben Sie Ihre
Position mit den Nummerntasten ein.
• Position: Überprüfen Sie ob sich der Motor in die
richtige Position bewegt und das Signal OK ist.
Speichern Sie die Position mit OK.

DEUTSCH DEUTSCH
10
11
DiSEqC1.2 Einstellung
3.1.0.1 Schnellsuche
3.2 Spektrum
• Satellit: Drücken Sie um den gewünschten Satelliten zu wählen.
• Frequenz: Drücken Sie um den Transponder zu wählen.
• Bewegen: Der Satellit kann nun in die gewünschte Richtung mit den Pfeiltasten ge-
dreht werden.
• Kontinuierliche Bewegung: Der Satellit kann kontinuierlich in die gewünschte Richtung
gedreht werden.
• Limit: Die zugewiesenen Limits die Antenne.
• Go to Referenz: Ein Ausgangspunkt für die Satelliten-Such-Funktion kann durch
drücken der OK-Taste ausgewählt werden.
• Wenn das Signal gefunden wurde, wird die aktuelle Position automatische gespeichert.
• S/Q: Vergrößerung der Signalstärke
und-qualität
• Scan : Auf dem jeweiligen Transponder
wird die Kanalsuche durchgeführt
• Auto : Automatischer Satellitensuchlauf
• Blind search: „Blinde Suche“ aller
Frequenzen. Als erstes werden die
gespeicherten Transponder gescannt,
anschließend weitere.
• Monitor: Verwenden von Ebene, um
die Stärke und Qualität zu zeigen
In der Satelliten-Suchoberfläche, drücken Sie die OK-Taste für die Schnellsuche.
Wenn Sie Längen- und Breitengrad, der Winkel des LNB, die Ausrichtung und Höhe der
Antenne unter „3.6 System-Einstellung“ eingestellt haben, werden alle auf dem Bild-
schirm angezeigt. Drücken Sie die BEEP Taste (F3) um den Sound zu aktivieren. Drücken
Sie die Taste , um die TP-Frequenz auswählen.
Drücken Sie für S/Q, Monitor, Scan, Auto, Blind, und bestätigen Sie mit OK
Seite wird geladen ...
Seite wird geladen ...
Seite wird geladen ...
Seite wird geladen ...
Seite wird geladen ...
Seite wird geladen ...
Seite wird geladen ...
Seite wird geladen ...
Seite wird geladen ...
-
 1
1
-
 2
2
-
 3
3
-
 4
4
-
 5
5
-
 6
6
-
 7
7
-
 8
8
-
 9
9
-
 10
10
-
 11
11
-
 12
12
-
 13
13
-
 14
14
-
 15
15
-
 16
16
-
 17
17
-
 18
18
-
 19
19
-
 20
20
-
 21
21
-
 22
22
-
 23
23
-
 24
24
-
 25
25
-
 26
26
-
 27
27
-
 28
28
-
 29
29


Megasat Digital 1 HD Benutzerhandbuch
- Kategorie
- TV-Set-Top-Boxen
- Typ
- Benutzerhandbuch
- Dieses Handbuch eignet sich auch für
in anderen Sprachen
- English: Megasat Digital 1 HD User manual