
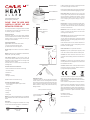
Installation of alarm:
1. Detach the alarm from the mounting base by twisting
counter clockwise. Use the mounting base to mark the
screw holes on the ceiling. Use the enclosed screws and
plugs to install the mounting base. Once the mounting
base is installed on ceiling or wall, attach the alarm by
twisting clockwise.
127617 rev6
2. After mounting, test the alarm by pushing the test but-
ton on the top and get a loud alarm tone.
Please note: The label in the product must not be removed
as it contains important information regarding the product.
Heat alarm signal: The heat alarm has a visual and
acoustic signal. In the passive state, the LED will ash
every 48 seconds to indicate normal function. In alarm
state the LED will speed up flash, and the alarm will
emit a sweeping sound pattern design to alert oc-
cupants.
Hush function: In case of unintentional or false alarms,
push button for 2 seconds.This will mute the alarm for
10 minutes, after which time the alarm will automatically
resume its normal function.
Maintenance: Test the heat alarm at least once per
quarter, by pushing the test button. The heat alarm
should give a loud alarm tone.
Fault nding: If the heat alarm activates without visible
cause, then possible cause could be:
You may have your heat alarm too close to the cooking
hobs and stove. Try reinstalling slightly further away to
alleviate any issues.
If the heat alarm does not work, when the test button is
pushed, the probably cause is a faulty battery, and the
heat alarm must be replaced.
Other information: Do not paint the heat alarm.
Disposal: For product, please dispose properly at end
of life. This is electronic waste that should be recycled.
WARNING: All alarms should be assumed as due to
actual re and the dwelling should be evacuated imme-
diately.
WARNING: To prevent injury, this apparatus must be
securely attached to the ceiling/wall in accordance with
the installation instructions.
WARNING: Batteries shall not be exposed to excessive
heat such as shine, re, or the like. Note the local coun-
try regulations regarding installation.
The CE mark afxed to this product conrms its compliance
with the European Directives which apply to the product.
Tested to comply to the standard of system heat alarms
EN54-5 class A1/R.
Alarm condition aural signal pattern according to ISO 8201.
CAVIUS assumes no responsi bility for any errors, which may
appear in this manual. Furthermore, CAVIUS reserves the
right to alter the hardware, software, and/or specications de-
tailed herein at any time without notice, and CAVIUS does not
make any commitment to update the infor mation contained
herein.
Developed by CAVIUS
Jens Juuls Vej 28 K, DK-8260
Manufactured in P.R.C.
Commercial reference: 3003
Developed by CAVIUS
PLEASE READ THE USER GUIDE
CAREFULLY BEFORE USE AND
RETAIN FOR FUTURE USE!
This Thermal Heat Alarm is designed for areas not suitable
for smoke alarms due to high risk of false alarms such
as; kitchens, garages or workshops.
Safety instructions:
The device comes with a 3V lithium battery. Batteries
are to be handled with care and battery powered devices
should be kept out of reach of children. Do not try to
recharge or burn the batteries.
Technical information:
Type of alarm: CAVIUS heat alarm detects
1) rapidly increased temperature level
2) absolute heat level of 58 degrees C.
Sound output: The minimum sound level is 85dB at 3
meter.
Battery: Powered by a non-replaceable 3v CR123A Lithium
battery with 10-year life (included).
Low battery indicator: A short acoustic “beep” will
sound and the LED will ash every 48 seconds when
the battery is near the end of its life. In this stage it will
continue for minimum 30 days.
The heat alarm is not active unless it is inserted in the
mounting base.
The best areas to mount the alarm:
• Areas not suitable for smoke alarms due to high
risk of false alarms
• Kitchen area
• Bathroom
• Garage or workshop
Additional alarms increase the security.
The alarm may NOT be placed:
• In rooms where the temperature goes outside
-10ºC to +50ºC.
• Bedrooms
• Lounge
• Dining room
• Hallway
• Family room
NOTE: In areas where smoldering res occur over aming
res, photoelectric smoke alarms are still the best to be in-
stalled.
Placement:
The heat alarm is designed to be installed on a ceiling
or wall. Never install directly above an oven/hob/stove.
Test/Hush button
Alarm audible alert
Mounting base
UK
Use the enclosed screws and
plugs for installation
Mark up screw holes with a pen
Minimum 50cm
from wall
Wall
Ceiling
Minimum 30cm and
maximum 50cm from
ceiling
Ceiling
Wall
Minimum 30cm
and maximum 50cm
from stove
Ceiling
Minimum 50cm
from peak
Peak ceiling
©2023 Carrier. All Rights Reserved.
All trademarks and service marks referred herein are property of their respective owners.

2. Überprüfen Sie den Rauchmelder nach der Montage,
indem Sie die Testknopf drücken, so dass ein lauter Ton
zu hören ist.
Info: Der Aufkleber am Produkt darf nicht entfernt
werden, da er wichtige Informationen über das Produkt
enthält.
Hitzewarnsignal: Der Hitzealarm wird optisch und
akus-tisch signalisiert. Im Normalbetrieb blinkt die LED
alle 48 Sekunden. Bei Alarm blinkt die LED schnell und
eine an-schwellende Tonfolge alarmiert die Bewohner.
Alarm-Stop (Stummschaltung): Wurde der Alarm ver-
sehentlich ausgelöst oder bei falschem Alarm, drück-
en Sie die Unterbrechungstaste (testtaste) 2 Sekunden
lang. Das unterbricht den Alarm 10 Minuten lang, da-
nach beginnt automatisch wieder der Normalbetrieb
Wartung: Testen Sie den Hitzemelder mindestens einmal
alle drei Monate, indem Sie die Testtaste drücken. Der
Hitzemelder sollte einen lauten Alarmton senden.
Fehlersuche: Wird der Hitzealarm ohne erkennbaren
Grund ausgelöst, könnte die Ursache sein:
Ihr Hitzewarnmelder bendet sich zu dicht an den Koch-
platten und am Herd. Montieren Sie ihn erneut etwas
weiter entfernt an, um Probleme zu beseitigen.
Reagiert der Hitzewarnmelder beim Drücken der Test-
taste nicht, liegt das wahrscheinlich an einer schad-
haften Batterie. Der Warnmelder muss dann ausgetauscht
werden.
Weitere Informationen: Überstreichen Sie den Hitze-
warnmelder nicht mit Farbe.
Entsorgung: Entsorgen Sie bitte das Produkt und die
Batterie am Ende der Lebensdauer ordnungsgemäß.
Das ist Elektronikschrott, der recycelt werden sollte.
WARNUNG: Bei allen Alarmen sollte immer davon
aus-gegangen werden, dass es sich um einen tatsäch-
lichen Brand handelt, und die Wohnung sollte sofort
evakuiert werden.
WARNUNG: Um Verletzungen zu vermeiden, muss das
Gerät gemäß Installationsanweisungen sicher an der
Decke/Wand befestigt werden.
WARNUNG: Die Batterien dürfen nicht übermäßiger Hi-
tze ausgesetzt werden, wie z. B. Glut, Feuer, etc. Bitte
beachten Sie Ihre gültigen Normen oder Vorschriften
zur Installation
Artikelnummer: 3003
Eine Entwicklung von CAVIUS
LESEN SIE DIE BEDIENUNGSAN-
LEITUNG BITTE VOR GEBRAUCH
SORGFÄLTIG UND BEWAHREN SIE
SIE GRIFFBEREIT AUF!
Dieser Hitzemelder wurde für Bereiche entwickelt, die
sich wegen der großen Gefahr von Fehlalarmen für
Rauchmelder nicht eignen, wie Küchen, Garagen oder
Werkstätten.
Sicherheitshinweise:
Das Gerät wird mit einer 3V Lithiumbatterie versorgt.
Beachten Sie bitte: Batterien sind mit besonderer Sorg-
falt zu behandeln, stets unter Aufsicht zu verwenden und
gehören nicht in Kinderhände. Versuchen Sie nicht, die
Batterie wiederaufzuladen oder zu verbrennen.
Technische Information:
Rauchmeldertyp: Der Cavius-Hitzemelder ortet
1) eine schnell ansteigende Temperatur
2) eine absolute Temperatur von 58 oC.
Ausgabelautstärke: Die Mindestlautstärke beträgt bei
einem Abstand von 3 m 85 dB.
Batterie: Nicht auswechselbare CR123A 3 V Lithi-
um-Batterie mit einer Lebensdauer von 10 Jahren (im
Lieferumfang enthalten).
Anzeige bei schwacher Batterie: Ein kurzer Piepton ist
zu hören, und die LED blinkt alle 48 Sekunden, wenn die
Batterie fast am Ende ihrer Lebensdauer ist. Das geht
mindestens 30 Tage so weiter.
Der Hitzemelder ist erst aktiviert, wenn er in den Montag-
esockel eingesetzt ist.
Der beste Platz für den Hitzemelder:
• In Bereichen, die sich wegen der großen Gefahr
von Fehlalarmen für Rauchmelder nicht eignen
• Küchenbereich
• Bad
• Garage oder Werkstatt
Zusätzliche Hitzemelder erhöhen die Sicherheit.
NICHT geeignete Montageorte::
• In Räumen mit Temperaturen außerhalb des
Bereichs von -10 ºC bis +50 ºC.
• In Schlafräumen
• In Lounges
• Im Esszimmer
• Im Flur
• Im Wohnzimmer
HINWEIS: In Bereichen, in denen es nach offenem
Feuer zu glimmendem Feuer kommt, werden am besten
optische Rauchmelder angebracht.
Platzierung:
Der Hitzemelder ist für die Montage an einer Zimmer-decke
oder Wand gedacht. Bringen Sie ihn nie direkt über dem Ofen/
der Kochplatte/dem Herd an.
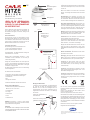
Montage des Hitzemelders:
1. Nehmen Sie den Hitzemelder vom Montagesockel
ab, indem Sie ihn gegen den Uhrzeigersinn drehen.
Markieren Sie mit Hilfe des Montagesockels die
Schraubenlöcher an der Decke. Verwenden Sie die
mitgelieferten Schrauben und Dübel für die Montage
des Sockels.
Das auf diesem Produkt angebrachte CE-Kennzeichen
bestätigt die Einhaltung der europäischen Richtlinien für
das Produkt.
Geprüft auf die Einhaltung der Norm EN54-5, Klasse
A1/R, für Hitzewarnsysteme.
Akustisches Signalmuster bei Alarm nach ISO 8201.
CAVIUS haftet nicht für Fehler, die in dieser Bedienungsanlei-
tung auftreten können. Weiterhin behält CAVIUS sich vor, die
darin angegebenen Hardware, Software und/oder Spezika-
tionen jederzeit ohne Vorankündigung zu ändern, und CAV-
IUS ist nicht verpichtet, die darin enthaltenen Informationen
zu aktualisieren.
Entwickelt von CAVIUS, Jens Juuls Vej 28 K, DK-8260
Hergestellt in der Volksrepublik China
Test-/
Unterbrechungstaste
Akustisches
Alarmsignal
Montagesockel
DE
Nehmen Sie zur Montage die mit-
gelieferten Schrauben und Dübel
Zeichnen Sie die Dübellöcher mit
einem Bleistift an
Mindestabstand von
der Wand 50 cm
Wand
Decke
Mindestens 30 cm,
höchstens 50 cm
Abstand von der
Decke
Decke
Wand
Mindestens 30 cm,
höchstens 50 cm
Abstand vom Herd
Decke
Mindestabstand von der
Spitze 50 cm
Spitzdecke
©2023 Carrier. Alle Rechte vorbehalten.
Alle hier erwähnten Warenzeichen und Dienstleistungsmarken sind Eigentum ihrer
jeweiligen Inhaber.
-
 1
1
-
 2
2

