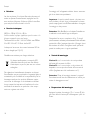
Ingo Maurer Birds Birds Birds Bedienungsanleitung
- Typ
- Bedienungsanleitung

birds birds birds LED Instructions

2
Montageanleitung
Bitte vor der Montage aufmerksam lesen und aufbe-
wahren!
Instructions for assembly
Please read these instructions carefully before going
any further, and keep them in a safe place for future
reference!
Instructions de montage
A lire attentivement avant le montage et à conserver
soigneusement!
Istruzioni di montaggio
Prima del montaggio leggere attentamente le pre-
senti istruzioni e conservarle!
Deutsch Seite 4
English Page 9
Français Page 14
Italiano Pagina 19
Zeichnungen Seite 24
Drawings Page 24
Dessins Page 24
Disegni Pagina 24
3

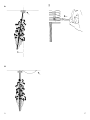
4
Montage und Elektroanschluss müssen von einer Elektro-
fachkraft ausgeführt werden.
Wichtig: Bei allen Arbeiten am Lüster bitte die bei-
liegenden Stoffhandschuhe tragen. Die verzinnten Metallteile
sowie die Federn sind sehr empfindlich.
Wir empfehlen, die Montage mit zwei Personen durchzu-
führen.
Achtung: Birds Birds Birds ist nicht geeignet für die Montage
in Räumen mit hoher Luftfeuchtigkeit oder im Freien.
Überprüfen Sie die ausreichende Tragfähigkeit der Decke;
der Lüster hat ein Gesamtgewicht von ca. 15 kg. Achten
Sie auf adäquate Befestigungsmittel entsprechend der
Deckenkonstruktion: Wir empfehlen Schwerlastdübel aus
dem Fachhandel.
Montagevarianten
Version A: mit beiliegendem Baldachin direkt neben
dem Deckenauslass.
Version B: mit beiliegendem Baldachin, wenn die Position
des Lüsters nicht mit dem Auslass übereinstimmt (Trafo-
kabel länge 3 m).
Wichtig: Schalten Sie die Sicherung des Deckenauslasses
vor der Montage aus! Achten Sie unbedingt auf den Ver-
lauf von Elektroleitungen in der Decke, damit auf keinen
Fall ein Kabel angebohrt wird. Montieren Sie nicht auf
feuchtem und leitendem Untergrund!
Montagevorbereitung
Benutzen Sie zum Markieren der Bohrlöcher die isolierte
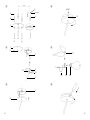
Montageplatte (1) und den Baldachin (2) als Schablone.
Version A: Platzieren Sie die Montageplatte (1) im Abstand
von ca. 10 cm (Mitte Montageplatte – Mitte Anschlussdose)
neben dem Baldachin (2), damit dieser später von den
Blendenringen des Transformators vollständig verdeckt
wird. ①
Version A+B: Bohren Sie ein Dübelloch Ø 6 mm (3)
für den Baldachin, setzen Sie den Dübel S6 (4) ein und
schrauben Sie den Baldachin fest. Bohren Sie drei Dübel-
löcher Ø 8 mm (5) für die Montageplatte, setzen Sie die
Dübel S8 (6) ein und schrauben Sie die Montageplatte
gut fest. Decken Sie die Schraubenköpfe mit den beilie-
genden Isolierkappen ab.①
Lassen Sie die Zuleitungen (7) des Deckenauslasses etwa
8 cm aus der Dose ragen und isolieren Sie die Enden von
Leiter und Neutralleiter jeweils ca. 5 mm ab. ②
Zur Entnahme des Lüsters öffnen Sie bitte die untere
Seite der Verpackung. Entfernen Sie die Styroporscheibe
und die Schutzfolie des Transformators und hängen Sie
den Lüster in den Haken (8) an der Montageplatte (1)
ein. ②
Achtung: Entfernen Sie die Schnur erst nach erfolgter
Montage.
Montage
Version A: Eine Person sollte den Lüster in Schräglage
festhalten, während die zweite Person das Trafokabel
anpasst. Bild A (Seite 26)
Version B: Legen Sie die Kabellänge so fest, dass das Kabel
in einem leichten Schwung vom Trafo zur Anschlussdose
verläuft. Bild B (Seite 26)
Wichtig: Birds Birds Birds darf nicht geerdet werden!
5
Deutsch Deutsch

Die Leuchtmittel werden exklusiv für die Ingo Maurer
GmbH hergestellt und können nur über unseren Webshop
oder unsere Händler bezogen werden.
Wechsel der Transformator-Sicherung
Achtung: Schalten Sie die Sicherung des Deckenauslasses
aus. Wechseln Sie die Sicherung niemals unter Last!
Finden und beseitigen Sie die Ursache des
Sicherungsausfalls.
Verwenden Sie ausschließlich Feinsicherungen (5x20mm)
mit den folgenden Werten:
230V: 1,0A Träge
125V: 2,0A Träge
Der Sicherungshalter befindet sich seitlich neben dem
Kabelausgang des Transformators. ⑦
Mit einem Schrauben dreher (Viertel-Linksdrehung) lässt
sich das Sicherungs gehäuse leicht öffnen. Alte Sicherung
aus der Fassung ziehen und ersetzen.
Öffnen des Baldachins
Zum Öffnen des Baldachins stecken Sie einen Schrauben-
dreher in die Öffnung der Abdeckung und drücken den
Widerhaken nach innen. Lösen Sie gleichzeitig die Ab-
deckung durch eine Linksdrehung bis zum Anschlag. ⑥
Pflege
Die Flügel aus Gänsefedern können vorsichtig mit einem
weichen Pinsel gesäubert werden. Gegebenfalls können
die Flügel mit handelsüblichem Haarlack bzw. -spray
imprägniert werden. Für das Trafogehäuse und die Drähte
benutzen Sie am besten ein Mikrofasertuch.
Führen Sie das Trafokabel (9) durch die mittige Öffnung
der Baldachinabdeckung (10) und durch die Zugent-
lastung (11). Schließen Sie zuerst die Zuleitungen des
Trafokabels in der Lüsterklemme (12) an, danach Leiter
und Neutralleiter des Deckenauslasses (7). ②
Bringen Sie die Baldachinabdeckung (10) auf die in
Zeichnung Fig. 3 gezeigte Position und stecken Sie sie auf
den Baldachin (2). Verschließen Sie den Baldachin, indem
Sie die Abdeckung nach rechts drehen, bis der Haken am
Baldachin hörbar in der Öffnung (13) der Abdeckung ein-
rastet. ④
Entfernen Sie die Schnur um den Lüster und biegen Sie
die anliegenden silbernen Arme mit den roten, blauen oder
transparenten Drähten vorsichtig auseinander.
Einsetzen der Leuchtmittel
Schrauben Sie die LED Leuchtmittel in die Fassungsringe
(14) ein und Stecken Sie die Anschlussdrähte (15) bis
zum Anschlag in die Buchsen (16) der LED Lampen.
Überzeugen Sie sich vom festen Sitz der Drähte. ⑤
Achtung: Alle 24 Anschlussdrähte müssen sich vor
dem Einschalten des Stroms in den Steckbuchsen der
Leuchtmittel befinden, sonst besteht Kurzschlussgefahr!
Stecken Sie die 24 Flügelpaare jeweils mit dem Messing-
clip (17) auf den Fassungsring (14). ⑤
Gestalten Sie Birds Birds Birds selbst durch vorsichtiges
Biegen der silbernen Arme und die Stellung der Flügel.
Wechsel der Leuchtmittel
Achtung: Schalten Sie die Sicherung des Deckenauslasses
aus und lassen Sie die LED Lampen vollständig abkühlen.
Ziehen Sie den Anschlussdraht (15) aus der Buchse (16)
der zu ersetzenden LED Lampe, drehen Sie diese aus dem
Fassungsring (14) und setzen Sie die neue LED Lampe ein,
wie unter „Einsetzen der Leuchtmittel“ beschrieben. ⑤
7
6
Deutsch Deutsch

Technische Daten
230 Volt~, 50 Hz; 125 Volt~, 60 Hz.
Die für Ihre Leuchte zutreffende Spannung und Frequenz ent-
nehmen Sie bitte dem Typenschild.
Ringkerntransformator 11,8V bei 36W, max. 70W LED
24 x LED 12V AC, 1,5 Watt, Fassungen E27.
Diese Leuchte wird geliefert mit LED Lichtquellen der
Energieeffizienzklasse G (A-G).
Dimmbar mit Phasenanschnittdimmer für induktive Lasten.
Eine defekte Leuchte, ein Transformator oder
LED Leuchtmittel müssen als Elektroschrott
entsorgt werden und dürfen nicht in den
Hausmüll gelangen.
Eventuell notwendige Reparaturen dürfen nur von einer
Elektrofachkraft durchgeführt werden. Bei Schäden, die
durch Nichtbeachten dieser Bedienungsanleitung, unsach-
gemäßer Inbetriebnahme und/oder baulicher Veränderung
z.B. durch Fremdbauteile,Handhabung oder Fremdeingriff
verursacht werden, erlischt der Garantieanspruch.
9
English
8
Deutsch
The lamp assembly and electrical installation must be car-
ried out by a qualified electrician.
Important: Always wear protective cloth gloves when
handling the chandelier. The galvanized metal parts and
the feathers are easily damaged.
We recommend that the assembly be carried out by two
people.
Caution: Birds Birds Birds is not suitable for installation
outdoors or in spaces with high humidity.
The chandelier has a total weight of around 15 kg. Please
make sure that your ceiling is capable of taking the strain,
and that the means of attachment are suitable for the task.
We recommend the use of heavy-duty ceiling anchors,
available from specialist retailers.
Installation options
Version A: With the canopy, immediately adjacent to the
ceiling outlet.
Version B: With the canopy, if the lamp is to hang at
a distance from the ceiling outlet (length of transformer
cable: 3 m).
Caution: Remove or switch off the fuse for the ceiling
outlet before beginning the assembly procedure. Take care
to ascertain the exact position of the mains cable, so as
to avoid drilling into it.

Preparation
Use the base plate (1) and the canopy (2) as a template
to mark the drill holes.
Version A: Position the base plate (1) as shown in ①,
with a distance of approximately 10 cm between the centre
of the plate and the centre of the canopy (2), so that the
latter will eventually be concealed by the transformer.
Versions A and B: Drill a 6 mm-diameter hole (3) for
the canopy, insert the S6 plug (4) and attach the canopy
with the screw. Drill the three 8 mm-diameter holes (5)
for the base plate, insert the S8 plugs (6) and attach the
plate, ensuring that the screws are tight. ①
Remove an 8 cm section of the outer covering from the
mains cable (7), then strip about 5 mm from the ends of
the plus and minus leads. ②
Open the underside of the box and take the chandelier
out of the packaging. Remove the styrofoam disc and the
protective foil from the transformer, and hang the chandelier
on the hook (8) attached to the base plate (1). ②
Caution: Do not remove the thread around the chandelier
before completing the assembly.
Assembly
Version A: One person holds the chandelier at an angle
while the other attaches the transformer cable. Fig. A
Version B: Adjust the length of the cable so that it hangs
in a shallow arc between the ceiling outlet and transfor-
mer. Fig. B
Important: Birds Birds Birds must not be grounded!
Thread the transformer cable (9) through the aperture
in the canopy cover (10) and then through the retaining
clip (11). Attach the transformer leads to the contacts
in the terminal block (12), and then attach the plus and
minus leads from the ceiling outlet (7).
Position the canopy cover (10) as shown in ④, and fit
it over the canopy (2). Close the canopy by turning the
cover to the right until the hook clicks into place in the
aperture (13). ④
Remove the thread from around the chandelier and care-
fully unwind the silver arms with the red, blue or transpa-
rent wires from the central rod.
Inserting the light bulbs
Screw the low-voltage LED bulbs into the sockets (14)
and push the ends of the connecting wires (15) as far
as they will go into the sleeves (16). Make sure that the
ends of the wires are securely in position. ⑤
Caution: All 24 connecting wires must be inserted in the
sleeves before switching on the current. Failure to observe
this may cause a short-circuit.
Fit each of the 24 pairs of wings with the brass clip (17)
on the socket ring (14). ⑤
The lamp can be modified to suit your own wishes by
carefully bending the silver arms and turning the wings in
the desired direction.
11
English English
10

Cleaning
The goose-feather wings can be cleaned carefully with a
soft paintbrush. If necessary, the wings can be impregna-
ted with ordinary hairspray or hair lacquer. A microfibre
cloth should be used for the transformer housing and the
wires.
Technical specification
230 Volt~, 50 Hz; 125 Volt, ~60 Hz.
The correct voltage and frequency for your lamp are indica-
ted on the type label.
Toroidal transformer 11,8Volt at 36Watt, max. 70Watt LED
24x LED 12Volt AC, 1,5 Watt, E27 sockets.
The chandelier is delivered with LED light sources of the
energy class G (A-G).
Dimmable with leading edge dimmer for inductive loads.
A defective lamp, transformer or LED bulb
must be disposed as electronic scrap, it must
not get into domestic waste.
Any repairs that may become necessary must be carried
out by a qualified electrician. The legal and contractual
warranty for defects and productliability will be void,
should the installation instructions not be duly followed or
non-original components be employed.
Changing the light bulbs
Caution: Switch off or remove the fuse for the ceiling
outlet and allow the lamp to cool down completely.
Remove the connecting wire (15) from the sleeve (16)
on the relevant socket (14), unscrew the spent LED bulb
and fit the replacement (see “Inserting the lightbulbs“,
above).⑤
The bulbs are manufactured exclusively for Ingo Maurer
GmbH. Replacements are only available from our web-
shop or authorized retailers.
Changing the transformer fuse
Caution: Switch off or remove the fuse for the ceiling
outlet. Never change the fuse under load!
Find and eliminate the cause of the fuse failure.
Use only fuses (5x20mm) with the following values:
230V: 1,0A slow
125V: 2,0A slow
The fuse mounting is located at the side of the transformer,
next to the cable outlet. ⑦ Open the cover of the trans-
former by inserting the tip of a screwdriver in the slit and
giving it a quarter turn to the left. Remove the spent fuse
from the mounting and fit the replacement.
Opening the canopy
To open the canopy, insert a screwdriver in the slit in the
cover and press the retaining hook inwards, while turning
the cover to the left until the fastening is released. ⑥
English
12
English
13

Français
15
Préparation au montage
Pour marquer les trous de perçage, se servir de la plaque
de montage jointe (1) et du baldaquin (2) comme gabarit.
Version A: Positionner la plaque de montage (1) à une
distance d‘environ 10 cm à côté du baldaquin (2) (centre
de la plaque de montage – centre de la boîte de connexion)
afin que le baldaquin se trouve après complètement
caché par les anneaux – écrans du transformateur. ①
Version A+B: Percer un trou de cheville Ø 6 mm (3)
pour le baldaquin, enfoncer la cheville S6 (4) et visser le
baldaquin. Percer trois trous de cheville Ø 8 mm pour la
plaque de montage (5), enfoncer les chevilles (6) et visser
fermement la plaque de montage. ①
Laisser dépasser les conduites isolées (7) de la sortie pla-
fond d‘environ 8 cm de la boîte de connexion et dénuder
les fils de phase et phase nulle d‘environ 5 mm. ②
Pour retirer le lustre de son emballage, ouvrir le côté bas
de l‘emballage. Retirer la plaque de styropor et la feuille
de protection du transformateur et accrocher le lustre
dans le crochet (8) sur la plaque de montage (1). ②
Attention: Retirer la ficelle seulement une fois le monta-
ge effectué!
Montage
Version A: Une personne maintient le lustre dans une
position inclinée pendant que la deuxième personne
adapte le câble du transformateur. Fig. A
Version B: Déterminer la longueur du câble de telle
manière qu‘il forme une légère courbe entre le trans-
formateur et la boîte de connexion. Fig. B
14
Français
Le montage et la connexion éléctrique sont à effectuer
par un électricien qualifié.
Important: Il est indispensable de porter des gants en
tissu pour effectuer tous travaux sur le lustre: les parties en
métal étamé ainsi que les plumes sont très fragiles.
Nous recommandons d‘effectuer le montage à deux personnes.
Attention: La Birds Birds Birds n’est pas appropriée pour
l’installation dans des pièces avec haut taux d’humidité, ou
en extérieur.
Vérifier si la force portative du plafond est suffisante:
le lustre ayant un poids total d‘environ 15 kg. Veillez à
l‘utilisa-tion de moyens de fixation adéquats correspon-
dant à la construction du plafond: nous recommandons
l‘emploi de chevilles spéciales pour forte charge à acheter
en magasin spécialisé.
Variantes de montage
Version A: avec le baldaquin joint directement à côté de
la sortie plafond.
Version B: avec le baldaquin joint si la position du lus-
tre n‘est pas la même que la sortie plafond (longueur de
câble du transformateur: 3 m)
Attention: Déconnecter le fusible contrôlant l‘arrivée du
courant au plafond avant le montage! Il est indispensable
de respecter le positionnement des conduites électriques
pour éviter de percer le câble électrique!

17
Français
Changement des ampoules
Attention: Déconnecter le fusible contrôlant l‘arrivée du
courant au plafond et laisser refroidir les ampoules LED
complètement.
Retirer le fil de connexion (15) de la douille à fiches (16) de
l‘ampoule à remplacer, dévisser l‘ampoule du porte-anneau
(14) et insérer l‘ampoule de rechange (cf § „installation des
ampoules“). ⑤
Cette ampoule est produite exclusivement pour la société
Ingo Maurer GmbH. Ampoules de rechange sont à com-
mander auprès de nos revendeurs et notre webshop.
Changement de fusible du transformateur
Attention: Déconnecter le fusible contrôlant l‘arrivée
du courant au plafond. Ne changez jamais le fusible sous
charge!
Trouvez et éliminez la cause de la défaillance du fusible.
Utilisez uniquement des fusibles (5x20 mm) avec les
valeurs suivantes:
230V: 1,0A lent
125V: 2,0A lent
Le boîtier à fusible se trouve situé latéralement de la sor-
tie de câble du transformateur. ⑦ Le boîtier à fusible
s‘ouvre avec un tournevis (rotation à gauche d‘un quart
de tour). Retirer le fusible usé et le remplacer.
Ouverture du baldaquin
Pour ouvrir le baldaquin, introduire un tournevis dans
l‘ouverture du couvercle du baldaquin et repousser
le crochet vers l‘intérieur. Défaire en même temps le
couvercle par une rotation à gauche jusqu‘à la butée. ⑥
16
Français
Important: Birds Birds Birds ne doit pas être connecté à
la terre!
Passer le câble du transformateur (9) par l‘ouverture
centrale du couvercle du baldaquin (10) et par le dispositif
anti-traction (11).
Connecter en premier le câble du transformateur à la
barrette de connexion (12) et ensuite la phase et la phase
nulle de la sortie plafond (7). ②
Amener le couvercle du baldaquin (10) dans la position
indiquée sur le dessin ③ et enclencher le dans le
baldaquin (2). Fermer le baldaquin en tournant le couvercle
vers le côté droit jusqu‘au moment où le crochet du
baldaquin s‘emboîte dans l‘ouverture (13) du couvercle.
Un clic se fait entendre. ④
Enlever la ficelle fixée autour du lustre et déplier avec
précaution les bras argentés avec les fils rouges et bleus.
Installation des ampoules
Visser les ampoules LED basse-tension dans les porte-
anneaux (14) et amener les fils de connexion (15)
jusqu‘en butée dans les douilles à fiches (16) des
ampoules LED. Assurez-vous de la position ferme des fils
de connexion. ⑤
Important: Les 24 fils de connexion doivent se trouver
fixés dans les douilles à fiches avant la mise en circuit,
sinon il y a danger de court-circuit!
Insérer les 24 paires d’ailes chacunes avec les clips en laiton
sur le porte-anneau (14). ⑤
Formez votre Birds Birds Birds vous-même en pliant les
bras argentés et les ailes avec précaution.

19
Italiano
Il montaggio ed il collegamento elettrico devono essere ese-
guiti da un elettricista specializzato.
Importante: Le parti in metallo zincato e le piume sono
molto delicate; per tutti i lavori sul lampadario indossare,
quindi, sempre guanti in stoffa! Raccomandiamo di eseguire
il montaggio in due persone.
Attenzione: Birds Birds Birds non è adatta all’installazione
in ambienti con alta umidità oppure all’aperto.
Il lampadario ha un peso complessivo di kg. 15 circa: è
quindi necessario accertarsi preventivamente della sufficiente
portata del soffitto. Impiegare dispositivi di fissaggio idonei
alla struttura del soffitto: consigliamo tasselli per carichi
pesanti in vendita presso i negozi specializzati.
Varianti di montaggio
Versione A: con il rosone incluso in corrispondenza
dell‘uscita della corrente al soffitto.
Versione B: con il rosone incluso, se la posizione del
lampadario non corrisponde all‘uscita della corrente al
soffitto (lunghezza cavo del trasformatore m. 3).
Attenzione: Prima del montaggio staccare la corrente!
Fare attenzione alla linea di alimentazione nel soffitto per
evitare di danneggiare un cavo!
Preparazione del montaggio
Impiegare la piastra di montaggio (1) e il rosone (2) alle-
gati come dima di foratura per contrassegnare i punti da
forare.
18
Français
Entretien
Les ailes en plumes d’oie doivent être nettoyées avec pré-
caution au pinceau. Eventuellement, imprégner les ailes
avec une laque à cheveux. Utilisez un chiffon à microfibre
pour nettoyer le boîtier du trafo et les fils.
Données techniques
230 Volt~, 50 Hz; 125 Volt~, 60 Hz.
Veuillez consulter la plaque signalétique pour la tension et la
fréquence appropriée pour votre lampe.
Transformateur toroidal 11,8Volt á 36Watt, max.70Watt
24 x LED 12Volt AC, 1,5 Watt, douilles E27.
La lampe est livree avec des sources lumineuses LED de
la classe énergétique G (A-G).
Gradable avec variateur pour charges inductives.
Un lampe, transformateur ou ampoule LED
défectueux devra être jeté avec des déchets
électroniques, ne pas les jeter avec vos ordures
ménagères.
Des réparations éventuellement nécessaires ne doivent
être effectuées que par un spécialiste. La garantie légale et
contractuelle pour les défauts et la responsabilité pour les
dommages causés par des produits défectueux, expire-
ront en cas de dommages ou de réclamations résultant
du non-respect des instructions d‘installation et/ou des
modifications structurelles, en particulier si des compo-
sants non originaux sont utilisés.

Importante: Non collegare Birds Birds Birds a terra!
Condurre il cavo del trasformatore (9) attraverso
l‘apertura centrale della copertura del rosone (10) e
attraverso il fermacavo (11). Collegare prima il cavo del
trasformatore al morsetto e successivamente la fase e
neutro dell‘uscita corrente del soffitto (7). ②
Sistemare la copertura del rosone (10) come mostrato in
figura ③ e applicare il rosone (2). Chiudere il rosone,
girando la copertura verso destra finché il dentello, disposto
sul rosone, si innesta nell‘apertura (13) della copertura
fino al prodursi di uno scatto. ④
Rimuovere la corda che avvolge il lampadario e distendere
con cautela le braccia argentate con i fili rossi e blu.
Inserimento delle lampadine
Avvitare le lampadine LED a basso voltaggio negli anelli
portalampada (14) e inserire i fili di collegamento (15)
fino all‘arresto negli spinotti (16) delle lampadine LED.
Assicurarsi che i fili siano saldamente inseriti. ⑤
Importante: Prima di attaccare la corrente, i 24 fili di
collegamento devono essere inseriti negli spinotti, in caso
contrario si rischia il corto circuito!
Applicare le 24 paia di ali con la molletta in ottone (17)
agli anelli portalampada (14). ⑤
Potete dare a Birds Birds Birds la forma che desiderate,
torcendo attentamente le braccia in argento e le ali.
Italiano
2120
Italiano
Versione A: Disporre la piastra di montaggio (1) accanto
al rosone (2) a una distanza di circa cm. 10 (centro piastra
di montaggio – centro scatola di derivazione), per consentire
al rosone di essere in seguito completamente coperto dagli
schermi anulari del trasformatore. ①
Versione A+B: Effettuare un foro per il tassello di
Ø mm. 6 (3) del rosone, inserire il tassello S6 (4) e avvitare
il rosone. Effettuare tre fori per i tasselli di Ø mm. 8 (5)
della piastra di montaggio, inserire i tasselli (6) e avvitare
saldamente la piastra di montaggio. ①
Lasciare spuntare dalla scatola i cavi di alimentazione (7)
dell‘uscita corrente dal soffitto di circa cm. 8 e spelare le
estremità di fase e neutro su circa mm. 5. ②
Per estrarre il lampadario, aprire il lato inferiore dell’
imballaggio. Rimuovere il disco in polistirolo espanso e la
pellicola protettiva del trasformatore e appendere il lam-
padario nel gancio (8) della piastra di montaggio (1). ②
Attenzione: Rimuovere la corda e la pellicola protettiva
delle ali soltanto a montaggio avvenuto!
Montaggio
Versione A: Una persona tiene il lampadario in una posi-
zione inclinata, mentre la seconda persona adatta il cavo
del trasformatore. Fig. A
Versione B: Determinare la lunghezza del cavo, facendo
sì che il cavo formi tra il trasformatore e la scatola di con-
nessione una leggera curva. Fig. B

Cura
Le ali in piume d’oca possono essere pulite delicatamente
con un pennello morbido. E’ possibile impregnare le ali, in
caso di necessità, con una lacca/spray per capelli.
Per la scatola del trasformatore e i fili è consigliato
l’impiego di un panno in microfibra.
Dati tecnici
230 Volt~, 50 Hz; 125 Volt~, 60 Hz.
I dati tecnici relativi alla tensione e alla frequenza di funzio-
namento della Vostra lampada sono riportati sulla targhetta
d’identificazione.
Trasformatore toroidale 11,8Volt al 36Watt, max 70Watt LED
24x LED 12 Volt AC, 1,5 watt, portalampada E27.
Questo luminare essere consegnato con sorgenti lumino-
se a LED della classe energetica G (A-G).
Dimmerabile con varialuce per carichi induttivi.
Un luminare, trasformatore o lampadina LED
difettoso è da considerarsi un rifiuto elettrici e
non deve essere smaltito con i rifiuti domestici.
Eventuali riparazioni possono essere effettuate esclusiva-
mente da un elettricista. La garanzia legale e contrattuale
per difetti e la responsabilità per danni da prodotti difet-
tosi, decadono in caso di danni o reclami conseguenti
all’inosservanza delle istruzioni d’installazione e/o a modi-
fiche strutturali, soprattutto se impiegati componenti non
originali.
23
Italiano
Sostituzione delle lampadine
Attenzione: Staccare la corrente e attendere che le lam-
padine siano completamente fredde.
Staccare il filo di collegamento (15) dallo spinotto (16)
della lampadina LED da sostituire, svitarla dall’anello por-
talampada (14) e inserire la nuova lampadina LED (vedi
„Inserimento delle lampadine“ ⑤.
Questa lampadina viene prodotta in esclusiva per la Ingo
Maurer GmbH e può essere acquistata solo dal nostro
negozio online o i nostri rivenditori autorizzati.
Sostituzione del fusibile del trasformatore
Attenzione: Staccare la corrente.
Non cambiare mai il fusibile sotto carico!
Trovare ed eliminare la causa del guasto del fusibile.
Utilizzare solo fusibili (5x20 mm)con i seguenti valori:
230V: 1,0A lenti
125V: 2,0A lenti
Il supporto del fusibile è disposto accanto all‘uscita del
cavo del trasformatore. ⑦ Aprire l‘alloggiamento del fusi-
bile mediante un cacciavite (con 1/4 di rotazione in senso
anti-orario). Quindi, rimuovere e sostituire il vecchio fusi-
bile.
Aprire il rosone
Per aprire il rosone, inserire un cacciavite nell‘apertura
della copertura e spingere il dentello verso l‘interno.
Contemporaneamente staccare la copertura girandola
verso sinistra fino all‘arresto. ⑥
22
Italiano

④
⑥
⑤
11
12
9
10
10
Ø 6 mm
10 cm
„click“
13
1
1
8
2
2
3
64
5
7
①
②
③
17
14
15 16
2524

A
B
26 27
⑦

Ingo Maurer GmbH
Kaiserstrasse 47
80801 München
Germany
T. +49. 89. 381606-0
F. +49. 89. 381606 20
www.ingo-maurer.com
September 2021 Made in Germany
-
 1
1
-
 2
2
-
 3
3
-
 4
4
-
 5
5
-
 6
6
-
 7
7
-
 8
8
-
 9
9
-
 10
10
-
 11
11
-
 12
12
-
 13
13
-
 14
14
-
 15
15


Ingo Maurer Birds Birds Birds Bedienungsanleitung
- Typ
- Bedienungsanleitung
in anderen Sprachen
Verwandte Artikel
-
Ingo Maurer Birds Birds Birds Halogen Bedienungsanleitung
-
-
-
-
-
-
-
-
-
