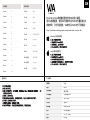
EPOMAKER Alice Benutzerhandbuch
- Kategorie
- Tastaturen
- Typ
- Benutzerhandbuch

QUICK S T A R T GUIDEEN
Manufacturer: Shenzhen Changyun Technology Co., Ltd.
Address: Seventh Floor, Kai Daer Building, No.168 Tongsha Road,
Xili Street, Nanshan Disctrict, Shenzhen,Guangdong, CN
Email: support@epomaker.com
Web: www.epomaker.com
Made in China
Should you require more assistance please email us at support@epomaker.com
Alice QMK/VIA Gasket-mounted Hot-swappable
Acrylic Wired Mechanical Keyboard
RoHS
COMPLIANT
Created by Heipi
from the Noun Project
Created by Loren Klein
from the Noun Project
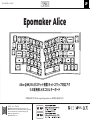
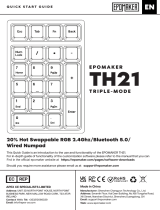
Epomaker Alice
F2
F1
CTRL
F3
ESC
FN

EN
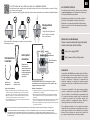
To be able to customize your key layouts, RGB, macros,
and other functions in your Epomaker Alice you can use the
VIA Software with the use of a JSON File.
1. Unzip the file to find the .exe and .json files.
2. Install the .exe file in your computer.
3. Run the VIA software once installed.
4. Import the JSON file to be able to edit the Epomaker Alice settings inside VIA.
Instructions to install on Windows:
1. Unzip the file to find the .exe and .json files.
2. Unpack the .dmg file
3. Drag the VIA software to your applications folder to install it.
4. Authorize the VIA software in: System Preferences > Security & Privacy.
Instructions to install on macOS:
Download the Software at: https://epomaker.com/blogs/qmk-via/epomaker-alice-via-json-file
1. Unplug the cable of the keyboard.
2. Press the ESC and hold it.
3. Plug in the cable to connect the computer and keyboard, do NOT release the ESC key until the
cable is plugged into both computer and the keyboard.
4. Release the ESC key
5. Wait until the computer completes the setup for USB, now the keyboard won’t respond to the
key pressing, and a window of USB folder might pop up on the screen.
6. Eject the USB from the computer.
7. Re-plug the cable to connect the keyboard with the computer.
8. Wait a few seconds until the backlights are on.
FACTORY RESET
STRUCTURE: Gasket-mount
STABILIZERTYPE: Plate-mounted
PCBTYPE: 3/5-pin Hotswap PCB
KEYSAMOUNT: 69Keys
ANTI-GHOSTKEY: NKRO
COMPATIBILITY: WINDOWS/MAC
CONNECTIVITY: Type-CWired
SOFTWARE: VIA/QMK Compatible
DIMENSION: 327*170*30mm
WEIGHT: Around0.8kg
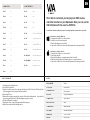
SPECS
LIGHT EFFECTS
Fn + S
Hue +
Fn + D
Hue -
Fn + F
Sat +
Fn + G
Sat -
Fn + Z
Turn On/Off Backlights
Fn + X
Toggle RGB Effects +
Fn + C
Toggle RGB Effects -
Fn + V
Backlight Brightness +
Fn + B (Left)
Backlight Brightness -
Fn + B (Right)
Backlights Speed +
Fn + N
Backlights Speed -
1. Unzip the file to find the .exe and .json files.
2. Install the .exe file in your computer.
3. Run the VIA software once installed.
4. Import the JSON file to be able to edit the Mini Cat 64 settings inside VIA.
1. Unzip the file to find the .exe and .json files.
2. Unpack the .dmg file
3. Drag the VIA software to your applications folder to install it.
4. Authorize the VIA software in: System Preferences > Security & Privacy.
5. Import the JSON file to be able to edit the Mini Cat 64 settings inside VIA.
5. Import the JSON file to be able to edit the Epomaker Alice settings inside VIA.
Fn + 1
F1
Fn + 2
F2
Fn + 3
F3
Fn + 4
F4
Fn + 5
F5
Fn + 6
F6
Fn + 7
F7
Fn + 8
F8
Fn + 9
F9
Fn + 0
F10
Fn + -
F11
Fn + =
F12
SHORTCUTS

TECHNICAL ASSISTANCE
REPLACING KEY C APS A N D S W I T C HES
For technical assistance, please email to
support@epomaker.com with your purchase order number and
a detailed description of your issue.
We normally respond to enquiries within 24 hours. If you
purchased your keyboard from a distributor or not from any
official store of Epomaker, please contact them directly for any
additional help.
WARRANTY
EPOMAKER’s Warranty covers any factory defects that might
affect the proper functionality of your purchase. It doesn’t
cover any damage that may occur from normal wear and tear.
If your product is defective we will send you a replacement
unit. Replacement units might require you to send the
defective unit back to Epomaker.
We provide a 1 year warranty for our products when bought
from our website (EPOMAKER.com). Your item will not be
covered by your 1 year warranty if the inspection shows any
sign of modification or changes unsupported by the original
product, these include: Changing internal components,
Assembling and reassembling the product, Replacing
Batteries, etc.
We will ONLY cover the item if it is bought from our official
stores. You do not have a warranty with us if you bought the
item from another reseller or likewise. Please contact the store
that you bought your product from to resolve issues.
COMMUNITY FORUMS
https://discord.gg/2q3Z7C2
Join our community and learn together with
other keyboard enthusiasts.
EN
Logo
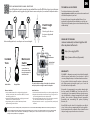
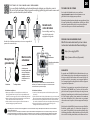
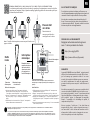
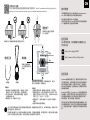
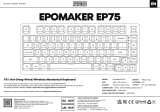
Switch Shaft
The Switch Puller tool aligns Vertically to the Switch to
unclip the plastic securing the switch to the plate.
Example of a switch
as seen from top
after you remove the
keycap to prepare for
switch removal.
Mechanical
Switch
Switch Puller Keycap Puller
For a full guide on how to remove keycaps and switches scan the QR Code or type in your browser:
https://epomaker.com/blogs/guides/diy-guide-how-to-remove-and-replace-your-mechanical-keyboard-switches
Included
Tools
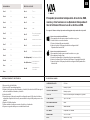
1. Grab your Switch Removal Tool and align the gripping teeth
vertically (on the Y-Axis) at the center of the switch, as shown in
the example graphic above.
2. Grab the switch with the Switch Puller and apply pressure until
the switch releases itself from the plate.
3. Using firm but gentle force pull the switch away from the
keyboard using a vertical motion.
Remove Switches
1. Check that all the switch metallic pins are perfectly straight and clean.
2. Align the switch vertically to have the Gateron logo facing north. The
pins should align themselves to the keyboard PBC.
3. Press the switch down until you hear a click. This means your switch
clips have attached themselves to the keyboard plate.
4. Inspect the switch to ensure it’s properly attached to your keyboard,
and test it.
Install Switches
Note: If the key doesn’t work its possible you may have bent one of the switches while installing it. Pull the switch out and repeat the process.
Pins may be damaged beyond repair and need replacement if this process is not done correctly. Never apply excessive force when replacing
keycaps or switches. If you cannot remove or install keycaps or switches please contact customer service as soon as possible to avoid
damage to the keyboard due to operating errors.
Please be gentle. Be sure
the pins are aligned with
the slots.
Before installing switches, be sure the pins are clean and straight.
Push Straight
Down
https://www.reddit.com/r/Epomaker/
EPOMAKER

Q U ICK - S T A R T ANLEITUN G DE
Manufacturer: Shenzhen Changyun Technology Co., Ltd.
Address: Seventh Floor, Kai Daer Building, No.168 Tongsha Road,
Xili Street, Nanshan Disctrict, Shenzhen,Guangdong, CN
Email: support@epomaker.com
Web: www.epomaker.com
Made in China
Sollten Sie weitere Hilfe benötigen, senden Sie uns bitte eine E-Mail an support@epomaker.com.
RoHS
COMPLIANT
Created by Heipi
from the Noun Project
Created by Loren Klein
from the Noun Project
Alice QMK/VIA Dichtung montiert Hot-swappable
Verkabelte mechanische Acryl-Tastatur
Epomaker Alice
F2
F1
CTRL
F3
ESC
FN

DE
Um Ihre Tastenlayouts, RGB, Makros und andere Funk -
tionen in Ihrem Epomaker Alice anzupassen, können Sie die
VIA Software mit Hilfe einer JSON-Datei verwenden.
1. Entpacken Sie die Datei, um die .exe- und .json-Dateien zu finden.
2. Installieren Sie die .exe-Datei auf Ihrem Computer.
3. Führen Sie die VIA-Software nach der Installation aus.
4. Importieren Sie die JSON-Datei, um die Einstellungen des Epomaker Alice in
VIA bearbeiten zu können.
Anweisungen zur Installation unter Windows:
1. Entpacken Sie die Datei, um die .exe- und .json-Dateien zu finden.
2. Entpacken Sie die .dmg-Datei
3. Ziehen Sie die VIA-Software in Ihren Anwendungsordner, um sie zu installieren.
4. Autorisieren Sie die VIA-Software in: Systemeinstellungen > Sicherheit und Datenschutz.
Anweisungen zur Installation unter macOS:
Laden Sie die Software herunter unter:
https://epomaker.com/blogs/qmk-via/epomaker-alice-via-json-file
1. Ziehen Sie das Kabel der Tastatur ab.
2. Drücken Sie die ESC-Taste und halten Sie sie gedrückt.
3. Stecken Sie das Kabel ein, um den Computer und die Tastatur zu verbinden, lassen Sie die
ESC-Taste NICHT los, bis das Kabel sowohl am Computer als auch an der Tastatur eingesteckt
ist.
4. Lassen Sie die ESC-Taste los.
5. Warten Sie, bis der Computer die USB-Einrichtung abgeschlossen hat. Jetzt reagiert die
Tastatur nicht mehr auf Tastendruck, und auf dem Bildschirm wird möglicherweise ein Fenster
mit einem USB-Ordner angezeigt.
6. Ziehen Sie das USB-Kabel aus dem Computer.
7. Stecken Sie das Kabel erneut ein, um die Tastatur mit dem Computer zu verbinden.
WERKSRÜCKSTELLUNG
5. Importieren Sie die JSON-Datei, um die Epomaker Alice-Einstellungen
in VIA bearbeiten zu
STRUKTUR: Dichtungsmontage
STABILISATOR-TYP: Plattenmontiert
PCB-TYP: 3/5-Pin Hotswap PCB
SCHLÜSSEL AMOUNT: 69Tasten
ANTI-GHOST-SCHLÜSSEL: NKRO
KOMPATIBILITÄT: WINDOWS/MAC
VERBINDLICHKEIT: Typ-C verkabelt
SOFTWARE: VIA/QMK-kompatibel
ABMESSUNG: 327*170*30mm
GEWICHT: Etwa 0,8 kg
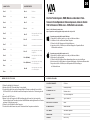
SPEZIFIKATIONEN
Fn + S
Farbton +
Fn + D
Farbton -
Fn + F
Sa +
Fn + G
Sa +
Fn + Z
Hintergrundbeleuchtung
ein-/ausschalten
Fn + X
RGB-Effekte umschalten +
Fn + C
RGB-Effekte umschalten -
Fn + V
Hintergrundbeleuchtung
Helligkeit +
Fn + B (Links)
Hintergrundbeleuchtung
Helligkeit -
Fn + B (Rechts)
Hintergrundbeleuchtung
Geschwindigkeit +
Fn + N
Hintergrundbeleuchtung
Geschwindigkeit -
LICHTEFFEKTE
Fn + 1
F1
Fn + 2
F2
Fn + 3
F3
Fn + 4
F4
Fn + 5
F5
Fn + 6
F6
Fn + 7
F7
Fn + 8
F8
Fn + 9
F9
Fn + 0
F10
Fn + -
F11
Fn + =
F12
SHORTCUTS

TECHNISCHE BIJSTAND
T O E T S KAP J E S E N S C H AKELAARS V E R V ANGEN
Voor technische bijstand stuurt u een e-mail naar
support@epomaker.com met uw bestelnummer en een
gedetailleerde beschrijving van uw probleem.
Normaal gesproken beantwoorden wij uw vragen binnen 24 uur.
Als u uw toetsenbord bij een distributeur of niet bij een officiële
winkel van Epomaker hebt gekocht, neem dan rechtstreeks
contact met hen op voor eventuele aanvullende hulp.
GARANTIE
De garantie van EPOMAKER dekt alle fabrieksfouten die van
invloed kunnen zijn op de goede werking van uw aankoop. Het
dekt geen schade die kan ontstaan door normale slijtage. Als
uw product defect is, sturen wij u een vervangend apparaat.
Voor vervanging kan het nodig zijn dat u het defecte apparaat
terugstuurt naar Epomaker.
Wij bieden 1 jaar garantie op onze producten bij aankoop via
onze website (EPOMAKER.com). Uw item zal niet worden
gedekt door uw 1 jaar garantie als de inspectie enig teken van
wijziging of veranderingen toont die niet worden ondersteund
door het originele product, deze omvatten: Het veranderen
van interne onderdelen, Het in elkaar zetten en opnieuw in
elkaar zetten van het product, Het vervangen van Batterijen,
enz.
Wir decken den Artikel NUR ab, wenn er in unseren offiziellen
Geschäften gekauft wurde. Sie haben keine Garantie bei
uns, wenn Sie den Artikel bei einem anderen Händler oder
ähnlichem gekauft haben. Bitte kontaktieren Sie das Geschäft,
in dem Sie Ihr Produkt gekauft haben, um Probleme zu lösen.
FORUMS VAN DE GEMEENSCHAP
https://discord.gg/2q3Z7C2
Word lid van onze community en leer samen
met andere toetsenbordenthousiastelingen.
DE
Logo
Schacht van schakelaar
Het gereedschap voor het uittrekken van schakelaars richt zich
verticaal op de schakelaar om het plastic los te maken waarmee
de schakelaar aan de plaat is bevestigd.
Voorbeeld van een
schakelaar van
bovenaf gezien nadat
u de toetskap hebt
verwijderd om het
verwijderen van de
schakelaar voor te
bereiden.
Mechanische
schakelaar
Schakelaar Toetskap trekker
Voor een volledige handleiding over het verwijderen van toetskapjes en schakelaars, scan de
QR-code of typ in uw browser: https://epomaker.com/blogs/guides/diy-guide-how-to-remove-and-
replace-your-mechanical-keyboard-switches
Meegeleverd
gereedschap
1. Pak uw gereedschap voor het verwijderen van schakelaars en
lijn de grijptanden verticaal (op de Y-as) uit op het midden van de
schakelaar, zoals weergegeven in de voorbeeldafbeelding hierboven.
2. Pak de schakelaar vast met de schakelaartrekker en oefen druk uit
tot de schakelaar zichzelf losmaakt van de plaat
3. Trek de schakelaar met een stevige maar zachte kracht met een
verticale beweging weg van het toetsenbord.
Schakelaars verwijderen
1. Controleer of alle metalen pennen van de schakelaar perfect recht en
schoon zijn.
2. Lijn de schakelaar verticaal uit, zodat het Gateron-logo naar het noorden
wijst. De pinnen moeten uitgelijnd zijn met de PBC van het toetsenbord.
3. Druk de schakelaar omlaag totdat u een klik hoort. Dit betekent dat de
clips van de schakelaar zich aan de toetsenbordplaat hebben bevestigd.
4. Inspecteer de schakelaar om er zeker van te zijn dat hij goed is
bevestigd aan uw toetsenbord, en test hem
Schakelaars installeren
Opmerking: Als de toets niet werkt, is het mogelijk dat u een van de schakelaars verbogen hebt tijdens de installatie ervan. Trek de schakelaar
eruit en herhaal het proces
Als dit proces niet correct wordt uitgevoerd, kunnen de pennen onherstelbaar beschadigd raken en moeten ze worden vervangen. Oefen nooit
overmatige kracht uit bij het vervangen van toetskapjes of schakelaars. Als u de toetskapjes of schakelaars niet kunt verwijderen of installeren,
neem dan zo snel mogelijk contact op met de klantenservice om schade aan het toetsenbord als gevolg van bedieningsfouten te voorkomen.
Ga voorzichtig te werk. Zorg
ervoor dat de pinnen zijn
uitgelijnd met de gleuven.
Voordat u de schakelaars monteert, moet u ervoor zorgen dat de
pennen schoon en recht zijn.
Gerade nach
unten drücken
https://www.reddit.com/r/Epomaker/
EPOMAKER

GUÍA DE INICIO RÁPIDOES
Manufacturer: Shenzhen Changyun Technology Co., Ltd.
Address: Seventh Floor, Kai Daer Building, No.168 Tongsha Road,
Xili Street, Nanshan Disctrict, Shenzhen,Guangdong, CN
Email: support@epomaker.com
Web: www.epomaker.com
Made in China
Si necesita más ayuda, envíenos un correo electrónico a support@epomaker.com
RoHS
COMPLIANT
Created by Heipi
from the Noun Project
Created by Loren Klein
from the Noun Project
Alice QMK/VIA con junta intercambiable en caliente
Teclado mecánico con cable acrílico
Epomaker Alice
F2
F1
CTRL
F3
ESC
FN

ES
Para poder personalizar la disposición de las teclas, RGB,
macros y otras funciones en su Epomaker Alice puede uti-
lizar el Software VIA con el uso de un Archivo JSON.
1. Descomprima el archivo para encontrar los archivos .exe y .json.
2. Instale el archivo .exe en su ordenador.
3. Ejecute el software VIA una vez instalado.
4. Importe el archivo JSON para poder editar la configuración del
Epomaker Alice dentro de VIA.
Instrucciones para instalar en Windows:
1. Descomprimir el archivo para encontrar los archivos .exe y .json.
2. Descomprimir el archivo .dmg
3. Arrastre el software VIA a su carpeta de aplicaciones para instalarlo.
4. Autorice el software VIA en: Preferencias del Sistema > Seguridad y Privacidad.
Instrucciones para instalar en macOS:
Descargue el Software en: https://epomaker.com/blogs/qmk-via/epomaker-alice-via-json-file
1. Desconecte el cable del teclado.
2. Pulse la tecla ESC y manténgala pulsada.
3. Enchufe el cable para conectar el ordenador y el teclado, NO suelte la tecla ESC hasta que el
cable esté enchufado al ordenador y al teclado.
4. Suelte la tecla ESC
5. Espere hasta que el ordenador complete la configuración para el USB, ahora el teclado no
responderá a la pulsación de la tecla, y una ventana de la carpeta USB puede aparecer en la
pantalla.
6. Expulse el USB del ordenador.
7. Vuelva a enchufar el cable para conectar el teclado con el ordenador.
8. Espere unos segundos hasta que se encienda la luz de fondo.
RESTABLECIMIENTO DE FÁBRICA
1. Descomprima el archivo para encontrar los archivos .exe y .json.
2. Instale el archivo .exe en su ordenador.
3. Ejecute el software VIA una vez instalado.
4. Importe el archivo JSON para poder editar la configuración del Mini Cat 64 dentro de VIA.
1. Descomprimir el archivo para encontrar los archivos .exe y .json.
2. Descomprimir el archivo .dmg
3. Arrastre el software VIA a su carpeta de aplicaciones para instalarlo.
4. Autorice el software VIA en: Preferencias del Sistema > Seguridad y Privacidad.
5. Importe el archivo JSON para poder editar la configuración del Mini Cat 64 dentro de VIA.
5. Importe el archivo JSON para poder editar la configuración del Epomaker Alice
dentro de VIA.
ESTRUCTURA: Montaje con junta
TIPO DE ESTABILIZADOR: Montaje en placa
TIPO PCB: Placa de circuito impreso Hotswap de 3/5 patillas
CANTIDAD DE LLAVES: 69Teclas
LLAVE ANTIFANTASMA: NKRO
COMPATIBILIDAD: WINDOWS/MAC
CONECTIVIDAD: Tipo C con cable
SOFTWARE: Compatible con VIA/QMK
DIMENSIONES: 327*170*30mm
PESO: Alrededor de 0,8 kg
ESPECIFICACIONES
EFECTOS DE LUZ
Fn + S
Tono +
Fn + D
Tono -
Fn + F
Sáb +
Fn + G
Sáb -
Fn + Z
Encender y apagar la
retroiluminación
Fn + X
Alternar efectos RGB +
Fn + C
Alternar efectos RGB -
Fn + V
Retroiluminación Brillo +
Fn + B (Izquierda)
Retroiluminación Brillo -
Fn + B (Derecha)
Retroiluminación
Velocidad +
Fn + N
Retroiluminación
Velocidad -
Fn + 1
F1
Fn + 2
F2
Fn + 3
F3
Fn + 4
F4
Fn + 5
F5
Fn + 6
F6
Fn + 7
F7
Fn + 8
F8
Fn + 9
F9
Fn + 0
F10
Fn + -
F11
Fn + =
F12
ESCAPADAS

ASISTENCIA TÉCNICA
S U S TITUCIÓN D E L A S T E C L A S Y D E L O S I N T E R R UPTORE S
Para obtener asistencia técnica, envíe un correo electrónico
a support@epomaker.com con su número de pedido y una
descripción detallada de su problema.
Normalmente respondemos a las consultas en un plazo
de 24 horas. Si ha adquirido su teclado a través de un
distribuidor o no en ninguna tienda oficial de Epomaker,
póngase en contacto con ellos directamente para cualquier
ayuda adicional.
GARANTÍA
La garantía de EPOMAKER cubre cualquier defecto de fábrica
que pueda afectar al correcto funcionamiento de su compra.
No cubre ningún daño que pueda ocurrir por el desgaste
normal. Si su producto es defectuoso, le enviaremos una
unidad de reemplazo. Las unidades de reemplazo pueden
requerir que usted envíe la unidad defectuosa de vuelta a
Epomaker.
Ofrecemos una garantía de 1 año para nuestros productos
cuando se compran en nuestra página web (EPOMAKER.
com). Su artículo no estará cubierto por su garantía de 1 año
si la inspección muestra cualquier signo de modificación
o cambios no soportados por el producto original, estos
incluyen: Cambio de componentes internos, Montaje y
remontaje del producto, Sustitución de baterías, etc.
Sólo cubriremos el artículo si se ha comprado en nuestras
tiendas oficiales. Usted no tiene una garantía con nosotros si
usted compró el artículo de otro revendedor o de la misma
manera. Por favor, póngase en contacto con la tienda en la
que compró el producto para resolver los problemas.
FOROS DE LA COMUNIDAD
https://discord.gg/2q3Z7C2
Únase a nuestra comunidad y aprenda junto
a otros entusiastas de los teclados.
ES
Logo
Eje del interruptor
La herramienta de extracción de interruptores se alinea
verticalmente con el interruptor para soltar el plástico que
asegura el interruptor a la placa.
Ejemplo de un
interruptor visto
desde arriba después
de quitar la tapa del
teclado para preparar
la extracción del
interruptor.
Interruptor
mecánico
Extractor de
interruptores
Extractor de
tapas de teclas
Para obtener una guía completa sobre cómo quitar las tapas de las teclas y los interruptores, escanee el código
QR o escriba en su navegador:
https://epomaker.com/blogs/guides/diy-guide-how-to-remove-and-replace-your-mechanical-keyboard-switches
Herramientas
incluidas
1. Agarre su herramienta de extracción de interruptores y alinee
los dientes de agarre verticalmente (en el eje Y) en el centro del
interruptor, como se muestra en el gráfico de ejemplo anterior.
2. Agarre el interruptor con el extractor de interruptores y aplique
presión hasta que el interruptor se libere de la placa
3. Con una fuerza firme pero suave, separe el interruptor del teclado
con un movimiento vertical.
Quitar los interruptores
1. Compruebe que todos los pasadores metálicos del interruptor están
perfectamente rectos y limpios.
2. Alinee el interruptor verticalmente para que el logotipo de Gateron
esté orientado hacia el norte. Los pines deben alinearse con el PBC
del teclado.
3. Presione el interruptor hacia abajo hasta que oiga un clic. Esto significa
que los clips del interruptor se han unido a la placa del teclado.
4. Inspeccione el interruptor para asegurarse de que está bien conectado
a su teclado, y pruébelo.
Instalar los interruptores
Nota: Si la tecla no funciona es posible que haya doblado uno de los interruptores al instalarlo. Saque el interruptor y repita el proceso
Las clavijas pueden dañarse de forma irreparable y necesitar ser reemplazadas si este proceso no se realiza correctamente. No aplique
nunca una fuerza excesiva al sustituir las tapas de las teclas o los interruptores. Si no puede retirar o instalar las tapas de las teclas o los
interruptores, póngase en contacto con el servicio de atención al cliente lo antes posible para evitar que el teclado sufra daños debido a errores
de funcionamiento.
Tenga cuidado. Asegúrese de
que las clavijas estén alinea-
das con las ranuras.
Antes de instalar los interruptores, asegúrese de que las clavijas
estén limpias y rectas.
Empuje hacia
abajo.
Importe el archivo JSON para poder editar la configuración del Mini Cat 64 dentro de VIA.
Importe el archivo JSON para poder editar la configuración del Mini Cat 64 dentro de VIA.
https://www.reddit.com/r/Epomaker/
EPOMAKER

GUIDE DE DÉMARRAGE RAPIDEFR
Manufacturer: Shenzhen Changyun Technology Co., Ltd.
Address: Seventh Floor, Kai Daer Building, No.168 Tongsha Road,
Xili Street, Nanshan Disctrict, Shenzhen,Guangdong, CN
Email: support@epomaker.com
Web: www.epomaker.com
Made in China
Si vous avez besoin d’une assistance supplémentaire, veuillez nous envoyer un e-mail à support@epomaker.com.
RoHS
COMPLIANT
Created by Heipi
from the Noun Project
Created by Loren Klein
from the Noun Project
Alice QMK/VIA Joint d'étanchéité monté et remplaçable à chaud
Clavier mécanique filaire en acrylique
Epomaker Alice
F2
F1
CTRL
F3
ESC
FN

FR
Pour pouvoir personnaliser la disposition des touches, le
RGB, les macros et d’autres fonctions de votre Epomaker
Alice, vous pouvez utiliser le logiciel VIA à l’aide d’un fichier
JSON.
1. Dézippez le fichier pour trouver les fichiers .exe et .json.
2. Installez le fichier .exe sur votre ordinateur.
3. Exécutez le logiciel VIA une fois installé.
4. Importez le fichier JSON pour pouvoir modifier les paramètres du
Epomaker Alice dans VIA.
Instructions pour l’installation sous Windows :
1. Dézippez le fichier pour trouver les fichiers .exe et .json.
2. Décompressez le fichier .dmg
3. Faites glisser le logiciel VIA dans votre dossier d’applications pour l’installer.
4. Autorisez le logiciel VIA dans : Préférences système > Sécurité et confidentialité.
Instructions pour l’installation sur macOS :
Téléchargez le logiciel à l’adresse suivante :
https://epomaker.com/blogs/qmk-via/epomaker-alice-via-json-file
1. Débranchez le câble du clavier.
2. Appuyez sur la touche ESC et maintenez-la enfoncée.
3. Branchez le câble pour connecter l’ordinateur et le clavier, ne relâchez PAS la touche ESC tant
que le câble n’est pas branché à la fois à l’ordinateur et au clavier.
4. Relâchez la touche ESC
5. Attendez que l’ordinateur termine l’installation de l’USB, maintenant le clavier ne répondra pas
à la pression des touches, et une fenêtre de dossier USB peut apparaître à l’écran.
6. Ejectez l’USB de l’ordinateur.
7. Rebranchez le câble pour connecter le clavier à l’ordinateur.
8. Attendez quelques secondes jusqu’à ce que le rétro-éclairage s’allume.
9. Traduit avec www.DeepL.com/Translator (version gratuite
RÉINITIALISATION D’USINE
5. Importez le fichier JSON pour pouvoir modifier les paramètres du
Epomaker Alice dans VIA.
STRUCTURE : Montage sur joint d'étanchéité
TYPE DE STABILISATEUR : Monté sur plaque
PCB TYPE : PCB 3/5 broches Hotswap
KEYS AMOUNT : 69Keys
CLÉ ANTI-FANTÔMES : NKRO
COMPATIBILITÉ : WINDOWS/MAC
CONNECTIVITÉ : Type-C filaire
LOGICIEL : Compatible VIA/QMK
DIMENSION : 327*170*30mm
POIDS : Environ 0,8 kg
SPECS
EFFETS DE LUMIÈRE
Fn + S
Hue +
Fn + D
Hue -
Fn + F
sam +
Fn + G
sam -
Fn + Z
Allumer/éteindre les
rétro-éclairages
Fn + X
Basculer les effets RGB +
Fn + C
Basculer les effets RGB -
Fn + V
Rétro-éclairage
Luminosité +
Fn + B (Gauche)
Rétro-éclairage
Luminosité -
Fn + B (Droit)
Rétroéclairage Vitesse +
Fn + N
Rétroéclairage Vitesse -
Fn + 1
F1
Fn + 2
F2
Fn + 3
F3
Fn + 4
F4
Fn + 5
F5
Fn + 6
F6
Fn + 7
F7
Fn + 8
F8
Fn + 9
F9
Fn + 0
F10
Fn + -
F11
Fn + =
F12
SHORTCUTS

ASSISTANCE TECHNIQUE
REMPLACEMENT D E S C APUCHONS D E T OUCHES E T D E S I N TERR U PTEU R S
Pour obtenir une assistance technique, veuillez envoyer un
courriel à support@epomaker.com en indiquant votre numéro de
commande et une description détaillée de votre problème.
Nous répondons normalement aux demandes dans les 24
heures. Si vous avez acheté votre clavier chez un distributeur
ou dans un magasin officiel d’Epomaker, veuillez les contacter
directement pour toute aide supplémentaire.
GARANTIE
La garantie EPOMAKER couvre tout défaut d’usine qui pourrait
affecter le bon fonctionnement de votre achat. Elle ne couvre
pas les dommages qui pourraient résulter d’une usure
normale. Si votre produit est défectueux, nous vous enverrons
une unité de remplacement. Les unités de remplacement
peuvent nécessiter que vous renvoyiez l’unité défectueuse à
Epomaker.
Nous offrons une garantie d’un an pour nos produits achetés
sur notre site Internet (EPOMAKER.com). Votre article ne sera
pas couvert par la garantie d’un an si l’inspection montre tout
signe de modification ou de changement non pris en charge
par le produit d’origine : Le changement de composants
internes, l’assemblage et le réassemblage du produit, le
remplacement des piles, etc.
Nous ne couvrirons l’article que s’il est acheté dans nos
magasins officiels. Vous n’avez pas de garantie avec nous si
vous avez acheté l’article chez un autre revendeur ou de la
même manière. Veuillez contacter le magasin où vous avez
acheté votre produit pour résoudre les problèmes.
FORUMS DE LA COMMUNAUTÉ
https://discord.gg/2q3Z7C2
Rejoignez notre communauté et apprenez
avec d’autres passionnés de claviers.
FR
Logo
Arbre de l’interrupteur
L’outil d’extraction de l’interrupteur s’aligne verticalement sur
l’interrupteur pour déclipser le plastique qui fixe l’interrupteur à
la plaque.
Exemple d’un inter-
rupteur vu du dessus
après avoir retiré le
capuchon du clavier
pour préparer le re-
trait de l’interrupteur.
Interrupteur
mécanique
Extracteur
d’interrupteur
Extracteur de capu-
chon de touche
Pour obtenir un guide complet sur la façon de retirer les capuchons et les interrupteurs, scannez le code QR ou
tapez dans votre navigateur : https://epomaker.com/blogs/guides/diy-guide-how-to-remove-and-replace-your-
mechanical-keyboard-switches.
Outils
inclus
1. Saisissez votre outil de retrait d’interrupteur et alignez les
dents de préhension verticalement (sur l’axe Y) au centre de
l’interrupteur, comme indiqué dans l’exemple graphique ci-dessus.
2. Saisissez l’interrupteur avec l’extracteur d’interrupteur et exercez
une pression jusqu’à ce que l’interrupteur se détache de la
plaque.
3. En utilisant une force ferme mais douce, éloignez l’interrupteur du
clavier en effectuant un mouvement vertical.
Retirer les interrupteurs
1. Vérifiez que toutes les broches métalliques de l’interrupteur sont
parfaitement droites et propres.
2. Alignez l’interrupteur verticalement pour que le logo Gateron soit
orienté vers le nord. Les broches doivent s’aligner sur le PBC du clavier.
3. Appuyez sur le commutateur jusqu’à ce que vous entendiez un clic.
Cela signifie que les clips de l’interrupteur se sont fixés à la plaque du
clavier.
4. Inspectez le commutateur pour vous assurer qu’il est correctement fixé
à votre clavier, et testez-le.
Install Switches
Remarque : si la touche ne fonctionne pas, il est possible que vous ayez plié l’un des commutateurs lors de son installation. Retirez
l’interrupteur et répétez le processus.
Si ce processus n’est pas effectué correctement, les broches peuvent être endommagées au point d’être irréparables et doivent être
remplacées. N’appliquez jamais une force excessive lorsque vous remplacez des capuchons de touches ou des commutateurs. Si vous ne
pouvez pas retirer ou installer les capuchons de touches ou les commutateurs, veuillez contacter le service clientèle dès que possible afin
d’éviter d’endommager le clavier en raison d’erreurs de manipulation.
Faites attention. As-
surez-vous que les broches
sont alignées avec les fentes.
Avant d’installer les interrupteurs, assurez-vous que les broches sont
propres et droites.
Pousser droit
vers le bas
https://www.reddit.com/r/Epomaker/
EPOMAKER

ク イ ッ ク ス タ ー ト ガ イ ド JP
Manufacturer: Shenzhen Changyun Technology Co., Ltd.
Address: Seventh Floor, Kai Daer Building, No.168 Tongsha Road,
Xili Street, Nanshan Disctrict, Shenzhen,Guangdong, CN
Email: support@epomaker.com
Web: www.epomaker.com
メ イド イ ン チ ャ イ ナ
ご不明な点がございましたら、support@epomaker.com までお問い合わせください。
RoHS
COMPLIANT
Created by Heipi
from the Noun Project
Created by Loren Klein
from the Noun Project
Alice QMK/VIA ガスケット搭載 ホットスワップ対応 アク
リル製 有線 メカニカル キーボード
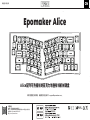
Epomaker Alice
F2
F1
CTRL
F3
ESC
FN

JP
Epomaker AliceメカニカルキーボードキットはVIAカスタマ
イズプログラミング可能です。ユーザーは自分のニーズにより、VIAオーペン
ソースソフトウェアとJSONファイルを利用してメカニカルキーボードキッ
トの配列、ライトとマクロカスタマイズすることができる。VIAソフトウェアと
JSONファイルのダウンロードリンクが下記にあり。
1. ダウンロード済みのZIPファイルを解凍する
2. サフィックスが.exeのファイルをインストールする
3. インストール完了されたら、VIAソフトウェアを実行する
4. JSONファイルを導入した後、カスタマイズができられる
Windowsバージョンのインストールチュートリアル
1. ダウンロード済みのZIPファイルを解凍する
2. サフィックスが.dmgのファイルをオーペンする
3. VIAソフトウェアをアプリケーションに移動してインストールする
4. システムセッティング>セフティーとプライバシー中で、VIAの使用を許可する
macOSバージョンのインストールチュートリアル
https://epomaker.com/blogs/qmk-via/epomaker-alice-via-json-file
1. キーボードのケーブルをパソコンから抜き出す
2. ESCキーを押してままする
3. ESCキーを押してままに、ケーブルをパソコンに差し込んでください。(ケーブルをパソコンに差し込む時
に、ESCキーも押してままの状態を確保ください)
4. 接続完了されたら、ESCキーを解放する
5. パソコンがUSB設定を自動的に完了するまで、キーボードがなんの変化がありませんとご了承くださ
い。パソコンにUSBファイル窓口が現れる。
6. パソコンにUSBデバイスをポップアップするボタンをクリックする
7. ケーブルを再度パソコンに差し込んでください。キーボードをパソコンと接続してください。
8. 数秒後に、キーボードのバックライトが再度と起動したらキーボードのリセットには成功しました。
キ ー ボ ー ド を リ セ ット す る
1. ダウンロード済みのZIPファイルを解凍する
2. サフィックスが.exeのファイルをインストールする
3. インストール完了されたら、VIAソフトウェアを実行する
4. JSONファイルを導入した後、カスタマイズができられる
1. ダウンロード済みのZIPファイルを解凍する
2. サフィックスが.dmgのファイルをオーペンする
3. VIAソフトウェアをアプリケーションに移動してインストールする
4. システムセッティング>セフティーとプライバシー中で、VIAの使用を許可する
5. JSONファイルを導入した後、カスタマイズができれる
5. JSONファイルを導入した後、カスタマイズができれる
構造: ガスケットマウント式
スタビライザータイプ: プレートマウント
PCBタイプ: 3/5ピンホットスワップPCB
キー数: 69キー
アンチゴーストキー: NKRO
互換性: WINDOWS/MAC
コネクティビティー: Type-C有線接続
ソフトウェア: VIA/QMK互換性
寸法: 327*170*30 mm
重量: 約0.8kg
スペック
ライトエフェクト
Fn + S
ヒュー+
Fn + D
ヒュー -
Fn + F
サチュレーション+
Fn + G
サチュレーション-
Fn + Z
バックライトのオン/オフ
Fn + X
ライト効果切り替え+
Fn + C
ライト効果切り替え-
Fn + V
バックライト輝度+
Fn + B (Left)
バックライト輝度-
Fn + B (Right)
バックライトスピード+
Fn + N
バックライトスピード-
Fn + 1
F1
Fn + 2
F2
Fn + 3
F3
Fn + 4
F4
Fn + 5
F5
Fn + 6
F6
Fn + 7
F7
Fn + 8
F8
Fn + 9
F9
Fn + 0
F10
Fn + -
F11
Fn + =
F12
快捷键

テクニカルアシスタンス
スイッチと キ ー キ ャップ を 交 換 す る
技術的なサポートについて、support@epomaker.com宛てにメール
で問い合わせてください。それと、メールの中に注文番号および問題の
詳細を添えてください。
問い合わせには24時間以内に対応できます。
EPOMAKERオフィシャル店舗以外の代理店舗から製品を購入すれ
ば、直接その代理店舗に連絡を取ってください。
保証について
EPOMAKERの保証には、工場より購入した製品がうまく使用で
きませんの状況に適用しています。この保証が正常に使用した製
品故障或いは摩損な状況に適用していませんとご注意ください。
購入した製品が初期不良品になれば、交換できますとご安心くだ
さい。新品を再送する前に、初期不良品を返送しなければならない
とご注意ください。
EPOMAKERはオフィシャル店舗(epomaker.com)から購入した
製品に一年の保証を提供します。オフィシャル認定されない改造/
調整/修復/改良した製品に保証および交換サービスを提供できま
せん。改良/修復/改造/調整の行為が製品中の部品を交換、勝手
に製品を分解とバッテリーを交換などが含まれていますが、その以
上の行為だけではありません。
弊社はオフィシャルサイト(epomaker.com)から販売した製品だ
けに保証と修理サービスを提供します。弊社オフィシャル店舗以外
の店舗から製品にアフターサービスを提供できませんとご注意く
ださい。その場合、なんの問題があれば、直接にその店舗に連絡を
取ってください。
コミュニティフォーラム
https://discord.gg/2q3Z7C2
私たちのコミュニティにようこそ、ほかのパソコン周辺機
器愛好家と一緒に学んで、経験をシェアしましょう。
JP
スイッチシャフト
スイッチのヒントと軸本体の上端と下端のスイッチに揃っていて、強力して
スイッチをインストールする
キーキャップが抜き出し
たら、イメージのような機
械軸が現われた
スイッチプーラー キーキャッププーラー
QRコードをスキャニング或いはウェブサイトを開くの方法で、キーキャップとスイッチを交換するの詳しい取
扱説明書をご覧ください。https://epomaker.com/blogs/guides/diy-guide-how-to-remove-and-
replace-your-mechanical-keyboard-switches
付属ツール
1. スイッチ引き抜き器をピックアップして、引き抜き器のヒントが垂直な状
態に入り、スイッチ本体の上と下の軸スイッチ(スイッチが軸の中心軸に
おいて、イメージの3の位置)に揃ってください。
2. 軸のスイッチを強力でクランプして、スイッチ引き抜き器と軸が垂直の状
態を保持して、スイッチ引き抜き器を軽くて上に引き出しなさい。
3. ピンセットを使用するように、軸をボードから引き出す。
スイッチを引き出す
1. 軸の底のピンがまっすぐ、曲がりなしと汚れられないと確保する
2. 軸本体がキットに垂直させて、ピンがキットPCBボードのジャックに揃えさ
せる。キーボードはライトの位置が下(LEDライトが南方向に置いて)にあ
り、Gateronマークが上(北の方向)にあります。逆にも同じです。
3. 軸を軽くて押した後、軸が正確に差し込めれば、小さいカタな音を聞こえ
できる。
4. 軸が正確的にインストールするかどうかを確認とチェックください。
スイッチをインストールする
メモ:軸を引き抜き過程に、軸のそこのピンが曲がていれば、キーボードのキーがうまく動作できません。その時に、軸本体を抜き出して、ピンを真っ直ぐの状
態に調整して、再びキットに差し込んでください。
軸を引き抜き過程に誤操作でピンが壊れると回復できませんの可能性がある。軸とキーキャップをインストールする時に、強力過ぎではないとご注意くださ
い。インストールする過程に暴力的に引き抜きません。インストールする途中でなんの問題があれば、ご遠慮せずに問い合わせてください。
ピンとキーボードのスロットが
揃っていることを確認済み、軽く
て押しなさい。
キースイッチをインストールする前に、キースイッチの底のピンが綺麗で、真
っ直ぐな状態を確保ください。
縦に押す
機械軸
https://www.reddit.com/r/Epomaker/
EPOMAKER

快速启动指南CN
制造商:深圳市畅韵科技有限公司
地址:广东省深圳市南山区西丽街道同沙路168号凯达尔大厦7楼
电子邮件: [email protected]
网址:www.epomaker.com
中国制造
如果您需要更多的帮助,请给我们发电子邮件:[email protected]。
RoHS
COMPLIANT
Created by Heipi
from the Noun Project
Created by Loren Klein
from the Noun Project
Alice配列可热插拔的亚克力堆叠有线机械键盘
Epomaker Alice
F2
F1
CTRL
F3
ESC
FN

CN
Epomaker Alice机械键盘套件支持VIA自定义编程,
您可以根据需要,使用VIA开源软件和JSON文件重新自定义
按键布局、灯光和创建宏。VIA软件及JSON文件下载链接:
Windows 版本安装教程
macOS版本安装教程
https://epomaker.com/blogs/qmk-via/epomaker-alice-via-json-file
重置键盘
结构: Gasket
卫星轴类型: 钢板卫星轴
PCB板类型: 3/5脚热插拔 PCB
按键数: 69键
无冲键: 全键无冲
系统兼容: WINDOWS/MAC
连接方式: Type-C 有线
软件 VIA/QMK兼容性
尺寸: 327*170*30 mm
重量: 约0.8kg
产品参数
Fn + 1
F1
Fn + 2
F2
Fn + 3
F3
Fn + 4
F4
Fn + 5
F5
Fn + 6
F6
Fn + 7
F7
Fn + 8
F8
Fn + 9
F9
Fn + 0
F10
Fn + -
F11
Fn + =
F12
快捷键 灯光效果
Fn + S
色相 +
Fn + D
色相 -
Fn + F
饱和度 +
Fn + G
饱和度 -
Fn + Z
开启/关闭背光灯
Fn + X
灯效切换 +
Fn + C
灯效切换 -
Fn + V
背光灯亮度 +
Fn + B (左)
背光灯亮度 -
Fn + B (右)
背光速度 +
Fn + N
背光速度 -

技术支持
更换轴与键帽
如您需要帮助或技术支持,请发送邮件至support@epomaker.
com。邮件中请提供您的订单号和问题的详细说明。
我们通常会在收到邮件后24小时内回复您。
如您的产品是从除了Epomaker官方店铺以外的其他经销商处购
买,请直接联系将产品出售给您的经销商。
Epomaker的保修政策适用于因工厂缺陷而导致您购买的产品无
法正常使用的情况。该保修政策不适用于任何因正常使用而引
发的产品故障或产品磨损。如您购买的产品有工厂制造缺陷,
我们会为您提供替换品。在提供替换品前,您需要将您持有的
故障品寄回给我们。
Epomaker为在官网上(epomaker.com)购买的键盘提供1年
的保修服务。未经官方授权的修改/修复/改造/调整过的产品无
法享有保修或退换服务,修改/修复/改造/调整包括并不限于:
更换内部配件、自行拆开或组装、更换电池等。
我们仅为在我们官方商店购买的商品提供售后保障服务。如您
从其他零售商处购买,则我们无法为您提供相应的售后保障服
务。当您遇到售后问题时,请直接联系将产品销售给您的零售
商。
社区论坛
https://discord.gg/2q3Z7C2
加入我们的社群,与其他机械外设爱好者一起
学习和分享。
CN
标志
轴心
请将拔键器的尖端对准轴体上下两端的轴体开关,用力夹
紧开关,像使用镊子一样将轴拔出。
将键盘上的键帽拔除
后,可看到如图所示的
机械轴。
机械轴
拔轴器 拔键器
扫描二维码或登录网址查看拔插键帽与轴的完整说明书。https://epomaker.com/blogs/guides/diy-
guide-how-to-remove-and-replace-your-mechanical-keyboard-switches
随附工具
1. 拿起拔轴器,将拔键器的尖端垂直,对准轴体上下两端
的轴体开关(开关位于轴体中轴线上,即图例中部位)。
2. 用力夹紧轴体开关,保持拔键器与轴体垂直,用适当的
力度将拔键器向上提。
3. 像使用镊子一样,将轴从板子上拔出。
拔除轴体
1. 检查轴体底部的插针,确保插针竖直无弯曲,干净无脏污。
2. 将轴体垂直于套件,让插针对准套件PCB板上的插孔。如果
键盘是下灯位键盘(LED灯位于正南),则此时Gateron的标
志应位于正上方(正北方)。反之亦然。
3. 将轴轻轻按下,当轴体正确插入时,您会听到一声轻轻的
咔哒声。
4. 检查并测试轴体是否安装稳妥。
安装轴体
注意:如果您在插拔轴体的过程中不慎将轴体底部插针弯曲,则键盘按键会无法正常工作。此时请将轴体拔出,将插针捋平并
还原为竖直状态,重新插入套件。
如在插拔过程中操作不当,则插针可能会被损坏且无法修复。在安装轴体和键帽时,请不要过度用力。安装过程中禁止使用暴
力插拔。如您安装过程中有任何疑问,请立即联系客服,避免因操作不当损毁产品。
请确认插针与键盘上的插槽对
齐后,轻轻按下。
在装轴之前,请确保轴底部的插针是笔直且干净的。
垂直按下
社区论坛
https://www.reddit.com/r/Epomaker/
EPOMAKER
-
 1
1
-
 2
2
-
 3
3
-
 4
4
-
 5
5
-
 6
6
-
 7
7
-
 8
8
-
 9
9
-
 10
10
-
 11
11
-
 12
12
-
 13
13
-
 14
14
-
 15
15
-
 16
16
-
 17
17
-
 18
18


EPOMAKER Alice Benutzerhandbuch
- Kategorie
- Tastaturen
- Typ
- Benutzerhandbuch
in anderen Sprachen
- English: EPOMAKER Alice User guide
- français: EPOMAKER Alice Mode d'emploi
- español: EPOMAKER Alice Guía del usuario
- Nederlands: EPOMAKER Alice Gebruikershandleiding
- 日本語: EPOMAKER Alice ユーザーガイド
Verwandte Papiere
-
EPOMAKER MINI CAT68 65 Benutzerhandbuch
-
 EPOMAKER PASTEL 64 Benutzerhandbuch
-
 EPOMAKER Mini Cat 69 Benutzerhandbuch
-
EPOMAKER Mini Cat64 Benutzerhandbuch
-
EPOMAKER EK98-1 VIA 1800 Benutzerhandbuch
-
EPOMAKER TH96 QMK Benutzerhandbuch
-
EPOMAKER TH96 Benutzerhandbuch
-
 EPOMAKER SKYLINE 75 Benutzerhandbuch
-
 EPOMAKER Th21 Triple-Mode Numpad Benutzerhandbuch
-
 EPOMAKER EP75 Benutzerhandbuch


