Costway HW70217 Benutzerhandbuch

Typ
Benutzerhandbuch
HW70217
If you're having difficulty, our friendly
customer team is always here to help.
THIS INSTRUCTION BOOKLET CONTAINS IMPORTANT SAFETY INFORMATION. PLEASE READ AND KEEP FOR FUTURE REFERENCE.
Building Block Table Set
Bausteintabelle
Table de Blocs de Construction
Mesa de Bloques de Construcción
Tavolino per Blocchi da Costruzione
Stolik do układania klocków
AUS:cs.au@costway.com
FRA:cs.fr@costway.com
DEU:cs.de@costway.com
ITA:cs.it@costway.com ESP:cs.es@costway.com
POL:sklep@costway.com
GBR:cs.uk@costway.com
DEU office: FDS GmbH, Neuer Höltigbaum 36, 22143 Hamburg, Deutschland
ITA office: Milano
FRA office: Saint Vigor d'Ymonville
POL office: GdańskGBR office: IpswichAUS office: TruganinaUSA office: Fontana
Allgemeine Warnhinweise
Before You Start Bevor Sie beginnen
Warnung: Kinder sollten diesen Artikel unter elterlicher Aufsicht benutzen.
Warnung: Halten Sie alle Kleinteile und Verpackungsmaterialien, die verschluckt werden
können, von Babys und Kindern fern.
Bitte sorgfältig lesen und zum späteren Nachschlagen aufbewahren.
WARNING:
CHOKING HAZARD
-Small parts.
Not for children under 3 years.
0-3
Please read all instructions carefully and keep it for future reference.
0-3
EN DE
Achtung:
ERSTICKUNGSGEFAHR
-Kleine Teile.
Nicht für Kinder unter 3 Jahren.
Der Artikel muss unter der Aufsicht eines Erwachsenen montiert und benutzt werden.
Lesen Sie jeden Schritt sorgfältig durch und befolgen Sie die richtige Reihenfolge.
Entfernen Sie alle Verpackungen, Überprüfen Sie, ob alle Teile und Zubehörteile
vorhanden sind.
Bitte stellen Sie sicher, dass alle Teile richtig montiert sind, eine falsche Montage kann zu
einer Gefahr führen.
Wir empfehlen, alle Teile möglichst in der Nähe des Aufstellungsortes zu montieren, um
unnötige Bewegungen nach der Montage zu vermeiden.
Achten Sie bei der Montage auf einen sicheren Untergrund und stellen Sie den Artikel
immer auf eine ebene, feste und stabile Fläche.
The product must be installed and used under the supervision of an adult.
Read through each step carefully and follow the proper order.
Remove all packaging, separate and count all parts and hardware.
Please ensure that all parts are correctly installed, incorrect installation can lead to a
danger.
We recommend that, where possible, all items are assembled near the area in which
they will be placed in use, to avoid moving the product unnecessarily once assembled.
Ensure a secure surface during installation, and place the product always on a flat,
steady and stable surface.
General Warnings
Attention: Children should use this product under the parental supervision.
Danger: Keep all small parts and packaging materials for this product away from babies
and children, otherwise they may pose a choking hazard.
Warning Warnung
02 03
Atención: Los niños deben utilizar este producto bajo la supervisión de sus padres.
Peligro: Mantenga todas las piezas pequeñas y los materiales de embalaje de este producto
fuera del alcance de los bebés y los niños, ya que de lo contrario pueden suponer un peligro
de asfixia.
Attention : Les enfants doivent utiliser ce produit sous la surveillance de leurs parents.
Danger : Gardez toutes les petites pièces et les matériaux d’emballage de ce produit hors
de la portée des bébés et des enfants pour éviter un risque d’étouffement.
Avant de Commencer
Veuillez lire attentivement toutes les instructions et les conserver pour la référence ultérieure.
Antes de Empezar
Lea atentamente todas las instrucciones y consérvelas para futuras consultas.
0-3
AVERTISSEMENT :
RISQUE D’ÉTOUFFEMENT
– Les petites pièces.
Ne convient pas aux enfants de
moins de 3 ans.
Le produit doit être installé et utilisé sous la surveillance d’un adulte.
Lisez attentivement chaque étape et suivez l’ordre correct.
Retirez tous les emballages, séparez et comptez toutes les pièces et le matériel.
Veuillez vous assurer que toutes les pièces soient correctement installées, une
installation incorrecte peut entraîner un danger.
Nous recommandons que, dans la mesure du possible, tous les articles soient
assemblés à proximité de la zone dans laquelle ils seront utilisés, afin d’éviter de
déplacer inutilement le produit une fois assemblé.
Assurez-vous que la surface soit solide pendant l’assemblage et placez toujours le
produit sur une surface plane et stable.
El producto debe ser instalado y utilizado bajo la supervisión de un adulto.
Lea detenidamente cada paso y siga el orden correcto.
Retire todo el embalaje, separe y cuente todas las piezas y los accesorios.
Asegúrese de que todas las piezas estén instaladas correctamente, una instalación
incorrecta puede provocar un peligro.
Recomendamos que, siempre que sea posible, todos los elementos se monten cerca de
la zona en la que se van a utilizar, para evitar mover el producto innecesariamente una
vez montado.
Asegure una superficie segura durante el montaje, y coloque el producto siempre sobre
una superficie plana, firme y estable.
FR ES
Avertissements Généraux Advertencias Generales
0-3
ADVERTENCIA:
PELIGRO DE ASFIXIA
- Piezas pequeñas.
No es adecuado para niños
menores de 3 años.
Avertissements Advertencia
04 05
Prima di Iniziare Zanim Zaczniesz
0-3
AVVERTENZA:
RISCHIO DI SOFFOCAMENTO
- Piccole parti.
Non per i bambini sotto i 3 anni.
Przeczytaj uważnie wszystkie instrukcje i zachowaj je na przyszłość.Si prega di leggere attentamente tutte le istruzioni e conservarle per riferimento futuro.
Produkt musi złożony i używany pod nadzorem osoby dorosłej.
Przeczytaj uważnie każdy krok i postępuj we właściwej kolejności.
Usuń opakowanie i upewnij się, że zestaw zawiera wszystkie części i elementy
montażowe.
Upewnij się, że wszystkie części poprawnie połączone, nieprawidłowa instalacja
może prowadzić do wypadku.
Zalecamy, aby w miarę możliwości wszystkie elementy były montowane w pobliżu
miejsca, w którym będą używane, aby uniknąć niepotrzebnego przenoszenia produktu
po złożeniu.
Zapewnij bezpieczną przestrzeń roboczą podczas montażu i upewnij się, że produkt
znajduje się na płaskiej i stabilnej powierzchni.
PLIT
Avvertenza per il Montaggio Ogólne ostrzeżenia
UWAGA:
RYZYKO ZADŁAWIENIA
- Produkt zawiera małe elementy.
Nieodpowiednie dla dzieci poniżej
3 roku życia.
0-3
Il prodotto deve essere installato e utilizzato sotto la supervisione di un adulto.
Leggere attentamente ogni passo e seguire l'ordine corretto.
Rimuovere tutti gli imballaggi, separare e contare tutte le parti e tutti gli accessori.
Si prega di assicurarsi che tutte le parti siano installate correttamente, un'installazione
errata può portare a un pericolo.
Si consiglia, ove possibile, di montare tutti gli articoli vicino alla zona in cui verranno posti
in uso, per evitare di spostare inutilmente il prodotto una volta assemblato.
Garantire una superficie sicura durante il montaggio e posizionare il prodotto sempre su
una superficie piana, stabile.
Attenzione: I bambini devono usare questo prodotto sotto la supervisione dei genitori.
Pericolo: Tenere tutte le piccole parti e i materiali di imballaggio di questo prodotto lontano
da neonati e bambini, altrimenti potrebbero rappresentare un rischio di soffocamento.
Uwaga: Dzieci moga używać tego produktu jedynie pod nadzorem dorosłych.
Niebezpieczeństwo: Trzymaj wszystkie małe części i opakowania tego produktu z dala od.
niemowląt i dzieci - w przeciwnym razie mogą stwarzać ryzyko zadławienia.
Avvertenza Uwaga
06 07
INSTALLATION INSTRUCTIONS FOR THE BUILDING BLOCK TABLE /
PRODUKTMONTAGE / ASSEMBLAGE DU PRODUIT / INSTRUCCIONES
DE INSTALACIÓN DE LA MESA DE BLOQUES DE CONSTRUCCIÓN /
ISTRUZIONI PER L'INSTALLAZIONE DEL TAVOLINO / INSTRUKCJA
MONTAŻU STOLIKA
Open the two buckled ears outwards to open the table top and take out
the accessories to be installed later.
Öffnen Sie die beiden Ohren mit der Schlaufe nach außen, um die
Tischplatte zu öffnen, und nehmen Sie das Zubehör für die spätere
Installation heraus.
Ouvrez les deux oreilles avec boucle vers l’extérieur pour ouvrir le
plateau de la table et sortez les accessoires pour les installer plus tard.
Abra las dos orejas abrochadas hacia afuera para abrir el tablero de la
mesa y saque los accesorios que se instalarán posteriormente.
Aprire le due orecchie con fibbia verso l'esterno per aprire il piano del
tavolino ed estrarre gli accessori da installare in seguito.
Odblokuj oba uchwyty blokujące, aby otworzyć blat i wyjmij akcesoria.
Będą potrzebne w dalszym montażu.
EN:
Install the table legs and link into
the slots. 3 levels adjustable
EN:
There are 4 slots under the table as shown in
the picture.
Install the table legs, table bases and storage
tank into their corresponding slots. There are
four
slots in the reverse side of the table.
EN:
Es gibt 4 Schlitze unter dem Tisch, wie das
Bild zeigt.
Installieren Sie die Tischbeine, den Tischfuß
und den Lagertank in den entsprechenden
Steckplätzen. Auf der Rückseite des Tisches
befinden sich vier Steckplätze.
DE:
Hay 4 ranuras debajo de la
mesa como se muestra en la
imagen.
Instale las patas de la mesa, la
base de la mesa y la caja de
almacenamiento en sus ranuras
correspondientes. Hay cuatro
ranuras en el reverso de la mesa.
ES:
Ci sono 4 fessure sotto il tavolino
come mostrato in figura.
Installare le gambe del tavolino,
le basi del tavolino e il serbatoio
di stoccaggio nelle fessure
corrispondenti. Ci sono quattro
fessure sul retro del tavolino.
PL:
Il y a 4 fentes sous la table,
comme le montre la photo.
Installez les pieds de table, la
base de table et le réservoir de
stockage dans leurs fentes
correspondantes. Il y a quatre
fentes au dos de la table.
FR:
Ci sono 4 fessure sotto il tavolino
come mostrato in figura.
Installare le gambe del tavolino,
le basi del tavolino e il serbatoio
di stoccaggio nelle fessure
corrispondenti. Ci sono quattro
fessure sul retro del tavolino.
IT:
Installieren Sie die Tischbeine und
Anschlüsse in den Schlitzen.
Einstellbar auf drei Ebenen.
DE:
Installez les pieds de table et les
connecteurs dans les fentes.
Réglable sur trois niveaux
FR:
Instale las patas de la mesa y los conectores en las ranuras.
Hay tres niveles ajustables
ES:
Installare le gambe del tavolino e collegare nelle fessure.
3 livelli regolabili.
IT:
Zainstaluj nogi stołu i łączniki w szczelinach.
Regulacja na trzech poziomach
PL:
DE:
FR:
ES:
IT:
PL:
1
2
3
08 09
Take out four big screws and rotate them
to fix the table legs and storage tank.
EN:
Nehmen Sie vier große Schrauben
heraus und drehen Sie sie, um die
Tischbeine und den Lagertank zu sichern.
DE:
Retirez quatre grosses vis et faites-les
tourner pour fixer les pieds de la table et
le réservoir de stockage.
FR:
Hang two receivers on both outer
sides of the storage tank.
EN:
Install accessories into the four
corners to turn the storage tank
immediately into a sand bowl.
EN:
Installieren Sie Zubehör in allen
vier Ecken, um den Lagertank
sofort in eine Sandschale zu
verwandeln.
DE:
Hängen Sie zwei Fächer an die
beiden Außenseiten des Lagertanks.
DE:
Accrochez deux compartiments sur
les deux côtés extérieurs du réservoir
de stockage.
FR:
Cuelgue dos recipientes en ambos
lados exteriores de la caja de
almacenamiento.
ES:
Zawieś dwa zbiorniczki, po obu
zewnętrznych stronach pojemnika.
PL:
Appendere due contenitori
su entrambi i lati esterni
del serbatoio di toccaggio.
IT:
Saque cuatro tornillos grandes y gírelos para fijar las patas de la mesa y
la caja de almacenamiento
ES:
Estrarre quattro grandi viti e ruotarle per fissare le gambe del tavolino e il
serbatoio di stoccaggio.
IT:
Odkręć cztery duże śruby i obróć je, aby zabezpieczyć nogi stołu i
pojemnik.
PL:
Pass the small screws through the four
holes of the storage tank and rotate
them until they click, indicating the
securing of the casters.
EN:
Führen Sie die kleinen Schrauben durch
die vier Löcher im Lagertank und drehen
Sie sie, bis sie einrasten.
Dies zeigt an, dass die Rollen sicher
sind.
DE:
Faites passer les petites vis dans les quatre trous du réservoir de
stockage et faites-les tourner jusqu’à ce qu’elles s’enclenchent, indiquant
la fixation des roulettes.
FR:
Pase los tornillos pequeños a través de los cuatro orificios de la caja de
almacenamiento y gírelos hasta que hagan clic, lo que indica la sujeción
de las ruedas.
ES:
Passare le piccole viti attraverso i quattro fori del serbatoio di stoccaggio
e ruotarle fino a farle scattare, indicando il fissaggio delle ruote.
IT:
Przełóż małe śruby przez cztery otwory w pojemniku i obracaj je, aż
zatrzasną się na miejscu, wskazując, że kółka są zabezpieczone.
PL:
Installez des accessoires dans les quatre coins pour transformer
immédiatement le réservoir de stockage en un bol de sable.
FR:
Instale los accesorios en las cuatro esquinas para convertir la caja de
almacenamiento inmediatamente en un cuenco de arena.
ES:
Installare gli accessori nei quattro angoli per trasformare immediatamente
il serbatoio di stoccaggio in una ciotola di sabbia.
IT:
Zainstaluj akcesoria we wszystkich czterech rogach, aby przekształcić
zbiornik w pojemnik z piaskiem.
PL:
6
7
4
5
Sand bowl accessories / Zubehör für Sandschalen /
Accessoires pour bols de sable / Accesorios para
cuenco de arena / Accessori per ciotola di sabbia /
Akcesoria do pojemników
x4
10 11
Cover the table top to finish the
installation of block table.
EN:
Upturn the table
top to turn it
immediately into a
block table, and it
can be installed
both sideways and
endways
EN:
Drehen Sie die
Tischplatte um, um
sie sofort in eine
Bausteintabelle zu
verwandeln. Sie
kann sowohl
seitlich als auch
vertikal installiert
werden.
DE:
Retournez le
plateau de la table
pour la transformer
immédiatement en
une table de bloc,
et elle peut être
installée aussi bien
latéralement et
verticalement.
FR:
Cubra el tablero de la mesa para
terminar la instalación de la mesa
de bloques.
ES:
Załóż blat stołu; produkt gotowy
do użycia.
PL:Coprire il piano del tavolino
per completare l'installazione
del tavolino a blocchi.
IT:
Decken Sie die Tischplatte ab, um
Montage der Bausteintabelle
abzuschließen.
DE:
Couvrez le plateau de la table pour
terminer l’assemblage de la table
de bloc.
FR:
Voltee el tablero de la mesa para convertirlo inmediatamente en una
mesa de bloques, y se puede instalar tanto lateral como verticalmente.
ES:
Capovolgere il piano del tavolino per trasformarlo immediatamente in un
tavolino a blocchi e può essere installato sia lateralmente che
all'estremità.
IT:
Odwróć blat, aby przekształcić go w stolik do układania klocków. Można
go zainstalować zarówno w pozycji horyzontalnej jak i wertykalnej.
PL:
Hay una ranura en uno de los bordes del tablero de la mesa, que se
utiliza para cambiar la placa granular.
ES:
Il y a une rainure sur l’un des bords du plateau de la table, qui sert à
changer la semelle granulaire.
FR:
There is a die cut on one of the edges of the table top, which is used to
change the granular soleplate.
EN:
An einer Kante der Tischplatte befindet sich eine Nut, mit der die
körnige Basis gewechselt werden kann.
DE:
C'è una scanalatura su uno dei bordi del piano del tavolino, che viene
utilizzata per cambiare la piastra granulare.
IT:
Na jednej z krawędzi blatu znajduje się rowek, który służy do zmiany
powierzchni.
PL:
10
8
9
12 13
In case a return is required, the item must be returned in original box. Without this
your return will not be accepted.
DO NOT discard the box / original packaging.
Take a photo of the box markings.
Take a photo of the damaged part (if applicable).
Send us an email with the images requested.
A photo of the markings (text) on the side of the box is required in case a part is
needed for replacement. This helps our staff identify your product number to
ensure you receive the correct parts.
A photo of the damage is always required to file a claim and get your replacement
or refund processed quickly. Please make sure you have the box even if it is
damaged.
Email us directly from marketplace where your item was purchased with the
attached images and a description of your claim.
Falls eine Rücksendung erforderlich ist, muss der Artikel in der
Originalverpackung zurückgeschickt werden. Andernfalls wird Ihre Rücksendung
nicht angenommen.
Werfen Sie den Karton / die Originalverpackung NICHT weg.
Machen Sie ein Foto von der Beschriftung des Kartons.
Machen Sie ein Foto des beschädigten Teils (falls zutreffend).
Schicken Sie uns eine E-Mail mit dem gewünschten Foto.
Für den Fall, dass ein Ersatzteil benötigt wird, benötigen wir ein Foto der
Beschriftung (Text) auf der Seite des Kartons. So können unsere Mitarbeiter Ihre
Artikelnummer identifizieren und sicherstellen, dass Sie die richtigen Teile
erhalten.
Ein Foto des beschädigten Teils ist immer erforderlich, um eine Reklamation
einzureichen und eine schnelle Bearbeitung Ihres Ersatzteils oder Ihrer
Rückerstattung zu gewährleisten. Bitte stellen Sie sicher, dass Sie den Karton
haben, auch wenn er beschädigt ist.
Schicken Sie uns eine E-Mail direkt vom Marktplatz, auf dem Sie den Artikel
gekauft haben, mit den angehängten Fotos und einer Beschreibung Ihrer
Reklamation.
EN
DE
Return / Damage Claim Instructions
Rücksendung / Beschädigung Anweisungen
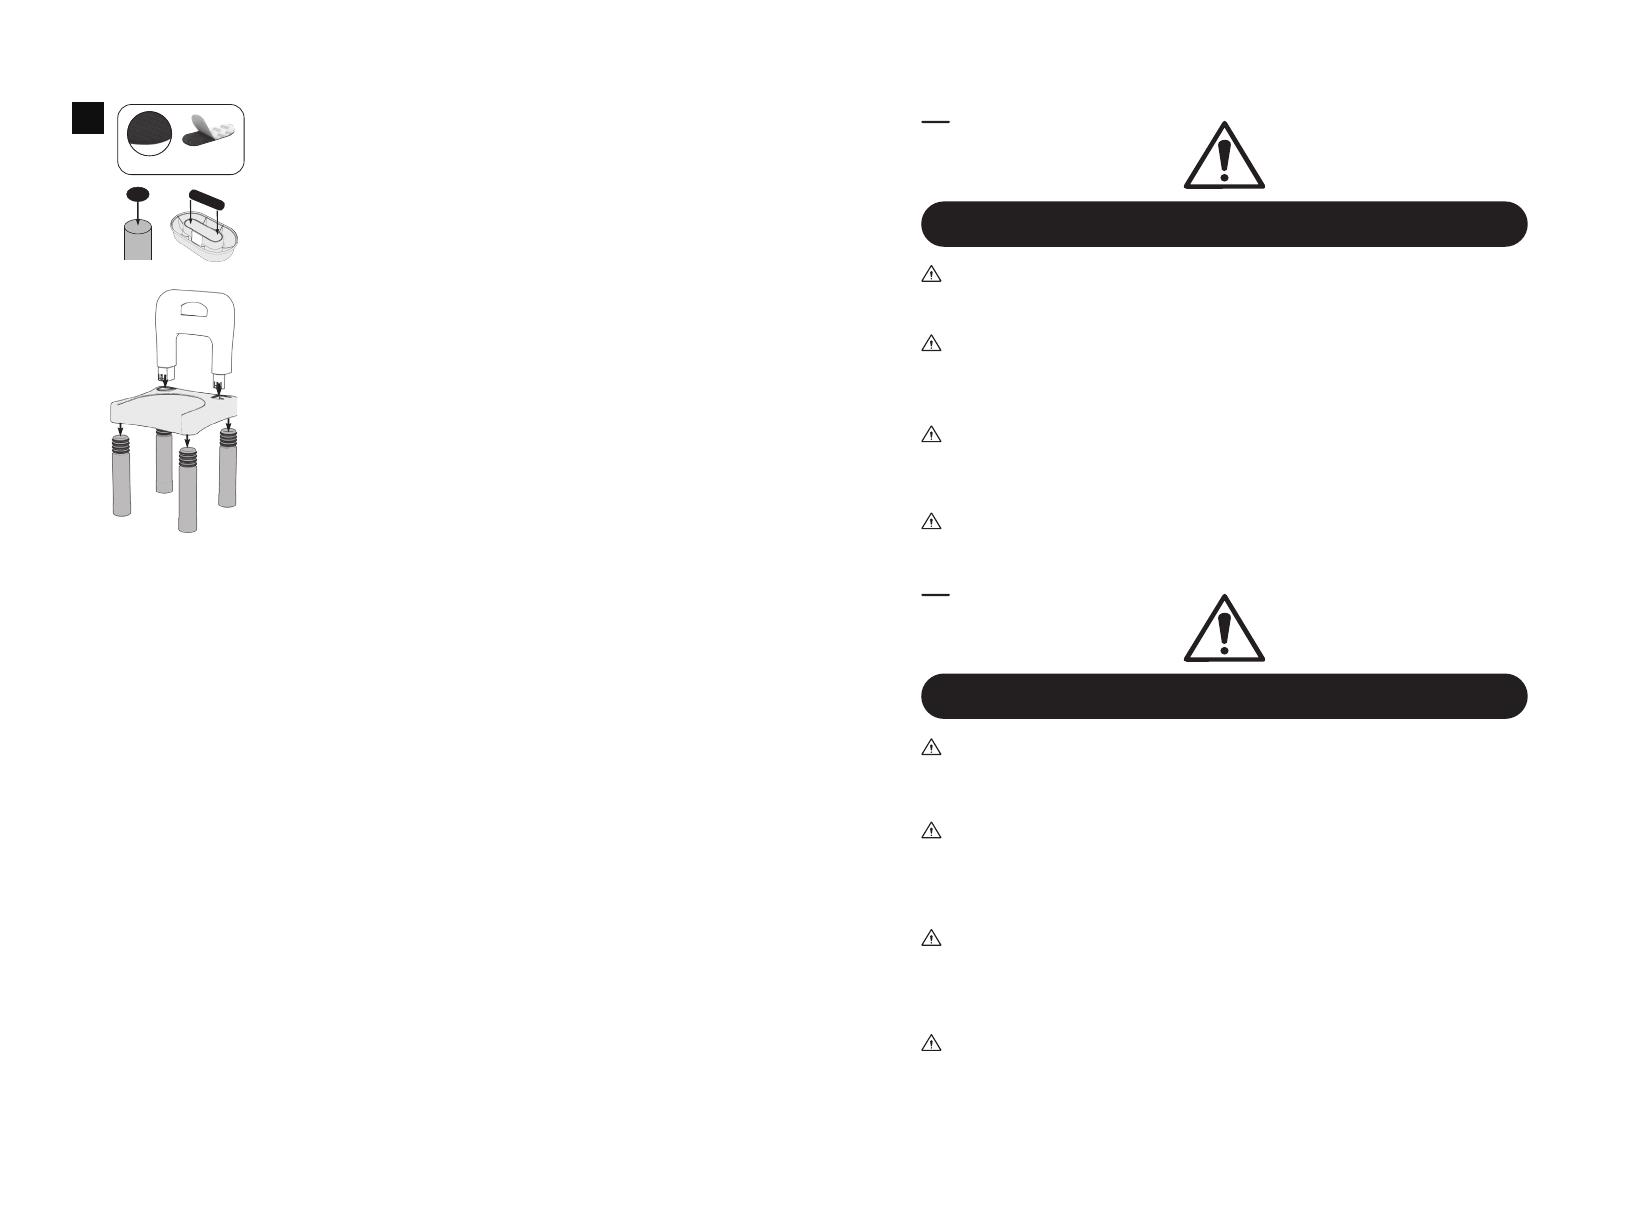
Install the accessories of chair in turn into their
corresponding slots.
Notes: this product is equipped with a non-slip mat.
Take out the table legs and the chair bases, invert
them to the reverse, tear the label off the non-slip mat
and paste it as per figure.
EN:
Installieren Sie das Stuhlzubehör an den
entsprechenden Stellen.
Hinweise: Dieses Produkt ist mit einer rutschfesten
Matte ausgestattet.
Nehmen Sie die Tischbeine und die Basis der Stühle,
drehen Sie sie um, reißen Sie das Etikett von der
rutschfesten Matte ab und kleben Sie es wie in der
Abbildung gezeigt.
DE:
Installez les accessoires de chaise dans leurs emplacements
correspondants.
Remarques: ce produit est équipé d’un tapis antidérapant.
Sortez les pieds de la table et la base des chaise, inversez-les, déchirez
l’étiquette du tapis antidérapant et collez-la comme indiqué sur le schéma.
Instale los accesorios de la silla en sus ubicaciones correspondientes.
Notas: este producto está equipado con una alfombra antideslizante.
Saque las patas de la mesa y la base de la silla, inviértalas, quite la
etiqueta de la alfombra antideslizante y péguela como se muestra en la
figura.
Installare gli accessori della sedia uno per uno nelle fessure
corrispondenti.
Nota: Questo prodotto è dotato di un tappetino antiscivolo.
Estrarre le gambe del tavolino e le basi della sedia, capovolgerle al
contrario, strappare l'etichetta dal tappetino antiscivolo e incollarla come
in figura.
Zainstaluj akcesoria do krzeseł w odpowiednich miejscach.
Ważne: Ten produkt jest wyposażony w matę antypoślizgową.
Wyjmij nogi stołu i podstawę krzeseł, odwróć je, oderwij etykietę z maty
antypoślizgowej i przyklej matę, jak pokazano na schemacie.
FR:
ES:
IT:
PL:
11
Non-slip particles / Rutschfeste Partikel / Particules
antidérapantes / Partículas antideslizantes / Particelle
antiscivolo / Antypoślizgowe części
14 15
Instructions De Retour / Réclamation De Dommages
Dans le cas où un retour est requis, l'article doit être retourné dans sa boîte
d'origine. Sans cela, votre retour ne sera pas accepté.
NE PAS jeter la boîte/l'emballage d'origine.
Prenez une photo des marquages de la boîte.
Prenez une photo des dommages (le cas échéant).
Envoyez-nous un e-mail avec les images demandées.
Une photo des marquages (texte) sur le côté de la boîte est requise au cas où une
pièce serait nécessaire pour le remplacement. Cela aide notre personnel à
identifier votre numéro de produit pour s'assurer que vous recevez les bonnes
pièces.
Une photo des dommages est toujours requise pour déposer une réclamation et
obtenir rapidement votre remplacement ou votre remboursement. Assurez-vous
d'avoir la boîte même si elle est endommagée.
Envoyez-nous un e-mail directement depuis le marché où votre article a été
acheté avec les images ci-jointes et une description de votre réclamation.
Instrucciones de Devolución / Reclamación de Daños
En caso de que se requiera una devolución, el artículo debe ser devuelto en la
caja original. Sin esto su devolución no será aceptada.
NO deseche la caja/embalaje original.
Tome una foto de las marcas de la caja.
Tome una foto de los daños (si procede).
Envíenos un correo electrónico con las imágenes solicitadas.
Se requiere una foto de las marcas (texto) en el lado de la caja en caso de que se
necesite una pieza para reemplazarla. Esto ayuda a nuestro personal a identificar
su número de producto para asegurarse de que recibe las piezas correctas.
Una foto de los daños es siempre necesaria para presentar una reclamación y
conseguir que su reemplazo o reembolso sea procesado rápidamente. Por favor,
asegúrese de tener la caja aunque esté dañada.
Envíenos un correo electrónico directamente desde el mercado donde se compró
su artículo con las imágenes adjuntas y una descripción de su reclamación.
FR
ES
Nel caso in cui sia richiesto un reso, l'articolo deve essere restituito nella scatola
originale. Senza la scatola originale il tuo reso non sarà accettato.
NON scartare la scatola / confezione originale.
Fare una foto dei contrassegni sulla scatola.
Fare una foto di Danno (se è applicabile).
Inviarci una mail con le immagini richieste.
È necessaria una foto dei contrassegni (testo) sul lato della scatola nel caso in
cui la parte debba essere sostituita. Questo aiuta il nostro staff a identificare il
numero del tuo prodotto per assicurarti di ricevere le parti corrette.
Una foto del danno è sempre necessaria per presentare un reclamo e ottenere
rapidamente la sostituzione o il rimborso. Assicurati di avere la scatola anche se
è danneggiata.
Inviarci un’e-mail direttamente dal mercato in cui è stato acquistato il tuo articolo
con le immagini allegate e una descrizione del tuo reclamo.
Jeśli chcesz zwrócić produkt, musi znajdować się on w oryginalnym opakowaniu.
Towar zwrócony w nieoryginalnym opakowaniu nie zostanie przyjęty.
Nie wyrzucaj oryginalnego opakowania.
Zrób zdjęcie oznaczeń na opakowaniu.
Zrób zdjęcie uszkodzonej części (jeśli dotyczy).
Skontaktuj się z nami.
Jeśli jakakolwiek część wymaga wymiany, zrób zdjęcie oznaczeń kodu produktu,
który znajduje się na opakowaniu. Pozwoli nam to zidentyfikować produkt i
dostarczyć ci właściwą część.
Jeśli chcesz złożyć reklamację, zrób zdjęcie uszkodzonej części. Pozwoli nam to
zatwierdzić reklamację i zlecić zwrot środków na twoje konto. Do złożenia
reklamacji potrzebne będzie oryginalne opakowanie.
Skontaktuj się z nami telefonicznie, mailowo lub poprzez formularz kontaktowy.
Załącz zdjęcia produktu i opis roszczenia.
IT
PL
Istruzioni Per La Restituzione / Reclamo Per Danni
Zwroty i reklamacje
16 17
  • Page 1 1
  • Page 2 2
  • Page 3 3
  • Page 4 4
  • Page 5 5
  • Page 6 6
  • Page 7 7
  • Page 8 8
  • Page 9 9

Costway HW70217 Benutzerhandbuch

Typ
Benutzerhandbuch