Kaiser EA 644 ElfEm Eco Benutzerhandbuch
- Kategorie
- Dunstabzugshauben
- Typ
- Benutzerhandbuch

USER MANUAL
ИНСТРУКЦИЯ ПО ОБСЛУЖИВАНИЮ И
ЭКСПЛУАТАЦИИ
GEBRAUCHSANWEISUNG
BUILT-IN COOKER HOOD
EINBAU-DUNSTABZUGSHAUBE
ВСТРАИВАЕМЫЙ КУХОННЫЙ ВОЗДУХООЧИСТИТЕЛЬ

2
DEAR CUSTOMERS,
We are convinced that you have made a right choice. This
product which satisfies the high quality demands and
corresponds to world comprehensive standards realizes your
cooker hood, and his modern appearance which has been
developed by the best European designers will decorate your
kitchen splendidly.
With the thoughts of a constant improvement of the quality of
our cooker hoods the changes in design and equipment which
lead only to positive changes of the technical qualities are
reserved by the manufacturer.
We ask you to read the operating instructions before usage
thoroughly. The consideration of recommendations protects
you from possible inconveniences which can appear as a
result of the wrong use of the hood, and allows you to reduce
the consumption of electric energy. If the use corresponds to
the present operating instructions, the hood will bring you a
lot of pleasure for a long time.
Our cooker hoods correspond to the main demands of the
security, hygiene and environment protection, according to
the directives of the EU which is confirmed with certificates
DIN ISO 9001, ISO 1400, according to the norms counting
within the frames of the EU, they also correspond to the
Gosstandart of Russia, standards of the CIS, which is
confirmed with the corresponding certificates.
thank you for purchasing this Kaiser product.
We Inform you that our devices which are the object of the
present operating instructions are precertain exclusively
for the domestic use.
OLAN-Haushaltsgeräte
Berlin Germany
Yours faithfully
We wish you an effective use of the cooker hood of our firm.
EN

3
УВАЖАЕМЫЙ ПОКУПАТЕЛЬ,
Данный продукт удовлетворяет самым высоким
требованиям и отвечает мировым стандартам, его
со в р е м е н н ы й в и д , р а з р а б о т а н н ы й л у ч ш и м и
европейскими дизайнерами, великолепно украсит Вашу
кухню.
Просим Вас внимательно прочитать инструкцию по
обслуживанию и эксплуатации до пуска устройства.
Соблюдение содержащихся в ней рекомендаций
защитит Вас от возможных неприятностей при
н е п р а в и л ь н о й э к с п л у а т а ц и и к у х о н н о г о
воздухоочистителя, а также позволит Вам уменьшить
расход электроэнергии. Если эксплуатация кухонного
возду хоочи с т и т еля бу д е т со о т в ет с т во в ать
настоящей инструкции, наше устройство будет
радовать Вас долгое время.
С мыслью о дальнейшем повышении технических и
э к с п л у а т а ц и о н н ы х х а р а к т е р и с т и к н а ш и х
воздухоочистителей мы оставляем за собой право на
внесение изменений в дизайн и устройство, влияющих
только положительно на потребительские качества и
свойства продукта.
Желаем Вам эффективного пользования кухонным
воздухоочистителем нашей фирмы.
Уважающий Вас
Мы уверены, что Вы сделали правильный выбор.
Наши кухонные воздухоочистители полностью
соответствуют основным требованиям безопасности,
гигиены и защиты окружающей среды, согласно
директивам Европейского Союза, что подтверждено
се рт и ф и ка т а м и DIN ISO 90 01, ISO 1 4 0 0 , в
соответствии с настоящими нормами, действующими
на территории Европейского сообщества, а также
полностью отвечают всем требованиям Госстандарта
России и стандартов других стран СНГ, что
подтверждается сертификатами соответствия.
благодарим Вас за приобретение нашей техники.
Информируем, что наши приборы, являющиеся
предметом настоящей Инструкции, предназначены
исключительно для домашнего пользования.
OLAN-Haushaltsgeräte
Berlin Germany
DE
RU
wir danken Ihnen für den Erwerb unserer Technik.
Wir sind überzeug, dass Sie eine richtige Wahl getroffen
haben. Dieses Produkt, das die hohen Forderungen zur
Qualität befriedigt und weltumfassenden Standards
entspricht, verwirklicht Ihre Dunstabzugshaube, und ihr
modernes Aussehen, das von besten europäischen Designer
entwickelt worden ist, wird Ihre Küche prächtig schmücken.
LIEBE KUNDIN, LIEBER KUNDE,
Wir bitten Sie die Bedienungsanleitung vor der Nutzung
aufmerksam zu lesen. Die Beachtung von Empfehlungen
schützt Sie von eventuellen Unannehmlichkeiten, die als
Folge der falschen Nutzung der Dunstabzugshaube,
auftreten können, und ermöglicht Ihnen den Verbrauch von
Elektroenergie zu reduzieren. Die Dunstabzugshaube, bringt
Ihnen viel Vergnügen auf lange Zeit, wenn der Gebrauch der
vorliegenden Bedienungsanleitung entsprechen wird.
U n s e re Du n s t a b z u g s h a u b e n en t s p re c h e n d e n
Hauptforderungen der Sicherheit, der Hygiene und des
Umweltschutzes, laut den Direktiven der EU, was mit
Zertifikaten DIN ISO 9001, ISO 1400, entsprechend den im
Rahmen der EU geltenden Normen, bestätigt ist, und
genauso auch den Anforderungen von Gosstandart in
Russland und Standards anderer GUS Länder, was durch die
Identifikationszertifikate bestätigt ist.
Wir informieren Sie, dass unsere Geräte, die der Gegenstand
der vorliegenden Bedienungsanleitung sind, sind
ausschließlich für den häuslichen Gebrauch vorbestimmt.
Hochachtungsvoll
Berlin Germany
OLAN-Haushaltsgeräte
Wir wünschen Ihnen die effektive Nutzung d er
Dunstabzugshaube unserer Firma.
Mit den Gedanken der ständigen Verbesserung der Qualität
unserer Dunstabzugshauben, sind Änderungen bei Design
und Einrichtung, die nur zu positiven Veränderungen der
technischen Eigenschaften führen, vom Hersteller
vorbehalten.

4
EN
Connecting to the power network 16
Electrical shock hazard 20
CONTENTS
OPERATING CONDITIONS 24
SAFETY REGULATIONS 18
OPERATION MODE 26
Operational safety 28
Control panels 30
INSTALLATION INSTRUCTIONS 6
BRIEF DESCRIPTION 22
Location drawing 22
USAGE 28
Remote control 32
Cleaning 42
Metal grease filter 36
Periodic inspection 42
RESPECT FOR THE ENVIRONMENT 44
Charcoal filter 36
CARE AND MAINTENANCE 36
Lighting 38

5
5
DE
RU
ОГЛАВЛЕНИЕ
Опасность поражения электрическим током 21
ТЕХНИКА БЕЗОПАСНОСТИ 19
ИНСТРУКЦИЯ ПО МОНТАЖУ 7
Подключение к электросети 17
КРАТКОЕ ОПИСАНИЕ 23
Внешний вид 23
УСЛОВИЯ ЭКСПЛУАТАЦИИ 25
РЕЖИМЫ РАБОТЫ 27
ИСПОЛЬЗОВАНИЕ 29
ОБСЛУЖИВАНИЕ И УХОД 37
Металлический жироулавливающий
Освещение 39
Безопасность эксплуатации 29
Пульт дистанционного управления 35
Угольный фильтр 37
фильтр 37
Органы управления 31
Очистка 43
ОХРАНА ОКРУЖАЮЩЕЙ СРЕДЫ 45
Периодический осмотр 43
Stromschlaggefahr 21
INHALTSVERZEICHNIS
Gesamtansicht 23
SICHERHEITSHINWEISE 19
KURZBESCHREIBUNG 23
FÜR DEN INSTALLATEUR 7
Stromnetzanschluss 17
BETRIEBSARTEN DER ABZUGSHAUBE 27
BENUTZUNG 29
Benutzungssicherheit 29
BETRIEBSBEDINGUNGEN 25
Reinigung 43
Bedienblenden 31
Fernbedienung 35
PFLEGE UND WARTUNG 37
UMWELTVERTRÄGLICHKEIT 45
Periodische Besichtigung 43
Metallfettfilter 37
Kohlefilter 37
Beleuchtung 39

6
EN
1
2
3
2
3
4
4
5
5
5
5
6
6
6
6
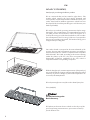
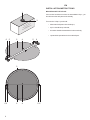
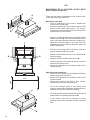
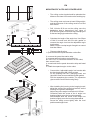
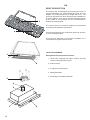
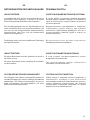
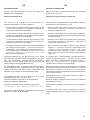
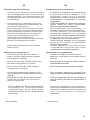
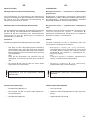
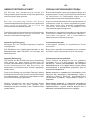
• Mount two half-parts 2 into the body 3;
To mount the V-flap you should:1
INSTALLATION INSTRUCTIONS
MOUNTING OF THE V-FLAP
• a pin 4 should be top oriented;
If the cooker hood does not have an assembled V-flap 1, you
should mount the half-parts to the its body.
• the axis 5 should be inserted in the holes 6 on body;
• repeat all the operations for the 2nd half-part.
Built-in C
ooker hood
einbau-
Dunstabzugshaube
встраиваемый
К
ухонный в
о
з
духоо
чистите
ль

7
Если воздухоочиститель не имеет V-клапан 1 в сборе, вы
должны смонтировать две половины клапана на его
корпус.
• оси 5 вставить в отверстия 6 на корпусе;
МОНТАЖ V-КЛАПАНА
• повторить все операции для второй половины V-
клапана.
ИНСТРУКЦИЯ ПО МОНТАЖУ
• шпенёк 4 сориентировать наверх;
Чтобы установить V-клапан 1 следует:
• Установить две половины клапана 2 на его корпус 3;
DE
RU
FÜR DEN INSTALLATEUR
MONTAGE DER V-KLAPPE
• Montieren Sie die beiden Hälften 2 aufs Ventilgehäuse 3;
Um die V-Klappe zu montieren:
• die Achsen 5 platzieren Sie in den Öffnungen 6 am
Gehäuse;
• den Stift 4 orientieren Sie nach oben;
• wiederholen Sie alle Schritte für die zweite Hälfte
der V-Klappe.
Falls die Dunstabzugshaube keine zusammengesetzte V-
Klappe 1 hat, sollen Sie die Halbteile aufs Ventilgehäuse
montieren.

8
265
665 / 490
2
7
1
1
3
3
5
6
4
EN
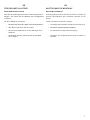
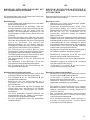
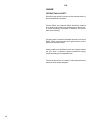
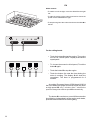
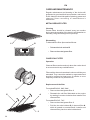
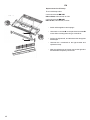
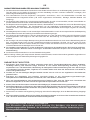
The cooker hood is mounted in the wall unit.
Two persons are required for proper installation. A qualified
installer should be commissioned to make the mounting.
MOUNTING OF BUILT-UNDER COOKER
HOOD
Mounting under a wall unit
• Saw out in the wall unit 1 an aperture 2 665/ 490 × 265
mm (depending on model).
• Detach the control panel 3 by unscrewing the two screws
(M4 × 10 mm).
• Mount the V-flap 5 on the exhaust outlet of the cooker
hood 6.
• For an air extractor mode of the cooker hood make an
opening 7 in the deck of cabinet according with the
drawing.
• Mount the cooker hood 4 on the cabinet 1 by 8 screws
(ST4 × 18 mm) and mount the control panel 3 on the hood
body by two screws(M4 × 10 mm)
• If the cooker hood will be operate in odour absorber mode
it is necessary to install charcoal filter (not supplied).
Attention! Installation and electrical connection must
be made by a qualified expert only.
Att ention! T h e manufact u rer d e clines all
responsibility for damage or injury if all instructions and
normal safety precautions are not respected.

9
Для монтажа устройства требуется минимум 2 человека.
В о з д у х о о ч и с т и т е л ь д о л ж е н п о д к л ю ч а т ь
квалифицированный специалист.
• Вырежьте в шкафу 1 отверстие 2 размером 665/ 490 ×
265 мм (в зависимости от модели).
• Отделите панель управления 3, крепящуюся двумя
винтами (M4 × 10 мм).
• Установите V-клапан 5 на выпускное отверстие
воздухоочистителя 6.
М О Н ТА Ж В О З Д У Х О О Ч И С Т И Т Е Л Я
ВСТРАИВАЕМОГО В ШКАФ
• Закрепите воздухоочиститель 4 под шкаф восемью
шурупами (ST4 × 18 мм) и прикрепите панель
управления 3 двумя винтами (M4 × 10 мм).
• Для работы воздухоочистителя в режиме вытяжной
системы с выходом трубы наверх заранее
проделайте в шкафу отверстие 7 согласно чертежу.
Воздухоочиститель монтируется в навесном шкафу.
Монтаж в навесном шкафу
• Если воздухоочиститель будет работать в режиме
рециркуляции, необходимо установить угольный
фильтр (в комплекте не поставляется).
Für die Montage sind mindestens 2 Personen erforderlich.
Es wird empfohlen, die Montage von qualifizierten
Fachkräften durchführen zu lassen.
• Für den Umluftbetrieb muss der Kohlenfilter installiert
werden (nicht mitgeliefert).
Die Abzugshaube wird im Hängeschrank montiert.
Montage unter dem Hängeschrank
MONTAGE DER
UNTERBAUABZUGSHAUBE
• Für den Abluftbetrieb mit dem Ausgang des Rohres nach
oben, die Öffnung 7 im Schrank entsprechend der
Zeichnungen im Voraus durchführen.
• Montieren Sie die Abzugshaube 4 unter dem
Hängeschrank mit acht Schrauben (ST4 × 18 mm) und
befestigen Sie die Bedienblende 3 mit zwei schrauben (M4
× 10 mm).
• Schneiden Sie im Hängeschrank 1 eine Öffnung 2 mit
Größen 665/ 490 × 265 (hängt vom Modell auf).
• Trennen Sie die Bedienblende 3, die mit zwei schrauben
(M4 × 10 mm) befestigt ist.
• Die V-Klappe 5 an die Abluftöffnung 6 der Abzugshaube
installieren.
Внимание! Монтаж и подключение кухонного
воздухоочистителя должны проводиться только
квалифицированным специалистом.
Внимание! Изготовитель не несёт никакой
ответственности, если при установке прибора не
соблюдаются все предписания.
Achtung! Die Montage und Stromnetzanschluss soll nur
von einem qualifizierten Fachmann durchgeführt
werden.
Achtung! Der Hersteller ist nicht haftbar, wenn bei der
Installation des Gerätes alle Anweisungen nicht befolgt
werden.
DE
RU

10
4
3
1
5
496
9
0
2
EN
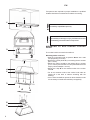
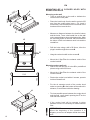
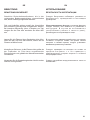
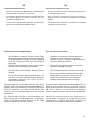
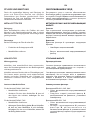
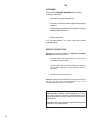
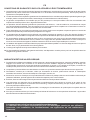
MOUNTING OF A COOKER HOOD WITH
ELECTRONIC CONTROL
• Place the hood body 1 on the wall to get min 650
mm from the cooker plate (see p. 14). Level it
horizontally. Use the bottom of the rear side of the
hood as ruler to trace the line.
Mounting on the wall
There are two ways of installation of the cooker hood:
on the wall and under a wall unit.
• Fasten the cooker hood with a four screws,
operate from the inside of the wall unit.
• For an air extractor mode of the cooker hood
make an opening 7 in the bottom of the wall unit in
advance, in accordance with the drawing.
• Mount the V-flap 4 on the exhaust outlet of the
cooker hood 5.
• Trace a vertical line on the wall to indicate the
centre of the cooker plate.
Mounting under a wall unit
• Mount the V-flap 4 on the exhaust outlet of the
cooker hood 5.
• f the cooker hood will be operate in odour I
absorber mode it is necessary to install charcoal
filter.
• Drill in the wall unit the four holes 6 in predefined
places using a drill of Ø 4 mm.
• Drill the holes 3 under 90 mm of the top holes 2.
Drive the plugs.
• Measure a distance between the hood’s bottom
and the top holes 2. Trace a horizontal line on the
wall on the same distance above the bottom line.
Mark the mounting holes on the wall: 496 mm
between the holes or 248 mm between each hole
and the central line.
• Tight the screws in the holes 3, operate from the
inside of the cooker hood.
• Drill the holes using a drill of Ø 8 mm, drive the
plugs in and then tight the screws.
• Hang the cooker hood 1 on the screws 2.
• To close possible space between the cooker hood
and the wall, use a plastic spacing bar 8.
4
5
1
8
516
254
7
6 6

11
DE
RU
Воздухоочиститель может быть подвешен на стене
либо под навесным шкафом.
М О Н ТА Ж В О З Д У ХО О Ч И С Т И Т Е Л Я С
Э Л Е К Т Р О Н Н Ы М У П Р А В Л Я Ю Щ И М
УСТРОЙСТВОМ
Монтаж на стене
• Заверните шурупы в отверстия 3, оперируя
изнутри воздухоочистителя.
• Подвесьте воздухоочиститель 1 на шурупы 2.
• Высверлите отверстия сверлом диаметром 8
мм. Забейте дюбели, заверните шурупы.
• Установите V-клапан 4 на выпускное
отверстие воздухоочистителя 5.
Монтаж под навесным шкафом
• Высверлите отверстия 3 на 90 мм ниже
верхних отверстий 2. Забейте дюбели.
• Разместите воздухоочиститель 1 так, чтобы
расстояние между его нижней гранью и
нагревательной плитой составляло минимум
650 мм (см. стр. 15). Установите его по
горизонтали, начертите линию по нижнему
краю устройства.
• Начертите вторую горизонтальную линию над
первой, на высоте, равной расстоянию между
нижним краем воздухоочистителя и верхними
отверстиями 2 на нем. Обозначьте места
монтажных отверстий на стене: 496 мм между
отверстиями или 248 мм между каждым
отверстием и центральной линией.
• Начертите на стене вертикальную линию,
обозначающую центр плиты.
• Для устранения возможного зазора между
воздухоочистителем и стеной используйте
пластмассовую накладку 8.
• Для работы воздухоочистителя в режиме
вытяжной системы с выходом трубы наверх
заранее проделайте в шкафу отверстие 7
согласно чертежу.
• Если воздухоочиститель будет работать в
р е ж и м е р е ц и р к ул я ц и и , н е о бхо д и м о
установить угольный фильтр.
• Высверлите в шкафу в обозначенных местах
четыре отверстия 6 диаметром 4 мм.
• Закрепите воздухоочиститель четырьмя
шурупами, оперируя изнутри шкафа.
• Установите V-клапан 4 на выпускное
отверстие воздухоочистителя 5.
M O N TA G E D E R A B Z UG S H A UB E M I T
ELETRONISCHER STEUERUNG
Die Abzugshaube kann an die Wand oder unter dem
Hängeschrank montiert werden.
Wandmontage
• Die Abzugshaube 1 so platzieren, dass der
Abstand zwischen ihrem unteren Rand und dem
Kochfeld Minimum 650 mm (siehe Seite 15)
beträgt. Die Abzugshaube horizontal an die
Wand anlegen und am unteren Rand eine Linie
zeichnen.
• Die zweite horizontale Linie über die erste in der
Höhe, die dem Abstand zwischen dem unteren
Rand der Abzugshaube und derer Öffnungen 2
g l e i c h i s t , z e i c h n e n . D i e St e l l e n de r
Montageöffnungen an der Wand: 496 mm
zwischen den Öffnungen bzw. 248 mm zwischen
jeder Öffnung und zentraler Linie markieren.
• Die Öffnungen mit einem Bohrer vom
Durchmesser 8 mm in der Wand bohren. Dübel
einschlagen und die Schrauben einschrauben.
• Die Öffnungen 3 so bohren, dass sie 90 cm tiefer
als die Oberen 2 sind. Dübel einschlagen.
• Die Abzugshaube 1 auf die Schrauben 2
aufhängen.
Montage unter dem Hängeschrank
• Für den Abluftbetrieb mit dem Ausgang des
Rohres nach oben, die Öffnung 7 im Schrank
entsprechend der Zeichnungen im Voraus
durchführen.
• Für den Umluftbetrieb muss der Kohlenfilter
installiert werden.
• Vier Öffnungen 6 vom Durchmesser 4 mm an den
markierten Stellen auf dem Schrank bohren.
• Die V-Klappe 4 an die Abluftöffnung 5 der
Abzugshaube installieren.
• Die Schrauben in die Öffnungen 3 von der
Innenseite der Abzugshaube einschrauben.
• Auf der Wand eine senkrechte Linie in der Mitte
des Kochfeldes zeichnen.
• Um einen eventuellen Abstand zwischen der
Abzugshaube und der Wand zu beseitigen,
verwenden Sie die Kunststoffleiste 8.
• Die V-Klappe 4 an die Abluftöffnung der
Abzugshaube 5 installieren.
• Befestigen Sie die Abzugshaube mit 4
Schrauben, das soll von innen des Schrankes
gemacht werden.

12
3
1
4
496
2
516
60
60
194
194
6
5 5
4
5
1
8
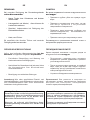
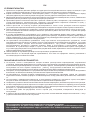
EN
• Drill in the wall unit the 6 holes 5 in predefined
places using a drill of Ø 4 mm.
• Fasten the cooker hood with a 6 screws, operate
inside of the wall unit.
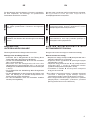
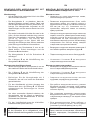
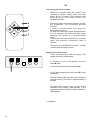
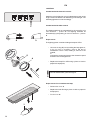
MOUNTING OF A COOKER HOOD WITH
SLIDER CONTROLS
• Trace a vertical line on the wall to indicate the
centre of the cooker plate.
• Drill the holes using a drill of Ø 8 mm, drive the
plugs in and then tight the screws 2.
Mounting on the wall
• Hang the cooker hood 1 on the screws 2.
• Mount the V-flap 3 on the exhaust outlet of the
cooker hood 4.
• Measure a distance between the hood’s bottom
and the holes. Trace a horizontal line on the wall
on the same distance above the bottom line. Mark
the mounting holes on the wall: 496 mm between
the holes or 248 mm between each hole and the
central line.
Mounting under a wall unit
• Mount the V-flap 3 on the exhaust outlet of the
cooker hood 4.
• For the air extractor mode of the cooker hood
make an opening 6 in the bottom of the wall unit in
advance, in accordance with the drawing.
• Place the hood body 1 on the wall to get min 650
mm from the cooker plate (see p. 14). Level it
horizontally. Use the bottom of the rear side of the
hood as ruler to trace the line.
• f the cooker hood will be operate in odour I
absorber mode it is necessary to install charcoal
filter.
• To close possible space between the cooker hood
and the wall, use a plastic spacing bar 7 on the
rear side of the device.
Before the beginning of the operation it is
obligatory to remove an adapter inside the cooker
hood.
ATTENTION!

13
DE
RU
• Разместите воздухоочиститель 1 так, чтобы
расстояние между его нижней гранью и
нагревательной плитой составляло минимум
650 мм (см. стр. 15). Установите его по
горизонтали, начертите линию по нижнему
краю устройства.
Монтаж на стене
М О Н ТА Ж В О З Д У ХО О Ч И С Т И Т Е Л Я С
УПРАВЛЕНИЕМ СЛАЙДЕРНОГО ТИПА
• Начертите на стене вертикальную линию,
обозначающую центр плиты.
• Начертите вторую горизонтальную линию над
первой, на высоте, равной расстоянию между
ни ж н им кр а е м возд у хо очи с т и теля и
отверстиями на нем. Обозначьте места
монтажных отверстий на стене: 496 мм между
отверстиями или 248 мм между каждым
отверстием и центральной линией.
• Высверлите отверстия сверлом диаметром 8
мм. Забейте дюбели, заверните шурупы 2.
• Подвесьте воздухоочиститель 1 на шурупы 2.
• Высверлите в шкафу в обозначенных местах
шесть отверстий 5 диаметром 4 мм.
• Установите V-клапан 3 на выпускное
отверстие воздухоочистителя 4.
Монтаж под навесным шкафом
• Для работы воздухоочистителя в режиме
вытяжной системы с выходом трубы наверх
заранее проделайте в шкафу отверстие 6
согласно чертежу.
• Закрепите воздухоочиститель шестью
шурупами, оперируя изнутри шкафа.
• Для устранения возможного зазора между
воздухоочистителем и стеной используйте
пластмассовую накладку 7 на задней стенке
прибора.
• Установите V-клапан 3 на выпускное
отверстие воздухоочистителя 4.
• Если воздухоочиститель будет работать в
р е ж и м е р е ц и р к ул я ц и и , н е о бх о д и м о
установить угольный фильтр (см. стр. 23).
• Befestigen Sie die Abzugshaube mit 6
Schrauben, das soll von innen des Schrankes
gemacht werden.
• Die Abzugshaube 1 auf die Schrauben 2
aufhängen.
• Sechs Öffnungen 5 vom Durchmesser 4 mm an
den markierten Stellen auf dem Schrank bohren.
M O N TA G E D E R A B Z UG S H A UB E M I T
SCHIEBEKNÖPFE BEDIENBLENDE
Wandmontage
Montage unter dem Hängeschrank
• Für den Abluftbetrieb mit dem Ausgang des
Rohres nach oben, die Öffnung 6 im Schrank
entsprechend der Zeichnungen im Voraus
durchführen.
• Um einen eventuellen Abstand zwischen der
Abzugshaube und der Wand zu beseitigen,
verwenden Sie die Kunststoffleiste 7 auf der
Rückwand des Gehäuses.
• Die V-Klappe 3 an die Abluftöffnung der
Abzugshaube 4 installieren.
• Für den Umluftbetrieb muss der Kohlenfilter
installiert werden (siehe Seite 23).
• Die Abzugshaube 1 so platzieren, dass der
Abstand zwischen seinem unteren Rand und
dem Kochfeld Minimum 650 mm (siehe Seite 15)
beträgt. Die Abzugshaube horizontal an die
Wand anlegen und am unteren Rand eine Linie
zeichnen.
• Die Öffnung vom Durchmesser 8 mm an der
Wand bohren. Dübel einschlagen und die
Schrauben 2 einschrauben.
• Auf der Wand eine senkrechte Linie in der Mitte
des Kochfeldes zeichnen.
• Die zweite horizontale Linie über die erste in der
Höhe, die dem Abstand zwischen dem unteren
Rand der Abzugshaube und derer Öffnungen
gl e i c h i s t , z ei c h n e n. Di e St e l le n de r
Montageöffnungen an der Wand: 496 mm
zwischen den Öffnungen bzw. 248 mm zwischen
jeder Öffnung und zentraler Linie markieren.
• Die V-Klappe 3 an die Abluftöffnung der
Abzugshaube 4 installieren.
ACHTUNG!
Vor der Operation ist es obligatorisch, einen
Adapter innerhalb der Abzugshaube zu entfernen.
Перед началом эксплуатации обязательно
удалить переходник, находящийся внутри
вытяжки.
ВНИМАНИЕ!

14
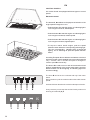
EN
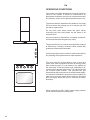
• The ceiling cooker hood should be placed at the
distance of at least 150 cm above the working top.
Make sure the overlap length of angle iron cannot
less than 36mm.
MOUNTING OF A CEILING COOKER HOOD
• Calculate the length of the angle iron. Use 32pcs
of M4*10 screws and M4 nut with gasket to
connect the angle iron into the adjustable angle
iron bracket.
• Choose outlet direction:
1. open the decorative plate and take out the filter.
2. unscrew the panel decorative strip.
3. unscrew cabinet housing and rotate it by
90°/180°/270° to choose the direction of the outlet,
then screw it back;
• The ceiling must can bear at least 120kg weight,
and the thickness of the ceiling must be not less
than 30mm.
• Drill 14 holes Ø 8 mm on the ceiling once the
installation size is determined. Use 14pcs of
ST6*40mm big flat screws and 14pcs wall plugs to
fix the two hanging board on the ceiling.
Adjust rang of the angle iron bracket is 0-25mm.
Screw the safety screw tightly after the level
position and height is set.
Anticlockwise twist the screw of the angle iron
bracket, slightly move the housing downwards.
5. install the expansion pipe to the outlet.
4. screw back the the panel decorative strip and instal
filter.
Pull the expansion pipe outside. The expansion
pipe must be fixed on the housing firmly.
Fix the housing onto the 2 hanging board, use
8pcs M4*12mm screws and M4 nut with gasket.
• Connect the 4 adjustable angle iron bracket with
the housing by 8pcs M4*12mm screws.
• After installing the housing to the hanging board,
adjust the screw of the angle iron bracket, set the
housing level position and height.
Clockwise twist the screw of the 4 angle iron
bracket, slightly move the housing upwards.
950
440
560
60
B
C
A
4 x

15
DE
RU
М О Н Т А Ж П О Т О Л О Ч Н О Г О
ВОЗДУХООЧИСТИТЕЛЯ
• Потолок должен выдерживать вес не менее
120 кг, а толщина потолка должна быть не
менее 30 мм.
• Потолочный воздухоочиститель следует
монтировать на высоте мин. 150 см над
столом.
• Рассчитайте длину угловых профилей.
Винтами M4 * 10 и гайками с прокладкой М4
соедините угловые профили с кронштейнами.
Длина нахлеста углового профиля на
кронштейн не может быть меньше 36 мм.
• Выберите направление воздухоотвода:
1. Раскройте воздухоочиститель и уберите
фильтр.
• Определите посадочные места на потолке и
высверлите соответственно 14 отверстий Ø 8
мм. Забейте дюбели, используйте большие
плоские винты ST6 * 40 мм для крепления
двух подвесных плат на потолке.
2. Отвинтите декоративную панель.
3. Открутите кожух мотора, установите
воздухоотвод в нужном направлении, затем
прикрутите его обратно.
4. Прикрутите обратно декоративную панель и
установите фильтр.
5. Установите шланг для отвода воздуха.
• Соедените угловые профили с корпусом
воздухоочистителя винтами M4*12 мм.
Чтобы опустить корпус вниз раскрутите винты
угловых кронштейнов против часовой
стрелки.
Зафиксируйте корпус воздухоочистителя на
подвесных платах используя винты M4 * 12 мм
и гайку M4 с прокладкой.
Вытяните шланг для отвода воздуха наружу.
Шланг должен быть надежно закреплен на
корпусе.
• После установки корпуса на подвесных
платах отрегулируйте винт кронштейна
углового профиля, установите положение и
высоту корпуса.
Чтобы поднять корпус вверх зарутите винты
угловых кронштейнов по часовой стрелке.
Уровень настройки углового профиля
составляет 0-25 мм.
После окончательной установки уровня и
высоты плотно закрутите зажимные винты.
Ziehen Sie den Luftauslassschlauch nach außen
heraus. Der Schlauch muss fest mit dem
Deckenhaubengehäuse verbunden sein.
• N a c h d e m S i e d a s G e h ä u s e a n d e n
Hängebrettern installiert haben, justieren Sie die
Winkelprofile und stellen Sie die Position und
H ö h e d e s G e h ä u s e s e i n .
Die Einstellhöhe des Winkelprofils beträgt 0-25
mm
3. Schrauben Sie die Motorabdeckung ab, installieren
Sie die Entlüftungsöffnung in der gewünschten
Richtung und schrauben Sie sie dann wieder fest.
2. Entfernen Sie die Deckorplatte.
• Die Montage der Deckenhaube nur bei einem
Mindestabstand zum Kochtisch von 150 cm
zulässig.
• Berechnen Sie die Länge der Winkelprofile.
Verbinden Sie die Winkelprofile mit der Halterung
mit M4 * 10 Schrauben und Muttern M4 mit
Dichtung.
• Die Tragkraft der Decke muss mindestens 120
Kg betragen. Die Decke soll mindestens 30 mm
dick sein.
Die Mindestlänge des Winkelprofile auf der
Halterung soll von 36 mm sein.
MONTAGE DER DECKENHAUBE
1. Öffnen Sie die Deckenhaube und entfernen Sie
den Filter.
4. Schrauben Sie die Dekorplatte wieder auf und
montieren Sie den Filter.
5. Installieren Sie den Luftauslassschlauch.
• Wählen Sie die Richtung der Entlüftungsöffnung:
• Legen Sie die Befestigungsstellen an der Decke
fest und bohren Sie 14 Öffnungen je Ø 8 mm.
Setzen Sie die Dübel ein. Verwenden Sie große
flache Schrauben ST6 * 40 mm, um die beiden
Aufhängeplatten an der Decke zu befestigen.
• Verbinden Sie die Winkelprofile mit M4 * 12 mm
Schrauben mit dem Deckenhaubengehäuse.
Befestigen Sie das Deckenhaubengehäuse mit
M4 * 12 mm Schrauben und einer M4 Mutter mit
einer Dichtung an den Hängebrettern.
Um das Gehäuse anzuheben, ziehen Sie die
Schrauben der Winkel im Uhrzeigersinn.
Um das Gehäuse abzusenken, lösen Sie die
Schrauben der Eckhalterung gegen den
U h r z e i g e r s i n n .
N a c h a b s c h l i e ß e n d e r H ö h e n - u n d
Höheneinstellung die Klemmschrauben fest
anziehen.

16
After connecting the device to the power supply
network (in accordance with the requirements defined
above) it is necessary to check the lighting of the hood
and whether its motor works correctly.
If the appliance is to be connected directly to mains
terminals, fit a switch with minimum aperture of 3 mm
between the contacts. Make sure that the switch is of
sufficient capacity for the power specified on the
appliance's data plate, and compliant with applicable
regulations. The switch must not break the yellow-
green earth wire. The socket or switch must be easily
reachable with the oven fully installed.
CONNECTING TO THE POWER NETWORK
Before connecting the oven to the mains power supply,
make sure that:
• The supply voltage corresponds to the
specifications on the data plate in the interior of
the device.
• The power network has an efficient ground
connection complying with all applicable laws
and regulations.
The according to the rules installed socket is a legal
requirement. The power cable should never reach a
temperature 50° C above ambient temperature at any
point along its length.
EN
Attention! The manufacturer declines all
responsibility for damage or injury if the above
instructions and normal safety precautions are not
respected
Attention! Failure to install the screws or wall
hanger in accordance with these instructions may
result in electrical hazards.

17
DE
RU
Wenn ein direkter Stromnetzanschluss gewünscht
wird, muss ein allpoliger Schalter mit Kontaktöffnung
von Minimum 3 mm vorgesehen werden, der erlaubt
das Gerät vom Netz zu trennen, der den technischen
Daten der geltenden Vorschriften entsprechen muss
(das gelb-grüne Erdungskabel darf nicht vom
genannten Schalter unterbrochen werden). Der
Stecker bzw. der allpolige Schalter müssen bei
installiertem Gerät problemlos zugänglich sein.
Die vorschriftsmäßig installierte Steckdose ist eine
notwendige Voraussetzung der Nutzung des Gerätes.
Das Kabel darf an keiner Stelle keinesfalls eine
Temperatur von über 50° C erreichen.
• Das Str omn etz ge mäß d en gel tend en
Bestimmungen und Rechtsvorschriften geerdet
ist.
STROMNETZANSCHLUSS
Vor der Durchführung des Stromanschlusses muss
sichergestellt werden, dass:
• Die Eigenschaften des Stromnetzes mit den
Werten auf dem angebrachten Typenschild im
Innenraum des Gerätes übereinstimmen;
Nach dem Netzanschluss (gemäß der oben
beschriebenen Bestimmungen) sollten Sie die
Beleuchtung und den Motor auf ihre Funktion prüfen.
• Электрическая сеть заземлена в соответствии
с действующими предписаниями.
ПОДКЛЮЧЕНИЕ К ЭЛЕКТРОСЕТИ
Перед подключением устройства к электросети
необходимо убедиться, что:
• Параметры электросети соответствуют
д а н н ы м н а т а б л и ч к е в н у т р и
воздухоочистителя,
В случае подсоединения непосредственно к
эл е к т р о с ет и , н е о бх о д и м о и с п о л ь з о в а т ь
специальный автоматический выключатель с
зазором между контактами не менее 3 мм,
позволяющий отсоединять прибор от сети,
соответственно техническим данным действующих
предписаний (желто-зеленый кабель заземления
не должен прерываться данным выключателем).
Штекер или автоматический выключатель на
правильно установленном приборе должен быть
всегда легко досягаем.
П о с л е п од к л ю ч е н и я к э л е к т р о с е т и ( п о
вышеописанным требованиям) следует проверить
исправность освещения и двигателя.
Правильно установленная розетка является
необходимым условием правильной эксплуатации.
Кабель ни в коем случае не должен нагреваться
выше температуры 50° С.
Внимание! Изготовитель не несёт никакой
ответственности, если при установке прибора
не соблюдаются все вышеприведённые
предписания.
Achtung! Der Hersteller ist nicht haftbar, wenn bei
der Installation des Gerätes alle obenangeführten
Anweisungen nicht befolgt werden.
Внимание! Установка винтов или крепления
воздухоочистителя, в несоответствии с данной
инструкцией, может привести к опасности
поражения электрическим током.
Achtung! Bei Nichtbeachtung der Schrauben
oder Wandhalterung in Übereinstimmung mit
diesem Gebrauchsanweisung zu installieren,
kann zu elektrischen Gefahren führen.

18
EN
• Never let the children operate the machine.
• The cooker hood is for home use only, not suitable
for barbecue, roast shop and other commercial
purpose.
• Clean the cooker hood according to the instruction
manual and keep the unit from danger of burning.
SAFETY REGULATIONS
• Direct suction from gas cooker is forbidden.
• Please keep the kitchen room a good convection.
• Before connecting this appliance check that the
power supply cord is not damaged. A damage supply
cord must be replaced by the manufacturer, its service
agent or similarly qualified persons in order to avoid a
hazard.
• This appliance can be used by children aged from 8
years and above and persons with reduced physical,
sensory or mental capabilities or lack of experience and
knowledge if they have been given supervision or
instruction concerning use of the appliance in a safe
way and understand the hazards involved.
• Do not flambé under the range hood.
• There is a fire risk if cleaning is not carried out in
accordance with the instructions.
• Cleaning and user maintenance shall not be made
by children without supervision.
• This appliance is not intended for use by persons
(including children) with reduced physical, sensory or
mental capabilities, or lack of experience and
knowledge, unless they have been given supervision or
instruction concerning use of the appliance by a person
slide for their safety.
• Children should be supervised to ensure, that they
do not play with the appliance.
• The air must not be discharged into a flue that is
used for exhausting fumes from appliances burning gas
or other fuels (not applicable to appliances that only
discharge the air back into the room).
• Regulations for air discharge have to be fulfilled.

19
DE
RU
ТЕХНИКА БЕЗОПАСНОСТИ
• Н е п о з в о л я й т е д е т я м у п р а в л я т ь
воздухоочистителем.
• Воздухоочиститель предназначен только для
домашнего использования, не пригоден для
барбекю, грилей и прочих коммерческих целей.
• Засасывание воздуха напрямую из газовой плиты
запрещено.
• Пожалуйста, держите кухонное помещение в
хорошо проветриваемом состоянии.
• Перед подключением прибора убедитесь, что
шнур питания не поврежден. Во избежании
опастности повреждения неисправный шнур
питания должен быть заменен производителем, его
а г е н т о м п о с е р в и с у и л и а н а л о г и ч н ы м
квалифицированным персоналом.
• Предписания по отводу воздуха должны быть
выполнены.
• В озду хо оч ис т и тель с л ед ует чи с т ит ь в
соответствии с инструкцией, и не допускать его до
опасности возгорания.
• Д а н н ы й п р и б о р н е п р е д н а з н а ч е н д л я
ис п оль зо ва н и я дет ь м и и л и л иц а м и , чь и
физиче с кие, сенс орные или ментальные
способности либо отсутствие необходимого опыта
и знаний не позволяют им обеспечить безопасную
эксплуатацию прибора без присмотра или указаний
со стороны ответственного лица, которое должно
о б е с п еч и т ь о с у щ е с т вл е н и е б е з о п а с н о й
эксплуатации с их стороны.
• Дети должны находиться под наблюдением,
чтобы гарантировать, что они не играют с
прибором.
• Д а н н ы й п р и б о р п р е д н а з н а ч е н д л я
использования детьми от 8 лет или лицами с
ограниченными физическими, сенсорными или
ментальными способностями либо отсутствием
необходимого опыта и знаний под присмотром или с
указаний ответственного лица, которое должно
о б е с п еч и т ь о с у щ е с т вл е н и е б е з о п а с н о й
эксплуатации с их стороны и предотвращение
возможных опасностей.
• Воздух не должен выводиться в дымоход, который
используется для отвода паров от приборов,
работающих на газе или других видах топлива (не
относится к приборам, которые работают на
рециркуляции).
• Существует риск возникновения пожара, если
очистка прибора не осуществляется в соответствии
с инструкциями.
• Не поджигайте спиртосодержащие блюда под
воздухоочистителем.
• Дети без присмотра не допускаются до
обслуживания прибора и ухода за ним.
• Die Kinder oder Personen, die wegen geistigen,
physischen und motorischen Fähigkeiten oder wegen
des Fehlens der notwendigen Erfahrungen oder
Kenntnisse nicht in der Lage sind, das Gerät sicher zu
benutzen, dürfen das Gerät nicht ohne Aufsicht oder
Anweisungen durch eine verantwortliche Person
benutzen.
• Die Luftansaugung direkt aus dem Gasherd ist
verboten.
• Die Kinder müssen unter Aufsicht bleiben, um
sicherzustellen, dass sie mit dem Gerät nicht spielen.
• Flambieren Sie unter der Dunstabzugshaube nicht.
• Erlauben Sie den Kindern nicht, die Abzugshaube
zu steuern.
SICHERHEITSHINWEISE
• Die Abzugshaube ist ausschließlich für den privaten
Gebrauch im Haushalt bestimmt. Das Gerät ist nicht für
das Barbecue, den Grill und die übrige gewerbliche
Nutzung bestimmt.
• Die Küche muss gut belüftet sein.
• Die Luft muss nicht in den Rauchabzug geleitet
werden, der zum Abziehen von Dämpfen der
Gasgeräte bestimmt ist. Diese Vorschrift betrifft auch
die Geräte, die durch andere Brennstoffarten
funktionsfähig sind (die Ausnahme bilden die Geräte
mit der Rezirkulation).
• D i e A b zu g s h a ub e i s t e n t spr e c h en d d e r
Bedienungsanleitung zu reinigen. Die Brandgefahr ist
unbedingt zu vermeiden.
• Versichern Sie sich vor dem Anschluss des Geräts,
dass das Netzkabel nicht beschädigt ist. Um die Gefahr
einer Beschädigung zu vermeiden, muss das
beschädigte Netzkabel durch den Hersteller, seiner
Serviceagentur oder anderes Fachpersonal
ausgetauscht werden.
• Die Vorschriften bezüglich der Entlüftung sind
einzuhalten.
• Die Kinder ab 8 Jahren oder Personen mit
begrenzten geistigen, physischen oder motorischen
Fähigkeiten oder Personen ohne notwendige
Erfahrungen und Kenntnisse können das Gerät unter
Aufsicht oder mit Anweisungen durch eine
verantwortliche Person benutzen. Die verantwortliche
Person muss für die Betriebssicherheit und die
Vermeidung möglicher Gefahren sorgen.
• Die Kinder ohne Aufsicht dürfen das Gerät nicht
bedienen oder pflegen.
• Wenn die Reinigung der Abzugshabe nicht
entsprechend der Bedienungsanleitung durchgeführt
wird, gibt es das Risiko eines Brandausbruchs.

20
EN
ELECTRICAL SHOCK HAZARD
Plug this unit only into a properly earthed outlet. In case
of doubt, check with qualified service personal.
Failure to follow these instructions can result in death,
fire, or electrical shock.
Attention! Accessible parts of devise may become
hot during cooking.
Seite laden ...
Seite laden ...
Seite laden ...
Seite laden ...
Seite laden ...
Seite laden ...
Seite laden ...
Seite laden ...
Seite laden ...
Seite laden ...
Seite laden ...
Seite laden ...
Seite laden ...
Seite laden ...
Seite laden ...
Seite laden ...
Seite laden ...
Seite laden ...
Seite laden ...
Seite laden ...
Seite laden ...
Seite laden ...
Seite laden ...
Seite laden ...
Seite laden ...
Seite laden ...
Seite laden ...
Seite laden ...
Seite laden ...
Seite laden ...
Seite laden ...
Seite laden ...
Seite laden ...
Seite laden ...
Seite laden ...
Seite laden ...
-
 1
1
-
 2
2
-
 3
3
-
 4
4
-
 5
5
-
 6
6
-
 7
7
-
 8
8
-
 9
9
-
 10
10
-
 11
11
-
 12
12
-
 13
13
-
 14
14
-
 15
15
-
 16
16
-
 17
17
-
 18
18
-
 19
19
-
 20
20
-
 21
21
-
 22
22
-
 23
23
-
 24
24
-
 25
25
-
 26
26
-
 27
27
-
 28
28
-
 29
29
-
 30
30
-
 31
31
-
 32
32
-
 33
33
-
 34
34
-
 35
35
-
 36
36
-
 37
37
-
 38
38
-
 39
39
-
 40
40
-
 41
41
-
 42
42
-
 43
43
-
 44
44
-
 45
45
-
 46
46
-
 47
47
-
 48
48
-
 49
49
-
 50
50
-
 51
51
-
 52
52
-
 53
53
-
 54
54
-
 55
55
-
 56
56


Kaiser EA 644 ElfEm Eco Benutzerhandbuch
- Kategorie
- Dunstabzugshauben
- Typ
- Benutzerhandbuch