Alesis CompactKit 4 Benutzerhandbuch
- Kategorie
- Musiktrommeln
- Typ
- Benutzerhandbuch


2
User Guide (English)
Introduction
Box Contents
CompactKit 4 User Guide
(2) Drum Sticks Safety & Warranty Manual
Power Adapter
Support
For the latest information about this product (system requirements, compatibility information,
etc.) and product registration, visit alesis.com.
For additional product support, visit alesis.com/support.
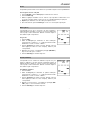
Features
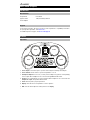
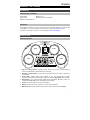
Top Panel
4
55
5
6
7
89
1011
12 13 14
15 16
17
5
2
1
3
1. Power Input: Connect this input to a power outlet using the included power adapter.
2. Power Switch: Use this switch to power CompactKit 4 on or off.
3. Headphone Output: Connect 1/8” (3.5 mm) stereo headphones (optional, sold separately)
to this output. When headphones are connected, the speaker will be muted.
4. Speaker: The sound will play out of this speaker. When headphones are connected to the
headphone output, this speaker will be muted.
5. Pads: Hit these pads to play CompactKit 4.
6. Display: This LCD shows CompactKit 4’s current operation.
7. Dial: Turn this dial to adjust the setting shown in the display.
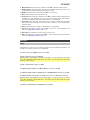
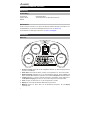
Pad 1
Pad 4
Pad 2
Pad 3

3
8. Master Volume: Press this button, and then turn the dial to adjust the master volume.
9. Rhythm Volume: Press this button, and then turn the dial to adjust the volume of the
accompaniment (everything but the drum sounds in a song).
10. Rhythm: Press this button, and then turn the dial to select a song.
11. Demo: Press this button to play the demo song.
12. Tempo/Tap: Press this button, and then turn the dial to adjust the tempo. Alternatively, hit
any pad 3 or 4 times (based on the current song’s time signature) at the desired tempo.
The current song will start playing at a tempo based on your last two hits.
13. Pad Assign: Press this button, and then hit a pad to change its sound. Each hit will play
and select the next sound. After you hear the sound you want to use for that pad, press
this button again.
14. Chord: Press this button to activate or deactivate the accompaniment.
15. Coach: Press this button, and then turn the dial to select a solo to play using the Coach
feature. See Operation > Coach to learn more.
16. Start/Stop: Press this button to start or stop the current song.
17. Game: Press this button, and then turn the dial to select a rhythm to play using the Game
feature. See Operation > Game to learn more.
Operation
Songs
CompactKit 4 has several songs consisting of drum parts and accompaniment (“rhythm”). You
can play the song with or without the accompaniment.
To select a song, press Rhythm and then turn the dial.
To play or stop the song, press Start/Stop.
Tip: Alternatively, press Tempo, and then hit any pad 3 or 4 times (based on the current
song’s time signature) at the desired tempo. The current song will start playing at a tempo
based on your last two hits.
To play or stop the demo song, press Demo.
To adjust the master volume, press Master Volume and then turn the dial.
To adjust the volume of the accompaniment, press Rhythm Volume and then turn the dial.
To adjust the tempo of the song, press Tempo, and then turn the dial to adjust the tempo.
Tip: Alternatively, press Tempo, and then hit any pad 3 or 4 times (based on the current
song’s time signature) at the desired tempo. The current song will start playing at a tempo
based on your last two hits.
To activate or deactivate the accompaniment, press Chord.

4
Sounds
CompactKit 4 has several different sounds that you can assign to each drum pad.
To assign a sound to a pad:
1. Press Rhythm then turn the dial to select a song.
2. Press Pad Assign.
3. Hit a pad to change its sound. Each hit will play and select the next sound. Stop after you
hear the sound you want to use for that pad.
4. Optional: To change the sound of another pad, repeat Step 3.
5. When you are finished, press Pad Assign. The sounds are now assigned to those pads.
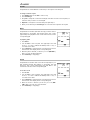
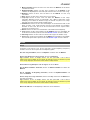
Game
CompactKit 4 has a built-in game that can help you learn its various
drum patterns. In the display, bars will descend in each column
(representing each pad). Once a bar reaches below the line, hit the
corresponding pad.
To play the game:
1. Press Game.
2. Turn the dial to select a rhythm. The upper-right corner will
show 1, 2, or 3 stars to indicate the difficulty level: 1 is easy, 2
is normal, and 3 is hard.
3. Press Start/Stop to start playing. As each bar reaches the line
at the bottom of the display, hit the corresponding pad.
4. When the game is finished, you will see your score (000–100%).
After 3 seconds, the game will restart.
5. Press Start/Stop to stop playing.
Coach
CompactKit 4 has a built-in drum coach that can help improve your
skill at learning general drum patterns. In the display, bars will
descend in each column (representing each pad). Once a bar
reaches below the line, hit the corresponding pad.
To use the coach:
1. Press Coach.
2. Turn the dial to select a pattern. The upper-right corner will
show 1, 2, or 3 stars to indicate the difficulty level: 1 is easy, 2
is normal, and 3 is hard.
3. Press Start/Stop to start playing. As each bar reaches the line
at the bottom of the display, hit the corresponding pad.
4. When the session is finished, you will see your score (000–
100%). After 3 seconds, the coach will restart.
5. Press Start/Stop to stop playing.

5
Guía del usuario (Español)
Introducción
Contenido de la caja
CompactKit 4 Guía del usuario
(2) Baquetas Manual de seguridad y garantía
Adaptador de corriente
Soporte
Para obtener la información más reciente acerca de este producto (requisitos de sistema,
información de compatibilidad, etc.) y registrarlo, visite alesis.com.
Para obtener soporte adicional del producto, visite alesis.com/support.
Características
Panel superior
4
55
5
6
7
89
1011
12 13 14
15 16
17
5
2
1
3
1. Entrada de corriente: Conecte esta entrada a un tomacorriente utilizando el adaptador de
alimentación incluido.
2. Interruptor de encendido: Utilice este interruptor para encender y apagar el CompactKit 4.
3. Salida para auriculares: Conecte auriculares estéreo de 3,5 mm (1/8 pulg.) a esta salida
(opcionales se venden por separado). Cuando se conectan auriculares, el altavoz interno
se silencia.
4. Altavoz: El sonido se emite desde este altavoz. Cuando los auriculares están conectados
a la salida para auriculares, el altavoz se silencia.
5. Pads: Golpee estos pads para tocar el CompactKit 4.
6. Pantalla: Este LCD muestra el funcionamiento actual del CompactKit 4.
7. Cuadrante: Gire este cuadrante para ajustar el ajuste que se muestra en la pantalla.
Pad 1
Pad 4
Pad 2
Pad 3

6
8. Volumen maestro: Pulse este botón y luego gire el cuadrante para ajustar el volumen
maestro.
9. Volumen del ritmo: Pulse este botón y luego gire el cuadrante para ajustar el volumen del
acompañamiento (todo menos los sonidos de batería de una canción).
10. Ritmo: Pulse este botón y luego gire el cuadrante para seleccionar una canción.
11. Demo: Pulse este botón para reproducir la canción de muestra.
12. Tempo/Tap: Pulse este botón y luego gire el cuadrante para ajustar el tempo. Como
alternativa, golpee cualquier pad 3 o 4 veces (en base a la firma de tiempo de la canción
actual) al tempo deseado. La canción actual comenzará a reproducirse al tempo basado
en sus dos últimos golpes.
13. Asignar pad: Pulse este botón y luego golpee un pad para cambiar su sonido. Cada golpe
reproducirá y seleccionará el siguiente sonido. Tras escuchar el sonido que desea usar
para ese pad, pulse este botón nuevamente.
14. Acorde: Pulse este botón para activar o desactivar el acompañamiento.
15. Entrenador: Pulse este botón y luego gire el cuadrante para seleccionar un solo para
reproducir utilizando la característica Entrenador. Consulte Funcionamiento > Entrenador
para aprender más.
16. Iniciar/parar: Pulse este botón para iniciar o detener la canción actual.
17. Juego: Pulse este botón y luego gire el cuadrante para seleccionar un ritmo para reproducir
utilizando la característica Juego. Consulte Funcionamiento > Juego para aprender más.
Funcionamiento
Canciones
CompactKit 4 tiene diversas canciones que consisten en partes de batería y acompañamiento
(“ritmo”). Puede reproducir la canción con o sin el acompañamiento.
Para seleccionar una canción, pulse Ritmo y luego gire el cuadrante.
Para reproducir o detener la canción, pulse Start/Stop.
Consejo: Como alternativa, pulse Tempo y golpee cualquier pad 3 o 4 veces (en base a la
firma de tiempo de la canción actual) al tempo deseado. La canción actual comenzará a
reproducirse al tempo basado en sus dos últimos golpes.
Para reproducir o detener la canción de muestra, pulse Demo.
Para ajustar el volumen maestro, pulse Master Volume y luego gire el cuadrante.
Para ajustar el volumen del acompañamiento, pulse Rhythm Volume y luego gire el cuadrante.
Para ajustar el tempo de la canción, pulse Tempo y luego gire el cuadrante para ajustar el
tempo.
Consejo: Como alternativa, pulse Tempo y golpee cualquier pad 3 o 4 veces (en base a la
firma de tiempo de la canción actual) al tempo deseado. La canción actual comenzará a
reproducirse al tempo basado en sus dos últimos golpes.
Para activar o desactivar el acompañamiento, pulse Chord (Acorde).

7
Sonidos
CompactKit 4 tiene varios sonidos diferentes que usted puede asignar a cada pad de la batería.
Cómo asignar un sonido a un pad:
1. Pulse Rhythm y luego gire el cuadrante para seleccionar una canción.
2. Pulse Pad Assign.
3. Golpee un pad para cambiar su sonido. Cada golpe reproducirá y seleccionará el
siguiente sonido. Tras escuchar el sonido que desea usar para ese pad, deténgase.
4. Opcional: Para cambiar el sonido de otro pad, repita el paso 3.
5. Cuando termine, pulse Pad Assign. Los sonidos están ahora asignados a esos pads.
Juego
CompactKit 4 tiene un juego incorporado que le puede ayudar a
aprender sus diversos patrones de batería. En la pantalla,
descenderán barras en cada columna (que representan a cada pad).
Una vez que una barra pasa esa línea, golpee el pad correspondiente.
Cómo jugar al juego:
1. Pulse Game.
2. Gire el cuadrante para seleccionar un ritmo. En la esquina
superior derecha verá 1, 2 o 3 estrellas que indican el nivel de
dificultad: 1 es fácil, 2 es normal y 3 es difícil.
3. Pulse Start/Stop para iniciar la reproducción. A medida que
cada barra llega a la línea en el fondo de la pantalla, golpee el
pad correspondiente.
4. Una vez terminado el juego, podrá ver su puntaje (000–100%).
Después de tres segundos, el juego vuelve a comenzar.
5. Pulse Start/Stop para detener el juego.
Entrenador
CompactKit 4 tiene un entrenador de batería incorporado que
puede ayudar a mejorar su habilidad para aprender patrones
genéricos de batería. En la pantalla, descenderán barras en cada
columna (que representan a cada pad). Una vez que una barra pasa
esa línea, golpee el pad correspondiente.
Para utilizar el entrenador:
1. Pulse Coach.
2. Gire el cuadrante para seleccionar un patrón. En la esquina
superior derecha verá 1, 2 o 3 estrellas que indican el nivel de
dificultad: 1 es fácil, 2 es normal y 3 es difícil.
3. Pulse Start/Stop para iniciar la reproducción. A medida que
cada barra llega a la línea en el fondo de la pantalla, golpee el
pad correspondiente.
4. Una vez terminada la sesión, podrá ver su puntaje (000–100%).
Después de 3 segundos, el entrenador vuelve a comenzar.
5. Pulse Start/Stop para detener el juego.

8
Guide d’utilisation (Français)
Présentation
Contenu de la boîte
CompactKit 4 Guide d’utilisation
2 baguettes Consignes de sécurité et informations concernant la garantie
Câble d’alimentation
Assistance technique
Pour les toutes dernières informations concernant la configuration système requise, la
compatibilité, etc., et l’enregistrement du produit, veuillez visiter alesis.com.
Pour de l’assistance supplémentaire, veuillez visiter alesis.com/support.
Caractéristiques
Panneau supérieur
4
55
5
6
7
89
1011
12 13 14
15 16
17
5
2
1
3
1. Entrée d’alimentation : Branchez cette entrée à une prise d’alimentation secteur à l’aide
du câble d’alimentation inclus.
2. Interrupteur d’alimentation : Cet interrupteur permet de mettre la CompactKit 4 sous et
hors tension.
3. Sorties casque : Cette sortie permet de brancher un casque d’écoute stéréo 3,5 mm (en
option, vendu séparément). Lorsqu’un casque d’écoute est branché, l’enceinte interne est
désactivée.
4. Enceinte : Le son sera diffusé par cette enceinte. Lorsqu’un casque d’écoute est branché
à la sortie casque, cette enceinte est désactivée.
5. Pads : Frappez ces pads pour jouer la CompactKit 4.
6. Écran : Cet écran ACL affiche les opérations en cours de la CompactKit 4.
7. Molette : Cette molette vous permet de régler le paramètre sélectionné à l’écran.
Pad 1
Pad 4
Pad 2
Pad 3

9
8. Master Volume : Appuyez sur cette touche et ensuite tournez la molette pour régler le
volume général.
9. Rhythm Volume : Appuyez sur cette touche et ensuite tournez la molette pour régler le
volume de l’accompagnement (tout sauf les sons de batterie dans une chanson).
10. Rhythm : Appuyez sur cette touche puis tournez la molette pour sélectionner une chanson.
11. Demo : Appuyez sur cette touche pour jouer la chanson de démonstration.
12. Tempo/Tap : Appuyez sur cette touche et ensuite tourner la molette pour régler le tempo.
Vous pouvez également frapper n’importe quel pad 3 ou 4 fois (selon la division temporelle
de la chanson en cours) au tempo désiré. La chanson en cours commencera à jouer à un
tempo basé sur vos deux dernières frappes.
13. Pad Assign : Appuyez sur cette touche et ensuite sur un pad afin de modifier le son
correspondant. Chaque pression successive permet de jouer et de sélectionner le son
suivant. Après que vous entendiez le son que vous souhaitez utiliser pour ce pad, appuyez
de nouveau sur cette touche.
14. Chord : Cette touche permet d’activer et de désactiver l’accompagnement.
15. Coach : Appuyez sur cette touche puis tournez la molette pour sélectionner un
enchaînement à jouer en solo avec la fonction Coach. Pour de plus amples informations,
veuillez consulter la section Fonctionnement > Fonction Coach.
16. Start/Stop : Cette touche permet de lancer ou d’arrêter la lecture de la chanson sélectionnée.
17. Game : Appuyez sur cette touche puis tournez la molette pour sélectionner un rythme à
jouer avec la fonction Game. Pour de plus amples informations, veuillez consulter la
section Fonctionnement > Fonction Game.
Fonctionnement
Chansons
CompactKit 4 dispose de plusieurs chansons composées de parties de batterie et
d’accompagnement (« rythme »). Vous pouvez jouer la chanson avec ou sans accompagnement.
Pour sélectionner une chanson, appuyez sur la touche Rhythm puis tournez la molette.
Pour lancer ou arrêter la chanson, appuyez sur la touche Start/Stop.
Astuce : Vous pouvez également appuyer sur la touche Tempo et ensuite frapper n’importe
quel pad 3 ou 4 fois (selon la division temporelle de la chanson en cours) au tempo désiré. La
chanson en cours commencera à jouer à un tempo basé sur vos deux dernières frappes.
Pour lancer ou arrêter la chanson de démonstration, appuyez sur la touche Demo.
Pour régler le volume principal, appuyez sur la touche Master Volume puis tournez la molette.
Pour régler le volume de l’accompagnement, appuyez sur la touche Rhythm Volume puis
tournez la molette.
Pour ajuster le tempo de la chanson, appuyez sur la touche Tempo, puis tournez la molette
pour régler le tempo.
Astuce : Vous pouvez également appuyer sur la touche Tempo et ensuite frapper n’importe
quel pad 3 ou 4 fois (selon la division temporelle de la chanson en cours) au tempo désiré. La
chanson en cours commencera à jouer à un tempo basé sur vos deux dernières frappes.
Pour activer et désactiver l’accompagnement, appuyez sur la touche Chord.

10
Sons
CompactKit 4 dispose de plusieurs sons que vous pouvez assigner à chaque pad.
Pour assigner un son à un pad :
1. Appuyez sur la touche Rhythm puis tournez la molette afin de sélectionner une chanson.
2. Appuyez sur la touche Pad Assign.
3. Frappez sur un pad afin de modifier le son correspondant. Chaque pression successive
permet de jouer et de sélectionner le son suivant. Arrêtez de frapper dès que vous
entendez le son que vous souhaitez utiliser pour ce pad.
4. Facultatif : Pour modifier le son d’un autre pad, répétez l’étape 3.
5. Lorsque vous avez terminé, appuyez sur la touche Pad Assign. Les sons sont maintenant
assignés à ces pads.
Fonction Game
CompactKit 4 dispose d’un jeu intégré qui peut vous aider à
apprendre divers enchaînements de batterie. À l’écran, des barres
descendront dans chaque colonne (représentant chaque pad).
Lorsqu’une barre atteint la ligne, frappez le pad correspondant.
Pour jouer :
1. Appuyez sur la touche Game.
2. Tournez la molette afin de sélectionner un rythme. 1, 2 ou 3
étoiles s’afficheront dans le coin supérieur droit afin d’indiquer
le niveau de difficulté : 1 indique facile, 2 normal et 3 difficile.
3. Appuyez sur la touche Start/Stop afin de commencer à jouer.
Lorsque chaque barre atteint la ligne au bas de l’écran, frappez
le pad correspondant.
4. Lorsque le jeu se termine, votre score devrait s’afficher (000–
100 %). Après 3 secondes, le jeu recommence.
5. Appuyez sur la touche Start/Stop afin de cesser de jouer.
Fonction Coach
CompactKit 4 dispose d’un instructeur de batterie intégré qui peut
vous aider à améliorer vos capacités à jouer divers enchaînements
de batterie. À l’écran, des barres descendront dans chaque
colonne (représentant chaque pad). Lorsqu’une barre atteint la ligne
au bas de l’écran, frappez le pad correspondant.
Pour utiliser l’instructeur intégré :
1. Appuyez sur la touche Coach.
2. Tournez la molette afin de sélectionner un enchaînement. 1, 2 ou
3 étoiles s’afficheront dans le coin supérieur droit afin d’indiquer
le niveau de difficulté : 1 indique facile, 2 normal et 3 difficile.
3. Appuyez sur la touche Start/Stop afin de commencer à jouer.
Lorsque chaque barre atteint la ligne au bas de l’écran, frappez
le pad correspondant.
4. Lorsque la session se termine, votre score devrait s’afficher
(000–100 %). Après 3 secondes, la session recommence.
5. Appuyez sur la touche Start/Stop afin de cesser de jouer.

11
Guida per l’uso (Italiano)
Introduzione
Contenuti della confezione
CompactKit 4 Guida per l’uso
(2) Bacchette Manuale di sicurezza e garanzia
Adattatore di alimentazione
Assistenza
Per le ultime informazioni in merito a questo prodotto (requisiti di sistema, informazioni sulla
compatibilità, ecc.) e per la registrazione del prodotto, recarsi alla pagina alesis.com.
Per ulteriore assistenza sul prodotto, recarsi alla pagina alesis.com/support.
Caratteristiche
Pannello superiore
4
55
5
6
7
89
1011
12 13 14
15 16
17
5
2
1
3
1. Ingresso di alimentazione: collegare questo ingresso ad una presa di alimentazione
servendosi dell’adattatore di alimentazione in dotazione.
2. Interruttore di alimentazione: servirsi di questo interruttore per accendere e spegnere il
CompactKit 4.
3. Uscita cuffie: collegare cuffie stereo standard da 1/8” (3,5 mm) (opzionali, vendute
separatamente) a questa uscita. quando le cuffie sono collegate, l’altoparlante viene silenziato.
4. Altoparlante: il suono viene riprodotto tramite questo altoparlante. Quando le cuffie sono
collegate all’uscita cuffie, questo altoparlante verrà silenziato.
5. Pad: battere questi pad per suonare il CompactKit 4.
6. Display: questo LCD mostra l’operazione corrente del CompactKit 4.
7. Manopola: girare questa manopola per regolare le impostazioni illustrate a display.
Pad 1
Pad 4
Pad 2
Pad 3

12
8. Volume Master: premere questo tasto e girare la manopola per regolare il volume master.
9. Rhythm Volume (volume ritmo): premere questo tasto e girare la manopola per regolare
il volume dell’accompagnamento (tutto ciò che non comprende i suoni di batteria in una
canzone).
10. Rhythm (ritmo): premere questo tasto e girare la manopola per selezionare una canzone.
11. Demo: premere questo tasto per riprodurre la canzone dimostrativa (demo).
12. Tempo/Tap: premere questo tasto e girare la manopola per regolare il tempo.
Alternativamente, battere qualsiasi pad 3 o 4 volte (in base alla divisione metrica della
canzone corrente) al tempo desiderato. La canzone corrente inizierà ad essere riprodotta
al tempo basato sui ultimi due battiti.
13. Pad Assign: premere questo tasto e battere un pad per modificarne il suono. Ciascun
colpo riprodurrà e selezionerà il suono successivo. Dopo aver sentito il suono che si
desidera utilizzare per quel pad, premere nuovamente il tasto.
14. Chord (accordo): premere questo tasto per attivare o disattivare l’accompagnamento.
15. Coach (istruttore): premere questo tasto e girare la manopola per selezionare un assolo
da suonare servendosi della funzione istruttore. Si veda Operazione > Istruttore per
saperne di più.
16. Start/Stop: premere questo tasto per avviare o interrompere la canzone corrente.
17. Game (gioco): premere questo tasto e girare la manopola per selezionare un ritmo da suonare
servendosi della funzione Gioco (game). Si veda Operazione > Gioco
per saperne di più.
Operazione
Canzoni
Il CompactKit 4 presenta diverse canzoni composte da parti di batteria e accompagnamento
(“ritmo”). La canzone può essere suonata con o senza accompagnamento.
Per selezionare una canzone, premere Rhythm (ritmo) e girare la manopola.
Per avviare o interrompere la riproduzione della canzone, premere Start/Stop.
Suggerimento: alternativamente, premere Tempo e battere un qualsiasi pad 3 o 4 volte (in
base alla divisione metrica corrente della canzone) al tempo desiderato. La canzone corrente
inizierà ad essere riprodotta al tempo basato sui ultimi due battiti.
Per avviare o interrompere la riproduzione della canzone dimostrativa, premere Demo.
Per regolare il volume master, premere Volume Master e girare la manopola.
Per regolare il volume dell’accompagnamento, premere Rhythm Volume e girare la manopola.
Per regolare il tempo della canzone, premere Tempo, e girare la manopola.
Suggerimento: alternativamente, premere Tempo e battere un qualsiasi pad 3 o 4 volte (in
base alla divisione metrica corrente della canzone) al tempo desiderato. La canzone corrente
inizierà ad essere riprodotta al tempo basato sui ultimi due battiti.
Per attivare o disattivare l’accompagnamento, premere Chord.

13
Suoni
CompactKit 4 presenta numerosi suoni diversi che è possibile assegnare a ciascun pad di batteria.
Per assegnare un suono a un pad:
1. Premere Rhythm e girare la manopola per selezionare una canzone.
2. Premere Pad Assign.
3. Battere un pad per cambiarne il suono. Ciascun colpo riprodurrà e selezionerà il suono
successivo. Fermarsi quando si sente il suono che si desidera utilizzare per quel pad.
4. Opzione: per cambiare il suono di un altro pad, ripetere la fase 3.
5. Una volta terminato, premere Pad Assign. I suoni sono ora assegnati a questi pad.
Game (gioco)
Il CompactKit 4 ha un gioco incorporato che aiuta a imparare i
pattern di batteria. A display, in ciascuna colonna (che rappresenta
ciascun pad) scendono delle barre. Quando una barra supera la
linea, battere il pad corrispondente.
Per giocare:
1. Premere Game.
2. Girare la manopola per selezionare un ritmo. Nell’angolo
superiore destro compaiono 1, 2 o 3 stelle per indicare il livello
di difficoltà: 1 è facile, 2 normale, 3 difficile.
3. Premere Start/Stop per iniziare a giocare. Quando ciascuna
barra raggiunge la linea in fondo al display, battere il pad
corrispondente.
4. Quando il gioco finisce, si visualizzerà il punteggio (000–100%).
Dopo tre secondi, il gioco si riavvia.
5. Premere Start/Stop per smettere di giocare.
Coach (istruttore)
Il CompactKit 4 ha un istruttore di batteria incorporato che può
aiutare a migliorare le proprie capacità nell’imparare pattern di
batteria generali. A display, in ciascuna colonna (che rappresenta
ciascun pad) scendono delle barre. Quando una barra supera la
linea, battere il pad corrispondente.
Per utilizzare l’istruttore:
1. Premere Coach.
2. Girare la manopola per selezionare un pattern. Nell’angolo
superiore destro compaiono 1, 2 o 3 stelle per indicare il livello
di difficoltà: 1 è facile, 2 normale, 3 difficile.
3. Premere Start/Stop per iniziare a giocare. Quando ciascuna
barra raggiunge la linea in fondo al display, battere il pad
corrispondente.
4. Quando la sessione finisce, si visualizzerà il punteggio (000–
100%). Dopo 3 secondi, l’istruttore si riavvia.
5. Premere Start/Stop per smettere di giocare.

14
Benutzerhandbuch (Deutsch)
Einführung
Lieferumfang
CompactKit 4 Benutzerhandbuch
(2) Drum-Sticks Sicherheitshinweise & Garantieinformationen
Netzteil
Kundendienst
Für die neuesten Informationen zu diesem Produkt (Systemanforderungen, Informationen zur
Kompatibilität etc.) und für die Produktregistrierung besuchen Sie alesis.com.
Für zusätzlichen Produkt-Support besuchen Sie alesis.com/support.
Funktionen
Oberseite
4
55
5
6
7
89
1011
12 13 14
15 16
17
5
2
1
3
1. Stromversorgung: Verwenden Sie das mitgelieferte Netzteil, um diesen Eingang mit einer
Steckdose zu verbinden.
2. Netzschalter: Verwenden Sie diesen Schalter, um CompactKit 4 ein- oder auszuschalten.
3. Kopfhörerausgang: Verbinden Sie 3,5 mm Stereokopfhörer (optional, separat erhältlich) mit
diesem Ausgang. Wenn Kopfhörer angeschlossen sind, ist der Lautsprecher stummgeschaltet.
4. Lautsprecher: Der Ton wird von diesem Lautsprecher ausgegeben. Wenn Kopfhörer an
den Kopfhörerausgang angeschlossen sind, ist der Lautsprecher stummgeschaltet.
5. Pads: Schlagen Sie diese Pads an, um das CompactKit 4 zu spielen.
6. Display: Das LCD zeigt den aktuellen Betrieb des CompactKit 4.
7. Wahlrad: Richten Sie dieses Rad, um die Einstellung anzupassen, die am Display
angezeigt wird.
Pad 1
Pad 4
Pad 2
Pad 3

15
8. Master-Lautstärke: Drücken Sie diese Taste und drehen das Wahlrad, um die Master-
Lautstärke einzustellen.
9. Rhythmuslautstärke: Drücken Sie diese Taste und drehen Sie das Wahlrad, um die
Lautstärke des Begleitrhythmus einzustellen (alles außer den Drum-Sounds in einem Song).
10. Rhythmus: Drücken Sie diese Taste und drehen Sie das Wahlrad, um einen Song
auszuwählen.
11. Demo: Drücken Sie diese Taste, um den Demo-Song zu spielen.
12. Tempo/Tap: Drücken Sie diese Taste und drehen das Wahlrad, um das Tempo
einzustellen. Wahlweise können Sie jedes Pad 3 oder 4 Mal im gewünschten Tempo
betätigen (je nach Taktart des aktuellen Songs). Der aktuelle Song wird nun im Tempo
abgespielt, das auf Ihren letzten beiden Schlägen basiert.
13. Pad Zuweisen: Drücken Sie diese Taste und betätigen Sie anschließend ein Pad, um den
Klang zu ändern. Jeder Schlag wird den nächsten Sound abspielen und auswählen.
Nachdem Sie den Sound, den Sie für das Pad verwenden möchten, angehört haben,
drücken Sie erneut diese Taste.
14. Akkord: Drücken Sie diese Taste zum Aktivieren oder Deaktivieren der Begleitung.
15. Coach: Drücken Sie diese Taste und drehen Sie das Wahlrad, um ein Solo auszuwählen, das
Sie mit der Coach-Funktion spielen möchten. Siehe Betrieb > Coach, um mehr zu erfahren.
16. Start/Stopp: Drücken Sie diese Taste zum Starten oder Stoppen des aktuellen Songs.
17. Spiel: Drücken Sie diese Taste und drehen Sie das Wahlrad, um einen Rhythmus auszuwählen,
den Sie mit der Spiel-Funktion spielen möchten. Siehe Betrieb > Spiel, um mehr zu erfahren.
Betrieb
Songs
CompactKit 4 hat mehrere Songs, die aus Drum-Parts und der Begleitung (“Rhythmus”)
bestehen. Sie können den Song mit oder ohne Begleitung spielen.
Um einen Song auszuwählen, drücken Sie Rhythmus und drehen dann das Wahlrad.
Um den Song abzuspielen oder zu stoppen, drücken Sie Start/Stopp.
Tipp: Wahlweise können Sie Tempo drücken und dann jedes Pad 3 oder 4 Mal im
gewünschten Tempo betätigen (je nach Taktart des aktuellen Songs). Der aktuelle Song wird
nun im Tempo abgespielt, das auf Ihren letzten beiden Schlägen basiert.
Um den Demo-Song abzuspielen oder zu stoppen, drücken Sie Demo.
Um die Master-Lautstärke einzustellen, drücken Sie Master-Lautstärke und drehen das
Wahlrad.
Um die Lautstärke der Begleitung einzustellen, drücken Sie Rhythmuslautstärke und
drehen das Wahlrad.
Um das Tempo des Songs einzustellen, drücken Sie Tempo und drehen das Wahlrad, um
das Tempo einzustellen.
Tipp: Wahlweise können Sie Tempo drücken und dann jedes Pad 3 oder 4 Mal im
gewünschten Tempo betätigen (je nach Taktart des aktuellen Songs). Der aktuelle Song wird
nun im Tempo abgespielt, das auf Ihren letzten beiden Schlägen basiert.
Drücken Sie Akkorde, um die Begleitung zu aktivieren oder zu deaktivieren.

16
Sounds
CompactKit 4 hat einige verschiedene Sounds, die Sie einem beliebigen Drum-Pad zuweisen
können.
Um einem Pad einen Sound zuzuweisen:
1. Drücken Sie Rhythmus und drehen dann das Wahlrad, um einen Song auszuwählen.
2. Drücken Sie Pad zuweisen.
3. Betätigen Sie ein Pad, um den Sound zu ändern. Jeder Schlag wird den nächsten Sound
abspielen und auswählen. Hören Sie auf, nachdem Sie den Sound gehört haben, den Sie
für das Pad verwenden möchten.
4. Optional: Um den Sound eines anderen Pads zu ändern, wiederholen Sie Schritt 3.
5. Wenn Sie fertig sind, drücken Sie Pad zuweisen. Die Sounds sind nun diesen Pads
zugewiesen.
Spiel
CompactKit 4 hat ein integriertes Spiel, das Ihnen helfen kann,
verschiedene Drum-Patterns zu erlernen. Am Display bewegen sich
Balken in jeder Spalte nach unten (die Spalten stellen die jeweiligen
Pads dar). Betätigen Sie das entsprechende Pad, sobald der
Balken die Linie erreicht hat.
Um das Spiel zu spielen:
1. Drücken Sie Spiel.
2. Drehen Sie das Wahlrad, um einen Rhythmus auszuwählen. Die
rechte, obere Ecke zeigt 1, 2 oder 3 Sterne, um den
Schwierigkeitsgrad anzuzeigen: 1 für einfach, 2 für normal und
3 für schwierig.
3. Drücken Sie Start/Stopp, um die Wiedergabe zu starten. Drücken Sie das entsprechende
Pad, sobald jeder Balken die Linie am unteren Rand des Displays erreicht.
4. Wenn das Spiel beendet ist, sehen Sie Ihre Punktzahl (000–100%). Nach 3 Sekunden wird
das Spiel neu gestartet.
5. Drücken Sie Start/Stopp, um das Spiel zu beenden.
Coach
CompactKit 4 hat einen integrierten Drum-Coach, der Ihnen beim
Erlernen von allgemeinen Drum-Patterns helfen kann. Am Display
bewegen sich Balken in jeder Spalte nach unten (die Spalten stellen
die jeweiligen Pads dar). Betätigen Sie das entsprechende Pad,
sobald der Balken die Linie erreicht hat.
Um den Coach zu verwenden:
1. Drücken Sie Coach.
2. Drehen Sie das Wahlrad, um ein Pattern auszuwählen. Die rechte,
obere Ecke zeigt 1, 2 oder 3 Sterne, um den Schwierigkeitsgrad
anzuzeigen: 1 für einfach, 2 für normal und 3 für schwierig.
3. Drücken Sie Start/Stopp, um die Wiedergabe zu starten.
Drücken Sie das entsprechende Pad, sobald jeder Balken die
Linie am unteren Rand des Displays erreicht.
4. Wenn die Sitzung beendet ist, sehen Sie Ihre Punktzahl (000–100%). Nach 3 Sekunden
wird der Coach neu gestartet.
5. Drücken Sie Start/Stopp, um das Spiel zu beenden.

17
Appendix (English)
Sounds
Kick (Bass) Drum
27 Hi-Hat & Kick 50 Cowbell 2
1 Standard Kick 28 Standard Hi-Hat Closed 51 Cowbell 3
2 Analog Kick 1 29 Standard Hi-Hat Open 52 Timbale Low
3 Rock Kic
k
30 Analog Hi-Hat Closed 53 Timbale 1
4 Room Kick 31 Analog Hi-Hat Open 54 Timbale 2
5 Analog Kick 2 55 Timbale & Kick
6 Hard Kick
Toms
56 Metronome Clic
k
7 Acoustic Kic
k
32 Standard Tom 1 57 Metronome Bell
8 Standard Kick 2 33 Standard Tom 2 58 Hand Clap
9 Standard Kick 3 34 Standard Tom 3 59 Tambourine 1
35 Standard Tom 4 60 Tambourine 2
Snare Drum
36 Tom & Snare 61 Bongo Hi
10 Standard Snare 1 37 Tom Low 62 Bongo Low
11 Standard Snare 2 38 Acoustic Tom 63 Conga Open
12 Synth Snare 1 39 Rock Tom 64 Conga Mute
13 Synth Snare 2 40 Analog Tom 65 Cabasa
14 Synth Snare 3 66 Maracas
15 Analog Snare 1
Crash
67 Claves
16 Standard Snare Rim 41 Standard Crash 1 68 Triangle Open
17 Standard Snare 3 42 Standard Crash 2 69 Triangle Mute
18 Acoustic Snare 43 Standard Crash 3 70 Analog Cowbell
19 Rock Snare 44 Analog Crash 71 One
20 Rock Snare Rim 72 Two
21 Analog Snare Rim
Ride
73 Three
22 Analog Snare 2 45 Ride 1 74 Fou
r
23 House Snare 46 Ride 2 75 OK
47 Ride 3 76 Good
Hi-Hat
48 Standard Ride 77
V
ery Good
24 Hi-Hat 1 78 Excellent
25 Hi-Hat 2
Percussion
79 FX
26 Hi-Hat & Snare 49 Cowbell 1 80 BLJ Trill

18
Songs
8-Beat Dance
35 Samba
1 8-Beat 17 Pop Dance 36 Latin Roc
k
2 8-Beat Ballad 18 Disco 37 Cha Cha
3 8-Beat Pop 19 House 38 Mambo
4 8-Beat Roc
k
20 Hip Hop 39 Rhumba
5 Rock 1 21 Rap
6 Rock 2 22 Shuf
f
le
Country
7 Hard Roc
k
23 Slow Roc
k
40 Country
8 Heavy Metal 1 24 Soul 41 Country Roc
k
9 Heavy Metal 2
Jazz March & Waltz
6/8 Pop
25 Cool Jazz 42 March
10 6/8 Pop 1 26 Jazz Swing 43 Polka
11 6/8 Pop 2 27 Blues 1 44 Waltz 1
28 Blues 2 45 Waltz 2
16-Beat
29 Fusion 1
12 16-Beat Pop 30 Fusion 2
Sound Effects
13 16-Beat Fun
k
31 Bounce 46 SFX 1
47 SFX 2
Funk Latin
48 SFX 3
14 Fun
k
32 Reggae 1 49 SFX 4
15 Funk Pop 33 Reggae 2 50 SFX 5
16 Blues Fun
k
34 Bossa Nova

19
Technical Specifications
Pads
4 velocity-sensitive pads with indication lights
Sounds
70 drum and percussion sounds
10 effect sounds
Songs
50 songs
20 coach songs
1 demo song
Connections
(1) 1/8” (3.5 mm) stereo headphone output
(1) power input
Power
9V DC, 800 mA, center-positive power adapter (included)
(6) C batteries
Dimensions
(width x depth x height)
18.1” x 10.2” x 5.9”
460 mm x 260 mm x 150 mm
Weight
3.3 lbs.
1.5 kg
Specifications are subject to change without notice.
Trademarks and Licenses
Alesis is a trademark of inMusic Brands, Inc., registered in the U.S. and other countries.
All other product or company names are trademarks or registered trademarks of their
respective owners.

-
 1
1
-
 2
2
-
 3
3
-
 4
4
-
 5
5
-
 6
6
-
 7
7
-
 8
8
-
 9
9
-
 10
10
-
 11
11
-
 12
12
-
 13
13
-
 14
14
-
 15
15
-
 16
16
-
 17
17
-
 18
18
-
 19
19
-
 20
20


Alesis CompactKit 4 Benutzerhandbuch
- Kategorie
- Musiktrommeln
- Typ
- Benutzerhandbuch
in anderen Sprachen
- français: Alesis CompactKit 4 Mode d'emploi
- español: Alesis CompactKit 4 Guía del usuario
- italiano: Alesis CompactKit 4 Guida utente