Kenwood KM082 Bedienungsanleitung
- Kategorie
- Mischer
- Typ
- Bedienungsanleitung

KM080 series
TYPE KM08
instructions
istruzioni
instrucciones
Bedienungsanleitungen
gebruiksaanwijzing

E
nglish 4 - 18
N
ederlands 19 - 35
Français 36 - 52
Deutsch 53 - 68
Italiano 69 - 84
Português 85 - 100
Español 101 - 116
Ekkgmij 117 - 132

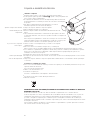
know your Kenwood Cooking Chef Kitchen Machine
safety
●
Read these instructions carefully and retain for future
reference.
●
Remove all packaging and any labels.
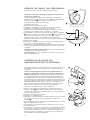
important note - electronic medical implants
●
Like all induction heating products, this appliance generates short-range
magnetic fields. If any user or person in close proximity has a
pacemaker or other active implants, please consult a doctor before use,
concerning any possible incompatibility to prevent any risk to health.
●
Switch off and unplug the appliance before fitting or removing
tools/attachments, after use and before cleaning.
●
Keep body parts, jewellery and loose clothing away from moving parts
and fitted attachments.
●
Never put your fingers etc., into the hinge mechanism.
●
Never leave the appliance on unattended.
●
Never use a damaged appliance. Get it checked or repaired: see
‘service and customer care’, page 16.
●
Never use an unauthorised attachment or more than one attachment at
once.
●
Never exceed the maximum capacities on page 15 and when using the
induction heater never exceed the 3 litre maximum fill level marked on
the inside of the bowl.
●
When using an attachment, read the safety and usage instructions that
come with it.
●
Take care when lifting this appliance as it is heavy. Ensure the head is
locked and that the bowl, tools, outlet covers and cord are secure before
lifting.
●
Never let the cord hang down where a child could grab it.
●
Never let the power unit, cord or plug get wet.
●
Be careful when handling or touching any part of the appliance when
being used in the cook mode or after cooking, IN PARTICULAR THE
BOWL, SPLASHGUARD AND TOOLS as they will remain HOT long
after the appliance has been switched off. Use the handles to remove
and carry the bowl. Use oven gloves when handling the hot bowl and
hot mixing tools.
●
The underside of the bowl will remain hot long after the heating has
stopped. Use caution when handling and use the work surface
protection mat when placing the bowl on heat sensitive surfaces.
●
Be careful of steam escaping from the mixer bowl particularly when
opening the lid in the splashguard or when raising the mixer head.
●
If transferring hot food from the mixer to the liquidiser, always allow the
ingredients to cool to room temperature before placing in the liquidiser.
●
Only use the bowl and tools supplied with this appliance. Never use the
bowl with any other heat source.
●
Never operate the appliance in the cook mode with the bowl empty.
4
English

5
●
Never insert anything through the air vents.
●
When using this appliance ensure it is positioned on a level surface
away from the edge. Make sure it is at least 10 cm from walls and
ensure that the vents are not blocked. Do not position below
overhanging cupboards.
●
For the correct and safe operation of the induction cooker ensure that
the bowl base and temperature sensors are clean and dry before
cooking.
●
As with all induction cooking appliances do not place credit cards,
magnetic media or sensitive electronic equipment near to the appliance
when in use.
●
Do not use the appliance for deep frying foods.
●
Always ensure food is thoroughly cooked before eating.
●
Food should be eaten shortly after cooking or allowed to cool quickly
and then refrigerated as soon as possible.
●
Misuse of your appliance can result in injury.
●
Appliances can be used by persons with reduced physical, sensory or
mental capabilities or lack of experience and knowledge if they have
been given supervision or instruction concerning use of the appliance in
a safe way and if they understand the hazards involved.
●
Children should be supervised to ensure that they do not play with the
appliance.
●
This appliance shall not be used by children. Keep the appliance and its
cord out of reach of children.
●
Only use the appliance for its intended domestic use. Kenwood will not
accept any liability if the appliance is subject to improper use, or failure
to comply with these instructions.

6
before plugging in
●
Make sure your electricity supply is the same as the one shown on the underside of your machine.
●
WARNING: THIS APPLIANCE MUST BE EARTHED.
●
This appliance conforms to EC directive 2004/108/EC on Electromagnetic Compatibility and EC regulation no.
1935/2004 of 27/10/2004 on materials intended for contact with food.
b
efore using for the first time
Wash the parts: see ‘care and cleaning’ page 16.
introduction
T
hank you for buying this Kenwood Cooking Chef Kitchen Machine, we hope you will enjoy many years use.
Kenwood has nearly 60 years of experience and expertise in developing our Kitchen Machines and their wide
variety of attachments. Kenwood Chef Kitchen Machines are renowned for being more than just a food mixer.
I
n the development of Cooking Chef we have taken the well-known versatility of the Chef a step further by
i
ntroducing integrated Induction Cooking directly beneath the mixing bowl. You can now enjoy all of the benefits
of everyday ‘cold bowl’ planetary mixing when preparing your favourite cakes, pastries and dough, plus the
added advantage of heating and cooking directly in the bowl combined with planetary mixing. The opportunities
are endless.
The Kenwood Cooking Chef with its range of optional attachments truly is the complete food preparation system.
Strong, Reliable, Versatile, Kenwood.
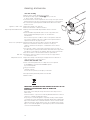
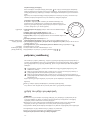
What is Induction Cooking and how does it work?
Induction cooking is an advanced cooking method that employs the principles of electromagnetic induction.
When an electric current is passed through a copper coil in the induction cooking area it creates an electro-
magnetic field. When the Cooking Chef bowl is locked into position the circuit is completed by a special layer of
stainless steel in the bowl base. In turn this creates a large amount of thermal energy that passes through to the
contents of the bowl, thus heating the food.
Induction cooking is extremely energy efficient because it only produces heat in the base of the bowl. Other
heating methods such as gas hobs waste almost 50% of the heat energy around the sides of the pan. Indeed
the Induction cooking area on your Cooking Chef only feels hot during and immediately after cooking because of
the heat transferred back from the contents of the bowl. All of this means that Induction cooking is very efficient,
very safe and very clean.
The cooking functionality of your Kenwood Cooking Chef is similar to using a saucepan on your cooker hob. The
added advantage is that the Chef will automatically stir your food and regulate the cooking temperature to your
precise requirements, leaving you free to confidently perform other tasks in your kitchen.
The Cooking Chef uses induction heating technology which is extremely efficient. When compared to cooking on
a gas or electric hob, you may find that cooking times are reduced or that you need to cook on a lower
temperature.This should be considered when using your appliance for the first time or when experimenting with a
new recipe. Make sure that if you start cooking at a high temperature, you keep watching and reduce the heat
when necessary to stop food burning and sticking to the bowl, just as you would with your saucepan. Generally
the Cooking Chef will automatically heat the food to your desired temperature in the quickest possible time. It is
therefore not necessary to set the temperature higher than you require in order to reduce cooking times. At this
stage you should also pay attention to the frequency of the stir settings. When cooking at higher temperatures
you may find it necessary to stir constantly using stir setting . Stir settings and are useful in
maintaining the consistency of your food during longer cooking periods on a low simmer.

Selection of the correct bowl tool is also important at this stage. Further on in this book we have suggested the
most appropriate uses for each tool and with experience you will quickly understand which is best for each task.
When cooking you will find that the high temperature flexible beater is best used to obtain a very smooth
c
onsistency for sauces and creams, whereas the stirring tool is better when cooking foods that need to maintain
a
more solid consistency, such as stews, casseroles, ragouts etc. Our recipe book recommends the best tools
for each recipe, and you may also find that changing the tool for different processes during your meal preparation
gives better results.
D
uring cooking and immediately afterwards, the bowl, splashguard and bowl tool will be hot – just as your
saucepan would be. Please take care when touching any of these. It is important to also remember that the
cooking process will generate steam and condensation so take care when looking into the bowl, lifting the food
chute lid or the Cooking Chef/machine head to view or access the bowl. You should also warn others when the
machine is cooking or hot so they will also be careful. When touching or removing hot parts it is advised to use
o
ven gloves and only carry the bowl using the handles provided. You may also find the work surface protection
mat useful to protect heat sensitive surfaces.
When heating liquids or food with a high water content, the accuracy of the temperature reading is usually within
+
/- 5°C. The accuracy of the temperature display and control will vary depending upon the consistency of your
b
owl contents, the volume of your bowl contents, the frequency of stirring and the bowl tool that is used. Again
this is similar to cooking on a hob, for example, where a large quantity of food in a large saucepan is heated but
not stirred thoroughly. The food will be hot at the base of the saucepan, or even burnt, whereas the food near the
top will be much cooler.
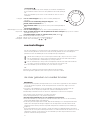
In addition to the temperature display the machine has a small blue LED. This will flash until the machine has
reached the selected temperature. Once the required temperature is reached the light will stop flashing. However,
you should note that when you add further ingredients to the bowl the blue LED will begin to flash again as the
temperature of the bowl contents will be reduced by cold ingredients. You may also notice the static light begin
to flash if the mixing frequency is increased.
You will quickly find that your Kenwood Cooking Chef is simple to use and will help make your everyday food
preparation easy.
7

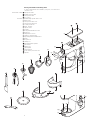
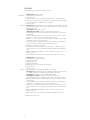
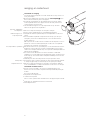
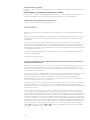
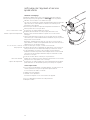
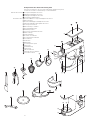
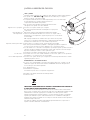
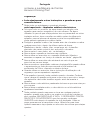
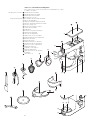
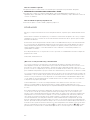
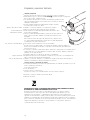
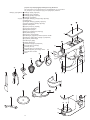
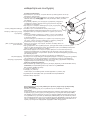
know your Kenwood Cooking Chef
To buy an attachment not included in your pack, see service and
customer care.
a
ttachment outlets
h
igh speed outlet
medium speed outlet
s
low speed outlet
tool socket
the mixer
medium/high speed outlet cover
m
ixer head
slow speed outlet cover
s
low speed outlet lever
cooking chef bowl
head - lift lever
s
peed control
air vents
bowl pedestal/induction area
drain hole
temperature sensors
s
tainless steel K beater
high temperature flexible beater
whisk
d
ough hook
stirring tool
high temperature spatula
heat shield
rubber seal
splashguard
feed chute lid
work surface protection mat
spanner
8

9
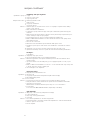
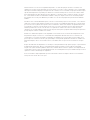
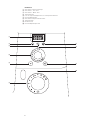
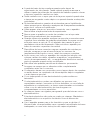
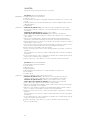
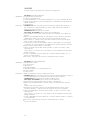
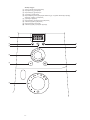
control panel
timer/temperature display
timer decrease button
t
imer increase button
t
emperature control
pulse button/high speed, high temperature whisk button
speed control
timer/temperature selector button
t
emperature indicator light
fold button
speed control indicator light

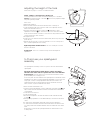
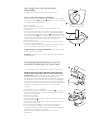
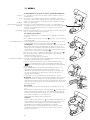
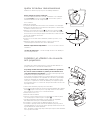
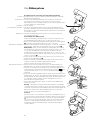
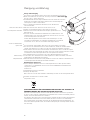
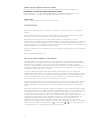
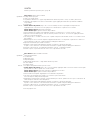
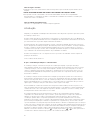
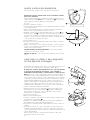
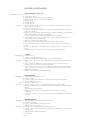
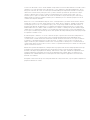
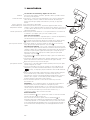
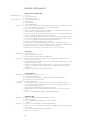
adjusting the height of the tools
Please refer to page 11 on how to assemble the mixer.
whisk, stainless steel K beater, stirring tool
For best performance the whisk, K beater and stirring tool should be
a
lmost touching the bottom of the bowl
.
If necessary adjust the height
using the spanner provided.
Here’s how:
1
Unplug the appliance.
2
Raise the mixer head and insert the whisk, beater or stirring tool.
3 Lower the mixer head. If the clearance needs to be adjusted, raise the
mixer head and remove the tool.
4 Using the spanner provided loosen the nut
sufficiently to allow
a
djustment of the shaft
.
To lower the tool closer to the bottom of the
b
owl, turn the shaft anti-clockwise. To raise the tool away from the bottom
of the bowl turn the shaft clockwise.
5 Re-tighten the nut.
6 Fit the tool to the mixer and lower the mixer head. (Check its position see
p
oints above).
7 Repeat the above steps as necessary until the tool is set correctly. Once
this is acheived tighten the nut securely.
high temperature flexible beater - this tool should just touch the
bottom of the bowl.
dough hook - this tool is set at the factory and should require no
adjustment.
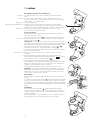
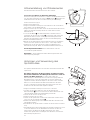
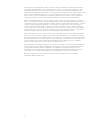
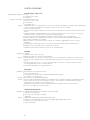
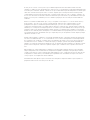
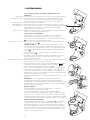
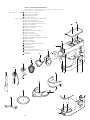
to fit and use your splashguard
assembly
The splashguard assembly consists of 2 pieces: the heat shield and the
splashguard.
The heat shield must be fitted during cooking operations
otherwise the mixer will not operate and error code E:03 will
be displayed. The heat shield is to protect the mixer head from steam
produced during the cooking process.
If necessary both the heat shield and the splashguard can be fitted to retain
ingredients in the bowl e.g. when mixing light ingredients such as flour and
icing sugar, or when cooking ingredients where moisture needs to be
retained in the bowl. The splashguard should not be fitted to the bowl
unless used in conjunction with the heat shield.
1 Raise the mixer head until it locks.
2 Push the heat shield upwards onto the underside of the mixer head
until
fully located. The heat shield must never be used without the rubber seal
correctly fitted.
3 Fit the bowl onto the base.
4 Lower the mixer head.
5 Rest the splashguard on the bowl rim and then slide forward until fully
located
.
●
During mixing, ingredients can be added directly to the bowl via the feed
chute.
6 To remove the splashguard simply slide it away from the appliance.
7 To remove the heat shield, raise the mixer head until it locks. Remove the
tool, then pull the heat shield downwards from the underside of the mixer
head.
Note: Only fit or remove the splashguard when the mixer head is in the
locked position.
10

the mixer
t
he mixing tools and some of their uses
K
-beater
●
F
or making cakes, biscuits, pastry, icing, fillings, éclairs and mashed
potato.
whisk
●
For eggs, cream, batters, fatless sponges, meringues, cheesecakes,
mousses, soufflés. Don’t use the whisk for heavy mixtures (e.g. creaming
f
at and sugar) - you could damage it.
d
ough hook
●
F
or yeast mixtures only.
high temperature flexible beater
●
Suitable for many cooking operations in particular cooking custards,
scrambled eggs and sauces. Ideal for scraping mixes both hot and cold
from the sides of the bowl during mixing. Also suitable to sauté vegetables.
s
tirring tool
●
S
uitable to use during cooking to maintain the consistency of food
e.g. chicken, fish, vegetables and fruit.
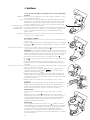
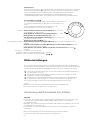
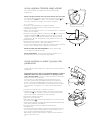
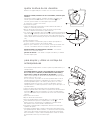
to use your mixer
B
efore using the mixer ensure the temperature and speed controls are
switched to the off ‘O’ positions.
1 Turn the head-lift lever clockwise
and raise the mixer head until it locks.
to fit a tool 2 Place the tool in the socket, locating the shaft pin in the groove and then
turn to lock into position .
s
tirring tool - to fit the stirring tool, insert the shaft into the socket, then
line up the slot on the extension so that it is located beneath the metal pin on
the underside of the mixer head. Hold the paddle and turn so that the shaft
pin is below the groove then push up and turn to lock into position
.
3 Fit the bowl onto the base - press down and turn clockwise .
4 To lower the mixer head, raise it slightly, then turn the head lift lever clockwise.
Lower into the locked position.
to remove a tool
●
Reverse step 2 above. (Always use oven gloves to remove tools after
cooking).
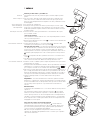
5 Connect the mixer to the power supply. The speed and temperature
indicator lights will illuminate briefly. The display will show and then
clear leaving the power on indicator illuminated .
6 Turn the speed control to the desired setting (see page 12 for
recommendations), the mixer will start and the speed control indicator light
will flash. The timer will count up in 1 second intervals. The speed can be
changed at any time whilst the mixer is operating.
7 Stop the mixer by returning the speed control to the off ‘O’ position.
Important - If at any time, the mixer head is raised during an operation,
the mixer will automatically stop and beep and it will not re-start when the
mixer head is lowered. To re-start the mixer turn the speed control to the
off ‘O’ position and then re-select a speed.
pulse button
The pulse button can only be used when the speed control is in the off ‘O’
position.
To select pulse, press the pulse button and the mixer will run at maximum
speed for as long as the button is held in this position. If the bowl contents
are above 60°C, the speed will increase gradually. This will be accompanied
by a beeping sound and the speed and temperature indicator lights will flash
quickly.
fold button
Press and release the fold button and the mixer will automatically
operate on minimum speed for 2 revolutions and then stop. The button
can be pressed for a longer operation or pressed repeatedly as needed to
combine ingredients.
Note: If the fold button is pressed whilst the motor is running it will perform
the standard fold function and then return to the selected speed.
P
11

sp
eed control
The following speeds are a guide only and will vary depending upon the
quantity and the temperature of the ingredients being mixed etc.
Turn the speed control clockwise to obtain speeds ‘min’ through to ‘max’.
K-beater
●
creaming fat and sugar start on min, gradually increasing to ‘max’.
●
beating eggs into creamed mixtures 4 - ‘max’.
●
folding in flour, fruit etc min - 1
●
a
ll in one cakes start on min speed, gradually increase to max.
●
r
ubbing fat into flour min - 2.
high temperature flexible beater
●
creaming fat and sugar start on min, gradually increasing to 3.
●
scraping mixes both hot and cold from the sides of the
bowl start on min gradually increasing to 3.
●
s
auteing vegetables, stirring risotto and polenta etc.,
use .
whisk
●
Gradually increase to ‘max’.
dough hook
●
Start on ‘min’, gradually increasing to 1.
stirring tool
●
Use with the stir settings only
,
,
.
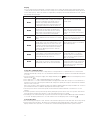
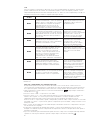
stir settings
T
o select the stir settings turn the speed control anti-clockwise These are most suitable when the mixer
is used in the cook mode. Please note, to use the stir speeds all outlet covers must be fitted.
– Use this setting when a constant slow speed is required e.g. stirring sauces.
– When the speed control is set to this position, the mixer will intermittently operate on a slow
speed once every 5 seconds for approximately 2 revolutions.
– When the speed control is set to this position, the mixer will intermittently operate on a slow
speed once every 30 seconds, making it suitable for stirring casseroles etc.
Return the speed control to the off ‘O’ position to stop the operation.
Note:
●
Whenever a speed is selected, the speed indicator light will flash.
●
A high pitched sound may be heard from the appliance when in use. This is normal.
to use the mixer to cook food
IMPORTANT
●
Make sure the induction area, temperature sensors and external surface of the bowl base are clean.
Failure to do this will affect the heat sensor, resulting in poor cooking performance.
●
Check that all the outlet covers including the heat shield are fitted. If they are not correctly fitted the
heating function will not operate.
●
Always use oven gloves to remove the bowl and tools after cooking.
1 Assemble the mixer following the instructions on page 11.
2 Turn the temperature control to the required temperature.
●
Heating will not commence unless a speed is selected.
3 Turn the speed control to the desired speed which will switch on the motor and the heater. Both
indicator lights will flash.
4 Once the set temperature is reached, the temperature indicator light will illuminate continuously.
However, during cooking the light will start to flash if the temperature changes indicating that the mixer
is trying to maintain the set temperature (please read introduction page 6).
●
If the bowl temperature exceeds 60°C, for safety reasons the speed is automatically limited even if a
higher speed has been selected. The speed will not automatically increase when the temperature drops
below 60°C. The speed control must be switched off first and the desired speed reselected.
●
Note: Each time the timer/temperature selector button is pressed, the display will alternate between the
timer display and the temperature of the bowl contents.
5 To stop or pause the mixing and heating process, return the speed control to the off ‘O’ position. To
resume the operation select a speed.
12

13
hints
●
Some recipes, in particular those with a high water content, will not be able to reach a
cooking temperature above 100°C (as this is the boiling point of water).
●
W
hen adding ingredients to the bowl during cooking, turn the speed down and add the ingredients slowly and
e
venly.
●
To heat sauces quickly use a continuous stir setting .
●
You may find changing the tool for different processes during your meal preparation gives better results e.g. use
the high temperature flexible beater to fry vegetables and then the stirring tool whilst cooking pieces of meat or
p
oultry.
●
If using the splashguard during cooking, always remove it before lifting the mixer head. Be aware of condensation
formed on the splashguard and heat shield.
●
When lifting the mixer head lift it slowly to allow any liquid on the underside of the heat shield to flow back into
the bowl.
●
T
hree stir functions are available which enable you to select the appropriate amount of stirring for individual
recipes. Some recipes will require constant stirring to stop ingredients from sticking to the bottom of the bowl,
whereas others will benefit from intermittent stirring to maintain the consistency of the food.
●
For optimum performance adjust the tool heights see page 10.
●
T
he maximum cooking time is 3 hours after which time the mixer will automatically switch off.
●
I
t is possible to heat food without a tool in position, however a speed must be selected. This may be
advantageous when melting foods e.g. butter, chocolate.
●
Each time the timer/temperature selector button is pressed the display will alternate between displaying the
cooking time and the temperature reached at that point.
High speed, high temperature whisk control
To whisk at high speed at temperatures above 60°C, turn the speed control to the desired whisking speed and
then press and hold the pulse button. This will be accompanied by a beeping sound and the speed and
temperature indicator lights will flash quickly. The whisking speed will slowly increase to the selected speed.
Repeat the procedure to increase the speed further. You can reduce the whisking speed or turn off the mixer as
normal.
This function MUST only be used with the whisk. You should not exceed the maximum
cooking capacity of 3 litres and you must ensure the splashguard is fitted. The machine
must not be left unattended.
after cooking
●
Be careful when handling or touching any part of the mixer when being used in the cook mode or after cooking,
IN PARTICULAR THE BOWL, SPLASHGUARD AND TOOLS as they will remain HOT long after the appliance has
been switched off. Use the handles to remove and carry the bowl. Use oven gloves when handling the hot bowl
and hot mixing tools.
●
The underside of the bowl will remain hot long after the heating has stopped. Use caution when handling and
use the work surface protection mat provided to protect heat sensitive surfaces.

14
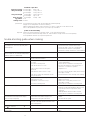
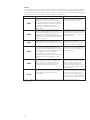
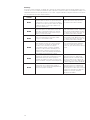
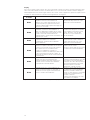
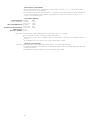
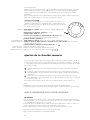
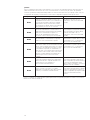
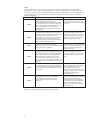
display
For your safety the mixer is fitted with 5 separate safety sensors which will operate when using the mixer in the
cooking mode. If the mixer is switched on and a safety sensor activated, the timer/temperature display will show
a
n error message e.g. ‘E:01’. This will be accompanied by a beeping sound and the mixer will not work. Check
t
he following error messages:-
If these or any other error codes continue to appear on the display contact Kenwood Customer Care.
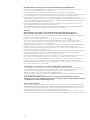
to use the countdown timer
The timer can be used in both the cooking and non cooking modes. If a countdown time is not selected, the
timer will automatically count up in 1 second intervals whilst the mixer is in operation. The maximum running time
is 3 hours.
1 Connect the mixer to the power supply. The display will briefly show and then clear leaving the power on
indicator visible .
2 Press either the + or – button and 0:00 will appear in the display.
3 Press either the + or – button until the desired time is displayed. The timer will count up in 5 second intervals. If
the button is pressed continuously the numbers will change more quickly the longer it is held down. A maximum
time of 3 hours can be set.
Note: If the + button is pressed when the timer is at 3:00 the displayed time will change to 0:00. If the – button is
pressed when the timer is at 0:00 the displayed time will change to 3:00.
4 Turn the speed control to the desired speed, the mixer will start and the timer will count down in 1 second
intervals.
●
The mixer operation can be paused at any time by turning the speed control to the off ‘O’ position. This will also
pause the timer. The timer will continue to count down when the mixer is re-started.
5 The mixing process will automatically stop when the total time has elapsed and audible beeps will be emitted for
3 seconds. The display will flash for 5 seconds and then clear showing the power on indicator .
to reset the timer
1 Zero the timer by pressing the + and – buttons at the same time (the speed control must be in the off ‘O’ position).
●
If the machine has been idle for 10 minutes, the LCD display and backlight will enter ‘sleep mode’ and all the
displays will turn off. If any button or control knob is activated, the display will resume its previous format.
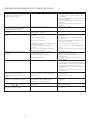
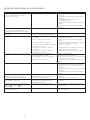
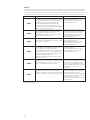
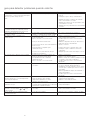
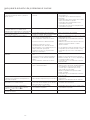
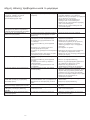
Error Message Description Solution
The head of the machine is in the raised position. Close the head. Turn the speed control
When the head is lifted, a safety sensor disables to the ‘O’ position and then select the
E:01
t
he motor and heater. If the speed control is desired speed.
turned to any setting other than the Off ‘O’
position when the head is raised, this message
is displayed and the motor will not switch on.
T
he Cooking Chef Bowl is not fitted. The heating Ensure that the Cooking Chef bowl is
function will only work if the Cooking bowl is being used. Check that the bowl
E:02 being used. This bowl must also be correctly is fitted correctly. Turn the speed
fitted. Safety sensors will detect an incorrect control to “0” and then select desired
bowl or the correct bowl incorrectly fitted. speed.
The heat shield is not fitted. The heating function Ensure the heat shield is fitted
E:03 will be disabled if the heat shield is not correctly correctly. Turn the speed control to ‘O’
fitted. and then select desired speed.
T
he slow speed outlet and high speed/medium Ensure that all covers are fitted correctly.
s
peed outlet covers are not fitted. These covers Turn the speed control to ‘O’ and then
are fitted with safety sensors. If the covers are select desired speed.
E:04 not fitted correctly the heating will switch off and
if stir functions are selected, the motor will run
continuously. Mixing speeds min to max will
run continuously.
Temperature sensor problem. If the heater Turn the speed control to ‘O’, unplug the
control detects a bowl temperature higher than machine and allow to cool. Check
E:09 expected during normal use, the motor and that the bowl base and temperature
heater will automatically switch off. sensors are clean. Replace plug and
switch on as normal.
Motor speed or overheat problem. If the motor Turn the speed control to ‘O’ and unplug
E:10
stalls or gets too hot, the control system will the machine. Remove any obstructions
automatically switch off the motor and heater. causing the motor to stall. Ensure all
the air vents are clear of obstructions.
Plug in and switch on.

15
maximum capacities
shortcrust pastry
●
Flour weight: 910g - 2lb
stiff yeast dough
●
Flour weight: 1.5kg - 3lb 5oz
●
T
otal weight: 2.4kg - 5lb 5oz
s
oft yeast dough
●
F
lour weight: 2.6kg - 5lb 12oz
●
Total weight: 5kg - 11lb
fruit cake mix
●
Total weight: 4.55kg - 10lb
egg whites
●
16
c
ooking mode
●
3
litres
general hints
●
Stop mixing and scrape down the bowl with the spatula frequently.
●
Eggs at room temperature are best for whisking.
●
Before whisking egg whites, make sure there’s no grease or egg yolk on the whisk or bowl.
●
U
se cold ingredients for pastry unless your recipe says otherwise.
points for bread making
important
●
Never exceed the maximum capacities stated - you’ll overload the machine.
●
I
f you hear the machine labouring, switch off, remove half the dough and do each half separately.
●
T
he ingredients mix best if you put the liquid in first.
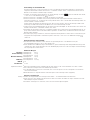
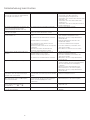
trouble shooting guide when cooking
P
roblem Cause Solution
The mixer will not operate in the heat mode One of the safety sensors has been activated. See the table referring to error messages page 14.
and displays an error message and gives a • Ensure the head is lowered and locked.
warning beep. • Ensure all outlet covers are correctly fitted.
• Ensure the heat shield is correctly fitted.
• Ensure the cooking chef bowl is corrected fitted.
A temperature has been selected but the A speed has not been selected. Select a speed.
bowl contents do not heat (the temperature
indicator light is not illuminated).
The mixer changes speed during cooking. The speed is automatically limited when the This is a safety feature.
bowl contents reach 60°C.
Food burning on the base of the bowl. 1 The temperature setting selected may be 1 Reduce the temperature on the dial or cook at
too high. a lower temperature.
2 Incorrect tool being used. 2 Check the most suitable tool is being used.
3 The stir function is too slow. 3 Increase the frequency of the stir function or
increase to a continuous operation.
4 The tool may not be low enough in 4 Adjust the tool.
the bowl.
5 The timer has been set for too long. 5 Cook for a shorter length of time (ensure food is
thoroughly cooked).
6 The sensor and/or the underside of bowl 6 Ensure that these areas are kept clean and dry.
may not be clean.
Consistency of food not maintained. 1 Temperature selected too high. 1 Reduce temperature.
2 Stir function too fast. 2 Reduce stir speed.
3 Ingredients cooked for too long. 3 Reduce the cooking time (ensure food is
thoroughly cooked).
4 Incorrect tool being used. 4 Check the most suitable tool is being used.
Inconsistent mixing speed. 1 Ingredients too large, hard or too firm. 1 Cut food into smaller pieces, remove stones
from fruit, slowly melt ingredients without a tool
in position (but ensure a speed has been
selected).
2 Add ingredients after the head is lowered.
3 Check the most suitable tool is being used.
Cold ingredients have been added to a If the bowl contents are not thoroughly 1 Allow time for the ingredients to be thoroughly
hot mixture but the temperature display stirred then there will be varying food mixed.
does not respond quickly. temperatures throughout the bowl. 2 Increase the stir speed.
Difficult to shut mixer head with food in bowl. Firm ingredients such as chocolate in the Add ingredients after the mixer head is lowered.
bottom of the bowl prevent the mixer head
from locking down.
Mixer runs continuously when stir or Outlet covers are incorrectly fitted. Ensure the outlet covers are correctly fitted.
stir are selected.
Motor speed is limited when using Hot bowl fitted. Remove the bowl, or cool the bowl to below
attachments 60°C.

cleaning and service
c
are and cleaning
●
Always switch off and unplug before cleaning.
●
A little grease may appear at outlet when you first use
it. This is normal - just wipe it off.
●
T
he metal surfaces of the temperature sensors may show signs of wear
d
uring normal use. this does not affect the performance of the product.
●
Do not leave the high temperature flexible beater fitted to the mixer
when not in use.
a
ppliance, outlet covers
●
W
ipe with a damp cloth, then dry.
●
Never use abrasives or immerse in water.
high temperature flexible beater
●
Always remove the flexible wiper blade from the tool before
cleaning.
●
W
ash the flexible wiper blade and tool in hot soapy water, then
d
ry thoroughly. Alternatively the parts can be washed in
a dishwasher.
N
ote: Please inspect the condition of the tool body before and after
u
se and also regularly inspect the condition of the wiper blade and
replace it if there are any signs of wear.
bowl, tools, splashguard
●
Wash by hand, then dry thoroughly or wash in the dishwasher.
●
Never use a wire brush, steel wool or bleach to clean your
stainless steel bowl. Use vinegar or a suitable descaler to remove
limescale.
●
If food sticks or burns on the inside of the bowl, remove as much as
possible using the spatula provided. Fill the bowl with warm soapy water
and allow to soak. Remove any stubborn deposits using a nylon brush.
●
Any discolouration of the bowl will not affect its performance.
drain hole
●
Ensure this area is free from food. If necessary use a pipe cleaner
or cotton bud to clean.
temperature sensors
●
Wipe with a damp cloth then dry thoroughly. Never use abrasives or
sharp instruments to clean the sensors.
service and customer care
●
If the cord is damaged it must, for safety reasons, be replaced
by KENWOOD or an authorised KENWOOD repairer.
If you need help with:
●
using your machine
●
servicing or repairs
Contact the shop where you bought your machine.
●
Designed and engineered by Kenwood in the UK.
●
Made in China.
IMPORTANT INFORMATION FOR CORRECT DISPOSAL OF THE
PRODUCT IN ACCORDANCE WITH EC DIRECTIVE
2002/96/EC.
At the end of its working life, the product must not be disposed of as
urban waste.
It must be taken to a special local authority differentiated waste collection
centre or to a dealer providing this service.
Disposing of a household appliance separately avoids possible negative
consequences for the environment and health deriving from inappropriate
disposal and enables the constituent materials to be recovered to obtain
significant savings in energy and resources. As a reminder of the need to
dispose of household appliances separately, the product is marked with a
crossed-out wheeled dustbin.
16

recipes
See important points for bread making on page 15.
ingredients
method
method
●
●
●
●
●
1
2
3
4
5
6
7
8
●
●
●
●
●
●
●
●
1
2
3
4
5
6
7
8
●
white bread
s
tiff yeast dough
1.36kg (3lb) strong plain flour
15ml (3tsp) salt
25g (1oz) fresh yeast; or 15g/20ml (
1
⁄2oz) dried yeast + 5ml (1tsp) sugar
750m
l (
1
1
⁄4p
ts) warm water:
43˚C (110˚F)
. Use a thermometer or add
250m
l
(
9fl oz) boiling water to
500m
l (18fl oz) cold water
25g (1oz) lard
dried yeast (the type that needs reconstituting): pour the warm water into
the bowl. Then add the yeast and the sugar and leave to stand for about 10
m
inutes until frothy.
fresh yeast: crumble into the flour.
other types of yeast: follow the manufacturer’s instructions.
Pour the liquid into the bowl. Then add the flour (with fresh yeast if used),
salt and lard.
K
nead at minimum speed for
45 - 60 s
econds. Then increase to speed 1,
adding more flour if necessary, until a dough has formed.
Knead for
3 - 4 more minutes at speed 1 until the dough is smooth, elastic
and leaves the sides of the bowl clean.
Put the dough into a greased polythene bag or a bowl covered with a tea
t
owel. Then leave somewhere warm until doubled in size.
Re-knead for
2 minutes at speed 1.
Half fill four
450g (1lb) greased tins with the dough, or shape it into rolls.
Then cover with a tea towel and leave somewhere warm until doubled in
size.
Bake at 230˚C/450˚F/Gas Mark 8 for 30 - 35 minutes
for loaves
or 10 - 15
minutes
for rolls
.
When ready, the bread should sound hollow when tapped on the base.
white bread
soft yeast dough
2.6kg (5lb 12oz) ordinary plain flour
1.3 litre (2
1
⁄4pts) milk
300g (10oz) sugar
450g (1lb) margarine
100g (4oz) fresh yeast or 50g (2oz) dried yeast
6 eggs, beaten
5 pinches salt
Melt the margarine in the milk and bring to 43˚C (110˚F).
dried yeast (the type that needs reconstituting): add the yeast and sugar
to the milk and leave to stand for about 10 minutes until frothy.
fresh yeast: crumble into the flour and add the sugar.
other types of yeast: follow the manufacturer’s instructions.
Pour the milk into the bowl. Add the beaten eggs and 2kg (4lb 6oz) flour.
Mix at minimum speed for 1 minute, then at speed 1 for a further minute.
Scrape down.
Add the remaining flour and mix at minimum speed for 1 minute, then at
speed
1 for 2 - 3 minutes until smooth and evenly mixed.
Half fill some
450g (1lb) greased tins with the dough, or shape it into rolls.
Then cover with a tea towel and leave somewhere warm until doubled in
size.
Bake at
200˚C/400˚F/Gas Mark 6 for 20 - 25 minutes
for loaves
or 15
minutes
for rolls
.
When ready, the bread should sound hollow when tapped on the base.
Makes about 10 loaves.
17

recipes
continued
ingredients: sponge
f
illing and decoration
method
ingredients
method
ingredients
hint
method
strawberry and apricot gâteau
3 eggs
75g
(
3o
z) caster sugar
75g
(
3o
z) plain flour
150ml (
1
⁄4pt) double cream
Sugar to taste
225g (8oz) strawberries
225g
(
8o
z) apricots
H
alve the apricots and remove the stones. Cook gently in very little water, adding
sugar to taste, until soft.
Wash and halve the strawberries.
To make the sponge, whisk the eggs and sugar at maximum speed until very pale
a
nd thick.
Remove the bowl and the whisk. Fold in the flour by hand using a large metal spoon -
do this carefully to keep the sponge light.
Put the mixture into two
18cm (7”) greased and lined sandwich tins.
Bake at 180˚C/350˚F/Gas Mark 4 for about 20 minutes until the cake springs back
w
hen lightly touched.
Turn out onto a wire rack.
Whisk the cream at maximum speed until stiff. Add sugar to taste.
Roughly chop the apricots and a third of the strawberries. Fold them into half the
cream.
Spread this over one of the sponges, then put the other sponge on top.
Spread the remaining cream on top and decorate with the remaining strawberries.
meringues
4 egg whites
250g (9oz) icing sugar, sieved
Line your baking tray with non-stick baking parchment.
Whisk the egg whites and sugar at maximum speed for about 10 minutes until it
stands in peaks.
Spoon the mixture onto the baking tray (or use a piping bag with a 2.5cm (1”) star
nozzle).
Bake at 110˚C/225˚F/Gas Mark
1
⁄4 for about 4 - 5 hours until firm and crisp. If they start
to brown, leave the oven door slightly ajar.
Store meringues in an airtight tin.
shortcrust pastry
450g (1lb) flour, sieved with the salt
5ml (1tsp) salt
225g (8oz) fat (mix lard and margarine straight from the fridge)
About 80ml (4tbsp) water
Don’t overmix
Put the flour into the bowl. Chop the fat up roughly and add to the flour.
Using the stainless steel K beater mix at speed 1 until it resembles breadcrumbs.
Stop before it looks greasy.
Add the water and mix at minimum speed. Stop as soon as the water is
incorporated.
Cook at around
200˚C/400˚F/Gas Mark 6, depending on the filling.
●
●
●
●
●
●
●
1
2
3
4
5
6
7
8
9
1
0
11
●
●
1
2
3
●
●
●
●
●
●
1
2
3
4
chilli marinade
Ingredients
●
200g (7oz) cold clear honey (refrigerated overnight)
●
1 green chilli (whole)
●
5ml (1 tsp) crunchy peanut butter
●
seasoning
method
1 Place all the ingredients into the mini chopper/mill.
2 Fit the attachment to the mixer and allow the ingredients to settle around the blade.
3 Switch to pulse for 10 seconds.
4 Use as required.
18

ken uw Kenwood Cooking Chef keukenmachine
veiligheid
●
Lees deze instructies zorgvuldig door en bewaar ze voor
toekomstig gebruik.
●
Verwijder alle verpakking en labels.
belangrijke mededeling – elektronisch-medische
implantaten
●
Net als andere inductieverwarmingsproducten genereert dit apparaat
magnetische velden met beperkt bereik. Gebruikers of andere personen
met een pacemaker of ander actief implantaat dienen voor gebruik een
arts te raadplegen over eventuele incompatibiliteit, zodat eventueel
gevaar voor de gezondheid kan worden voorkomen.
●
Schakel het apparaat uit en haal de stekker uit het stopcontact voordat
u hulpstukken installeert of verwijdert, na het gebruik en voordat u het
apparaat reinigt.
●
Houd lichaamsdelen, sieraden en loszittende kleding uit de buurt van
bewegende delen en geïnstalleerde hulpstukken.
●
Steek uw vingers, enz. nooit in het scharniermechanisme.
●
Laat het apparaat nooit onbeheerd aanstaan.
●
Gebruik nooit een beschadigd apparaat. Laat het nakijken of repareren:
zie 'onderhoud en klantenservice' op pagina 32.
●
Gebruik nooit een ongeautoriseerd hulpstuk of meer dan één hulpstuk
tegelijkertijd.
●
Overschrijdt de maximum capaciteit (zie pagina 30) niet en vul het
apparaat bij gebruik van de inductieverwarming nooit meer dan het
maximum vulniveau van 3 liter dat aan de binnenkant van de kom wordt
aangegeven.
●
Lees bij het gebruik van een hulpstuk de veiligheids- en
gebruiksinformatie die erbij wordt geleverd.
●
Wees voorzichtig wanneer u dit apparaat optilt, omdat het zwaar is.
Zorg dat de kop vergrendeld is en dat de kom, hulpstukken, afdekking
van de aansluitpunten en het snoer vastzitten voordat u het apparaat
optilt.
●
Laat het snoer nooit naar beneden hangen waar een kind erbij kan.
●
Laat de motor, het snoer of de stekker nooit nat worden.
●
Wees voorzichtig als u enig deel van het apparaat vastpakt of aanraakt
terwijl het in de kookmodus wordt gebruikt en na het koken. DIT
GELDT MET NAME VOOR DE KOM, HET SPATDEKSEL EN DE
HULPSTUKKEN omdat deze nog lange tijd nadat het apparaat is
uitgeschakeld HEET blijven. Gebruik de handgrepen om de kom te
verwijderen en te dragen. Gebruik ovenhandschoenen om de hete kom
en menghulpstukken aan te pakken.
●
De onderkant van de kom blijft nog lange tijd nadat de verwarming is
uitgeschakeld heet. Wees voorzichtig als u de kom vastpakt en gebruik
de beschermmat voor het werkoppervlak als u de kom op een
warmtegevoelige ondergrond plaatst.
19
Nederlands

20
●
Pas op voor stoom die uit de mengkom kan komen, met name als u
het deksel van het spatdeksel verwijdert of de mixerkop omhoog zet.
●
Als heet voedsel van de mixer wordt overgebracht naar de blender, laat
u de ingrediënten tot kamertemperatuur afkoelen voor u ze in de
blender plaatst.
●
Gebruik alleen de kom en hulpstukken die bij dit apparaat worden
geleverd. Gebruik de kom met geen enkele andere hittebron.
●
Laat het apparaat nooit werken in de kookmodus als de kom leeg is.
●
Steek nooit iets in de ventilatiegaten.
●
Zorg dat dit apparaat tijdens het gebruik niet te dicht bij de rand en op
een vlakke ondergrond staat. Zorg dat het ten minste 10 cm verwijderd
is van de muur en dat de ventilatiegaten niet worden geblokkeerd.
Plaats het apparaat niet onder overhangende keukenkastjes.
●
Voor een juiste en veilige werking van de inductiekoker dient u ervoor te
zorgen dat de kombasis en temperatuursensors schoon en droog zijn
voordat u gaat koken.
●
Net als voor andere inductieverwarmende apparaten geldt dat u geen
creditcards, magnetische media of gevoelige elektronische apparatuur
in de buurt van het apparaat mag plaatsen wanneer dit in gebruik is.
●
Gebruik het apparaat niet om te frituren.
●
Zorg dat het voedsel voldoende gekookt is voordat u gaat eten.
●
Voedsel dient kort na bereiding te worden gegeten of moet snel worden
afgekoeld en zo snel mogelijk in de koelkast worden bewaard.
●
Misbruik van uw apparaat kan tot letsel leiden.
●
Dit apparaat kan worden gebruikt door personen met verminderde
lichamelijke, sensorische of geestelijke capaciteiten of gebrek aan
ervaring en kennis mits ze onder toezicht staan of instructie hebben
gekregen over het veilig gebruik van het apparaat en de betrokken
risico's begrijpen.
●
Op kinderen moet toezicht gehouden worden om er zeker van te zijn
dat ze niet met het apparaat spelen.
●
Dit apparaat mag niet door kinderen worden gebruikt. Houd het
apparaat en het snoer buiten het bereik van kinderen.
●
Gebruik het apparaat alleen voor het huishoudelijke gebruik waarvoor
het is bedoeld. Kenwood kan niet aansprakelijk worden gesteld in het
geval dat het apparaat niet correct is gebruikt, of waar deze instructies
niet worden opgevolgd.

vóór u de stekker in het stopcontact steekt
●
Z
org dat de elektriciteitsvoorziening dezelfde spanning heeft als op de onderkant van het apparaat wordt
aangegeven.
●
W
AARSCHUWING: DIT APPARAAT MOET GEAARD ZIJN.
●
D
it apparaat voldoet aan de EC-richtlijn 2004/108/EC betreffende de elektromagnetische compatibiliteit en EC-
b
epaling 1935/2004 van 27/10/2004 betreffende materialen die bestemd zijn voor contact met voedsel.
vóór het eerste gebruik
W
as de onderdelen: zie 'onderhoud en reiniging' op pagina 32.
inleiding
Hartelijk dank voor uw aankoop van deze Kenwood Cooking Chef keukenmachine. We hopen dat u er vele jaren
van kunt genieten.
K
enwood heeft bijna 60 jaar ervaring en expertise met de ontwikkeling van onze keukenmachines en het grote
aantal verschillende hulpstukken. Kenwood Chef keukenmachines staan erom bekend meer te zijn dan een mixer.
Bij de ontwikkeling van de Cooking Chef hebben we de veelzijdigheid van de Chef verder uitgebreid door een
g
eïntegreerde inductieverwarming direct onder de mengkom te installeren. U kunt bij de bereiding van uw
favoriete cakes, gebak en deeg nu genieten van alle voordelen van de planetaire mengbeweging en u hebt het
extra voordeel dat u de ingrediënten in de kom direct met de planetaire mengbeweging kunt verwarmen en
koken. De mogelijkheden zijn eindeloos.
De Kenwood Cooking Chef kan met zijn scala aan optionele hulpstukken een volledig voedselbereidingssysteem
worden genoemd.
Sterk, betrouwbaar, veelzijdig, Kenwood.
Wat is inductiekoken en hoe werkt het?
Inductiekoken is een geavanceerde kookmethode die gebruik maakt van de beginselen van elektromagnetische
inductie. Als elektrische stroom door een koperen spoel gaat, ontstaat een elektromagnetisch veld in het
inductiegebied. Als de kom van de Cooking Chef op zijn plaats is vergrendeld, wordt het circuit gesloten door
een speciale roestvrij stalen laag in de bodem van de kom. Hierdoor wordt een grote hoeveelheid thermische
energie gecreëerd die door de inhoud van de kom wordt geleid en het voedsel verhit.
Inductiekoken bespaart enorm veel energie omdat het alleen warmte produceert in de kombodem. Bij andere
verwarmingsmethoden zoals gaspitten wordt bijna 50% van de warmte-energie verspild aan de zijkanten van de
pan. Het inductiegebied van uw Cooking Chef voelt inderdaad alleen heet aan tijdens en onmiddellijk na het
koken omdat de warmte overgebracht wordt naar de inhoud van de kom. Dit alles betekent dat inductiekoken
erg efficiënt, erg veilig en erg schoon is.
De kookfunctie op uw Kenwood Cooking Chef lijkt sterk op het gebruik van een steelpan op uw kookplaat. Het
bijkomende voordeel is dat de Chef uw voedsel automatisch roert en de kooktemperatuur regelt naar uw
precieze eisen, waardoor u zonder zorgen andere taken in uw keuken kunt uitvoeren.
De Cooking Chef maakt gebruik van uiterst efficiënte inductieverwarmingstechnologie. U zult zien dat de
kooktijden vergeleken met koken op gas of elektrisch korter zijn en dat u bij een lagere temperatuur kunt koken.
Houd dit in gedachten als u uw apparaat voor de eerste keer gebruikt of als u experimenteert met een nieuw
recept. Zorg dat als u bij een hoge temperatuur begint te koken, u blijft kijken en de hitte zo nodig verlaagt om te
voorkomen dat het voedsel aanbrandt of aankoekt, net als u zou doen met uw steelpan. De Cooking Chef
verwarmt het voedsel in het algemeen zo snel mogelijk tot de gewenste temperatuur. U hoeft de temperatuur
daarom niet hoger in te stellen om de kooktijd te verkorten. In deze fase moet u ook aandacht schenken aan de
instelling voor de roerfrequentie. Als u bij een hogere temperatuur kookt, kan het nodig zijn voortdurend te blijven
roeren met behulp van de roerfunctie . De roerinstellingen en zijn een goed hulpmiddel om de textuur
van uw voedsel in stand te houden als u het voedsel gedurende langere tijd laag laat pruttelen.
21
Seite wird geladen ...
Seite wird geladen ...
Seite wird geladen ...
Seite wird geladen ...
Seite wird geladen ...
Seite wird geladen ...
Seite wird geladen ...
Seite wird geladen ...
Seite wird geladen ...
Seite wird geladen ...
Seite wird geladen ...
Seite wird geladen ...
Seite wird geladen ...
Seite wird geladen ...
Seite wird geladen ...
Seite wird geladen ...
Seite wird geladen ...
Seite wird geladen ...
Seite wird geladen ...
Seite wird geladen ...
Seite wird geladen ...
Seite wird geladen ...
Seite wird geladen ...
Seite wird geladen ...
Seite wird geladen ...
Seite wird geladen ...
Seite wird geladen ...
Seite wird geladen ...
Seite wird geladen ...
Seite wird geladen ...
Seite wird geladen ...
Seite wird geladen ...
Seite wird geladen ...
Seite wird geladen ...
Seite wird geladen ...
Seite wird geladen ...
Seite wird geladen ...
Seite wird geladen ...
Seite wird geladen ...
Seite wird geladen ...
Seite wird geladen ...
Seite wird geladen ...
Seite wird geladen ...
Seite wird geladen ...
Seite wird geladen ...
Seite wird geladen ...
Seite wird geladen ...
Seite wird geladen ...
Seite wird geladen ...
Seite wird geladen ...
Seite wird geladen ...
Seite wird geladen ...
Seite wird geladen ...
Seite wird geladen ...
Seite wird geladen ...
Seite wird geladen ...
Seite wird geladen ...
Seite wird geladen ...
Seite wird geladen ...
Seite wird geladen ...
Seite wird geladen ...
Seite wird geladen ...
Seite wird geladen ...
Seite wird geladen ...
Seite wird geladen ...
Seite wird geladen ...
Seite wird geladen ...
Seite wird geladen ...
Seite wird geladen ...
Seite wird geladen ...
Seite wird geladen ...
Seite wird geladen ...
Seite wird geladen ...
Seite wird geladen ...
Seite wird geladen ...
Seite wird geladen ...
Seite wird geladen ...
Seite wird geladen ...
Seite wird geladen ...
Seite wird geladen ...
Seite wird geladen ...
Seite wird geladen ...
Seite wird geladen ...
Seite wird geladen ...
Seite wird geladen ...
Seite wird geladen ...
Seite wird geladen ...
Seite wird geladen ...
Seite wird geladen ...
Seite wird geladen ...
Seite wird geladen ...
Seite wird geladen ...
Seite wird geladen ...
Seite wird geladen ...
Seite wird geladen ...
Seite wird geladen ...
Seite wird geladen ...
Seite wird geladen ...
Seite wird geladen ...
Seite wird geladen ...
Seite wird geladen ...
Seite wird geladen ...
Seite wird geladen ...
Seite wird geladen ...
Seite wird geladen ...
Seite wird geladen ...
Seite wird geladen ...
Seite wird geladen ...
Seite wird geladen ...
Seite wird geladen ...
Seite wird geladen ...
Seite wird geladen ...
Seite wird geladen ...
-
 1
1
-
 2
2
-
 3
3
-
 4
4
-
 5
5
-
 6
6
-
 7
7
-
 8
8
-
 9
9
-
 10
10
-
 11
11
-
 12
12
-
 13
13
-
 14
14
-
 15
15
-
 16
16
-
 17
17
-
 18
18
-
 19
19
-
 20
20
-
 21
21
-
 22
22
-
 23
23
-
 24
24
-
 25
25
-
 26
26
-
 27
27
-
 28
28
-
 29
29
-
 30
30
-
 31
31
-
 32
32
-
 33
33
-
 34
34
-
 35
35
-
 36
36
-
 37
37
-
 38
38
-
 39
39
-
 40
40
-
 41
41
-
 42
42
-
 43
43
-
 44
44
-
 45
45
-
 46
46
-
 47
47
-
 48
48
-
 49
49
-
 50
50
-
 51
51
-
 52
52
-
 53
53
-
 54
54
-
 55
55
-
 56
56
-
 57
57
-
 58
58
-
 59
59
-
 60
60
-
 61
61
-
 62
62
-
 63
63
-
 64
64
-
 65
65
-
 66
66
-
 67
67
-
 68
68
-
 69
69
-
 70
70
-
 71
71
-
 72
72
-
 73
73
-
 74
74
-
 75
75
-
 76
76
-
 77
77
-
 78
78
-
 79
79
-
 80
80
-
 81
81
-
 82
82
-
 83
83
-
 84
84
-
 85
85
-
 86
86
-
 87
87
-
 88
88
-
 89
89
-
 90
90
-
 91
91
-
 92
92
-
 93
93
-
 94
94
-
 95
95
-
 96
96
-
 97
97
-
 98
98
-
 99
99
-
 100
100
-
 101
101
-
 102
102
-
 103
103
-
 104
104
-
 105
105
-
 106
106
-
 107
107
-
 108
108
-
 109
109
-
 110
110
-
 111
111
-
 112
112
-
 113
113
-
 114
114
-
 115
115
-
 116
116
-
 117
117
-
 118
118
-
 119
119
-
 120
120
-
 121
121
-
 122
122
-
 123
123
-
 124
124
-
 125
125
-
 126
126
-
 127
127
-
 128
128
-
 129
129
-
 130
130
-
 131
131
-
 132
132
-
 133
133


Kenwood KM082 Bedienungsanleitung
- Kategorie
- Mischer
- Typ
- Bedienungsanleitung
in anderen Sprachen
- français: Kenwood KM082 Le manuel du propriétaire
- español: Kenwood KM082 El manual del propietario
- italiano: Kenwood KM082 Manuale del proprietario
- Nederlands: Kenwood KM082 de handleiding
- português: Kenwood KM082 Manual do proprietário
Verwandte Artikel
-
Kenwood KMC570 Bedienungsanleitung
-
Kenwood KM080 Bedienungsanleitung
-
Kenwood KM 030 Bedienungsanleitung
-
De'Longhi KMM065 Benutzerhandbuch
-
-
Kenwood KM 336 Bedienungsanleitung
-
-
Kenwood KMM770 Bedienungsanleitung
-
Kenwood Electronics KMC577 Benutzerhandbuch
-
Kenwood Electronics 0WKMM02052 Bedienungsanleitung
Andere Dokumente
-
 Yoo Digital COOKYOO7000 Bedienungsanleitung
-
 Outsunny 845-981V00DR Assembly Instructions
-
 Outsunny 845-981V03GN Assembly Instructions
-
 Outsunny 845-981V02CW Assembly Instructions
-
Taurus DARKFIRE DAILY Bedienungsanleitung
-
 NewCook Masterful Bedienungsanleitung
-
GGM Gastro RTK12 Bedienungsanleitung
-
 Profi-pumpe HeißluftMultigarer ECO AIRPROFI SOUP DC1400W Bedienungsanleitung


