Electrolux EOG21300X Benutzerhandbuch
- Kategorie
- Mikrowellen
- Typ
- Benutzerhandbuch

electrolux 1
Gas built-in oven
Einbau Gas-Backofen
EOG 21300
User manual
Gebrauchsanleitung
RO


electrolux 3
Welcome to the world of Electrolux
Thank you for choosing a first class product from Electrolux, which hopefully will
provide you with lots of pleasure in the future.
The Electrolux ambition is to offer a wide variety of quality products that make
your life more comfortable.
You find some examples on the cover in this manual.
Please take a few minutes to study this manual so that you can take advantage
of the benefits of your new machine.
We promise that it will provide a superior User Experience delivering Ease-of-
Mind.
Good luck!

4 electrolux
For the User
Important safety information .............................................................................. 5
Description of the appliance ............................................................................... 8
Controls ............................................................................................................ 9
Before using the oven for the first time .............................................................. 11
Using the oven ................................................................................................ 12
Using the gas oven ......................................................................................... 13
Cooking chart-Gas oven .................................................................................. 15
Using the fan oven ........................................................................................... 16
Cooking chart-Fan oven ................................................................................... 17
Grilling ............................................................................................................ 18
Cooking chart-Grilling ...................................................................................... 19
Turnspit ........................................................................................................... 20
Cleaning and Maintenance .............................................................................. 21
Something not working .................................................................................... 24
Service and Spare Parts .................................................................................. 34
European guarantee ........................................................................................ 34
For the Installer
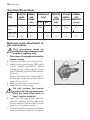
Technical data ................................................................................................. 25
Important safety requirements ......................................................................... 26
Gas connection ............................................................................................... 27
Adaptation to different types of gas ................................................................. 29
Instructions fo building In ................................................................................. 31
Electrical connection ....................................................................................... 33
Safety instructions
Step by step instructions
Hints and Tips
Environmental Information
Guide to use the instructions
)
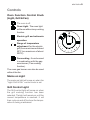
Contents

electrolux 5
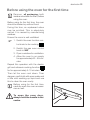
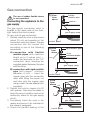
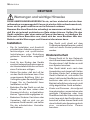
Important safety information
These warnings are provided for the safety of the users and those living
with them. So read them carefully before connecting and/or using the
appliance.
Always keep these user instructions with the appliance. Should the
appliance be passed on to third persons or sold, or if you leave this
appliance behind when you move house, it is very important that the new
user has access to these user instructions and the accompanying
information.
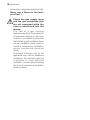
Installation
• This oven must be installed by qualified
personnel in accordance with existing
rules and regulations.
• This oven is heavy. Take care when
moving it.
• Remove all packaging, both inside and
outside the oven, before using the oven.
• Do not attempt to modify the oven in
any way.
• This appliance is not connected to a
combustion products evacuation
device. It must be installed and
connected in accordance with current
installation regulations. Particular
attention shall be given to the relevant
requirements regarding ventilation.
• The use of a gas cooking appliance
results in the production of heat and
moisture in the room in which it is
installed. Ensure that the kitchen is
well ventilated: keep natural
ventilation holes open or install a
mechanical ventilation device
(mechanical extractor hood).
• Prolonged intensive use of the
appliance may call for additional
ventilation, for example opening a
window, or more effective ventilation,
for example increasing the level of
mechanical ventilation where present.
Child Safety
• This oven is designed to be operated by
adults. Do not allow children to play
near or with the oven.
• This appliance is not intended for use
by children or other persons whose
physical, sensory or mental capabili-
ties or lack of experience and knowl-
edge prevents them from using the
appliance safely without supervision
or instruction by a responsible per-
son to ensure that they can use the
appliance safely.
• The oven gets hot when it is in use.
Children should be kept away until it
has cooled.
During Use
• This oven is intended for domestic
cooking only. It is not designed for
commercial or industrial purposes.
• Appliances become very hot with
use, and retain their heat for a long
period after use. Care should be
taken to avoid touching heating
elements inside the oven.
ENGLISH

6 electrolux
• Always stand back from the oven
when opening the oven door during
cooking or at the end of it to allow
any build up of steam or heat to
release.
• Do not block any of the oven vents. Never
line any part of the oven with aluminium
foil.
• Do not allow heatproof cooking material,
e.g. roasting bags, to come into contact
with oven elements.
• Never place plastic or any other material
which may melt in or on the oven.
• Do not place sealed cans or aerosols
inside the oven. They may explode if they
are heated.
• Do not hang towels, dishcloths or clothes
from the oven or its handle.
• Do not use this oven if it is in contact with
water and never operate it with wet
hands.
• Take great care when heating fats and
oils as they will ignite if they become too
hot.
• Always use oven gloves to remove and
replace food in the oven.
• Ensure that all control knobs are in the
OFF position when not in use.
• Do not leave cookware containing
foodstuffs, e.g. fat or oil in or on the oven
in case it is inadvertently switched ON.
• When using other electrical appliances,
ensure the cable does not come into
contact with the hot surfaces of the oven.
• Do not use harsh abrasive cleaners or
sharp metal scraper to clean the oven
door glass since they can scratch the
surface, which may result in shattering of
the glass.
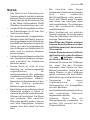
Maintenance and Cleaning
• Only clean this oven in accordance with
the instructions.
• This appliance cannot be cleaned with
steam or with a steam cleaning machine.
• Do not use abrasive cleaners or sharp
metal scrapers. These can scratch the
glass in the oven door, which may result
in the shattering of the glass.
• The oven should be kept clean at all
times. A build-up of fats or other foodstuffs
could result in a fire, especially in the grill
pan.
• Always allow the oven to cool down and
switch off the electrical supply before
carrying out any cleaning or maintenance
work.
Service
• This oven should only be repaired or
serviced by an authorised Service Engineer
and only genuine approved spare parts
should be used.
• The manufacturer disclaims any
responsibility should these safety
measures not be carried out.

electrolux 7
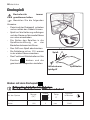
Environmental Information
• After installation, please dispose of the
packaging with due regard to safety and
the environment.
• When disposing of an old appliance,
make it unusable, by cutting off the cable.
Remove any door catches, to prevent
small children being trapped inside.
• The symbol on the product or on
its packaging indicates that this product
may not be treated as household waste.
Instead it shall be handed over to the
applicable collection point for the recy-
cling of electrical and electronic equip-
ment. By ensuring this product is dis-
posed of correctly, you will help prevent
potential negative consequences for the
environment and human health, which
could otherwise be caused by inappro-
priate waste handling of this product. For
more detailed information about recy-
cling of this product, please contact your
local city office, your household waste
disposal service or the shop where you
purchased the product.
MANUFACTURER:
ELECTROLUX ITALIA S.p.A.
C.so Lino Zanussi 30
33080 Porcia (PN) - Italy
This appliance conforms with the following ECC Directives:
- 2006/95 (Low Voltage Directive);
- 2004/108 (EMC Directive);
- 90/396 (Gas Appliances);
and subsequent modifications.

8 electrolux
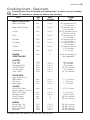
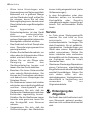
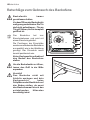
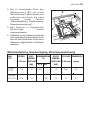
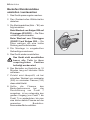
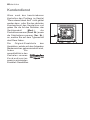
Description of the appliance
2
3
1
8
7
12
6
1. Control panel
2. Minute minder
3. Oven function (Light, Grill & Fan) control knob
4. Gas oven control knob
5. Grill control light
6. Mains on light
7. Grill
8. Oven lamp
9. Turnspit hole
10. Oven fan
11. Oven cavity bottom plate
12. Rating plate
45
10
9
11

electrolux 9
Controls
Oven Function Control Knob
(Light, Grill & Fan)
0
The oven is off.
Oven Light - The oven light
will be on without any cooking
function.
Electric grill and rotisserie
operation
- Range of temperature
adjustment for the electric
grill (from a minimum of about
50ºC to a maximum of about
200°C).
Fan cooking - It can be used
in combination with the gas
oven burner (“Fan cooking”
function).
The oven gas burner can also be used
without the fan.
Mains on Light
The mains on light will come on when the
“Light-Grill & Fan” control knob is set.
Grill Control Light
The Grill control light will come on when
the grill cooking function has been
selected. The light will remain on until the
correct temperature is reached. It will
then cycle on and off to show the tempe-
rature is being maintained.

10 electrolux
Gas Oven Control Knob
Oven burner off
min. - 240 Range of temperature
adjustment for conventional cooking
Minute minder
The minute minder will mark the end of
a timed period with an acoustic alarm.
The maximum timing is 60 minutes.
Turn the minute minder knob clockwise
to the maximum time position, then turn
it back to the required time.
The minute minder will not affect in any
way the oven operation, if it is in use.
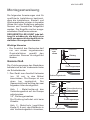
The cooling fan
The cooling fan switches off automatically
after a few minutes of cooking.The
cooling fan operates during cooking.
Air is expelled through vents between the
oven door and the control panel, as
shown in the diagram.
The cooling fan may run on after the oven
is switched off to keep the controls cool.
min.

electrolux 11
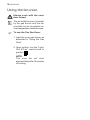
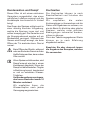
Before using the oven for the first time
To open the oven door,
always hold the handle in the
centre.
Remove all packaging, both
inside and outside the oven, before
using the oven.
Before using for the first time, the oven
should be heated up without food.
During this time, an unpleasant odour
may be emitted. This is absolutely
normal. It is caused by manufacturing
residues.
Ensure the room is well ventilated.
1. Switch the oven function con-
trol knob to fan cooking .
2. Switch the gas oven control
knob to 240.
3. Open a window for ventilation.
4. Allow the oven to run empty
for approximately 60 - 90 min-
utes.
Repeat this operation with the electric
grill and rotisserie cooking function
for for approximately 5-10 minutes.
Then let the oven cool down. Then
dampen a soft cloth with warm water and
a little mild washing-up liquid and use
this to clean the oven cavity.
Before using for the first time,
carefully wash the oven accesso-
ries as well.
)

12 electrolux
Using the oven
The oven is supplied with an exclusive
system which produces a natural
circulation of air and the constant
recycling of steam.
This system makes it possible to cook in
a steamy environment and keep the
dishes soft inside and crusty outside.
Moreover, the cooking time and energy
consumption are reduced to a minimum.
During cooking steam may be produced
which can be released when opening the
oven door. This is absolutely normal.
However, always stand back from
the oven when opening the oven
door during cooking or at the end
of it to allow any build up of steam
or heat to release.
Attention! - Do not place objects
on the oven base and do not cover
any part of the oven with aluminium
foil while cooking, as this could
cause a heat build-up which
would affect the baking results and
damage the oven enamel. Always
place pans, heat-resisting pans
and aluminium trays on the shelf
which has been inserted in the
shelf runners.When food is heated,
steam is created, like in a kettle.
When the steam comes into
contact with the glass in the oven
door, it condenses and creates
water droplets.
To reduce condensation, always
preheat the empty oven for 10
minutes.
We recommend you wipe the water
droplets away after every cooking
process.
Always cook with the oven
door closed. Stand clear when
opening the drop down oven door.
Do not allow it to fall open -
support the door using the door
handle, until it is fully open.
The oven has four shelf levels, and
is supplied with one shelf. The
shelf positions are counted from
the bottom of the oven as shown
in the diagram.
It is important that these shelves
are correctly positioned as shown
in the diagram.
Do not place cookware directly on
the oven base.
Cooking times
Cooking times vary according to the type
of food to be cooked, its consistency,
and volume.We suggest that you take
particular note of your first cooking
experiments with the oven, since
operating in the same conditions for the
same dishes you will of course obtain
similar results.
Only experience will enable you to make
the appropriate changes to values given
on charts.
4
3
2
1

electrolux 13
Using the gas oven
Oven safety device
The gas oven features a thermocou-
ple; if for any reason the flame should
extinguish, the device will stop the gas
flow.
Always cook with the oven
door closed.
))
))
)
To ignite the oven gas burner:
1. Open the oven door.
2. Press the gas oven control
knob, turn it to 240 and wait
for the flame to come on. This
may take 10-15 seconds. Do
not release the knob until the
burner ignites. It is possible to
check the flame through the
holes in the bottom of the oven.
3. Upon ignition, keep the knob
pressed for about 10-15
seconds, then release it and
turn it to the required setting.
If the oven burner does not light
even after 15 seconds:
1. Release the gas oven control
knob and turn it to the “Off
position”.
2. Open the oven door and wait
for at least one minute before
trying to light the oven burner
again.
If the oven burner accidentally
goes out, turnthe gas oven
knob to the “Off” position
andwait at least one minute
before trying to lightthe burner
again.
The gas oven and the electric grill
cannot be used at the same time.
The ignition of the gas oven burner
prevents the electric grill control
knob to operate.
)

14 electrolux
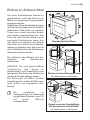
Manual ignition (in case of
lack of electrical supply)
1. Open the oven door.
2. Hold a flame near the hole in the
bottom of the oven cavity as shown
in the relevant picture.
3. At the same time press the gas oven
control knob and turn it anti-clock-
wise until the maximum tempera-
ture ("240") is reached.
It is possible to check the flame
through the holes in the bottom of
the oven.
4. When the oven burner is lit, keep
the gas oven control knob for ap-
proximately 10-15 seconds.
5. Release the control knob and then
gently close the oven door. To adjust
the temperature, turn the knob to the
required setting after a few minutes.
If the oven burner accidentally
goes out or does not light,
turn the oven knob to the “Off”
position and wait at least one
minute before trying to light
the burner again.
)
hole for manual
ignition

electrolux 15
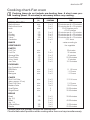
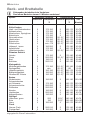
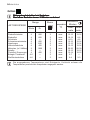
MEAT & POULTRY
Beef with bone min. 2 or 3 20 minutes per lb
+ 20 minutes
Beef without bone 190 2 or 3 25 minutes per lb
+ 25 minutes
Lamb min. 2 or 3 20-25 minutes per lb
+ 20-25 minutes
Pork 175 2 or 3 25 minutes per lb
+ 25 minutes
Chicken 225 2 or 3 25 minutes per lb
+ 25 minutes
Duckling 190 2 or 3 30 minutes per lb
+ 30 minutes
Turkey 180 2 or 3 30 minutes per lb
+ 30 minutes
Casseroles min. 2 or 3 21/2 hours
BAKED min. 2 varies according to
VEGETABLES the vegetable
PASTRY
Fruit Tart 175 2 35 minutes
Fruit Pie 175 2 or 3 35 minutes
Sausage Rolls 200 2 or 3 20 minutes
Choux Pastry 190 2 or 3 25-30 minutes
Vol au Vents 200 2 or 3 15 minutes
Jam Tarts 200 2 or 3 10-15 minutes
PUDDINGS
Egg Custard in a
Bain Marie min. 2 or 3 1-1 1/4 hours
Pavlova min. 2 or 3 1 1/2 hours
Meringues min. 2 or 3 1 1/2 hours
CAKES
Rich Fruit Cake min. 2 or 3 3 1/2-4 hours
(diam. approx. 20 cm)
Plain Fruit Cake min. 2 or 3 2 1/2 hours
Madeira Cake min. 2 or 3 1 3/4-2 hours
Small Cakes min. 3 20-30 minutes
Ginger Bread min. 3 35-45 minutes
BREAD
Bread (Kg. 0,5) 200 2 or 3 30-40 minutes
Bread (Kg. 1,0) 200 2 or 3 40-50 minutes
Rolls and Buns 200 2 or 3 15-20 minutes
Biscuits 190 2 or 3 25-35 minutes
TEMP.
(°C)
FOOD
SHELF
POSITIONS
COOKING
TIME
Change trays over halfway through the cooking time.
Cooking chart - Gas oven
Cooking times do not include pre-heating time. A short oven pre-heating
(about 10 minutes) is necessary before any cooking.

16 electrolux
Using the fan oven
The air inside the oven is heated
by the gas burner and the fan
circulates hot air to maintain an
even temperature inside the oven.
Always cook with the oven
door closed.
To use the Fan Gas Oven:
1. Light the oven gas burner as
described in “Using the Gas
Oven”.
2. Upon ignition, turn the “Light-
Grill & Fan” control knob to
position .
NOTE:
The oven fan will start
approximately after 10 minutes
of cooking.
)

electrolux 17
MEAT & POULTRY
Beef with bone
min.
2 or 3 20 minutes per lb + 20 minutes
Beef without bone 190 2 or 3 25 minutes per lb + 25 minutes
Lamb
min.
2 or 3 20-25 minutes per lb
+ 20-25 minutes
Pork 175 2 or 3 25 minutes per lb + 25 minutes
Chicken 210 2 or 3 25 minutes per lb + 25 minutes
Duckling 190 2 or 3 30 minutes per lb + 30 minutes
Turkey 180 2 or 3 30 minutes per lb + 30 minutes
Casseroles
min.
2 or 3 21/2 hours
BAKED
min.
2 varies according to
VEGETABLES the vegetable
PASTRY
Fruit Tart
min.
2 35 minutes
Fruit Pie
min.
2 or 3 35 minutes
Sausage Rolls 180 2 or 3 20 minutes
Choux Pastry 175 2 or 3 25-30 minutes
Vol au Vents 175 2 or 3 15 minutes
Jam Tarts 180 2 or 3 10-15 minutes
PUDDINGS
Egg Custard in a
Bain Marie
min.
2 or 3 1-1 1/4 hours
Pavlova
min.
2 or 3 1 1/2 hours
Meringues
min.
2 or 3 1 1/2 hours
CAKES
Rich Fruit Cake
min.
2 or 3 3 1/2-4 hours
(diam. approx. 20 cm) 2 or 3
Plain Fruit Cake
min.
2 or 3 2 1/2 hours
Madeira Cake
min.
2 or 3 1 3/4-2 hours
Small Cakes
min.
3 20-30 minutes
Ginger Bread
min.
3 35-45 minutes
BREAD
Bread 190 2 or 3 30-40 minutes
(Kg. 0,5) 2 or 3
Bread 190 2 or 3 40-50 minutes
(Kg. 1,0) 2 or 3
Rolls and Buns 180 2 or 3 15-20 minutes
Biscuits 180 2 or 3 25-35 minutes
Cooking chart-Fan oven
Cooking times do not include pre-heating time. A short oven pre-
heating (about 10 minutes) is necessary before any cooking.
FOOD
Change trays over halfway through the cooking time.
Choose these shelf positions when cooking more than one tray simoultaneously.
TEMP.
(°C)
SHELF
POSITIONS
COOKING
TIME

18 electrolux
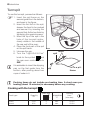
Grilling must be carried out
with the oven door closed.
How to Use the Grill
1. Turn the oven function control knob
(Light-Grill & Fan) clockwise to
position . The symbol - on the
control knob indicates the tempera-
ture range (from a minimum of about
50ºC to a maximum of about 200°C).
2. Adjust the grid and grill pan runner
position to allow for different
thicknesses of food. Position the food
close to the top element for faster
cooking and further away for more
gentle cooking.
Preheat the grill on a full setting for a
few minutes before sealing steaks or
toasting. Adjust the heat setting and the
shelf as necessary during cooking.
• The grill control light will come on
when the "Light-Grill & Fan" control
knob is set.
It will remain on until the correct tem-
perature is reached. It will then cycle
on and off to show that the tempera-
ture is being maintained.
NOTE
The action of the cooling fan will depend
on how long the grill has been used and
at what temperature. It may not switch
in at all at lower temperature settings nor
run on where the oven has only been
used for a short time.
Grilling
Hints and Tips
- Most foods should be placed on the
grid in the grill pan to allow maximum
circulation of air to lift the food out of
the fats and juices. Food such as fish,
liver and kidneys may be placed
directly on the grill pan, if preferred.
- Food should be thoroughly dried
before grilling to minimise splashing.
Brush lean meats and fish lightly with
a little oil or melted butter to keep
them moist during cooking.
- Accompaniments such as tomatoes
and mushrooms may be placed
underneath the grid when grilling
meats.
- When toasting bread, we suggest that
the top runner position is used with
the grid in its 'high' position.
- The food should be turned over during
cooking, as required.
)
O
I
L

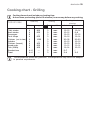
electrolux 19
Cooking times do not include pre-heating time.
A short oven pre-heating (about 10 minutes) is necessary before any cooking.
The temperatures quoted are guidelines. The temperatures may have to be adapted
to personal requirements.
1st side
temp.°CPieces g.
Quantity
Cooking time in
minutes
2nd side
Grilling
4
3
2
1
TYPE OF DISH
Fillet steaks 4 800 3 max 12~15 12~14
Beef-steaks 4 600 3 max 10~12 6~8
Sausages 8
— 3 max 12~15 10~12
Pork chops 4 600 3 max 12~16 12~14
Chicken (cut in two) 2 1000 3 max 30~35 25~30
Kebabs 4
— 3 max 10~15 10~12
Chicken (breast) 4 400 3 max 12~15 12~14
Hamburger 6 600 2 max
13
~
15 12
~
14
Fish (fillets) 4 400 3 max 12~14 10~12
Sandwiches 4~6
— 3 max 5~7 /
Toast 4~6
— 3 max 2~4 2~3
Cooking chart - Grilling

20 electrolux
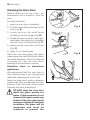
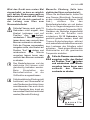
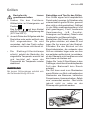
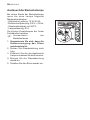
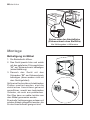
To use the turnspit, proceed as follows:
1. Insert the spit frame on the
second guide from the bottom,
as shown in the figure.
2. Insert the first fork in the spit,
skewer the food to be cooked
and secure it by inserting the
second fork; fix the two forks by
tightening the special screws.
3. Insert the tip of the spit in the
hole of the turnspit motor,
clearly visible in the middle of
the rear wall of the oven.
4. Place the front part of the spit
on the spit frame.
5. Unscrew the grip.
6. Turn the “Light-Grill & Fan”
knob to the symbol and
the gas oven control knob to
240.
It is advisable to insert the dripping
pan on the first guide from the
bottom, after pouring about two
cups of water in it.
)
Food type
Shelf level
Poultry 1000 2 max. 50/60
Roasts 800 2 max. 50/60
Cooking with the turnspit
Cooking
time
(minutes)
Quantity
Gr.
Temperature
°C
4
3
2
1
Cooking times do not include pre-heating time. A short oven pre-
heating (about 10 minutes) is necessary before any cooking.
turnspit
frame
grip
forks
spit
Turnspit
Seite wird geladen ...
Seite wird geladen ...
Seite wird geladen ...
Seite wird geladen ...
Seite wird geladen ...
Seite wird geladen ...
Seite wird geladen ...
Seite wird geladen ...
Seite wird geladen ...
Seite wird geladen ...
Seite wird geladen ...
Seite wird geladen ...
Seite wird geladen ...
Seite wird geladen ...
Seite wird geladen ...
Seite wird geladen ...
Seite wird geladen ...
Seite wird geladen ...
Seite wird geladen ...
Seite wird geladen ...
Seite wird geladen ...
Seite wird geladen ...
Seite wird geladen ...
Seite wird geladen ...
Seite wird geladen ...
Seite wird geladen ...
Seite wird geladen ...
Seite wird geladen ...
Seite wird geladen ...
Seite wird geladen ...
Seite wird geladen ...
Seite wird geladen ...
Seite wird geladen ...
Seite wird geladen ...
Seite wird geladen ...
Seite wird geladen ...
Seite wird geladen ...
Seite wird geladen ...
Seite wird geladen ...
Seite wird geladen ...
Seite wird geladen ...
Seite wird geladen ...
Seite wird geladen ...
Seite wird geladen ...
Seite wird geladen ...
Seite wird geladen ...
Seite wird geladen ...
Seite wird geladen ...
Seite wird geladen ...
Seite wird geladen ...
Seite wird geladen ...
Seite wird geladen ...
-
 1
1
-
 2
2
-
 3
3
-
 4
4
-
 5
5
-
 6
6
-
 7
7
-
 8
8
-
 9
9
-
 10
10
-
 11
11
-
 12
12
-
 13
13
-
 14
14
-
 15
15
-
 16
16
-
 17
17
-
 18
18
-
 19
19
-
 20
20
-
 21
21
-
 22
22
-
 23
23
-
 24
24
-
 25
25
-
 26
26
-
 27
27
-
 28
28
-
 29
29
-
 30
30
-
 31
31
-
 32
32
-
 33
33
-
 34
34
-
 35
35
-
 36
36
-
 37
37
-
 38
38
-
 39
39
-
 40
40
-
 41
41
-
 42
42
-
 43
43
-
 44
44
-
 45
45
-
 46
46
-
 47
47
-
 48
48
-
 49
49
-
 50
50
-
 51
51
-
 52
52
-
 53
53
-
 54
54
-
 55
55
-
 56
56
-
 57
57
-
 58
58
-
 59
59
-
 60
60
-
 61
61
-
 62
62
-
 63
63
-
 64
64
-
 65
65
-
 66
66
-
 67
67
-
 68
68
-
 69
69
-
 70
70
-
 71
71
-
 72
72


Electrolux EOG21300X Benutzerhandbuch
- Kategorie
- Mikrowellen
- Typ
- Benutzerhandbuch
in anderen Sprachen
- English: Electrolux EOG21300X User manual