
BEJUBLAD
SMAKLIG
GB
DE

ENGLISH
Please refer to the last page of this manual for the full list of IKEA
appointed After Sales Service Provider and relative national phone
numbers.
DEUTSCH
Auf der letzten Seite dieser Broschüre finden Sie eine vollständige
Liste der offiziellen IKEA After-Sales-Dienstleister mit den
jeweiligen nationalen Telefonnummern.


Contents
Safety information 4
Safety instructions 6
Product description 8
Daily use 9
Hints and tips 12
Care and cleaning 12
Troubleshooting 13
Installation 15
Technical data 16
Energy efficiency 17
Environmental concerns 17
IKEA guarantee 18
Subject to change without notice.
Safety information
Before the installation and use of the appliance, carefully read
the supplied instructions. The manufacturer is not responsible if
an incorrect installation and use causes injuries and damages.
Always keep the instructions with the appliance for future
reference.
Children and vulnerable people safety
• This appliance can be used by children aged from 8 years
and above and persons with reduced physical, sensory or
mental capabilities or lack of experience and knowledge if
they have been given supervision or instruction concerning
the use of the appliance in a safe way and understand the
hazards involved.
• Do not let children play with the appliance.
• Keep all packaging away from children and dispose of it
appropriately.
• Keep children and pets away from the appliance when it
operates or when it cools down. Accessible parts are hot.
• If the appliance has a child safety device, this should be
activated.
• Children shall not carry out cleaning and user maintenance of
the appliance without supervision.
• Children aged 3 years and under must be kept away from
this appliance when it is in operation at all times.
ENGLISH
4

General Safety
• WARNING: The appliance and its accessible parts become
hot during use. Care should be taken to avoid touching
heating elements. Children less than 8 years of age shall be
kept away unless continuously supervised.
• Do not operate the appliance by means of an external timer
or separate remote-control system.
• WARNING: Unattended cooking on a hob with fat or oil can
be dangerous and may result in fire.
• NEVER try to extinguish a fire with water, but switch off the
appliance and then cover flame e.g. with a lid or a fire
blanket.
• CAUTION: The cooking process has to be supervised. A short
term cooking process has to be supervised continuously.
• WARNING: Danger of fire: Do not store items on the cooking
surfaces.
• Metallic objects such as knives, forks, spoons and lids should
not be placed on the hob surface since they can get hot.
• Do not use a steam cleaner to clean the appliance.
• After use, switch off the hob element by its control and do not
rely on the pan detector.
• If the glass ceramic surface / glass surface is cracked, switch
off the appliance to avoid the possibility of electric shock.
• If the supply cord is damaged, it must be replaced by the
manufacturer, the Authorised Service Centre or similarly
qualified persons in order to avoid a hazard.
• WARNING: Use only hob guards designed by the
manufacturer of the cooking appliance or indicated by the
manufacturer of the appliance in the instructions for use as
suitable or hob guards incorporated in the appliance. The
use of inappropriate guards can cause accidents.
ENGLISH
5

Safety instructions
Installation
Warning! Only a qualified
person must install this
appliance.
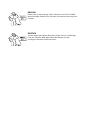
• Remove all the packaging.
• Do not install or use a damaged
appliance.
• Follow the installation instruction
supplied with the appliance.
• Keep the minimum distance from the
other appliances and units.
• Always take care when moving the
appliance as it is heavy. Always use
safety gloves and enclosed footwear.
• Seal the cut surfaces with a sealant to
prevent moisture to cause swelling.
• Protect the bottom of the appliance from
steam and moisture.
• Do not install the appliance adjacent to
a door or under a window. This prevents
hot cookware to fall from the appliance
when the door or the window is opened.
• If the appliance is installed above
drawers make sure that the space,
between the bottom of the appliance
and the upper drawer, is sufficient for air
circulation.
• The bottom of the appliance can get hot.
Make sure to install a non-combustible
separation panel under the appliance to
prevent access to the bottom.
Refer to the Assembly Instructions.
• Make sure that the ventilation space of 2
mm, between the worktop and the front
of the below unit, is free. The warranty
does not cover damages caused by the
lack of an adequate ventilation space.
Electrical Connection
Warning! Risk of fire and
electrical shock.
• All electrical connections should be made
by a qualified electrician.
• The appliance must be earthed.
• Before carrying out any operation make
sure that the appliance is disconnected
from the power supply.
• Make sure that the electrical information
on the rating plate agrees with the
power supply. If not, contact an
electrician.
• Make sure the appliance is installed
correctly. Loose and incorrect electricity
mains cable or plug (if applicable) can
make the terminal become too hot.
• Use the correct electricity mains cable.
• Do not let the electricity mains cable
tangle.
• Make sure that a shock protection is
installed.
• Use the strain relief clamp on the cable.
• Make sure the mains cable or plug (if
applicable) does not touch the hot
appliance or hot cookware, when you
connect the appliance to the near
sockets
• Do not use multi-plug adapters and
extension cables.
• Make sure not to cause damage to the
mains plug (if applicable) or to the mains
cable. Contact our Authorised Service
Centre or an electrician to change a
damaged mains cable.
• The shock protection of live and
insulated parts must be fastened in such
a way that it cannot be removed without
tools.
• Connect the mains plug to the mains
socket only at the end of the installation.
Make sure that there is access to the
mains plug after the installation.
• If the mains socket is loose, do not
connect the mains plug.
• Do not pull the mains cable to disconnect
the appliance. Always pull the mains
plug.
ENGLISH
6

• Use only correct isolation devices: line
protecting cut-outs, fuses (screw type
fuses removed from the holder), earth
leakage trips and contactors.
• The electrical installation must have an
isolation device which lets you disconnect
the appliance from the mains at all poles.
The isolation device must have a contact
opening width of minimum 3 mm.
Use
Warning! Risk of injury, burns
and electrical shock.
• Remove all the packaging, labelling and
protective film (if applicable) before first
use.
• Use this appliance in a household
environment.
• Do not change the specification of this
appliance.
• Make sure that the ventilation openings
are not blocked.
• Do not let the appliance stay unattended
during operation.
• Set the cooking zone to “off” after each
use.
• Do not rely on the pan detector.
• Do not put cutlery or saucepan lids on
the cooking zones. They can become hot.
• Do not operate the appliance with wet
hands or when it has contact with water.
• Do not use the appliance as a work
surface or as a storage surface.
• If the surface of the appliance is cracked,
disconnect immediately the appliance
from the power supply. This to prevent
an electrical shock.
• Users with a pacemaker must keep a
distance of minimum 30 cm from the
induction cooking zones when the
appliance is in operation.
• When you place food into hot oil, it may
splash.
Warning! Risk of fire and
explosion
• Fats and oil when heated can release
flammable vapours. Keep flames or
heated objects away from fats and oils
when you cook with them.
• The vapours that very hot oil releases
can cause spontaneous combustion.
• Used oil, that can contain food remnants,
can cause fire at a lower temperature
than oil used for the first time.
• Do not put flammable products or items
that are wet with flammable products in,
near or on the appliance.
Warning! Risk of damage to the
appliance.
• Do not keep hot cookware on the control
panel.
• Do not put a hot pan cover on the glass
surface of the hob.
• Do not let cookware to boil dry.
• Be careful not to let objects or cookware
fall on the appliance. The surface can be
damaged.
• Do not activate the cooking zones with
empty cookware or without cookware.
• Do not put aluminium foil on the
appliance.
• Cookware made of cast iron, aluminium
or with a damaged bottom can cause
scratches on the glass / glass ceramic.
Always lift these objects up when you
have to move them on the cooking
surface.
• This appliance is for cooking purposes
only. It must not be used for other
purposes, for example room heating.
Care and cleaning
• Clean regularly the appliance to prevent
the deterioration of the surface material.
• Deactivate the appliance and let it cool
down before you clean it.
• Disconnect the appliance from the
electrical supply before maintenance.
• Do not use water spray and steam to
clean the appliance.
• Clean the appliance with a moist soft
cloth. Only use neutral detergents. Do
ENGLISH
7

not use abrasive products, abrasive
cleaning pads, solvents or metal objects.
Disposal
Warning! Risk of injury or
suffocation.
• Contact your municipal authority for
information on how to discard the
appliance correctly.
• Disconnect the appliance from the mains
supply.
• Cut off the mains electrical cable close to
the appliance and dispose of it.
Product description
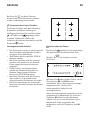
Cooking surface layout
3
1 2
45
1
Single cooking zone (210 mm) 2300 W,
with Booster 3200 W
2
Single cooking zone (180 mm) 1800 W,
with Booster 2500 W
3
Single cooking zone (145 mm) 1400 W,
with Booster 1800 W
4
Control panel
5
Single cooking zone (210 mm) 2300 W,
with Booster 3200 W
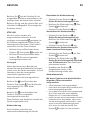
Control panel layout
1 2 3 4 5 6
78910
Press the symbol to operate the appliance.
The display, indicators and sounds tell
which function operate.
1
To activate or deactivate the hob.
2
To activate and deactivate the Lock
or the Child Safety Device.
3
To activate the function STOP+GO.
4
Timer indicators of cooking zones.
5
Timer display: 00 - 99 minutes.
6
To activate the Booster (Display
shows a ).
7
A power setting display: , - .
8
Power selector to select power settings.
ENGLISH 8

9
/ To increase or to decrease the
Timer.
10
To activate and deactivate the
Bridge function.
Power setting displays
Display Description
The cooking zone is deactivated.
-
The cooking zone operates.
STOP+GO function operates.
+ digit
There is a malfunction. Refer to "Troubleshooting" chapter.
A cooking zone is still hot (residual heat).
Lock / The Child Safety Device function operates.
Incorrect or too small cookware or no cookware on the cooking zone.
Automatic Switch Off function operates.
Residual heat indicator
Warning! There is a risk of
burns from residual heat.
The induction cooking zones make the heat
necessary for cooking process directly in the
bottom of the cookware. The glass ceramic
is heated by the heat of the cookware.
Daily use
Activating and deactivating
Touch for 1 second to activate or
deactivate the hob.
Adjusting the power setting
Touch the power selector at a desired
power setting. Correct to the left or the
right, if necessary. Do not release before
you reach a desired power setting.
Bridge function
The function connects two cooking zones
and they operate as one. First set the
power setting for one of the cooking zones.
To activate the function touch . To set or
change the power setting touch one of the
symbols.
To deactivate the function touch
. The
cooking zones operate independently.
Using the Booster function
The Booster function makes additional
power available for the induction cooking
ENGLISH 9

zones. Touch to activate it, a lights up
on the display. After maximum 10 minutes,
the induction cooking zones automatically
return to cooking level .
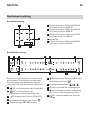
Power exchange function
• Cooking zones are grouped according to
the location and number of the phases in
the hob. See the illustration.
• Each phase has a maximum electricity
loading of 3700 W.
• The function divides the power between
cooking zones connected to the same
phase.
• The function activates when the total
electricity loading of the cooking zones
connected to a single phase exceeds
3700 W.
• The function decreases the power to the
other cooking zones connected to the
same phase.
• The power setting display of the reduced
zones changes between two levels.
Using the Timer
Touch repeatedly until the indicator of a
desired cooking zone flashes. For example
for the front right zone.
Touch or of the Timer to set the time
between 00 and 99 minutes. When the
indicator of the cooking zone flashes more
slowly, the time counts down. Set the power
setting.
If the power setting is set and the time set
has elapsed, an acoustic signal sounds, 00
flashes, and cooking zone deactivates. If
cooking zone is not in use and the time set
has elapsed an acoustic signal sounds and
00 flashes.
Touch
to deactivate the function for the
selected cooking zone and the indicator for
this cooking zone flashes faster. Touch
and the remaining time counts backwards
to 00. The indicator of the cooking zone
goes out.
STOP+GO
The function sets all cooking zones that
operate to the lowest power setting
.
When the function operates, you cannot
change the power setting. The function does
not stop the timer function.
• To activate this function touch . The
symbol
comes on.
• To deactivate this function touch . The
power setting that you set before comes
on.
Lock
When the cooking zones operate, you can
lock the control panel, but not deactivate
ENGLISH
10

the appliance. It prevents an accidental
change of the power setting.
First set the power setting.
To start this function touch . The symbol
comes on for 4 seconds. The Timer stays
on.
To stop this function touch . The power
setting that you set before comes on.
When you stop the appliance, you also stop
this function.
The Child Safety Device
This function prevents an accidental
operation of the appliance.
To activate the Child Safety Device
• Activate the appliance with . Do not
set the power settings.
• Touch
for 4 seconds. The symbol
comes on.
• Deactivate the appliance with .
To deactivate the Child Safety Device
• Activate the appliance with
. Do not
set the power settings. Touch for 4
seconds. The symbol
comes on.
• Deactivate the appliance with .
To override the Child Safety Device for
only one cooking time
• Activate the appliance with
. The
symbol
comes on.
• Touch for 4 seconds. Set the power
setting in 10 seconds. You can operate
the appliance.
• When you deactivate the appliance with
, the Child Safety Device operates
again.
Automatic Switch Off
The function deactivates the hob
automatically if:
• all cooking zones are deactivated.
• you do not set the power setting after
activating the hob.
• you cover any symbol with an object (a
pan, a cloth, etc.) for longer than approx.
10 seconds.
• you do not deactivate a cooking zone
after a certain time, or you do not modify
the power setting, or if the overheating
occurs (e.g. when a pan boils dry). The
symbol lights up. Before using again,
you must set the cooking zone to .
Power setting Automatic switch off
after
, -
6 hours
-
5 hours
4 hours
-
1.5 hours
If cookware that is not suitable is
used, lights up on the display
and after 2 minutes the indicator
for the cooking zone deactivates
itself.
OffSound Control - Deactivating and
activating the sounds
Deactivating the sounds
Deactivate the appliance.
Touch for 3 seconds. The displays comes
on and goes out. Touch for 3 seconds.
comes on, the sound is on. Touch ,
comes on, the sound is off.
ENGLISH
11

When this function operates, you can hear
the sounds only when:
• you touch
• you put something on the control panel.
Activating the sounds
Deactivate the appliance.
Touch for 3 seconds. The displays come
on and go out. Touch for 3 seconds.
comes on, because the sound is off. Touch
, comes on. The sound is on.
Hints and tips
Noises during operation
When a cooking zone is active, it
may hum briefly. This is a
characteristic of all ceramic glass
cooking zones and does not
impair either the function or the
life of the appliance.
Cookware for induction cooking zones
Use the induction cooking zones
with correct cookware.
Cookware material
• correct: cast iron, steel, enamelled steel,
stainless steel, the bottom made of multi-
layer (with correct mark from a
manufacturer).
• not correct: aluminium, copper, brass,
glass, ceramic, porcelain.
Cookware is correct for an induction hob
if …
• ... some water boils very quickly on a
zone set to the highest power setting...
• ... a magnet pulls on to the bottom of the
cookware.
The bottom of the cookware must
be as thick and flat as possible.
Cookware sizes
Induction cooking zones adapt
automatically to the size of the bottom of
the cookware. But, it must have a minimum
diameter depending on the size of the
cooking zone.
Cooking zone Cookware diame-
ter [mm]
Right rear cooking
zone
145 - 180
Right front cooking
zone
125 - 145
Left rear cooking
zone
125 - 210
Left front cooking
zone
125 - 210
Care and cleaning
General information
Warning! Deactivate the
appliance and let it cool down
before you clean it.
Warning! For safety reasons, do
not clean the appliance with
steam blasters or high-pressure
cleaners.
ENGLISH 12

Warning! Sharp objects and
abrasive cleaning agents will
damage the appliance. Clean
the appliance and remove the
residues with water and washing
up liquid after each use. Remove
also the remnants of the cleaning
agents!
Scratches or dark stains on the
glass ceramic that cannot be
removed do not affect the
functioning of the appliance.
Removing the residues and stubborn
residues
1. Food containing sugar, plastics, tin foil
residues should be removed at once,
best tool for cleaning glass surface is a
scraper (not included with the
appliance). Place a scraper on the glass
ceramic surface at an angle and remove
residues by sliding the blade over the
surface. Wipe the appliance with a
damp cloth and a little washing up
liquid. Finally, rub the appliance dry
using a clean cloth.
2. Limescale rings, water rings, fat
splashes, shiny metallic discolorations
should be removed after the appliance
has cooled down using cleaner for glass
ceramic or stainless steel.
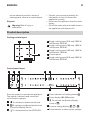
Troubleshooting
Warning! Refer to Safety
chapters.
What to do if…
Problem Possible cause Remedy
The appliance cannot be ac-
tivated or is not operating.
The appliance is not connec-
ted to an electrical supply or
it is connected incorrectly.
Check if the appliance is cor-
rectly connected to the elec-
trical supply (refer to con-
nection diagram).
More than 10 seconds
passed since you activated
the hob.
Activate the appliance
again.
The Child Safety Device or
the Lock is on .
Deactivate the Child Safety
Device (See the section
“Child Safety Device" or
"Lock").
Several symbols were
touched at the same time.
Touch only one symbol.
ENGLISH 13

Problem Possible cause Remedy
Acoustic signal sounds, ap-
pliance deactivates.
One or more symbols have
been covered for longer
than 10 seconds.
Uncover symbols.
Display is switching between
two power settings.
Power exchange function is
reducing the power of this
cooking zone.
See the section "Power ex-
change function".
The residual heat indicator is
not displaying anything.
The cooking zone was only
on for a short time and is
therefore not hot.
If the cooking zone is sup-
posed to be hot, call the Af-
ter Sales Service.
There is no signal when you
touch panel symbols.
The signals are deactivated. Activate the signals. Refer to
OffSound Control.
lights up on the power
setting display.
Unsuitable cookware. Use suitable cookware.
No cookware on the cooking
zone.
Place cookware on the cook-
ing zone.
The diameter of the bottom
of the cookware is too small
for the cooking zone.
Move onto a smaller cooking
zone.
symbol plus a number
appears on the power set-
ting display.
Electronics fault. Disconnect the appliance
from the electrical supply for
a few minutes. Take the fuse
out of the house’s electric
system. If after activating
again,
is displayed
again, call the After Sales
Service.
lights up on the power
setting display.
Overheating protection for
the cooking zone operates.
Deactivate the appliance.
Remove the hot cookware.
After approximately 30 sec-
onds activate the cooking
zone again. should dis-
appear, residual heat indi-
cator can stay. Cool down
the cookware and check it
with the section "Cookware
for the induction cooking
zones".
ENGLISH 14

If there is a fault, first try to find a solution to
the problem yourself. If you cannot find a
solution to the problem yourself, contact
your dealer or the After Sales Service.
If you operated the appliance
wrongly, or the installation was
not carried out by a registered
engineer, the visit from the After
Sales Service technician or
dealer may not take place free
of charge, even during the
warranty period.
Installation
General information
Manufacturer is not responsible for any
injury to persons and pets or damage to
property caused by failure to comply
following requirements.
Caution! To proceed with the
installation refer to the assembly
instructions.
Warning! Installation process
must follow the laws, ordinances,
directives and standards
(electrical safety rules and
regulations, proper recycling in
accordance with the regulations,
etc.) in force in the country of use!
Warning! The appliance must be
earthed!
Warning! Risk of injury from
electrical current.
• The electrical mains terminal is live.
• Make electrical mains terminal free of
voltage.
• Loose and inappropriate plug and
socket connections can make the
terminal overheat.
• Have the clamping connections correctly
installed.
• Use strain relief clamp on cable.
• Follow the connection diagram (it is
located on the underneath surface of the
casting of the hob).
Important!
• You must observe the minimum distances
to other appliances and furniture
cabinets or other units according to
Assembly Instruction.
• If there is no oven beneath the hob insert
a dividing panel at a minimum distance
of 20 mm from the bottom of the hob.
• Do not use silicon sealant between the
appliance and the worktop. Avoid
installing the appliance next to doors
and under windows as hot cookware
may be knocked off the rings when doors
and windows are opened.
• Only an authorized service engineer can
install, connect or repair this appliance.
Use only original spare parts.
Electrical connection
• Before connecting, check that the
nominal voltage of the appliance stated
on the rating plate, corresponds to the
available supply voltage. Also, check the
power rating of the appliance and
ensure that the wire is suitably sized to
suit the appliance power rating (refer to
the "Technical information" chapter). The
rating plate is located on the lower
casing of the hob.
• The appliance is not provided with a
mains cable. Buy the right one from
specialized dealer. Single phase or two-
ENGLISH
15

phase connection requires a mains cable
of minimum 70°C temperature stability.
Cable has been provided with end
sleeves. According to IEC regulations use
for one-phase connection: mains cable 3
x 4mm² and for two-phase connection:
mains cable 4 x 2.5mm². Please respect
in first priority specific national
regulations.
• The appliance works perfectly on AC
230 V, AC 220 V~ or AC 240 V~ 50 Hz
electrical network.
• You must have the means for
disconnection incorporated in the fixed
wiring. Have the appliance connected to
the mains using a device that allows the
appliance to be disconnected from the
mains at all poles with a contact opening
width of at least 3 mm, eg. automatic line
protecting cut-out, earth leakage trips or
fuse.
• You must have the connection and the
connecting links carried out as shown in
the connection diagram (it is located on
the underneath surface of the casing of
the hob). The earth lead is connected to
terminal marked with the symbol and
must be longer than leads carrying
electric current. Tighten the terminal
screws securely! Finally, secure the
connecting cable with the mains cable
cleat and the covering closed by
pressing firmly (lock into place).
Warning! Once connected to the
mains supply check that all
cooking zones are ready for use
by briefly setting each to
maximum power.
Technical data
Rating Plate
PQM
21552
000.000.00
Made in Germany
© Inter IKEA Systems B.V. 1999
DGT
230 V
Model
00000000
PNC 000 000 000 01 S No .................... 220V-240V AC 50-60 Hz
Typ 60 GAD DC AU 7.4kW
IKEA of Sweden AB
SE - 343 81 Älmhult
The graphic above represents the rating
plate of the appliance without serial
number, which is located at its underneath
surface of the casing.
Dear Customer, keep the additional rating
plate with the user manual. This will allow us
to assist you better, by identifying precisely
your hob, in case you will need in future our
assistance. Thank you for your help!
ENGLISH 16

Energy efficiency
Product information according to EU 66/2014
Model identification BEJUBLAD
803.039.32 SMA-
KLIG 202.228.30
Type of hob Built-In Hob
Number of cooking zones 4
Heating technology Induction
Diameter of circular cook-
ing zones (Ø)
Left front
Left rear
Right front
Right rear
21.0 cm
21.0 cm
14.5 cm
18.0 cm
Energy consumption per
cooking zone (EC electric
cooking)
Left front
Left rear
Right front
Right rear
177.4 Wh / kg
177.4 Wh / kg
185.0 Wh / kg
169.7 Wh / kg
Energy consumption of the
hob (EC electric hob)
177.4 Wh / kg
EN 60350-2 - Household electric cooking
appliances - Part 2: Hobs - Methods for
measuring performance
The energy measurements referring to the
cooking area are identified by the crosses
of the respective cooking zones.
Energy saving
You can save energy during everyday
cooking if you follow below hints.
• When you heat up water, use only the
amount you need.
• If it is possible, always put the lids on the
cookware.
• Before you activate the cooking zone put
the cookware on it.
• Put the smaller cookware on the smaller
cooking zones.
• Put the cookware directly in the centre of
the cooking zone.
• Use the residual heat to keep the food
warm or to melt it.
Environmental concerns
Recycle materials with the symbol . Put
the packaging in relevant containers to
recycle it. Help protect the environment and
human health by recycling waste of
ENGLISH 17

electrical and electronic appliances. Do not
dispose of appliances marked with the
symbol
with the household waste. Return
the product to your local recycling facility or
contact your municipal office.
IKEA guarantee
How long is the IKEA guarantee valid?
This guarantee is valid for 5 years from the
original date of purchase of Your appliance
at IKEA. The original sales receipt is
required as proof of purchase. If service
work is carried out under guarantee, this
will not extend the guarantee period for the
appliance.
Who will execute the service?
IKEA service provider will provide the
service through its own service operations
or authorized service partner network.
What does this guarantee cover?
The guarantee covers faults of the
appliance, which have been caused by
faulty construction or material faults from
the date of purchase from IKEA. This
guarantee applies to domestic use only. The
exceptions are specified under the headline
“What is not covered under this
guarantee?” Within the guarantee period,
the costs to remedy the fault e.g. repairs,
parts, labour and travel will be covered,
provided that the appliance is accessible
for repair without special expenditure. On
these conditions the EU guidelines (Nr.
99/44/EG) and the respective local
regulations are applicable. Replaced parts
become the property of IKEA.
What will IKEA do to correct the problem?
IKEA appointed service provider will
examine the product and decide, at its sole
discretion, if it is covered under this
guarantee. If considered covered, IKEA
service provider or its authorized service
partner through its own service operations,
will then, at its sole discretion, either repair
the defective product or replace it with the
same or a comparable product.
What is not covered under this
guarantee?
• Normal wear and tear.
• Deliberate or negligent damage,
damage caused by failure to observe
operating instructions, incorrect
installation or by connection to the
wrong voltage, damage caused by
chemical or electro-chemical reaction,
rust, corrosion or water damage
including but not limited to damage
caused by excessive lime in the water
supply, damage caused by abnormal
environmental conditions.
• Consumable parts including batteries
and lamps.
• Non-functional and decorative parts
which do not affect normal use of the
appliance, including any scratches and
possible color differences.
• Accidental damage caused by foreign
objects or substances and cleaning or
unblocking of filters, drainage systems or
soap drawers.
• Damage to the following parts: ceramic
glass, accessories, crockery and cutlery
baskets, feed and drainage pipes, seals,
lamps and lamp covers, screens, knobs,
casings and parts of casings. Unless such
damages can be proved to have been
caused by production faults.
• Cases where no fault could be found
during a technician’s visit.
ENGLISH
18

• Repairs not carried out by our appointed
service providers and/or an authorized
service contractual partner or where
non-original parts have been used.
• Repairs caused by installation which is
faulty or not according to specification.
• The use of the appliance in a non-
domestic environment i.e. professional
use.
• Transportation damages. If a customer
transports the product to their home or
other address, IKEA is not liable for any
damage that may occur during transport.
However, if IKEA delivers the product to
the customer's delivery address, then
damage to the product that occurs
during this delivery will be covered by
this guarantee.
• Cost for carrying out the initial
installation of the IKEA appliance.
However, if an IKEA service provider or
its authorized service partner repairs or
replaces the appliance under the terms
of this guarantee, the service provider or
its authorized service partner will re-
install the repaired appliance or install
the replacement, if necessary.
This restriction do not apply to fault-free
work carried out by a qualified specialist
using our original parts in order to adapt
the appliance to the technical safety
specifications of another EU country.
How country law applies
The IKEA guarantee gives You specific legal
rights, which covers or exceed local
demands. However these conditions do not
limit in any way consumer rights described
in the local legislation.
Area of validity
For appliances which are purchased in one
EU country and taken to another EU
country, the services will be provided in the
framework of the guarantee conditions
normal in the new country. An obligation to
carry out services in the framework of the
guarantee exists only if the appliance
complies and is installed in accordance
with:
• the technical specifications of the country
in which the guarantee claim is made;
• the Assembly Instructions and User
Manual Safety Information;
The dedicated After Sales Service for
IKEA appliances:
Please do not hesitate to contact IKEA After
Sales Service to:
1. make a service request under this
guarantee;
2. ask for clarification on installation of the
IKEA appliance in the dedicated IKEA
kitchen furniture. The service won’t
provide clarifications related to:
• the overall IKEA kitchen installation;
• connections to electricity (if machine
comes without plug and cable), to
water and to gas since they have to
be executed by an authorized
service engineer.
3. ask for clarification on user manual
contents and specifications of the IKEA
appliance.
To ensure that we provide you with the best
assistance, please read carefully the
Assembly Instructions and/or the User
Manual section of this booklet before
contacting us.
How to reach us if You need our service
Please refer to the last page of this manual
for the full list of IKEA appointed contacts
and relative national phone numbers.
ENGLISH
19

In order to provide You with a
quicker service, we recommend
that You use the specific phone
numbers listed at the end of this
manual. Always refer to the
numbers listed in the booklet of
the specific appliance You need
an assistance for. Before calling
us, assure that You have to hand
the IKEA article number (8 digit
code) for the appliance of which
you need our assistance.
SAVE THE SALES RECEIPT! It is
Your proof of purchase and
required for the guarantee to
apply. Note that the receipt
reports also the IKEA article
name and number (8 digit code)
for each of the appliances you
have purchased.
Do You need extra help?
For any additional questions not related to
After Sales of your appliances, please
contact our nearest IKEA store call centre.
We recommend you read the appliance
documentation carefully before contacting
us.
ENGLISH
20
Seite wird geladen ...
Seite wird geladen ...
Seite wird geladen ...
Seite wird geladen ...
Seite wird geladen ...
Seite wird geladen ...
Seite wird geladen ...
Seite wird geladen ...
Seite wird geladen ...
Seite wird geladen ...
Seite wird geladen ...
Seite wird geladen ...
Seite wird geladen ...
Seite wird geladen ...
Seite wird geladen ...
Seite wird geladen ...
Seite wird geladen ...
Seite wird geladen ...
Seite wird geladen ...
Seite wird geladen ...
Seite wird geladen ...
Seite wird geladen ...
Seite wird geladen ...
Seite wird geladen ...
-
 1
1
-
 2
2
-
 3
3
-
 4
4
-
 5
5
-
 6
6
-
 7
7
-
 8
8
-
 9
9
-
 10
10
-
 11
11
-
 12
12
-
 13
13
-
 14
14
-
 15
15
-
 16
16
-
 17
17
-
 18
18
-
 19
19
-
 20
20
-
 21
21
-
 22
22
-
 23
23
-
 24
24
-
 25
25
-
 26
26
-
 27
27
-
 28
28
-
 29
29
-
 30
30
-
 31
31
-
 32
32
-
 33
33
-
 34
34
-
 35
35
-
 36
36
-
 37
37
-
 38
38
-
 39
39
-
 40
40
-
 41
41
-
 42
42
-
 43
43
-
 44
44


in anderen Sprachen
- English: IKEA SMAKLIG User manual
Verwandte Artikel
-
IKEA AVENTYRLIG Benutzerhandbuch
-
IKEA SMAKLIG Benutzerhandbuch
-
-
-
-
IKEA FHGC4T Benutzerhandbuch
-
-
-
IKEA GRUNDAD Benutzerhandbuch
-