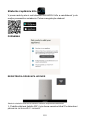
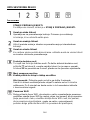
Hoover HTS6CBK5XWIFI Benutzerhandbuch
- Kategorie
- Dunstabzugshauben
- Typ
- Benutzerhandbuch
Dieses Handbuch eignet sich auch für

ENGLISH
INSTALLATION AND USER'S MANUAL
DEUTSCH
EINBAU- UND BEDIENUNGSANLEITUNG
ΕΛΛΗΝΙΚΑ
ΕΓΚΑΤΑΣΤΑΣΗ ΚΑΙ ΕΓΧΕΙΡΙΔΙΟ ΧΡΗΣΤΗ
FRANÇAIS
MANUEL D'INSTALLATION ET D'UTILISATION
MAGYAR
TELEPÍTÉS ÉS FELHASZNÁLÓI KÉZIKÖNYV
NEDERLANDS
HANDLEIDING VOOR INSTALLATIE EN GEBRUIK
SRPSKI
UPUTSTVO ZA UGRADNJU I UPOTREBU
ČEŠTINA
NÁVOD K INSTALACI A POUŽITÍ
SLOVENČINA
INŠTALAČNÁ A POUŽÍVATEĽSKÁ PRÍRUČKA
SLOVENŠČINA
NAVODILA ZA MONTAŽO IN UPORABO

INSTALLATION AND USER’S MANUAL
02
02
04
05
06
13
14
14
17
18
19
CONTENT
INTRODUCTION
SAFETY PRECAUTION
ELECTRICA L INSTALLATION
SPECIFICATION
INSTALLATION (VENT OUTSIDE)
INSTALLATION (VENT INSIDE)
DESCRIPTION OF COMPONENTS
OPERATION
MAINTENANCE
TROBULESHOOTING
CONFORMITY WITH DIRECTIVES
ENVIRONMENTAL PROTECTION19
1

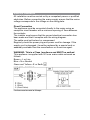
INTRODUCTION
Thank you for choosing this cooker hood.
This instruction manual is designed to provide you with all required
instructions related to the installation, use and maintenance of the appliance.
In order to operate the unit correctly and safety, please read this instruction
manual carefully before installation and usage.
The cooker hood uses high quality materials, and is made with a streamlined
design. Equipped with large power electric motor and centrifugal fan, it also
provides strong suction power, low noise operation, non-stick grease filter and
easy assembly installation.
Hereby, Candy Hoover Group Srl declares that the radio equipment is in
compliance with Directive 2014/53/EU and with the relevant Statutory
internet address: www.candy-group.com
SAFETY PRECAUTION
Never let the children operate the machine.
The cooker hood is for home use only, not suitable for barbecue, roast
shop and other commercial purpose.
The cooker hood and its filter should be clean regularly in order to
keep in good working condition.
Clean the cooker hood according to the instruction manual and keep
the unit from danger of burning.
Forbid the direct baking from the gas cooker.
Please keep the kitchen room a good convection.
Before connecting this appliance check that the power supply cord is
not damaged. A damage supply cord must be replaced by qualified
service personnel only.
There shall be adequate ventilation of the room when the range hood
is used at the same time as appliances burning gas or other fuels;
The air must not be discharged into a flue that is use d for exhausting
fumes from appliances burning gas or other fuels;
Regulations concerning the discharge of air have to be fulfilled.
Requirements (for the UKCA market).
The full text of the declaration of conformity is available at the following
2

Electrical Shock Hazard
˜
Only plug this unit into a properly earthed outlet. If in doubt seek
advice from a suitably qualified engineer.
˜
Failure to follow these instructions can result in death, fire, or
electrical shock.
5IFTFTIBMMCFBEFRVBUFWFOUJMBUJPOPGUIFSPPNXIFOUIFSBOHF
IPPEJTVTFEBUUIFTBNF UJNFBTBQQMJBODFTCVSOJOHHBTPSPUIFS
GVFMTOPUBQQMJDBCMFUPBQQMJBODFTUIBUPOMZEJTDIBSHFUIFBJSCBDL
JOUPUIFSPPN
UIFEFUBJMTDPODFSOJOHUIFNFUIPEBOEGSFRVFODZPGDMFBOJOH
UIFSFJTBGJSFSJTLJGDMFBOJOHJTOPUDBSSJFEPVUJOBDDPSEBODFXJUIUIF
JOTUSVDUJPOT
EPOPUGMBNFVOEFSUIFSBOHFIPPE
$"65*0/"DDFTTJCMFQBSUTNBZCFDPNFIPUXIFOVTFEXJUI
DPPLJOHBQQMJBODFT
- Children should be supervised to ensure that they do not play with
the appliance.
- Do not flambé under the range hood.
The range hood is not intended to be installed over a hob having
more than four hob elements
The lamp used in this product is not suitable for use
in the lighting of a room.
The purpose of this lamp is to provide illumination for using the product.
3

Direct Connection
The appliance must be connected directly to the mains using an
omnipolar circuit breaker with a minimum opening of 3mm between
the contacts.
The installer must ensure that the correct electrical connection has
been made and that it complies with the wiring diagram.
The cable must not be bent or compressed.
Regularly check the power plug and power cord for damage. If the
supply cord is damaged, it must be replaced by a special cord or
assembly available from the manufacturer or its service agent.
WARNING: This is a Class I appliance and MUST be earthed
This appliance is supplied with a 3 core mains cable coloured as
follows:
Brown = L or Live
Blue = N or Neutral
Green and Yellow = E or Earth
The fuse must be rated at 3 Amps.
Electrical Installation
All installation must be carried out by a competent person or qualified
electrician. Before connecting the mains supply ensure that the mains
voltage corresponds to the voltage on the rating plate.
4

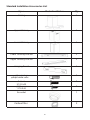
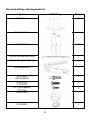
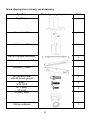
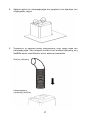
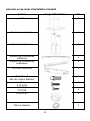
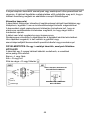
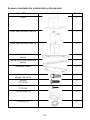
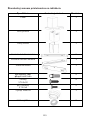
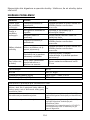
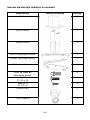
Standard Installation Accessories List
Spec. Qty
Casing 1
Upper Chimney 1
Lower Chimney 1
Lower chimney bracket 1
Upper chimney bracket 1
Hanging Board 1
φ8 rawl plugs
φ8×φ6 white color 9
Screws
ST4.0×30 9
φ7.2screws
ST4.0×8
Air outlet 1
Carbon filter 2
2
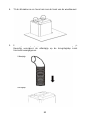
Illustration Picture
5

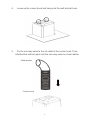
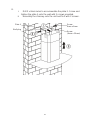
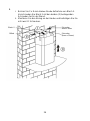
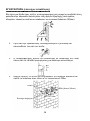
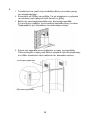
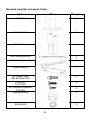
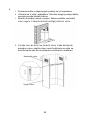
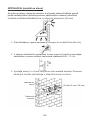
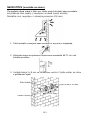
INSTALLATION
˄
˄
wall mounting
˅
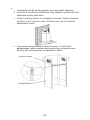
If you have an outlet to the outside, your cooker hood can be connected as
below picture by means of an extraction duct (enamel, aluminum, flexible pipe
non flammabe with an interior diameter of 150mm)
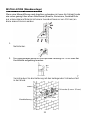
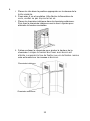
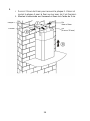
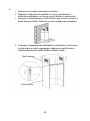
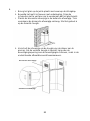
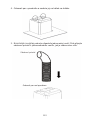
1. Before installation, turn the unit off and unplug it from the outlet.
2. The cooker hood should be placed at a distance of 65~75cm above
the cooking plane for best effect.
3. Drill 3 x 8mm holes to accommodate the bracket. Screw and tighten
the bracket onto the wall with the screws provided.
Wall plug
Wall bracket 107.5mm
Screw(4mm x 30mm)
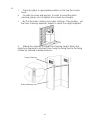
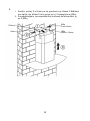
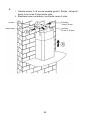
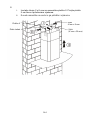
6

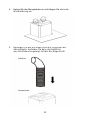
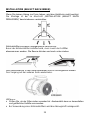
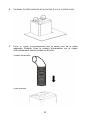
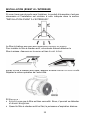
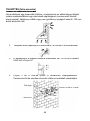
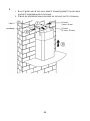
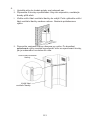
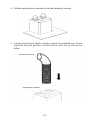
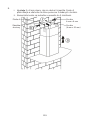
4. Leave up the cooker hood and hang onto the wall bracket hook.
5. Fix the one-way-valve to the air outlet of the cooker hood. Then,
attached the exhaust pipe onto the one-way-valve as shown below.
Exhaust pipe
Cooker hood
7

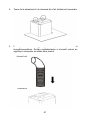
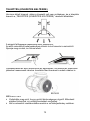
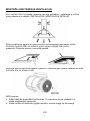
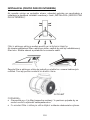
6. i. Place the glass in appropriate position on the top the cooker
hood.
ii. Fix with 4 screws and washer. In order to avoid the glass
cracking, please do not tighten the screws too strongly.
i. By Put the inner chimney into outer chimney .Then pulling out
the inner chimney upwards. Adjust to reach the height required.
ii. Sliding the chimney to adjust the chimney height. When the
height you required is reached, then hang the fixing hole to the fixing
screws as showed in below pictures.
Inner chimney
Outer chimney
8

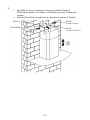
8. i. Drill 2 x 8mm holes to accommodate the plate II. Screw and
tighten the plate II onto the wall with 2 screws provided.
ii. Assembly the chimney onto the unit and fix it with 2 screws.
Plate II
Wall plug
Screw
4mm x 8mm
Screw
(4mm x 30mm)
9

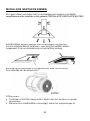
INSTALLATION (VENT INSIDE)
If you do not have an outlet to the outside, exhaust pipe is not required and
the installation is similar to the one show in section “INSTALLATION (VENT
OUTSIDE)”.
Activated carbon filter can be used to trap odors.
In order to install the activated carbon filter, the grease filter should be
detached first. Press the lock and pull it downward.
Plug the activated carbon filter into the unit and turn it in clockwise direction.
Repeat the same on the other side.
NOTE:
oMake sure the filter is securely locked. Otherwise, it would loosen and
cause dangerous.
oWhen activated carbon filter attached, the suction power will be
lowere
10

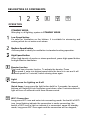
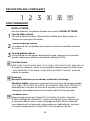
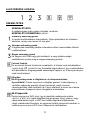
STANDBY MODE.
After plug in, all lighting, system in
STANDBY MODE
.
Medium Speed button
Airflow speed is ideally for ventilation in standard cooking operation.
High Speed button
When high density of smoke or steam produced, press high-speed button
for high effective ventilation.
Booster function
This hood has a booster function. To activate the booster, Press
to speed 4, enter into highest speed while the hood is in use and it will
increase speed for 5 minutes, before slowing down again.
Light
Short press for lighting on & off
Quick timer: Long press the light button hold for 3 seconds, fan speed
buttons will flashing & into 5minutes count down, after 5 minutes motor &
light will turn off automatic with three Buzzer sound.
Wi-Fi Connection
Long press WiFi icon and enter into connecting mode: the backlit of WiFi
icon keep flashing indicate the connection is under connecting, the
backlit of WiFi icon is light on indicate it is connected, same for standby
mode; long press WiFi icon again and the connection will be stopped;
Low Speed button
It ’s used for Ventilation on the kitchen. It is suitable for simmering and
cooking which do not make much steam.
DESCRIPTION OF COMPONENTS
OPERATION
11

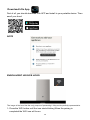
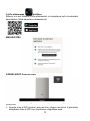
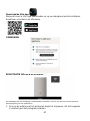
Download hOn App
First of all, you should download hOn APP and install to your portable device. Then
enroll your hood.
NOTE
ENROLLMENT HOOVER HOOD
1- Press the WiFi button until the icon starts blinking When the pairing is
completed the WiFi icon will be on.
The image of the hood has the only purpose of presenting it. May not be perfectly representative.
12

MAINTENANCE
Before cleaning switch the unit off and pull out the plug.
I. Regular Cleaning
Use a soft cloth moistened with hand-warm mildly soapy water or
household cleaning detergent. Never use metal pads, chemical, abrasive
material or stiff brush to clean the unit.
II. Monthly Cleaning for Grease Filter
ESSENTIAL: Clean the filter every month can prevent any risk of fire.
The filter collects grease, smoke and dust…... so the filter is directly
affecting the efficiency of the cooker hood. If not cleaned, the grease
residue (potential flammable) will saturate on the filter. Clean it with
household cleaning detergent.
III. Annual Cleaning for Activated Carbon Filter
Apply SOLELY to unit that installed as a recirculation unit (not vented to
the outside). This filter traps odors and must be replaced at least once a
year
depending on how frequent the cooker hood used.
IV. Changing a light bulb
Remove the screws on the glass, take off the hood glass. Find the
bulb that requires replacement, you will find it located in the light
fixture which is inside the exposed section of the canopy.
Disconnect the light wiring point and remove the bulb holders and
wiring from the hood. Important: It’s not possible to replace the bulbs
individually, it will be necessary to obtain the bulbs, bulb holders and
wiring as a complete part. (LED light: MAX 1.5W)
Fit the replacement bulbs, bulb holders and wiring in the same
manners as the originals. Then reconnect the light wiring point.
13

Refit the hood glass and fasten the glass screws. Make sure the screws are
fully tightened.
TROBULESHOOTING
Fault
Cause
Solution
Light on, but
fan does not
work
The fan blade is
jammed.
Switch off the unit and repair by
qualified service personnel only.
The motor is damaged.
Both light and
fan do not
work
Halogen light bulb burn.
Replace the bulb with correct
rating.
Power cord looses.
Plug in to the power supply again.
Serious
Vibration of
the unit
The fan blade is
damaged.
Switch of the unit and repair by
qualified service personnel only.
The fan motor is not
fixed tightly.
Switch off the unit and repair by
qualified service personnel only.
The unit is not hung
properly on the bracket.
Take down the unit and check
whether the bracket is in proper
location.
Too long distance
between the unit and
the cooking plane
Readjust the distance to 65-75cm
Suction
performance
not good
Technology Wi-Fi
Standard 802.11 b/g/n
Frequency Band(s)[MHz] 2400 MHz - 2483.5 MHz
Maximum Power[mW] 100 mW
Product information for networked equipment
power consumption of the product in
networked standby if all wired
network ports are connected and all
wireless network ports are activated:
2W
If the Hood has been enrolled with the APP,
turn on the Hood to activate wireless
network port.
How to activate wireless network port:
If the Hood has been enrolled with the APP, turn
off the Hood to deactivate wireless network port.
If the Hood hasn’t been enrolled with the APP,
wireless network port will be deactivated even the
Hood is on.
How to deactivate wireless network port:
14

treatments, in order to remove and dispose properly all pollutants, and
recover and recycle all materials.
Individuals can play an important role in ensuring that WEEE does not
become an environmental issue; it is essential to follow some basic rules:
WEEE should not be treated as household waste;
WEEE should be handed over to the relevant collection points managed by
the municipality or by registered companies. In many countries, for large
WEEE, home collection could be present.
In many countries, when you buy a new appliance, the old one may be
returned to the retailer who has to collect it free of charge on a one-to-one
basis, as long as the equipment is of equivalent type and has the same
functions as the supplied equipment.
CUSTOMER ASSISTANCE SERVICE
If you cannot identify the cause of the operating anomaly, switch off the
appliance and contact the Assistance Service.
PRODUCT SERIAL NUMBER. Where can I find it?
It is important you to inform the Assistance Service of your product code
and its serial number (a 16 character code which begins with the number 3);
this can be found on the guarantee certificate or on the data plate located
on the appliance.
It will help to avoid wasted journeys to technicians, thereby (and most
significantly) saving the corresponding callout charges.
This appliance is marked according to the European directive
2012/19/EU on Waste Electrical and Electronic Equipment
(WEEE).
WEEE contains both polluting substances (which can cause
negative consequences for the environment) and basic components (which
can be re-used). It is important to have WEEE subjected to specific
15

16
EINBAU- UND BEDIENUNGSANLEITUNG
INHALT
EINLEITUNG 17
SICHERHEITSVORKEHRUNGEN 17
ELEKTRISCHER ANSCHLUSS 19
SPEZIFIKATION 20
INSTALLATION (ABLUFT NACH DRAUSSEN) 21
INSTALLATION (ABLUFT NACH INNEN) 25
BESCHREIBUNG DER KOMPONENTEN 26
BETRIEB 26
WARTUNG 28
FEHLERSUCHE 29

17
EINLEITUNG
Vielen Dank, dass Sie sich für diese Abzugshaube entschieden haben.
Diese Bedienungsanleitung enthält notwendigen Anleitungen für die Installation,
die Bedienung und die Wartung des Gerätes.
Lesen Sie diese Bedienungsanleitung vor der Installation und Benutzung bitte
durch, damit das Gerät richtig und sicher bedient werden kann.
Diese Abzugshaube ist auch hochwertigen Werkstoffen und in einer schlanken
Bauweise gefertigt. Ausgestattet mit einem großen, starken Elektromotor und
einem Zentrifugalgebläse bietet sie starke Saugleistung, geräuscharmen Betrieb,
einen austauschbaren Fettfilter sowie die einfache Montage.
Hiermit erklärt die Candy Hoover Group Srl, dass die Funkausstattung der
Richtlinie 2014/53/EU und den einschlägigen gesetzlichen Anforderungen
(für den UKCA-Markt) entspricht.
Der vollständige Text der Konformitätserklärung ist unter der folgenden
Internet-Adresse verfügbar: www.candy-group.com
SICHERHEITSVORKEHRUNGEN
• Kinder dürfen das Gerät niemals bedienen.
• Die Abzugshaube ist für den Hausgebrauch und nicht für Grill-Restaurants,
Großküchen oder sonstigen gewerblichen Gebrauch geeignet.
• Die Abzugshaube und ihr Filter sollten regelmäßig gereinigt werden,
damit sie in einem guten Zustand bleibt.
• Reinigen Sie die Abzugshaube gemäß den Angaben in dieser
Bedienungsanleitung und vermeiden Sie Brandgefahr für das Gerät.
• Direktes Backen auf dem Gasherd ist untersagt.
• Für gute Be- und Entlüftung der Küche sorgen.
• Vergewissern Sie sich, dass das Stromkabel nicht beschädigt ist, bevor
Sie das Gerät anschließen. Der Austausch eines defekten Stromkabels
muss qualifiziertem Kundendienstpersonal vorbehalten sein.
• Für ausreichende Belüftung sorgen, wenn die Abzugshaube zusammen
mit Geräten betrieben wird, die Gas oder Benzin verbrennen.
• Die Abluft sollte nicht in einen Rauchfang geleitet werden, der auch für
die Abgase einer Gas- oder Ölheizung verwendet wird.
• Vorschriften zur Abluft müssen befolgt werden.

18
- Kinder sollten beaufsichtigt werden, um sicherzustellen, dass sie
nicht mit dem Gerät spielen.
- Keine Gerichte unter der Abzugshaube flambieren.
Die Dunstabzugshaube ist nicht für die Montage über einem Herd
mit mehr als vier Kochfeldern ausgelegt.
- Für ausreichende Belüftung sorgen, wenn die Abzugshaube
zusammen mit Geräten betrieben wird, die Gas oder Benzin
verbrennen (gilt nicht für Geräte, die die abgesaugte Luft zurück
in den Raum leiten);
- Eine detaillierte Anweisung zur Reinigung und deren Häufigkeit.
- Es besteht ein Brandrisiko, wenn die Reinigung nicht entsprechend
dieser Anweisungen durchgeführt wird.
- Keine Gerichte unter der Abzugshaube flambieren;
- VORSICHT: Es kann sein, dass bestimmte Teile der Abzugshaube
beim Kochen heiß werden.
Gefahr von Stromschlägen
Dieses Gerät nur mit einer richtig geerdeten Steckdose verbinden.
Wenden Sie sich im Zweifel an einen Fachelektriker.
Bei Zuwiderhandlung besteht Lebensgefahr, Brandgefahr oder
Elektroschlaggefahr.
Die in diesem Produkt verwendete Lampe ist nicht
für die Beleuchtung eines Raumes geeignet.
Diese Lampe dient der Beleuchtung für die Benutzung des Produkts.

19
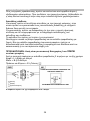
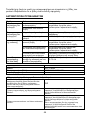
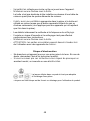
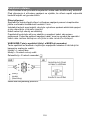
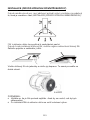
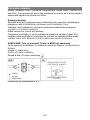
Elektrischer Anschluss
Sämtliche Anschlüsse müssen durch einen Fachmann oder qualifizierten Elektriker
vorgenommen werden. Vergewissern Sie sich vor dem Anschluss an das
Stromnetz, dass die Netzspannung mit der auf dem Typenschild angegebenen
Spannung übereinstimmt.
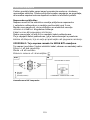
Direkter Anschluss
Das Gerät muss mit einem allpoligen Leistungsschalter mit einer
Mindestöffnung von 3 mm zwischen den Kontakten direkt an das Stromnetz
angeschlossen werden.
Der Installateur muss sicherstellen, dass der Stromanschluss korrekt
hergestellt wurde und dem Verdrahtungsplan und den
Sicherheitsvorschriften entspricht.
Das Netzkabel darf nicht geknickt oder gequetscht werden.
Überprüfen Sie den Netzstecker und das Netzkabel regelmäßig auf
Beschädigungen. Wenn das Netzkabel beschädigt ist, muss es durch ein
vom Hersteller oder von seinem Service-Mitarbeiter empfohlenes
ausgetauscht werden.
WARNUNG: Dies ist ein Gerät der Klasse I und MUSS geerdet werden.
Dieses Gerät wird mit einem 3-adrigen Netzkabel geliefert, das wie
folgt gefärbt ist:
Braun = L oder Spannungsführender Draht
Blau = N oder Neutralleiter
Grün und Gelb = E oder Erdung
Die Sicherung muss für 3 Ampere ausgelegt sein.
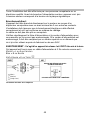
ZWEIPOLIG GESCHALTETE
ABGESICHERTE STICHLEITUNG
(Blau)
(Braun)
(Grün/Gelb)
EINE 3-AMPERE-SICHERUNG
VERWENDEN
Seite wird geladen ...
Seite wird geladen ...
Seite wird geladen ...
Seite wird geladen ...
Seite wird geladen ...
Seite wird geladen ...
Seite wird geladen ...
Seite wird geladen ...
Seite wird geladen ...
Seite wird geladen ...
Seite wird geladen ...
Seite wird geladen ...
Seite wird geladen ...
Seite wird geladen ...
Seite wird geladen ...
Seite wird geladen ...
Seite wird geladen ...
Seite wird geladen ...
Seite wird geladen ...
Seite wird geladen ...
Seite wird geladen ...
Seite wird geladen ...
Seite wird geladen ...
Seite wird geladen ...
Seite wird geladen ...
Seite wird geladen ...
Seite wird geladen ...
Seite wird geladen ...
Seite wird geladen ...
Seite wird geladen ...
Seite wird geladen ...
Seite wird geladen ...
Seite wird geladen ...
Seite wird geladen ...
Seite wird geladen ...
Seite wird geladen ...
Seite wird geladen ...
Seite wird geladen ...
Seite wird geladen ...
Seite wird geladen ...
Seite wird geladen ...
Seite wird geladen ...
Seite wird geladen ...
Seite wird geladen ...
Seite wird geladen ...
Seite wird geladen ...
Seite wird geladen ...
Seite wird geladen ...
Seite wird geladen ...
Seite wird geladen ...
Seite wird geladen ...
Seite wird geladen ...
Seite wird geladen ...
Seite wird geladen ...
Seite wird geladen ...
Seite wird geladen ...
Seite wird geladen ...
Seite wird geladen ...
Seite wird geladen ...
Seite wird geladen ...
Seite wird geladen ...
Seite wird geladen ...
Seite wird geladen ...
Seite wird geladen ...
Seite wird geladen ...
Seite wird geladen ...
Seite wird geladen ...
Seite wird geladen ...
Seite wird geladen ...
Seite wird geladen ...
Seite wird geladen ...
Seite wird geladen ...
Seite wird geladen ...
Seite wird geladen ...
Seite wird geladen ...
Seite wird geladen ...
Seite wird geladen ...
Seite wird geladen ...
Seite wird geladen ...
Seite wird geladen ...
Seite wird geladen ...
Seite wird geladen ...
Seite wird geladen ...
Seite wird geladen ...
Seite wird geladen ...
Seite wird geladen ...
Seite wird geladen ...
Seite wird geladen ...
Seite wird geladen ...
Seite wird geladen ...
Seite wird geladen ...
Seite wird geladen ...
Seite wird geladen ...
Seite wird geladen ...
Seite wird geladen ...
Seite wird geladen ...
Seite wird geladen ...
Seite wird geladen ...
Seite wird geladen ...
Seite wird geladen ...
Seite wird geladen ...
Seite wird geladen ...
Seite wird geladen ...
Seite wird geladen ...
Seite wird geladen ...
Seite wird geladen ...
Seite wird geladen ...
Seite wird geladen ...
Seite wird geladen ...
Seite wird geladen ...
Seite wird geladen ...
Seite wird geladen ...
Seite wird geladen ...
Seite wird geladen ...
Seite wird geladen ...
Seite wird geladen ...
Seite wird geladen ...
Seite wird geladen ...
Seite wird geladen ...
Seite wird geladen ...
Seite wird geladen ...
Seite wird geladen ...
Seite wird geladen ...
Seite wird geladen ...
Seite wird geladen ...
Seite wird geladen ...
Seite wird geladen ...
Seite wird geladen ...
Seite wird geladen ...
Seite wird geladen ...
Seite wird geladen ...
-
 1
1
-
 2
2
-
 3
3
-
 4
4
-
 5
5
-
 6
6
-
 7
7
-
 8
8
-
 9
9
-
 10
10
-
 11
11
-
 12
12
-
 13
13
-
 14
14
-
 15
15
-
 16
16
-
 17
17
-
 18
18
-
 19
19
-
 20
20
-
 21
21
-
 22
22
-
 23
23
-
 24
24
-
 25
25
-
 26
26
-
 27
27
-
 28
28
-
 29
29
-
 30
30
-
 31
31
-
 32
32
-
 33
33
-
 34
34
-
 35
35
-
 36
36
-
 37
37
-
 38
38
-
 39
39
-
 40
40
-
 41
41
-
 42
42
-
 43
43
-
 44
44
-
 45
45
-
 46
46
-
 47
47
-
 48
48
-
 49
49
-
 50
50
-
 51
51
-
 52
52
-
 53
53
-
 54
54
-
 55
55
-
 56
56
-
 57
57
-
 58
58
-
 59
59
-
 60
60
-
 61
61
-
 62
62
-
 63
63
-
 64
64
-
 65
65
-
 66
66
-
 67
67
-
 68
68
-
 69
69
-
 70
70
-
 71
71
-
 72
72
-
 73
73
-
 74
74
-
 75
75
-
 76
76
-
 77
77
-
 78
78
-
 79
79
-
 80
80
-
 81
81
-
 82
82
-
 83
83
-
 84
84
-
 85
85
-
 86
86
-
 87
87
-
 88
88
-
 89
89
-
 90
90
-
 91
91
-
 92
92
-
 93
93
-
 94
94
-
 95
95
-
 96
96
-
 97
97
-
 98
98
-
 99
99
-
 100
100
-
 101
101
-
 102
102
-
 103
103
-
 104
104
-
 105
105
-
 106
106
-
 107
107
-
 108
108
-
 109
109
-
 110
110
-
 111
111
-
 112
112
-
 113
113
-
 114
114
-
 115
115
-
 116
116
-
 117
117
-
 118
118
-
 119
119
-
 120
120
-
 121
121
-
 122
122
-
 123
123
-
 124
124
-
 125
125
-
 126
126
-
 127
127
-
 128
128
-
 129
129
-
 130
130
-
 131
131
-
 132
132
-
 133
133
-
 134
134
-
 135
135
-
 136
136
-
 137
137
-
 138
138
-
 139
139
-
 140
140
-
 141
141
-
 142
142
-
 143
143
-
 144
144
-
 145
145
-
 146
146
-
 147
147
-
 148
148
-
 149
149
-
 150
150
-
 151
151


Hoover HTS6CBK5XWIFI Benutzerhandbuch
- Kategorie
- Dunstabzugshauben
- Typ
- Benutzerhandbuch
- Dieses Handbuch eignet sich auch für
in anderen Sprachen
- français: Hoover HTS6CBK5XWIFI Manuel utilisateur
- slovenčina: Hoover HTS6CBK5XWIFI Používateľská príručka
Verwandte Artikel
Andere Dokumente
-
Haier HATS9DS6BPLWI Benutzerhandbuch
-
Haier HATS9DS46BWIFI Benutzerhandbuch
-
Candy CTS6CEXWIFI Benutzerhandbuch
-
-
-
Haier HADG9DCS56B Benutzerhandbuch
-
-
Klarstein 10030273 Benutzerhandbuch
-
OK. OHO630 Benutzerhandbuch
-
Candy 36900756 Benutzerhandbuch