Flashforge 3 FDM Benutzerhandbuch

Typ
Benutzerhandbuch
Creator 3 Pro
Quick Start Guide
EN//FR
This guide is only applicable to FLASHFORGE Creator 3 Pro 3D printer
WARNING 1. Hot! Avoid touching the heating nozzle and heating build plate in
operation.
2. Moving parts in printer may cause injury. Do not wear gloves or other
sources of entanglement in operation.
Creator 3 Pro Quick Start Guide
Creator 3 Pro Introduction
01
3
4
10
12 13 14
11
5
6
7
8
9
21
1. Touch screen
2. USB disk port
3. Right extruder
4. Left extruder
5. The anti-oozing metal plate
6. Build plate
7. Leveling nut
8. Filament holder cover
9. Filament holder cover handle
10. Wind guide nozzle
11. Nozzle
12. Ethernet port
13. Power switch
14. Power cord entry
Packing List
02
Creator 3 Pro Filament Quick Start Guide After-sales
service card
Power cord
Unclogging pin tool
Lubricating grease Nozzle kit Nozzle support tube
Stamping wrench Screwdriver
Allen wrench
USB disk Leveling card
PTFE tube
Scraper
快速启动指南
Creator 3 Pro 金刚狼3 Pro
Quick Start Guide
EN/CN/DE/FR/-A01
本手册仅适用于闪铸科技 金刚狼3 Pro 3D打印机
This guide is only applicable to FLASHFORGE Creator 3 Pro 3D printer
EN P01 / CN P09 / D E P17 / FR P2 5 / P33
WARNING
注意事项
1. Hot! Avoid touching the heating nozzle and heating build plate in
operation.
2. Moving parts in printer may cause injury. Do not wear gloves or other
sources of entanglement in operation.
1. 高温危险!打印机喷嘴和打印平台在工作时会被加热,请避免接触!
2. 可动部件可能造成卷入挤压和切割伤害。操作机器时请不要佩戴手套或缠绕物。
03
Precautions for Unpacking the Equipment
4. Remove the buckles on the X-axis and Y-axis synchronous belts.
1. Take out the top accessories and pearl cotton.
2. Remove the tape from the machine.
3. Take out the internal pearl cotton block.
6. Press and hold [Z-] continuously until the build plate rises to a higher position, and
then take out the foam block below.
5. Connect the printer to the power supply, after power on, and then click [Tools] and
[Manual] in turn on the touch screen to enter the manual control interface.
04
1. Open the filament holder cover.
2. Take out the filament and insert it
into the filament feeding inlet.
3. Attention: To facilitate smooth rotation of the filament, please install the filament in
the direction shown in the figure.
Filament Loading
Preparation for Printing
Filament
intake
05
4. Insert the filament into the filament
feeding inlet continuously until the filament
goes through the filament guide tube.
5. Press the filament feeding pressing plate
in front of the extruder, insert the filament
vertically into the extruder until it can't be
inserted any further, and then loosen the
filament feeding pressing plate.
6. Insert the filament guide tube into the
filament inlet hole on the extruder to fix.
7. Finally, fix the filament spool on the
filament spool holder and close the cover.
06
8. Filament feeding operation: Click the [Tools]-[Filament] button on the screen in turn,
and set a reasonable heating temperature according to the required temperature value
of the material; Operate according to the screen prompts, and wait for the nozzle to
extrude uniform filament smoothly.
Filament unloading operation: Click [Unload], press down the filament pressing plate
after the extruder temperature heating is completed, pull out the white filament guide
tube, and pull out the filament upward quickly and then filament unloading is completed.
Press here
Push filament
down through
for 3 seconds
Withdraw
Filament
Guidetube
23
9-Punkt-Nivellierung: Wenn die Flachheit des Druckers nach der Plattformnivellierung
und XY/Z-Achskalibrierung weiterhin nicht zufriedenstellend ist, kann diese Funktion
verwendet werden, um die Flachheit zu verbessern.
Manuelle Nivellierung: Führen Sie nacheinander die Plattform-Nivellierung, Z-Achska-
librierung und die X-/Y-Achskalibrierung durch. Es handelt sich um einen kompletten
Satz der Nivellierung- und Kalibriervorgänge.
Das Gerät wurde vor dem Versand ab Werk nivelliert und kalibriert. Die Nivellierebene
kann jedoch infolge von Vibrationen während des Transports beschädigt sein. Es wird
eine Nivellierung vor dem ersten Druck empfohlen. Es gibt zwei Nivelliermodi: Hilfsnivel-
lierung und manuelle Nivellierung. Im Modus „Hilfsnivellierung“ werden alle Vorgänge
mithilfe des Extrudersensors und unterstützenden Eingabeaufforderungen ausgeführt.
Im manuellen Modus aktiviert die Plattformnivellierung im Hilfsmodus keine Sensorfunk-
tion.
Insgesamt ermöglicht das Gerät die folgenden Nivellierkalibrierungen: Bettnivellierung,
XY Kalibrierung, Z Kalibrierung und 9-Punkt-Nivellierung.
Behalten Sie bitte die folgenden Reihenfolge bei:
1. Tippen Sie auf dem Touchscreen auf [Tools] und [Nivellieren Kalibrieren].
2. Wählen Sie den Hilfsmodus für die Nivellierung und Kalibrierung.
3. Der Extrudersensor wurde vor dem Versand im Werk kalibriert und muss nicht erneut
kalibriert werden. Tippen Sie auf die Plattformnivellierung und befolgen Sie die Bildschir-
manweisungen.
4. Nehmen Sie die Kalibrierung der Z-Achse vor und befolgen Sie die Eingabeauf-
forderungen auf dem Bildschirm.
5. Die X- und Y-Achsen wurden ab Werk kalibriert. Sie müssen daher nicht erneut
kalibriert werden.
6. Der gesamten Nivellier- und Kalibriervorgang ist abgeschlossen.
Nivellierung und Kalibrierung
24
Vor dem ersten Druck schließen Sie bitte die Nivellierung, das Beladen und die
Kalibrierung ab. Ziehen Sie die Schnellstartanleitung hinzu.
1. Berühren Sie [Drucken] (Konstruktion). 2. Berühren Sie [Local memory] (Lokaler
Speicher) für die Auswahl der Druckdateien.
3. Wählen Sie die vorhandene Druckdatei.
5. Der Drucker wird aufgewärmt und startet
den Druck nach dem Ende der Aufwärm-
phase.
Erster Druck
4. Berühren Sie [Drucken] (Konstruktion).
25
Creator 3 Pro Guide rapide
Présentation de la Creator 3 Pro
3
4
10
12 13 14
11
5
6
7
8
9
21
1. Écran tactile
2. Port pour disque USB
3. Extrudeuse de droite
4. Extrudeuse de gauche
5. Plaque anti-pénétration
6. Plateau
7. Écrou de nivellement
8. Carter du porte-filament
9. Poignée du carter du porte-filament
10. Buse du déflecteur d’air
11. Buse
12. Port Ethernet
13. Interrupteur marche/arrêt
14. Entrée du cordon d’alimentation
26
Creator 3 Pro
Cordon
d’alimentation
Poinçon de
décolmatage
Graisse lubrifiante Ensemble de buse Tuyau de support
pour buse
Clé en acier plat
Tournevis
Disque USB Carte de
nivellement
Tube en PTFE
Filament Guide rapide Carte de service
après-vente
Grattoir
Clé Allen
Contenu de l'emballage
快速启动指南
Creator 3 Pro 金刚狼3 Pro
Quick Start Guide
EN/CN/DE/FR/-A01
本手册仅适用于闪铸科技 金刚狼3 Pro 3D打印机
This guide is only applicable to FLASHFORGE Creator 3 Pro 3D printer
EN P01 / CN P09 / D E P17 / FR P2 5 / P33
WARNING
注意事项
1. Hot! Avoid touching the heating nozzle and heating build plate in
operation.
2. Moving parts in printer may cause injury. Do not wear gloves or other
sources of entanglement in operation.
1. 高温危险!打印机喷嘴和打印平台在工作时会被加热,请避免接触!
2. 可动部件可能造成卷入挤压和切割伤害。操作机器时请不要佩戴手套或缠绕物。
27
4. Retirez les attaches des courroies synchrones des axes X et Y.
1. Retirez les accessoires du dessus et le coton perlé.
2. Décollez le ruban adhésif de la machine.
3. Sortez le bloc de coton perlé de l’intérieur.
6. Appuyez longuement sur [Z–] jusqu’à ce que le plateau atteigne sa position la plus
haute, puis retirez le bloc de mousse du dessous.
5. Branchez l’imprimante sur le secteur, allumez-la et cliquez sur [Outils] puis sur
[Manuel] sur l’écran tactile pour entrer à l’interface de commande manuelle.
Précautions à prendre lors du déballage
28
1. Ouvrez le carter du porte-filament.
2. Tirez sur le filament et insérez-le dans
l’entrée d’alimentation en filament.
3. Attention: Pour faciliter la rotation libre du filament, installez celui-ci dans la direction
illustrée.
Chargement du filament
Préparation à l'impression
Réception
du filament
29
4. Continuez l’insertion du filament dans
l’entrée d’alimentation en filament jusqu’à
ce qu’il ait traversé le tube de guidage.
5. Appuyez sur la plaque de pression de
l’alimentation en filament située à l’avant
de l’extrudeuse, insérez le filament
verticalement dans l’extrudeuse jusqu’à ce
qu’il bute, puis libérez la plaque de
pression.
6. Insérez le tube de guidage du filament
dans le trou d’entrée de l’extrudeuse pour
le fixer. 7. Enfin, fixez la bobine de filament sur le
porte-filament et fermez le carter.
30
8. Alimentation en filament: cliquez successivement sur les boutons [Outils]-[Filament]
de l’écran, puis définissez une température de chauffage raisonnable conformément à la
température requise par le matériau. Suivez les invites qui s’affichent, et attendez que la
buse extrude sans heurts un filament uniforme.
Déchargement du filament: cliquez sur [Décharger], appuyez sur la plaque de pression
du filament une fois que l’extrudeuse a atteint la température de consigne, tirez sur le
tube de guidage blanc du filament pour le retirer, puis tirez rapidement le filament vers le
haut. Le déchargement est alors terminé.
Poussez le
filament à
fond vers le
bas pendant
3 secondes
Appuyez ici
Retirez le
tube de
guidage du
filament
31
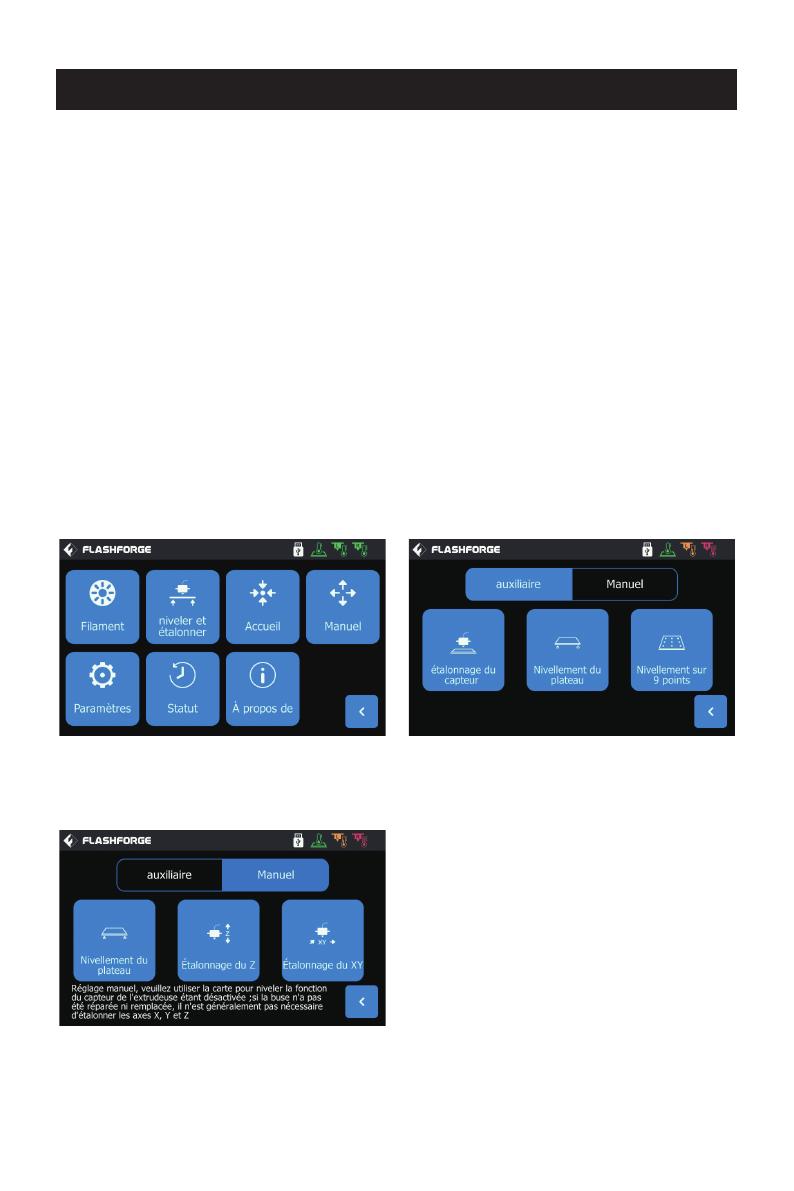
Nivellement et étalonnage
Fonction de nivellement sur 9 points: si après le nivellement de la plateforme et
l’étalonnage des axes X, Y et Z la planéité est encore imparfaite, vous pouvez utiliser
cette fonction pour l’améliorer.
Mode de nivellement manuel: Exécutez successivement le nivellement de la plateforme,
l’étalonnage de l’axe Z et celui des axes X et Y. C’est un ensemble complet de procédures
de nivellement et d’étalonnage.
Lappareil a été nivelé et étalonné en usine. Cependant, le plan de nivellement peut s’être
modifié à cause de vibrations pendant le transport. Il est conseillé d’effectuer un
nivellement avant la première impression. Il y a deux modes de nivellement: le mode
auxiliaire et le mode manuel. Dans le mode auxiliaire, tout se fera avec l’aide du capteur
de l’extrudeuse et des invites auxiliaires. Si l’option de fonction est en mode manuel, le
nivellement de la plateforme en mode auxiliaire n’active pas la fonction du capteur.
Lappareil demande les étalonnages de nivellement suivants: Nivellement du plateau,
Étalonnage du XY, Étalonnage du Z et Nivellement sur 9 points.
Procédez dans l’ordre suivant:
1. Cliquez sur [Outils] puis sur [Niveler et étalonner] sur l’écran tactile.
2. Sélectionnez le mode auxiliaire de nivellement et d’étalonnage.
3. Le capteur de l’extrudeuse a été étalonné en usine. Il n’est donc pas nécessaire de le
refaire. Cliquez sur «Nivellement du plateau» et suivez les invites qui s’affichent.
4. Étalonnez l’axe Z et suivez les invites qui s’affichent.
5. Les axes X et Y ont été étalonnés en usine. Il n’est donc pas nécessaire de les réétalon-
ner.
6. Le nivellement et l’étalonnage sont terminés.
32
Avant la première impression, veuillez achever le calibrage, calibration et chargement du
filament correctement.
1. Cliquez sur Imprimer. 2. Appuyez sur mémoire locale pour choisir
les fichiers d’impression.
3. Sélectionnez le fichier.
5. L’imprimante commencera à imprimer
une fois le chauffage terminé.
Première impression
4. Cliquez sur Imprimer.
34
USB
PTFE
快速启动指南
Creator 3 Pro 金刚狼3 Pro
Quick Start Guide
EN/CN/DE/FR/-A01
本手册仅适用于闪铸科技 金刚狼3 Pro 3D打印机
This guide is only applicable to FLASHFORGE Creator 3 Pro 3D printer
EN P01 / CN P09 / D E P17 / FR P2 5 / P33
WARNING
注意事项
1. Hot! Avoid touching the heating nozzle and heating build plate in
operation.
2. Moving parts in printer may cause injury. Do not wear gloves or other
sources of entanglement in operation.
1. 高温危险!打印机喷嘴和打印平台在工作时会被加热,请避免接触!
2. 可动部件可能造成卷入挤压和切割伤害。操作机器时请不要佩戴手套或缠绕物。
  • Page 1 1
  • Page 2 2
  • Page 3 3
  • Page 4 4
  • Page 5 5
  • Page 6 6
  • Page 7 7
  • Page 8 8
  • Page 9 9
  • Page 10 10
  • Page 11 11
  • Page 12 12
  • Page 13 13
  • Page 14 14
  • Page 15 15
  • Page 16 16
  • Page 17 17
  • Page 18 18
  • Page 19 19
  • Page 20 20
  • Page 21 21

Flashforge 3 FDM Benutzerhandbuch

Typ
Benutzerhandbuch

in anderen Sprachen