
MANUAL
OCTAGON 2

OCTAGON 2
WELCOME
We want to welcome you to our team and be thankful for the condence
you placed in our company by choosing a Niviuk product.
The OCTAGON 2 parachute is the result of Niviuk Gliders and Vital
Parachute working together. Following our philosophy based on
offering top performance and quality safety oriented products to our
customers, we are proud to introduce the OCTAGON 2.
Please thoroughly read this owner’s manual.
The Niviuk team.
USER’S MANUAL
NIVIUK OCTAGON 2
This manual will give you all the necessary information to familiarize
yourself with your new product’s main characteristics but does not
intend in any way to teach anyone how to use it. Instructions can only
be taught by a qualied and certied organization.
Please carefully and thoroughly read the entire manual. The risk
of sustaining severe injuries or death could result for misusing this
equipment.
2

3
SUMMARY
1. CHARACTERISTICS 4
2. UNPACKING AND ASSEMBLY 4
3. RESCUE DEPLOYMENT 5
4. CARE AND MAINTENANCE 5
5. SAFETY AND RESPONSIBILITY 7
6. WARRANTY 7
7. PACKING 7
8. PARACHUTE LOG RECORD 12
TECHNICAL DATA 50
ESENG

4
1. CHARACTERISTICS
1.1 CERTIFICATION
The OCTAGON 2 has successfully passed the European EN and LTF
certication (EN 12491:2001 / LTF 91/09). You can check the certica-
tion results and gures at http://www.para-test.com
1.2 WHO WAS IT DESIGNED FOR? PARACHUTE’S LIMITATIONS
This rescue parachute was designed for the paragliding activity only. It
must not be used nor deployed in velocities reaching over 32 m/s (115
km/h). It is expressly forbidden and can not be used in free-fall.
The maximum load for each side of the parachute is established
according to the certication requirements. The total weight (payload)
includes: person, clothing, accessories, glider, harness and parachute.
2. UNPACKING AND ASSEMBLY
2.1 COMPONENTS
The OCTAGON 2 is delivered with:
• A parachute properly packed in a deployment bag.
• A deployment bag (pod) with central and lateral anchor.
• A 25 cm bridle.
• User’s manual.
2.2 PROCEDURE
Check the condition of the parachute and the deployment bag, making
sure there are no abnormalities.
2.3 HARNESS ASSEMBLY
We strongly recommend for the process to be supervised by an
authorized dealer or a professional instructor.
The OCTAGON 2 rescue is compatible with all NIVIUK harnesses.
Attaching the rescue parachute’s bridle to the harness:
• A suitable screw-gate connector should be used, for example; 7mm,
square, Stainless Steel maillon (Maillon Rapide type).
• Connect the reserve parachute handle to the pod which will vary
depending on the harness model and reserve parachute pocket
location (center or side).
• Place the properly packed OCTAGON 2 inside the inside the reserve
parachute container.
• Fasten the deployment handle in its place.
• Close the reserve parachute container aps, insert the safety pin and
check its operation.
• Harness models without an integrated reserve parachute pocket will
need to be outtted with a corresponding outer container (front mount
or otherwise).
• Repeat the same steps to install an outer reserve parachute container.
CAUTION!
After installing the reserve parachute in its container, it is mandatory to
conduct a hang-test. Be certain for the handle to open all the container
aps prior the parachute extraction while evaluating the force amount
exerted during the pull to jettison the rescue system.
After a conclusive outcome, reinstall the reserve parachute by following
the same procedure as before.

5
ES
2.4 PRE-FLIGHT CHECK
Before each ight, check that:
• There is no visible damage that could affect its airworthiness.
• The rescue parachute container is correctly closed with the safety
pin(s) in place.
• The deployment handle is correctly and securely fastened and all
parts are in good condition.
Any part of the harness/reserve/handle using Velcro must regularly
have it separated and re-attached to prevent ‘bedding in’ over time
which could impede a successful reserve parachute deployment
sequence.
3. RESCUE DEPLOYMENT
It is vital to periodically guide your hand toward the rescue handle
and feel its location in ight. Memorizing the gesture to the point of
becoming second nature will become an asset in case of an emergency.
In the event of an emergency, the pilot must quickly evaluate the AGL
(Altitude Above Ground Level) and decide whether or not to deploy
the emergency parachute. Deploying the rescue when the glider is
recoverable may increase the risk of injury. If there is sufcient elevation
(AGL), you have sufcient height and the glider is in a at spin, it is
preferable to rst try to stop the spin (e.g. full stall), due to the risk of
entanglement. On the other hand, a second hesitation in deploying the
reserve could prove costly if there is insufcient height.
3.1 DEPLOYMENT PROCEDURE
If the rescue must be deployed, the procedure should be as follows:
• Look for the rescue handle and grasp it rmly with one hand.
• Pull rmly upwards/sideward on the handle to unfastens its Velcro
and releases the safety pins keeping the reserve parachute container
closed. The pod extraction from the container will then take place.
• Look for a clear area, then throw and let go the reserve parachute
handle with the pod attached to it away from harness and paragli-
der. Throwing the reserve parachute in the downwind direction will
speed-up its opening sequence. Throwing it opposite to the spinning
direction will also help prevent tangling with the glider.
• After deployment, avoid entanglement, pendulum motions and pos-
sible downplaning, by pulling the glider in as symmetrically as possible
with the B, C, D or brake lines.
• On landing, do a PLF (Parachute Landing Fall) to minimize the risk of
injury if the terrain surface permits it.
• Once on the ground, deate the canopy by pulling one of the reserve
parachute lines to avoid the possibility of being dragged.
4. CARE AND MAINTENANCE
4.1 MAINTENANCE
The OCTAGON 2 rescue parachute will be repacked at 180 day inter-
vals to insure airworthiness. When necessitated by climate, storage, or
condition the equipment maintenance specialist may require additional
maintenance.
We always recommend for this rescue parachute to be inspected
and repacked by a trained and certied professionals. Additional
inspections should be performed if there is any suspicion of damage
or excessive wear.
After a deployment, the reserve parachute should be checked by the
distributor or manufacturer. Always seek professional advice whenever
in doubt.
The materials used in the OCTAGON 2 rescue have been carefully
ENG

6
4.4 LIFE SPAN
The life span of the OCTAGON 2 reserve parachute is not to exceed 10
years. If past that period, the product is deemed to be B.E.R (beyond
economical repair) it will be removed from service, not to be used again
(contact your local dealer or school on the correct way to dispose of
the reserve parachute).
selected for maximum durability. Nevertheless, maintaining your
rescue following the guidelines below will extend its lifetime.
4.2 STORAGE
Unnecessary exposure to UV rays, heat and humidity should always
be avoided. Keep your harness and reserve parachute in your rucksack
when not in use. Store all your paragliding equipment in a cool, dry
place, and away from solvents such as grease, acid, oil and paint and
abrasive materials.
Never stow away your reserve parachute when damp or wet. If your
reserve parachute does ever get wet (i.e. water landings or snow),
it must be taken out of the harness, let dry in a shaded area, and
properly repacked before inserting it back into the reserve parachute
container.
A dirty reserve parachute canopy or container can be cleaned with
lukewarm water. Mild soap may be used if necessary without rubbing
the fabric. Do not use caustic chemicals.
Rinse the canopy thoroughly and allow it to dry naturally. If the
canopy shows signs of mildew, it must be sent to the distributor or
manufacturer for repairs, as its integrity could be compromised.
If the rescue is to be stored for an extended period, the canopy should
be opened and loosely rolled.
Observe the following precautions: use care in handling packed
parachutes as metal parts could cause personal injury. Damage to
the canopy materials could result from watches, rings, bracelets, etc.
Protect the parachute from damaging elements, dust, oil, grease, and
caustic products. Place the unpacked reserve parachute in aviator kit
bag/duffel bag. Cover the canopy during periods of inactivity. Avoid
prolonged exposure to sunlight, inspections lights, or orescent lights.
Nylon material is subject to deterioration under ultraviolet light.
Use a climate controlled building to store parachutes when available.
Store parachute in a dry, well-ventilated location, dampness,re, dirt,
insects, and direct sunlight.
CAUTION!
Leaving the packed parachute system exposed to the sun will greatly
decrease its service life.
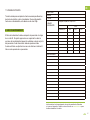
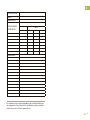
4.3 CHECKS AND CONTROLS
CANOPY
Canopy Assembly Fabric
Inspect for rips, tears, dampness, debris, broken or loose
stitching, and marred and illegible marks.
APEX
LINES
Inspect for holes, cuts, frays, tears, burns, loose or
broken bers.
UPPER
LATERAL
BAND
Inspect for dampness, dirt, foreign materials, holes, cuts,
tears, frays, burns, loose or broken stitching, marred or
illegible marks.
GORES
SECTIONS
Inspect for loose or broken stitching, frays, tears, burns,
and cuts.
LOWER
LATERAL
BAND
Inspect for loose or broken stitching, picks, frays, burns,
and stains.
SUSPENSION
LINES
Inspect line continuity and lengths. Inspect for zigzag on
suspension lines.

7
4.5 REPAIRS
Repairs of the reserve parachute should be made by a professional
certied outt using genuine parts, materials, fabric and threads
matching the original strength and colors.
All straight stitching should have 6.5-11 stitches per inch, overlapping
stitch row at least 2-inches.
Zigzag stitching should extend at least 1/2-inch into the undamaged
stitching at each end. Re-stitching should be made directly over the ori-
ginal stitching, following the original stitch pattern as closely as possible.
All thread on the canopy should be V-T-295e, Type 2, Class A, Size E
and applied with a light or medium duty machine.
CAUTION!
Any repairs should only be carried out by the manufacturer or by an
approved agent. This will ensure that the correct materials and repair
techniques are used.
5. SAFETY AND RESPONSIBILITY
It is well known that paragliding is considered a high-risk sport, where
safety depends on the person who is practicing it.
Wrong use of this equipment may cause severe injuries to the pilot,
even death. Manufacturers and dealers are not responsible for any act
or accident that may be the result of practicing this sport.
You must not use this equipment if you have not been properly trained
to use it. Do not take advice or accept any informal training from
anyone who is not properly qualied as a ight instructor.
ESENG
6. WARRANTY
The entire equipment and components are covered by a 2-year
warranty against manufacturing defects.
The warranty does not cover misuse or abnormal use of the product.
7. PACKING
The OTAGON rescue parachute is initially inspected and packed at the
factory and it is recommend to have it serviced by a qualied professional
outt or parachute rigger prior to its installation inside the harness. The
reserve parachute’s efciency, and your life will depend on it.
7.1 PREPARE THE RESERVE PARACHUTE AS FOLLOWS
• Check for the correct assembly of the reserve parachute and
components.
• Place the packing tools in a convenient location on the packing table.
• Layout the canopy assembly lengthwise on the packing table and
attach the canopy’s packing loop to the table’s apex hook.
• Attach the riser to the tension plate (hook) and apply enough
tension to keep the canopy stretched on the table.
• Check the apex lines to determine if the canopy is inverted or
not. If the apex lines do not appear attached to the outside of the
upper lateral band, then the canopy is inverted.
7.2 SUSPENSION LINES
• Locate the top center gore (cell) of the canopy. Divide the suspension
lines into two groups (lines 1 to 8/12 in the left group and lines 9/16 to
13/24 in the right group).
• Straighten the lines and remove any turns, tangles or twists.

8
7.3 OVERALL INSPECTION
An overall inspection will be made on the OCTAGON 2 rescue para-
chute to ascertain the following:
• Log record/parachute inspection data pocket and form.
• Thorough product assembly.
• Operational adequacy.
• Markings and stenciling.
• Foreign material and stains.
7.4 DETAILED INSPECTION
In addition to the overall inspection, a subsequent verication
follow-up will be performed on all component and parts in guidance
with the following criteria, as applicable:
• Metal:
Inspect for rust, corrosion, dents, bends, breaks, burrs, rough spots,
sharp edges, wear, deterioration; damaged, loose, or missing grommets,
safety pins, loss of spring tension.
• Cloth:
Inspection for breaks, burns, cuts, frays, holes, rips, snags, tears;
loose, missing or broken stitching or tacking; weak spots, wear, or
deterioration.
• Fabric tape, webbing, and cordage:
Inspect for breaks, burns, cuts, frays, holes, snags, tears, incorrect
weaving, and sharp edges formed from searing; loose, missing or
broken stitching, tacking, whipping, and weaving; weak spots, wear,
and deterioration.
• Rubber and elastic:
Inspect for burns, cuts, holes, tears, weak spots; loss of elasticity and
deterioration.
7.5 AIRING
Before packing, the canopy should be aired, and ideally hung by its
apex from the ceiling for 6-24 hours in a cool, dry room.
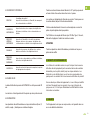
7.6 PREPARATION
The packing area must be spacious, clean, smooth and dry.
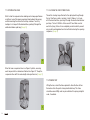
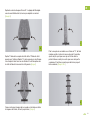
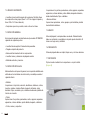
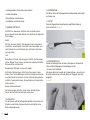
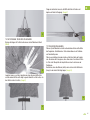
7.7 LAYOUT
Afx the risers to a solid point using carabiners or rapid links.
(Image A)
A

9
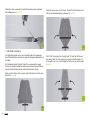
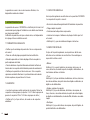
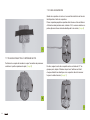
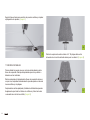
7.9 FOLDING PROCESS. DIVIDING THE GORES (CELLS)
Use the folding loops to secure the canopy before you start to fold the
panels. (Image D)
Place the suspension lines on the line separator in such way that half
of them are on the left, and half are on the right. Put a weight on the
skirt to secure the canopy down. (Image E)
ES
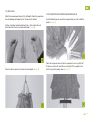
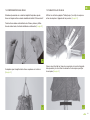
7.8 LINE CHECK
Stretch the reserve parachute out to its full length. Check the suspension
lines for damage and tangles by the “4 lines check” method.
All lines should be located inside the 4 lines – rst and last lines at
both sides from the riser as illustrated below. (Image B)
Check for all the apex lines to have the same length. (Image C)
ENG
B
D
E
C

10
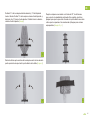
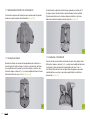
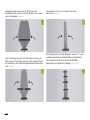
Follow the outer suspension line to nd the centre panels and begin
the folding process. (Image F)
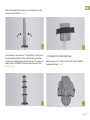
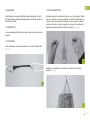
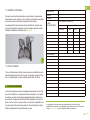
7.10 DIVIDING THE PANELS
First fold all the panels one by one to the right side of the suspension
lines. While doing this, check for any signs of damage or deterioration of
the fabric.
By folding each panel to the left side of the suspension lines again
one by one, check carefully that each panel is laid evenly and without
creases. Check the main seams and inside the panels as well.
Make sure that all the skirts are even and all the loops lie in the same
direction. (Image G)
Fold both sides corner at a 45° angle. The skirts fold should be in line
with the wind channel but not overlapped. (Image H)
Fold 1/5 of the canopy from the right and 1/5 from the left toward
the center. Fold 1/3 of the canopy to the left, and fold another 1/3
to the right side. Then, fold the right half of the canopy onto the left.
(Image I)
FH
I
G

11
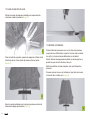
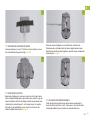
Fold so that the width of the canopy is the same from the top of the
canopy to the skirt (bottom). (Image J)
Fold the canopy in an accordion or “Z” shaped folds, so that it ts into
the inner deployment bag. If possible, adjust the folds so that those
at skirt level are slightly shorter and those at the top of the canopy are
slightly longer. The OCTAGON 2 rescue ts well if there are 4 folds.
(Image K and L)
7.11 PACKING INTO THE DEPLOYMENT BAG
Stow the canopy in a “Z” pattern so that the skirt is atop the folds in
the deployment bag. (Image M)
ESENG
JL
KM

12
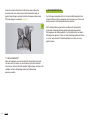
7.12 STOWING THE LINES
Start to stow the suspension lines making sure to keep equal tension
on all lines. Layout the upper suspension lines between the canopy
and the inner bag, then close the two aps, numbers 1 and 2 by
making a 3 cm loop with the bunched lines, pushing it through the
elasticated retainer pod loop. (Image N)
Stow the lower suspension lines in a ‘gure 8’ pattern, securing
each loop end with a rubber band twisted in a gure “8”. Keep the
suspension lines with the same length and equal tension. (Image O)
7.13 CLOSING THE DEPLOYMENT BAG
Thread the closing loop attached to the deployment bag through
the last two flaps eyelets, numbers 3 and 4. Make a 3 cm loop
with the bunched lines, pushing it through the elasticated retainer
pod loop. The last 30-50cm of lines are left free. Make sure for
each bite (loop) of lines to be completely unobstructed to prevent
any possible entanglement and/or malfunction during the opening
sequence. (Image P)
7.14 TENSION TEST
Lifting the riser, check the force required to allow the lines to free
themselves from the pod’s closing elasticated loop. This force
should be around 200g. and may be veried with a spring or digital
scale, if available.
O
P
N

13
8. PARACHUTE LOG RECORD
The Reserve Parachute Log Record is a historical maintenance
document which accompanies the parachute canopy and packing
assemblies.
Logging records provides means of tracking the scheduled maintenance
and reserve parachute’s history. A prepared log record will not be remo-
ved or separated from a parachute, except as directed by an equipment
maintenance specialist. When full, a log record should be kept and
another attached.
ESENG
The information in this manual can be subjected to last minute changes and/
or typographic errors. Please, refer to the online version at www.niviuk.com to
conrm the validity of the included data.
PILOT NAME
MODEL
SERIAL NUMBER
TYPE OF REPACKING
OR REPAIR
Repacking, repair & inspection record.
Date
By: Day Month Year
NOTES

OCTAGON 2
BIENVENUE
Nous vous remercions pour la conance que vous nous témoignez en
choisissant un produit de la marque Niviuk.
Le parachute OCTAGON 2 est le résultat d’un travail conjoint entre
Niviuk Gliders et Vital parachutes. Les caractéristiques de ce produit
remplissent rigoureusement tous les critères que les deux fabricants
ont exigés pour ce projet, priorisant l’intégrité et la sécurité du pilote
durant l’ensemble du processus de conception et fabrication.
Nous vous proposons ici le manuel d’utilisation, que nous vous
demandons de lire attentivement.
L’équipe Niviuk.
MANUEL D’UTILISATION
NIVIUK OCTAGON 2
Ce manuel rassemble toutes les informations nécessaires pour connaitre
les principales caractéristiques de votre nouveau parachute.
Toutes les indications données ici ont un caractère informatif an d’assurer
une utilisation correcte du produit.
Ce manuel ne vous habilite en rien à replier vous-même des parachutes
de secours. L’obtention du brevet pour ce faire relève des autorités locales
compétentes.
Nous vous rappelons qu’il est de la plus haute importance de lire
consciencieusement la totalité du contenu de ce manuel.
Une mauvaise utilisation de l’équipement peut avoir des conséquences
graves et irréversibles pour le pilote, allant jusqu’à la mort.
14

FR
SOMMAIRE
1. CARACTERISTIQUES 16
2. MONTAGE 16
3. SYSTEME DE LIBERATION 17
4. SOIN ET MAINTENANCE 18
5. SECURITE ET RESPONSABILITE 19
6. GARANTIE 19
7. INSTRUCTIONS DE PLIAGE 20
8. LIVRE DE MAINTENANCE 25
DONNÉES TECHNIQUES 50
15

16
1. CARACTERISTIQUES
1.1 HOMOLOGATION
L’OCTAGON 2 a été homologué selon les normes EN 12491:2001 et
LTF 91/09. Voir les tests de conformité effectués en laboratoire:
http://www.para-test.com
1.2 POUR QUI? LIMITES D’UTILISATION
Ce parachute de secours s’utilise uniquement dans le cadre de la pratique
du parapente.
Ce produit n’est pas adéquat pour un usage à des vitesses d’ouver-
ture supérieures à 32 m/s (115 km/h). Son utilisation en chute libre est
formellement interdite.
La limite de poids total volant est établie pour chaque taille en fonction
des données de l’homologation. Le poids total volant inclut : le pilote, les
vêtements, accessoires, parapente (voile et sellette), harnais et parachute.
2. MONTAGE
2.1 CONTENU
L’OCTAGON 2 est fourni avec:
• Parachute « plié usine » dans son pod.
• Pod avec ancrage de sangle, central et latéral.
• Elévateur de 25 cm.
• Manuel d’utilisation.
2.2 PROCEDURE
Veiller à ce que le parachute, ainsi que le pod, ne soient pas endo-
mmagés par de mauvaises manipulations, par des déchirures, de la
poussière ou autres salissures.
Renvoyer en révision les éléments dont vous doutez, ou dont vous ne
connaissez pas l’historique.
2.3 MONTAGE DANS LA SELLETTE
Nous recommandons que l’installation dans la sellette soit supervisée
par un distributeur autorisé ou un moniteur diplômé.
Le parachute OCTAGON 2 peut être installé sur toutes les sellettes de
parapente.
Sur une sellette avec conteneur parachute intégré:
• Fixer la sangle en V de la sellette à la sangle du parachute, grâce à un
maillon acier inox de 7mm – Ce maillon doit être bloqué à la pince.
• Attacher la poignée d’extraction de la sellette au pod de l’OCTAGON
2. En fonction de la disposition du conteneur parachute de la sellette,
utiliser l’ancrage central ou latéral (voir le manuel sellette).
• Placer l’OCTAGON 2 à l’intérieur du conteneur.
• Placer la poignée d’extraction à l’endroit qui lui est destiné.
• Fermer les volets du conteneur, placer l’aiguille ou le système de
verrouillage et s’assurer de son bon fonctionnement.
Certaines sellettes sont prévues pour utiliser un pod spécique, livré
avec la sellette. Dans ce cas, il est important de replacer le parachute
plié dans le pod spécique, puis respecter les informations de montage
données par le constructeur de la sellette.
TRÈS IMPORTANT!
Après l’installation du parachute dans le conteneur de la sellette ou

17
FR
dans un conteneur externe, il est obligatoire de réaliser plusieurs simu-
lations d’extraction sous portique, pilote assis dans la sellette.
Ces essais permettent de contrôler si l’installation de la poignée
d’extraction comme la fermeture des volets sont correctes, d’évaluer
l’effort nécessaire pour l’extraction et de valider la possibilité d’extrac-
tion du système de secours.
Après la simulation, réinstaller le parachute dans le conteneur de la
même manière.
2.4 CONTROLE PRE VOL
Avant chaque vol, tout l’équipement doit être inspecté. Vérier
visuellement que tout est en ordre pour son utilisation.
• Pas de dégâts visibles sur l’équipement qui puissent affecter le système.
• Le conteneur du parachute est bien verrouillé avec les aiguilles à
leur place.
• La poignée d’extraction est correctement placée.
• Le maillon de jonction avec la sellette est en bonne position et bloqué.
Si l’un ou l’autre composant de la sellette/du parachute/de la poignée
d’extraction contient du Velcro, celui-ci doit régulièrement décroché
et replacé an d’éviter que le Velcro demande plus de force qu’à la
normale et rende difcile l’extraction.
3. SYSTEME DE LIBERATION
Il est important de s’habituer à localiser rapidement la poignée
d’extraction. Nous recommandons de procéder régulièrement à
des ”poignées témoin” consistant à aller toucher la poignée, afin
d’en mémoriser le cheminement, la position, et automatiser l’action
d’extraction en cas de situation d’urgence.
En cas d’urgence, le pilote doit évaluer rapidement sa hauteur et le
degré de l’incident. La décision d’extraction ou non du parachute doit
être prise immédiatement.
Avoir recours au système de secours, alors que la voile peut encore
revenir à un vol normal, peut augmenter le risque d’accident.
Si la hauteur est sufsante et que la voile est dans une conguration
instable, il est recommandé de d’abord essayer de la stabiliser.
Cependant, un retard de décision quant à l’utilisation du parachute
de secours peut rendre inefcace le système de secours, si la hauteur
n’est pas ou plus sufsante.
3.1 PROCEDURE D’OUVERTURE
S’il est nécessaire d’extraire le parachute, la procédure à suivre est la
suivante:
• Localiser la poignée d’extraction, la tenir fermement.
• Tirer sur la poignée vers le haut/le côté. Cette action a pour effet, le
déverrouillage des aiguilles et des volets, puis l’extraction du pod du
conteneur.
• Repérer un endroit sûr et, dans un mouvement continu, lancer et
lâcher l’ensemble pod/parachute aussi rapidement et énergiquement
que possible.
• Le vent relatif provoque le gonage de la coupole.
• Si vous êtes en rotation, lancer le parachute en direction contraire
évitera le risque que le parachute s’emmêle dans le parapente.
• Après l’ouverture du parachute, la voile de parapente doit être
ramenée le plus rapidement possible. Tirer sur un frein pour ramener
la voile.

18
• A l’atterrissage, se préparer à amortir la chute en joignant les jambes
et en pliant les genoux, puis réaliser un roulé-boulé an de dissiper
l’énergie de l’impact.
• Une fois au sol, dégonez le parachute en tirant sur une des suspentes,
an de limiter le risque d’être traîné sur le sol.
4. SOIN ET MAINTENANCE
4.1 MAINTENANCE
L’OCTAGON 2 doit être aéré et plié à intervalles réguliers de 180
jours, en suivant les indications du manuel. Lorsque cela s’avère
nécessaire, en raison du climat, du stockage ou d’une obligation of-
cielle, il est possible qu’il requière une maintenance additionnelle.
Nous recommandons que l’inspection et le pliage soient toujours
réalisés par un personnel certié ou habilité.
Après chaque ouverture, le parachute doit être révisé par le distribu-
teur ou le fabricant. Rechercher toujours un support professionnel, en
cas de doute.
Les matériaux utilisés sur l’OCTAGON 2 ont été sélectionnés pour durer
un maximum. Cependant, assurer une maintenance du système de se-
cours, en suivant les conseils de ce manuel, prolongera la vie du produit.
4.2 STOCKAGE
Il est déconseillé d’exposer son matériel de vol aux rayons UV, à la
chaleur, à l’humidité et à l’eau. Il est recommandé de conserver la
sellette et le parachute dans le sac de protection lorsque vous ne
l’utilisez pas.
Conserver votre équipement dans un endroit sec, aéré, loin de
produits comme la graisse, l’acide, l’huile, l’essence ou la peinture.
Ne stockez jamais votre parachute humide. Si votre parachute est
mouillé, à cause d’un atterrissage dans l’eau ou dans la neige, il doit
être désinstallé de la sellette, séché, avant d’être installé à nouveau
dans son conteneur.
Si la coupole est salie, elle peut être nettoyée à l’aide d’un chiffon
humide. Ensuite, laisser-la sécher complètement. Si la coupole com-
porte des traces de moisissure, elle doit être renvoyée au distributeur
ou au fabriquant pour réparation. La résistance de la voile peut avoir
été affectée.
Prenez en compte les précautions suivantes:
Prenez bien soin de votre parachute, à chaque fois que vous
le manipulez, sans quoi cela peut occasionner des dégâts. Les
opérations de pliage doivent se faire dans un endroit et sur un sol
parfaitement propres.
Les panneaux ou toutes autres parties peuvent être endommagés lors des
manipulations par des bijoux, tels que montres, bagues, bracelets, etc.
Protéger également le parachute de l’humidité, de la poussière, de
l’huile, des graisses et des acides.
Durant les périodes d’inactivité, protégez-le. Il est recommandé de le
stocker dans un endroit aux température/humidité constantes ou dans
un lieu sec et bien ventilé, protégé de l’humidité, du feu, de la terre,
des insectes, des rongeurs et de la lumière directe du soleil.
Evitez l’exposition prolongée à la lumière du soleil, aux lumières
articielles ou uorescentes. Le tissu type: nylon se détériore sous une
lumière ultraviolette.
ATTENTION!
Laisser le parachute exposé à la lumière du soleil réduit considérable-
ment sa durée de vie.

19
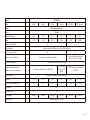
4.3 REVISION ET CONTROLES
COUPOLE
Assemblage du matériel.
Inspection des déchirures, de l’humidité, des marques et
des coutures abimées ou défaites.
SUSPENTES
SUPÉRIEURES
Inspection des trous, des coupures, des dégâts, des
déchirures, des brûlures et des coutures abimées ou
défaites.
CEINTURE
LATÉRALE
SUPÉRIEURE
Inspection de l’humidité, de la saleté, des matériaux
étrangers, des trous, des coupures, des brûlures, des
coutures abimées ou défaites et des dégâts dans la toile.
PANNEAUX Inspection des coupures, des brûlures, des coutures
abimées ou défaites et des dégâts dans la toile.
CEINTURE
LATÉRALE
INFÉRIEURE
Inspection des coutures abimées ou défaites, des brûlures,
des taches, des dégâts dans la toile.
SUSPENTES Inspection sur toute la longueur des suspentes, inspection
des zigzags dans les suspentes.
4.4 DURÉE DE VIE
La durée d’utilisation du parachute OCTAGON 2 ne doit pas excéder 10
ans.
Les révisions et montage doivent être opérés par des professionnels.
4.5 REPARATIONS
Les réparations doivent être réalisées au moyen de matériaux (tissus, l,
renforts, sangle…) identiques aux matériaux d’origine.
Toutes les coutures linéaires doivent être de 6,5 à 11 points par pouce et
achevée à l’aide d’une autre couture d’au moins 2 pouces.
Les coutures en zigzag doivent s’étendre sur au moins 1 demi-pouce sur
la couture abîmée, de part et d’autre des extrémités.
Il faut recoudre directement à travers la couture originale, en suivant le
patron du point original autant que possible.
Tout l utilisé sur la coupole doit être en nylon VT-295e, Type 2, Classe A,
Mesure E et appliqué à l’aide d’une machine à coudre.
ATTENTION!
Toutes les réparations doivent être réalisées par le fabricant ou par un
professionnel certié.
5. SECURITE ET RESPONSABILITE
Le vol libre est considéré comme un sport à risque. Une mauvaise
utilisation de cet équipement peut causer des lésions de caractère
irréversible, pour le pilote, allant jusqu’au risque de décès. Les
fabricants ou les distributeurs ne sont en rien responsables de
quelque acte ou accident dû à une mauvaise utilisation du produit.
Vous ne devez pas utiliser cet équipement, si vous n’êtes pas habilité
à le faire. N’acceptez pas les conseils, ni les cours informels de
qui que ce soit, s’il n’est pas ofciellement certié/habilité comme
instructeur ou moniteur.
6. GARANTIE
Tout l’équipement, ainsi que ses composantes, sont garantis deux ans
en cas de défaut de fabrication.
FR

20
La garantie ne couvre ni les cas de mauvaise utilisation, ni la
dégradation normale du matériel.
7. INSTRUCTIONS DE PLIAGE
Le parachute de secours OCTAGON 2 est vérié et plié à l’usine. Il est
recommandé que le pliage et l’installation sur la sellette soient réalisés
par du personnel qualié.
L’efcacité du parachute, ainsi que sa durée de vie, sont dépendantes
d’un pliage et d’une installation corrects.
7.1 PRÉPARATION DU PARACHUTE
• Vérier que l’assemblage du parachute et de ses composantes
est correct.
• Placer les outils de pliage pour garantir leur bonne utilisation.
• Etendre le parachute sur la table de pliage et xer la coupole à la
partie supérieure de la table.
• Fixer les élévateurs à la partie inférieure de la table et mettre de la
tension dans les suspentes an d’étendre le parachute correctement.
• Vérier que le parachute est dans le bon sens. Si les suspentes
supérieures semblent rattachées à la partie extérieure de la bande
latérale supérieure, le parachute est à l’envers.
7.2 SUSPENTES
• Localiser le panneau central supérieur de la coupole. Diviser les
suspentes en deux groupes (suspentes 1 à 8/12 dans le groupe de
gauche et suspentes 9/16 à 13/24 dans le groupe de droite.)
• Vérier qu’il n’y ait pas de tours, de noeuds ou de suspentes
emmêlées.
7.3 INSPECTION GÉNÉRALE
Une inspection générale sera effectuée sur le parachute OCTAGON
2 en respectant les points suivants:
• Se munir du manuel d’enregistrement/d’informations du parachute.
• Pliage complet du produit.
• Fonctionnement adéquat des composantes.
• Localiser les marques et références du pliage et vérier que tout
est correct.
• Vérier qu’il n’y a pas de matériaux étrangers ni de taches.
7.4 INSPECTION DÉTAILLÉE
En plus de l’inspection générale, une inspection en détails sera
effectuée sur les matériaux de construction et d’assemblage, en
respectant le critère suivant:
• Métaux:
Vérier qu’il n’y a pas d’oxydation, de corrosion, de bosses, de
casse, de taches, de bords coupants, de dégâts, détériorations, de
boutonnières abîmées ou lâchées.
• Tissu:
Vérier qu’il n’y ait pas de brûlures, de déchirures, de trous, d’accrocs,
de coutures abîmées, des points de couture fragiles ou détendus, de
dégâts ou de détériorations.
• Sangles, poignée et suspentes:
Vérier qu’il n’y a pas de déchirures, de brûlures, de coupures, de
trous, d’accrocs, de coutures abîmées, de points de couture fragiles,
de dégâts ou de détériorations, de bords eflés, distendus ou endom-
magés.
• Elastiques:
Vérier qu’il n’y a pas de brûlures, de coupures, de points fragiles, de
perte d’élasticité ou de détérioration.
Seite wird geladen ...
Seite wird geladen ...
Seite wird geladen ...
Seite wird geladen ...
Seite wird geladen ...
Seite wird geladen ...
Seite wird geladen ...
Seite wird geladen ...
Seite wird geladen ...
Seite wird geladen ...
Seite wird geladen ...
Seite wird geladen ...
Seite wird geladen ...
Seite wird geladen ...
Seite wird geladen ...
Seite wird geladen ...
Seite wird geladen ...
Seite wird geladen ...
Seite wird geladen ...
Seite wird geladen ...
Seite wird geladen ...
Seite wird geladen ...
Seite wird geladen ...
Seite wird geladen ...
Seite wird geladen ...
Seite wird geladen ...
Seite wird geladen ...
Seite wird geladen ...
Seite wird geladen ...
Seite wird geladen ...
Seite wird geladen ...
Seite wird geladen ...
-
 1
1
-
 2
2
-
 3
3
-
 4
4
-
 5
5
-
 6
6
-
 7
7
-
 8
8
-
 9
9
-
 10
10
-
 11
11
-
 12
12
-
 13
13
-
 14
14
-
 15
15
-
 16
16
-
 17
17
-
 18
18
-
 19
19
-
 20
20
-
 21
21
-
 22
22
-
 23
23
-
 24
24
-
 25
25
-
 26
26
-
 27
27
-
 28
28
-
 29
29
-
 30
30
-
 31
31
-
 32
32
-
 33
33
-
 34
34
-
 35
35
-
 36
36
-
 37
37
-
 38
38
-
 39
39
-
 40
40
-
 41
41
-
 42
42
-
 43
43
-
 44
44
-
 45
45
-
 46
46
-
 47
47
-
 48
48
-
 49
49
-
 50
50
-
 51
51
-
 52
52


in anderen Sprachen
- English: Niviuk Octagon 2 User manual
- français: Niviuk Octagon 2 Manuel utilisateur
- español: Niviuk Octagon 2 Manual de usuario
Verwandte Artikel
Andere Dokumente
-
Ozone Angel Benutzerhandbuch
-
SUPAIR Radical 4 Benutzerhandbuch
-
-
-
-
 Skyman Ultra CROSS 125 Bedienungsanleitung
-
-
-
