iON USB WRIST BLOOD PRESSURE MONITOR Bedienungsanleitung
- Kategorie
- Blutdruckmessgeräte
- Typ
- Bedienungsanleitung
Dieses Handbuch eignet sich auch für

USB WRIST BLOOD
PRESSURE MONITOR
QUICKSTART GUIDE
ENGLISH ( 3 – 21 )
GUÍA DE INICIO RÁPIDO
ESPAÑOL ( 22 – 40 )
GUIDE D’UTILISATION RAPIDE
FRANÇAIS ( 41 – 59 )
GUIDA RAPIDA
ITALIANO ( 60 – 78 )
KURZANLEITUNG
DEUTSCH ( 79 – 97 )
SNELSTARTGIDS
NEDERLANDS ( 98 – 116 )
MANUAL VERSION 1.0
2011.08.31


3
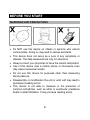
BEFORE YOU START
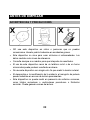
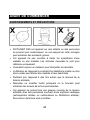
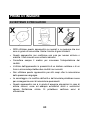
WARNINGS AND PRECAUTIONS
• Do NOT use this device on infants or persons who cannot
communicate. Doing so may lead to serious accidents.
• This device does not serve as a cure of any symptoms or
disease. The data measured are only for reference.
• Always consult your physician to have the results interpreted.
• Use of this device near a mobile phone or microwave oven
may cause inaccurate results.
• Do not use this device for purposes other than measuring
blood pressure.
• Disassembly or modification the unit or wrist cuff may lead to
permanent reading errors.
• This device is not able to measure in the presence of
common arrhythmia, such as atrial or ventricular premature
beats or atrial fibrillation. It may produce reading errors.

4
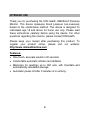
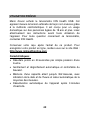
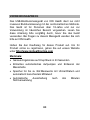
INTENDED USE
Thank you for purchasing the ION Health USB Blood Pressure
Monitor. This device measures blood pressure non-invasively
based on the oscillometric method. This device is designed for
individuals age 18 and above for home use only. Please read
these instructions carefully before using the device. For other
questions regarding this monitor, please contact ION Health.
Please keep your receipt after purchasing this product. To
register your product online, please visit our website:
http://www.ionhealthonline.com
Features:
• One-touch, accurate results in 20 seconds.
• Comfortable automatic inflation and deflation.
• Memories for readings up to 352 sets, with time/date and
automatically calculated average.
• Automatic power-off after 3 minutes of no activity.

5
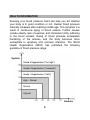
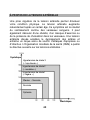
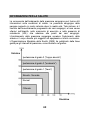
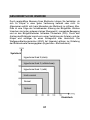
HEALTH INFORMATION
Knowing your blood pressure trend can help you tell whether
your body is in good condition or not. Human blood pressure
naturally increases after reaching middle age. This symptom is a
result of continuous aging of blood vessels. Further causes
include obesity, lack of exercise, and cholesterol (LDL) adhering
to the blood vessels. Rising of blood pressure accelerates
hardening of the arteries, and the body becomes more
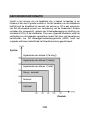
susceptible to apoplexy and coronary infarction. The World
Health Organization (WHO) has published the following
guideline of blood pressure range:
Grade 3 Hypertension ("too high")
Grade 2 Hypertension ("moderate")
Grade 1 Hypertension ("mild")
High – Normal
Normal
Optimal
Systolic
Diastolic

6
ABOUT THE DEVICE
Box Contents:
• Blood pressure monitor
• Wrist cuff
• USB cable
• Software CD
• Storage case
• 2 AAA batteries
• Quickstart Guide
Please check the box to ensure you have everything listed
above. If not, please return the product where you purchased it.

7
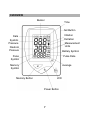
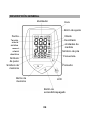
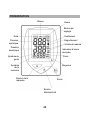
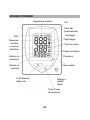
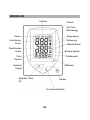
OVERVIEW
Power Button
Set Button
Memory Button
LCD
Date
Time
Inflation
Deflation
Measurement
Units
Battery Symbol
Pulse Rate
Average
Memory
Symbol
Pulse
Symbol
Diastolic
Pressure
Systolic
Pressure
Buzzer

8
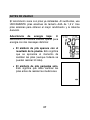
BEFORE USE
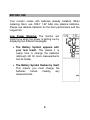
Your monitor comes with batteries already installed. When
replacing them, use ONLY 1.5V AAA size alkaline batteries.
Please use alkaline batteries for the best performance and the
longest life.
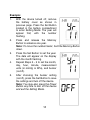
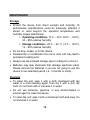
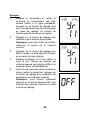
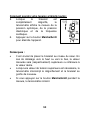
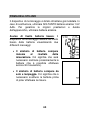
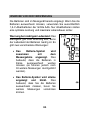
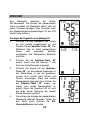
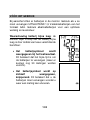
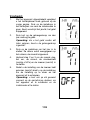
Low Power Warning:
The monitor will
remind you when the power is getting low by
displaying two different messages:
• The Battery Symbol appears with
your test result. This means it is
nearly time to change the batteries
(although still 30 more measurements
can be made).
• The Battery Symbol flashes by itself.
This means you must change the
batteries before making any
measurements.

9
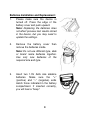
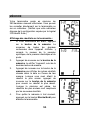
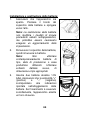
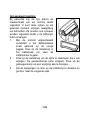
Batteries Installation and Replacement:
1. Please make sure the device is
turned off. Press the edge of the
battery cover and push upward.
Note: Replacing the batteries does
not affect previous test results stored
in the device, but you may need to
update the settings.
2. Remove the battery cover then
remove the batteries inside.
Note: Do not use different type, date
or brand name batteries together.
Use only new batteries of the
required size and type.
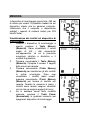
3. Insert two 1.5V AAA size alkaline
batteries. Make sure the "+"
(positive) and "–" (negative) ends
match those indicated in the battery
compartment. If inserted correctly,
you will hear a "beep."

10
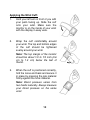
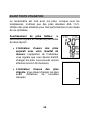
Setting the Device:
Your monitor comes with the time, date,
and measurement units preset. These
options may be changed any time to fit
your needs. They also need to be set
again after you change the batteries.
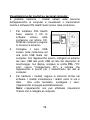
1. With the monitor turned off,
remove the battery cover as
shown in previous page. Press the
Set Button located in the battery
compartment to enter Setting
Mode.
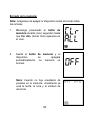
2. Press the Set Button to select what you would like to
change. The selected one will be flashing. Press the
Memory Button to make change.
3. Save the Changes by pressing the Set Button and move
on to the next step.

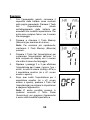
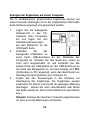
11
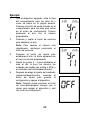
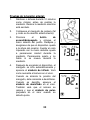
Example:
1. With the device turned off, remove
the battery cover as shown in
previous page. Press the Set Button
located in the battery compartment
to enter Setting Mode. The year will
appear first, with the number
flashing.
2. Press and release the Memory
Button to advance one year.
Note: To move the number faster, hold the Memory Button
down.
3. Press the Set Button to set the year.
The date will appear on the display
with the month flashing.
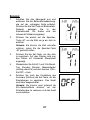
4. Repeat Steps 2 – 3 to set the month,
day, hour, minute, measurement
units (in mmHg or KPa), and buzzer
(on/off).
5. After choosing the buzzer setting
(on/off), press the Set Button to save
the settings and turn off the device.
Note: You may also press the Power
Button any time to turn off the device
and exit the Setting Mode.

12
USING THE DEVICE
MEASURING YOUR BLOOD PRESSURE
Suggestions before Measuring:
• Avoid caffeine, tea, alcohol, and cigarettes at least 30
minutes before measurement.
• Wait 30 minutes after exercising or bathing before
measurement.
• Sit or lie down for at least 10 minutes before measuring.
• Do not measure when feeling anxious or tense.
• Please take a 5-10 minute break between measurements.
• Waiting allows the engorged blood vessels to return to
normal status. This break can be longer if necessary,
depending on your physical conditions.
• Keep the records for your physician as reference.

13
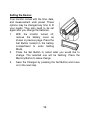
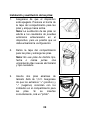
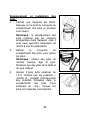
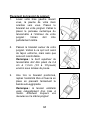
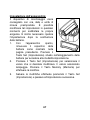
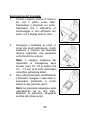
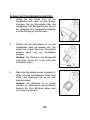
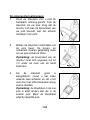
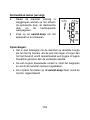
Applying the Wrist Cuff:
1. Hold your left arm in front of you with
your palm facing up. Slide the cuff
onto your wrist. Make sure the
monitor is on the inside of your wrist
with the display in easy view.
2. Wrap the cuff comfortably around
your wrist. The top and bottom edges
of the cuff should be tightened
evenly around your wrist.
Note: The top margin of the monitor
should be about 1/4 to 1/2 inch (0.6
cm to 1.3 cm) below the ball of
thumb.
3. When the cuff is positioned correctly,
fold the loose end back and secure it
in place by pressing the pile material
firmly against the hook material.
Note: Blood pressure varies from
two hands naturally. Always measure
your blood pressure on the same
wrist.

14
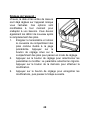
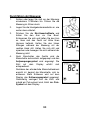
Testing Your Blood Pressure:
1. Sit or lie down for at least 10 minutes before measuring.
Take the measurement while sitting.
2. Apply the wrist cuff (as described
earlier).
3. Press the Power Button and place
your arm in front of your chest. Relax
and make sure the device is at the
same height as your heart. Holding
your left elbow with your right hand
helps you hold still during
measurement. Remain still and do not talk or move during
the measurement.
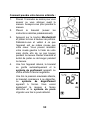
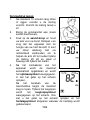
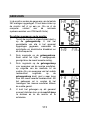
4. After turning on the device, the cuff
automatically inflates and Inflation
Symbol appears. You will see the
number increasing on the display.
After the cuff pressure is reached,
the cuff begins to deflate. As it
deflates, the Deflation Symbol will
appear on the display. You will also
see the number decreasing and
Pulse Symbol flashing on the
display when a pulse is detected.

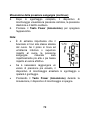
15
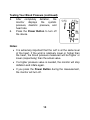
Testing Your Blood Pressure (continued):
5. After completely deflation, the
monitor displays the systolic
pressure, diastolic pressure, and
heart rate.
6. Press the Power Button to turn off
the device.
Notes:
• It is extremely important that the cuff is at the same level
of the heart. If the wrist is relatively lower or higher than
the heart, the blood pressure measured will be higher or
lower (respectively) than the actual value.
• If a higher pressure value is needed, the monitor will stop
deflation and inflate again.
• If you press the Power Button during the measurement,
the monitor will turn off.

16
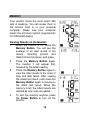
MEMORY
Your monitor stores the most recent 352
sets of readings. You can review them in
the monitor itself or in your personal
computer. (Make sure your computer
meets the minimum system requirements
for ION Health Suite.)
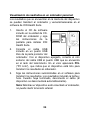
Viewing Results on the Monitor:
1. When the monitor is off, press the
Memory Button. You will see the
average of all data stored in the
device, including systolic and
diastolic blood pressure, and pulse.
2. Press the Memory Button again.
The number 1 will appear first,
followed by the latest reading.
3. Press the Memory Button again to
view the other results in the order of
time and date taken. After viewing
the oldest test result, push down the
Memory Button again to resume to
the latest test result. When the
memory is full, the oldest results are
deleted as new ones are added.
4. To exit the memory anytime, press
the Power Button to turn off the
monitor.

17
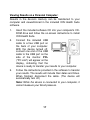
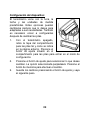
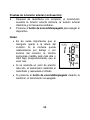
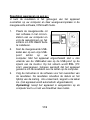
Viewing Results on a Personal Computer:
Results in the device's memory can be transferred to your
computer and viewed/stored in the included ION Health Suite
software.
1. Insert the included software CD into your computer's CD-
ROM drive and follow the on-screen instructions to install
ION Health Suite.
2. Connect the included USB
cable to a free USB port on
the back of your computer.
With the device turned off,
connect one end of the USB
cable to the USB port on the
side of the monitor. PCL
("PC Link") will appear on the
display, indicating that the
device is ready to transfer your results to your computer.
3. Follow the instructions provided in the software to transfer
your results. The results will include their dates and times.
When finished, disconnect the cable. (The device will
automatically turn off.)
Note: While the device is connected to your computer, it
cannot measure your blood pressure.

18
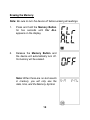
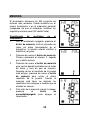
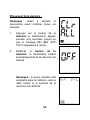
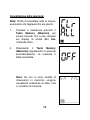
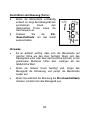
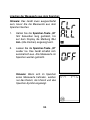
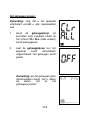
Erasing the Memory:
Note: Be sure to turn the device off before erasing all readings.
1. Press and hold the Memory Button
for five seconds until CLr ALL
appears on the display.
2. Release the Memory Button and
the device will automatically turn off.
Its memory will be erased.
Note: When there are no test results
in memory, you will only see the
date, time, and the Memory Symbol.

19
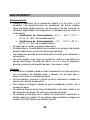
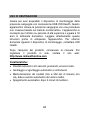
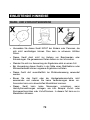
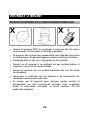
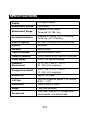
MAINTENANCE
Storage
• Protect the device from direct sunlight and humidity. Its
performance specifications could be adversely affected if
stored or used beyond the specified temperature and
humidity ranges listed below:
Operating conditions: 10°C – 40°C (50°F – 104°F),
30 – 85% relative humidity
Storage conditions: -20°C – 60° C (-4°F – 140°F),
10 – 95% relative humidity
• Do not drop, shake, or hit the device.
• Disassembly or modification the unit or wrist cuff may lead to
permanent reading error.
• Always use the included storage case to transport or store it.
• Batteries may leak chemicals that damage electronic parts.
Please remove the batteries if you are not going to use the
device for an extended period (i.e., 3 months or more).
Cleaning
• To clean the unit, wipe it with a cloth moistened with tap
water or a mild cleaning agent, then dry it with a soft, dry
cloth. Do not flush with or immerse it in water.
• Do not use benzene, gasoline, or any alcohol-based or
solvent agent to clean the device.
• To clean the cuff, wipe it with a moistened cloth and soap. Do
not immerse it in water.

20
Cleaning (continued)
• Do not twist any of the device's tubing. Do not stretch, bend,
or tug on the wrist cuff. Do not turn the cuff inside-out.
• Do not separate the cuff from the unit, disassemble the
device, or try to repair the unit yourself. If any problem
occurs, contact ION Health for service.
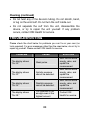
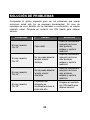
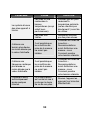
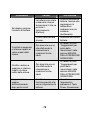
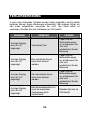
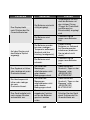
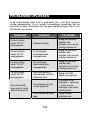
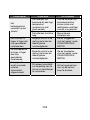
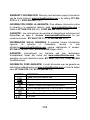
TROUBLESHOOTING
Please check the chart below for problems you can fix on your own (no
tools required). For error messages other than the ones below, do not try to
repair by yourself. Please contact ION Health for service.
PROBLEM CAUSE SOLUTION
The display shows
"Err 00."
Weak pulse.
Refit the cuff more
snugly, relax, and
repeat the
measurement.
The display shows
"Err 02."
Systolic pressure
cannot be detected.
Refit the cuff more
snugly, relax, and
repeat the
measurement.
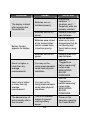
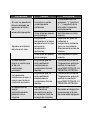
The display shows
"Err 04."
Diastolic pressure
cannot be detected.
Refit the cuff more
snugly, relax, and
repeat the
measurement.
The display shows
"Err 09."
Cuff pressure is not
enough even at the
highest amount.
Contact ION
Health for service.
Seite wird geladen ...
Seite wird geladen ...
Seite wird geladen ...
Seite wird geladen ...
Seite wird geladen ...
Seite wird geladen ...
Seite wird geladen ...
Seite wird geladen ...
Seite wird geladen ...
Seite wird geladen ...
Seite wird geladen ...
Seite wird geladen ...
Seite wird geladen ...
Seite wird geladen ...
Seite wird geladen ...
Seite wird geladen ...
Seite wird geladen ...
Seite wird geladen ...
Seite wird geladen ...
Seite wird geladen ...
Seite wird geladen ...
Seite wird geladen ...
Seite wird geladen ...
Seite wird geladen ...
Seite wird geladen ...
Seite wird geladen ...
Seite wird geladen ...
Seite wird geladen ...
Seite wird geladen ...
Seite wird geladen ...
Seite wird geladen ...
Seite wird geladen ...
Seite wird geladen ...
Seite wird geladen ...
Seite wird geladen ...
Seite wird geladen ...
Seite wird geladen ...
Seite wird geladen ...
Seite wird geladen ...
Seite wird geladen ...
Seite wird geladen ...
Seite wird geladen ...
Seite wird geladen ...
Seite wird geladen ...
Seite wird geladen ...
Seite wird geladen ...
Seite wird geladen ...
Seite wird geladen ...
Seite wird geladen ...
Seite wird geladen ...
Seite wird geladen ...
Seite wird geladen ...
Seite wird geladen ...
Seite wird geladen ...
Seite wird geladen ...
Seite wird geladen ...
Seite wird geladen ...
Seite wird geladen ...
Seite wird geladen ...
Seite wird geladen ...
Seite wird geladen ...
Seite wird geladen ...
Seite wird geladen ...
Seite wird geladen ...
Seite wird geladen ...
Seite wird geladen ...
Seite wird geladen ...
Seite wird geladen ...
Seite wird geladen ...
Seite wird geladen ...
Seite wird geladen ...
Seite wird geladen ...
Seite wird geladen ...
Seite wird geladen ...
Seite wird geladen ...
Seite wird geladen ...
Seite wird geladen ...
Seite wird geladen ...
Seite wird geladen ...
Seite wird geladen ...
Seite wird geladen ...
Seite wird geladen ...
Seite wird geladen ...
Seite wird geladen ...
Seite wird geladen ...
Seite wird geladen ...
Seite wird geladen ...
Seite wird geladen ...
Seite wird geladen ...
Seite wird geladen ...
Seite wird geladen ...
Seite wird geladen ...
Seite wird geladen ...
Seite wird geladen ...
Seite wird geladen ...
Seite wird geladen ...
Seite wird geladen ...
Seite wird geladen ...
Seite wird geladen ...
Seite wird geladen ...
-
 1
1
-
 2
2
-
 3
3
-
 4
4
-
 5
5
-
 6
6
-
 7
7
-
 8
8
-
 9
9
-
 10
10
-
 11
11
-
 12
12
-
 13
13
-
 14
14
-
 15
15
-
 16
16
-
 17
17
-
 18
18
-
 19
19
-
 20
20
-
 21
21
-
 22
22
-
 23
23
-
 24
24
-
 25
25
-
 26
26
-
 27
27
-
 28
28
-
 29
29
-
 30
30
-
 31
31
-
 32
32
-
 33
33
-
 34
34
-
 35
35
-
 36
36
-
 37
37
-
 38
38
-
 39
39
-
 40
40
-
 41
41
-
 42
42
-
 43
43
-
 44
44
-
 45
45
-
 46
46
-
 47
47
-
 48
48
-
 49
49
-
 50
50
-
 51
51
-
 52
52
-
 53
53
-
 54
54
-
 55
55
-
 56
56
-
 57
57
-
 58
58
-
 59
59
-
 60
60
-
 61
61
-
 62
62
-
 63
63
-
 64
64
-
 65
65
-
 66
66
-
 67
67
-
 68
68
-
 69
69
-
 70
70
-
 71
71
-
 72
72
-
 73
73
-
 74
74
-
 75
75
-
 76
76
-
 77
77
-
 78
78
-
 79
79
-
 80
80
-
 81
81
-
 82
82
-
 83
83
-
 84
84
-
 85
85
-
 86
86
-
 87
87
-
 88
88
-
 89
89
-
 90
90
-
 91
91
-
 92
92
-
 93
93
-
 94
94
-
 95
95
-
 96
96
-
 97
97
-
 98
98
-
 99
99
-
 100
100
-
 101
101
-
 102
102
-
 103
103
-
 104
104
-
 105
105
-
 106
106
-
 107
107
-
 108
108
-
 109
109
-
 110
110
-
 111
111
-
 112
112
-
 113
113
-
 114
114
-
 115
115
-
 116
116
-
 117
117
-
 118
118
-
 119
119
-
 120
120


iON USB WRIST BLOOD PRESSURE MONITOR Bedienungsanleitung
- Kategorie
- Blutdruckmessgeräte
- Typ
- Bedienungsanleitung
- Dieses Handbuch eignet sich auch für
in anderen Sprachen
- English: iON USB WRIST BLOOD PRESSURE MONITOR Owner's manual
- français: iON USB WRIST BLOOD PRESSURE MONITOR Le manuel du propriétaire
- español: iON USB WRIST BLOOD PRESSURE MONITOR El manual del propietario
- italiano: iON USB WRIST BLOOD PRESSURE MONITOR Manuale del proprietario
- Nederlands: iON USB WRIST BLOOD PRESSURE MONITOR de handleiding
Andere Dokumente
-
Terraillon WRIST BLOOD PRESSURE MONITORING Benutzerhandbuch
-
Terraillon Pressio W Bedienungsanleitung
-
 Welch Allyn OSZ 3 Easy Directions For Use Manual
-
boso medistar+ Benutzerhandbuch
-
Archos Blood Pressure Monitor Benutzerhandbuch
-
Panasonic ew 3004 w800 Bedienungsanleitung
-
-
Braun Vitalscan Plus BP-1750 Bedienungsanleitung
-
-
Konig Electronic HC-BLDPRESS10 Bedienungsanleitung
