
Specications are subject to change without notice
© 2019 Koninklijke Philips N.V.
All rights reserved
4213 342 20529 B
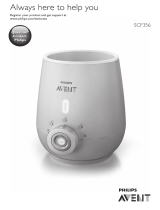
SCF355

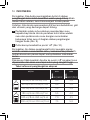
2 3 4 5
6
7 8 9
10 11 12 13
14 15 16
1

SCF355
ENGLISH 6
DEUTSCH 17
FRANÇAIS 30
ITALIANO 42
NEDERLANDS 55
INDONESIA 67
80
TIẾNG VIỆT 89

6
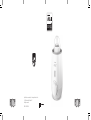
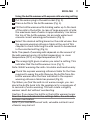
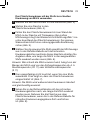
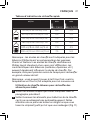
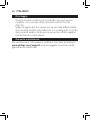
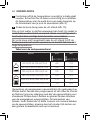
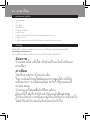
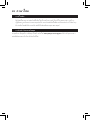
General description (Fig. 1)
1. Bottle warmer
2. Light
3. Settings knob
4. O setting
5. Defrost setting
6. Keep warm setting
7. Express milk warming setting for contents up to
180ml/6oz
8. Food warming setting
9. Express milk warming setting for contents over and
including 180ml/6oz
Important
To fully benet from the support that Philips
oers, register your appliance at
www.philips.com/welcome.
Read this user manual carefully before you
use the bottle warmer and save it for future
reference.
Danger
- Do not immerse the cord, plug or
appliance in water or other liquid.
Warning
- Only use the appliance indoors.
- Do not let the mains cord hang over the
edge of a table or worktop. Excess cord
can be stored in the base of the bottle
warmer.
ENGLISH

- Keep the mains cord away from hot
surfaces.
- Only connect the appliance to an earthed
wall socket. Always make sure that the
plug is inserted into the wall socket
properly.
- Check if the voltage indicated on the
bottom of the appliance corresponds to
the local mains voltage before you
connect the appliance.
- If you need to use an extension cord,
make sure it is an earthed extension cord
with a rating of at least 13 amperes.
- Do not use the appliance if the plug, the
mains cord or the appliance itself is
damaged. If the mains cord is damaged,
you must have it replaced by Philips, a
service centre authorised by Philips or
similarly qualied persons in order to avoid
a hazard.
- Do not place the appliance on or near a
hot gas or electric cooker, or in a heated
oven.
- This appliances can be used by persons
with reduced physical, sensory or mental
capabilities or lack of experience and
knowledge if they have been given
supervision or instruction concerning use
ENGLISH 7

of the appliance in a safe way and
understand the hazards involved.
- Cleaning and user maintenance shall not
be made by children.
- This appliance shall not be used by
children. Keep the appliance and its cord
out of reach of children.
- Children shall not play with the appliance.
- Do not spill water on the mains plug.
- Only use the appliance as described in
the user manual to avoid potential injury
due to misuse.
- Do not preheat the appliance.
- Always place a fully assembled bottle
with cap in the bottle warmer before you
add water.
- Make sure you add water before you
switch on the bottle warmer.
- Hot water can cause serious burns. Be
careful when the bottle warmer contains
hot water.
- The accessible surfaces of the appliance
may become hot during use and are
subject to residual heat after use.
- Do not move the appliance when it
contains hot water.
- When the food or milk has reached the
required temperature, remove the bottle
or container from the bottle warmer. If you
ENGLISH8

leave food or milk in the bottle warmer,
the temperature of the food or milk
increases.
- Always check the food temperature
before you feed your child.
Caution
- This appliance is intended to be used in
household and similar applications such
as farm houses, bed and breakfast type
environments, sta kitchen areas in shops,
oces and other working environments,
and by clients in hotels, motels and other
residential type environments.
- Unplug the appliance when it is not in use.
- The surface of the heating element is
subject to residual heat after use.
- Let the appliance cool down before you
clean it.
- Follow the descaling instructions to avoid
irreparable damage.
- Do not try to open or repair the appliance
yourself. You can contact the Philips
Consumer Care Centre in your country (see
www.philips.com/support).
- The food should not be heated for too
long.
ENGLISH 9

You can nd the production date code YYWW in the cord
storage compartment in the base of the bottle warmer.
Electromagnetic elds (EMF)
This Philips appliance complies with all applicable standards
and regulations regarding exposure to electromagnetic elds.
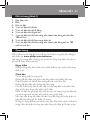
Using the bottle warmer
With this bottle warmer, you can safely warm all Philips Avent
feeding bottles and milk/baby food in containers and other
baby food jars.
Note: Philips Avent breast milk bags and Philips Avent
2oz/60ml bottles cannot be used in this bottle warmer.
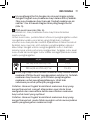
Explanation of settings
- O setting: The bottle warmer is switched o and the light
is o. On every other setting, the appliance is switched on
and the light is lit (Fig. 2).
-
Express milk warming setting for contents up to 180ml/6oz:
Select this setting when you want to quickly warm a bottle of
milk with a content up to 180ml/6oz.
The bottle has to be taken out immediately after warming to
the right temperature, otherwise the milk will be overheated.
- Food warming setting: Select this setting when you want
to warm a container/jar of baby food.
- Express milk warming setting for contents over and
including 180ml/6oz:
Select this setting when you want to quickly warm a bottle
of milk with a content over and including 180ml/6oz.
The bottle needs to be taken out immediately after
warming to the right temperature, otherwise the milk will be
overheated.
- Keep warm setting: Milk is warmed at a slower speed and
be kept at right temperature.
- Defrost setting: Defrost a bottle/container of milk/baby
food to liquid state. No warming occurs.
ENGLISH10

Using the bottle warmer with express milk warming setting
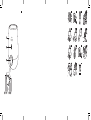
1 Put the mains plug in the wall socket (Fig. 3).
2 Place a bottle in the bottle warmer (Fig. 4).
3 Fill the bottle warmer with drinking water up to the level
of the milk in the bottle. In case of large amounts of milk,
the maximum level of water is approximately 1 cm below
the top of the bottle warmer. An accurate water level
ensures correct warming performance (Fig. 5).
4 Select the desired setting based on the milk volume. See
the express warming reference table at the end of this
chapter to check how long the milk needs to be warmed
in the selected setting (Fig. 6).
Note: The speed of warming milk depends on the amount of
the milk warmed and on its initial temperature, i.e. room
temperature (20°C) or fridge temperature (5°C).
5 The orange light goes on when you select a setting. This
indicates that the bottle warmer is on (Fig. 7).
Note: Whilst warming the milk circulates and heats evenly.
6 Check the express warming reference table for the time
required to warm the milk. Remove the bottle from the
bottle warmer after the time indicated in the express
warming reference table has passed (Fig. 8).
Tip: When you nd the milk is not warm enough, you can
place the bottle back into the appliance for a maximum of
30 seconds of extra warming. This will create a slightly
warmer result but without overheating.
Caution: If you leave the bottle in the bottle warmer longer
than the time indicated in the settings table, the milk may
become overheated.
Note: If you overheat breast milk, valuable nutrients and
vitamins may be lost.
ENGLISH 11

7 Always check the temperature before you feed your baby.
Gently shake the bottle or milk storage container and check
the temperature of the milk by sprinkling a few drops on the
inside of your wrist (Fig. 9).
8 Turn the knob back to the ‘o’ position (Fig. 10).
Caution: The water in the bottle warmer might be hot after
nishing warming milk / baby food. Be careful that hot water
can cause serious burns.
If you do not turn the knob back to the ‘o’ position, the
water keeps heating up and will reach a very high
temperature.
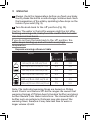
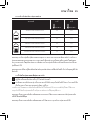
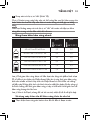
Express warming reference table
ml/oz min min
5°C/40°F 20°C/70°F
60 ml/2 oz-90 ml/3 oz 4.5 3.0
90 ml/3 oz-110 ml/3.7 oz 5.5 3.0
125 ml/4 oz-150 ml/5 oz 3.5 3.0
180 ml/6 oz-210 ml/7 oz 5.5 4.0
240 ml/8 oz-260 ml/9 oz 7.0 4.5
290 ml/10 oz-330 ml/11 oz 7.5 5.0
Note: The indicated warming times are based on Philips
Avent Classic and Natural PP bottle ranges. Be aware that
warming timings of Philips Avent standard bottles and glass
bottles deviate from these indications. The characteristics of
bottles such as material or thickness may also impact the
warming times, therefore it may take less time to warm a
larger volume of milk.
ENGLISH12

Note: The milk may feel cool to you, but for a newborn baby
its temperature is very pleasant.
Using the bottle warmer to warm baby food
1 Follow the same steps as indicated in the previous
paragraph.
2 Make sure to stir the baby food during warming as it does
not circulate automatically. Be careful not to burn your
ngers when holding the container/jar while stirring
(Fig. 11).
After warming test the baby food with a spoon to ensure it is
not too hot. If the baby food is not warm enough, put the
container back into the bottle warmer and warm the baby food
until it has the desired temperature.
Note: Due to the high variety of baby food consistencies, it
is strongly recommended to continuously stir and check
while you are warming the baby food for an optimal result.
Note: Due to the high variety of baby food consistencies, it
is not possible to indicate warming timings for baby food.
Using the keep warm setting to warm milk
1 Put the mains plug in the wall socket (Fig. 3).
2 Place the bottle or container in the bottle warmer (Fig. 4).
3 Fill the bottle warmer with drinking water up to the level
of the milk in the bottle/container. In case of large
amounts of milk, the maximum level of water is
approximately 1 cm below the top of the bottle warmer
(Fig. 5).
4 Select the position of keep warm (Fig. 6).
At this setting, you can warm your milk at a slow pace and
keep it warm at the right end temperature. E.g. to warm a
bottle of 4oz milk starting from room temperature, it will
take 15-20min. The warming time may be longer or shorter
depends on the milk volumes and starting temperature.
ENGLISH 13

Note: Philips Avent recommends to feed your baby as
soon as possible after the milk is warmed. We advise not to
reheat the milk after it has cooled down again.
Note: Always check the temperature before you feed your
baby (Fig. 9).
5 Turn the knob back to the ‘o’ position when the bottle/
container is removed from the bottle warmer (Fig. 10).
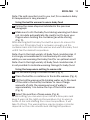
Using the bottle warmer with defrost setting
1 Put the mains plug in the wall socket (Fig. 3).
2 Place the bottle or container in the bottle warmer (Fig. 4).
3 Fill the bottle warmer with drinking water up to the level
of the milk/baby food in the bottle/container. In case of
large amounts of milk/baby food, the maximum level of
water is approximately 1 cm below the top of the bottle
warmer (Fig. 5).
4 Select the position of defrost (Fig. 6).
At this setting, your frozen milk/baby food can be defrosted
till liquid state.
For frozen milk, check the warming reference table for the
expected defrost timings, as indication one small and one
larger milk volume are included in the table. After your milk is
defrosted, choose express warming setting or keep warming
setting to warm your milk. Please refer to the previous
chapters for usage instructions. Consider the start
temperature of your milk around fridge temperature for the
warming timings as rough guideline.
ml/oz hours
60 ml/2 oz-90 ml/3 oz 1-1.5
180 ml/6 oz-210 ml/7 oz 1.5-2.5
ENGLISH14

15
5 You may also defrost baby food in Philips Avent food
container by this setting. After your baby food is
defrosted, choose food warming setting to warm it.
Please refer to the previous chapter for usage instruction.
Note: Due to the high variety of baby food consistencies, it
is strongly recommended to continuously stir and check
while you are defrosting the baby food for an optimal result.
Note: Due to the high variety of baby food consistencies, it
is not possible to indicate warming timings for baby food.
Cleaning and descaling
Cleaning
1 After each use, unplug the bottle warmer and let it cool
down (Fig. 12).
2 Remove the water from the bottle warmer for hygienic
reasons (Fig. 13).
3 Wipe the outside and inside of the bottle warmer with a
moist cloth (Fig. 14).
Do not use abrasive, anti-bacterial cleaning agents,
chemical solvents or sharp tools to clean the bottle warmer.
Note: If you used the bottle warmer to warm containers with
baby food, make sure that no spilled baby food remains on
the bottom of the bottle warmer.
ENGLISH 15

ENGLISH16
Descaling
It is recommended to descale the bottle warmer every four
weeks to ensure it continues to work eciently.
1 Mix 50ml/1.7oz of white vinegar with 100ml/3.4oz of cold
water to descale the bottle warmer. Switch on the bottle
warmer, select the milk warming setting for contents
under 180ml/6oz and let the appliance operate for 10
minutes. Leave the solution in the bottle warmer until all
scale has dissolved (Fig. 15).
Note: You can also use citric acid based descalers.
Note: Do not use other types of descalers.
2 Unplug the bottle warmer before you empty it (Fig. 12).
3 Empty the bottle warmer and rinse its inside thoroughly.
If you still see traces of scale after rinsing, repeat the
descaling procedure (Fig. 13).
Recycling
- This symbol means that this product shall not be disposed
of with normal household waste (2012/19/EU). (Fig. 16)
- Follow your country’s rules for the separate collection of
electrical and electronic products. Correct disposal helps
prevent negative consequences for the environment and
human health.
Guarantee and support
If you need information or support,
please visit www.philips.com/support or read the separate
worldwide guarantee leaet.

DEUTSCH 17
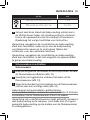
Allgemeine Beschreibung (Abb. 1)
1. Flaschenwärmer
2. Anzeige
3. Drehregler
4. Aus-Stufe
5. Auftau-Stufe
6. Warmhaltestufe
7. Stufe zur schnellen Erwärmung von Milchmengen von bis
zu 180 ml
8. Stufe zur Erwärmung von Speisen
9. Stufe zur schnellen Erwärmung von Milchmengen
einschließlich und über 180 ml
Wichtig
Um das Kundendienstangebot von Philips
vollständig nutzen zu können, sollten Sie Ihr
Gerät unter www.philips.com/welcome
registrieren.
Lesen Sie diese Bedienungsanleitung vor
dem Gebrauch des Flaschenwärmers
aufmerksam durch, und bewahren Sie sie für
eine spätere Verwendung auf.
Gefahr
- Tauchen Sie das Kabel, den Stecker oder
das Gerät nicht in Wasser oder andere
Flüssigkeiten.
Warnung
- Verwenden Sie das Gerät nur im Haus.

18
- Lassen Sie das Netzkabel nicht über den
Rand des Tisches oder der Arbeitsäche
hängen. Das Kabel lässt sich im Sockel
des Flaschenwärmers verstauen.
- Achten Sie darauf, dass das Netzkabel
nicht in der Nähe heißer Flächen verläuft.
- Schließen Sie das Gerät nur an eine
geerdete Steckdose an. Achten Sie stets
darauf, dass der Stecker richtig in der
Steckdose sitzt.
- Prüfen Sie vor Inbetriebnahme, ob die
Spannungsangabe auf der Unterseite des
Geräts mit der örtlichen Netzspannung
übereinstimmt.
- Wenn Sie ein Verlängerungskabel
verwenden, muss dieses geerdet und auf
mindestens 13 A ausgelegt sein.
- Verwenden Sie das Gerät nicht, wenn der
Stecker, das Netzkabel oder das Gerät
selbst beschädigt ist. Wenn das Netzkabel
beschädigt ist, darf es nur von einem
Philips Service-Center, einer von Philips
autorisierten Werkstatt oder einer ähnlich
qualizierten Person ausgetauscht
werden, um Gefährdungen zu vermeiden.
- Stellen Sie das Gerät nicht auf den heißen
Gas- oder Elektroherd oder in den
beheizten Ofen.
DEUTSCH

- Dieses Gerät kann von Personen mit
verringerten physischen, sensorischen
oder psychischen Fähigkeiten oder
Mangel an Erfahrung und Kenntnis
verwendet werden, wenn sie bei der
Verwendung beaufsichtigt wurden oder
Anweisung zum sicheren Gebrauch des
Geräts erhalten und die Gefahren
verstanden haben.
- Die Reinigung und Wartung darf nicht von
Kindern durchgeführt werden.
- Dieses Gerät sollte nicht von Kindern
verwendet werden. Halten Sie das Gerät
und das Netzkabel außerhalb der
Reichweite von Kindern.
- Kinder dürfen nicht mit dem Gerät
spielen.
- Achten Sie darauf, dass kein Wasser auf
den Netzstecker geschüttet wird.
- Verwenden Sie das Gerät nur wie in der
Bedienungsanleitung beschrieben, um
mögliche Verletzungen durch falsche
Bedienung zu vermeiden.
- Wärmen Sie das Gerät nicht vor.
- Stellen Sie immer eine vollständig
zusammengesetzte Flasche mit Kappe in
den Flaschenwärmer, bevor Sie Wasser
hinzufügen.
DEUTSCH 19

- Vergewissern Sie sich, dass Sie vor dem
Einschalten des Flaschenwärmers Wasser
hinzufügen.
- Heißes Wasser kann Verbrühungen
verursachen. Gehen Sie vorsichtig mit
dem Flaschenwärmer um, wenn er heißes
Wasser enthält.
- Die Oberächen des Geräts können
während des Gebrauchs heiß werden und
verfügen nach dem Gebrauch über
Restwärme.
- Bewegen Sie das Gerät nicht, wenn es
heißes Wasser enthält.
- Wenn die Babykost bzw. Milch die
erforderliche Temperatur erreicht hat,
nehmen Sie die Flasche bzw. den
Behälter aus dem Flaschenwärmer
heraus. Wenn Babykost oder Milch
weiterhin im Flaschenwärmer bleibt,
erhöht sich die Temperatur der Babykost
bzw. Milch.
- Bevor Sie Ihr Baby füttern, sollten Sie die
Temperatur der Nahrung überprüfen.
DEUTSCH20

Achtung
- Dieses Gerät ist für die Verwendung im
Haushalt und in Einrichtungen wie
Bauernhöfen, Frühstückspensionen,
Mitarbeiterküchen in Geschäften, Büros
und anderen Arbeitsumgebungen sowie
für Kunden in Hotels, Motels und anderen
Einrichtungen vorgesehen.
- Stecken Sie das Gerät aus, wenn es nicht
in Gebrauch ist.
- Die Oberäche des Heizelements kann
nach der Verwendung Abwärme abgeben.
- Lassen Sie das Gerät abkühlen, bevor Sie
es reinigen.
- Befolgen Sie die Anweisungen zum
Entkalken, um irreparable Schäden zu
vermeiden.
- Versuchen Sie nicht, das Gerät selbst zu
önen oder zu reparieren. Wenden Sie
sich an ein Philips Service-Center in Ihrem
Land (siehe www.philips.com/support).
- Die Speisen sollten nicht zu lange erhitzt
werden.
Elektromagnetische Felder
Dieses Philips Gerät erfüllt sämtliche Normen und
Regelungen bezüglich der Exposition in elektromagnetischen
Feldern.
DEUTSCH 21

Den Flaschenwärmer verwenden
Mit diesem Flaschenwärmer können Sie alle Philips Avent
Flaschen und Milch-/Babynahrungsbehälter sowie andere
Babynahrungsgläschen sicher erwärmen.
Hinweis: Philips Avent Milchaufbewahrungsbeutel sowie
Philips Avent 60 ml Flaschen können in diesem
Fläschchenwärmer nicht verwendet werden.
Erklärung der Einstellungen
- Aus-Stufe: Der Fläschchenwärmer wird ausgeschaltet und
das Licht erlischt. Auf jeder anderen Stufe wird das Gerät
eingeschaltet und das Licht leuchtet (Abb. 2).
-
Stufe zur schnellen Erwärmung von Milchmengen von bis
zu 180 ml: Wählen Sie diese Stufe aus, wenn Sie eine
Flasche Milch mit bis zu 180 ml Inhalt schnell erwärmen
möchten.
Die Flasche muss nach der Erwärmung auf die richtige
Temperatur sofort herausgenommen werden, sonst wird
die Milch überhitzt.
- Stufe zur Erwärmung von Speisen: Wählen Sie diese Stufe
aus, wenn Sie einen Behälter/ein Gläschen mit
Babynahrung erwärmen möchten.
- Stufe zur schnellen Erwärmung von Milchmengen
einschließlich und über 180 ml:
Wählen Sie diese Stufe aus, wenn Sie eine Flasche Milch
mit einem Inhalt von 180 ml und mehr schnell erwärmen
möchten.
Die Flasche muss nach der Erwärmung auf die richtige
Temperatur sofort herausgenommen werden, sonst wird
die Milch überhitzt.
- Warmhaltestufe: Die Milch wird langsamer erwärmt und
auf der richtigen Temperatur gehalten.
- Auftau-Stufe: Auftauen einer Flasche/eines Behälters mit
Milch/Babynahrung, bis diese üssig ist. Es ndet keine
Erwärmung statt.
DEUTSCH22
Seite wird geladen ...
Seite wird geladen ...
Seite wird geladen ...
Seite wird geladen ...
Seite wird geladen ...
Seite wird geladen ...
Seite wird geladen ...
Seite wird geladen ...
Seite wird geladen ...
Seite wird geladen ...
Seite wird geladen ...
Seite wird geladen ...
Seite wird geladen ...
Seite wird geladen ...
Seite wird geladen ...
Seite wird geladen ...
Seite wird geladen ...
Seite wird geladen ...
Seite wird geladen ...
Seite wird geladen ...
Seite wird geladen ...
Seite wird geladen ...
Seite wird geladen ...
Seite wird geladen ...
Seite wird geladen ...
Seite wird geladen ...
Seite wird geladen ...
Seite wird geladen ...
Seite wird geladen ...
Seite wird geladen ...
Seite wird geladen ...
Seite wird geladen ...
Seite wird geladen ...
Seite wird geladen ...
Seite wird geladen ...
Seite wird geladen ...
Seite wird geladen ...
Seite wird geladen ...
Seite wird geladen ...
Seite wird geladen ...
Seite wird geladen ...
Seite wird geladen ...
Seite wird geladen ...
Seite wird geladen ...
Seite wird geladen ...
Seite wird geladen ...
Seite wird geladen ...
Seite wird geladen ...
Seite wird geladen ...
Seite wird geladen ...
Seite wird geladen ...
Seite wird geladen ...
Seite wird geladen ...
Seite wird geladen ...
Seite wird geladen ...
Seite wird geladen ...
Seite wird geladen ...
Seite wird geladen ...
Seite wird geladen ...
Seite wird geladen ...
Seite wird geladen ...
Seite wird geladen ...
Seite wird geladen ...
Seite wird geladen ...
Seite wird geladen ...
Seite wird geladen ...
Seite wird geladen ...
Seite wird geladen ...
Seite wird geladen ...
Seite wird geladen ...
Seite wird geladen ...
Seite wird geladen ...
Seite wird geladen ...
Seite wird geladen ...
-
 1
1
-
 2
2
-
 3
3
-
 4
4
-
 5
5
-
 6
6
-
 7
7
-
 8
8
-
 9
9
-
 10
10
-
 11
11
-
 12
12
-
 13
13
-
 14
14
-
 15
15
-
 16
16
-
 17
17
-
 18
18
-
 19
19
-
 20
20
-
 21
21
-
 22
22
-
 23
23
-
 24
24
-
 25
25
-
 26
26
-
 27
27
-
 28
28
-
 29
29
-
 30
30
-
 31
31
-
 32
32
-
 33
33
-
 34
34
-
 35
35
-
 36
36
-
 37
37
-
 38
38
-
 39
39
-
 40
40
-
 41
41
-
 42
42
-
 43
43
-
 44
44
-
 45
45
-
 46
46
-
 47
47
-
 48
48
-
 49
49
-
 50
50
-
 51
51
-
 52
52
-
 53
53
-
 54
54
-
 55
55
-
 56
56
-
 57
57
-
 58
58
-
 59
59
-
 60
60
-
 61
61
-
 62
62
-
 63
63
-
 64
64
-
 65
65
-
 66
66
-
 67
67
-
 68
68
-
 69
69
-
 70
70
-
 71
71
-
 72
72
-
 73
73
-
 74
74
-
 75
75
-
 76
76
-
 77
77
-
 78
78
-
 79
79
-
 80
80
-
 81
81
-
 82
82
-
 83
83
-
 84
84
-
 85
85
-
 86
86
-
 87
87
-
 88
88
-
 89
89
-
 90
90
-
 91
91
-
 92
92
-
 93
93
-
 94
94


Avent SCF355 Benutzerhandbuch
- Kategorie
- Flaschenwärmer
- Typ
- Benutzerhandbuch
in anderen Sprachen
- English: Avent SCF355 User manual
- français: Avent SCF355 Manuel utilisateur
- italiano: Avent SCF355 Manuale utente
- Nederlands: Avent SCF355 Handleiding
Verwandte Artikel
Andere Dokumente
-
Philips SCF355/02 Benutzerhandbuch
-
Philips AVENT SCF358/00 Bedienungsanleitung
-
Alecto BW600 Benutzerhandbuch
-
 Philips AVENT SCF356 Benutzerhandbuch
-
Alecto BW-70 Benutzerhandbuch
-
Alecto BW-512 Benutzerhandbuch
-
Alecto BW-700 Bedienungsanleitung
-
Olympia BS 22 Bedienungsanleitung
-
NUK NUK Thermo Express baby bottle warmer_0711836 Benutzerhandbuch
-
 Miniland warmyplus digy Benutzerhandbuch

