
HK312000 EN User manual 2
DE Benutzerinformation 13

CONTENTS
1. SAFETY INFORMATION . . . . . . . . . . . . . . . . . . . . . . . . . . . . . . . . . . . . . . . . . . . . . . . . . . . . . . 3
2. SAFETY INSTRUCTIONS . . . . . . . . . . . . . . . . . . . . . . . . . . . . . . . . . . . . . . . . . . . . . . . . . . . . . . 4
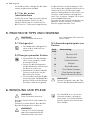
3. PRODUCT DESCRIPTION . . . . . . . . . . . . . . . . . . . . . . . . . . . . . . . . . . . . . . . . . . . . . . . . . . . . . 6
4. DAILY USE . . . . . . . . . . . . . . . . . . . . . . . . . . . . . . . . . . . . . . . . . . . . . . . . . . . . . . . . . . . . . . . . . 6
5. HELPFUL HINTS AND TIPS . . . . . . . . . . . . . . . . . . . . . . . . . . . . . . . . . . . . . . . . . . . . . . . . . . . . 6
6. CARE AND CLEANING . . . . . . . . . . . . . . . . . . . . . . . . . . . . . . . . . . . . . . . . . . . . . . . . . . . . . . . 7
7. TROUBLESHOOTING . . . . . . . . . . . . . . . . . . . . . . . . . . . . . . . . . . . . . . . . . . . . . . . . . . . . . . . . 8
8. INSTALLATION . . . . . . . . . . . . . . . . . . . . . . . . . . . . . . . . . . . . . . . . . . . . . . . . . . . . . . . . . . . . . 9
9. TECHNICAL INFORMATION . . . . . . . . . . . . . . . . . . . . . . . . . . . . . . . . . . . . . . . . . . . . . . . . . 11
FOR PERFECT RESULTS
Thank you for choosing this AEG product. We have created it to give you impeccable
performance for many years, with innovative technologies that help make life simpler –
features you might not find on ordinary appliances. Please spend a few minutes reading to get
the very best from it.
Visit our website for:
Get usage advice, brochures, trouble shooter, service information:
www.aeg.com
Register your product for better service:
www.aeg.com/productregistration
Buy Accessories, Consumables and Original spare parts for your appliance:
www.aeg.com/shop
CUSTOMER CARE AND SERVICE
We recommend the use of original spare parts.
When contacting Service, ensure that you have the following data available.
The information can be found on the rating plate. Model, PNC, Serial Number.
Warning / Caution-Safety information
General information and tips
Environmental information
Subject to change without notice.
2
www.aeg.com

1. SAFETY INFORMATION
Before the installation and use of the appliance, careful-
ly read the supplied instructions. The manufacturer is
not responsible if an incorrect installation and use cau-
ses injuries and damages. Always keep the instructions
with the appliance for future reference.
1.1 Children and vulnerable people safety
WARNING!
Risk of suffocation, injury or permanent disability.
• This appliance can be used by children aged from 8
years and above and persons with reduced physical,
sensory or mental capabilities or lack of experience
and knowledge if they are supervised by an adult or a
person who is responsible for their safety.
• Do not let children play with the appliance.
• Keep all packaging away from children.
• Keep children and pets away from the appliance
when it operates or when it cools down. Accessible
parts are hot.
• If the appliance has a child safety device, we recom-
mend that you activate it.
• Cleaning and user maintenance shall not be made by
children without supervision.
1.2 General Safety
• The appliance and its accessible parts become hot
during use. Do not touch the heating elements.
• Do not operate the appliance by means of an exter-
nal timer or separate remote-control system.
• Unattended cooking on a hob with fat or oil can be
dangerous and may result in fire.
ENGLISH 3

• Never try to extinguish a fire with water, but switch off
the appliance and then cover flame e.g. with a lid or a
fire blanket.
• Do not store items on the cooking surfaces.
• Do not use a steam cleaner to clean the appliance.
• Metallic objects such as knives, forks, spoons and lids
should not be placed on the hob surface since they
can get hot.
2.
SAFETY INSTRUCTIONS
2.1 Installation
WARNING!
Only a qualified person must in-
stall this appliance.
• Remove all the packaging.
• Do not install or use a damaged appli-
ance.
• Obey the installation instruction sup-
plied with the appliance.
• Keep the minimum distance from the
other appliances and units.
• Always be careful when you move the
appliance because it is heavy. Always
wear safety gloves.
• Seal the cut surfaces with a sealant to
prevent moisture to cause swelling.
• Protect the bottom of the appliance
from steam and moisture.
• Do not install the appliance adjacent
to a door or under a window. This pre-
vents hot cookware to fall from the ap-
pliance when the door or the window
is opened.
• If the appliance is installed above
drawers make sure that the space, be-
tween the bottom of the appliance
and the upper drawer, is sufficient for
air circulation.
• The bottom of the appliance can get
hot. We recommend to install a non-
combustile separation panel under the
appliance to prevent access to the
bottom.
Electrical connection
WARNING!
Risk of fire and electrical shock.
• All electrical connections must be
made by a qualified electrician.
• The appliance must be earthed.
• Before carrying out any operation
make sure that the appliance is dis-
connected from the power supply.
• Use the correct electricity mains cable.
• Do not let the electricity mains cable
tangle.
• Make sure the mains cable or plug (if
applicable) does not touch the hot ap-
pliance or hot cookware, when you
connect the appliance to the near
sockets
• Make sure the appliance is installed
correctly. Loose and incorrect electrici-
ty mains cable or plug (if applicable)
can make the terminal become too
hot.
• Make sure that a shock protection is
installed.
• Use the strain relief clamp on cable.
• Make sure not to cause damage to the
mains plug (if applicable) or to the
mains cable. Contact the Service or an
electrician to change a damaged
mains cable.
• The electrical installation must have an
isolation device which lets you discon-
nect the appliance from the mains at
all poles. The isolation device must
4
www.aeg.com

have a contact opening width of mini-
mum 3 mm.
• Use only correct isolation devices: line
protecting cut-outs, fuses (screw type
fuses removed from the holder), earth
leakage trips and contactors.
2.2 Use
WARNING!
Risk of injury, burns or electric
shock.
• Use this appliance in a household en-
vironment.
• Do not change the specification of this
appliance.
• Do not let the appliance stay unatten-
ded during operation.
• Do not operate the appliance with wet
hands or when it has contact with wa-
ter.
• Do not put cutlery or saucepan lids on
the cooking zones. They become hot.
• Set the cooking zone to “off” after
use.
• Do not use the appliance as a work or
as a storage surface.
WARNING!
Risk of fire or explosion.
• Fats and oil when heated can release
flammable vapours. Keep flames or
heated objects away from fats and oils
when you cook with them.
• The vapours that very hot oil releases
can cause spontaneous combustion.
• Used oil, that can contain food rem-
nants, can cause fire at a lower tem-
perature than oil used for the first
time.
• Do not put flammable products or
items that are wet with flammable
products in, near or on the appliance.
WARNING!
Risk of damage to the appliance.
• Do not keep hot cookware on the con-
trol panel.
• Do not let cookware to boil dry.
• Do not activate the cooking zones
with empty cookware or without cook-
ware.
• Do not put aluminium foil on the ap-
pliance.
• Do not let acid liquids, for example
vinegar, lemon juice or limescale re-
mover touch the hob. This can cause
matt patches.
2.3 Care and Cleaning
WARNING!
Risk of damage to the appliance.
• Clean regularly the appliance to pre-
vent the deterioration of the surface
material.
• Do not use water spray and steam to
clean the appliance.
• Clean the appliance with a moist soft
cloth. Only use neutral detergents. Do
not use abrasive products, abrasive
cleaning pads, solvents or metal ob-
jects.
2.4 Disposal
WARNING!
Risk of injury or suffocation.
• Contact your municipal authority for
information on how to discard the ap-
pliance correctly.
• Disconnect the appliance from the
mains supply.
• Cut off the mains cable and discard it.
ENGLISH 5

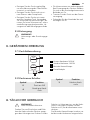
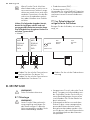
3. PRODUCT DESCRIPTION
3.1 Cooking surface layout
1
2
3
4
180
mm
145
mm
1
Rear cooking zone 1800 W
2
Front cooking zone 1200 W
3
Power indicator
4
Control knobs
3.2 Electric cooking zones
control knobs
Symbol Function
0 off position
Symbol Function
minimum heat
3 maximum heat
4. DAILY USE
WARNING!
Refer to the Safety chapters.
To switch on and increase the heat set-
ting turn the knob counterclockwise. To
decrease the heat setting turn the knob
clockwise. To switch off turn the knob to
the 0.
Power indicator is activated when either
of the zones are turned on, and will stay
on until the cooking zones are switched
off.
4.1 Before first use
Put on all cooking zones a pan filled with
some water. Set the maximum position
and operate the appliance for approxi-
mately 10 minutes until water inside the
pans boils. After that, operate the appli-
ance at minimum position for 20 mi-
nutes. During this period, an odour and
smoke can occur. This is normal. Make
sure that the airflow is sufficient.
After this operation, clean the appliance
with a soft cloth soaked in warm water.
5. HELPFUL HINTS AND TIPS
WARNING!
Refer to the Safety chapters.
5.1 Cookware
• The bottom of the cookware
must be as thick and flat as
possible.
6
www.aeg.com

5.2 Energy saving
• If possible, always put the lids
on the cookware.
• Put cookware on a solid hot-
plate before you start it.
• Stop the solid hotplate before
the end of the cooking time to
use residual heat.
• For satisfactory results, the
bottom of pans must have the
same dimensions (or slightly
larger) as solid hotplates. Do
not use smaller pans.
5.3 Examples of cooking
applications
Heat
set-
ting:
Use to:
0 OFF Position
Heat
set-
ting:
Use to:
Keeping warm
1 Gentle simmering
Simmering
2 Frying / browning
Bringing to the boil
3 Bringing to the boil / quick
frying / deep-frying
WARNING!
Make sure that pots do not cover
the control zone.
6. CARE AND CLEANING
WARNING!
Refer to the Safety chapters.
Clean the appliance after each use.
Always use cookware with clean bottom.
WARNING!
Before any maintenance or
cleaning can be carried out, you
must disconnect the hob from
the electricity supply.
The hob is best cleaned while it
is still warm, as spillage can be
removed more easily than if it is
left to cool.
WARNING!
Sharp objects and abrasive
cleaning agents will damage the
appliance.
For your safety, do not clean the
appliance with steam blasters or
high-pressure cleaners.
Scratches or dark stains have no
effect on how the appliance op-
erates.
Removing the dirt:
1.
Use the fine scouring powder or a
scouring pad to remove the dirt.
2.
Clean the appliance with a damp
cloth and some detergent.
3.
Heat the hotplate to a low tempera-
ture and leave to dry.
4.
To maintain the hotplates, wipe the
plates with a drop of olive oil on a
kitchen towel to prevent rust.
For stainless steel edges of the
hob use cleaner for stainless
steel.
The stainless steel edge of the
plate can be slightly discoloured
as a result of the thermal load.
The stainless steel can become tarnished
if it is too much heated. Refer to this you
must not cook with potstones, earthen-
ware pans or cast iron plates.
ENGLISH 7

7. TROUBLESHOOTING
Problem Possible cause and remedy
The appliance does not
operate.
• Examine the fuse in the electrical system of the
house in the fuse box. If the fuses blow time after
time, speak to an authorised electrician.
The plate does not heat
up.
• Make sure that you plug in the appliance and
switch the electrical supply.
• Make sure that you turn correct control knob.
• Examine the fuse in the electrical system of the
house in the fuse box. If the fuses blow time after
time, speak to an authorised electrician.
Results of plate are not
satisfactory.
• Make sure that plate is clean and dry.
• Make sure that the cooking pan is the correct size
for the plate.
• Make sure that cooking pan has a flat bottom.
• Make sure that the setting is correct for type of
cooking.
If there is a fault, first try to find a solu-
tion to the problem yourself. If you can-
not find a solution to the problem your-
self, speak your dealer or the local Serv-
ice Force Centre.
If you operated the appliance in-
correctly, or the installation was
not carried out by a registered
engineer, the visit from the cus-
tomer service technician or deal-
er may not take place free of
charge, even during the warranty
period.
These data are necessary to help you
quickly and correctly. These data are
available on the supplied rating plate.
• Model description .................
• Product number (PNC) .................
• Serial Number (S.N.) .................
Use the original spare parts only. They
are available at Service Force Centre and
approved spare parts shops.
7.1 Labels supplied with the
accessories bag
Stick the adhesive labels as indicated
below:
8
www.aeg.com

MOD.
PROD.NO.
SER.NO
DATA
MOD.
PROD.NO.
SER.NO
DATA
MODELMODEL
MOD.
PROD.NO.
SER.NO.
03 IT
MADE IN ITALY
TYPE
230V-50Hz
IP20
0049
1 2 3
1
Stick it on Guarantee Card and send
this part
2
Stick it on Guarantee Card and keep
this part
3
Stick it on instruction booklet
8. INSTALLATION
WARNING!
Refer to the Safety chapters.
8.1 Installation
WARNING!
Read and follow the instructions
carefully. There is a risk of injury
or damage to the appliance.
• Make sure that there is no damage to
the appliance from the transportation.
Do not connect a damaged appliance.
Speak to the supplier if necessary.
• Install built-in appliances only after
you assemble the appliance into cor-
rect built-in units and work surfaces.
Make sure that built-in units and surfa-
ces obey the standards.
• Obey all orders and standards in force
in the country where you use the ap-
pliance (safety standards, recycling
standards, electrical safety standards
etc.)
WARNING!
Risk of injury from electrical cur-
rent.
• The electrical mains terminal is live.
• Make electrical mains terminal free of
voltage.
• If the fixing bracket is near to the ter-
minal block, do not let the connection
cable come in contact with the edge
of the bracket.
8.2 Electrical connection
• Ground the appliance according to
safety precautions.
• Make sure that the rated voltage and
type of power on the rating plate
agree with the voltage and the power
of the local power supply.
• This appliance is supplied with a mains
cable. It has to be supplied with a cor-
rect plug, able to support the load
marked on the rating plate. The plug
has to be fitted in a correct socket.
• Any electrical component must be in-
stalled or replaced by the Service
Force Centre technician or qualified
service personnel.
• Always use a correctly installed shock-
proof socket.
ENGLISH 9

• Make sure that there is an access to
the mains plug after installation.
• Do not pull the mains cable to discon-
nect the appliance. Always pull the
mains plug.
• The appliance must not be connected
with an extension cable, an adapter or
a multiple connection (risk of fire).
Check that the ground connection is
in conformity with the standard and
regulations force.
• The power cable must be placed in
such a way that it does not touch any
hot part.
• Connect the appliance to the mains
with a device that lets to disconnect
the appliance from the mains at all
poles with a contact opening width of
minimum 3 mm, eg. automatic line
protecting cut-out, earth leakage trips
or fuse.
• None of a parts of the connection ca-
ble can not get a temperature 90 °C.
The blue neutral cable must be con-
nected to the terminal block label with
"N". The brown (or black) phase cable
(fitted in the terminal block contact
marked with "L") must always be con-
nected to the live phase.
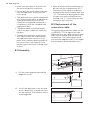
8.3 Replacement of the
connection cable
To replace the connection cable use on-
ly H05V2V2-F T90 or equivalent type.
Make sure that the cable section is appli-
cable to the voltage and the working
temperature. The yellow/green earth
wire must be approximately 2 cm longer
than the brown (or black) phase wire.
8.4 Assembly
40-50 mm
55 mm
30 mm
min. 650 mm
490 mm
270 mm
1.
Put the sealing gasket around the
edge of cut out.
2.
Install the appliance in cut out and
push it down until it touch the kitch-
en top surface. Then remove the re-
maining gasket.
10
www.aeg.com

3.
To remove the appliance from cut
out, lift the edge of the appliance.
Use the screwdriver
To install more 30 cm appliances
side by side in one cut out use
the assembly kit. The kit includes
the side bracket and more gas-
kets and is available at our After
Sales Centres. The installation in-
struction for the kit is supplied
with it.
CAUTION!
Install the appliance only on a
worktop with flat surface.
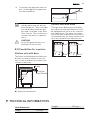
8.5 Possibilities for insertion
Kitchen unit with door
The panel installed below the hob must
be easy to remove and let an easy ac-
cess in case a technical assistance inter-
vention is necessary.
min 20 mm
(max 150 mm)
30 mm
60 mm
B
A
A)
Removable panel
B)
Space for connections
Kitchen unit with oven
The hob recess dimensions must obey
the indication and the kitchen unit must
be equipped with vents to let a continu-
ous supply of air. The electrical connec-
tion of the hob and the oven must be in-
stalled separately for safety reasons and
to let easy remove oven from the unit.
50 cm
2
360 cm
2
180 cm
2
120 cm
2
9. TECHNICAL INFORMATION
Hob dimensions
Width: 290 mm
Length: 510 mm
ENGLISH 11

Hob recess dimensions
Width: 270 mm
Length: 490 mm
Hot plate rating
Rear cooking
zone 180 mm
1.8 kW
Front cooking
zone 145 mm
1.2 kW
Total rating 3.0 kW
Electric supply 230 V ~ 50 Hz
10. ENVIRONMENT CONCERNS
Recycle the materials with the
symbol
. Put the packaging in
applicable containers to recycle it.
Help protect the environment and
human health and to recycle waste
of electrical and electronic
appliances. Do not dispose
appliances marked with the symbol
with the household waste. Return the
product to your local recycling
facility or contact your municipal
office.
12
www.aeg.com

INHALT
1. SICHERHEITSINFORMATIONEN . . . . . . . . . . . . . . . . . . . . . . . . . . . . . . . . . . . . . . . . . . . . . . 14
2. SICHERHEITSHINWEISE . . . . . . . . . . . . . . . . . . . . . . . . . . . . . . . . . . . . . . . . . . . . . . . . . . . . . 15
3. GERÄTEBESCHREIBUNG . . . . . . . . . . . . . . . . . . . . . . . . . . . . . . . . . . . . . . . . . . . . . . . . . . . . 17
4. TÄGLICHER GEBRAUCH . . . . . . . . . . . . . . . . . . . . . . . . . . . . . . . . . . . . . . . . . . . . . . . . . . . . . 17
5. PRAKTISCHE TIPPS UND HINWEISE . . . . . . . . . . . . . . . . . . . . . . . . . . . . . . . . . . . . . . . . . . . 18
6. REINIGUNG UND PFLEGE . . . . . . . . . . . . . . . . . . . . . . . . . . . . . . . . . . . . . . . . . . . . . . . . . . . 18
7. FEHLERSUCHE . . . . . . . . . . . . . . . . . . . . . . . . . . . . . . . . . . . . . . . . . . . . . . . . . . . . . . . . . . . . . 19
8. MONTAGE . . . . . . . . . . . . . . . . . . . . . . . . . . . . . . . . . . . . . . . . . . . . . . . . . . . . . . . . . . . . . . . . 20
9. TECHNISCHE DATEN . . . . . . . . . . . . . . . . . . . . . . . . . . . . . . . . . . . . . . . . . . . . . . . . . . . . . . . 23
FÜR PERFEKTE ERGEBNISSE
Danke, dass Sie sich für dieses AEG Produkt entschieden haben. Wir haben es geschaffen,
damit Sie viele Jahre von seiner ausgezeichneten Leistung und den innovativen Technologien,
die Ihnen das Leben erleichtern, profitieren können. Es ist mit Funktionen ausgestattet, die in
gewöhnlichen Geräten nicht vorhanden sind. Nehmen Sie sich ein paar Minuten Zeit zum
Lesen, um seine Vorzüge kennen zu lernen.
Besuchen Sie uns auf unserer Website, um:
Anwendungshinweise, Prospekte, Fehlerbehebungs- und Service-Informationen zu
erhalten:
www.aeg.com
Ihr erworbenes Produkt zu registrieren, um den besten Service dafür zu
gewährleisten:
www.aeg.com/productregistration
Zubehör, Verbrauchsmaterial und Original-Ersatzteile für Ihr Gerät zu erwerben:
www.aeg.com/shop
KUNDENDIENST UND -BETREUUNG
Bitte verwenden Sie ausschließlich Original-Ersatzteile für Ihre Produkte.
Halten Sie folgende Angaben bereit, wenn Sie sich an den Kundendienst wenden
(diese Informationen finden Sie auf dem Typenschild): Modell, Produktnummer (PNC),
Seriennummer.
Warnungs-/ Sicherheitshinweise.
Allgemeine Hinweise und Ratschläge
Hinweise zum Umweltschutz
Änderungen vorbehalten.
DEUTSCH 13

1. SICHERHEITSINFORMATIONEN
Lesen Sie vor der Montage und Verwendung des Ge-
räts sorgfältig die mitgelieferte Anleitung. Der Herstel-
ler haftet nicht für Verletzungen oder Schäden, die
durch eine fehlerhafte Montage entstehen. Bewahren
Sie die Anleitung zum Nachschlagen auf.
1.1 Sicherheit von Kindern und schutzbedürftigen
Personen
WARNUNG!
Es besteht Erstickungsgefahr, das Risiko von Ver-
letzungen oder permanenten Behinderungen.
• Dieses Gerät kann dann von Kindern ab 8 Jahren, von
Personen mit eingeschränkten körperlichen, sensori-
schen oder geistigen Fähigkeiten sowie von Personen
ohne bisherige Erfahrung im Umgang mit solchen
Geräten bedient werden, wenn sie dabei von einer
Person, die für ihre Sicherheit verantwortlich ist, be-
aufsichtigt werden.
• Kinder dürfen nicht mit dem Gerät spielen.
• Halten Sie das Verpackungsmaterial von Kindern fern.
• Halten Sie Kinder und Haustiere vom Gerät fern,
wenn es in Betrieb oder in der Abkühlphase ist. Be-
rührbare Teile sind heiss.
• Falls Ihr Gerät mit einer Kindersicherung ausgestattet
ist, empfehlen wir, diese einzuschalten.
• Reinigung und Wartung des Geräts darf nicht von
Kindern ohne Aufsicht erfolgen.
1.2 Allgemeine Sicherheit
• Das Gerät und die zugänglichen Geräteteile werden
während des Betriebs heiß. Berühren Sie nicht die
Heizelemente.
• Schalten Sie das Gerät nicht über eine externe Zeit-
schaltuhr oder eine separate Fernsteuerung ein.
14
www.aeg.com

• Kochen mit Fett oder Öl auf einem unbeaufsichtigten
Kochfeld ist gefährlich und kann zu einem Brand füh-
ren.
• Versuchen Sie nicht einen Brand mit Wasser zu lö-
schen, sondern schalten Sie das Gerät aus und bede-
cken Sie die Flamme mit einem Deckel oder einer
Feuerlöschdecke.
• Legen Sie keine Gegenstände auf dem Kochfeld ab.
• Benutzen Sie zum Reinigen des Gerätes keinen
Dampfreiniger.
• Legen Sie keine Metallgegenstände wie Messer, Ga-
beln, Löffel oder Topfdeckel auf die Oberfläche des
Kochfelds, da diese heiß werden können.
2.
SICHERHEITSHINWEISE
2.1 Montage
WARNUNG!
Nur eine qualifizierte Fachkraft
darf den elektrischen Anschluss
des Geräts vornehmen.
• Entfernen Sie das gesamte Verpa-
ckungsmaterial.
• Stellen Sie ein beschädigtes Gerät
nicht auf und benutzen Sie es nicht.
• Halten Sie sich an die mitgelieferte
Montageanleitung.
• Die Mindestabstände zu anderen Ge-
räten und Küchenmöbeln sind einzu-
halten.
• Seien Sie beim Umsetzen des Geräts
vorsichtig, denn es ist schwer. Tragen
Sie stets Sicherheitshandschuhe.
• Dichten Sie die Ausschnittskanten mit
einem Dichtungsmittel ab, um ein Auf-
quellen durch Feuchtigkeit zu verhin-
dern.
• Schützen Sie die Geräteunterseite vor
Dampf und Feuchtigkeit.
• Installieren Sie das Gerät nicht direkt
neben einer Tür oder unter einem
Fenster. So kann heißes Kochgeschirr
nicht herunterfallen, wenn die Tür
oder das Fenster geöffnet wird.
• Wird das Gerät über Schubladen ein-
gebaut, achten Sie darauf, dass zwi-
schen dem Geräteboden und der
oberen Schublade ein ausreichender
Abstand für die Luftzirkulation vorhan-
den ist.
• Der Boden des Geräts kann heiß wer-
den. Wir empfehlen eine feuerfeste
Trennplatte unter dem Gerät anzu-
bringen, damit der Boden nicht zu-
gänglich ist.
Elektrischer Anschluss
WARNUNG!
Brand- und Stromschlaggefahr.
• Die elektrischen Anschlüsse müssen
von einem qualifizierten Elektriker aus-
geführt werden.
• Das Gerät muss geerdet sein.
• Vor der Durchführung jeglicher Arbei-
ten muss das Gerät von der elektri-
schen Stromversorgung getrennt wer-
den.
DEUTSCH 15

• Stellen Sie sicher, dass Sie das richtige
Kabel für den elektrischen Netzan-
schluss verwenden.
• Achten Sie darauf, dass das Netzkabel
nicht lose hängt oder sich verheddert.
• Stellen Sie beim elektrischen An-
schluss des Gerätes sicher, dass das
Netzkabel oder ggf. der Netzstecker
nicht mit dem heißen Gerät oder heiß-
em Kochgeschirr in Berührung kommt.
• Achten Sie darauf, dass das Gerät ord-
nungsgemäß montiert wird. Wenn
freiliegende oder ungeeignete Netz-
kabel oder Netzstecker verwendet
werden, kann der Anschluss überhit-
zen.
• Sorgen Sie dafür, dass ein Berüh-
rungsschutz installiert wird.
• Kabel zugentlasten.
• Achten Sie darauf, Netzstecker und
Netzkabel nicht zu beschädigen. Wen-
den Sie sich zum Austausch des be-
schädigten Netzkabels an den Kun-
dendienst oder einen Elektriker.
• Die elektrische Installation muss eine
Trenneinrichtung aufweisen, mit der
Sie das Gerät allpolig von der Strom-
versorgung trennen können. Die
Trenneinrichtung muss mit einer Kon-
taktöffnungsbreite von mindestens 3
mm ausgeführt sein.
• Verwenden Sie nur geeignete Trenn-
vorrichtungen: Überlastschalter, Siche-
rungen (Schraubsicherungen müssen
aus dem Halter entfernt werden kön-
nen), Fehlerstromschutzschalter und
Schütze.
2.2 Gebrauch
WARNUNG!
Es besteht Verletzungs-, Verbren-
nungs- und Stromschlaggefahr.
• Das Gerät ist für die Verwendung im
Haushalt vorgesehen.
• Nehmen Sie keine technischen Ände-
rungen am Gerät vor.
• Lassen Sie das Gerät bei Betrieb nicht
unbeaufsichtigt.
• Bedienen Sie das Gerät nicht mit
feuchten oder nassen Händen oder
wenn es mit Wasser in Kontakt ge-
kommen ist.
• Legen Sie kein Besteck und keine
Topfdeckel auf die Kochzonen. Sie
werden heiß.
• Schalten Sie die Kochzonen nach je-
dem Gebrauch aus.
• Benutzen Sie das Gerät nicht als Ar-
beits- oder Abstellfläche.
WARNUNG!
Es besteht Explosions- und
Brandgefahr.
• Erhitzte Öle und Fette können brenn-
bare Dämpfe freisetzen. Halten Sie
Flammen oder erhitzte Gegenstände
beim Kochen mit Fetten und Ölen von
diesen fern.
• Die von sehr heißem Öl freigesetzten
Dämpfe können eine Selbstzündung
verursachen.
• Bereits verwendetes Öl kann Lebens-
mittelreste enthalten und einen Brand
bei niedrigeren Temperaturen als fri-
sches Öl verursachen.
• Platzieren Sie keine entflammbaren
Produkte oder Gegenstände, die mit
entflammbaren Produkten benetzt
sind, im Gerät, auf dem Gerät oder in
der Nähe des Geräts.
WARNUNG!
Das Gerät könnte beschädigt
werden.
• Stellen Sie kein heißes Kochgeschirr
auf das Bedienfeld.
• Lassen Sie das Kochgeschirr nicht leer-
kochen.
• Schalten Sie die Kochzonen niemals
ein, wenn sich kein Kochgeschirr da-
rauf befindet, oder wenn das Kochge-
schirr leer ist.
• Legen Sie keine Alufolie auf das Ge-
rät.
• Lassen Sie keine säurehaltigen Flüssig-
keiten wie Essig, Zitronensaft oder kal-
klösende Reinigungsmittel mit dem
Kochfeld in Berührung kommen. Diese
könnten matte Flecken verursachen.
2.3 Reinigung und Pflege
WARNUNG!
Das Gerät könnte beschädigt
werden.
16
www.aeg.com

• Reinigen Sie das Gerät regelmäßig,
um eine Abnutzung des Oberflächen-
materials zu verhindern.
• Reinigen Sie das Gerät nicht mit ei-
nem Wasser- oder Dampfstrahl.
• Reinigen Sie das Geräts mit einem
weichen, feuchten Tuch. Verwenden
Sie ausschließlich Neutralreiniger. Be-
nutzen Sie keine Scheuermittel, scheu-
ernde Reinigungsschwämmchen, Lö-
sungsmittel oder Metallgegenstände.
2.4 Entsorgung
WARNUNG!
Verletzungs- oder Erstickungsge-
fahr.
• Für Informationen zur ordnungsgemä-
ßen Entsorgung des Gerätes wenden
Sie sich an die zuständige kommunale
Behörde vor Ort.
• Trennen Sie das Gerät von der Strom-
versorgung.
• Schneiden Sie das Netzkabel ab und
entsorgen Sie es.
3. GERÄTEBESCHREIBUNG
3.1 Kochfeldanordnung
1
2
3
4
180
mm
145
mm
1
Hintere Kochzone 1800 W
2
Vordere Kochzone 1200 W
3
Betriebs-Kontrolllampe
4
Einstellknöpfe
3.2 Kochzonen-Schalter
Symbol Funktion
0 Position AUS
Niedrigste Koch-
stufe
Symbol Funktion
3 Höchste Koch-
stufe
4. TÄGLICHER GEBRAUCH
WARNUNG!
Siehe Sicherheitshinweise.
Drehen Sie zum Einschalten und Erhö-
hen der Kochstufe den Schalter entge-
gen dem Uhrzeigersinn. Drehen Sie den
Schalter im Uhrzeigersinn, um die Koch-
stufe zu verringern. Drehen Sie den
Schalter auf 0, um die Kochzone auszu-
schalten.
Die Betriebs-Kontrolllampe leuchtet, so-
bald eine der Kochzonen eingeschaltet
DEUTSCH 17

wird und leuchtet solange, bis die Koch-
zonen ausgeschaltet werden.
4.1 Vor der ersten
Inbetriebnahme
Stellen Sie einen Topf mit etwas Wasser
auf jede Kochzone. Stellen Sie die
höchste Kochstufe ein und lassen Sie
das Gerät ca. 10 Minuten eingeschaltet,
bis das Wasser zu kochen beginnt. Stel-
len Sie dann die niedrigste Kochstufe ein
und lassen Sie sie 20 Minuten einge-
schaltet. Während dieser Zeit kann es zu
Geruchs- und Rauchentwicklung kom-
men. Das ist normal. Sorgen Sie für eine
ausreichende Belüftung.
Reinigen Sie das Gerät nach diesem Vor-
gang mit einem weichen, in warmem
Wasser angefeuchteten Tuch.
5. PRAKTISCHE TIPPS UND HINWEISE
WARNUNG!
Siehe Sicherheitshinweise.
5.1 Kochgeschirr
• Der Boden des Kochgeschirrs
sollte so dick und flach wie
möglich sein.
5.2 Energie sparendes Kochen
• Verschließen Sie das Kochge-
schirr, wenn möglich, immer
mit einem Deckel.
• Stellen Sie das Kochgeschirr
auf die Kochzone und schalten
Sie diese erst dann ein.
• Kochzonen vor dem Ende der
Garzeit ausschalten, um die
Restwärme zu nutzen.
• Für zufrieden stellende Ergeb-
nisse sollte der Topfboden die
gleiche Größe wie die Kochzo-
ne haben, oder etwas größer
sein. Verwenden Sie keine klei-
neren Töpfe.
5.3 Anwendungsbeispiele zum
Kochen
Koch-
stufe:
Verwendung:
0 Position AUS
Warmhalten
1 Sanftes Köcheln
Köcheln
2 Braten/Bräunen
Zum Kochen bringen
3 Zum Kochen bringen/
Schnell-Braten/Frittieren
WARNUNG!
Achten Sie darauf, dass die Töp-
fe nicht das Bedienfeld berühren.
6. REINIGUNG UND PFLEGE
WARNUNG!
Siehe Sicherheitshinweise.
Reinigen Sie das Gerät nach jedem Ge-
brauch.
Achten Sie immer darauf, dass der Bo-
den des Kochgeschirrs sauber ist.
WARNUNG!
Trennen Sie vor Reinigungs-
oder Wartungsarbeiten das
Kochfeld immer vom Netz.
Das Kochfeld lässt sich am ein-
fachsten reinigen, solange es
noch warm ist; auf diese Weise
können Speisereste leichter ent-
fernt werden.
18
www.aeg.com

WARNUNG!
Scharfe Gegenstände und scheu-
ernde Reinigungsmittel können
das Gerät beschädigen.
Reinigen Sie das Gerät aus Si-
cherheitsgründen nicht mit ei-
nem Dampfstrahl- oder Hoch-
druckreiniger.
Kratzer oder dunkle Flecken be-
einträchtigen die Funktionsfähig-
keit des Geräts nicht.
Entfernen von Verunreinigungen:
1.
Verwenden Sie feines Scheuerpulver
oder ein Scheuerschwämmchen, um
Verschmutzungen zu entfernen.
2.
Reinigen Sie das Gerät mit einem
feuchten Tuch und etwas Spülmittel.
3.
Anschließend die Kochplatte leicht
aufheizen und trocknen lassen.
4.
Reiben Sie die Kochzonen zur Ver-
meidung von Rost mit einem Tuch
und einem Tropfen Olivenöl ein.
Verwenden Sie für die Edelstahl-
rahmen des Kochfelds ein han-
delsübliches Reinigungsmittel für
Edelstahl.
Der Edelstahlrahmen der Koch-
platte kann sich aufgrund der
Hitzebelastung leicht verfärben.
Edelstahl kann anlaufen, wenn es zu
stark erhitzt wird. Verwenden Sie zum
Kochen keine Topfsteine, Römertöpfe
oder Gusseisenplatten.
7. FEHLERSUCHE
Problem Mögliche Ursache und Abhilfe
Das Gerät funktioniert
überhaupt nicht.
• Sehen Sie im Sicherungskasten der Wohnung
nach, ob die Sicherung für das Gerät ausgelöst
hat. Wenn die Sicherung öfter auslöst, wenden
Sie sich an eine Elektrofachkraft.
Die Kochzone heizt nicht
auf.
• Vergewissern Sie sich, dass das Gerät an die
Stromversorgung angeschlossen ist und diese
eingeschaltet ist.
• Drehen Sie den richtigen Einstellknopf.
• Sehen Sie im Sicherungskasten der Wohnung
nach, ob die Sicherung für das Gerät ausgelöst
hat. Wenn die Sicherung öfter auslöst, wenden
Sie sich an eine Elektrofachkraft.
Die Kochzonenleistung
ist nicht zufriedenstel-
lend.
• Vergewissern Sie sich, dass die Kochzone sauber
und trocken ist.
• Vergewissern Sie sich, dass Sie ein den Abmes-
sungen der Kochzone entsprechendes Kochge-
schirr verwenden.
• Verwenden Sie ausschließlich Kochgeschirr mit
ebenem Boden.
• Stellen Sie sicher, dass Ihre Einstellungen für die
ausgewählte Garart geeignet sind.
Wenn ein Problem vorliegt, versuchen
Sie zunächst, die Ursache des Problems
herauszufinden und das Problem selbst
zu beheben. Wenn Sie das Problem
nicht selbst lösen können, wenden Sie
sich an Ihren Händler oder an den Kun-
dendienst.
DEUTSCH 19

Wenn Sie das Gerät falsch be-
dient haben oder es nicht von ei-
ner autorisierten Fachkraft ange-
schlossen wurde, kann auch wäh-
rend der Garantiezeit für den Be-
such eines Kundendiensttechni-
kers oder Händlers eine Gebühr
anfallen.
Halten Sie folgende Angaben bereit,
damit Ihr Anliegen schnell und ord-
nungsgemäß bearbeitet werden kann.
Die erforderlichen Angaben finden Sie
auf dem Typenschild.
• Modell ............
• Produktnummer (PNC) ............
• Seriennummer (S.N.) ............
Verwenden Sie ausschließlich Originaler-
satzteile. Diese sind beim Kundendienst
und autorisierten Ersatzteilhändlern er-
hältlich.
7.1 Im Zubehörbeutel
mitgelieferte Aufkleber
Bringen Sie die Aufkleber, wie unten ge-
zeigt, an:
MOD.
PROD.NO.
SER.NO
DATA
MOD.
PROD.NO.
SER.NO
DATA
MODELMODEL
MOD.
PROD.NO.
SER.NO.
03 IT
MADE IN ITALY
TYPE
230V-50Hz
IP20
0049
1 2 3
1
Kleben Sie ihn auf die Garantiekarte
und verschicken Sie diesen Teil
2
Kleben Sie ihn auf die Garantiekarte
und behalten Sie diesen Teil
3
Kleben Sie ihn auf die Gebrauchsan-
weisung
8. MONTAGE
WARNUNG!
Siehe Sicherheitshinweise.
8.1 Montage
WARNUNG!
Lesen Sie die Gebrauchsanlei-
tung sorgfältig und folgen Sie
den Anweisungen. Es besteht
Verletzungsgefahr und das Gerät
könnte beschädigt werden.
• Vergewissern Sie sich, dass das Gerät
beim Transport nicht beschädigt wur-
de. Schließen Sie das Gerät nicht an,
wenn Beschädigungen festzustellen
sind. Wenden Sie sich bei Bedarf an
den Lieferanten.
• Einbaugeräte dürfen nur nach dem
Einbau in bzw. unter normgerechte,
passende Einbauschränke und Ar-
beitsplatten betrieben werden. Ach-
ten Sie darauf, dass die Einbauschrän-
ke und Arbeitsplatten den Normen
entsprechen.
20
www.aeg.com
Seite wird geladen ...
Seite wird geladen ...
Seite wird geladen ...
Seite wird geladen ...
-
 1
1
-
 2
2
-
 3
3
-
 4
4
-
 5
5
-
 6
6
-
 7
7
-
 8
8
-
 9
9
-
 10
10
-
 11
11
-
 12
12
-
 13
13
-
 14
14
-
 15
15
-
 16
16
-
 17
17
-
 18
18
-
 19
19
-
 20
20
-
 21
21
-
 22
22
-
 23
23
-
 24
24


