
HAGOR Products GmbH | Oberbecksener Straße 97 | D-32547 Bad Oeynhausen | Telefon: +49(0)57 31-7 55 07-0 | Mail: info@hagor.de
Installationsanleitung
CON-Line® FS Table 32 - 55“ | Art.-Nr.: 2815
DE Installationsanleitung
ES Guía de instalación
GB Installation manual
FR Guide d‘installation
SE Installationsanvisning
TR Yükleme Rehberi
RU инструкция по установке
NL Installatievoorschrift
CN 安装指南
Dieses Dokument ist Eigentum der HAGOR Products GmbH. Weitergabe sowie Vervielfältigung dieses Dokuments, Verwertung und Mitteilung seines Inhalts sind verboten, soweit nicht ausdrücklich gestattet.
Zuwiderhandlung verpichten zu Schadenersatz. Alle Rechte für den Fall der Patent-, Gebrauchsmuster- oder Geschmacksmustereintragung vorbehalten.
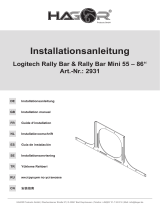
440 mm
1100 mm
1812 mm
1465 mm
1800 mm
450 mm
800 mm
100
150
28
120
165
750 mm
700 mm
min. 100 - max. 400 mm
T / D: 1380 mm

HAGOR Products GmbH | Oberbecksener Straße 97 | D-32547 Bad Oeynhausen | Telefon: +49(0)57 31-7 55 07-0 | Mail: info@hagor.de
DE
GB
Achtung!
Technische Geräte stellen einen beträchtlichen Wert dar. Sie sollten daher bei
der Installation vorsichtig mit den Komponenten umgehen und diese bei Bedarf
schützen.
Auch sollte, falls nötig, der Installtionsbereich abgesichert werden. Herabfallen-
de Teile können zu Verletzungen und Materialschäden führen.
Die im Lieferumfang enthaltenen Materialien sind unter Umständen nicht für die
speziellen Gegebenheiten am Installationsort geeignet. Bitte prüfen Sie dies
vorab und ersetzen Sie diese bei Bedarf durch geeignete Materialien.
Falls Sie Bezüglich der Installation des Produkts unsicher sind oder noch Fra-
gen haben wenden Sie sich an uns oder anderes ausgebildetes Fachpersonal.
Caution!
Technical devices are of considerable value. You should therefore handle the
components carefully during installation and protect them if necessary.
If necessary, the installation area should also be secured. Falling parts can cause
injuries and material damage.
The materials included in the scope of delivery may not be suitable for the spe-
cial conditions at the installation site. Please check this in advance and replace it
with suitable materials if necessary.
If you are unsure about the installation of the product or have any questions,
please contact us or other trained specialists.

HAGOR Products GmbH | Oberbecksener Straße 97 | D-32547 Bad Oeynhausen | Telefon: +49(0)57 31-7 55 07-0 | Mail: info@hagor.de
Lieferumfang | Scope of delivery
E
1x
F
2x
G
2x
J 8x
M8x55
K 2x
Ø 8
M 8x
M8x12
N 10x
L 2x
M8x10
H
2x
I
2x
Q 8x
M8
U 10x
4,0x16
B
1x
C
1x
A
1x
D
1x
M-A 4x
M5x14
M-B 4x
M6x14
M-C 4x
M6x30
M-D 4x
M8x30
M-E 4x
M8x50 M-F 4x M-G 8x M-H 8x
P 8x
Ø 8
S 4x
Ø 6
R 4x
M6x25
T 8x
M8x16

HAGOR Products GmbH | Oberbecksener Straße 97 | D-32547 Bad Oeynhausen | Telefon: +49(0)57 31-7 55 07-0 | Mail: info@hagor.de
T-G 2x
M8
T-A
1x
T-B
1x
T-C
1x
T-D 6x
M6x35
T-E 2x
Ø 8,4 mm
T-F 2x
Ø 8,4 mm

HAGOR Products GmbH | Oberbecksener Straße 97 | D-32547 Bad Oeynhausen | Telefon: +49(0)57 31-7 55 07-0 | Mail: info@hagor.de
1
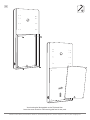
Nehmen Sie die Frontblende ab. Die Frontblende ist durch eine Magnetarretierung xiert.
Take off the front panel. The front panel is xed by a magnet lock.

HAGOR Products GmbH | Oberbecksener Straße 97 | D-32547 Bad Oeynhausen | Telefon: +49(0)57 31-7 55 07-0 | Mail: info@hagor.de
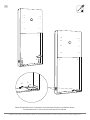
Verschraubung der Montageplatte von der Rückwand lösen.
Loosen the screw connection of the mounting plate from the rear panel.
2
1
2
1
2

HAGOR Products GmbH | Oberbecksener Straße 97 | D-32547 Bad Oeynhausen | Telefon: +49(0)57 31-7 55 07-0 | Mail: info@hagor.de
3
12
12
12
RS
BC
Setzen Sie die Winkel B und C in den Korpus und verschrauben Sie diese in die Seite des Korpus.
Place brackets B and C in the corpus and screw them into the side wall.

HAGOR Products GmbH | Oberbecksener Straße 97 | D-32547 Bad Oeynhausen | Telefon: +49(0)57 31-7 55 07-0 | Mail: info@hagor.de
4
A
D
Q
P
J
Legen Sie den Korpus auf den Rückseite und xieren Sie die Bodenplatte mittels Schrauben, Scheiben und Muttern.
Stellen Sie das Stele danach wieder auf.
Lay the corpus on its back and x the base plate with screws, washers and nuts. Then set the totem up again.

HAGOR Products GmbH | Oberbecksener Straße 97 | D-32547 Bad Oeynhausen | Telefon: +49(0)57 31-7 55 07-0 | Mail: info@hagor.de
5
6
NE
E
N
I
K
L
G
M
Ziehen Sie die Schrauben noch nicht ganz fest, damit ein nachjustieren der Position möglich ist.
Do not tighten the screws completely so that the position can be readjusted.
Die Nutensteine in die Schiene schieben, Kappen aufsetzen und beides festschrauben. Auf der anderen Seite ebenso.
Slide the slot nuts into the rail, put on the caps and screw both tight. On the other side as well.

HAGOR Products GmbH | Oberbecksener Straße 97 | D-32547 Bad Oeynhausen | Telefon: +49(0)57 31-7 55 07-0 | Mail: info@hagor.de
7
T
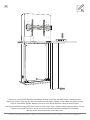
Die gewünschte Montagehöhe wird nach dem verwendeten Bildschirm ausgewählt.
Richten Sie die Schiene mittig aus und ziehen Sie die rückseitigen Schrauben jetzt richtig fest.
The desired mounting height is selected according to the used screen.
Align the rail centred and tighten the screws on the back properly now.

HAGOR Products GmbH | Oberbecksener Straße 97 | D-32547 Bad Oeynhausen | Telefon: +49(0)57 31-7 55 07-0 | Mail: info@hagor.de
Zur Montage in der obersten Montageposition, können die verdeckten Verschraubungspunkte, mit zum Beispiel einem 8er
Holzbohrer, freigelegt werden. Nutzen Sie hierfür die Befestigungsadapter als Schablone gemäß Abbildung.
For mounting in the top mounting position, the concealed screwing points can be uncovered, for example with a size 8
wood drill bit. To do this, use the fastening adapter as a template as shown in the illustration.

HAGOR Products GmbH | Oberbecksener Straße 97 | D-32547 Bad Oeynhausen | Telefon: +49(0)57 31-7 55 07-0 | Mail: info@hagor.de
!
F
F
8a
8b

HAGOR Products GmbH | Oberbecksener Straße 97 | D-32547 Bad Oeynhausen | Telefon: +49(0)57 31-7 55 07-0 | Mail: info@hagor.de
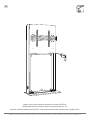
9
!
!
Hängen Sie den Bildschirm in die Halterung ein und ziehen Sie nach dem Ausrichten, die Sicherheitsschrauben fest.
Attach the screen to the bracket and after aligning, tighten the security screws.

HAGOR Products GmbH | Oberbecksener Straße 97 | D-32547 Bad Oeynhausen | Telefon: +49(0)57 31-7 55 07-0 | Mail: info@hagor.de
10
2
1
2
1
Positionieren Sie das benötigte AV-Zubehör frei, nach Ihren Wünschen, auf der Montageplatte.
Position the required AV accessories freely, according to your wishes, on the mounting plate.
U

HAGOR Products GmbH | Oberbecksener Straße 97 | D-32547 Bad Oeynhausen | Telefon: +49(0)57 31-7 55 07-0 | Mail: info@hagor.de
11
2
1
Verschrauben Sie die Montageplatte wieder an der Rückwand.
Screw the mounting plate back to the rear wall. Finally, the front panel is attached to the front of the corpus again.
12
H

HAGOR Products GmbH | Oberbecksener Straße 97 | D-32547 Bad Oeynhausen | Telefon: +49(0)57 31-7 55 07-0 | Mail: info@hagor.de
13
14
Verschrauben Sie die Verbindungsplatte mit der Mono-Tischstütze.
Screw the connecting plate to the mono table solution.
Legen Sie die Tischplatte auf die Oberäche (Achtung: Legen Sie etwas zum Schutz der Platte auf den Boden)
und montieren die Verbindungsplatte samt Tischstütze auf dieser.
Place the table top on the surface (Attention: Put something on the oor to protect the table top).
and mount the connecting plate together with the table leg on it.
T-A
T-D
T-D
T-C
T-B

HAGOR Products GmbH | Oberbecksener Straße 97 | D-32547 Bad Oeynhausen | Telefon: +49(0)57 31-7 55 07-0 | Mail: info@hagor.de
15
Nehmen Sie nun die HAGOR Bohrhilfen und befestigen Sie diese in den Ecken des oberen Korpus. (Abstand Kante zur
Markierung: 105 mm). Stellen Sie den Tisch vorsichtig auf und richten diesen in Waage vor Ihrem Möbel aus (Nutzen Sie, falls
nötig, die vormontierten Stellfüße). Markieren Sie nun mit einem Stift die Bohrlöcher entlang der Stockschrauben.
Now take the HAGOR drilling help and x them in the corners of the upper corpus. (Distance between edge and marking: 105 mm)
Carefully place the table and level it in front of your furniture (use the pre-assembled adjustable feet if necessary).
Now mark the drill holes along the stock screws with a pencil.

HAGOR Products GmbH | Oberbecksener Straße 97 | D-32547 Bad Oeynhausen | Telefon: +49(0)57 31-7 55 07-0 | Mail: info@hagor.de
16
Nehmen Sie nun einen Holzbohrer und bohren die Löcher auf 8-8,5 auf.
(Hinweis: Bitte bohren Sie vorab mit einem kleineren Bohrer das Loch vor)
Now take a wood drill and drill the holes to 8-8.5. (Note: Please pre-drill the hole in advance with a smaller drill bit).

HAGOR Products GmbH | Oberbecksener Straße 97 | D-32547 Bad Oeynhausen | Telefon: +49(0)57 31-7 55 07-0 | Mail: info@hagor.de
17
Schieben Sie nun die Stockschrauben durch die Löcher und sichern diese von innen
mit den Unterlegscheiben, Zahnscheiben sowie den Muttern.
Now push the stock bolts through the holes and secure them from the inside with the washers,
toothed lock washers as well as the nuts.
T-G T-F T-E

HAGOR Products GmbH | Oberbecksener Straße 97 | D-32547 Bad Oeynhausen | Telefon: +49(0)57 31-7 55 07-0 | Mail: info@hagor.de
Nun wird die Frontblende wieder vorne am Korpus befestigt. Die Frontblende ist durch eine Magnetarretierung xiert.
Finally, the front panel is attached to the front of the corpus again. The front panel is xed by a magnet lock.
18
Seite wird geladen ...
Seite wird geladen ...
Seite wird geladen ...
Seite wird geladen ...
-
 1
1
-
 2
2
-
 3
3
-
 4
4
-
 5
5
-
 6
6
-
 7
7
-
 8
8
-
 9
9
-
 10
10
-
 11
11
-
 12
12
-
 13
13
-
 14
14
-
 15
15
-
 16
16
-
 17
17
-
 18
18
-
 19
19
-
 20
20
-
 21
21
-
 22
22
-
 23
23
-
 24
24


in anderen Sprachen
- English: Hagor 2815 Owner's manual
Verwandte Artikel
-
 Hagor 2805 Bedienungsanleitung
-
 Hagor 1913 Bedienungsanleitung
-
 Hagor 3346 Bedienungsanleitung
-
 Hagor 8707 Installationsanleitung
-
 Hagor 8719 Bedienungsanleitung
-
 Hagor 2809 Bedienungsanleitung
-
 Hagor 1925 Installationsanleitung
-
 Hagor 2876 Bedienungsanleitung
-
 Hagor 2306 Bedienungsanleitung
-
 Hagor 2931 Bedienungsanleitung


