Haier ES50V-VH3(EU) Electric Water Heater Benutzerhandbuch
- Typ
- Benutzerhandbuch

ES50V-F1(EU)
ES80V-F1(EU)
ES100V-F1(EU)
ES50V-TF7(EU)
ES80V-TF7(EU)
ES50V-VH3(EU)
ES80V-VH3(EU)
Please read this manual carefully before use.
Please keep it properly for future reference.
This product is for home use only and should not be used for industrial or commercial purposes.
Electric Water Heater
Instruction Manual
English

1. Safety Precautions (Please Read Before Use)...........................................3-4
2. Specification - Packing List.........................................................................5-6
3. Installations.................................................................................................7-9
4. Operations.............................................................................................. 10-12
5. Cleaning and Maintenance.......................................................................... 13
6. Transportation and Storage..........................................................................13
7. Product Disposal..........................................................................................13
8. Fault Clearance............................................................................................14
Contents:

3
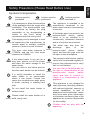
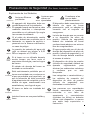
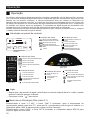
Actions must be
prohibited
Actions must be
performed
Actions must be
attended to
Symbolic Interpretation
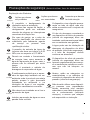
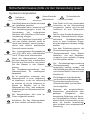
Safety Preautions (Please Read Before Use)
Warning Caution
Ban
Warning
It is necessary to allow disconnection
of the appliance from the supply after
installation. The disconnection may
be achieved by having the plug
accessible or by incorporating a
switch in the fixed wiring in
accordance with the wiring rules.
If the supply cord is damaged, it must
be replaced by the manufacturer, its
service agent or similarly qualified
persons in order to avoid a hazard.
The max. inlet water pressure is
0.75MPa, and the min. inlet water
pressure is 0.05MPa.
Caution
If the water heater is not use for a
long time, please cut off the power
and drain the water storage in the
water heater.
You can refer to the below part for
how the water heater can be drained.
It is strictly forbidden to install the
water heater in an environment
where it can freeze. Freeze can
cause the container and water pipes
to break, resulting in scalding and
leak.
Ban
Ban
Do not install the water heater in
outdoor areas.
Please install the water heater on a
solid, sturdy wall.
The appliance is intended to be
permanently connected to the
water mains and not connected by
a hose-set.
A discharge pipe connected to the
pressure-relief device (safety
valve) is to be installed in a
continuously downward direction
and in a frost-free environment.
The water may drip from the
discharge pipe of the
pressure-relief device (safety
valve) and that this pipe must be
left open to the atmosphere.
The pressure-relief device ((safety
valve) is to be operated regularly to
remove lime deposits and to verify
that it is not blocked
Ban
You can refer to the below part for
the type or characteristics of the
pressure-relief device (safety
valve) and how to connect it,
unless it is incorporated in the
appliance.
This appliance is not intended for
use by persons (including children)
with reduced physical, sensory or
mental capabilities, or lack of
experience and knowledge, unless
they have been given supervision
or instruction concerning use of the
appliance by a person responsible
for their safety.
Warning
Warning
Warning
Warning
Warning
Warning
Warning
Warning
Children shall not play with the
appliance.
Ban
English

4
Do not repair, maintain, dismantle or
modify the water heater without
professional maintenance persons.
The water may drip from the
discharge pipe of the
pressure-relief device (safety
valve) and that this pipe must be
left open to the atmosphere.
Children should be supervised to
ensure that they do not play with
the appliance.
Earthed
Use independent outlets and make
them reliably earthed.
It is strictly forbidden to use wet
hands to plug and unplug the
power supply.
If you notice any abnormality or
smell burnt odor, please immediately
cut off the powerand contact the
service center.
Check the electric meter, whether
the diameter of wire is in line with
the rated current of the water
heater, if necessary, invite a
qualified electrician to check the
wiring.
Be careful not to be scalded by hot
water.
Do not touch the valves and pipes
that supply hot water.
Please test the water temperature
with your hand before use. When the
water is at the right temperature,
then use it.
Do not use the hot water from the
water heater directly as drinking
water or for similar purposes.
Do not sprinkle water or spray
steam on the main unit of the water
heater.
Do not sprinkle water or spray
steam on the main unit of the water
heater.
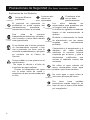
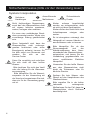
Safety Preautions (Please Read Before Use)
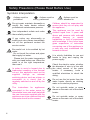
Actions must be
prohibited
Actions must be
performed
Actions must be
attended to
Symbolic Interpretation
Warning Caution
Ban
Warning
Warning
Ban
Ban
Ban
Ban
Ban
Caution
This appliance can be used by
children aged from 3 years and
above and persons with reduced
physical, sensory or mental
capabilities or lack of experience
and knowledge if they have been
given supervision or instruction
concerning use of the appliance in
a safe way and understand the
hazards involved.
Warning
In order to avoid a hazard due to
inadvertent resetting of the thermal
cut-out, this appliance must not be
supplied through an external
switching device, such as a timer, or
connected to a circuit that is
regularly switched on and off by the
utility.
Caution
The instructions for appliances
connected to the water mains by
detachable hose-sets shall state that
the new hose-sets supplied with the
appliance are to be used and that old
hose-sets should not be reused.
Caution

5
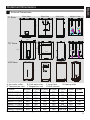
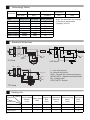
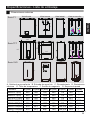
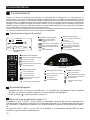
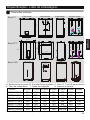
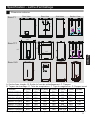
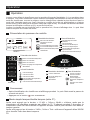
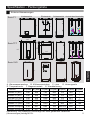
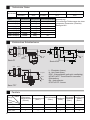
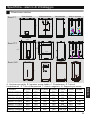
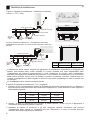
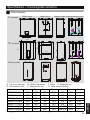
F1 Serie
External Dimensions
Front View Rear View Side View Section View
A Hot water outlet B Cold water inlet C Inner liner D Heating tube
E Temperature tube F Magnesium rod G Wall bracket
External Dimensions
c1
d1
ABa1
f1
e1
GGC C
EDED
FF
b1
TF7 Serie e1
g1
G
e1
f1
a1
c1
d1
AB
G
b1
F F
C C
E E
DD
a1(mm) b1(mm) c1(mm) d1(mm) e1(mm)
ES50V-F1(EU) 530 305 720 350 170
ES80V-F1(EU) 530 305 1046 350 170
530 305 1265 350 170
ES100V-F1(EU)
530 320 745 100 360
530 320 1070 100 360
g1(mm)
/
/
/
Model
f1(mm)
362
635
851
297
622
ES50V-TF7(EU)
ES80V-TF7(EU)
194
194
Note: The allowable error range of the above parameters (dimensions) is ±10%.
410 421 685 100 190-270
410 421 995 100 190-270
200
510
ES50V-VH3(EU)
ES80V-VH3(EU)
/
/
VH3 Serie
English
c1
A B b1 d1
C
F
ED
a1
G
e1=190
f1
e1=270

6
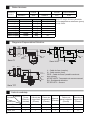
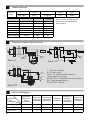
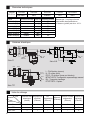
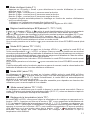
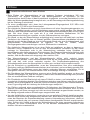
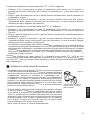
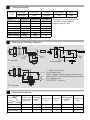
Electrical Schematic
Note: The allowable error range
of the above parameters
(weights) is ±10%.
Technology Datas
F1 Serie
1 1 4 1 2
TF7 Serie
/
Expansion
Bolt
(unit)
Model
Quantity Name
Packing List
Electric Water
Heater
(unit)
Expansion
hook
(unit)
Wall-mounting
frame
(unit)
Safety Valve
(unit)
Instruction
Manual
(unit)
1 1 / 1 / 2
ES50V-F1(EU) 3000W
3000W
3000W
25kg
34kg
41kg
47L
74L
97L
ES80V-TF7(EU)
ES100V-F1(EU)
ES50V-TF7(EU)
3000W
25kg
46L
ES80V-F1(EU)
3000W
33kg
77L
Rated Power Net Weight Rated CapacityModel
220-240
V~
50
Hz
0.80
MPa
75°C IPX4
Waterproof LevelRated Voltage Rated
Temperature
Rated Frequency Rated Pressure
All models
1500W 18kg
47L
ES50V-VH3(EU)
1500W 26kg
75L
ES80V-VH3(EU)
F1 Serie
Display Board
MT2
RT1
L
NPE
EH PE
RT2
MT1
N
Relay Relay
VH3 Serie
T2
EH
RT1
MT1 MT2
E
L
N
E
Display Board
Relay Relay Relay
L - Live wire (brown)
N - Neutral wire (blue)
PE/E - Ground wire (yellow and green)
MT/MT1/MT2 - Manual reset thermostat
EH - Heating tube
RT/RT1/RT2 - Sensor
Relay Display panel
L
N
E
MT
N
EH E
RT
TF7 Serie
VH3 Serie
1 1 / 1 / 2

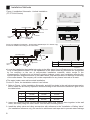
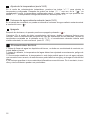
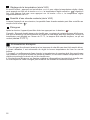
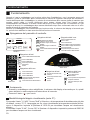
Installations Cautions
Installations
7
When installing the water heater, it should leave a certain amount of space (at least 300mm)
to facilitate future maintenance. If the water heater is embedded in the gusset plate during
installation, the gusset plate near the maintenance cover side should be movable to facilitate
disassembling the maintenance cover during maintenance.
It should ensure that the inlet pressure of tap water is not less than 0.05MPa and the
maximum pressure does not exceed 0.75MPa.
Electric water heater should be installed indoors, where the ambient temperature is above
0°C. The pipeline should be centrally arranged. The hot water outlet should not be too far
from the use place of hot water. If it exceeds eight meters, the hot water pipeline should be
insulated to reduce the heat loss.
The wall where the water heater is hung should be sturdy and secure to withstand four times
the weight of the water heater after filling with water. If it is a non-bearing wall or hollow brick
wall, it is necessary to take appropriate protective measures, add brackets, use crossing
screws, and install back boards.
The installation location of the electric water heater should be selected a place that is
convenient to use, maintain and have a floor drain. If the water tank or water pipe leaks, it
will not cause damage to nearby or lower level facilities. The installation position try to avoid
installing on the toilet, bathtub, washbasin and door frame. So that it does not create a
feeling of overwhelming or insecurity for the user.
Do not reverse the inlet and outlet pipes. The safety valve should be installed in the
designated position and should not be altered privately. The pressure relief hole of safety
valve should be kept in contact with atmosphere. Do not block it.
For security, water heaters should use independent sockets (multifunctional sockets are
prohibited) and be reliably earthed. And the quality of the socket should be in line with local
national standards. It is strictly forbidden to use the water heater without reliable earthed.
The power outlet of the water heater should be placed in a dry place where water cannot
shower, so as not to affect the normal work of the machine (preferably with a waterproof
box).
Use an electroprobe to measure whether the live wire and neutral wire are connected in
reverse. After confirming that the machine has been filled with water, the joints do not leak
and the power supply meets the requirements, then it can be heated by electricity.
For avoiding the danger of accidental reset of the over-temperature thermostat, the water
heater must not be powered by external switching devices such as timers. It shall not be
connected to a circuit that is frequently switched on and off through other settings.
In order to prevent the occurrence of accidents, the accessories provided by our company
must be installed and must not be replaced or substituted by yourself. If the accessories are
damaged, it must be notified to our Maintenance Department for repair and replacement
with the accessories provided by our company. If the above matters are not complied with,
we will not be responsible for any direct or indirect loss caused by the accident.
English

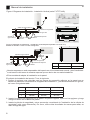
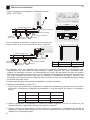
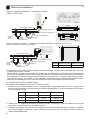
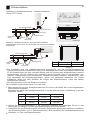
360mm
8
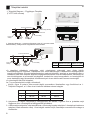
Figure 2
Figure 1 Installation Schematic - Vertical Installation
(F1/TF7/VH3 Series)
Installation Methods
f1
f1
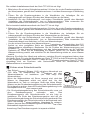
ES50V-TF7(EU)
297mm 622mm
Figure 5
ES80V-TF7(EU)
Figure 4 Installation Schematic - Horizontal Installation(for TF7 Series only)
It must be installed according to the schematic
Model
a 170 mm 170 mm 170 mm
b
c
ES50V-F1(EU) ES80V-F1(EU) ES100V-F1(EU)
88 mm 88 mm 88 mm
362 mm 635 mm 851 mm
Safety valve
Nozzle
Water mixing
valve
Cold water inlet
Hot water outlet
Cold water
valve
Hot water
valve
Safety valve
Nozzle
Cold water inlet
Hot water outlet
Water mixing
valve
It must be installed by the installer belonging to the After-sales Service Department of our company
or by its designated installer. For the installation of the water heater by personnel not recognized
by our company or the use of self-provided installation materials, which results in the
consequences, including but not limited to pipeline leakage, crash, poor installation affecting the
normal operation and performance of the water heater, and adverse effects or damage to the body
of the water heater. The company will not be responsible for any losses incurred as a result.
The water heater uses wall-mounted installation.
For the F1 Serie, the installation method is as follows:
Refer to Figure 1 of the Installation Schematic, and drill four holes in the wall using an percussion
drill to match the accessory expansion hook according to the dimensions shown in Figure 2 and
the table below.
1.
Insert the expansion bolts into the wall-mounting frame first, then fix them together in the wall
holes, and finally hang the water heater onto the wall-mounting frame.
Model
2.
Install the safety valve and other accessories with reference to the "Installation of Safety Valve"
(for installation reference only). Be careful to add thread seal tape seal to prevent water leakage.
3.
Cold water
valve
Hot water
valve
190mm
270mm
Figure 3
TF7 Serie
VH3 Serie

9
Pressure relief hole connects
to drain pipe
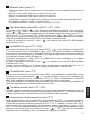
Installation of Safety Valve
Figure 6
For TF7/VH3 Series, the vertical installation method is as follows:
Refer to Figure 1 of the Installation Schematic, and drill two holes in the wall using an
percussion drill to match the accessory expansion hook according to the dimensions shown
in Figure 3.
1.
Insert the expansion hook into the wall hole and fix it, then hang the water heater onto the
hook.
2.
Install the safety valve and other accessories with reference to the "Installation of Safety
Valve" (for installation reference only). Be careful to add thread seal tape seal to prevent
water leakage.
3.
For TF7 Serie, the horizontal installation method is as follows:
Refer to Figure 4 of the Installation Schematic, and drill two holes in the wall with an
percussion drill to match the accessory expansion hook according to the dimensions shown
in Figure 5.
1.
Insert the expansion hook into the wall hole and fix it, then hang the water heater onto the
hook.
2.
Install the safety valve and other accessories with reference to the "Installation of Safety
Valve" (for installation reference only). Be careful to add thread seal tape seal to prevent
water leakage.
3.
In order to facilitate the installation and disassembly of the water heater, it is recommended
that the water heater inlet and outlet pipes are installed at the appropriate location with G1/2
loose joints respectively. Determine the location of the water supply. Connect the water inlet
pipe and the tap pipe to the water place respectively. Fill the inner tank with water, check
whether the water line is leaking. If there is a leak, it needs to be reconnected.
Warning: It is important to make sure that the hooks on the back of the machine (F1 Serie) or
the wall bracket (TF7/VH3 Series) are securely hung on the wall-mounting frame (F1 Serie) or
expansion hook (TF7/VH3 Series) before releasing the hands to prevent the water heater
from falling and causing personal injury or property damage.
Install the safety valve (its connection is G1/2) with a rated
pressure of 0.80MPa in the direction of the arrow on the safety
valve (arrow pointing to the water heater) to the inlet pipe. When
the water heater is heated by electricity, the water inside the tank
is heated and expands. In order to reduce the water pressure
inside the tank, a small amount of water droplets will flow from the
pressure relief hole of the safety valve. The pressure relief hole
should be kept open to the atmosphere and should not be
blocked.
The pressure relief hole of the safety valve can be connected to
the drain pipe. The installation method of the drain pipe of the
safety valve is as follows: Screw the one end of the drain pipe to
the pressure relief hole of the safety valve. The drain pipe
connected to the safety valve should be kept inclined installed in
a frost-free environment in a continuous downward way, and the
water overflowing from the drain pipe should drain into the floor
drain.
Note: Drain pipes are sold separately.
English

kW
kW
F1 Serie
10
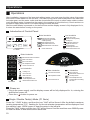
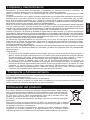
Operations
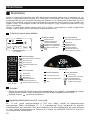
Introduction of Control Panel
Operations
Enter the bath separately
mode/ Choose the number
of bath separately
1.5kW
3kW
Display icon of the
number of bath separately
Heating icon
After installation, because of the inner tank without water, you must open the inlet valve of tap water
and outlet of water heater for the first time. The water mixing valve must be adjusted to the maximum
hot water gear, and the water outlet shall be closed after the nozzle or other water outlets continu-
ously discharge water (it means that the water in the container is full at this time). Check and turn on
the power supply when there is no water leakage at each interface.
After the water heater is powered on for the first time and the display screen is fully displayed for 1s,
it enters the state before turning on the power.
Icon Introduction
Button Introduction
Double tanks mode icon
Single tank mode icon
Set temperature /
actual temperature icon
Bacteriostatic function icon
Enter single tank mode
Enter double tanks mode
BPS bacteriostatic mode button
Power-on/Power-off
Single / Double Tank(s) Mode (F1 Serie)
Press the "1.5kW" button, and then the icon "Half" will be illumed. After the default maximum
heating temperature 75ºC. flashing for 2s, the actual water temperature will be displayed. And
the machine uses 1500W power to heat the water in the left tank.
Press the "3kW" button, and the icon "All" will be illumed. And the machine uses 3000W power
to heat the water in both tanks at the same time.
ECO
MAX
SET
MAX mode button
ECO mode button
Set temperature button
ECO mode icon
MAX mode icon
TF7 Serie
Button Introduction
BPS bacteriostatic mode button
Heating icon
Set temperature/
actual temperature icon
Bacteriostatic function icon
Icon Introduction
Power-on/ Power off
MAX
ECO
BPS
SET
Function select button
Button Introduction
Set temperature button
Power-on/Power-off
ECO mode icon
Icon Introduction
Bacteriostatic function icon
Set temperature /
actual temperature icon
Indicator light of remaining
hot water
ECO
BPS
VH3 Serie
Power-on
Plug in the power supply, and the display screen will be fully displayed for 1s, entering the
state before power-off.
Press the « » button to power on.

11
Bath Separately Mode (F1 Serie)
Press the "Smart" button to choose the number of bath separately at one time. The number
of bath separately at one time will be switched circularly between 1, 2 and 3.
Digital 1 is illumed: It is suitable for 1 person to take a bath.
Digital 2 is illumed: It is suitable for 2 persons to take a bath.
Digital 3 is illumed: It is suitable for 3 persons to take a bath.
The machine will automatically complete the heating according to the number of bathing
people you choose.
50L water can be set to bath for 1 person and 2 persons.
80L / 100L water can be set to bath for 1 person, 2 persons and 3 persons.
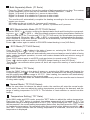
BPS Bacteriostatic Mode
(F1/TF7/VH3 Series)
Press the "BPS" / « » button, entering the bacteriostatic mode and illuming the correspond-
ing icon « » / « » /« BPS- » . After the default maximum heating temperature flashes for
a few seconds (80°C for F1 series and 75°C for TF7/VH3 serie), the actual water temperature
will be displayed. When the « » / « » /« BPS- » extinguishs, it indicates that the bacterio-
static function is completed, and the machine will automatically exit the BPS bacteriostatic
mode and return to the normal mode.
Press « » button again to switch to ECO-BPS-Instant heating in turn(VH3 Serie).
Normal Mode ( TF7/VH3 Series)
When the user does not choose the above modes, the machine will enter the normal mode.
In this mode, the user can adjust the setting temperature according to the demand, and the
range of setting temperature is 35-75°C. The function of heat retention is carried out after
heating.
Temperature Setting ( TF7 Serie)
In the MAX mode and ECO mode, press the "SET" button to adjust the setting temperature.
Each time the "SET" button is pressed, the setting temperature will increase by 5°C. The
adjustment range of setting temperature is 35ºC-75°C. When pressing the "SET" button to set
the temperature, the current setting temperature flashes first, and then press the "SET" button
to change the temperature. No operation within 6s or pressing other buttons except the « »
and "SET" button indicate that the setting temperature is confirmed, and then the actual
temperature is displayed.
ECO Mode (TF7/VH3 Series)
Press the "ECO" / « » button in the state of power-on, entering the ECO mode and the
corresponding icon « » / « ECO- » are illumed.
In this mode, the water heater will automatically memorize and analyze user's habits of using
water, realize intelligent operation, to meet user's water demand and save electric energy to
the most extent.
Press "ECO" button again to exit ECO mode and return to normal mode.(TF7 Serie)
Press « » button again to switch to ECO-BPS-Instant heating in turn(VH3 Serie).
This function can memorize when power off, but it will reopen the memory of user's habits of
using water.
MAX Mode ( TF7 Serie)
Press the "MAX" button in the state of power-on, entering the MAX mode and illuming the
corresponding icon « ». In this state, the two tanks are heated to the setting temperature,
and the setting temperature range is 35-75°C. After heating, the machine will automatically
exit the MAX mode and return to the normal mode.
In this mode, the double tanks are heated simultaneously, which can meet the user’s demand
of using water rapidly.
English

12
Power-off
After bathing, press the « » button to power it off.
Precautions for Use
Tip: When the water heater works in the double tanks mode, affected by the power difference
between the heating tubes of the two tanks and other factors, it is normal that the right tank is
still heating when the display screen displays 75 °C (F1/ TF7 Series).
1. Do not turn on the power supply before the water heater is filled with water, protecting the
machine from damage.
2. Adjust the water temperature to the appropriate temperature before use, preventing
scalding.
3. When there is enough hot water, turn down the set temperature as much as possible, which
can reduce heat loss, high-temperature corrosion and scaling, and prolong the service life of
the water heater.
4. Please do not put gasoline and other inflammables near the water heater, or which may
cause fire and other accidents.
Press the "ECO" / « » button in the state of power-on, entering the ECO mode and the
corresponding icon « » / « ECO- » are illumed.
In this mode, the water heater will automatically memorize and analyze user's habits of using
water, realize intelligent operation, to meet user's water demand and save electric energy to
the most extent.
Press "ECO" button again to exit ECO mode and return to normal mode.(TF7 Serie)
Press « » button again to switch to ECO-BPS-Instant heating in turn(VH3 Serie).
This function can memorize when power off, but it will reopen the memory of user's habits of
using water.
Temperature Setting ( VH3 Serie)
In the normal mode, press “+”/“-” button to adjust the setting temperature, press “+”/“-” button
for one time, « » flashes the current setting temperature for 6 times, if press “+”/“-” button
for one time every time, then the setting temperature is to increase/decrease by 5°C.
Quantity of remaining hot water ( VH3 Serie)
Under the status of switching on, the quantity of current remaining hot water can be monitored
through the icon « ».

13
Product Disposal
Transportation and Storage
Attention:
Cleaning and Maintenance
Warning: This water heater should only be repaired and maintained by qualified service personnel.
Improper methods may cause serious injury accidents or property losses.
Be sure to unplug the power plug before cleaning and maintaining the water heater.
Wipe gently with a damp cloth dipped in a small amount of neutral detergent. Do not use gasoline
or other solutions. Finally, dry it with a dry cloth to keep the water heater dry. Be careful not to scrub
with cleaners containing abrasives (including toothpaste), acids, chemical solvents (including
alcohol) or polishes.
To keep the water heater working efficiently, the heating pipe and inner tank should be cleaned
every three years. When cleaning, do not damage the protective layer on the outside of the heating
pipe and the surface of the inner tank. The warranty period of the inner tank is 7 years, and the
anode needs to be inspected once a year from the second year.
When cleaning, close the water inlet valve, open the water outlet valve, remove the safety valve at
the cold water inlet, drain the water in the water tank, and then open the water inlet valve to wash
repeatedly for several minutes until the clean water discharged from water tank.
Check the safety valve once a month: Pull the small handle of the safety valve. If there is water
flowing out, it indicates that the safety valve has worked normally. If there is no water flowing out,
please contact Haier After-sales Service Department for repair or replacement.
The safety inspection, removing the scale in heating pipe in time and replacing the magnesium rod
shall be carried out by professionals regularly.
Products must be transported and stored in accordance with the handling marks indicated on the
original packaging.
Be careful when handling and transporting.
When transportation and storage, it is must ensure that the product is protected from atmospheric
precipitation and mechanical damage.
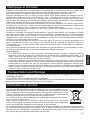
If the electric water heater cannot be used and you want to discard it, you must
dispose it correctly in order not to damage the environment. For more
information, please contact the local service department. If the water heater is
used for scrapping, cut the power line as close to the shell as possible so that
the water heater can no longer be used.
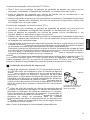
fThe electric water heater is designed and manufactured in such a way that you
can easily handle it.
This symbol indicates that this product must not be disposed together with
household refuses. Deliver product to an collection or recycling center for
electrical or for electronic or electrical equipment.
By ensuring proper disposal of this product, you will help preventing potential
negative impacts to environmental and human health. Otherwise these effects
may be caused by improper waste disposal.
If you do not use the water heater for a long time, please close the tap water valve and open the
hot water valve of the water heater to the maximum hot water gear. At the time, please be careful
not to be scalded by hot water. And then remove the safety valve, let the water flow out of the
inner tank.
When re-using, to avoid injury accidents, it is recommended to open the hot water valve before
opening the power switch of the water heater, discharging the gas that may exist in the pipe line
from the pipe line. At the time, smoking or other open flames are not allowed near the opened
valve. Meanwhile, carefully check whether all parts of the water heater are in good condition, and
confirm that the inner tank is filled with water. Then, the water heater can be put into use.
English

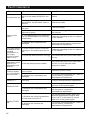
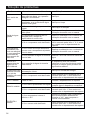
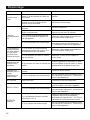
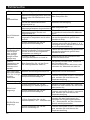
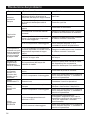
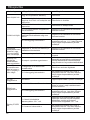
Fault Clearance
No water flow out
Whether the water supply system is
cut off or the water pressure is too
low
Whether the water place is blocked
and whether the hot water valve is
opened
1. Whether the hot water outlet is
not open
2. Whether the water temperature is
adjusted properly
3. The heating time is too short and
has not been heated to the setting
temperature
4Whether the components are
damaged
Flowing cold
water
The water cannot
be heated to the
required
temperature or
the output
amount of heat
water is less
1. Is the current function mode set
correctly or the temperature set too
low
2. Is the tap water pressure too high
The water is
alternately great
and less, or
alternately cold
and hot
Is the tap water pressure stable
It fails to power
on or the display
does not work
1. Whether the power supply is in
good contact
2. Whether the components are
damaged
Display E1 Line fault
Display E2/H0
1. Is the inner tank filled with water
2. Whether the components are
damaged
1. Whether the indoor temperature
is lower than minus 20°C
2. Whether the sensors are
damaged
Display E3//E6/
E8
Check
Check and clean
Check and open
Calibrate referring to the use method in
the manual
Calibrate according to the use method
in the manual
If you have confirmed that the 123
items are not the reason, contact the
Maintenance Department
Calibrate according to the use method
in the manual
Turn down the flow of the outlet valve
for use
Turn down the flow of the outlet valve
for use or use it after the water
pressure is stable
Check the power socket
If you have confirmed that the 1 item is
not the reason, contact the
Maintenance Department
Contact the Maintenance Department
After turning off the power, fill up water
and turn on the power again
If you have confirmed that the 1 item is
not the reason, contact the
maintenance department
Cut off the power supply. When the
ambient temperature is higher than
minus 19°C, it will return to normal
after turn on the power again
If you have confirmed that the 1 item is
not the reason, contact the
Maintenance Department
SolutionsItems to be ConfirmedPhenomenons
14

English
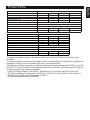
Product fiche
Trade mark Haier
Model ES50V-TF7(EU) ES80V-TF7(EU)
Load profile
Energy efficiency class B
Energy efficiency(%) 41
Annual electricity consumption(kWh) 1251
Thermostat temperature setting(°C) 75
Sound power level indoors(dB) 15
Specific precautions Refer to the manual
Daily electricity consumption(kWh) 7.163
V40(L) 95.4
The power consumption data in the table is defined in relation to EU Directives 812/2013 and
814/2013.
The products without the label and the data sheet for water heaters and solar devices, stipulated in
regulation 812/2013, are not intended to be used in such assemblies.
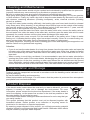
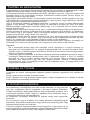
This appliance is conforming with the international electrical safety standards IEC 60335-1 and IEC
60335-2-21. The CE marking of the appliances attests its conformity to the following EC Directives,
of which it satisfies the essential requisites:
- LVD Low Voltage Directive: EN 60335-1, EN 60335-2-21, EN 60529, EN 62233, EN 50106.
- EMC Electro-Magnetic Compatibility: EN 55014-1, EN 55014-2, EN 61000-3-2, EN 61000-3-3.
- RoHS2 Risk of Hazardous Substances: EN 50581.
- ErP Energy related Products: EN 50440.
M
B
41.8
1229
7.801
143.1
M
ES50V-VH3(EU) ES80V-VH3(EU)
B
39.3
1315
6.883
95.5
M
B
41.9
1300
7.343
155.1
M
Trade mark
Haier
Model
ES50V-F1(EU) ES80V-F1(EU) ES100V-F1(EU)
Load profile
M L L
Energy efficiency class
C C C
Energy efficiency(%)
36 36 37
Annual electricity consumption(kWh)
1418 2713 2749
Thermostat temperature setting(
℃
)
75
Sound power level indoors(dB)
15
Specific precautions
Refer to the manual
Daily electricity consumption(kWh)
6.645 12.562 12.755
V40(L)
67.4 138.5 168.3


ES50V-F1(EU)
ES80V-F1(EU)
ES100V-F1(EU)
ES50V-TF7(EU)
ES80V-TF7(EU)
ES50V-VH3(EU)
ES80V-VH3(EU)
Por favor, lea y comprenda el manual antes de utilizarlo.
Consérvelo adecuadamente para futuras consultas.
Este producto sólo puede ser utilizado para fines domésticos,
y no para fines industriales o comerciales.
Termo Eléctrico
Manual del Usuario
Español

1. Precauciones de Seguridad (Por favor, Lea antes de Usar)......................3-4
2. Especificaciones - Lista de embalaje..........................................................5-6
3. Instalación...................................................................................................7-9
4. Funcionamiento...................................................................................... 10-12
5. Limpieza y mantenimiento........................................................................... 13
6. Transporte y Almacenamiento......................................................................13
7. Eliminación del producto..............................................................................13
8. Solución de problemas.................................................................................14
Contenido:

3
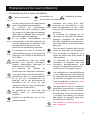
Acciones Eliminar
prohibidas
Acciones que
deben ser
ejecutadas
Cuestiones a las
que se debe
prestar atención
Explicación de los Símbolos
Precauciones de Seguridad (Por favor, Lea antes de Usar)
Alerta Nota
Prohibición
Alerta
El apagado del dispositivo debe ser
posible después de la instalación.
El apagado puede ser llevado a cabo
mediante enchufes o interruptores
accesibles en el cableado fijo según
las normas de cableado.
Alerta
Si el cable de alimentación resulta
dañado, deberá ser sustituido por el
fabricante, su agente de servicio o
personal con la misma cualificación,
en caso de peligro.
La presión de entrada del agua del
grifo no deberá ser inferior a 0,05
MPa ni superior a 0,75 MPa.
Alerta
Nota
Si el termo no es utilizado durante
mucho tiempo, por favor corte el
suministro de energía y vacíe el agua
del termo.
El método de drenaje del termo es
mostrado a continuación.
Está estrictamente prohibido que el
termo sea instalado en un entorno en
el que es probable que haya hielo, ya
que la formación de hielo provocará
el agrietamiento del recipiente y de la
tubería de agua, ocasionando una
escaldadura y una fuga de agua.
Prohibición
Prohibición
El termo no debe ser instalado del
exterior.
Instale el termo en una pared sólida y
firme.
Alerta
El dispositivo debe conectarse a la
tubería de agua de forma
permanente, pero no adoptar la
conexión con el conjunto de
mangueras.
Alerta
La tubo de drenaje que se conecta
a un dispositivo de alivio de
presión (válvula de seguridad)
deberá ser instalada de forma
continua hacia abajo en un entorno
libre de congelamiento.
El agua puede salir por el tubo de
drenaje del dispositivo de alivio de
presión (válvula de seguridad), y el
tubo de drenaje deberá mantener
el acceso al exterior.
El dispositivo de alivio de presión
(válvula de seguridad) deberá ser
operado regularmente para
eliminar los sedimentos calcáreos
y confirmar que no esté
bloqueado.
Alerta
Alerta
Alerta
Alerta
Prohibición
Las categorías o características y
los métodos de conexión del
dispositivo de alivio de presión
(válvula de seguridad) son
mostradas a continuación.
Las personas con capacidades
físicas, sensoriales o mentales
reducidas o con falta de
experiencia y conocimientos
(incluidos los niños) no deberán
utilizar este dispositivo, a menos
que estén bajo supervisión o
instrucción.
Español

4
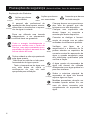
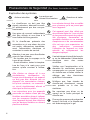
Precauciones de Seguridad (Por favor, Lea antes de Usar)
El personal de reparación no
profesional no podrá reparar, dar
mantenimiento, desmontar o
transformar el termo a voluntad.
Prohibición Prohibición
Los niños deberán ser
supervisados para garantizar que
no jueguen con el aparato.
Los niños sin vigilancia no deberán
limpiar ni dar mantenimiento al
aparato.
Acciones Eliminar
prohibidas
Acciones que
deben ser
ejecutadas
Cuestiones a las
que se debe
prestar atención
Explicación de los Símbolos
Alerta Nota
Prohibición
Conexión
a tierra
Una toma de corriente
independiente deberá ser utilizada y
una conexión a tierra fiable deberá
estar garantizada. Prohibición
Enchufar o desenchufar la fuente
de alimentación con las manos
mojadas está estrictamente
prohibido.
Si se detecta que el termo presenta
un funcionamiento anormal, o hay
olor a quemado, por favor, corte la
corriente inmediatamente y póngase
en contacto con el Centro de
Servicio.
Compruebe si el amperímetro y el
diámetro del cable pueden
satisfacer la corriente nominal
requerida por el termo, y pida a
electricistas cualificados que
revisen el cableado cuando sea
necesario.
Alerta
Tenga cuidado y no se queme con el
agua caliente
No toque la válvula o el tubo de
suministro de agua caliente.
Pruebe la temperatura del agua
con la mano antes de usarla y
asegúrese de que es adecuada para
su uso.
No utilice el agua caliente del
termo directamente como agua
potable o para fines similares.
No rocíe agua o vapor sobre la
estructura principal del termo.
Por favor, tome medidas
preventivas cuando haga frío, en
caso de que el termo sufra daños
por congelación.
Prohibición
Prohibición
Alerta
Nota
Seite wird geladen ...
Seite wird geladen ...
Seite wird geladen ...
Seite wird geladen ...
Seite wird geladen ...
Seite wird geladen ...
Seite wird geladen ...
Seite wird geladen ...
Seite wird geladen ...
Seite wird geladen ...
Seite wird geladen ...
Seite wird geladen ...
Seite wird geladen ...
Seite wird geladen ...
Seite wird geladen ...
Seite wird geladen ...
Seite wird geladen ...
Seite wird geladen ...
Seite wird geladen ...
Seite wird geladen ...
Seite wird geladen ...
Seite wird geladen ...
Seite wird geladen ...
Seite wird geladen ...
Seite wird geladen ...
Seite wird geladen ...
Seite wird geladen ...
Seite wird geladen ...
Seite wird geladen ...
Seite wird geladen ...
Seite wird geladen ...
Seite wird geladen ...
Seite wird geladen ...
Seite wird geladen ...
Seite wird geladen ...
Seite wird geladen ...
Seite wird geladen ...
Seite wird geladen ...
Seite wird geladen ...
Seite wird geladen ...
Seite wird geladen ...
Seite wird geladen ...
Seite wird geladen ...
Seite wird geladen ...
Seite wird geladen ...
Seite wird geladen ...
Seite wird geladen ...
Seite wird geladen ...
Seite wird geladen ...
Seite wird geladen ...
Seite wird geladen ...
Seite wird geladen ...
Seite wird geladen ...
Seite wird geladen ...
Seite wird geladen ...
Seite wird geladen ...
Seite wird geladen ...
Seite wird geladen ...
Seite wird geladen ...
Seite wird geladen ...
Seite wird geladen ...
Seite wird geladen ...
Seite wird geladen ...
Seite wird geladen ...
Seite wird geladen ...
Seite wird geladen ...
Seite wird geladen ...
Seite wird geladen ...
Seite wird geladen ...
Seite wird geladen ...
Seite wird geladen ...
Seite wird geladen ...
Seite wird geladen ...
Seite wird geladen ...
Seite wird geladen ...
Seite wird geladen ...
Seite wird geladen ...
Seite wird geladen ...
Seite wird geladen ...
Seite wird geladen ...
Seite wird geladen ...
Seite wird geladen ...
Seite wird geladen ...
Seite wird geladen ...
Seite wird geladen ...
Seite wird geladen ...
Seite wird geladen ...
Seite wird geladen ...
Seite wird geladen ...
Seite wird geladen ...
Seite wird geladen ...
Seite wird geladen ...
-
 1
1
-
 2
2
-
 3
3
-
 4
4
-
 5
5
-
 6
6
-
 7
7
-
 8
8
-
 9
9
-
 10
10
-
 11
11
-
 12
12
-
 13
13
-
 14
14
-
 15
15
-
 16
16
-
 17
17
-
 18
18
-
 19
19
-
 20
20
-
 21
21
-
 22
22
-
 23
23
-
 24
24
-
 25
25
-
 26
26
-
 27
27
-
 28
28
-
 29
29
-
 30
30
-
 31
31
-
 32
32
-
 33
33
-
 34
34
-
 35
35
-
 36
36
-
 37
37
-
 38
38
-
 39
39
-
 40
40
-
 41
41
-
 42
42
-
 43
43
-
 44
44
-
 45
45
-
 46
46
-
 47
47
-
 48
48
-
 49
49
-
 50
50
-
 51
51
-
 52
52
-
 53
53
-
 54
54
-
 55
55
-
 56
56
-
 57
57
-
 58
58
-
 59
59
-
 60
60
-
 61
61
-
 62
62
-
 63
63
-
 64
64
-
 65
65
-
 66
66
-
 67
67
-
 68
68
-
 69
69
-
 70
70
-
 71
71
-
 72
72
-
 73
73
-
 74
74
-
 75
75
-
 76
76
-
 77
77
-
 78
78
-
 79
79
-
 80
80
-
 81
81
-
 82
82
-
 83
83
-
 84
84
-
 85
85
-
 86
86
-
 87
87
-
 88
88
-
 89
89
-
 90
90
-
 91
91
-
 92
92
-
 93
93
-
 94
94
-
 95
95
-
 96
96
-
 97
97
-
 98
98
-
 99
99
-
 100
100
-
 101
101
-
 102
102
-
 103
103
-
 104
104
-
 105
105
-
 106
106
-
 107
107
-
 108
108
-
 109
109
-
 110
110
-
 111
111
-
 112
112


Haier ES50V-VH3(EU) Electric Water Heater Benutzerhandbuch
- Typ
- Benutzerhandbuch
in anderen Sprachen
Verwandte Artikel
Andere Dokumente
-
3M High Flow Series Ice Water Filtration System ICE195-S, 5616404, 3 um NOM, 5 gpm, 54000 gal, 0.4 ft3, 1/Case Bedienungsanleitung
-
Honda izy HRG416C1 PKEH Bedienungsanleitung
-
Olimpia Splendid S1 200 Sanitary Water Heat Pump Benutzerhandbuch
-
Olimpia Splendid Sherpa AQUADUE OS-CEBCH36EI Bedienungsanleitung
-
Gorenje TGR80N/D Bedienungsanleitung
-
 Olimpia Splendid Sherpa TOWER S2 Manuale d'installazione
