Parkside PKO 24 B2 Benutzerhandbuch
- Kategorie
- Luftkompressoren
- Typ
- Benutzerhandbuch

COMPRESSOR PKO 24 B2
CHAT
KOMPRESSOR
Bedienungs- und Sicherheitshinweise
Originalbetriebsanleitung
DE
KOMPRESOR
Pokyny pre obsluhu a bezpečnostné pokyny
Preklad originálneho návodu na obsluhu
SK
KOMPRESSZOR
Kezelési és biztonsági útmutató
Az eredeti használati útmutató fordítása
HU
KOMPRESOR
Navodila za upravljanje in varnostna opozorila
Prevod originalnega navodila za uporabo
SI
COMPRESSOR
Operating and Safety Instructions
Translation of Original Operating Manual
GB
KOMPRESOR
Pokyny pro obsluhu a bezpečnostní pokyny
Překlad originálního provozního návodu
CZ
4
IAN 360588_2010

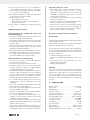
GB Operating and Safety Instructions Page 01
HU Kezelési és biztonsági útmutató Oldal 11
SI Navodila za upravljanje in varnostna opozorila Stran 22
CZ Pokyny pro obsluhu a bezpečnostní pokyny Strana 32
SK Pokyny pre obsluhu a bezpečnostné pokyny Strana 42
DE / AT / CH Bedienungs- und Sicherheitshinweise Seite 52
Klappen Sie vor dem Lesen die Seite mit den Abbildungen aus und machen Sie sich anschließend mit allen Funktionen des Gerätes vertraut.
DE AT CH
Pred branjem odprite stran s slikami in se nato seznanite z vsemi funkcijami naprave.
SI
Olvasás előtt kattintson az ábrát tartalmazó oldalra és végezetül ismerje meg a készülék mindegyik funkcióját.
HU
Před čtením si otevřete stranu s obrázky a potom se seznamte se všemi funkcemi přístroje.
CZ
Pred čítaním si odklopte stranu s obrázkami a potom sa oboznámte so všetkými funkciami prístroja.
SK
Before reading, unfold the page containing the illustrations and familiarise yourself with all functions of the device.
GB

1
1
2
8
10
14
43 5 67
2
17
5
9a
9b
9
13
9
11
12
13
3
7
3
15
18
19
19a 19b 19c
14b
14a
4
11b11a
11
11b
1111a

615a
12
15e15c 15d
7
15
9
20
16
10
18
11
A
15d 15b 15e
8
20a

1GB
Table of contents: Page:
1. Explanation of the symbols on the device ......................................................................................................................................................... 2
2. Introduction ..........................................................................................................................................................................................................3
3. Device description (fig. 1-12) .............................................................................................................................................................................3
4. Scope of delivery ................................................................................................................................................................................................ 3
5. Proper use ............................................................................................................................................................................................................3
6. Safety information ............................................................................................................................................................................................... 4
7. Technical data ..................................................................................................................................................................................................... 5
8. Before commissioning .........................................................................................................................................................................................6
9. Attachment and operation ..................................................................................................................................................................................6
10. Electrical connection ...........................................................................................................................................................................................7
11. Cleaning, maintenance and storage..................................................................................................................................................................7
12. Transport ..............................................................................................................................................................................................................8
13. Disposal and recycling .......................................................................................................................................................................................8
14. Troubleshooting ................................................................................................................................................................................................... 9
15. Warranty certificate ..........................................................................................................................................................................................10
16. Declaration of conformity .................................................................................................................................................................................63

2GB
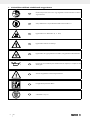
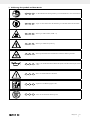
1. Explanation of the symbols on the device
GB Read the operating and safety instructions before start-up and follow them!
GB Wear hearing protection. Excessive noise can result in a loss of hearing.
GB Warning against hot parts! (A fig. 11)
GB Warning against electrical voltage
GB Warning! The equipment may start automatically without warning.
GB Attention! Prior to initial commissioning, check the oil level and replace the oil sealing
plug!
GB Observe warnings and safety instructions!
GB Sound power level specified in dB
GB Do not expose the device to rain!

3GB
2. Introduction
Manufacturer:
scheppach
Fabrikation von Holzbearbeitungsmaschinen GmbH
Günzburger Straße 69
D-89335 Ichenhausen
Dear customer,
We hope your new tool brings you much enjoyment and
success.
Note:
In accordance with the applicable product liability laws, the
manufacturer of this device assumes no liability for damage to
the device or caused by the device arising from:
• Improper handling,
• Non-compliance with the operating manual,
• Repairs carried out by third parties, unauthorised specialists.
• Installing and replacing non-original spare parts,
• Application other than specified,
• Failures of the electrical system in the event of the electrical
regulations and VDE provisions 0100, DIN 57113 / VDE
0113 not being observed.
Please consider:
Read through the complete text in the operating manual before
installing and commissioning the device.
This operating manual should help you familiarise yourself with
your power tool and teach you how to use it for its intended
purpose.
The operating manual includes important instructions for the
safe, proper and economic operation of the machine, for
avoiding danger, for minimising repair costs and downtimes
and for increasing the reliability and extending the service life
of the machine.
In addition to the safety instructions in this operating manual,
you must also observe the regulations applicable to the
operation of the machine in your country.
Keep the operating manual package with the power tool at
all times and store it in a plastic cover to protect it from dirt
and moisture. They must be read and carefully observed by all
operating personnel before starting the work. The power tool
may only be used by personnel who have been trained to use
it and who have been instructed with respect to the associated
hazards. The required minimum age must be observed.
In addition to the safety instructions in this operating manual
and the separate regulations of your country, the generally
recognised technical rules relating to the operation of such
machines must also be observed.
We accept no liability for accidents or damage that occur due
to a failure to observe this manual and the safety instructions.
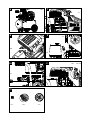
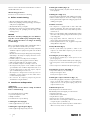
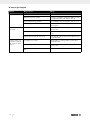
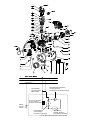
3. Device description (fig. 1-12)
1. Transport handle
2. Pressure switch
3. Quick coupling (regulated compressed air)
4. Pressure gauge (set pressure can be read off)
5. Pressure regulator
6. Pressure gauge (vessel pressure can be read off)
7. Quick coupling (unregulated compressed air)
8. Pressure vessel
9. Supporting foot
9a. Washer
9b. Screw
10. Drain screw for condensate
11. Wheel
11a. Washer
11b. Fillister head screw
12. Oil drain screw
13. Compressor pump
14. Compressed air hose
14a. Plug nipple
14b. Quick coupling
15. Air filter
15a. Transport lid
15b. Wing screw
15c. Filter element
15d. Filter housing
15e. Filter cover
16. Oil sealing plug
17. On/off switch
18. Oil-level window
19. Safety valve
19a. Exhaust nut
19b. Connection lock
19c. Cap of exhaust nut
20. Oil filling opening
20a. Transport lid
4. Scope of delivery
1x air filter
2x supporting foot
2x wheel
1x assembly material
1x oil sealing plug
1x oil bottle
1x compressed air hose
1x operating manual
5. Proper use
The compressor is designed to generate compressed air for
compressed-air driven tools which can be driven with an air
volume of up to approx. 180 l/min (e. g. tire inflator, blow-out
pistol and paint spray gun). Due to the limited air output it is
not possible to use the compressor to drive tools with very high
air consumption (for example orbital sanders, die grinders and
hammer screwdrivers).

4GB
The machine may only be used in the intended manner.
Any use beyond this is improper. The user/operator, not the
manufacturer, is responsible for damages or injuries of any
type resulting from this.
Please observe that our equipment was not designed with
the intention of use for commercial or industrial purposes. We
assume no guarantee if the equipment is used in commercial or
industrial applications, or for equivalent work.
6. Safety information
m Attention!
The following basic safety measures must be observed when
using power tools for protection against electric shock, and
the risk of injury and fire. Read all these notices before using
the power tool and store the safety instructions well for later
reference.
Safe work
1. Keep the work area orderly
- Disorder in the work area can lead to accidents.
2. Take environmental influences into account
- Do not expose power tools to rain.
- Do not use power tools in a damp or wet environment.
There is a risk of electric shock!
- Make sure that the work area is well-illuminated.
- Do not use power tools where there is a risk of fire or
explosion.
3. Protect yourself from electric shock
- Avoid physical contact with earthed parts (e. g. pipes,
radiators, electric ranges, cooling units).
4. Keep away from children!
- Do not allow other persons to touch the equipment or
cable, keep them away from your work area.
5. Securely store unused power tools
- Unused power tools should be stored in a dry, elevated
or closed location out of the reach of children.
6. Do not overload your power tool
- They work better and more safely in the specified output
range.
7. Wear suitable clothing
- Do not wear wide clothing or jewellery, which can
become entangled in moving parts.
- Rubber gloves and anti-slip footwear are recommended
when working outdoors.
- Tie long hair back in a hair net.
8. Do not use the cable for purposes for which it is not
intended
- Do not use the cable to pull the plug out of the outlet.
Protect the cable from heat, oil and sharp edges.
9. Take care of your tools
- Keep your compressor clean in order to work well and
safely.
- Follow the maintenance instructions.
- Check the connection cable of the power tool regularly
and have it replaced by a recognised specialist when
damaged.
- Check extension cables regularly and replace them
when damaged.
10. Pull the connector out of the socket
- When the power tool is not in use or prior to maintenance
and when replacing tools such as saw blades, bits,
milling heads.
11. Avoid inadvertent starting
- Make sure that the switch is switched off when plugging
the plug into an outlet.
12. Use extension cables for outdoors
- Only use approved and appropriately identified
extension cables for use outdoors.
- Only use cable reels in the unrolled state.
13. Always remain attentive
- Pay attention to what you are doing. Remain sensible
when working. Do not use the power tool when you are
distracted.
14. Check the power tool for potential damage
- Protective devices or other parts with minor damage
must be carefully inspected to ensure that they function
correctly and as intended prior to continued use of the
power tool.
- Check whether the moving parts function faultlessly and
do not jam or whether parts are damaged. All parts
must be correctly mounted and all conditions must be
fulfilled to ensure fault-free operation of the power tool.
- Damaged protective devices and parts must be properly
repaired or replaced by a recognised workshop, insofar
as nothing different is specified in the operating manual.
- Damaged switches must be replaced at a customer
service workshop.
- Do not use any faulty or damaged connection cables.
- Do not use any power tool on which the switch cannot
be switched on and off.
15. Have your power tool repaired by a qualified electrician
- This power tool conforms to the applicable safety
regulations. Repairs may only be performed by an
electrician using original spare parts. Otherwise
accidents can occur.
16. Attention!
- For your own safety, only use accessories and additional
equipment that are indicated in the operating manual
or have been recommended or indicated by the
manufacturer. Use of other tools or accessories that
those recommended in the operating manual or in the
catalogue could represent a personal danger to you.
17. Noise
- Wear hearing protection when using the compressor.
18. Replacing the connection line
- If the connection line is damaged, it must be replaced
by the manufacturer or an electrician to avoid danger.
There is a risk of electric shock.
19. Inflating tyres
- Directly after inflating tyres, check the pressure with
a suitable pressure gauge, for example at your filling
station.
20. Street-legal compressors in construction site operation
- Ensure that all hoses and fixtures are suitable for
the maximum permissible working pressure of the
compressor.
21. Set-up location
- Only set up the compressor on a flat surface.

5GB
22. In case of pressures above 7 bar, it is recommended to
equip supply hoses with a safety cable (e. g. a wire rope).
23. Avoid over-stressing the piping system by using flexible
hose connections to prevent kinking.
24. Ensure that oil cooling devices are kept clean and protective
devices remain in operational condition.
25. Risk of burns from hot oil
-Wear suitable protective gloves.
-Never work with the compressor near naked flames.
-Be careful not to spill oil.
26. Motor start-up is prohibited at low temperatures below
0°C.
Additional safety instructions
Safety instructions for working with compressed
air and blasting guns
• The compressor pump and lines can become very hot during
operation. Touching these parts will burn you.
• The air which is sucked in by the compressor must be kept
free of impurities that could cause fires or explosions in the
compressor pump.
• When releasing the hose coupling, hold the hose coupling
piece with your hand. This way, you can protect yourself
against injury from the rebounding hose.
• Wear safety goggles when working with the blow-out pistol.
Foreign bodies or blown off parts can easily cause injuries.
• Do not blow at people with the blow-out pistol and do not
clean clothes while being worn. Danger of injury!
Safety information for paint spraying
• Do not process any paints or solvents with a flash point
below 55° C. Risk of explosion!
• Do not heat up paints or solvents. Risk of explosion!
• If hazardous liquids are processed, wear protective filter
units (face guards). Also, adhere to the safety information
provided by the manufacturers of such liquids.
• The details and designations of the Ordinance on Hazardous
Substances, which are displayed on the outer packaging
of the processed material, must be observed. Additional
protective measures are to be undertaken if necessary,
particularly the wearing of suitable clothing and masks.
• Do not smoke during the spraying process and/or in the
work area. Risk of explosion! Paint vapours are easily
combustible.
• Never set up or operate the equipment in the vicinity of a fire
place, open lights or sparking machines.
• Do not store or eat food and drink in the work area. Paint
vapours are harmful to your health.
• The work area must exceed 30 m³ and sufficient ventilation
must be ensured during spraying and drying.
• Do not spray against the wind. Always adhere to the
regulations of the local police authority when spraying
combustible or hazardous materials.
• Do not process media such as white spirit, butyl alcohol and
methylene chloride with the PVC pressure hose. These media
will destroy the pressure hose.
• When used in conjunction with spray accessories (e. g. a
paint spray gun): Keep distance to the device while filling the
spray equipment and do not spray towards the compressor.
Operation of pressure vessels
• Anyone who operates a pressure vessel must keep this in
good working order, operate and monitor it correctly,
perform the necessary maintenance and servicing works
immediately and implement safety measures as required
according to the circumstances.
• The regulatory authority can instruct necessary monitoring
measures in individual cases.
• A pressure vessel must not be operated if it exhibits a defect
that poses a danger to personnel or third parties.
• Check the pressure vessel for rust and damage each time
before use. The compressor shall not be operated if the
pressure vessel is damaged or rusty. If you discover damage,
please contact the customer service workshop.
Keep these safety instructions in a safe place.
Residual risks
Comply with the stipulated maintenance and safety instructions
in the operating instructions.
Remain attentive at all times when working, and keep third
parties at a safe distance from your work area.
Even when the device is being used properly, there will always
be certain residual hazards that cannot be completely ruled
out. The following potential hazards can arise due to the type
and design of the device:
• Unintentional starting up of the product.
• Damage to hearing if the stipulated hearing protection is not
worn.
• Dirt particles, dust etc. can get irritate the eyes or face
despite wearing safety goggles.
• Inhaling swirled up particles.
Warning!
This power tool generates an electromagnetic field during
operation. This field can impair active or passive medical
implants under certain conditions. In order to prevent the risk
of serious or deadly injuries, we recommend that persons
with medical implants consult with their physician and the
manufacturer of the medical implant prior to operating the
power tool.
7. Technical data
Mains connection ................................................230 V∼ 50 Hz
Motor power ................................................................. 1800 W
Operating mode .......................................................................S1
Compressor speed .....................................................2850 min-1
Pressure vessel capacity ......................................... approx. 24 l
Maximum operating pressure............................ approx. 10 bar
Theoretical intake capacity ...........................approx. 260 l/min
Sound pressure level LPA ............................................ 72.9 dB(A)
Sound power level LWA .............................................. 92.9 dB(A)
Uncertainty KPA/WA .......................................................... 2.59 dB
Protection category .............................................................. IP32
Device weight ....................................................approx. 26.8 kg
Oil (SAE 15W 40) ...............................................approx. 0.25 l
Maximum altitude (above mean sea level) ...................1000 m

6GB
The noise emission values have been determined in accordance
with EN ISO 3744:1995.
Wear hearing protection.
Excessive noise can result in a loss of hearing.
8. Before commissioning
• Open the packaging and carefully remove the device.
• Remove the packaging material, packaging and transport
safety devices (if applicable).
• Check that the delivery is complete.
• Check the device and accessory parts for transport damage.
• If possible, keep the packaging until the expiry of the
warranty period.
DANGER
The device and the packaging are not children’s
toys! Do not let children play with plastic bags,
films or small parts! There is a danger of choking
or suffocating!
Before connecting the machine, make certain that the data on
the type plate matches with the mains power data.
• Prior to initial commissioning, remove the transport lid (20a)
and fill the compressor pump housing with oil as described
in item 9.4.
• Check the device for transport damage. Report any damage
immediately to the transport company which was used to
deliver the compressor.
• Install the compressor near the point of consumption.
• Avoid long air lines and supply lines (extension cables).
• Make sure that the intake air is dry and free of dust.
• Do not install the compressor in a damp or wet room.
• The compressor may only be used in suitable rooms (with
good ventilation and an ambient temperature from +5°C
to 40°C). There must be no dust, acids, vapours, explosive
gases or inflammable gases in the room.
• The compressor is designed to be used in dry rooms. It is
prohibited to use the compressor in areas where work is
conducted with sprayed water.
• The oil level in the compressor pump housing must be
checked before using the machine.
9. Attachment and operation
m Attention!
Always make sure the device is fully assembled
before commissioning!
You require the following for assembly:
1x open-ended spanner 13 mm
1x Phillips screwdriver
(not included in the scope of delivery)
9.1 Fitting the wheels (fig. 4)
• Fit the supplied wheels (11) as shown.
9.2 Fitting the supporting feet (fig. 5)
• Fit the supplied supporting feet (9) as shown.
9.3 Fitting the air filter (fig. 6, 7)
• Remove the transport lid (15a) and screw the air filter (15)
to the equipment.
9.4 Filling the oil (fig. 8, 9)
• Remove the transport lid (20a) of the oil filling opening (20).
• Fill the included compressor oil into the compressor pump
housing and insert the supplied oil sealing plug (16) into the
oil filling opening (20).
9.5 Mains connection
• The compressor is equipped with a mains cable with
protective contact plug. This can be connected to any 220 ‒
240 V∼ 50 Hz protective contact socket, with fuse protection
of at least 16A.
• Before you use the machine, make sure that the mains voltage
is the same as the operating voltage and the machine power
on the rating plate.
• Long supply cables, extensions, cable reels, etc. cause a
drop in voltage and can impede motor start-up.
• At low temperatures below +5°C, sluggishness may make
starting difficult or impossible.
9.6 On/off switch (fig. 2)
• Pull the on/off switch (17) upwards to switch on the
compressor. To switch off the compressor, press the on/off
switch (17) down.
9.7 Setting the pressure (fig. 1, 3)
• Use the pressure regulator (5) to set the pressure on the
pressure gauge (4).
• The pressure set can be drawn from the quick coupling (3).
• The vessel pressure can be read off at the pressure gauge
(6).
• The vessel pressure is drawn from the quick coupling (7).
9.8 Setting the pressure switch (fig. 1)
• The pressure switch (2) is set at the factory.
Cut-in pressure approx. 8 bar
Cut-out pressure approx. 10 bar
9.9 Fitting the compressed air hose (fig. 1, 3)
• Connect the plug nipple (14a) of the compressed air hose
(14) to one of the quick couplings (3, 7). Then attach the
compressed air tool to the quick coupling (14b) of the
compressed air hose (14).
9.10 Thermal protector
The thermal protector is built into the device.
If the thermal protector has tripped, proceed as follows:
• Pull out the mains plug.
• Wait about two to three minutes.
• Plug the device in again.
• If the device does not start, repeat the process.
• If the device does not start again, switch the device off and
on again using the on/off switch (17).
• If you have carried out all of the steps above and the device
still does not work, contact our service team.

7GB
10. Electrical connection
The electrical motor installed is connected and
ready for operation. The connection complies
with the applicable VDE and DIN provisions.
The customer’s mains connection as well as the
extension cable used must also comply with these
regulations.
10.1 Important notes
In the event of overloading, the motor will switch itself off. After
a cool-down period (time varies) the motor can be switched
back on again.
10.2 Damaged electrical connection cable
The insulation on electrical connection cables is often damaged.
This may have the following causes:
• Pressure points, where connection cables are passed through
windows or doors.
• Kinks where the connection cable has been improperly
fastened or routed.
• Places where the connection cables have been cut due to
being driven over.
• Insulation damage due to being ripped out of the wall outlet.
• Cracks due to the insulation ageing.
Such damaged electrical connection cables must not be used
and are life-threatening due to the insulation damage.
Check the electrical connection cables for damage regularly.
Ensure that the connection cables are disconnected from
electrical power when checking for damage.
Electrical connection cables must comply with the applicable
VDE and DIN provisions. Only use connection cables of the
same designation.
The printing of the type designation on the connection cable
is mandatory.
10.3 AC motor
• The mains voltage must be 220 - 240 V∼ 50 Hz.
• Extension cables up to 25 m long must have a cross-section
of 1.5 square millimetres.
Connections and repair work on the electrical equipment may
only be carried out by electricians.
Please provide the following information in the event of any
enquiries:
• Type of current for the motor
• Data of machine type plate
• Data of motor type plate
11. Cleaning, maintenance and storage
m Attention!
Pull out the mains plug before carrying out any cleaning and
maintenance work! Risk of injury from electric shock!
m Attention!
Wait until the equipment has cooled down completely! Danger
of burning!
m Attention!
Always depressurise the equipment before carrying out any
cleaning and maintenance work! Danger of injury!
11.1 Cleaning
• Keep the device as free of dust and dirt as possible. Rub the
device clean with a clean cloth or blow it off with compressed
air at low pressure.
• We recommend that you clean the device directly after every
use.
• Clean the device at regular intervals using a damp cloth and
a little soft soap. Do not use aggressive cleaning agents or
solvents; they could attack the plastic parts of the device.
Make sure that no water can penetrate the device interior.
• The hose and injection tools must be disconnected from the
compressor before cleaning. The compressor must not be
cleaned with water, solvents or similar. gereinigt werden.
11.2 Maintaining the pressure vessel (fig. 1)
Attention!
To ensure a long service life for the pressure vessel (8), drain off
the condensate after each use by opening the drain screw (10).
Release the vessel pressure first (see 11.8.1). Open the drain
screw (10) by turning it counterclockwise (when looking
at the screw from the bottom of the compressor) so that the
condensate can be completely drained out of the pressure
vessel (8).
Then close the drain screw (10) again (turn it clockwise).
Check the pressure vessel (8) for rust and damage each time
before use.
Do not use the compressor with a damaged or rusty pressure
vessel (8). If you discover damage, please contact the customer
service workshop.
m Attention!
The condensate from the pressure vessel (8) will contain
residual oil. Dispose of the condensate in an environmentally
friendly manner at a suitable collection point.
11.3 Safety valve (fig. 3)
The safety valve (19) has been set for the highest permitted
pressure of the pressure vessel (8). It is not permitted to adjust
the safety valve (19) or remove the connection lock (19b)
between the exhaust nut (19a) and its cap (19c). Actuate
the safety valve (19) every 30 operating hours but at least
three times a year to ensure that it works when required. Turn
the perforated exhaust nut (19a) counterclockwise to open it
and use your hands to pull the valve rod outwards over the
perforated exhaust nut (19a) to open the outlet of the safety
valve (19). Now, the valve audibly releases air. Then, tighten
the exhaust nut (19a) clockwise again.
11.4 Checking the oil level at regular intervals
(fig. 10)
Place the compressor on a level and straight surface.
The oil level must be between the MAX and MIN marks on the
oil-level window (18).
Oil change: recommended oil: SAE 15W 40 or equivalent. The
original oil filling must be changed after 100 operating hours;
afterwards the oil must be drained and replaced with new oil
after every 500 operating hours.

8GB
11.5 Changing the oil (fig. 1, 9, 10)
Switch the motor off and unplug the mains plug from the power
outlet. Remove the oil sealing plug (16). After releasing any
air pressure you can unscrew the oil drain screw (12) from the
compressor pump (13).
To prevent the oil from running out in an uncontrolled manner,
hold a small metal chute under the opening and collect the
oil in a vessel. If the oil does not drain out completely, we
recommend tilting the compressor slightly. When the oil has
drained out, re-fit the oil drain screw (12).
Dispose of the old oil at a drop-off point for old oil.
To fill in the correct quantity of oil, make sure that the compressor
stands on an even surface. Fill new oil through the oil filling
opening (20) until it comes up to the maximum level. This is
marked with a red dot on the oil-level window (18) (fig. 10).
Do not exceed the maximum filling quantity. Overfilling the
equipment may result in damage. Reinsert the oil sealing plug
(16) into the oil filling opening (20).
11.6 Cleaning the air filter (fig. 3, 11, 12)
The air filter (15) prevents dust and dirt being sucked in. It is
essential to clean this air filter (15) after at least every 300
hours in service. A blocked air filter significantly reduces the
compressor power.
Remove the air filter (15) by opening the wing screw (15b).
Then pull off the filter cover (15e). Now you can remove the
filter element (15c) and the filter housing (15d). Carefully tap
out the filter element (15c), the filter cover (15e) and the filter
housing (15d). These components must then be blown out with
compressed air (approx. 3 bar) and reassembled in reverse
order.
11.7 Service information
With this product, it is necessary to note that the following
parts are subject to natural or usage-related wear, or that the
following parts are required as consumables.
Wearing parts*:Air filter
* may not be included in the scope of supply!
11.8 Storage
m Attention!
Pull out the mains plug and ventilate the equipment
and all connected pneumatic tools. Store the
compressor in such a way that it cannot be used by
unauthorised persons.
m Attention!
Store the compressor only in a dry location which
is not accessible to unauthorised persons. Always
store upright, never tilted! Oil may leak out!
11.8.1 Releasing excess pressure
Release the excess pressure by switching off the compressor
and using the compressed air which is still left in the pressure
vessel (8), e. g. with a compressed air tool running in idle mode
or with a blow-out pistol.
12. Transport
Use the transport handle (1) to transport the device, and drive
the compressor with it.
When lifting the compressor, note its weight (see Technical
data).
Ensure that the load is well secured when transporting the
compressor in a motor vehicle.
13. Disposal and recycling
The device is supplied in packaging to avoid transport
damages. This packaging is raw material and can thus be used
again or can be reintegrated into the raw material cycle.
The device and its accessories are made of different materials,
such as metals and plastics. Take defective components to
special waste disposal sites. Check with your specialist dealer
or municipal administration!
The packaging is wholly composed of
environmentally-friendly materials that can be
disposed of at a local recycling centre.
Contact your local refuse disposal authority for
more details of how to dispose of your worn-out
electrical devices.
Old devices must not be disposed of with household
waste!
This symbol indicates that this product must not be
disposed of together with domestic waste in compliance
with the Directive (2012/19/EU) pertaining to waste
electrical and electronic equipment (WEEE). This
product must be handed over at the intended collection point.
This can be done, for example, by returning it when purchasing
a similar product or delivering it to an authorised collection
point for the recycling of old electrical and electronic devices.
Improper handling of waste equipment may have negative
consequences for the environment and human health due to
potentially hazardous substances that are often contained in
electrical and electronic equipment. By properly disposing of
this product, you are also contributing to the effective use of
natural resources. You can obtain information on collection
points for waste equipment from your municipal administration,
public waste disposal authority, an authorised body for the
disposal of waste electrical and electronic equipment or your
waste disposal company.

9GB
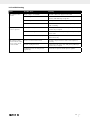
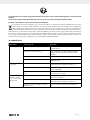
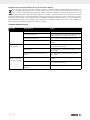
14. Troubleshooting
Fault Possible cause Remedy
The compressor does
not start.
Mains voltage is not available. Check the cable, mains plug, fuse and socket.
Mains voltage is too low. Make sure that the extension cable is not too long. Use an
extension cable with large enough wires.
Outside temperature is too low. Never operate with an outside temperature of below +5 °C.
Motor is overheated. Allow the motor to cool down. If necessary, remedy the cause
of the overheating.
The compressor starts but
there is no pressure.
The safety valve (19) leaks. Contact your local service centre. Only allow qualified per-
sonnel to carry out repairs.
The seals are damaged. Check the seals and have any damaged seals replaced by a
service centre.
The drain screw for condensate (10) leaks. Tighten the screw by hand. Check the seal on the screw and
replace if necessary.
The compressor starts,
pressure is shown on the
pressure gauge, but the
tools do not start.
The hose connections have a leak. Check the compressed air hose and tools and replace if
necessary.
A quick coupling has a leak. Contact your local service centre. Only allow qualified per-
sonnel to carry out repairs.
Insufficient pressure set on the pressure
regulator (5).
Increase the set pressure with the pressure regulator.

10 GB
15. Warranty certificate
Dear Customer,
All of our products undergo strict quality checks to ensure that they reach you in perfect condition. In the unlikely event that your device
develops a fault, please contact our service department at the address shown on this guarantee card. Of course, if you would prefer to
call us then we are also happy to offer our assistance under the service number printed below. Please note the following terms under which
guarantee claims can be made:
• These guarantee terms cover additional guarantee rights and do not affect your statutory warranty rights. We do not charge you for
this guarantee.
• Our guarantee only covers problems caused by material or manufacturing defects, and it is restricted to the rectification of these de-
fects or replacement of the device. Please note that our devices have not been designed for use in commercial, trade or industrial ap-
plications. Consequently, the guarantee is invalidated if the equipment is used in commercial, trade or industrial applications or for
other equivalent activities. The following are also excluded from our guarantee: compensation for transport damage, damage caused
by failure to comply with the installation/assembly instructions or damage caused by unprofessional installation, failure to comply with
the operating instructions (e.g. connection to the wrong mains voltage or current type), misuse or inappropriate use (such as overload-
ing of the device or use of non-approved tools or accessories), failure to comply with the maintenance and safety regulations, ingress
of foreign bodies into the device (e.g. sand, stones or dust), effects of force or external influences (e.g. damage caused by the device
being dropped) and normal wear resulting from proper operation of the device.
The guarantee is rendered null and void if any attempt is made to tamper with the device.
• The guarantee is valid for a period of 3 years starting from the purchase date of the device. Guarantee claims should be submitted
before the end of the guarantee period within two weeks of the defect being noticed. No guarantee claims will be accepted after the
end of the guarantee period. The original guarantee period remains applicable to the device even if repairs are carried out or parts
are replaced. In such cases, the work performed or parts fitted will not result in an extension of the guarantee period, and no new
guarantee will become active for the work performed or parts fitted. This also applies when an on-site service is used.
• In order to assert your guarantee claim, please contact the service partner shown below. If the complaint is within the guarantee pe-
riod, we will provide you with a return slip, with which you can return your defective device free of charge to us. It would help us if you
could describe the nature of the problem in as much detail as possible. If the defect is covered by our guarantee then your device will
either be repaired immediately and returned to you, or we will send you a new device.
Of course, we are also happy offer a chargeable repair service for any defects which are not covered by the scope of this guarantee or for
units which are no longer covered. To take advantage of this service, please send the device to our service address.
Service-Hotline (GB):
+800 4003 4003
(0,00 EUR/Min.)
Service-Email (GB):
service.GB@scheppach.com
Service Address (GB):
Forest Park & Garden
Coed Court, Taffsmead Road
Treforest, Ind. Estate, Pontypridd CF375SW
At www.lidl-service.com you can download this and many more manuals, product videos plus installation
software.
The QR code takes you directly to the Lidl service page (www.lidl-service.com) and you can open your oper-
ating manual by entering the article number (IAN) 360588_2010.

11HU
Tartalomjegyzék: Oldal:
1. A készüléken található szimbólumok magyarázata .......................................................................................................................................12
2. Bevezetés ...........................................................................................................................................................................................................13
3. A készülék leírása (1-12. ábra) ........................................................................................................................................................................13
4. Szállított elemek ................................................................................................................................................................................................13
5. Rendeltetésszerű használat ..............................................................................................................................................................................13
6. Biztonsági utasítások .........................................................................................................................................................................................14
7. Műszaki adatok ................................................................................................................................................................................................16
8. Üzembe helyezés előtt ......................................................................................................................................................................................16
9. Felépítés és kezelés ...........................................................................................................................................................................................16
10. Elektromos csatlakoztatás .................................................................................................................................................................................17
11. Tisztítás, karbantartás és tárolás ......................................................................................................................................................................17
12. Szállítás ..............................................................................................................................................................................................................18
13. Ártalmatlanítás és újrahasznosítás ...................................................................................................................................................................18
14. Hibaelhárítás .....................................................................................................................................................................................................19
15. Jótállási tájékoztató ...........................................................................................................................................................................................20
16. Megfelelőségi nyilatkozat ................................................................................................................................................................................63

12 HU
1. A készüléken található szimbólumok magyarázata
HU Üzembe helyezés előtt olvassa el és vegye figyelembe a kezelési útmutatót és a bizton-
sági utasításokat!
HU Viseljen hallásvédőt. A zaj következtében hallásvesztésre kerülhet sor.
HU Figyelmeztetés forró alkatrészekre! (A, 11. ábra)
HU Figyelmeztetés elektromos feszültségre
HU Figyelmeztetés! Az egység működése automatikus, és figyelmeztetés nélkül elindulhat.
HU Figyelem! Az első üzembe helyezés előtt ellenőrizze az olajszintet, és cserélje ki az olaj
záródugóját!
HU Tartsa be a figyelmeztető és biztonsági utasításokat!
HU Hangteljesítményszint értéke dB-ben
HU A készüléket ne érje eső!

13HU
2. Bevezetés
Gyártó:
scheppach
Fabrikation von Holzbearbeitungsmaschinen GmbH
Günzburger Straße 69
D-89335 Ichenhausen
Kedves Ügyfelünk!
Sok örömet és sikert kívánunk új készüléke használatához.
Megjegyzés:
E gép gyártója a hatályos termékfelelősségi törvény szerint
nem felelős a gépen esett vagy a gép által okozott károkért a
következő esetekben:
• szakszerűtlen kezelés,
• A kezelési útmutató be nem tartása,
• harmadik fél által végzett illetéktelen javítás,
• nem eredeti pótalkatrészek beépítése és cseréje,
• nem rendeltetésszerű használat,
• A villamos berendezés működésképtelensége a villamos elő-
írások és a VDE0100, valamint a DIN57113 / VDE0113
előírásainak be nem tartása esetén.
Vegye figyelembe a következőket:
A szerelés és üzembe helyezés előtt olvassa el a kezelési útmu-
tató teljes szövegét.
Kezelési útmutatónkból megismerheti elektromos szerszámát,
és elsajátíthatja a rendeltetésszerű használatához szükséges
ismereteket.
A kezelési útmutató fontos információkat tartalmaz arról, ho-
gyan dolgozhat az elektromos szerszámmal biztonságosan,
szakszerűen és gazdaságosan, hogyan kerülheti el a veszélye-
ket, csökkentheti a javítási költségeket és az időkieséseket, és
növelheti a gép megbízhatóságát és élettartamát.
A jelen kezelési útmutató biztonsági rendelkezésein túl feltétle-
nül tartsa be az országában az elektromos szerszám üzemelte-
tésével kapcsolatosan érvényes előírásokat is.
A szennyeződés és nedvesség ellen műanyag tokba csomagolt
kezelési útmutatót az elektromos szerszám közelében tárolja.
Munkába állás előtt minden kezelő olvassa el, és gondosan
tartsa be előírásait. Az elektromos szerszámon csak olyan
személyek dolgozhatnak, akiket betanítottak az elektromos
szerszám használatára, és megismertettek az előforduló ve-
szélyforrásokkal. Tartsa be a kezelők minimális életkorára vo-
natkozó rendelkezést.
A jelen kezelési útmutató biztonsági rendelkezésein és orszá-
gában a készülék üzemeltetésére vonatkozó előírásokon túl fel-
tétlenül tartsa be az azonos kialakítású gépek üzemeltetésére
vonatkozó általánosan elismert műszaki szabályokat is.
Nem vállalunk felelősséget az olyan balesetekért vagy káro-
kért, amelyek azért keletkeznek, mert nem vették figyelembe a
jelen útmutatót és a biztonsági utasításokat.
3. A készülék leírása (1-12. ábra)
1. Szállítási fogantyú
2. Nyomáskapcsoló
3. Gyorscsatlakozó (szabályozott sűrített levegő)
4. Manométer (leolvasható a beállított nyomás)
5. Nyomásszabályozó
6. Manométer (leolvasható a kazán nyomása)
7. Gyorscsatlakozó (nem szabályozott sűrített levegő)
8. Nyomástartó edény
9. Állítóláb
9a. Hézagoló alátét
9b. Csavar
10. Kondenzvíz leeresztő csavarja
11. Kerék
11a. Hézagoló alátét
11b. Lencsefejű csavar
12. Olajleeresztő csavar
13. Kompresszoros szivattyú
14. Sűrített levegő tömlője
14a. Dugaszcsonk
14b. Gyorscsatlakozó
15. Légszűrő
15a. Szállítási fedél
15b. Szárnyas csavar
15c. Szűrőbetét
15d. Szűrőház
15e. Szűrőfedél
16. Olajzáródugó
17. Be-/kikapcsoló
18. Olajszint-ellenőrző ablak
19. Biztonsági szelep
19a. Leeresztő anya
19b. Csatlakozás rögzítése
19c. A leeresztő anya sapkája
20. Olajbetöltő nyílás
20a. Szállítási fedél
4. Szállított elemek
1 db légszűrő
2 db állító láb
2 db kerék
1 db szerelőanyag
1 db olajzáródugó
1 db olajos flakon
1 db sűrítettlevegő-tömlő
1x Kezelési útmutató
5. Rendeltetésszerű használat
A kompresszor sűrített levegő előállítására szolgál olyan sűrí-
tett levegős szerszámokhoz, amelyek maximum kb. 180 l/perc
levegőmennyiséggel működtethetők (például abroncstöltő, ki-
fúvópisztoly vagy festékpisztoly). A szállított levegő korlátozott
mennyisége miatt nagyon nagy levegőfogyasztású szerszámok
(pl. rezgőcsiszolók, rúdcsiszolók és ütőműves csavarbehajtók)
üzemeltetése nem lehetséges.

14 HU
A gépet csak rendeltetésszerűen szabad használni. Minden
ettől eltérő használat nem rendeltetésszerűnek minősül. Az eb-
ből fakadó minden kárért és sérülésért nem a gyártó, hanem a
felhasználó/kezelő viseli a felelősséget.
Kérjük, vegye figyelembe, hogy készülékeinket rendeltetésük
szerint nem kisipari, kéziipari vagy ipari használatra tervezték.
A készülékre semmilyen garanciát nem vállalunk, ha kisipari,
kéziipari vagy ipari, valamint ezekkel egyenértékű tevékenysé-
gekhez használja.
6. Biztonsági utasítások
m Figyelem!
Elektromos szerszámok használatakor az elektromos áramütés,
a sérülés- és tűzveszély ellen tartsa be a következő alapvető
biztonsági intézkedéseket. Használat előtt olvassa el az elekt-
romos szerszám összes útmutatóját és tartsa be a biztonsági
utasításokat.
Biztonságos munkavégzés
1. Tartsa rendben a munkaterületet
- A munkaterületi rendetlenség balesetveszélyes.
2. Vegye figyelembe a környezeti hatásokat
- Az elektromos szerszámot ne érje eső.
- Az elektromos szerszámot ne használja nedves vagy
vizes környezetben. Áramütés veszélye!
- Gondoskodjon a jó megvilágításról a munkaterületen.
- Ne használja olyan helyen az elektromos szerszámot,
ahol tűz- vagy robbanásveszély áll fenn.
3. Védekezzen az áramütéssel szemben
- Teste ne érintkezzen a földelt alkatrészekkel (például
csövekkel, fűtőtestekkel, tűzhelyekkel, hűtőszekrények-
kel).
4. Tartsa távol a gyermekeket!
- Ne engedje, hogy mások megérintsék a szerszámot és
kábelét, tartsa őket távol a munkaterülettől.
5. A nem használt villamos kézi szerszámokat biztonságosan
kell tárolni
- A használaton kívüli elektromos szerszámokat száraz,
magasan fekvő vagy elzárt helyen kell tárolni, ahol nem
férnek hozzá gyermekek.
6. Ne terhelje túl a villamos kézi szerszámot
- A megadott teljesítménytartományban jobban és bizton-
ságosabban dolgozhat.
7. Megfelelő ruházatot viseljen
- Ne viseljen bő ruházatot vagy ékszert, mert azok bea-
kadhatnak a mozgó alkatrészekbe.
- Ha a szabadban dolgozik, akkor ajánlatos gumikesz-
tyűt és csúszásmentes lábbelit viselni.
- Ha hosszú a haja, viseljen hajhálót.
8. Ne használja a kábelt olyan célokra, amelyek nem mi-
nősülnek rendeltetésszerűnek
- Ne a kábelnél fogva húzza ki a csatlakozódugót az al-
jzatból. Óvja a kábelt a hőtől, olajtól és éles peremektől.
9. Gondosan ápolja a szerszámot
- A megfelelő és biztonságos munkavégzés érdekében
tartsa tisztán a kompresszort.
- Tartsa be a karbantartásra vonatkozó előírásokat.
- Rendszeresen ellenőrizze az elektromos szerszám csat-
lakozókábelét, és sérülés esetén elismert szakemberrel
cseréltesse ki.
- Rendszeresen ellenőrizze a hosszabbító kábeleket, és
cserélje ki azokat, ha megsérülnek.
10. A hálózati dugót húzza ki a dugaszoló aljzatból
- Ha nem használja az elektromos szerszámot, karban-
tartás előtt, valamint a szerszámok, pl. fűrészlap, fúró,
marófej cseréjekor.
11. Kerülje a véletlen bekapcsolást
- Győződjön meg arról, hogy a csatlakozódugó aljzatba
történő bedugásakor ki van kapcsolva a kapcsoló.
12. Kültéren használjon hosszabbítót
- A szabadban csak engedélyezett és megfelelő jelölés-
sel ellátott hosszabbítókábelt használjon.
- Kábeldob használata esetén mindig tekerje le teljesen
a kábelt.
13. Legyen mindig óvatos
- Figyeljen arra, amit csinál. Dolgozzon ésszel. Ne hasz-
nálja a villamos kézi szerszámot, ha nem koncentrál.
14. Ellenőrizze az elektromos szerszámot, hogy nem sérült-e
- Az elektromos szerszám további használata előtt gon-
dosan ellenőrizze a védőberendezések vagy a köny-
nyebben sérült részek kifogástalan és rendeltetésszerű
működését.
- Ellenőrizze, hogy a mozgó részek kifogástalanul mű-
ködnek, nem szorulnak és nem sérültek-e. Az elektromos
szerszám kifogástalan üzemeltetéséhez minden alkat-
részt helyesen kell felszerelni és minden feltételt be kell
tartani.
- A sérült védőberendezéseket és alkatrészeket rendelte-
tésszerűen, márkaszervizzel javíttassa meg vagy cserél-
tesse ki, amennyiben a kezelési utasítás nem rendelkezik
másként.
- A sérült kapcsolókat vevőszolgálati szervizünkkel cserél-
tesse ki.
- Ne használjon hibás vagy sérült csatlakozóvezetéket.
- Ne használjon olyan elektromos szerszámot, amelynek
a kapcsolója nem működik.
15. Az elektromos szerszámot villamossági szakemberrel javít-
tassa meg
- Ez az elektromos szerszám megfelel a vonatkozó bizton-
sági előírásoknak. Javításokat csak villamossági szakem-
ber végezhet, eredeti pótalkatrészekkel; ellenkező eset-
ben a gép használója balesetet szenvedhet.
16. Figyelem!
- A saját biztonsága érdekében csak a használati útmuta-
tóban megadott vagy a gyártó által ajánlott vagy meg-
adott tartozékokat és kiegészítő készülékeket használja.
A kezelési utasításban vagy a katalógusban javasoltak-
tól eltérő betétek vagy tartozékok használata személyi
sérülések veszélyével fenyegethet.
17. Zaj
- A kompresszor használatakor hallásvédő viselendő.
18. A csatlakozóvezeték cseréje
- Ha megsérül a csatlakozóvezeték, akkor a veszélyek el-
kerüléséhez a gyártó vagy villanyszerelő cserélje ki azt.
Áramütés veszélye.

15HU
19. Abroncs felfújása
- Felfújás után azonnal ellenőrizze az abroncsnyomást
egy megfelelő mérőkészülékkel, például egy benzin-
kúton.
20. Közúti közlekedésre alkalmas kompresszorok építkezése-
ken
- Ügyeljen rá, hogy minden tömlő és szerelvény megfe-
leljen a kompresszor megengedett legnagyobb üzemi
nyomásának.
21. Felállítás helye
- Állítsa a kompresszort vízszintes felületre.
22. 7 bar feletti nyomás esetén a bevezetőtömlőket érdemes
biztonsági kábellel, pl. egy drótkötéllel felszerelni.
23. Úgy kerülje el a vezetékrendszer nagy terheléseit, hogy
rugalmas tömlőcsatlakozókat használ, és kerüli a törési
helyeket.
24. Győződjön meg arról, hogy az olajhűtő berendezések
tisztán vannak tartva, és a védőberendezések üzemképes
állapotban maradnak.
25. Égési sérülések veszélye a forró olaj miatt
-Viseljen megfelelő védőkesztyűt.
-A kompresszoron soha ne dolgozzon nyílt láng köze-
lében.
-Ügyeljen rá, hogy ne folyjon ki az olaj.
26. 0 °C alatti alacsony hőmérsékletek esetén tilos elindítani
a motort.
További biztonsági utasítások
A sűrített levegővel és a kifúvópisztollyal való
munkavégzésre vonatkozó biztonsági utasítások
• A kompresszorszivattyú és a vezetékek üzem közben erősen
felmelegszenek. Megérintésük égési sérülést okoz.
• A kompresszor által beszívott levegőbe nem kerülhet semmi-
lyen adalékanyag, mert ez a kompresszorszivattyúnál tüzet
vagy robbanást okozhat.
• A tömlőcsatlakozó meglazításakor tartsa kézzel szorosan a
tömlő csatlakozódarabját. Így elkerülheti a visszacsapódó
tömlő miatti sérüléseket.
• A kifúvópisztollyal való munkavégzéskor viseljen védőszem-
üveget. Az idegen testek és kifúvott tárgyak könnyebb sérü-
léseket okozhatnak.
• A kifúvópisztollyal ne fújjon le személyeket, és ne használja
a ruházat a testen való megtisztítására. Sérülésveszély!
A festékszórásra vonatkozó biztonsági utasítások
• Ne használjon 55° C alatti lobbanáspontú lakkot vagy ol-
dószert. Robbanásveszély!
• Ne melegítse fel a lakkot vagy az oldószert. Robbanásve-
szély!
• Egészségkárosító folyadékokkal való munkavégzéskor véde-
lem céljából szűrő felszerelés (arcmaszk) használata szüksé-
ges. Vegye figyelembe az ilyen anyagok gyártói által meg-
adott, védelmi intézkedésekre vonatkozó információkat is.
• A felhasználandó anyagok külső csomagolásain elhelye-
zett, veszélyes anyagokra vonatkozó rendelet szerinti adato-
kat és jelöléseket figyelembe kell venni. Szükség esetén kie-
gészítő óvintézkedéseket kell foganatosítani, így elsősorban
megfelelő ruházatot és maszkot kell viselni.
• A szórási folyamat közben, és a munkaterületen általános-
ságban tilos a dohányzás. Robbanásveszély! A festékgőz
is könnyen éghető.
• Kerülni kell a tűzfészkek, nyílt láng és szikraképződéssel járó
gépek használatát, és ezek közelségét.
• Tilos a munkatérben ételt vagy italt tárolni vagy fogyasztani.
A festékgőz károsítja az egészséget.
• A munkatér legyen nagyobb, mint 30 m³, továbbá szórás-
kor, valamint száradáskor biztosítani kell a megfelelő levegő-
cserét.
• Soha ne végezzen szórást széllel szemben. Éghető, ill. ve-
szélyes szóróanyagok szórásakor alapvetően be kell tartani
a helyi rendőrhatóság rendelkezéseit.
• PVC nyomótömlő esetén nem szabad olyan anyagokkal
dolgozni, mint például lakkbenzin, butil-alkohol vagy meti-
lén-klorid. Ezek az anyagok károsítják a nyomótömlőt.
• Szóró tartozékokkal (pl. festékszóró pisztollyal) való hasz-
nálat esetén: A szóró készüléket feltöltés közben tartsa azt
távol a kompresszortól, és ne permetezzen a kompresszor
irányába.
Nyomástartály működtetése
• Nyomástartály működtetése esetén a tartályt megfelelő álla-
potban kell tartani, előírás szerint kell üzemeltetni és felügyel-
ni, a karbantartási és javítási munkákat haladéktalanul el kell
végezni, és a körülményektől függő szükséges biztonsági in-
tézkedéseket meg kell hozni.
• A felügyeleti szerv rendkívüli esetben szükséges felügyeleti
intézkedéseket is megkövetelhet.
• Nem szabad nyomástartályt üzemeltetni, ha olyan hiányos-
ság mutatkozik, amely az alkalmazottakat vagy más szemé-
lyeket veszélyeztet.
• Minden egyes üzemeltetés előtt ellenőrizze, hogy nem rozs-
dás vagy sérült-e a nyomástartály. A kompresszort nem sza-
bad sérült vagy rozsdás nyomástartállyal üzemeltetni. Ha
sérüléseket észlelt, forduljon vevőszolgálati szervizünkhöz.
A biztonsági utasításokat tárolja megfelelően.
Maradék kockázat
Tartsa be a kezelési útmutató előírt karbantartási és biztonsági
utasításait.
Munka közben mindig legyen figyelmes, és külső személyeket
tartson biztonságos távolságra a munkavégzési helytől.
A készülék szakszerű használata esetén is mindig marad egy
bizonyos maradék kockázat, ami nem zárható ki. A készülék
típusából és szerkezetéből adódóan az alábbi lehetséges ve-
szélyek származhatnak:
• A termék akaratlan üzembe helyezése.
• Halláskárosodás, ha nem viseli az előírt hallásvédőt.
• Szennyeződés részecskék, por stb. kerülhet a szemébe vagy
az arcára a védőszemüveg viselése esetén is.
• Felkavart részecskék belégzése.

16 HU
Figyelmeztetés!
Ez az elektromos szerszám üzem közben elektromágneses me-
zőt hoz létre. Ez a mező bizonyos körülmények között negatív
hatással lehet az aktív vagy passzív orvosi implantátumokra.
A komoly és súlyos sérülések kockázatának elkerülése érde-
kében javasoljuk, hogy az orvosi implantátummal rendelkező
személyek az elektromos szerszám használata előtt keressék
fel orvosukat és implantátumuk gyártóját.
7. Műszaki adatok
Hálózati csatlakozás ...........................................230 V∼ 50 Hz
Motorteljesítmény .......................................................... 1800 W
Üzemmód .................................................................................S1
Kompresszor-fordulatszám ......................................... 2850 min-1
Nyomótartály-térfogat .................................................... kb. 24 l
Maximális üzemi nyomás .......................................... kb. 10 bar
Elméleti szívóteljesítmény .................................... kb. 260 l/perc
LPA hangnyomásszint..................................................72,9 dB(A)
LWA hangteljesítményszint ..........................................92,9 dB(A)
Bizonytalanság, KPA/WA ................................................... 2,59 dB
Védelmi fokozat .................................................................... IP32
A berendezés súlya ...................................................kb. 26,8 kg
olaj (SAE 15W 40) ......................................................kb. 0,25 l
Maximális felállítási magasság (tengerszint felett) .......1000 m
A zajkibocsátási értékek megállapítása az ENISO 3744:1995
szabvány alapján történt.
Viseljen hallásvédőt.
A zaj következtében hallásvesztésre kerülhet sor.
8. Üzembe helyezés előtt
• Nyissa ki a csomagolást, és óvatosan vegye ki a készüléket.
• Távolítsa el a csomagolóanyagot, valamint a csomagolási és
szállítási biztosítékokat (ha vannak).
• Ellenőrizze, hogy hiánytalan-e a szállítmány.
• Ellenőrizze a készülék és a tartozékok szállításból eredő
sérüléseit.
• Lehetőség szerint a jótállási idő leteltéig őrizze meg a cso-
magolást.
VESZÉLY
A készülék és a csomagolóanyag nem játékszer!
Ne engedje, hogy a gyermekek a műanyag zacs-
kókkal, fóliákkal és apró részekkel játsszanak!
Lenyelés és fulladás veszélye áll fenn!
A csatlakoztatás előtt győződjön meg arról, hogy a típustáblán
szereplő adatok egyeznek a hálózati adatokkal.
• Az első üzembe helyezés előtt távolítsa el a szállítási fedelet
(20a), és a 9.4pontban leírtak szerint töltse fel olajjal a
kompresszor szivattyúházát.
• Ellenőrizze, hogy nincsenek-e szállítási sérülések a készülé-
ken. Az esetleges sérüléseket azonnal jelentse a kompresz-
szort kiszállító szállítmányozónak.
• A kompresszor telepítése a fogyasztó közelében történjen.
• Kerülje a hosszú légvezetékek és hosszú tápvezetékek (hosz-
szabbító kábel) használatát.
• Ügyeljen arra, hogy a beszívott levegő száraz és pormentes
legyen.
• Ne helyezze el nyirkos vagy nedves helyiségben a komp-
resszort.
• A kompresszort csak megfelelő helyiségben (jól szellőző,
+5°C és 40°C közötti környezeti hőmérséklet) szabad mű-
ködtetni. A helyiségnek portól, savaktól, gőzöktől, robbanás-
veszélyes és gyúlékony gázoktól mentesnek kell lennie.
• A kompresszort száraz helyiségben történő használatra ter-
vezték. Olyan területeken, ahol a munkavégzés porlasztott
vízzel történik, használata nem megengedett.
• Üzembe helyezés előtt ellenőrizze az olajszintet a kompresz-
szoros szivattyú házban.
9. Felépítés és kezelés
m Figyelem!
Az üzembe helyezés előtt feltétlenül szerelje össze
teljesen a készüléket!
A szereléshez a következőkre van szükség:
1 db villáskulcs, 13 mm
1db csillagcsavarhúzó
(nem szerepel a szállított elemek között)
9.1 A kerekek felszerelése (4. ábra)
• Szerelje fel a mellékelt kerekeket (11) az ábrán látható mó-
don.
9.2 Az állító lábak felszerelése (5. ábra)
• Szerelje fel a mellékelt állító lábakat (9) az ábrán látható
módon.
9.3 A légszűrő felszerelése (6., 7. ábra)
• Távolítsa el a szállítási fedelet (15a), és csavarozza fel erő-
sen a készülékre a légszűrőt (15).
9.4 Olaj betöltése (8., 9. ábra)
• Távolítsa el az olajbetöltő nyílás (20a) szállítási fedelét (20).
• Töltse be a szállítmány részét képező kompresszorolajat a
kompresszor szivattyúházába, és helyezze be a mellékelt
olajzáró dugót (16) az olajbetöltő nyílásba (20).
9.5 Hálózati csatlakozás
• A kompresszor védőérintkezős csatlakozós hálózati kábellel
rendelkezik. Ez minden 220‒240 V∼ 50 Hz, 16 A biztosí-
tékkal és védőföldeléssel ellátott aljzathoz csatlakoztatható.
• Az üzembe helyezés előtt ügyeljen arra, hogy a hálózati
feszültség egyezzen a típustáblán szereplő üzemi feszültség-
gel és gépteljesítménnyel.
• A hosszú tápvezetékek, hosszabbítók, kábeldobok stb. fe-
szültségesést okoznak, és megakadályozhatják a motor in-
dítását.
• +5°C alatti alacsony hőmérsékletek esetén szintén számolni
kell a motor nehézkes indításával.
9.6 Be-/kikapcsoló (2.ábra)
• A kompresszor bekapcsolásához húzza felfelé a be-/kikap-
csolót (17). Kikapcsoláshoz nyomja lefelé a be-/kikapcsolót
(17).
Seite wird geladen ...
Seite wird geladen ...
Seite wird geladen ...
Seite wird geladen ...
Seite wird geladen ...
Seite wird geladen ...
Seite wird geladen ...
Seite wird geladen ...
Seite wird geladen ...
Seite wird geladen ...
Seite wird geladen ...
Seite wird geladen ...
Seite wird geladen ...
Seite wird geladen ...
Seite wird geladen ...
Seite wird geladen ...
Seite wird geladen ...
Seite wird geladen ...
Seite wird geladen ...
Seite wird geladen ...
Seite wird geladen ...
Seite wird geladen ...
Seite wird geladen ...
Seite wird geladen ...
Seite wird geladen ...
Seite wird geladen ...
Seite wird geladen ...
Seite wird geladen ...
Seite wird geladen ...
Seite wird geladen ...
Seite wird geladen ...
Seite wird geladen ...
Seite wird geladen ...
Seite wird geladen ...
Seite wird geladen ...
Seite wird geladen ...
Seite wird geladen ...
Seite wird geladen ...
Seite wird geladen ...
Seite wird geladen ...
Seite wird geladen ...
Seite wird geladen ...
Seite wird geladen ...
Seite wird geladen ...
Seite wird geladen ...
Seite wird geladen ...
Seite wird geladen ...
Seite wird geladen ...
Seite wird geladen ...
Seite wird geladen ...
Seite wird geladen ...
Seite wird geladen ...
-
 1
1
-
 2
2
-
 3
3
-
 4
4
-
 5
5
-
 6
6
-
 7
7
-
 8
8
-
 9
9
-
 10
10
-
 11
11
-
 12
12
-
 13
13
-
 14
14
-
 15
15
-
 16
16
-
 17
17
-
 18
18
-
 19
19
-
 20
20
-
 21
21
-
 22
22
-
 23
23
-
 24
24
-
 25
25
-
 26
26
-
 27
27
-
 28
28
-
 29
29
-
 30
30
-
 31
31
-
 32
32
-
 33
33
-
 34
34
-
 35
35
-
 36
36
-
 37
37
-
 38
38
-
 39
39
-
 40
40
-
 41
41
-
 42
42
-
 43
43
-
 44
44
-
 45
45
-
 46
46
-
 47
47
-
 48
48
-
 49
49
-
 50
50
-
 51
51
-
 52
52
-
 53
53
-
 54
54
-
 55
55
-
 56
56
-
 57
57
-
 58
58
-
 59
59
-
 60
60
-
 61
61
-
 62
62
-
 63
63
-
 64
64
-
 65
65
-
 66
66
-
 67
67
-
 68
68
-
 69
69
-
 70
70
-
 71
71
-
 72
72


Parkside PKO 24 B2 Benutzerhandbuch
- Kategorie
- Luftkompressoren
- Typ
- Benutzerhandbuch
in anderen Sprachen
- slovenčina: Parkside PKO 24 B2 Používateľská príručka
Verwandte Artikel
-
Parkside PKO 500 A1 Operation and Safety Notes
-
-
Parkside PKO 270 A3 Operation and Safety Notes
-
-
-
Parkside PKO 270 A5 Operating And Safety Instructions Manual
-
Parkside PKO 400 B2 Original Operating Instructions