
KS7415001M
EN User Manual 2
DE 38
Gebrauchsanweisung

2
FOR PERFECT RESULTS
Thank you for choosing this AEG product. We have
created it to give you impeccable performance for many
years, with innovative technologies that help make life
simpler -- features you might not find on ordinary
appliances. Please spend a few minutes reading to get
the very best from it.
ACCESSORIES AND CONSUMABLES
In the AEG webshop, you’ll find everything you need to
keep all your AEG appliances looking spotless and
working perfectly. Along with a wide range of
accessories designed and built to the high quality
standards you would expect, from specialist cookware
to cutlery baskets, from bottle holders to delicate
laundry bags…
Visit the webshop at:
www.aeg-electrolux.com/shop

3
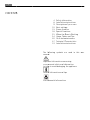
CONTENT
S
S
The f
o
manu
a
Impor
t
your p
e
on ho
w
Gener
a
Enviro
n
4
8
9
10
15
16
22
24
30
37
74
Safety inf
o
Installatio
n
Descriptio
n
Basic setti
n
Steam fun
c
Special Fu
n
When the
O
Usage, Tab
Care and
m
Technical
C
Installatio
n
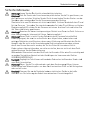
o
llowing symbols
a
a
l:
t
ant information co
n
e
rsonal safety and i
n
w
to avoid damagin
g
a
l information and ti
n
mental informatio
n
o
rmation
n
instructions
n
of your oven
n
gs
c
tion
n
ctions
O
ven is Working
les and Tips
m
aintenance
C
haracteristics
n
instructions
a
re used in this
u
n
cerning
n
formation
g
the appliance.
ps.
n
.
u
ser

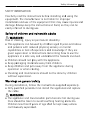
SAFETY I
N
Carefully
equipme
n
installati
o
damage.
A
easily ref
e
Safety o
f
WAR
N
Risk of c
h
•
This ap
and pe
r
capabil
given s
applia
n
•
Childre
•
Keep p
a
•
Keep c
h
operati
•
Cleani
n
withou
Warning
s
During in
•
Only q
u
the ca
b
WAR
N
•
The ap
p
Care s
h
Childre
contin
u
N
FORMATION
read the instr
n
t. The manuf
a
o
n and use of
A
lways keep t
e
rred to durin
g
f
children an
d
N
ING!
h
oking, injury
o
pliance can b
e
r
sons with red
ities or lack o
f
upervision or
i
n
ce in a safe w
n should not
p
a
ckaging mat
e
h
ildren and pe
on or when c
o
n
g and mainte
t supervision.
s
on general
s
stallation, foll
u
alified perso
n
b
le.
N
ING!
p
liance and it
s
h
ould be taken
n less than 8
y
u
ously supervi
s
uctions befor
e
a
cturer is not
the equipmen
he instruction
g
use.
d
vulnerable
a
o
r permanent
e
used by chil
d
uced physical
,
f
experience a
n
i
nstructions c
o
ay and under
s
p
lay with the
a
e
rials away fr
o
ts away from
o
oling.
nance should
s
afety
ow the instru
c
n
nel can instal
s
accessible pa
to avoid tou
c
y
ears of age s
h
s
ed.
Safe
t
e
installing an
d
liable for imp
r
t that may ca
u
s at hand, so
t
a
dults
disability:
d
ren aged 8 ye
,
sensory or m
n
d knowledge
o
ncerning ho
w
s
tand the haz
a
a
ppliance.
o
m children.
the appliance
not be done b
c
tions supplie
d
l the applianc
e
rts become h
o
c
hing heating
e
h
all be kept a
w
4
t
y Information
d
using the
r
oper
u
se injuries a
n
t
hey can be
ars and above
ental
if they are
w
to use the
a
rds involved.
during
y children
d
separately.
e
and replace
o
t during use.
e
lements.
w
ay unless
4
n
d

5
Safe
t
•
During
avoid t
o
WAR
N
•
Accessi
should
•
Do not
clean t
h
which
m
•
Do not
applia
n
•
Do not
•
The ele
c
is suita
minim
u
discon
n
crocke
r
then it
•
The co
n
with c
u
•
Discon
n
out an
y
t
y Information
use the appli
a
o
uching heati
N
ING!
ble parts may
be kept away.
use harsh abr
h
e oven door
g
m
ay result in
s
use abrasive
d
n
ce.
use steam cle
c
tric connecti
o
ble for the int
e
u
m gap of 3m
m
n
ection in cas
e
r
y warmer. If a
must be acce
s
n
nection shou
u
rrent norms.
n
ect the appli
a
y
maintenanc
e
a
nce becomes
ng elements i
n
become hot
d
asive cleaners
g
lass since th
e
s
hattering of
t
d
etergents or
m
aners to clea
n
o
n is made vi
a
e
nsity to be t
o
m
between its
e
of emergenc
y
plug is used
f
s
sible after ins
ld include cor
r
a
nce from the
e
operation.
hot. Care sho
u
n
side the ove
n
d
uring use. Yo
u
or sharp met
a
e
y can scratch
t
he glass.
m
etal scraper
s
n
the applianc
e
a
an omnipola
r
o
lerated and
w
contacts, whi
y
or when cle
a
f
or the electri
c
tallation.
r
ect earthing,
power suppl
y
u
ld be taken t
o
n
.
u
ng children
a
l scrapers to
the surface,
s
to clean the
e
.
r
switch, whic
h
w
hich has a
ch will ensur
e
a
ning the
c
connection,
in compliance
y
before carryi
n
o
h
e
n
g

Safety I
Warn
Warn
Switc
h
suppl
y
Overh
is dan
water
and
w
Warni
reduc
e
unles
s
by a
p
they
d
Warn
touch
Warn
away.
Warn
caref
u
cham
b
Warn
the h
o
nstructions
ing! Do not leave th
ing! If you see smo
k
h
off the oven and t
a
y
.
eated fat and oil ca
n
gerous and should
n
(danger of explosio
n
w
indows closed.
ng! This appliance i
s
e
d physical, sensory
s
they have been giv
e
p
erson responsible f
o
d
o not play with the
ing! During use the
ing heating elemen
t
ing! Accessible part
s
ing! When opening
u
l of the flow of hot
b
er. Step back or to
t
ing! Make sure you
o
t door or the oven.
e oven unsupervise
d
k
e or fire, keep the d
o
a
ke the plug out of
t
n
easily catch fire. H
e
n
ot be done. Never t
r
n
)! Smother the fla
m
s
not intended for u
s
or mental capabiliti
e
e
n supervision or in
s
o
r their safety. Child
r
appliance.
appliance becomes
v
t
s inside the oven. RI
s
may become hot d
u
the door during or
u
air and/or steam an
d
t
he side to avoid bu
r
never catch the po
w
The cable insulation
Safe
t
d
.
o
or closed in order t
o
t
he socket or cut off
e
ating oil in the coo
k
r
y to extinguish bur
n
m
es with a damp clo
t
s
e by persons (includ
e
s, or lack of experie
s
truction concernin
g
r
en should be super
v
v
ery hot. Care shoul
d
SK OF BURNS!
u
ring use.
Y
oung chi
u
pon completion of
t
d
water drops comi
n
r
ns.
w
er cables of other el
may melt. Danger
o
6
t
y Information
o
smother the flam
e
f
the oven power
k
ing space to sear
m
n
ing oil or fat with
t
h and keep all door
s
ing children) with
nce and knowledge,
g
use of the applianc
v
ised to ensure that
d
be taken to avoid
ldren should be kep
t
t
he cooking cycle, b
e
n
g out of the cookin
g
ectrical appliances i
o
f short-circuiting.
6
e
s.
m
eat
s
e
t
e
g
n

7
Saf
e
This
o
The a
p
for an
Avoid
•
Do
•
Do
swi
t
•
Do
•
Do
exp
•
Acc
we
a
•
To
a
tou
c
•
Do
hin
g
•
The
exc
e
Clean
•
The
slo
w
do
w
•
Do
gla
s
•
The
do
o
•
Ple
a
Mai
Repai
•
If t
h
aut
h
situ
Repai
out b
y
ty Information
o
ven is exclusively
f
p
pliance is designed
y damage caused b
y
damaging the oven
not cover or obstru
c
not keep any inflam
m
t
ched on.
not use the oven as
not pour spirits (e.g.
losion!
essories such as Wir
e
a
r protective gloves
o
a
void being burnt, al
c
hing the oven.
not lean or sit on th
e
g
e zone. The door ca
Wire shelfs can bea
e
ed this load.
ing:
appliance will rema
w
ly to room temper
a
w
n before, for instan
c
not use harsh abrasi
v
s
s since they can scr
a
door contact surfa
c
o
r) must be kept ver
y
a
se follow the instru
ntenance’’.
rs:
h
e power cable is da
m
h
orised agents or te
c
ations. Furthermore
,
r and maintenance
y
technicians author
f
or domestic use!
for use in the home
y
improper or incorr
e
or other dangerous
c
t the ventilation op
e
m
able object inside
t
a pantry.
brandy, whisky, sch
n
e
shelfs and trays, e
t
o
r use oven cloths.
ways use oven glov
e
e
open oven door. T
h
n bear a maximum
w
r a maximum load o
in hot for some tim
e
a
ture. Please allow s
u
c
e, cleaning it.
v
e cleaners or sharp
a
tch the surface, wh
c
es (the front of the
c
y
clean in order to e
n
ctions regarding cle
a
m
aged it should be
s
c
hnicians qualified f
o
,
special tools are re
q
work, especially of
c
ised by the manufa
c
for preparing food.
e
ct use.
situations by follow
e
nings.
t
he oven as it may b
n
apps, etc.) over hot
t
c. get hot in the co
o
e
s for handling dish
e
h
is may damage the
w
eight of 8 kg.
f 8 kg. To avoid dam
e
after it is switched
u
fficient time for th
e
metal scrapers to cl
ich may result in sh
a
c
ooking space and t
h
n
sure the oven funct
a
ning in the section
s
ubstituted by the m
o
r this task in order
q
uired for this task.
c
urrent carrying par
t
c
turer.
No liability is assum
ing these instructio
n
urn if the oven is
food. Danger of
o
king space. Always
e
s and containers an
d
oven, especially in t
aging the oven, do
n
off and cool down
o
e
appliance to cool
ean the oven door
a
ttering of the glass
.
h
e inside part of the
ions correctly.
‘‘Oven Cleaning and
anufacturer,
to avoid dangerous
ts, can only be carri
e
ed
n
s:
d
he
n
ot
o
nly
.
e
d

INSTALLA
T
Read the "S
a
appliance b
e
Before inst
a
Chec
k
volta
g
Open
Warn
the o
v
Make
corre
c
dama
g
DO N
O
functi
Centr
e
Put t
h
sourc
e
Durin
g
moist
u
dama
g
Warn
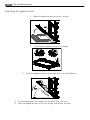
After instal
The o
v
230 -
If the
techn
circui
t
WAR
N
The
m
cause
d
The o
v
Befor
e
cleani
Durin
T
ION INSTRUC
T
a
fety Information"
e
fore installing the
a
llation
k
that the input vol
g
e of the power outl
e
the oven door and t
ing! The front surfa
c
v
en for the first tim
e
sure that the oven i
s
c
tly and that the int
e
g
ed. If you find any
d
O
T USE THE OVEN if
t
on correctly or if it
h
e
.
h
e oven on a flat an
d
e
s of heat, radios or
g
installation, make
s
u
re or objects with
s
g
e the cable.
ing: after the oven i
lation
v
en is equipped wit
h
240V ~ 50Hz.
oven is to be install
e
ician. In such a case
,
t
breaker with a min
N
ING: THE OVEN M
U
m
anufacturer and ret
a
d
to persons, animal
v
en only functions
w
e
the first use, clean
ng instructions give
g installation, foll
o
T
IONS
carefully for your
appliance.
tage indicated on t
h
e
t you are going to
u
ake out all the acce
s
c
e of the oven may
b
e
, carefully remove t
h
s
not damaged in a
n
e
rior of the door an
d
d
amage contact our
t
he power cable or t
h
as been damaged
o
d
stable surface. The
televisions.
s
ure that the power
s
harp edges and the
s installed you must
h
a power cable and
a
e
d on a permanent
b
,
the oven should be
imum separation of
U
ST BE EARTHED.
a
ilers do not accept
s or property if thes
e
w
hen the door is clo
s
the inside of the ov
e
n in the ‘‘Oven clean
o
w the instructions
Installati
o
safety and correct
h
e characteristics pl
a
u
se.
s
sories and remove t
b
e covered in a prot
e
h
is film, starting on
t
n
y way. Check that t
h
d
the front of the ov
e
Customer Care Cen
t
he plug is damaged,
o
r dropped. Contact
o
oven must not be in
cable does not com
e
back of the oven. Hi
make sure you can
a
plug for single ph
a
b
asis it must be inst
a
connected to a circ
u
3 mm between con
t
responsibility for an
e
installation instru
c
s
ed correctly.
e
n and the accessori
ing’’ section.
supplied separatel
y
8
o
n Instructions
operation of the
a
te is the same as th
he packing material.
e
ctive film. Before u
s
t
he inside.
h
e oven door closes
e
n opening are not
t
re.
if the oven does no
o
ur Customer Care
stalled close to any
e
into contact with
a
gh temperatures ca
n
access the plug.
a
se (household) curr
e
a
lled by a qualified
u
it with an all-pole
t
acts.
y damage that may
c
tions are not obser
v
es, following the
y
.
8
e
s
ing
t
a
ny
n
e
nt,
be
v
ed.

9
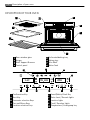
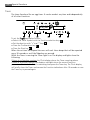
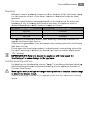
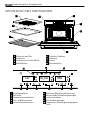
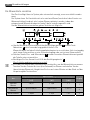
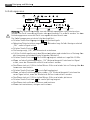
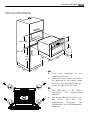
Description of your oven
DESCRIPTION OF YOUR OVEN
Door window glass Perforated baking tray
Hinges Baking tray
Shelf Support Runners Wire Shelf
Control panel Water Tank
Confirmation Key Cancel/Safety Block Key
Start Key Water Level / Descale lights
Parameter selection Keys Function lights
Plus and Minus Keys Clock / Duration lights
Function selection Keys Temperature / Foud group key
4
8
3
1
2
7
5
6
1
2 3
4 5
6
8
10
9
7
-L0-
20 00
180
10 5
9 4
8 3
7 2
6 1
84
73
62
51

10
Basic Settings
BASIC SETTINGS
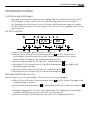
Initial Settings
After your steam oven is first plugged in or after a power failure, the clock display will
flash to indicate that the time shown is not correct.
The oven will not operate until the clock and the water hardness are set.
To set the clock and the water hardness parameter value proceed as described in the
following chapters.
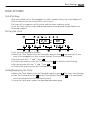
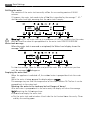
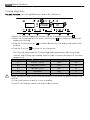
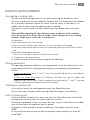
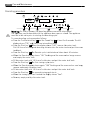
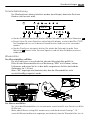
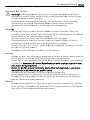
Setting the clock
To set the clock, proceed as follows:
• Select the Clock Symbol with the Parameter selection keys (not necessary if your
oven is first plugged in or after a power failure). The hours start blinking.
• Set the hours with ‘‘+’’ and ‘‘-‘‘keys .
• Confirm the selection with the Confirmation key .The minutes start blinking.
• Set the minutes with the ‘‘+’’ and ‘‘-‘‘keys .
• Confirm the selection with the Confirmation key .
Hiding/Displaying the Clock
• Select the Clock Symbol with the Parameter selection keys . The hours start blinking.
• Press the Confirmation key and the Cancel/Safety Block Key at the same (make
sure that you press first the confirmation key).
To show the clock again, repeat the described procedure again.
1
2 3
4 5
6
12 30
188
61
3
1
4
1
4
3

11
Basic Settings
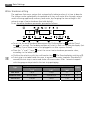
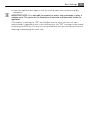
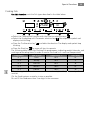
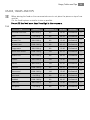
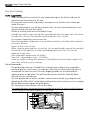
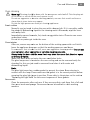
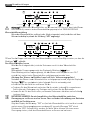
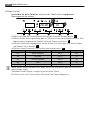
Water Hardness setting
The appliance features a system that automatically indicates when it is time to descale.
The system can be optimised for households with very soft water (also through using a
water softening appliance) and very hard water, by changing the user settings to the
relevant range of water hardness (see table below).
To set the water hardness parameter, proceed as follows:
• To set the the water hardness please press the Confirmation key and the Cancel
key for 1 second. The hardness number will start to flash on the Descale display (not
necessary if your Steam oven is first plugged in or after a power failure).
• Press the ‘‘+’’ and ‘‘-’’ keys , to set the correct water hardness parameter value,
according to the below table.
• Confirm the selection with the confirmation key . (The Descale display switches off).
• A test strip is included inside the oven to measure the water hardness. Diep briefly (1
second) the test strip in water and shake off excess water. After 1 minute compare
with the gauge scale printed in the test strip packaging.
1
2 3 4 5
6
1
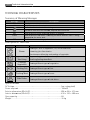
Type
Water hardness
Display
English deg.
[°eH]
French deg.
[°dF]
German deg.
[°dH]
Soft water
< 8,75 < 12,6 < 7
1
Medium water
8,75 to 26,25 12,6 to 25,2 7 to 21
2
Hard water
> 26,25 > 25,2 > 21
3
1
4
6
1

Basic Settings
12
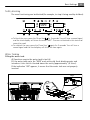
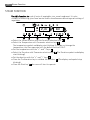
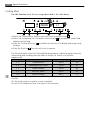
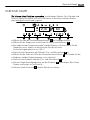
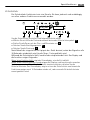
Safety blocking
The oven functioning can be blocked (for example, to stop it being used by children).
• To block the oven, press the Cancel key for 3 seconds. You will hear a sound signal
and the clock display will show the word ‘‘SAFE’’. The oven is blocked in this state and
cannot be used.
• To unblock the oven, press the Cancel key again for 3 seconds. You will hear a
sound signal and the clock display will show the time again.
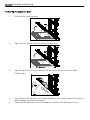
Water feeding
Filling the water tank
All functions require the water tank to be full.
Fill the water tank up to the “MAX” mark with cold, fresh drinking water and
introduce it into the slot located above the cavity (approximately 1,2 Liters).
If the indication “rES” appears, it means that the water tank was not properly
inserted.
1
2 3 4 5
6
safe
6
6
“MAX”

13
Basi
Refilling th
e
The c
o
minu
t
If, ho
w
and t
h
Warn
does
n
Water tank
m
Whe
n
mess
a
To cle
a
until
t
Emptying th
When
tank.
While
This
m
pump
Warn
After
t
‘‘DEP’
’
•
Re
m
•
Dry
and
c Settings
e
water
o
ntents of the water
t
es.
w
ever, the water tan
h
e water level light,
m
ing! Only fill the wa
n
ot overflow when i
t
m
essage
n
the water tank is
r
a
ge “rES”.
a
r the message, ope
n
t
he message ‘‘rES’’ d
i
e water tank
the appliance is sw
i
the water is being
p
m
essage stays on un
t
ed back to the wate
r
ing: the water in t
t
he water is pumpe
d
’
requiring the follo
w
m
ove and empty the
the water tank and
dry the cooking sp
a
1
2
-L0-
1
2
rE
S
tank normally suffi
c
k needs to be refille
d
m
eaning that the w
a
ter tank up to a ma
x
t
is pumped back to
r
emoved or misplac
e
n
the door and push
i
sappears.
i
tched off, the resid
u
p
umped the display
s
t
il the temperature
o
r
tank.
he tank may be ho
d
back to the water
t
w
ing actions:
water tank.
introduce it back in
t
a
ce.
3
4
3
4
S
c
e for one cooking s
e
d
this is signalled by
a
ter tank is empty.
x
imum of 0.5 litres t
o
the water tank. RIS
K
e
d, the Water Level
the water tank to t
h
u
al water is pumped
s
hows ‘‘PUMP’’.
o
f the water reaches
t. Danger of burns
t
ank, the display will
t
o the slot located a
b
4
5
5
e
ssion of 50-60
the message ‘‘- L0 -
’
o
ensure that the w
a
K
OF OVERFLOW.
display shows the
h
e correct position
back into the water
75ºC before it can b
!
show the message
b
ove the cavity. Cle
a
6
6
’
’
a
ter
e
a
n

Basic Settings
14
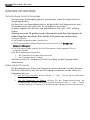
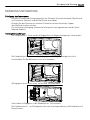
• Leave the appliance door open so that the cooking space can cool down and dry
completely.
IMPORTANT NOTE: It is advisable to remove the water tank and empty it after a
cooking cycle. This prevents the formation of bacteria and limestone inside the
appliance.
If the display is showing the ‘‘DEP’’ warning (because the water tank has not been
removed and it is desired to start a new cooking cycle, the ‘‘DEP’’ warning can be cleared
by pressing the STOP key. This way you can proceed with the new cooking cycle without
removing and emptying the water tank.

15
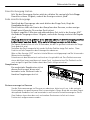
Steam Function
STEAM FUNCTION
Use this function to cook all sorts of vegetables, rice, cereals and meat. It is also
suitable for extracting juice from berries and for simultaneous defrosting and cooking of
vegetables.
• Select the Steam function with the Function selection keys .
• Select the Temperature with Parameter selection keys .
The temperature symbol and display start blinking. If you do not change the
temperature, the Oven operates with the default value of 100ºC.
• Set the temperature with the ‘‘+’’ and ‘‘-‘‘keys .
• Select the Duration with Parameter selection keys (The Duration symbol and display
start blinking).
• Set the duration with the ‘‘+’’ and ‘‘--’’ keys .
• Press the Confirmation key to validate the duration . (The display and symbol stop
blinking).
• Press the Start key , the oven will start to operate.
1
2 3 4 5
6
12 30
100
2
1
4
3
4
3
5

16
Special Functions
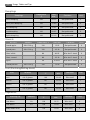
SPECIAL FUNCTIONS
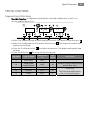
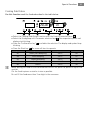
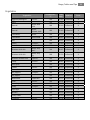
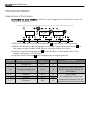
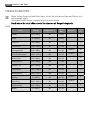
Regenerating & Sterilising
Use this function to regenerate plate dishes and ready-made meals as well as to
sterilise and boil down fruit.
• Select the Regenerating and Sterilising function with the Function selection keys .
• Select the Food group with Parameter selection keys . The respective symbol and
display start blinking.
• Press the Confirmation key to validate the duration. The display and symbol stop
blinking.
• Press the Start key . The oven will start to operate.
Programme Type of Food
T
emperature
ºC
Time
(min)
Instructions
r 1 Plate dishes 100°C 13
r 2
Ready-made
meals / frozen
100°C 18
Remove lid from container and
put on Wire shelf.
r 3 Beans 100°C 35
Sterilising:
The times and temperatures
refer to 1L preserving jars.
r 4 Cherries 80°C 35
r 5 Plums 90°C 35
1
2 3 4 5
6
12 30 1
R
2
1
3
5

17
Spe
c
Cooking V
e
Use this fun
c
•
Sel
e
•
Sel
e
dis
p
•
Pre
s
blin
•
Pre
s
The
int
e
te
m
Pr
o
When
anoth
Cut t
h
Do n
o
c
ial Functions
e
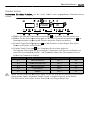
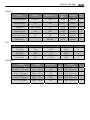
getables
c
tion cook the vege
t
e
ct the Cooking Veg
e
e
ct the Food group
w
p
lay start blinking.
s
s the Confirmation
king.
s
s the Start key .
T
following table sho
w
e
rvals, and cooking a
m
perature).
o
gramme
T
y
A 1 B
A 2 Ca
u
A 3 P
o
A 4
A 5
placing the food o
n
er.
h
e food in pieces as
s
o
t fill the food more
t
1
2
2
t
ables described in t
h
e
tables function wit
h
w
ith Parameter selec
key to validate t
h
T
he oven will start t
o
w
s the Cooking Veg
e
nd standing times (i
pe of Vegetable
roccoli / florets
u
liflower / florets
o
tatoes / pieces
Snow peas
Asparagus
n
the ovenwaretake
c
s
imilar in size as pos
s
t
han 3 cm high in t
h
3
4
20 00
1
h
e table below.
h
the Function selec
t
tion keys . The res
h
e duration. The disp
o
operate.
e
tables programmes,
n order to ensure th
T
emperature º
C
100°C
100°C
100°C
100°C
100°C
c
are to not place th
e
s
ible.
h
e ovenware
4
5
A1
3
t
ion keys .
pective symbol and
lay and symbol stop
indicating weight
e food is of a unifor
C
T
ime (min)
20
25
25
15
25
e
pieces on top of on
6
5
m
e

18
Special Functions
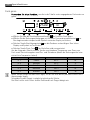
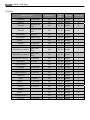
Cooking Fish
Use this function cook the fish types described in the table below.
• Select the Cooking Fish function with the Function selection keys .
• Select the Food group with Parameter selection keys . The respective symbol and
display start blinking.
• Press the Confirmation key to validate the duration. The display and symbol stop
blinking.
• Press the Start key . The oven will start to operate.
The following table shows the Cooking Fish programmes, indicating weight intervals, and
cooking and standing times (in order to ensure the food is of a uniform temperature).
Programme
T
ype of Fish Temperature ºC
T
ime (min)
b 1 Trout
80°C
25
b 2 Shrimp
90°C
15
b 3 Fish filet
80°C
18
b 4 Mussels
100°C
25
b 5 Lobster
100°C
30
When placing the food on the ovenwaretake care to not place the pieces on top of one
another.
Cut the food in pieces as similar in size as possible.
Do not fill the food more than 3 cm high in the ovenware.
1
2 3 4 5
6
125 00
B
2
1
3
5

19
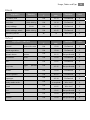
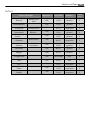
Special Functions
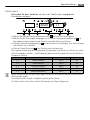
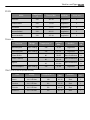
Cooking Meat
Use this function cook the meat types described in the table below.
• Select the Cooking Meat function with the Function selection keys .
• Select the Food group with Parameter selection keys . The respective symbol and
display start blinking.
• Press the Confirmation key to validate the selection. The display and symbol stop
blinking.
• Press the Start key . The oven will start to operate.
The following table shows the Cooking Meat programmes, indicating weight intervals,
and cooking and standing times (in order to ensure the food is of a uniform
temperature).
Programme
T
ype of Meat
T
emperature ºC
T
ime (min)
C 1 Chicken breast
100 ºC
30
C 2 Smoked pork loin / pieces
100 ºC
45
C 3 Turkey escalope
100 ºC
20
C 4 Pork filet, whole
100 ºC
25
C 5 Vienna sausages
90 ºC
15
When placing the food on the ovenwaretake care to not place the pieces on top of one
another.
Cut the food in pieces as similar in size as possible.
Do not fill the food more than 3 cm high in the ovenware.
1
2 3 4 5
6
1
30 00
C
2
1
3
5

20
Special Functions
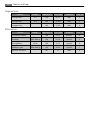
Cooking Side Dishes
Use this function cook the foods described in the table below.
• Select the Cooking Side Dishes function with the Function selection keys.
• Select the Food group with Parameter selection keys . The respective symbol and
display start blinking.
• Press the Confirmation key to validate the selection. The display and symbol stop
blinking.
• Press the Start key . The oven will start to operate.
Programme
T
ype of Food
T
emperature ºC
T
ime (min)
d 1 Sweet yeast dumpling 100 ºC 20
d 2 Yeast dumpling 100 ºC 25
d 3 Napkin dumpling 100 ºC 30
d 4 Rice 100 ºC 35
d 5 Lentils 100 ºC 40
When placing the food on the ovenwaretake care to not place the pieces on top of one
another.
Cut the food in pieces as similar in size as possible.
Do not fill the food more than 3 cm high in the ovenware.
1
2 3 4 5
6
1
20 00
D
2
1
3
5
Seite wird geladen ...
Seite wird geladen ...
Seite wird geladen ...
Seite wird geladen ...
Seite wird geladen ...
Seite wird geladen ...
Seite wird geladen ...
Seite wird geladen ...
Seite wird geladen ...
Seite wird geladen ...
Seite wird geladen ...
Seite wird geladen ...
Seite wird geladen ...
Seite wird geladen ...
Seite wird geladen ...
Seite wird geladen ...
Seite wird geladen ...
Seite wird geladen ...
Seite wird geladen ...
Seite wird geladen ...
Seite wird geladen ...
Seite wird geladen ...
Seite wird geladen ...
Seite wird geladen ...
Seite wird geladen ...
Seite wird geladen ...
Seite wird geladen ...
Seite wird geladen ...
Seite wird geladen ...
Seite wird geladen ...
Seite wird geladen ...
Seite wird geladen ...
Seite wird geladen ...
Seite wird geladen ...
Seite wird geladen ...
Seite wird geladen ...
Seite wird geladen ...
Seite wird geladen ...
Seite wird geladen ...
Seite wird geladen ...
Seite wird geladen ...
Seite wird geladen ...
Seite wird geladen ...
Seite wird geladen ...
Seite wird geladen ...
Seite wird geladen ...
Seite wird geladen ...
Seite wird geladen ...
Seite wird geladen ...
Seite wird geladen ...
Seite wird geladen ...
Seite wird geladen ...
Seite wird geladen ...
Seite wird geladen ...
Seite wird geladen ...
Seite wird geladen ...
-
 1
1
-
 2
2
-
 3
3
-
 4
4
-
 5
5
-
 6
6
-
 7
7
-
 8
8
-
 9
9
-
 10
10
-
 11
11
-
 12
12
-
 13
13
-
 14
14
-
 15
15
-
 16
16
-
 17
17
-
 18
18
-
 19
19
-
 20
20
-
 21
21
-
 22
22
-
 23
23
-
 24
24
-
 25
25
-
 26
26
-
 27
27
-
 28
28
-
 29
29
-
 30
30
-
 31
31
-
 32
32
-
 33
33
-
 34
34
-
 35
35
-
 36
36
-
 37
37
-
 38
38
-
 39
39
-
 40
40
-
 41
41
-
 42
42
-
 43
43
-
 44
44
-
 45
45
-
 46
46
-
 47
47
-
 48
48
-
 49
49
-
 50
50
-
 51
51
-
 52
52
-
 53
53
-
 54
54
-
 55
55
-
 56
56
-
 57
57
-
 58
58
-
 59
59
-
 60
60
-
 61
61
-
 62
62
-
 63
63
-
 64
64
-
 65
65
-
 66
66
-
 67
67
-
 68
68
-
 69
69
-
 70
70
-
 71
71
-
 72
72
-
 73
73
-
 74
74
-
 75
75
-
 76
76


in anderen Sprachen
- English: AEG KS7415001M User manual
Andere Dokumente
-
Electrolux EMC38915X Benutzerhandbuch
-
-
-
-
Aeg-Electrolux MCC3880EM Benutzerhandbuch
-
-
Foster 7103 680 Benutzerhandbuch
-
-
Bertazzoni F45 PRO VAP X Benutzerhandbuch
-
Progress PBCM4500X Benutzerhandbuch