Seite wird geladen ...

WR-34
PLL RECEIVER
PLL SYNTHESIZED STEREO WORLD RECEIVER
Operating Manual
NW / S W / FM ST.
PLL SYNTHES IZED S TEREO WORLD RECEIV ER
M1 M2 M3 M4 M5
TIME SET AL SLEEP +5
MEMORY ON/OFF
UP HOUR DOWN M IN
ON / OFF
MAN UA L / AUTO
SC AN
1 0 6 . 5
FM
MW
SW
ALARM SLEEP LOCK MEMO CH
MHz
5
5
+
5
M1 M2 M3 M4 M5
Please read this manual before operation
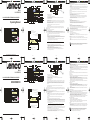
Volum e k nob
Preset s tation
LE D Dis pla y
FM indicator
Powe r ON / OFF
Phones ja c k
Slee p but ton
Preset “+ 5” k e y
Tuning/M inut e sett ing
Tuning/H our s etting
Ala rm ON/OFF
Time/Memory button
Reset key
FM /S W Ante nna
DC ja c k
Batt ery
com partm e nt
Keylock switch
Band se lect or
NW / S W / FM ST.
PLL S YNTHE SIZED STE REO WORLD RECEIVER
M1 M2 M3 M4 M5
TIME SET AL SLEEP +5
MEMORY ON/OFF
UP HOUR DOWN MIN
ON / OFF
MAN UAL / AUTO
SC AN
1 0 6 . 5
FM
MW
SW
ALARM SLEEP LOCK MEMO CH
MHz
5
5
+5
M1 M2 M3 M4 M5
1 0 6 . 5
FM
MW
SW
ALARM SLEEP LOCK MEMO CH
MHz
kHz
+
5
5
5
Alarm Indicator
Sleep mode Active indication
Keyboard Lock Indicator
+5 Indicator
Channel Number Indicator
Memory Indicator
Frequency or Time display
Band Indicator
Memory no. of preset stations
UK-2
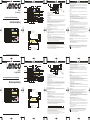
open
BATTERY COVER
AA BATTERY X 3
ADAPTOR
PLUG IN
R E A R V I E W
Installing batteries (not included)
1. Position the radio face down.
2. Press the catch and slide in the direction of the arrow.
3. Lift up the battery compartment
4. Insert 3xUM-3 (AA) size batteries. Make sure the batteries are positioned in accordance with the diagram indicated.
5. Replace the battery compartment
AC adaptor (not included)
The AC adaptor for use with this radio should provide 4.5volts DC output at 200 mA center pin (-)negative. Insert the adaptor
plug into the jack on the side of the radio marked "DC 4.5v". Plug the other end of the adaptor into a standard household outlet.
Whenever the adaptor is used, the batteries are automatically disconnected The AC adaptor should be disconnected from the
mains supply and the radio when not in use.
Note: The power adaptor supplies power only to the radio. The clock operates on batteries.
Phones Jack (not included):
Stereo Headphone Jack is enable you listening to stereo FM, which is inserted into the HEADPHONE jack located on the
left side of the radio, marked with the "PHONES" symbol. When the PHONES Jack is plugged in, the loudspeaker will mute.
Setting the clock time.
Note:Time can only be set with the radio turned off.
1. Ensure that the radio is turned off.
2. Press the [TIME SET] button, the digit hours and minutes with blink will be displayed on the LCD for 5 seconds.
3. While the time display is blinking, press and hold down the [DOWN/UP] button or intermittently until the desired time is reached.
4. Press the Alarm button to complete alarm time setting. The "ALARM" symbol will appear on the display indicating the alarm is set,
5. Press the [TIME SET] button again or wait for about 5 seconds to complete time setting.
Sleep Mode
With this Sleep function, the radio will be automatically switched off after a pre-set period of time.
1. When [SLEEP] button is pushed, the sleep function will be enabled and the initial sleep time "90" with the "SLEEP" symbol
will be displayed on the LCD for 5 seconds. If you don't press [SLEEP] again and the radio comes back on the SLEEP mode is
set. The radio will go off automatically after 90 minutes.
During the sleep time displayed period, the sleep time can be changed by pressing the [SLEEP] button. Each push of the
SLEEP button will change the SLEEP time according to the following flow:
2. Press [SLEEP] button to select the period of time (90, 80, 70, 60, 50, 40, 30, 20 or 10 minutes),
3. Each additional press of the [SLEEP] button will reduce the remaining sleep time in 10-minute increments, to the nearest
10 minutes. Example: If there are 90 minutes remaining in sleep, pressing the button once will reduce the sleep time to
80 minutes, twice will reduce it to 70 minutes, etc.
4. Wait for about 5 seconds and the sleep function will be activated automatically.
5. When listening to the Radio, this function turns the Radio off automatically after a predetermined time
6. To eliminate the SLEEP mode press the [SLEEP] button until "SLEEP" symbol disappears or press [ON/OFF] button.
The radio will no longer go off automatically.
90 80 70 60 50 40 30 20 10 off
UK-3
Alarm Mode
1. Ensure that the radio is turned off .
2. Press the [AL ON/OFF] button, the digit hours and minutes with "ALARM" symbol is blinking, will be displayed on the LCD
for 5 seconds.
3. While the time display is blinking, press and hold down the [DOWN/UP] button or intermittently until the desired wake-up time
is reached.
4. Press the Alarm button to complete alarm time setting. The "ALARM" symbol will appear on the display Indicating the alarm
is set, the buzzer will sound automatically when a predetermined time.
5. To permanently cancel the alarm, press the [AL ON/OFF] button, the "ALARM" symbol will be removed from the Display.
Radio operation
Switch on your radio by pressing the [ON/OFF] button. The radio will be turned on at the last preset radio station and volume.
A.Scan Tuning:
The unit is equipped with an Auto-Search function and can automatically search for the next clear channel.
1. To turn on the radio, press [ON/OFF] button..
2. Slide the [SW/MW/FM] button to the desired band, SW, MW or FM.
3. Press and hold the [DOWN/UP] button for 2 seconds and automatically the value of the frequency will Keep increasing
or decreasing until a clear channel is found. Once this function is activated, you can release and stop pressing the button.
Repeating the procedure will start the scan again.
4. Turn the VOLUME knob clockwise to increase the volume or counterclockwise to decrease the volume.
B.Manual Tuning:
1. To turn on the radio, press [ON/OFF] button.
2. Slide the [SW/MW/FM] button to the desired band, SW, MW or FM.
3. Desired station may be selected by either pressing the [DOWN/UP] button or intermittently until the Desired channel is
reached or pressing and holding the [DOWN/UP] button or until the channel is reached.
4. Turn the VOLUME knob clockwise to increase the volume or counterclockwise to decrease the volume.
Presetting stations
You may store up to 10 stations each on SW, MW or FM bands giving a total of 30 preset stations.
1. Tune into the required stations either using Auto or Manual Tuning methods.
2. To store the station, press the [MEMORY] button, the "MEMO" symbol with blink will be displayed on the LCD for 5 seconds.
Press one of the PRESET button M1-M5 which you wish to memorize the station, the display will show the preset station
number in the lower left corner of the display,
3. Press the [MEMORY] button again to complete selection.
4. To store the station into preset M6-M10, press the [MEMORY] button once, press[ +5 ]button, display will show +5, then
press one of the PRESET button M1-M5 which you wish to memorize the station
Recalling a preset station
1. To turn on the radio, press [ON/OFF] button.
2. Slide the [SW/MW/FM] button to the desired band, SW, MW or FM.
3. Simply press one of Preset buttons 1-5 to recall the required preset stations. To recall preset stations 6-10, press [+5] button,
then the Preset button 1-5.
Lock switch
The lock switch located on the top side of your radio is to prevent accidentally while carrying it around.
1. Slide the [LOCK] switch to the ON position, the symbol will appear in the display, The [ON/OFF] and all Other buttons will be
disabled.
2. To release the lock switch simply move the [LOCK] switch to the off position, the "KEY" symbol will be Removed from the
display.
UK-4
If at any time in the future you should need to dispose of this product please note that: Waste electrial products should
not be disposed of with household waste. Please recycle where facilities exist. Check with your Local Authority or
retailer for recycling advice. (Waste Electrical and Electronic Equipment Directive)
WR-34
PLL RECEIVER
PLL SYNTHESIZED STEREO WORLD RECEIVER
MODE D’EMPLOI
NW / S W / FM ST.
PLL SYNTHES IZED S TEREO WORLD RECEIV ER
M1 M2 M3 M4 M5
TIME SET AL SLEEP +5
MEMORY ON/OFF
UP HOUR DOWN M IN
ON / OFF
MAN UA L / AUTO
SC AN
1 0 6 . 5
FM
MW
SW
ALARM SLEEP LOCK MEMO CH
MHz
5
5
+
5
M1 M2 M3 M4 M5
Veuillez lire ce manuel avant la mise en marche
1 0 6 . 5
FM
MW
SW
ALARM SLEEP LOCK MEMO CH
MHz
kHz
+
5
5
5
Voyant du réveil
Voyant d'activation du mode Sommeil
Voyant du verrouillage du clavier
Voyant +5
Voyant numéro de la station
Voyant mémoire
Affichage de la fréquence ou de l'heure
Voyant indiquant la bande
Numéro des stations mémorisées
Bouton du volume
Présélection des
stations
Affichage à cristaux
liquides
Voyant FM
Interrupteur ON/OFF
Prise Jack
Bouton Sommeil
Touche de présélection
« +5 »
Réglage radio / minute
Réglage radio / heure
Réveil ON/OFF
Bouton heure/mémoire
Touche de
réinitialisation
Antenne FM/SW
Prise Jack DC
Compartiment
à piles
Bouton de verrouillage
Sélecteur de bandes
NW / S W / FM ST.
PLL S YNTHE SIZED STE REO WORLD RECEIVER
M1 M2 M3 M4 M5
TIME SET AL SLEEP +5
MEMORY ON/OFF
UP HOUR DOWN MIN
ON / OFF
MAN UAL / AUTO
SC AN
1 0 6 . 5
FM
MW
SW
ALARM SLEEP LOCK MEMO CH
MHz
5
5
+5
M1 M2 M3 M4 M5
F-2
open
Couvercle piles Cover
3 x piles A4
Prise
adaptateur
Vue arrière
Insertion des piles (non comprises)
1. Positionnez l'avant de la radio vers le bas.
2. Appuyez sur le couvercle et faites le glisser dans la direction de la flèche.
3. Relevez le compartiment à piles
4. Insérez 3 piles UM-2 de taille (AA). Assurez-vous que les piles soient positionnées selon le schéma indiqué.
5. Rememttez le compartiment à piles
Adaptateur CA (non comprises)
L’adaptateur CA à utiliser avec cette radio doit fournir une sortie de courant continu de 4,5 volts à prise centrale (-) négative de
200 mA. Insérez la prise de l’adaptateur dans la prise femelle sur le côté de la radio marqué par « DC 4,5v ». Branchez l’autre
extrémité de l’adaptateur dans la prise de courant standard ménagère. A chaque fois que l’adaptateur est utilisé, les piles sont
automatiquement déconnectées. L'adaptateur CA doit être débranché de l'alimentation électrique et de la radio lorsqu'il n'est
pas utilisé.
Note : L’adaptateur d’alimentation fournit uniquement la radio en électricité. L’horloge fonctionne avec des piles.
Prise pour Ecouteurs (non fournis) :
La prise Stéréo d’Ecouteurs vous permet d'écouter la FM stéréo, qui est insérée dans la prise d’ÉCOUTEURS situé sur le côté
gauche de la radio, marqué par le symbole « PHONES ». Quand la prise Jack est branchée, le son des hauts parleurs sera coupé.
Régler l’horloge.
Remarque : l’heure peut aussi être réglée quand la radio est éteinte.
1. Assurez-vous que la radio soit éteinte.
2. Appuyez sur le bouton [TIME SET], les chiffres des heures et des minutes apparaîtront en clignotant sur l'affichage à cristaux
liquides pendant 5 secondes.
3. Quand l’affichage de l’heure clignote, maintenez appuyé le bouton [DOWN/UP] ou par intermittence jusqu’à atteindre l’heure
souhaitée.
4. Appuyez sur le bouton Alarm pour régler l’heure du réveil. Le symbole « ALARM » apparaîtra sur l’affichage indiquant que
le réveil est réglé.
5. Appuyez de nouveau sur [TIME SET] ou attendez environ 5 secondes pour terminer le réglage de l'heure.
Mode Sommeil
Avec le mode Sommeil, la radio s'éteindra automatiquement après une durée prédéterminée.
1. Quand vous appuyez sur le bouton [SLEEP], la fonction sommeil sera enclenchée et la durée initiale sera de "90". et le symbole
« SLEEP » apparaîtra sur l’affichage à cristaux liquides pendant 5 secondes. Si vous n’appuyez pas de nouveau sur [SLEEP]
et la radio se rallume, le mode SLEEP est réglé. La radio s’éteindra automatiquement après 90 minutes. Pendant le temps de
sommeil affiché, la durée peut être modifiée en appuyant sur le bouton [SLEEP]. A chaque fois que vous appuyez sur le bouton
SLEEP, la durée changera comme ceci :
2. Appuyez sur le bouton [SLEEP] pour sélectionner la durée (90, 80, 70, 60, 50, 40, 30, 20 ou 10 minutes).
3. A chaque fois que vous appuyez sur le bouton SLEEP, la durée restante diminuera par pas de 10 minutes. jusqu’aux 10 minutes
les plus proches. Exemple : Si 90 minutes est la durée restante, Appuyer sur le bouton une fois réduira la durée à 80 minutes,
deux fois, à 70 minutes, etc.
4. Attendez environ 5 secondes et la fonction sommeil sera automatiquement activée.
5. Lorsque vous écoutez la radio, la fonction éteindra automatiquement la radio après une durée prédéterminée.
6. Pour quitter le mode SLEEP, appuyez sur le bouton [SLEEP] jusqu’à ce que le symbole « SLEEP » disparaisse ou appuyez
sur le bouton [ON/OFF]. La radio ne s´éteindra plus automatiquement.
90 80 70 60 50 40 30 20 10 off
F-3
Mode Réveil
1. Assurez-vous que la radio soit éteinte.
2. Appuyez sur le bouton [AL ON/OFF], les chiffres des heures et des minutes avec ALARM apparaîtront en clignotant
sur l’affichage à cristaux liquides pendant 5 secondes.
3. Quand l’affichage de l’heure clignote, maintenez appuyé le bouton [DOWN/UP] ou par intermittence jusqu’à atteindre
l’heure souhaitée.
4. Appuyez sur le bouton Alarm pour régler l’heure du réveil. Le symbole « ALARM » apparaîtra sur l’affichage indiquant
que le réveil est réglé, le buzzer sonnera automatiquement à l’heure réglée.
5. Pour quitter définitivement le mode réveil, appuyez sur le bouton [AL ON/OFF], le symbole « ALARM » disparaîtra. de
l’affichage.
Fonctionnement de la radio
Allumez la radio en appuyant sur le bouton [ON/OFF]. La radio s’allumera sur la dernière station de radio écoutée et au
même volume.
A. Réglage par Scan
L’appareil est pourvu d’une fonction Recherche Automatique et peut chercher automatiquement la prochaine station claire.
1. Allumez la radio en appuyant sur le bouton [ON/OFF].
2. Faîtes glisser le bouton [SW/MW/FM] à la bande souhaitée, SW, MW ou FM.
3. Maintenez appuyé le bouton [DOWN/UP] pendant 2 secondes, et la valeur de la fréquence défilera en croissant ou
décroissant jusqu’à qu’une station claire soit trouvée. Une fois que cette fonction est activée, vous pouvez relâcher et
arrêter d’appuyer sue le bouton. Recommencez la procédure pour relancer l’opération.
4. Tournez le bouton du VOLUME dans le sens des aiguilles d’une montre pour augmenter le volume et dans le sens
inverse pour diminuer le volume.
B Réglage manuel
1. Allumez la radio en appuyant sur le bouton [ON/OFF].
2. Faîtes glisser le bouton [SW/MW/FM] à la bande souhaitée, SW, MW ou FM.
3. La station souhaitée peut être sélectionnée soit en appuyant sur le bouton [DOWN/UP] ou par intermittence jusqu’à
ce que la station souhaitée soit atteinte, ou en maintenant appuyé le bouton [DOWN/UP] jusqu’à ce que la station
soit atteinte.
4. Tournez le bouton du VOLUME dans le sens des aiguilles d’une montre pour augmenter le volume et dans le sens
inverse pour diminuer le volume.
Présélection des stations
Vous pouvez enregistrer jusqu’à 10 stations chacune sur les bandes SW, MW ou FM offrant au total une capacité
de 30 stations.
1. Réglez les stations voulues en utilisant la méthode soit automatique soit manuelle.
2. Pour enregistrer une station, appuyez sur le bouton [MEMORY], le symbole « MEMO » apparaîtra en clignotant sur
l’affichage à cristaux liquides pendant 5 secondes. Appuyez sur l’un des boutons PRESET M1-M5 sur lequel vous
souhaitez mémoriser la station, l’écran affichera le numéro de la station présélectionnée en bas à gauche.
3. Appuyez de nouveau sur le bouton [MEMORY] pour terminer la sélection.
4. Pour enregistrer la station dans une présélection M6-M10, appuyez une fois sur le bouton [+5], l’affichage montrera
+5, puis appuyez sur l’un des boutons de présélection M1-M5 où vous souhaitez mémoriser la station.
Appeler une station mémorisée
1. Allumez la radio en appuyant sur le bouton [ON/OFF].
2. Faîtes glisser le bouton [SW/MW/FM] à la bande souhaitée, SW, MW ou FM.
3. Appuyez simplement sur l’un des boutons 1-5 pour appeler les stations mémorisées voulues. Appeler les stations
mémorisées 6-10, appuyez sur le bouton [+5], puis sur le bouton de présélection 1-5.
Verrouillage
La touche de verrouillage située sur le dessus de votre radio permet d’éviter les incidents lorsque vous la transportez.
1. Positionnez le bouton [LOCK] sur ON, le symbole apparaîtra sur l’affichage, les boutons [ON/OFF] et tous les autres
boutons seront bloqués.
2. Pour déverrouiller, bougez simplement le bouton [LOCK] sur off, le symbole « KEY » (clef) disparaîtra de l’écran.
F-4
Si vous souhaitez vous débarrasser ultérieurement du produit, veuillez noter que : les déchets électriques ne
doivent pas être jetés avec les déchets domestiques. Veuillez les faire déposer dans les centres de recyclage
existants. Contactez les autorités locales ou distributeurs pour obtenir de plus amples informations.
(Directive de l’équipement électronique et des déchets électriques).
WR-34
PLL Ontvanger
PLL Synthesized Stereo Wereldontvanger
Gebruiksaanwijzing
NW / S W / FM ST.
PLL SYNTHES IZED S TEREO WORLD RECEIV ER
M1 M2 M3 M4 M5
TIME SET AL SLEEP +5
MEMORY ON/OFF
UP HOUR DOWN M IN
ON / OFF
MAN UA L / AUTO
SC AN
1 0 6 . 5
FM
MW
SW
ALARM SLEEP LOCK MEMO CH
MHz
5
5
+
5
M1 M2 M3 M4 M5
Gelieve voor gebruik deze gebruiksaanwijzing te lezen
Volumeknop
Vooraf station
selecteren
LE D Dis pla y
FM indicator
Stroom aan/uit
Hoofdtelefooningang
Slaapknop
Voorafinstellingen
“+5” knop
Afstemming/minuut
instelling
Afstemming/uur
instelling
Alarm aan/uit
Tijd/geheugenknop
Terugstelknop
FM/SW Antenne
DC Ingang
Batterijvakje
Sleutelslotschakelaar
Bandkiezer
NW / S W / FM ST.
PLL S YNTHE SIZED STE REO WORLD RECEIVER
M1 M2 M3 M4 M5
TIME SET AL SLEEP +5
MEMORY ON/OFF
UP HOUR DOWN MIN
ON / OFF
MAN UAL / AUTO
SC AN
1 0 6 . 5
FM
MW
SW
ALARM SLEEP LOCK MEMO CH
MHz
5
5
+5
M1 M2 M3 M4 M5
1 0 6 . 5
FM
MW
SW
ALARM SLEEP LOCK MEMO CH
MHz
kHz
+
5
5
5
Alarm Indicator
Slaapmodus actief indicator
Toetsenbordslotindicator
+5 Indicator
Kanaalnummerindicator
Geheugenindicator
Frequentie- of tijdsweergave
Bandindicator
Geheugennummer van
voorafingestelde stations
NL-2
open
Batterijdeksel
AA Batterij x 3
Adapter
ingang
ACHTERZIJDE
Het installeren van batterijen (niet inbegrepen)
1. Plaats de radio met de voorkant naar beneden.
2. Duw het schuifje in de richting van de pijl.
3. Til het batterijvakje op
4. Plaats 3xUM-3 (AA) batterijen. Zorg ervoor dat de batterijen worden geplaatst in overeenstemming met de aanwijzingen in de
tekening.
5. Vervang het batterijvakje
AC adapter (niet inbegrepen)
De AC adapter die u voor deze radio gebruikt dient een vermogen te leveren van 4.5 volt DC bij 200 mA center pin (-)negatief. Plaats
de adapterstekker in het contact op de zijkant van de radio, gemarkeerd met "DC 4.5v". Steek het andere einde van de adapter in
een standaard huishoudelijk stopcontact. Iedere keer wanneer de adapter wordt gebruikt, worden de batterijen automatisch
uitgeschakeld. De AC adapter dient te worden losgekoppeld van de hoofdtoevoer wanneer de radio niet in gebruik is.
Opmerking: De stroomadapter levert alleen stroom aan de radio. De klok werkt op batterijen.
Koptelefoonstekker (niet inbegrepen):
Een stereo koptelefoonstekker geeft u de mogelijkheid om naar stereo FM te luisteren, en is ingebracht in de KOPTELEFOONingang
dat zich op de linkerzijde van de radio bevindt, gemarkeerd met het "KOPTELEFOON" symbool. Wanneer het koptelefoonstekker
is aangesloten, dan zal de luidspreker op mute (zonder geluid) worden gezet.
Het instellen van de klok.
Opmerking: De tijd kan alleen worden ingesteld wanneer de radio uitstaat.
1. Zorg ervoor dat de radio uitstaat.
2. Druk op de [TIME SET] (tijdsinstelling)knop, de digitale uren en minuten zullen gedurende 5 minuten knipperend worden
weergegeven op de LCD.
3. Terwijl de tijdweergave knippert, houdt u de [DOWN/UP] (naar beneden/naar boven) knop ingedrukt of drukt u met tussenpozen
op deze knop totdat de gewenste tijd is bereikt.
4. Druk op de alarmknop om het alarm in te stellen. Het "ALARM" symbool zal in de display verschijnen en aangeven dat het alarm
is ingesteld.
5. Druk opnieuw op de [TIME SET] (tijdsinstelling)knop en wacht gedurende ongeveer 5 seconden om de tijdsinstelling af te ronden.
Sleep Mode (slaapmodus)
Met deze slaapfunctie zal de radio automatisch worden uitgeschakeld na een voorafingestelde periode.
1. Als de [SLEEP] knop is ingedrukt, wordt de slaapfunctie mogelijk gemaakt en zal de beginslaaptijd gedurende 5 seconden
worden weergegeven met het “SLAAP” symbool op de LCD. Als u de [SLEEP] knop niet opnieuw indrukt en de radio begint weer
te spelen dan is de “SLAAP” modus ingesteld. De radio zal automatisch uitschakelen na 90 minuten. Gedurende de tijd dat de
slaaptijd is weergegeven, kan de slaaptijd worden gewijzigd door het indrukken van de [SLAAP] knop.Iedere keer dat u op de
“SLAAP” knop drukt zal de “SLAAP” tijd volgens de volgende beweging veranderen:
90 80 70 60 50 40 30 20 10 off
NL-3
Alarm Modus
1. Zorg ervoor dat de radio is uitgeschakeld.
2. Druk op de [AL ON/OFF] knop, de digitale uren en minuten zullen gedurende 5 seconden worden weergegeven op het LCD
terwijl het “ALARM” symbool knippert.
3. Terwijl de tijdsdisplay knippert, houdt u de [DOWN/UP] knop ingedrukt of drukt u met tussenpozen op deze knop totdat de
gewenste wektijd is bereikt.
4. Druk op de Alarmknop om het stellen van de alarmtijd af te ronden. Het "ALARM" symbool zal in het display verschijnen en
aangeven dat het alarm is ingesteld, de zoemer zal automatisch afgaan op de voorafingestelde tijd.
5. Om het alarm volledig uit te schakelen drukt u op de [AL ON/OFF] knop, het "ALARM" symbool zal worden verwijderd uit
de display.
Radio functie
Zet uw radio aan door te drukken op de [ON/OFF] knop. De radio zal worden ingeschakeld op het laatst gekozen radiostation
en volume.
A.Scan afstemming:
Het apparaat is uitgevoerd met een “Auto-Search” (auto-zoek) functie en kan automatisch naar de dichtstbijzijnde zender zoeken.
1. Druk op de [ON/OFF] knop om de radio in te schakelen .
2. Schuif de [SW/MW/FM] knop naar de gewenste band, SW, MW of FM.
3. Houdt de [DOWN/UP] knop gedurende 2 seconden ingedrukt en de frequentie zal automatisch blijven vermeerderen of
verminderen totdat een duidelijk station is gevonden.Als deze functie eenmaal is geactiveerd, dan kunt u het opheffen of
stoppen door op de knop te drukken. Het herhalen van de procedure zal de scan opnieuw opstarten.
4. Draai de VOLUME knop in de richting van de klok om het volume te verhogen of tegen de klok in om het volume te verlagen.
B. handmatige Afstemming:
1. Om de radio in te schakelen druk op de [ON/OFF] knop.
2. Schuif de [SW/MW/FM] knop naar de gewenste band, SW, MW of FM.
3. Het gewenste station kan worden gekozen door hetzij [DOWN/UP] knop gedurende 2 seconden ingedrukt te houden of met
tussenpozen tot het gewenste kanaal is bereikt of door de [DOWN/UP] knop ingedrukt te houden totdat het kanaal is gevonden.
4. Draai de VOLUME knop in de richting van de klok om het volume te verhogen of tegen de klok in om het volume te verlagen.
Vooraf instellen van stations
U kunt tot 10 stations opslaan, elk op SW, MW of FM banden, wat u een totaal van 30 vooraf in te stellen stations geeft.
1. Stem af op het gewenste station door hetzij de Auto- of de handmatige afstemmingsmethode te gebruiken.
2. Om het station op te slaan, drukt u op de [MEMORY] (geheugen) knop, het "MEMO" symbool zal
gedurende 5 seconden knipperend worden weergegeven in the LCD. Druk op een van de PRESET knoppen M1-M5 waaronder
u het station wenst te onthouden, de display zal nu het voorafingestelde stationnummer weergeven in de linker onderhoek
van de display.
3. Druk opnieuw op de [MEMORY] knop om de selectie af te ronden.
4. Om het station op te slaan in vooraf in te stellen M6-M10, drukt u eenmaal op de [MEMORY] knop, druk[ +5 ] knop, de display
toon +5, druk dan op een van de PRESET knoppen M1-M5 waaronder u het station wenst te onthouden.
Het oproepen van een voorafingesteld station.
1. Druk op de [ON/OFF] knop om de radio in te schakelen .
2. Schuif de [SW/MW/FM] knop naar de gewenste band, SW, MW of FM.
3. Druk eenvoudig op een van de voorafingestelde knoppen 1-5 om het gewenste voorafingestelde station op te roepen.
Om de voorafingestelde stations 6-10, op te roepen, druk op [+5] knop, en dan op de voorafingestelde knop 1-5.
Slotschakelaar
De slotschakelaar bevindt zich op de bovenzijde van uw radio en is bedoeld om het per ongeluk uitschakelen, wanneer u de radio
bij u draagt, te voorkomen.
1. Schuif de [LOCK] (slot) schakelaar naar de ON (aan) positie, het symbool zal verschijnen in de display, de [ON/OFF] en alle
andere knoppen worden nu uitgeschakeld
2. Om de slotschakelaar op te heffen kunt u eenvoudigweg de [LOCK] schakelaar weer naar de uitpositie schuiven, het "KEY"
(SLOT) symbool zal worden verwijderd uit de display.
NL-4
Indien u zich in de toekomst van dit toestel wenst te ontdoen, let er dan op dat elektrisch afvalmateriaal niet met het
huishoudelijk afval mag worden verwijderd. Breng het toestel naar een kringloopwinkel of anderevoorziening voor
recycling. Neem contact op met uw plaatselijke autoriteit of winkelier indien u meer informatie wenst over recycling.
(Richtlijn voor Afval van Elektrische en Elektronische Apparaten, AEEA).
WR-34
PLL EMPFÄNGER
STEREO WELTEMPFÄNGER MIT PLL SYNTESIZERSYSTEM
Bedienungsanleitung
NW / S W / FM ST.
PLL SYNTHES IZED S TEREO WORLD RECEIV ER
M1 M2 M3 M4 M5
TIME SET AL SLEEP +5
MEMORY ON/OFF
UP HOUR DOWN M IN
ON / OFF
MAN UA L / AUTO
SC AN
1 0 6 . 5
FM
MW
SW
ALARM SLEEP LOCK MEMO CH
MHz
5
5
+
5
M1 M2 M3 M4 M5
Bitte vor Gebrauch diese Bedienungsanleitung lesen
1 0 6 . 5
FM
MW
SW
ALARM SLEEP LOCK MEMO CH
MHz
kHz
+
5
5
5
Alarm-Anzeige
Anzeige Sleep-Modus aktiv
Anzeige Tastensperre
+5 Anzeige
Anzeige Sendernummer
Anzeige Speicher
Anzeige Frequenz oder Zeit
Bandanzeige
Speicher-Nr. der voreingestellten Sender
LAUTSTÄRKEREGLER
SENDERVOREINSTELLUNG
LED DISPLAY
FM ANZEIGE
EIN-/AUSSCHALTEN
KOPFHÖRERBUCHSE
SLEEP TASTE
“+5” TASTE
TUNINGEINSTELLUNG
MINUTE
TUNINGEINSTELLUNG
STUNDE
ALARM EIN/AUS
ZEIT/SPEICHER TASTE
RESET TASTE
FM STEREO ANTENNE
NETZANSCHLUSS-
BUCHSE
BATTERIEFACH
SCHALTER TASTENSPERRE
BANDAUSWAHL
NW / S W / FM ST.
PLL S YNTHE SIZED STE REO WORLD RECEIVER
M1 M2 M3 M4 M5
TIME SET AL SLEEP +5
MEMORY ON/OFF
UP HOUR DOWN MIN
ON / OFF
MAN UAL / AUTO
SC AN
1 0 6 . 5
FM
MW
SW
ALARM SLEEP LOCK MEMO CH
MHz
5
5
+5
M1 M2 M3 M4 M5
D-2
offen
Deckel Batteriefach
3x AA Batterien
Adapter-
Anschluss
Ansicht Rückseite
Einlegen der Batterien (nicht mitgeliefert)
1. Legen Sie das Radio mit der Vorderseite nach unten vor sich.
2. Drücken Sie auf den Verschluss und schieben Sie in Pfeilrichtung.
3. Öffnen Sie das Batteriefach.
4. Legen Sie 3 Batterien der Größe UM-3 (AA) ein. Vergewissern Sie sich, dass die Batterien entsprechend der Darstellung
eingelegt sind.
5. Schließen Sie das Batteriefach.
Netzanschluss-Adapter (nicht mitgeliefert)
Der Netzanschluss-Adapter für dieses Radio sollte 4.5 Volt DC Ausgangsleistung bei 200 mA, mittlerer Stift (-) negativ, besitzen.
Führen Sie den Adapterstecker in die mit „DC 4.v“ gekennzeichnete Anschlussbuchse an der Seite des Radios ein. Schließen Sie
das andere Ende des Adapters an eine normale Haussteckdose an. Sobald der Adapter genutzt wird, werden die Batterien
automatisch nicht zur Stromversorgung genutzt. Der Netzanschluss-Adapter sollte vom Hauptanschluss getrennt werden, wenn
das Radio nicht genutzt wird.
Hinweis: Der Stromadapter versorgt nur das Radio mit Strom. Die Uhr wird von den Batterien bedient.
Kopfhöreranschluss (Kopfhörer nicht mitgeliefert):
Stereo-Kopfhörer erlauben Ihnen das Anhören von FM Stereo. Sie werden in die Kopfhöreranschlussbuchse an der linken Seite des
Radios eingesteckt, die mit dem "Kopfhörer"-Symbol gekennzeichnet ist. Sobald Kopfhörer angeschlossen sind, wird der
Lautsprecher stumm geschaltet.
Die Uhrzeit einstellen.
Hinweis: kann nur bei abgeschaltetem Radio eingestellt werden.
1. Vergewissern Sie sich, dass das Radio abgeschaltet ist.
2. Drücken Sie die Taste [TIME SET] (Zeiteinstellung). Die Ziffern für Stunden und Minuten werden für 5 Sekunden blinkend im
Display angezeigt.
3. Während die Zeitanzeige aufleuchtet, drücken und halten Sie oder drücken Sie die Taste [DOWN/UP] (Auf/Ab) periodisch,
bis die gewünschte Zeit eingestellt ist.
4. Drücken Sie die Alarm-Taste, um die Weckrufeinstellungen zu speichern. Im Display erscheint das “Alarm”-Symbol. Damit
wird angezeigt, dass der Weckruf eingestellt ist.
5. Drücken Sie die Taste [TIME SET] noch einmal oder warten Sie für ca. 5 Sekunden, um die Zeiteinstellung abzuschließen.
Sleep-Modus
Mit dieser Sleep-Funktion wird das Radio nach Ablauf eines zuvor eingestellten Zeitraums automatisch abgeschaltet.
1. Nach Betätigen der [SLEEP] –Taste wird die Sleep-Funktion aktiviert und die Zeit “90” sowie das „Sleep“-Symbol werden für
5 Sekunden im Display angezeigt. Der SLEEP-Modus ist eingestellt, solange Sie nicht die SLEEP-Taste noch einmal drücken
und das Radio wieder einschalten. Das Radio wird sich nach 90 Minuten automatisch abschalten.
Während des Anzeigens der SLEEP-Zeit, kann diese durch Drücken der [SLEEP]-Taste geändert werden. Jedes Betätigen der
SLEEP-Taste ändert die SLEEP-Zeit entsprechend der folgenden Graphik:
2. Drücken Sie die [SLEEP]-Taste, um den Zeitraum auszuwählen (90, 80, 70, 60, 50, 40, 30, 20 oder 10 Minuten),
3. Jedes nochmalige Drücken der [SLEEP]-Taste reduziert die verbleibende Sleep-Zeit in 10-Minuten-Schritten bis auf 10 Minuten
als kürzeste Einstellung. Beispiel: Verbleiben 90 Minuten in der Sleep-Einstellung, reduziert einmaliges Drücken der Taste die
Sleep-Zeit auf 80 Minuten, zweimaliges Drücken auf 70 Minuten, usw.
4. Warten Sie ca. 5 Sekunden und die Sleep-Funktion wird automatisch aktiviert werden.
5. Beim Hören von Radio schaltet diese Funktion das Radio nach einer zuvor bestimmten Zeit automatisch ab.
6. Zum Löschen des SLEEP-Modus drücken Sie die [SLEEP]-Taste, bis das Symbol "SLEEP" nicht mehr angezeigt wird oder
drücken Sie die Taste [ON/OFF]. Das Radio wird sich nicht mehr automatisch abschalten.
90 80 70 60 50 40 30 20 10 off
D-3
Weckmodus
1. Vergewissern Sie sich, dass das Radio ausgeschaltet ist.
2. Drücken Sie die Taste [AL ON/OFF] (Alarm Ein/Aus). Die Ziffern für Stunden und Minuten sowie das Symbol "ALARM"
werden für 5 Sekunden blinkend im Display angezeigt.
3. Während die Zeit im Display aufleuchtet, drücken und halten Sie oder drücken Sie die Taste [DOWN/UP]
periodisch bis die gewünschte Weckzeit eingestellt ist.
4. Drücken Sie die Taste Alarm, um die Weckzeiteinstellung abzuschließen. Im Display wird das Symbol “Alarm” angezeigt.
Damit ist die Weckzeit eingestellt und der Summer wird automatisch zur zuvor eingestellten Zeit aktiviert werden.
5. Um den Weckmodus dauerhaft abzustellen, drücken Sie die Taste [AL ON/OFF]. Das Symbol "Alarm" wird nicht mehr im
Display angezeigt.
Bedienung des Radios
Sie schalten Ihr Radio ein, indem Sie die Taste [ON/OFF] betätigen. Das Radio schaltet sich mit den zuletzt eingestellten
Sender- und Lautstärkeeinstellungen ein.
A. Sendersuche:
Das Gerät ist mit einer automatischen Suchfunktion ausgestattet, die automatisch den nächsten klar zu empfangenden Sender
suchen kann.
1. Drücken Sie die Taste [ON/OFF], um das Radio einzuschalten.
2. Stellen Sie die Taste [SW/MW/FM] auf das gewünschte Band ein (SW, MW oder FM).
3. Drücken und halten Sie die Taste [DOWN/UP] für 2 Sekunden und die Frequenz erhöht bzw. verringert sich, bis ein klar zu
empfangender Sender gefunden wurde. Sobald diese Funktion aktiviert ist, können Sie loslassen und die Suche durch
Drücken der Taste anhalten. Durch Wiederholen des Vorgangs wird die Suche erneut gestartet.
4. Drehen Sie den LAUTSTÄRKEREGLER im Uhrzeigersinn, um die Lautstärke zu erhöhen oder entgegen dem Uhrzeigersinn,
um die Lautstärke zu verringern.
B. Manuelle Sendereinstellung:
1. Drücken Sie die Taste [ON/OFF], um das Radio einzuschalten.
2. Stellen Sie die Taste [SW/MW/FM] auf das gewünschte Band ein (SW, MW oder FM).
3. Der gewünschte Sender kann entweder durch Drücken und Halten oder durch periodisches Drücken der Taste [DOWN/UP]
eingestellt werden.
4. Drehen Sie den LAUTSTÄRKEREGLER im Uhrzeigersinn, um die Lautstärke zu erhöhen oder entgegen dem Uhrzeigersinn,
um die Lautstärke zu verringern.
Sendervoreinstellung
Sie können bis zu jeweils 10 Sender auf SW, MW oder FM speichern, was eine gesamte Sendervoreinstellung von 30
Sendestationen ergibt.
1. Stellen Sie den gewünschten Sender durch automatischen oder manuellen Sendersuchlauf ein.
2. Betätigen Sie die Taste [MEMORY] (Speicher), um den Sender zu speichern. Im Display wird das Symbol „MEMO“ für
5 Sekunden angezeigt. Drücken Sie eine der Voreinstellungstasten M1-M5, unter der Sie den Sender speichern möchten.
Im Display wird die Nummer der Voreinstellungstaste in der unteren linken Ecke angezeigt.
3. Drücken Sie die Taste [MEMORY] noch einmal, um die Auswahl abzuschließen.
4. Um den Sender unter den Voreinstellungsnummern M6-M10 zu speichern, drücken Sie die Taste [Memory] einmal und
anschließend die Taste [+5]. Im Display wird +5 angezeigt. Danach drücken Sie diejenige der Voreinstellungstasten M1-M5,
unter der Sie den Sender zu speichern wünschen.
Aufruf eines voreingestellten Senders
1. Drücken Sie die Taste [ON/OFF], um das Radio einzuschalten.
2. Stellen Sie die Taste [SW/MW/FM] auf das gewünschte Band ein (SW, MW oder FM).
3. Drücken Sie einfach eine der Voreinstellungstasten 1-5, um den gewünschten voreingestellten Sender aufzurufen. Um die
Voreinstellungen 6-10 aufzurufen, drücken Sie die Taste [+5] und anschließend eine der Voreinstellungstasten 1-5.
Tastensperre
Die Tastensperre befindet sich auf der Oberseite Ihres Radios und soll unbeabsichtigtes Einschalten während des Transports
verhindern.
1. Stellen Sie den Schalter [LOCK] (Sperren) in die Position ON. Das Symbol “KEY” erscheint im Display. Die ON/Off-Taste
sowie alle anderen Tasten sind deaktiviert.
2. Um die Tastensperre aufzuheben, stellen Sie den Schalter [LOCK] einfach in die Position OFF. Das Symbol “KEY” wird
nicht länger im Display angezeigt.
D-4
Sollten Sie irgendwann zu späterer Zeit dieses Produkt entsorgen wollen, beachten Sie bitte Folgendes:
Elektroschrott sollte nicht mit dem Haushaltsmüll entsorgt werden. Bitte recyceln Sie ihn, sofern Ihnen
entsprechende Möglichkeiten zur Verfügung stehen. Setzen Sie sich mit Ihren kommunalen Behörden oder
Ihrem Einzelhändler in Verbindung und fragen Sie diese um Rat bezüglich der Wiederverwertung.
(Elektro- und Elektronik-Altgeräte-Richtlinie (WEEE))
2. Druk op de [SLEEP] knop om een tijdsperiode (90, 80, 70, 60, 50, 40, 30, 20 of 10 minuten) te selecteren,
3. Nog een keer drukken op de [SLEEP] knop zal de resterende slaaptijd reduceren tot 10- minuten periodes tot de dichtstbijzijnde
10 minuten. Bijvoorbeeld: Als er nog 90 minuten in “slaap” resteren, dan zal eenmaal op de knop drukken de “slaap” reduceren
tot 80 minuten, twee maal zal het reduceren tot 70 minuten, etc.
4. Wacht ongeveer 5 seconden en de slaapfunctie zal automatisch worden geactiveerd.
5. Als u naar de radio luistert, dan schakelt deze functie de radio automatisch uit na een van tevoren ingestelde tijd.
6. Om de “SLAAP” modus uit te schakelen drukt u op de [SLEEP] knop tot het "SLAAP" symbool verschijnt of op de [ON/OFF]
(aan/uit) knop. De radio zal niet meer automatisch uitschakelen.
WR-34
PLL RECEIVER
PLL SYNTHESIZED STEREO WORLD RECEIVER
Manual de funcionamiento
NW / S W / FM ST.
PLL SYNTHES IZED S TEREO WORLD RECEIV ER
M1 M2 M3 M4 M5
TIME SET AL SLEEP +5
MEMORY ON/OFF
UP HOUR DOWN M IN
ON / OFF
MAN UA L / AUTO
SC AN
1 0 6 . 5
FM
MW
SW
ALARM SLEEP LOCK MEMO CH
MHz
5
5
+
5
M1 M2 M3 M4 M5
Lea este manual antes de usar el aparato
Botón de volumen
Emisora preajustada
Pantalla LED
Indicador FM
Encender/apagar
(ON/OFF)
Toma de auricular
Botón sleep (dormir)
Tecla preajuste “+ 5”
Sintonización/ajuste
minuto
Sintonización/ajuste
hora
Alarma ON/OFF
Botón Hora/memoria
(Time/Memory)
Tecla Reset
Antena FM/SW
Toma CC
Compartimiento
Interruptor de cerradura
Selector de banda
NW / S W / FM ST.
PLL S YNTHE SIZED STE REO WORLD RECEIVER
M1 M2 M3 M4 M5
TIME SET AL SLEEP +5
MEMORY ON/OFF
UP HOUR DOWN MIN
ON / OFF
MAN UAL / AUTO
SC AN
1 0 6 . 5
FM
MW
SW
ALARM SLEEP LOCK MEMO CH
MHz
5
5
+5
M1 M2 M3 M4 M5
1 0 6 . 5
FM
MW
SW
ALARM SLEEP LOCK MEMO CH
MHz
kHz
+
5
5
5
Indicador alarma
Indicación modo dormir activo
Indicador de cerradura de panel
Indicador +5
Indicador de número de canal
Indicador de memoria
Visualización de frecuencia/ hora
Indicador de banda
No. de memoria de emisoras preajustadas
E-2
open
TAPADERA COMPARTIMIENTO
DE PILAS
PILA AA X3
ENCHUFE
ADAPTADOR
VISTA TRASERA
ADAPTADOR CC
Instalación de pilas (no incluidas)
1. Sitúe la radio boca abajo.
2. Presione el gatillo y deslícelo en dirección de la flecha.
3. Levante el compartimiento de pilas.
4. Introduzca 3 pilas de tamaño UM-3 (AA). Asegúrese de que las pilas se encuentren situadas de acuerdo con el diagrama indicado.
5. Sustituya el compartimiento de pilas
Adaptador de CA (no incluido)
El adaptor de CA a utilizar con esta radio debe suministrar una salida de 4,5 voltios CC en un perno de centro de 200 mA (-) negativo.
Introduzca el enchufe del adaptador en la toma en la parte de la radio que indica “DC 4.5v”. Enchufe el otro extremo del adaptador
en una caja de enchufe doméstica estándar. Cada vez que se utilice el adaptador, las pilas se desconectan automáticamente.
Cuando no se utilice, el adaptador debe desconectarse de la alimentación eléctrica así como de la radio.
Nota: El adaptador de corriente sólo suministra corriente a la radio. El cronómetro funciona con pilas.
Toma de auricular (no incluida)
La toma de auricular estéreo le permite oír FM estéreo. Está se introduce en la salida de AURICULAR situada en la parte izquierda
de la radio provista del símbolo de "AURICULARES". Cuando la toma de auricular se enchufa, los altavoces son conectados a
modo mudo.
Ajuste de la hora en el cronómetro.
Nota: La hora sólo se puede ajustar si la radio está apagada.
1. Asegúrese de que la radio esté apagada.
2. Pulse el botón [TIME SET] los dígitos de las horas y los minutos destellan y son mostrados en el pantalla LCD durante 5 segundos.
3. Mientras que la indicación de la hora está destellando pulse y mantenga presionado hacia abajo el botón [DOWN/UP] o de modo
intermitente hasta que haya ajustado la hora deseada.
4. Para concluir el ajuste de hora de alarma, pulse el botón de alarma. El símbolo de “ALARMA” aparecerá en la pantalla indicando
de este modo que la alarma está activada,
5. Pulse de nuevo el botón [TIME SET] o espere aprox. 5 segundos para acabar de ajustar la hora.
Modo “dormir”
Mediante esta función “dormir” la radio es desconectada automáticamente detrás de un período de tiempo preajustado.
1. Cuando se pulsa el botón [SLEEP] se activa la función dormir y el tiempo a dormir inicial "90" con el símbolo de “DORMIR” será
mostrado en la pantalla LCD durante 5 segundos. Si no presiona [SLEEP] de nuevo y la radio vuelve a encenderse, el modo
dormir está ajustado. La radio se apagará automáticamente detrás de 90 minutos. Durante el período de indicación del tiempo
a dormir, el tiempo a dormir se puede modificar pulsando el botón [SLEEP]. Cada pulsación del botón SLEEP modificará el
tiempo a DORMIR según los pasos que se muestran a continuación:
2. Pulse el botón [SLEEP] para seleccionar el período de tiempo (90, 80, 70, 60, 50, 40, 30, 20 o 10 minutos),
3. Cada pulsación adicional del botón [SLEEP] reduce el tiempo a dormir restante en 10 minutes hasta llegar al valor decenal
más cercano. Ejemplo: Si quedan 90 minutos de tiempo a dormir, la simple pulsación del botón reducirá el tiempo a dormir a
80 minutos, dos pulsaciones a 70 minutos, etc.
4. Espere aprox. 5 segundos y la función dormir será activada automáticamente.
5. Si está escuchando la radio, está función apaga la radio automáticamente detrás de un tiempo predeterminado.
6. Para cancelar el modo DORMIR, pulse el botón [SLEEP] hasta que el símbolo “DORMIR” desaparezca o pulse el botón
[ON/OFF]. La radio ya no se apagará más automáticamente.
90 80 70 60 50 40 30 20 10 off
E-3
Modo de alarma
1. Asegúrese de que la radio esté apagada.
2. Pulse el botón [AL ON/OFF] los dígitos de las horas y los minutos con el símbolo de “ALARMA” destellan y son mostrados en
la pantalla LCD durante 5 segundos.
3. Mientras que la indicación de la hora está destellando pulse y mantenga presionado hacia abajo el botón [DOWN/UP] o de
modo intermitente hasta que haya ajustado la hora a la que desea ser despertado.
4. Para concluir el ajuste de hora de alarma, pulse el botón de alarma. El símbolo de “ALARMA” aparecerá en la pantalla para
indicar que la alarma está ajustada, el timbre sonará automáticamente a un hora predeterminada.
5. Para cancelar la alarma permanentemente, pulse el botón [AL ON/OFF], el símbolo de alarma desaparecerá de la Pantalla.
Funcionamiento de la radio
Encienda la radio mediante presión del botón [ON/OFF]. La radio se enciende en la última emisora y el volumen preajustados.
A. Sintonización mediante escaneo:
La unidad está provista de una función de autobúsqueda que puede buscar automáticamente el siguiente canal nítido.
1. Para encender la radio, pulse el botón [ON/OFF].
2. Mueva el botón [SW/MW/FM] hacia la banda que desee, SW, MW o FM.
3. Pulse y mantenga presionado el botón [DOWN/UP] durante 2 segundos y el valor de la frecuencia irá aumentando o
disminuyendo automáticamente hasta que aparezca un canal nítido. Una vez activada esta función, puede soltar y dejar
de presionar el botón. La repetición del procedimiento desencadenará el escaneo de nuevo.
4. Gire el botón de VOLUMEN según las agujas del reloj para subir el volumen o en sentido contrario a las agujas del reloj para
bajar el volumen.
B. Sintonización manual:
1. Para encender la radio, pulse el botón [ON/OFF].
2. Mueva el botón [SW/MW/FM] hacia la banda que desee, SW, MW o FM.
3. La emisora deseada puede ser seleccionada mediante presión del botón [DOWN/UP] o de modo intermitente hasta que la
emisora deseada sea localizada o pulsando y manteniendo presionado el botón [DOWN/UP] o hasta que la emisora sea
localizada.
4. Gire el botón de VOLUMEN según las agujas del reloj para subir el volumen o en sentido contrario a las agujas del reloj para
bajar el volumen.
Preajuste de emisoras
Puede almacenar hasta 10 emisoras por cada banda SW, MW or FM, resultando de este manera un total de 30 emisoras
preajustadas.
1. Sintonice las emisoras que requiere haciendo uso del método de sintonización automático o manual.
2. Para almacenar la emisora, pulse el botón [MEMORY] y el símbolo "MEMO" destellante será mostrado en la pantalla LCD
durante 5 segundos. Pulse el botón PRESET M1-M5, donde desee memorizar la emisora, la pantalla mostrará el número
de la emisora preajustada en la parte inferior de la esquina izquierda de la pantalla.
3. Pulse de nuevo el botón [MEMORY] para concluir con la selección.
4. Para almacenar la emisora en preselección M6-M10, pulse el botón [MEMORY] una vez, pulse el botón [ +5 ], la pantalla
mostrará +5, luego pulse el botón PRESET M1-M5, donde desee memorizar la emisora.
Llamar una emisora preajustada
1. Para encender la radio, pulse el botón [ON/OFF].
2. Mueva el botón [SW/MW/FM] hacia la banda que desee, SW, MW o FM.
3. Pulse uno de los botones de preajuste 1-5 para llamar las emisoras preajustadas que requiera. Para llamar las emisoras
preajustadas 6-10, presione el botón [+5], luego el botón de preajuste 1-5 correspondiente.
Interruptor de cerradura
El interruptor de cerradura situado en la parte superior de su aparato de radio es para prevenir accidentes durante el transporte.
1. Mueva el interruptor [LOCK] hacia la posición ON, el símbolo aparecerá en la pantalla, el botón [ON/OFF] y todos los otros
botones serán desactivados.
2. Para soltar el interruptor de cerradura desplace el interruptor [LOCK] hacia la posición off, el símbolo de “LLAVE” desaparecerá
de la pantalla.
E-4
Si en el futuro necesita deshacerse de este producto, tenga en cuenta lo siguiente: no debe deshacerse de los
residuos de productos eléctricos como si fueran residuos domésticos. Por favor, recicle en los sitios en los que esto
sea posible. Acuda a las autoridades locales o al vendedor en busca de asesoramiento sobre reciclaje.
(Directiva sobre residuos eléctricos y equipos electrónicos).
Seite wird geladen ...
-
 1
1
-
 2
2
-
 3
3


in anderen Sprachen
- English: Lenco WR-34 Datasheet
- français: Lenco WR-34 Fiche technique
- español: Lenco WR-34 Ficha de datos
- Nederlands: Lenco WR-34 Data papier
Andere Dokumente
-
Sony ICF-C723 - Ic Memory Clock Radio Benutzerhandbuch
-
Sony ICF-C153 Benutzerhandbuch
-
-
Sony ICF-C795RC Benutzerhandbuch
-
-
Sony 3-227-586-15 Benutzerhandbuch
-
-
Sony ICF-CD2000 Bedienungsanleitung
-
-
Sony Dream Machine ICF-C113 Benutzerhandbuch