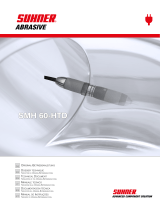
SUHNER ABRASIVE SMH 60-HT XL Benutzerhandbuch
- Typ
- Benutzerhandbuch

Manual de Instruções
tradução do «orIgInal-BetrIeBsanleItung»
PT
Documentación técnica
traDucción Del «original-BetrieBsanleitung»
ES
Manuale tecnico
traduzione delle «original-BetrieBsanleitung»
IT
Technical DocumenT
TranslaTions of The «original-BeTrieBsanleiTung»
EN
Dossier technique
traDuction Du «original-BetrieBsanleitung»
FR
Original-BetrieBsanleitung
DE
SMH 60-HT XLSMH 60-HT XL

English
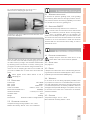
sparE parts
Français
Pièces de rechange
Deutsch
ersatzteile
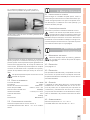
22
1.8m: 30132400
3.0m: 30132401
30132100

Portugúes
Peças de rePosição
Español
REfaccionEs
ItalIano
PezzI dI rIcambIo
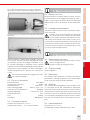
3
2.35mm: 11129003
3mm: 11129001
1/8": 11129002
30131500 30131800
2.35mm: 30131600
3mm: 30132700
1/8": 30132900

SymbolS
EngliSh
Attention!
Make sure to read!
This information is very important
for ensuring correct operation of
the product. Failure to observe this
information can result in a defect.
Note on safety / Warning
This information serves to achieve
safe operation. Failure to observe
this information may compromise
the operator‘s safety.
Information
This information serves for a good
understanding of the operation of
the product, thereby permitting full
exploitation of the operational po-
tential of the product.
Technical Document
Read the technical document prior
to commissioning.
Safety glasses and ear protection
Wear safety glasses and ear pro-
tection.
Disposal
Friendly-to-the-environment dis-
posal.
Power connector
Before any work is carried out on
the machine, disconnect the pow-
er connector.
Français
symboles
Attention !
A lire impérativement!
Cette information est très impor-
tante pour la garantie de fonc-
tionnement du produit. La non
observation peut entraîner une
défectuosité.
Indication relative à la sécurité /
Avertissement
Cette information sert à permettre
une utilisation sûre. En cas de non
observation, la sécurité de l’utilisa-
teur n’est pas garantie.
Information
Cette information sert à la com-
préhension du fonctionnement du
produit. Par cela, la pleine capa-
cité de fonctionnement du produit
pourra être exploitée.
Dossier technique
Lire le dossier technique avant la
mise en service.
Lunettes de protection et protec-
tion de l’ouïle
Porter des lunettes de protection et
une protection de l’ouïe.
Elimination
Elimination favorable à l’environne-
ment.
Fiche du secteur
Avant tout travail sur la machine,
retirer la fiche du secteur.
Deutsch
symbole
Achtung!
Unbedingt lesen!
Diese Information ist sehr wichtig
für die Funktionsgewährleistung
des Produktes. Bei Nichtbeachten
kann ein Defekt die Folge sein.
Sicherheitshinweis / Warnung
Diese Information dient zum Erlan-
gen eines sicheren Betriebes. Bei
Nichtbeachten ist die Sicherheit für
den Bediener nicht gewährleistet.
Information
Diese Information dient zum gu-
ten Verständnis der Funktion des
Produktes. Dadurch lässt sich die
volle Leistungsfähigkeit des Pro-
duktes ausschöpfen.
Betriebsanleitung
Vor Inbetriebnahme des Produktes
Betriebsanleitung lesen.
Schutzbrille und Gehörschutz
Schutzbrille und Gehörschutz tra-
gen.
Entsorgung
Umweltfreundliche Entsorgung.
Netzstecker
Vor jedem Arbeiten an der Maschi-
ne Netzstecker ziehen.
4

Portugúes
símbolos
Atenção!
A ler impreterivelmente!
Esta informação é extremamente impor-
tante para a garantia de funcionamento
do produto. A sua não observância pode
ocasionar uma avaria.
Indicações relativas à Segurança / Aviso
Esta informação serve para alcançar
uma operação segura. A sua não obser-
vância pode comprometer a segurança
do operador.
Informação
Esta informação permite a boa com-
preensão do funcionamento do produto
de modo a que se possa explorar à sua
plena capacidade de funcionamento.
Manual de Instruções
Ler o manual de Instruções antes de pro-
ceder ao arranque inicial.
Protecção visual e acústica
Usar óculos e dispositivos de protecção
acústica.
Eliminação
Eliminação respeitadora do meio ambi-
ente.
Ficha de conexão à rede
Antes de qualquer trabalho na máquina,
retirar a ficha da tomada
Español
símbolos
¡Atención!
¡Léase imprescindiblemente!
Esta información es muy importante para
garantizar el funcionamiento del produc-
to. Si no se tiene en cuenta se pueden
producir defectos o averías.
Indicación relativa a la seguridad / Ad-
vertenica
Esta información es muy importante
para garantizar un uso seguro del pro-
ducto. Si se ignora, no está garantizada
la seguridad del usuario.
Información
Esta información sirve para comprender
el funcionamiento del producto. Ello per-
mite aprovechar al máximo sus presta-
ciones.
Documentación técnica
Leer la documentación técnica antes de
poner en servicio el producto.
Protección visual y acústica
Usar gafas y protección acústica.
Gestión de residuos
Eliminar los residuos sin contaminar el
medio ambiente.
Enchufe de red
Desconectar el enchufe de la red eléc-
trica.
ItalIano
sImbolI
Attenzione!
Da leggere assolutamente!
Questa informazione è molto importante
per il mantenimento della funzionalità del
prodotto. In caso di non osservanza pos-
sono prodursi dei difetti.
Indicazione relativa alla sicurezza / Av-
vertimento
Questa informazione serve al raggi-
ungimento di un esercizio sicuro. In
caso di inosservanza, la sicurezza
dell‘utilizzatore non è garantita.
Informazione
Questa informazione serve ad una cor-
retta comprensione delle funzioni del
prodotto. In questo modo è possibile
sfruttare pienamente le potenzialità del
prodotto.
Manuale tecnico
Prima della messa in funzione del pro-
dotto, leggere il manuale tecnico.
Occhiali di protezione e protezione
dell‘udito
Portare gli occhiali di protezione e la pro-
tezione dell‘udito.
Smaltimento
Smaltimento rispettoso
dell‘ambiente.
Presa di rete
Prima di ogni lavoro sulla macchina to-
gliere la presa di rete.
5

English
ContEnts
Page
1.1 General notes on safety .......16
1.2 Use of the machine for
pUrposes for which it is
intended ..................................16
1.3 incorrect Use .........................16
1.4 declaration of incorporation 16
2.1 assembly instrUctions ............16
2.2 ratinG data ..............................17
2.3 operatinG conditions .............17
3.1 workinG instrUctions .............17
3.2 switchinG on/off .................17
4.1 preventive maintenance ..........17
4.2 spare parts .............................17
4.3 repair ......................................17
4.4 warranty ................................17
4.5 storaGe ..................................17
4.6 disposal / environmental com-
patibility ..................................18
Table des maTières
Français
Page
1.1 instrUctions Générales de
sécUrité...................................12
1.2 Utilisation conforme à la desti-
nation ......................................12
1.3 Utilisation contraire à la desti-
nation ......................................12
1.4 déclaration d‘incorporation ..12
2.1 instrUctions de montaGe ........12
2.2 performances .........................13
2.3 conditions d’exploitation .......13
3.1 indications de travail ..............13
3.2 mise en marche/en coUpUre ....13
4.1 maintenance préventive..........13
4.2 pièces de rechanGe .................13
4.3 réparation ..............................13
4.4 prestation de Garantie ...........13
4.5 entreposaGe ...........................14
4.6 elimination / compatibilité
environnementale ...................14
Deutsch
InhaltsverzeIchnIs
Seite
1.1 allGemeiner sicherheitstech-
nischer hinweis .........................8
1.2 bestimmUnGsGemässe
verwendUnG ..............................8
1.3 nicht bestimmUnGsGemässe
verwendUnG ..............................8
1.4 einbaUerklärUnG (oriGinal) .....8
2.1 montaGeanleitUnG ....................8
2.2 leistUnGsdaten .........................9
2.3 betriebsbedinGUnGen ................9
3.1 arbeitshinweise .........................9
3.2 ein-/aUsschalten ......................9
4.1 vorbeUGende instandhaltUnG ...9
4.2 ersatzteile ................................9
4.3 reparatUr .................................9
4.4 GarantieleistUnG ......................9
4.5 laGerUnG ..................................9
4.6 entsorGUnG / UmweltverträG-
lichkeit ....................................10
6

Índice
Portugúes
1.1 indicações Gerais sobre a
técnica de seGUrança .............28
1.2 Utilização correcta para os fins
previstos .................................28
1.3 Utilização incorrecta .............28
1.4 declaração de montaGem .......28
2.1 instrUções de montaGem ........28
2.2 características técnicas ........29
2.3 condições de operação ..........29
3.1 indicações para o trabalho ....29
3.2 liGar/desliGar .........................29
4.1 manUtenção preventiva ..........29
4.2 peças de reposição .................29
4.3 reparação ...............................29
4.4 condições de Garantia ...........29
4.5 armazenaGem .........................29
4.6 eliminação / compatibilidade
ambiental .................................30
Índice
español
1.1 indicación General relativa a
seGUridad ................................24
1.2 Uso conforme al previsto ......24
1.3 Uso no conforme al previsto .24
1.4 declaración de incorporación
................................................24
2.1 instrUcciones de montaje .......24
2.2 datos de rendimiento ..............25
2.3 condiciones de operación ......25
3.1 instrUcciones de trabajo .......25
3.2 conexión/desconexión ...........25
4.1 maintenance préventive..........25
4.2 reparación ..............................25
4.3 reparación ..............................25
4.4 Garantía .................................25
4.5 alimacenamiento .....................25
4.6 eliminación / compatibilidad con
el medio ambiente ....................26
IndIce
ItalIano
1.1 informazioni Generali sUlla
sicUrezza.................................20
1.2 impieGo conforme della
macchina .................................20
1.3 impieGo non conforme ...........20
1.4 dichiarazione di montaGGio ....20
2.1 instrUzioni per il montaGGio ...20
2.2 dati sUlle prestazioni .............21
2.3 condizioni di impieGo ...............21
3.1 modalità di lavor ....................21
3.2 inserimento/disinserimento .....21
4.1 manUtenzione preventiva ........21
4.2 pezzi di ricambio ......................21
4.3 riparazione .............................21
4.4 Garanzia .................................21
4.5 immaGazzinamento ...................21
4.6 smaltimento / compatibilità
ambientale ...............................22
Página Página
Pagina
7

Portugúes Español Italiano English Français Deutsch
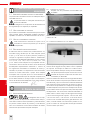
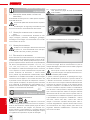
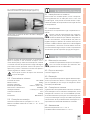
2.1.1 Anschluss des hAndstücks
Nur von SUHNER empfohlene Handstücke ver-
wenden.
Handstück in die Anschlussbuchsen A oder B einste-
cken/herausziehen.
2.1.2 demontAge/montAge des schleifwerkzeugs
Spannzange lösen durch Drehen des Griffstücks im Uhr-
zeigersinn. Werkzeug oder Spannstift entfernen. Montage
in umgekehrter Reihenfolge. Griffstück drehen bis es hör-
bar einrastet.
Spannzange nie ohne Werkzeug oder Spannstift
anziehen. Nur von SUHNER empfohlene Werk-
zeuge verwenden.
Die Sicherheitshinweise des Werkzeug-Herstellers sind
ebenfalls zu beachten. Es ist zu prüfen, dass der Durch-
messer des Werkzeugs zulässig ist und die zulässige ma-
ximale Drehzahl höher ist als die Leerlaufdrehzahl oder
die eingestellte Drehzahl der Maschine. Der Werkzeug-
schaft muss genau in die Werkzeugaufnahme passen.
Das Werkzeug ist möglichst tief in der Werkzeugaufnah-
me zu spannen. Die maximal zulässige Drehzahl ist zu
reduzieren, je grösser die offene Schaftlänge und je ge-
ringer die Einspannlänge ist: >20mm max. 50%, >25mm
max. 30%, >50mm max. 10% der Drehzahl. Das mon-
tierte Werkzeug muss frei drehen können. Anschliessend
ist ein Probelauf ohne Belastung von min. 30 Sekunden
durchzuführen. Vibrierendes Werkzeug umgehend erset-
zen.
1.1 Allgemeiner sicherheitstechnischer hin-
weis
Diese Betriebsanleitung gilt für das Handstück SMH 60-
HT XL.
Nur qualifiziertes Personal darf das Handstück
handhaben.
Die dem Antrieb separat beigelegten Sicherheits-
hinweise sind zwingend zu beachten.
1.2 Bestimmungsgemässe Verwendung
Das Handstück ist ausschliesslich zum Schleifen, Fräsen,
Polieren, Entgraten, Gravieren, Satinieren und Bürsten
mit Werkzeugen mit einem maximalen Durchmesser von
45mm bestimmt.
1.3 nicht Bestimmungsgemässe Verwendung
Alle andern als unter Pkt. 1.2 beschriebenen Ver-
wendungen gelten als nicht bestimmungsgemäs-
se Verwendung und sind deshalb nicht zulässig.
1.4 einBAuerklärung (originAl)
Hiermit erklärt der Hersteller Suhner Schweiz AG, In-
dustriestrasse 10, CH-5242 Lupfig, der unvollständigen
Maschine (Typ und Serien-Nr. siehe Rückseite) dass
folgende grundlegenden Anforderungen der Richtlinie
2006/42/EG nach Anhang I zur Anwendung kommen
und eingehalten werden: 1.1.2, 1.1.3, 1.1.5, 1.2.1, 1.2.2,
1.3.7, 1.3.8.1, 1.5.1, 1.5.4 und 1.6.1. Für die unvollständige
Maschine wurde eine technische Dokumentation nach
Anhang VII der Maschinenrichtlinie erstellt. Dokument-
bevollmächtigter: T. Fischer. Autorisierten Stellen wird
auf begründetem Verlangen die technischen Dokumen-
tationen in Papier- oder elektronischer Form zur Verfü-
gung gestellt. Diese unvollständige Maschine darf nur
dann in Betrieb genommen werden, wenn festgestellt
wurde, dass die Maschine, in welche die unvollständige
Maschine eingebaut werden soll, den Bestimmungen
der Maschinenrichtlinie entspricht. CH-Lupfig, 10/2019.
T. Fischer/Divisionsleiter
2. INbETRIEbNahmE
2.1 montAgeAnleitung
Die Kapitel 2 und 3 sind
zwingend vor der Inbetriebnahme des Handstücks zu le-
sen. Nur Handstücke und Schleifwerkzeuge in einwand-
freiem Zustand verwenden. Handstück und Schleifwerk-
zeug nur bei ausgeschaltetem Steuergerät montieren.
Länderspezifische Vorgaben beachten.
1. SIchERhEITShINwEIS
8
Deutsch

Portugúes ItalianoEspañol English Français Deutsch
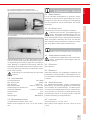
2.1.3 demontAge/montAge der spAnnzAnge
Werkzeug oder Spannstift entfernen (siehe 2.1.2).
Verschlusskappe des Kabels abschrauben und Elektro-
nik ausstecken.
Spannzangenschlüssel (1) in die Spannzange stecken
und mit Arretierschlüssel (2) Spannzangenachse blockie-
ren. Spannzange durch Drehen gegen den Uhrzeigersinn
lösen. Montage in umgekehrter Reihenfolge, dabei die
Spannzange ohne Anwendung von Kraft anziehen. Werk-
zeug oder Spannstift einstecken und Griffstück drehen
bis es hörbar einrastet.
Spannzange nie ohne Werkzeug oder Spannstift
anziehen.
2.2 leistungsdAten
Leistungsaufnahme max. 280W
Max. Drehmoment 8.9Nm
Max. Drehzahl 50‘000 min-1
Spannzangen EMA 2.35mm / 3 mm / 1/8“
Geräuschpegel bei 50‘000 min-1 59.8dB(A)
Vibrationen EN 60745 <2.5m/s2, K=1.3m/s2
Isolationsklasse IP54
Gewicht 0.400kg
Abmessungen Ø30x200mm
2.3 BetrieBsBedingungen
Temperaturbereich Betrieb: 0 bis +50°C
Relative Luftfeuchtigkeit: 95 % bei +10°C nicht konden-
siert.
12
3.1 ArBeitshinweise
Um ein optimales Schleifergebnis zu erreichen, Schleif-
werkzeug mit leichtem Druck gleichmässig hin und her
bewegen. Zu starker Druck verringert die Leistungsfähig-
keit des Handstücks und die Lebensdauer des Schleif-
werkzeugs.
3.2 ein-/AusschAlten
Handstück gut festhalten. Steuergerät einschalten.
Probelauf mind. 30 Sek. ohne Belastung durch-
führen. Vibrierende Schleifwerkzeuge nicht ver-
wenden. Im Betrieb muss das Handstück immer
in der Hand gehalten werden. Steuergerät bei beendeter
Arbeit ausschalten. Werkzeug läuft noch aus nachdem
das Handstück ausgeschaltet wird. Handstück so able-
gen, dass dadurch keine Gefahr entstehen kann.
4. INSTaNDhalTuNg/waRTuNg
4.1 VorBeugende instAndhAltung
Handstück stets sauber halten und trocken aufbe-
wahren. Verschlissene Spannzangen sind aus-
zutauschen.
4.2 ersAtzteile
Siehe Seite 2-3.
4.3 repArAtur
Sollte das Handstück, trotz sorgfältiger Herstellungs- und
Prüfverfahren, einmal ausfallen, ist die Reparatur von ei-
ner autorisierten SUHNER Kundendienststelle ausführen
zu lassen.
4.4 gArAntieleistung
Für Schäden/Folgeschäden wegen unsachgemässer
Behandlung, nicht bestimmungsgemässer Verwendung,
nicht Einhalten der Instandhaltungs- und Wartungsvor-
schriften sowie Handhabung durch nicht autorisierte Per-
sonen besteht kein Anspruch auf Garantieleistung. Be-
anstandungen können nur anerkannt werden, wenn das
Handstück unzerlegt zurückgesandt wird.
4.5 lAgerung
Temperaturbereich: -15°C bis +50°C
Max. relative Luftfeuchtigkeit: 90 % bei +30°C, 65 % bei
+50°C
3. haNDhabuNg / bETRIEb
9
Deutsch

Portugúes Español Italiano English Français Deutsch
4.6 entsorgung / umweltVerträglichkeit
Das Handstück besteht aus Materialien, die einem Recy-
clingprozess zugeführt werden können. Handstück vor
der Entsorgung unbrauchbar machen.
Handstück nicht in den Müll werfen.
Gemäss nationalen Vorschriften muss dieses
Handstück einer umweltgerechten Wiederverwer-
tung zugeführt werden.
10
Deutsch

Portugúes ItalianoEspañol English Français Deutsch
11
Deutsch

Portugúes Español Italiano English Français
1. INDIcaTIoN RElaTIvE à
SécuRITé
1.1 instructions générAles de sécurité
Ce dossier technique est valable pour la pièce manuelle
SMH 60-HT XL.
Seul le personnel qualifié peut opérer sur la pièce
manuelle.
Les consignes de sécurité fournies avec l’entraî-
nement en fascicule séparé doivent être impérativement
respectées.
1.2 utilisAtion conforme à lA destinAtion
La pièce manuelle sert uniquement pour des travaux
comme meuler, fraiser, polir, ébavurer, graver, satiner et
brosser à l’aide d’outils d’un diamètre maximal de 45 mm.
1.3 utilisAtion contrAire à lA destinAtion
Toutes les applications autres que celles décrites
au point 1.2 sont à considérer comme contraires à
la destination et ne sont donc pas admissibles.
1.4 déclArAtion d‘incorporAtion
Par la présente, le fabricant Suhner Schweiz AG, Indus-
triestrasse 10, CH-5242 Lupfig, de la quasi-machine (voir
au dos le type et le numéro de série) déclare que les exi-
gences essentielles suivantes de la directive 2006/42/
CE sont appliquées et respectées selon l‘annexe I :
1.1.2, 1.1.3, 1.1.5, 1.2.1, 1.2.2, 1.3.7, 1.3.8.1, 1.5.1, 1.5.4 et
1.6.1. Une documentation technique conforme à l‘annexe
VII de la directive Machines a été conçue pour la qua-
si-machine. Fondé de pouvoir : T. Fischer. Les docu-
ments techniques seront communiqués aux organismes
autorisés sur demande motivée sous forme papier ou
électronique. Cette quasi-machine ne peut être mise en
service que s‘il est constaté que la machine à laquelle
la quasi-machine doit être incorporée répond aux dis-
positions de la directive Machines. CH-Lupfig, 10/2019.
T. Fischer/Chef de division
2. mISE EN SERvIcE
2.1 instructions de montAge
Les chapitres 2 et 3 doivent
impérativement être lus avant la mise en service de la
pièce manuelle. Utilisez uniquement des pièces à main et
des outils de polissage dans un état impeccable. Monter
la pièce manuelle et l’outil de polissage uniquement
lorsque l’unité de commande est éteinte. Respecter les
consignes nationales spécifiques.
2.1.1 rAccordement de lA pièce mAnuelle
Utiliser uniquement des pièces manuelles recom-
mandées par SUHNER.
Enficher/retirer la pièce manuelle dans/de la douille de
raccordement «A» ou «B».
2.1.2 demontAge/montAge de l’outil de polissAge
Desserrer la pince de serrage en tournant la poignée dans
le sens horaire. Retirer l’outil ou la goupille de serrage.
Suivre la procédure dans l’ordre inverse pour le montage.
Tourner la poignée jusqu’à ce qu’elle s’enclenche de fa-
çon audible.
Ne jamais serrer la pince de serrage sans outil ou
goupille de serrage. Utiliser uniquement des outils
recommandés par SUHNER.
Les consignes de sécurité du fabricant des outils doivent
être également respectées. Il convient de vérifier que le
diamètre de l’outil est admissible et que la vitesse de rota-
tion maximale admissible est supérieure à la vitesse de
rotation de marche à vide ou à la vitesse de rotation pro-
grammée de la machine. Le mandrin de l’outil doit rentrer
exactement dans le porte-outil. Il convient de fixer l’outil
le plus profondément possible dans le porte-outil. La vi-
tesse de rotation maximale admissible doit être abaissée
en fonction de la longueur ouverte du mandrin et de la
longueur de serrage : >20 mm max. 50 %, >25 mm max.
30 %, >50 mm max. 10 % de la vitesse. L’outil installé doit
pouvoir tourner librement. Ensuite, il convient de procéder
à un essai à vide de min. 30 secondes. Remplacer immé-
diatement un outil qui vibre.
Deutsch
12
Français

Portugúes ItalianoEspañol English Français
2.1.3 demontAge/montAe de lA pince de serrAge
Retirer l’outil ou la goupille de serrage. (cf. 2.1.2).
Dévisser le bouchon du câble et débrancher l’électro-
nique.
Insérer la clé de la pince de serrage (1) dans la pince de
serrage puis bloquer l’axe de la pince de serrage à l’aide
de la clé de blocage (2). Desserrer la pince de serrage en
tournant dans le sens antihoraire. Montage dans le sens
inverse des étapes, ce faisant serrer la pince de serrage
sans forcer, insérer l’outil ou la goupille de serrage et tour-
ner la poignée jusqu’à ce qu’elle s’enclenche.
Ne jamais serrer la pince de serrage sans outil ou
goupille de serrage.
2.2 performAnces
Puissance absorbée max. 280W
Cople maxi 8.9Nm
Vitesses de rotation maxi. 50‘000 min-1
Pince de serrage EMA 2.35mm / 3 mm / 1/8“
Niveau sonore à 50‘000 min-1 59.8dB(A)
Vibration EN 60745 <2.5m/s2, K=1.3m/s2
Indice de protection IP54
Poids 0.400kg
Dimensions Ø30x200mm
2.3 conditions d’exploitAtion
Plage de températres en exploitation: 0 à +50°C
Humidité de l‘air relative: 95% à +10°C sans condensation
12
3.1 indicAtions de trAVAil
Afin d’obtenir un polissage optimal, mouvoir l’outil de
polissage en mouvement de va et vient en maintenant
une légère pression d’appui. Une pression d’appui trop
élevée diminue la capacité de performance de la pièce
manuelle et la durée de vie de l’outil de polissage.
3.2 mise en mArche/en coupure
Maintenir fermement la pièce manuelle. Mettre l’unité de
commande en marche.
Effectuer un essai de 30 secondes minimum hors
sollicitation. Ne pas utiliser d’outils qui vibrent.
Pendant le fonctionnement, la pièce manuelle doit
toujours être tenue dans la main. Arrêter l’unité de com-
mande une fois le travail terminé. L’outil tourne encore
après la mise hors circuit de la pièce manuelle. Déposer
la pièce manuelle de sorte qu’elle ne puisse présenter
aucun danger.
4. maINTENaNcE/ENTRETIEN
4.1 mAintenAnce préVentiVe
Maintenir la pièce manuelle en état propre et la
stocker à sec. Remplacer les pinces de serrage
usées.
4.2 pièces de rechAnge
Voir page 2-3.
4.3 répArAtion
Si la pièce manuelle devait présenter un défaut malgré
des processus de fabrication et de contrôles rigoureux, il
y a lieu de faire exécuter la remise en état par un atelier de
service à la clientèle agrée par SUHNER.
4.4 prestAtion de gArAntie
Pour des dégâts et dégâts consécutifs résultants d’un
traitement inadéquat, d’une utilisation non conforme à la
destination, du non respect des prescriptions de main-
tenance et d’entretien, ainsi que de la manutention par
du personnel non autorisé, il n’existe aucune prétention
de garantie. Des réclamations ne peuvent être reconnues
que si la pièce manuelle est retournée non démontée.
3. uTIlISaTIoN/ExPloITaTIoN
Deutsch
13
Français

Portugúes Español Italiano English Français
4.5 entreposAge
Plage de températures: -15°C à +50°C
Humidité de l’air relative max. 90% à + 30°C
4.6 eliminAtion / compAtiBilité enVironnemen-
tAle
Cette pièce manuelle est composée de matériaux pou-
vant être soumis à un processus de recyclage. Rendre la
pièce manuelle inutilisable avant la remise à une collecte
de déchets.
Ne pas mettre la pièce manuelle aux ordures.
Selon les prescriptions nationales, cette pièce ma-
nuelle doit être soumise à un recyclage respectant
l’environnement.
Deutsch
14
Français

Portugúes ItalianoEspañol English Français Deutsch
15
Français

Portugúes Español Italiano English
1.1 generAl notes on sAfety
This operation manual is applicable for the hand tool SMH
60-HT XL.
The hand tool may only be handled by personnel
who are qualified.
It is imperative that you observe the safety instruc-
tions provided separately for the drive.
1.2 use of the mAchine for purposes for
which it is intended
This hand tool is only intended to be used with tools of
a maximum diameter of 45 mm for grinding, milling, pol-
ishing, deburring, engraving, satin finishing and brushing
processes.
1.3 incorrect use
All uses other than those described under section
1.2 are regarded as incorrect use and are there-
fore not admissible.
1.4 declArAtion of incorporAtion
The manufacturer Suhner Schweiz AG of Industriestrasse
10, CH-5242 Lupfig, hereby declares for the partly com-
pleted machinery (see reverse side for type and serial
no.) that the following fundamental requirements of the
Directive 2006/42/EC are applied and fulfilled in accord-
ance with Annex I: 1.1.2, 1.1.3, 1.1.5, 1.2.1, 1.2.2, 1.3.7,
1.3.8.1, 1.5.1, 1.5.4, and 1.6.1. Technical documenta-
tion was generated for the partly completed machinery
in accordance with Annex VII of the Machinery Direc-
tive. Document Agent: T. Fischer. Authorised sites are
provided with this technical documentation in paper or
electronic form on justified request. This partly complet-
ed machinery may be put into operation only when the
machine in which the partly completed machinery is to
be incorporated has been ascertained to fulfil the condi-
tions under the Machinery Directive. CH-Lupfig, 10/2019.
T. Fischer/Division managerr
2. commISSIoNINg
2.1 AssemBly instructions
It is imperative that you
read Sections 2 and 3 before activating the hand tool.
Only use hand pieces and grinding tools if they are in per-
fect condition. Only fit or set up hand tools and grinding
tools when the control unit is switched OFF. Observe the
standards and requirements which apply in your country.
1. NoTES oN SaFETy
2.1.1 connecting the hAnd tool
Only utilize hand tools which have been approved
by SUHNER.
Plug the hand tool into/remove it from socket «A» or «B».
2.1.2 detAching/connecting the grinding tool
Loosen the collet chuck by turning the handle clockwise.
Remove tool or clamping pin. To assemble, follow the
above instructions in reverse order. Turn the handle until it
makes an audible click (this shows that it has locked into
place).
Never tighten chuck collets without a tool or
clamping pin. Only utilize tools which have been
approved by SUHNER.
The safety instructions issued by the tool manufacturer
must also be observed. Check that the diameter of the tool
is within the permitted limit and that the maximum permit-
ted speed is higher than the idle speed or set speed of the
machine. The tool shaft must fit the tool fitting exactly. The
tool needs to be clamped in the tool fitting once it is in as
deep as it can go. The bigger the open shaft length and
the smaller the clamping length, the lower the maximum
permitted speed, as follows: >20mm max. 50%, >25mm
max. 30%, >50mm max. 10% of the rotation speed. The
assembled tool must be able to turn freely. After this, a
trial run lasting a minimum of 30 seconds must be carried
out with no load. If tools vibrate, replace them instantly.
Français Deutsch
16
English

Portugúes ItalianoEspañol English
2.1.3 detAching/connecting the collet chuck
Remove tool or clamping pin (see 2.1.2).
Unscrew the cap on the cable so that the electronic com-
ponents are displayed.
Insert the collet chuck key (1) into the collet chuck and
lock the collet chuck shaft with the locking key (2). Loosen
the collet chuck by turning it anti-clockwise. Reassemble
by following these instructions in reverse, ensuring that
you tighten the collet chuck without using excessive force,
insert the tool or clamping pin and turn the handle until
you hear an audible click to show that it has locked into
place.
Never tighten chuck collets without a tool or
clamping pin.
2.2 rAting dAtA
Power Input max. 280W
Max. torque 8.9Nm
Max. speed 50‘000 min-1
Collet chuck EMA 2.35mm / 3 mm / 1/8“
Noise level at 50‘000 min-1 59.8dB(A)
Vibration EN 60745 <2.5m/s2, K=1.3m/s2
Insulation class IP54
Weight 0.400kg
Dimensions Diameter of 30mm x lenght 200mm
2.3 operAting conditions
Temperature range during operation: 0 to +50°C
Relative air humidity: 95% at +10°C not condensed
12
3.1 working instructions
To achieve an optimum grinding result, move grinding
tool uniformly back and forth with light pressure. Exces-
sive pressure lessens the working capability of the hand
tool, as well as the life of the grinding tool.
3.2 switching on/off
Hold the hand tool firmly. Switch on the control unit.
Perform a test run where the tool runs without load
for at least thirty seconds. Do not use the grinding
tool if it is vibrating. When it is in operation, the
hand tool must always be held in your hand. Switch OFF
the control unit when work has been finished. The tool will
continue to run for a while after the hand tool has been
switched OFF. Put the hand tool down safely, so that no
hazards can occur.
4. SERvIcE/maINTENaNcE
4.1 preVentiVe mAintenAnce
Always keep the hand tool clean and in a dry
place. Worn collet chucks must be replaced.
4.2 spAre pArts
See page 2-3.
4.3 repAir
If despite strict observance of the manufacturing and test-
ing method the hand tool should happen to fail, it must be
repaired by an authorized SUHNER agency.
4.4 wArrAnty
In the event of the tool being improperly handled, used
for purposes for which it is not intended and/or of the ser-
vice and maintenance instructions not being observed by
non-authorized persons, no warranty shall be in effect for
damages/consequential damages. Complaints can only
be honored if the hand tool is returned in the undisas-
sembled condition.
4.5 storAge
Temperature range: -15°C to +50°C
Max. relative air humidity: 90% at +30°C
3. haNDlINg/oPERaTIoN
Français Deutsch
17
English

Portugúes Español Italiano English
4.6 disposAl / enVironmentAl compAtiBility
This hand tool consists of materials which can be dis-
posed of in a recycling process. Before disposal, render
the hand tool unusable.
Do not throw the hand tool into the garbage collec-
tion.
According to national regulations this hand tool
must be disposed of in an environmentally-compatible
recycling process.
Français Deutsch
18
English

Portugúes ItalianoEspañol English Français Deutsch
19
English

Portugúes Español Italiano
1.1 informAzioni generAli sullA sicurezzA
Questo manuale tecnico si riferisce alla utensile a mano
SMH 60-HT XL.
È autorizzato a manipolare l‘utensile a mano
esclusivamente personale qualificato.
Attenersi strettamente alle raccomandazioni di si-
curezza allegate separatamente all’azionamento.
1.2 impiego conforme dellA mAcchinA
Il utensile a mano è destinato esclusivamente alla leviga-
tura, fresatura, sbavatura, incisione, satinatura e spazzo-
latura con utensili aventi un diametro massimo di 45 mm.
1.3 impiego non conforme
Tutti gli ulteriori impieghi, non indicati al prece-
dente punto 1.2 sono da considerare come non
conformi alle prescrizioni e sono pertanto vietati.
1.4 dichiArAzione di montAggio
Con la presente il costruttore Suhner Schweiz AG, Indus-
triestrasse 10, CH-5242 Lupfig, della macchina incomple-
ta (tipo e n. di serie vedi retro), dichiara che sono state
applicate e rispettate le seguenti specifiche di base della
direttiva 2006/42/CE secondo l’Appendice I: 1.1.2, 1.1.3,
1.1.5, 1.2.1, 1.2.2, 1.3.7, 1.3.8.1, 1.5.1, 1.5.4 e 1.6.1. Per la
macchina incompleta è stata prodotta la necessaria do-
cumentazione tecnica secondo l’Appendice VII della di-
rettiva macchine. Responsabile della documentazione:
T. Fischer. In caso di richiesta motivata la documentazi-
one tecnica viene fornita in formato cartaceo o elettro-
nico ai centri autorizzati. Questa macchina incompleta
può essere messa in funzione solo dopo aver opportu-
namente verificato che la macchina nella quale la mac-
china incompleta deve essere installata è conforme alle
specifiche della direttiva macchine. CH-Lupfig, 10/2019.
T. Fischer/Presidente di divisione
2. mESSa IN SERvIzIo
2.1 instruzioni per il montAggio
I capitoli 2 e 3 devono es-
sere letti assolutamente prima della messa in esercizio
del utensile a mano. Utilizzare solo manipoli e utensili ab-
rasivi in perfetto stato. Montare il utensile a mano e
l’utensile abrasivo solo con il dispositivo di controllo spen-
to. Rispettare le disposizioni specifiche per i singoli paesi.
1. PREScRIzIoNI DI SIcuREzza
2.1.1 collegAmento del utensile A mAno
Utilizzare solo utensili a mano raccomandati da
SUHNER.
Inserire/estrarre il utensile a mano nelle boccole di allac-
ciamento «A» o «B».
2.1.2 smontAggio/montAggio dell‘utensile ABrAsiVo
Allentare la pinza di serraggio dell’impugnatura in senso
orario. Rimuovere l’utensile o la spina di fissaggio. Mon-
taggio in sequenza inversa. Ruotare l’impugnatura fino a
quando non si blocca con un clic.
Non serrare mai la pinza di serraggio senza uten-
sile o spina di fissaggio. Utilizzare solo utensili
raccomandati da SUHNER.
Attenersi anche alle avvertenze di sicurezza del pro-
duttore dell’utensile. Si deve controllare che il diametro
dell’utensile sia ammesso e che la massima velocità am-
messa sia superiore al numero di giri a vuoto o alla veloci-
tà della macchina impostata. Il gambo dell’utensile deve
entrare correttamente nella sede dell’utensile. L’utensile
deve essere serrato nella sede dell’utensile il più profon-
damente possibile. La massima velocità ammessa deve
essere ridotta quanto più grande è la lunghezza del gam-
bo scoperta e quanto minore la lunghezza di bloccaggio.
> 20 mm max. 50 %, > 25 mm max. 30 %, > 50 mm max.
10 % della velocità. L’utensile montato deve poter ruotare
liberamente. Quindi si deve effettuare una prova di funzi-
onamento senza carico di almeno 30 secondi. Sostituire
immediatamente un utensile che provoca vibrazioni.
English Français Deutsch
20
Italiano
Seite laden ...
Seite laden ...
Seite laden ...
Seite laden ...
Seite laden ...
Seite laden ...
Seite laden ...
Seite laden ...
Seite laden ...
Seite laden ...
Seite laden ...
Seite laden ...
-
 1
1
-
 2
2
-
 3
3
-
 4
4
-
 5
5
-
 6
6
-
 7
7
-
 8
8
-
 9
9
-
 10
10
-
 11
11
-
 12
12
-
 13
13
-
 14
14
-
 15
15
-
 16
16
-
 17
17
-
 18
18
-
 19
19
-
 20
20
-
 21
21
-
 22
22
-
 23
23
-
 24
24
-
 25
25
-
 26
26
-
 27
27
-
 28
28
-
 29
29
-
 30
30
-
 31
31
-
 32
32


SUHNER ABRASIVE SMH 60-HT XL Benutzerhandbuch
- Typ
- Benutzerhandbuch
in anderen Sprachen
- français: SUHNER ABRASIVE SMH 60-HT XL Mode d'emploi
- español: SUHNER ABRASIVE SMH 60-HT XL Guía del usuario
- italiano: SUHNER ABRASIVE SMH 60-HT XL Guida utente
- português: SUHNER ABRASIVE SMH 60-HT XL Guia de usuario
Verwandte Papiere
-
 SUHNER ABRASIVE SMH 60-HTD Benutzerhandbuch
-
 SUHNER ABRASIVE SMH 60-SE Benutzerhandbuch
-
 SUHNER ABRASIVE SUNmic 60 Benutzerhandbuch
-
 SUHNER ABRASIVE FHA 4 Benutzerhandbuch
-
 SUHNER ABRASIVE FH 4-INOX Benutzerhandbuch
-
 SUHNER ABRASIVE FH 7-INOX Benutzerhandbuch
-
 SUHNER ABRASIVE FH 12-INOX Benutzerhandbuch
-
 SUHNER ABRASIVE FH 15 Benutzerhandbuch
-
 SUHNER ABRASIVE BA FH 10-L Benutzerhandbuch


