
C B64-3808-00/00 (E)
KTC-D500E
DIGITAL TV TUNER
INSTRUCTION MANUAL
SYNTONISEUR TV NUMÉRIQUE
MODE D’EMPLOI
DIGITALER TV-TUNER
BEDIENUNGSANLEITUNG
DIGITALE TV-TUNER
GEBRUIKSAANWIJZING
SINTONIZZATORE TV DIGITALE
ISTRUZIONI PER L’USO
SINTONIZADOR DE TV DIGITAL
MANUAL DE INSTRUCCIONES
SINTONIZADOR DE TV DIGITAL
MANUAL DE INSTRUÇÕES

2 KTC-D500E
Safety precautions 3
Getting Started 5
Switching to Digital TV Screen ÅıÇ 5
Functions During Digital TV Screen Åı 5
Functions During Digital TV Screen Ç 6
Touch Operation Å 6
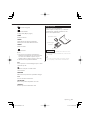
Contents
Displaying EPG 10
Viewing the Program Guide 10
Channel Search and Channel List 11
Searching for currently available station
(Auto Scan) 11
Manually Searching Station
(Manual Search) 11
Selecting a station from Channel List 12
Erasing Channel List 12
Setup 13
System Setup 13
Setting the Clock 14
Updating the Software 14
Restoring to Factory Default 15
Information and Conax 16
Displaying Information 16
Setting CA Control 16
Basic Operation
(When connected with DDX7029 Å) 7
Functions When Displaying the
Easy Control Panel 7
Functions While Displaying the
Control Screen 7
Basic Operation
(When connected with DDX6029 ı) 8
Displaying the Easy Control Panel 8
Displaying the TV Control screen 8
Remote Control Unit 18
List of Accessories 20
Installing the Digital TV Tuner 21
Installing and Connecting the Remote
Control Receiver 22
Inserting Pay Card 23
Connection 24
Specifications 25
Basic Operation
(When connected with LZ-760R Ç) 9
Functions While Displaying the
Control Screen 9
Notes 4
Seite laden ...
Seite laden ...
Seite laden ...
Seite laden ...

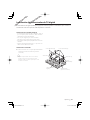
English 7
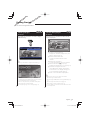
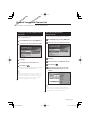
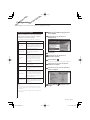
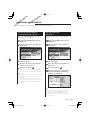
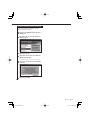
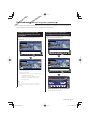
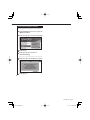
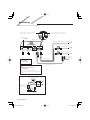
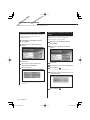
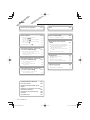
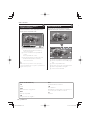
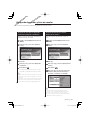
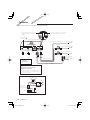
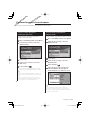
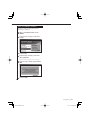
Various control screens appear in the Digital TV Source mode. (You can only operate Digital TV with the
optional accessory Digital TV Tuner connected.)
Functions When Displaying the Easy
Control Panel
Displays a floating control panel in the screen.
Mode : Full
2ch
AV-IN
AV- OUT:
IN
TV
TV
2ch
SRC
Mode : Full
2ch
AV-INAV-OUT:
IN
SRC
SCRN
TV
TV
2ch
1
2
3
2
1 Switches the source.
2 Select a channel.
3 Displays the Screen Control screen.
(page 7 for the <Functions While Displaying
the Control Screen>)
⁄
• The Easy Control Panel display is hidden when you touch
a central area of the monitor.
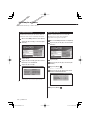
Functions While Displaying the Control
Screen
Switches to control screen to use various playback
functions.
Mode : Full
2ch
AV-IN
AV- OUT:
IN
TV
TV
2ch
SRC
Mode : Full
2ch
AV-INAV-OUT:
IN
SRC
SCRN
TV
TV
2ch
SRC
EXT SW
IN LOUD
2ch
TV
1
2
1
1 Select a channel.
2 Channel Number Display
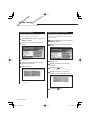
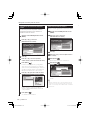
Basic Operation (When connected with DDX7029 Å)

8 KTC-D500E
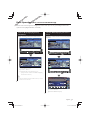
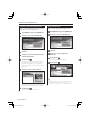
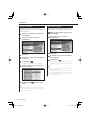
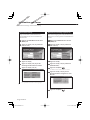
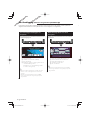
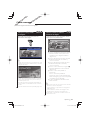
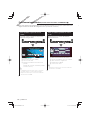
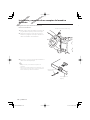
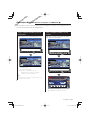
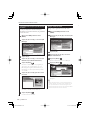
Various control screens appear in the Digital TV/ Video Source mode. (You can only operate Digital TV with
the optional accessory Digital TV Tuner connected.)
Displaying the Easy Control Panel
The Control Panel is displayed in a floating
position of the TV picture.
SRC
TV1
2chPreset 1
2chPreset 1
TV
MODE:FULL AV-OUT:DVD
Group1
SRC
SEEK
VID
TV
SCRN
1 2 3
4
3
1 Switches the source.
2 Switches to Video (VIDEO).
3 Select a channel.
4 Displays the Screen Control screen.
(page 8 for the <Displaying the TV Control
screen>)
⁄
• The Easy Control Panel display is hidden when you touch
a central area of the monitor.
• Buttons other than mentioned above are disabled in DVB
mode.
Displaying the TV Control screen
You can tune in a TV station using various
functions.
SRC
TV
13:50
TV1 Group1 Preset 1 2ch
TV
VIDEO
NextNext
AME
SEEK
AUTO1
––––
1
2
3
4
5 5
1 Calls the Sound Effects Menu.
2 Displays the Source Select screen.
3 Calls the Setup Menu.
4 Switches to VIDEO.
5 Select a channel.
⁄
• Buttons other than mentioned above are disabled in DVB
mode.
Basic Operation (When connected with DDX6029 ı)
Seite laden ...
Seite laden ...
Seite laden ...
Seite laden ...
Seite laden ...
Seite laden ...

English 15
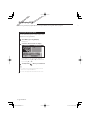
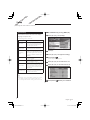
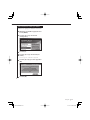
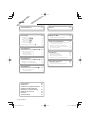
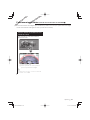
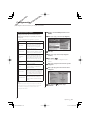
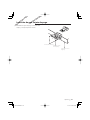
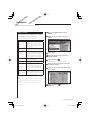
Restoring to Factory Default
Restore this unit's settings to factory default.
1 Show DVB Menu by pressing [MENU] key
2 Touch [5] or [∞], select [Setup]
3 Touch [3]
4 Touch [5] or [∞], select [Factory Default]
A confirmation message appears.
5 Touch [2] or [3] to show [OK]
6 Touch [OK]
Seite laden ...

English 17
⁄
• This function is not available unless a card is inserted.
• You can change the [Card Level] by touching [2] or [3].
However, you must enter a password when [Enter CA PIN:]
appears to change the Card Level setting.
• To change the password, enter the current password for
[Enter CA PIN:] and new password for [Enter New CA PIN:]
and [Confirm new CA PIN:].

18 KTC-D500E
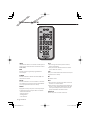
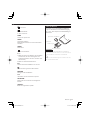
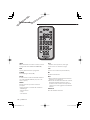
INFO
Current channel info (toggle between pages in
menu using 5/∞/2 / 3).
EPG
Opens the Electronic Program Guide.
POWER
Powers the (STB) unit on and off.
MUTE
Mutes the sound. Volume mute only works
in TV/Radio mode (i.e. not when a menu is
opened).
MENU
Press once to enter Main Menu.
The Main Menu consists of 4 sub-menus.
– CH Manager
– Channel Search
– Setup
– Info & Conax.
5/∞
a. Changes channels (channel up, channel
down).
b. Toggles between menu items (up/down).
2/3
Toggles between menu items (left/right).
OK
Verifies input.
EXIT
a. Return to the previous menu in menu screen
or escape from menu.
b. Return to normal TV mode from a menu.
Repeated pressing will take you through
all opened menus until normal TV mode is
reached.
SUBTITLE
Switches to Subtitle Mode.
INFO
POWER
LANG
AUTO
SCAN
TIMER AUDIO
SIGNAL
%
TV/RADIO
PREVIEW
AZ
SUB
TITLE
EXIT
MENU
MUTE
EPG
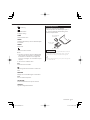
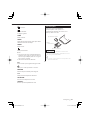
Remote Control Unit

English 19
Page up
a. TV/radio mode
b. Page down
LANG
Switches language.
TIMER
Sleep timer.
Press to set different times.
AUDIO
Audio modes.
Switches to teletext.
0 – 9
a. Selects a channel to watch. Press two
numbers one after the other to go beyond 9
(e.g. press 2 and then 3 to go to channel 23).
b. Selects a sub-menu item.
38
Pauses/resumes TV streaming images.
Returns to the channel you were watching
previously.
PREVIEW
Previews image display.
A-Z
Changes to alternative frequency.
AUTOSCAN
Searches the network for available channels.
SIGNAL%
Signal power/quality bar
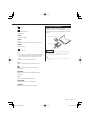
Loading battery
Use one lithium battery (CR2025).
Insert the batteries with the + and – poles aligned
properly, following the illustration inside the case.
BAT
TRY
BAT
TRY
BAT
TRY
BA
BAT
TR
1 Keep on slide
2 Pull out
3 Replace the battery
2WARNING
• Store unused batteries out of the reach of children.
Contact a doctor immediately if the battery is
accidentally swallowed.
¤
• Do not set the remote control in hot places such as on
the dashboard.

20 KTC-D500E
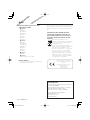
1 Digital TV Tuner ............... 1 2 Remote Control Unit ... 1 3 Wiring harness ................. 1
4 Remote Control
Receiver .................................1
5 TV Interface Cable ......... 1 6 Bracket .................................. 2 7 Card Slot Cover ............... 1 8 Screw (M3×4mm)............6
9 Screw (ø4×16mm) ........ 4
List of Accessories
Seite laden ...

22 KTC-D500E
Paste the remote control receiver to the dashboard.
1 Remove the paper from double-stick tape
and paste it on the back of the remote control
receiver.
2 Wipe the dirt and oil off from the installation area
and paste the remote control receiver 6 to the
dashboard.
3 Connect the connectors of the remote control
receiver to the main unit.
⁄
• Wipe oil and dirt off from the installation surface.
• Avoid area where there is direct sunlight or close to TV
monitor because the remote control signals may be
affected.
Remote control receiver 4
Remote control
receiver 4
Digital TV Tuner 1
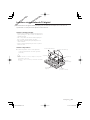
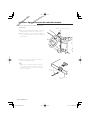
Installing and Connecting the Remote Control Receiver

English 23
Insert the Pay Card into the card slot, and attach
the card slot cover.
Screw (M3×4mm) 8
Card Slot Cover 7
Digital TV Tuner 1
Inserting Pay Card

24 KTC-D500E
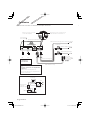
Connect the monitor and power as follows.
–
+
+
B
C
A
Ignition key switch
ACC
Car fuse box
Car fuse box
(Main fuse)
Battery
C
B
A
To AV input of the monitor Î
Fuse (5A)
Fuse (3A)
Ground wire (Black) - (To car chassis)
Battery wire (Yellow)
Ignition wire (Red)
To the center unit
such as a DVD
receiver. ÅıÇ
Set C position when connecting by
Kenwood TV Interface Cable.
Set S position when connecting
by AV Cable (RCA).
Wiring harness 3
TV Interface Cable 5
• 75Ω
• F connector
• For VHF/UHF
Digital TV Tuner 1
Connection
⁄
Connection of antenna with booster
amplifier
Set "0/5 Volt" ON when connecting an
antenna with booster amplifier to this unit.
Seite laden ...
Seite laden ...
Seite laden ...
Seite laden ...
Seite laden ...
Seite laden ...

Français 31
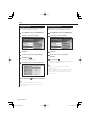
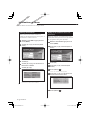
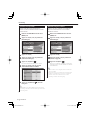
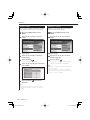
Fonctionnement de base (Connecté au DDX7029 Å)
Divers écrans de commande apparaissent en mode source télévision numérique. (Vous ne pouvez utiliser la
télévision numérique qu'avec le syntoniseur TV numérique (accessoire optionnel) connecté.)
Fonctions disponibles quand le panneau
de commande facile "Easy" est affiché
Affiche un panneau de commande flottant à
l'écran.
Mode : Full
2ch
AV-IN
AV- OUT:
IN
TV
TV
2ch
SRC
Mode : Full
2ch
AV-INAV-OUT:
IN
SRC
SCRN
TV
TV
2ch
1
2
3
2
1 Change la source.
2 Sélectionnez une chaîne.
3 Affiche l'écran de commande de l'écran.
(page 31 pour les <Fonctions disponibles
quand l'écran de commande est affiché>)
⁄
• L'affichage du panneau de commande facile est
dissimulé lorsque vous touchez une zone centrale du
moniteur.
Fonctions disponibles quand l'écran de
commande est affiché
Passe à l'écran de commande pour utiliser de
nombreuses fonctions de reproduction.
Mode : Full
2ch
AV-IN
AV- OUT:
IN
TV
TV
2ch
SRC
Mode : Full
2ch
AV-INAV-OUT:
IN
SRC
SCRN
TV
TV
2ch
SRC
EXT SW
IN LOUD
2ch
TV
1
2
1
1 Sélectionnez une chaîne.
2 Affichage du numéro de chaîne

32 KTC-D500E
Divers écrans de commande apparaissent en mode source TV/vidéo numérique. (Vous ne pouvez utiliser la
télévision numérique qu'avec le syntoniseur TV numérique (accessoire optionnel) connecté.)
Affichage du panneau de commande
facile
Le panneau de commande flotte au dessus de
l'image de télévision.
SRC
TV1
2chPreset 1
2chPreset 1
TV
MODE:FULL AV-OUT:DVD
Group1
SRC
SEEK
VID
TV
SCRN
1 2 3
4
3
1 Change la source.
2 Permet de passer à la vidéo (VIDEO).
3 Sélectionnez une chaîne.
4 Affiche l'écran de commande de l'écran.
(page 32 pour l'<Affichage de l'écran de
commande de la télévision>)
⁄
• L'affichage du panneau de commande facile est
dissimulé lorsque vous touchez une zone centrale du
moniteur.
• Les boutons autres que ceux mentionnés ci-dessus sont
désactivés en mode DVB.
Affichage de l'écran de commande de la
télévision
Vous pouvez syntoniser une chaîne de télévision
grâce à de nombreuses fonctions.
SRC
TV
13:50
TV1 Group1 Preset 1 2ch
TV
VIDEO
NextNext
AME
SEEK
AUTO1
––––
1
2
3
4
5 5
1 Appelle le menu d'effets de son.
2 Affiche l'écran de sélection de source.
3 Appelle le menu de configuration.
4 Permet de passer à VIDÉO.
5 Sélectionnez une chaîne.
⁄
• Les boutons autres que ceux mentionnés ci-dessus sont
désactivés en mode DVB.
Fonctionnement de base (Connecté au DDX6029 ı)
Seite laden ...
Seite laden ...
Seite laden ...
Seite laden ...
Seite laden ...
Seite laden ...

Français 39
Pour restaurer les valeurs par défaut
Restaurez les réglages par défaut de cette unité.
1 Affichez le menu DVB en appuyant sur la
touche [MENU]
2 Touchez [5] ou [∞], sélectionnez
[Configuration]
3 Touchez [3]
4 Touchez [5] ou [∞], sélectionnez [Par
défaut]
Un message de confirmation apparaît.
5 Touchez [2] ou [3] pour faire apparaître
[OK]
6 Touchez [OK]
Seite laden ...
Seite laden ...
Seite laden ...

Français 43
Page préc
a. Mode TV/radio
b. Page suiv
LANG
Permet de changer de langue.
TIMER
Minuterie de veille.
Appuyez dessus pour configurer diverses durées.
AUDIO
Modes audio.
Permet de passer au télétexte.
0 – 9
a. Permet de sélectionner une chaîne à regarder.
Appuyez sur deux chiffres l'un après l'autre
pour passer au delà de 9 (ex. appuyez sur 2 puis
sur 3 pour passer à la chaîne 23).
b. Sélectionnez un élément du sous-menu.
38
Mettre en pause/reprise des images de télévision.
Permet de retourner à la chaîne que vous
regardiez auparavant.
PREVIEW
Permet de donner un aperçu de l'affichage de
l'image.
A-Z
Permet de changer à une fréquence alternative.
AUTOSCAN
Permet de rechercher des chaînes disponibles sur
le réseau.
SIGNAL%
Barre indicatrice de la puissance/qualité du signal
Recharge de la pile
Utilisez une seule pile au lithium (CR2025).
Introduire les piles en prenant soin de bien
aligner les pôles + et –, en suivant l'illustration
située à l'intérieur du boîtier.
BAT
TRYBAT
TRY
BAT
TRY
BA
BAT
TR
1 Faire glisser
2 Extraire
3 Remplacer la pile
2ATTENTION
• Gardez les piles inutilisées hors de portée des enfants.
Contactez un médecin immédiatement si la pile était
accidentellement avalée.
¤
• Ne placez pas la télécommande dans des endroits
chauds comme sur le tableau de bord.
Seite laden ...
Seite laden ...
Seite laden ...

Français 47
Pour insérer la carte de paiement
Insérez la carte de paiement dans la fente à carte,
et fixez le couvercle de la fente.
Vis (M3×4mm) 8
Couvercle de fente
pour carte 7
Syntoniseur TV
numérique 1
Seite laden ...

Français 49
Syntoniseur TV
Fréquence d'entrée
VHF : 174 – 230 MHz
UHF : 470 – 862 MHz
Type de démodulation
: QPSK/ 64QAM/ 16QAM
Largeur de bande des chaînes
: 6/ 7/ 8 MHz
Taille FFT
: 2K et 8K
Intervalle de garde
: 1/4, 1/8, 1/16, 1/32
Taux de perforation
: 1/2, 2/3, 3/4, 5/6, 7/8
Entrée d'antenne
: Diversité 2 chaînes
Type de connecteur
: Type F × 2
Généralités
Tension de fonctionnement (11 – 16 V)
: 14,4 V
Consommation électrique
: 860 mA
Dimensions (l × H × P) (Unité principale)
: 215 × 37 × 172,4 mm
Plage de températures de fonctionnement
: -10 °C ~ +60 °C
Plage de températures de stockage
: -30 °C ~ +85 °C
Poids
: 1,2 kg
Spécifications

50 KTC-D500E
Inhalt
Sicherheitshinweise 51
Erste Schritte 53
Umschalten auf digitalen
TV-Bildschirm ÅıÇ 53
Funktionen im digitalen
TV-Bildschirm Åı 53
Funktionen im digitalen
TV-Bildschirm Ç 54
Bedienung per Touchscreen Å 54
Anzeige des EPG 58
Betrachten des Programmführers 58
Kanalsuche und Kanalliste 59
Suchen nach aktuell verfügbaren Sendern
(Automatisches abscan...) 59
Manuelle Sendersuche (Kanalsuche) 59
Auswahl eines Senders in der Kanalliste 60
Löschen der Kanalliste 60
Einstellungen 61
Systemeinstellungen 61
Einstellen der Systemuhr 62
Aktualisierung der Software 62
Wiederherstellen der Werkseinstellung 63
Information und Conax 64
Informationsanzeige 64
Einstellen der Kanalzugangskontrolle 64
Grundfunktionen
(beim Anschluss an ein DDX7029 Å) 55
Funktionen bei Anzeige des
Easy-Bedienfelds 55
Funktionen bei Anzeige des
Steuerbildschirms 55
Grundfunktionen
(beim Anschluss an ein DDX6029 ı) 56
Anzeige des Easy-Bedienfelds 56
Anzeige des TV-Steuerbildschirms 56
Fernbedienung 66
Zubehörliste 68
Installation des digitalen TV-Tuners 69
Installation und Anschluss des
Empfängers der Fernbedienung 70
Einführen der Smartcard 71
Anschluss 72
Technische Daten 73
Grundfunktionen
(beim Anschluss an ein LZ-760R Ç) 57
Funktionen bei Anzeige des
Steuerbildschirms 57
Hinweise 52

Deutsch 51
2WARNUNG
• Die Montage sowie die Verkabelung dieses Gerätes
macht besondere Fähigkeiten und Erfahrung
erforderlich. Überlassen Sie die Arbeiten zur
Montage und Verkabelung ausgewiesenem
Fachpersonal.
2ACHTUNG
• Betreiben Sie das Gerät ausschließlich mit 12-Volt-
Gleichstrom und negativer Masseverbindung.
• Verwenden Sie zur Installation nur die
mitgelieferten oder die angegebenen Schrauben.
Durch Verwendung falscher Schrauben kann das
Gerät beschädigt werden.
• Falls das Zündschloss Ihres Fahrzeugs über keine
ACC-Stellung verfügt, oder falls das Zündkabel
an eine Stromquelle mit Konstantspannung wie
beispielsweise ein Batteriekabel angeschlossen
ist, wird die Stromversorgung des Geräts nicht
mit der Zündung verbunden (d. h. das Gerät
wird nicht zusammen mit der Zündung ein- und
ausgeschaltet). Wenn Sie die Stromversorgung
des Geräts mit der Zündung verbinden wollen,
schließen Sie das Zündkabel an eine Stromquelle
an, die mit dem Zündschlüssel ein- und
ausgeschaltet werden kann.
• Wenn die Sicherung durchbrennt, überprüfen Sie
bitte zunächst die Kabel auf einen Kurzschluss.
Ersetzen Sie dann die defekte Sicherung durch eine
neue Sicherung gleichen Werts.
• Überprüfen Sie nach dem Einbau, ob Bremslichter,
Blinker und Scheibenwischer ordnungsgemäß
funktionieren.
Sicherheitshinweise
Seite laden ...
Seite laden ...
Seite laden ...
Seite laden ...
Seite laden ...
Seite laden ...
Seite laden ...
Seite laden ...
Seite laden ...
Seite laden ...
Seite laden ...
Seite laden ...
Seite laden ...
Seite laden ...
Seite laden ...
Seite laden ...
Seite laden ...
Seite laden ...
Seite laden ...
Seite laden ...
Seite laden ...
Seite laden ...
Seite laden ...
Seite laden ...
Seite laden ...
Seite laden ...
Seite laden ...
Seite laden ...
Seite laden ...
Seite laden ...
Seite laden ...
Seite laden ...
Seite laden ...
Seite laden ...
Seite laden ...
Seite laden ...
Seite laden ...
Seite laden ...
Seite laden ...
Seite laden ...
Seite laden ...
Seite laden ...
Seite laden ...
Seite laden ...
Seite laden ...
Seite laden ...
Seite laden ...
Seite laden ...
Seite laden ...
Seite laden ...
Seite laden ...
Seite laden ...
Seite laden ...
Seite laden ...
Seite laden ...
Seite laden ...
Seite laden ...
Seite laden ...
Seite laden ...
Seite laden ...
Seite laden ...
Seite laden ...
Seite laden ...
Seite laden ...
Seite laden ...
Seite laden ...
Seite laden ...
Seite laden ...
Seite laden ...
Seite laden ...
Seite laden ...
Seite laden ...
Seite laden ...
Seite laden ...
Seite laden ...
Seite laden ...
Seite laden ...
Seite laden ...
Seite laden ...
Seite laden ...
Seite laden ...
Seite laden ...
Seite laden ...
Seite laden ...
Seite laden ...
Seite laden ...
Seite laden ...
Seite laden ...
Seite laden ...
Seite laden ...
Seite laden ...
Seite laden ...
Seite laden ...
Seite laden ...
Seite laden ...
Seite laden ...
Seite laden ...
Seite laden ...
Seite laden ...
Seite laden ...
Seite laden ...
Seite laden ...
Seite laden ...
Seite laden ...
Seite laden ...
Seite laden ...
Seite laden ...
Seite laden ...
Seite laden ...
Seite laden ...
Seite laden ...
Seite laden ...
Seite laden ...
Seite laden ...
Seite laden ...
Seite laden ...
Seite laden ...
Seite laden ...
Seite laden ...
Seite laden ...
Seite laden ...
-
 1
1
-
 2
2
-
 3
3
-
 4
4
-
 5
5
-
 6
6
-
 7
7
-
 8
8
-
 9
9
-
 10
10
-
 11
11
-
 12
12
-
 13
13
-
 14
14
-
 15
15
-
 16
16
-
 17
17
-
 18
18
-
 19
19
-
 20
20
-
 21
21
-
 22
22
-
 23
23
-
 24
24
-
 25
25
-
 26
26
-
 27
27
-
 28
28
-
 29
29
-
 30
30
-
 31
31
-
 32
32
-
 33
33
-
 34
34
-
 35
35
-
 36
36
-
 37
37
-
 38
38
-
 39
39
-
 40
40
-
 41
41
-
 42
42
-
 43
43
-
 44
44
-
 45
45
-
 46
46
-
 47
47
-
 48
48
-
 49
49
-
 50
50
-
 51
51
-
 52
52
-
 53
53
-
 54
54
-
 55
55
-
 56
56
-
 57
57
-
 58
58
-
 59
59
-
 60
60
-
 61
61
-
 62
62
-
 63
63
-
 64
64
-
 65
65
-
 66
66
-
 67
67
-
 68
68
-
 69
69
-
 70
70
-
 71
71
-
 72
72
-
 73
73
-
 74
74
-
 75
75
-
 76
76
-
 77
77
-
 78
78
-
 79
79
-
 80
80
-
 81
81
-
 82
82
-
 83
83
-
 84
84
-
 85
85
-
 86
86
-
 87
87
-
 88
88
-
 89
89
-
 90
90
-
 91
91
-
 92
92
-
 93
93
-
 94
94
-
 95
95
-
 96
96
-
 97
97
-
 98
98
-
 99
99
-
 100
100
-
 101
101
-
 102
102
-
 103
103
-
 104
104
-
 105
105
-
 106
106
-
 107
107
-
 108
108
-
 109
109
-
 110
110
-
 111
111
-
 112
112
-
 113
113
-
 114
114
-
 115
115
-
 116
116
-
 117
117
-
 118
118
-
 119
119
-
 120
120
-
 121
121
-
 122
122
-
 123
123
-
 124
124
-
 125
125
-
 126
126
-
 127
127
-
 128
128
-
 129
129
-
 130
130
-
 131
131
-
 132
132
-
 133
133
-
 134
134
-
 135
135
-
 136
136
-
 137
137
-
 138
138
-
 139
139
-
 140
140
-
 141
141
-
 142
142
-
 143
143
-
 144
144
-
 145
145
-
 146
146
-
 147
147
-
 148
148
-
 149
149
-
 150
150
-
 151
151
-
 152
152
-
 153
153
-
 154
154
-
 155
155
-
 156
156
-
 157
157
-
 158
158
-
 159
159
-
 160
160
-
 161
161
-
 162
162
-
 163
163
-
 164
164
-
 165
165
-
 166
166
-
 167
167
-
 168
168
-
 169
169
-
 170
170
-
 171
171
-
 172
172


in anderen Sprachen
- English: Kenwood KTC-D500E Owner's manual
- français: Kenwood KTC-D500E Le manuel du propriétaire
- español: Kenwood KTC-D500E El manual del propietario
- italiano: Kenwood KTC-D500E Manuale del proprietario
- Nederlands: Kenwood KTC-D500E de handleiding
- português: Kenwood KTC-D500E Manual do proprietário
Verwandte Papiere
-
Kenwood KVT-522DVDY Bedienungsanleitung
-
-
-
-
-
-
Kenwood KOS-CV100 Bedienungsanleitung
-
-
Sonstige Unterlagen
-
JVC KV-C1000 Benutzerhandbuch
-
Panasonic CZ-RTC2 Installationsanleitung
-
Xoro HRS 8600 CI Bedienungsanleitung
-
Asus P8H77-M/CSM Benutzerhandbuch
-
Triax DVB C1 Benutzerhandbuch
-
Asus P8Z77-I DELUXE Benutzerhandbuch
-
 Mvision SX-5 USB Bedienungsanleitung
-
Megasat Premium Benutzerhandbuch
-
Xoro HRS 3400 Benutzerhandbuch
