Saeco HD8919 Benutzerhandbuch
- Kategorie
- Kaffeezubehör
- Typ
- Benutzerhandbuch

Register your product and get support at
www.saeco.com/welcome
Type HD8919
EnglisH
DEuTscH
HD8919_4219_460_2523_2_BOOKLET_A5_bl_FRONTCOVER.indd 1 28/01/16 11:26


English 5
Deutsch 37


ESPRESSO CAPPUCCINO
ESPRESSO LUNGO LATTE MACCHIATO
AROMA STRENGTH MENU
10
9
2
1
3
4
8
7
6
32
30
15
25
26
27
28
37
38
34
12
11
16
33
31
21 22
5
3635
14 13
29
23 24
18
19
17
20
1

English
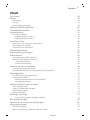
Contents
Introduction 6
Important 6
Warning 6
Caution 7
Electromagnetic fields (EMF) 7
Machine overview 8
The user interface 8
First installation 9
Manual rinsing cycle 12
Hot water circuit rinsing 12
Coffee brewing circuit rinsing 12
AquaClean filter 12
Preparing and installing the AquaClean filter 13
Activating the AquaClean filter 13
Replacing the AquaClean filter 14
Measuring the water hardness 14
Beverage types and lengths 15
Brewing coffee 16
Adjusting the coffee dispensing spout 16
Brewing coffee with beans 16
Brewing 1 cup of coffee 16
Brewing 2 cups of coffee 16
Brewing milk-based beverages 17
How to use the milk carafe 17
Brewing milk-based coffee beverages and milk froth 18
Special drinks 18
How to select special drinks 18
Dispensing hot water 18
Inserting and removing the hot water dispensing spout 18
Dispensing hot water 19
Adjusting quantity and taste 19
Saeco Adapting System 19
Adjusting coffee and milk length 19
Adjusting coffee strength 20
Adjusting the grinder settings 20
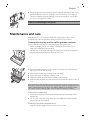
Maintenance and care 21
Cleaning the drip tray and the coffee grounds container 21
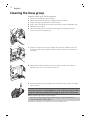
Cleaning the brew group 22
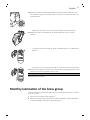
Monthly lubrication of the brew group 23
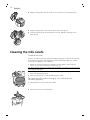
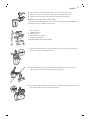
Cleaning the milk carafe 24
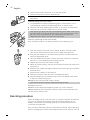
Descaling procedure 26
What to do if the descaling procedure is interrupted 28
5
English

Warning icons and error codes 29
Meaning of error codes 30
Troubleshooting 30
Demo mode function 34
Ordering accessories Saeco 34
Technical specifications 35
Recycling 35
Guarantee and support 35
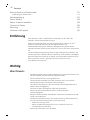
Introduction
Dear customer, we thank you for buying the Saeco Incanto full-automatic
espresso machine!
Coffee is a natural product and its characteristics may vary according to
origin, blend and roasting. The machine is equipped with a self-adjustment
system that allows it to get the best taste out of your favorite coffee beans.
It regulates itself after brewing 10-20 coffees.
In this user manual you find all the information you need to install, use,
maintain and get the best out of your machine. To fully benefit from the
support that Saeco offers, please register your product at
www.philips.com/welcome.
Important
Warning
-
Connect the machine to a wall socket with a voltage matching the
technical specifications of the machine.
-
Connect the machine to an earthed wall socket.
-
Do not let the power cord hang over the edge of a table or counter, or
touch hot surfaces.
-
Never immerse the machine, mains plug or power cord in water (danger
of electrical shock).
-
Do not pour liquids on the power cord connector.
-
Never direct the hot water jet towards body parts: danger of burns.
-
Do not touch hot surfaces. Use handles and knobs.
-
Switch off the machine with the main switch located on the back and
remove the mains plug from the socket:
-
If a malfunction occurs.
-
If the machine will not be used for a long time.
-
Before cleaning the machine.
-
Pull on the plug, not on the power cord.
-
Do not touch the mains plug with wet hands.
-
Do not use the machine if the mains plug, the power cord or the machine
itself is damaged.
-
Do not make any modifications to the machine or its power cord.
6
English

-
Only have repairs carried out by a service center authorized by Philips to
avoid a hazard.
-
The machine should not be used by children younger than 8 years old.
-
This machine can be used by children aged from 8 years and above and
by persons with reduced physical, sensory or mental capabilities or lack
of experience and knowledge if they have been given supervision or
instruction concerning use of the machine in a safe way and if they
understand the hazards involved.
-
Cleaning and user maintenance shall not be made by children unless
they are older than 8 and supervised.
-
Keep the machine and its cord out of the reach of children aged less than
8 years.
-
Children should be supervised to ensure that they do not play with the
machine.
-
Never insert fingers or other objects in the coffee grinder.
Caution
-
This machine is intended for normal household use only. It is not
intended for use in environments such as staff kitchens of shops, offices,
farms or other work environments.
-
Always put the machine on a flat and stable surface. Keep it in upright
position, also during transport.
-
Do not place the machine on a hotplate or directly next to a hot oven,
heater or similar source of heat.
-
Only put roasted coffee beans in the bean hopper. If ground coffee,
instant coffee, raw coffee beans or any other substance is put in the
coffee bean hopper, it may cause damage to the machine.
-
Let the machine cool down before inserting or removing any parts. The
heating surfaces may retain residual heat after use.
-
Never fill the water tank with warm, hot or sparkling water, as this may
cause damage to the water tank and the machine.
-
Never use souring pads, abrasive cleaning agents or aggressive liquids
such as petrol or acetone to clean the machine. Simply use a soft cloth
dampened with water.
-
Descale your machine regularly. The machine indicates when descaling is
needed. Not doing this will make your appliance stop working properly.
In this case repair is not covered under your guarantee.
-
Do not keep the machine at temperatures below 0°C.Water left in the
heating system may freeze and cause damage.
-
Do not leave water in the water tank when the machine is not used over
a long period of time. The water can be contaminated. Use fresh water
every time you use the machine.
Electromagnetic fields (EMF)
This Philips appliance complies with all applicable standards and
regulations regarding exposure to electromagnetic fields.
7
English

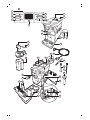
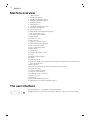
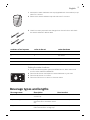
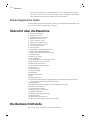
Machine overview
1 User interface
2 ESPRESSO button
3 ESPRESSO LUNGO button
4 AROMA STRENGTH button
5 Standby button
6 MENU button
7 LATTE MACCHIATO button
8 CAPPUCCINO button
9 Protection cover
10 Adjustable coffee dispensing spout
11 Lid of the water tank
12 Lid of the bean hopper
13 Main switch
14 Socket for cord
15 Service door
16 Drip tray release button
17 Milk froth dispensing spout
18 Lid of the milk carafe
19 Top of the milk carafe
20 Milk carafe
21 Water tank
22 Grinder adjustment knob
23 Cord
24 Water hardness tester
25 Grease
26 Cleaning brush
27 Multifunctional tool (measuring scoop, grinder adjustment key and coffee
duct cleaning tool)
28 Brew group
29 Inside of maintenance door with cleaning instructions
30 Coffee exit duct
31 Coffee residues drawer
32 Drip tray full indicator
33 Coffee grounds container
34 Drip tray cover
35 Drip tray
36 Hot water dispensing spout
37 Opening for hot water dispensing spout
The user interface
Use these buttons to navigate through the menus:
ESPRESSO
ESPRESSO button=ESC button:press this button to return to the main menu.
8
English

AROMA STRENGTH
AROMA STRENGTH button=OK button:press this button to select, confirm or
stop a function.
CAPPUCCINO
CAPPUCCINO button=UP button:press this button to scroll up through the
display menu.
MENU
MENU button=DOWN button:press this button to scroll down through the
display menu.
First installation
This machine has been tested with coffee. Although it has been carefully
cleaned, there may be some coffee residues left. We guarantee, however,
that the machine is absolutely new.Like with most full-automatic machines,
you first need to brew some coffees to enable the machine to complete its
self-adjustment and get the best tasting coffee.
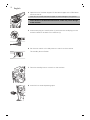
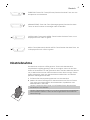
1 Remove all packaging material from the machine.
2 Place the machine on a table or worktop away from the tap, the sink and
heat sources.
15 cm
15 cm
15 cm
15 cm
15 cm
15 cm
15 cm
15 cm
Note: Leave at least 15 cm of free space above, behind and on both sides
of the machine.
Note: This machine may only be operated by a properly trained person.
Never let the machine operate unattended.
M
AX
CALC
CLEAN
MAX
3 Fill the water tank with fresh water to the MAX level indication.
9
English

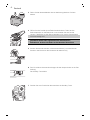
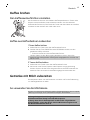
4 Open the lid of the bean hopper. Fill the bean hopper with coffee beans
and close the lid.
Note: Do not overfill the bean hopper to avoid damage to the grinder.
Caution: Only use espresso beans. Never use ground coffee, unroasted
coffee beans or caramelized coffee beans, as this may cause damage
to the machine.
2
1
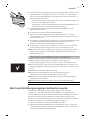
5 Insert mains plug into a wall socket (1) and insert the small plug into the
socket located on the back of the machine (2).
6 Set the main switch to the ON position to switch on the machine.
The standby button flashes.
7 Press the standby button to switch on the machine.
8 Insert the hot water dispensing spout.
10
English

-
The display shows the circuit priming icon to indicate that you have to
prime the circuit.
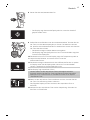
9 Place a container under the hot water dispensing spout. Press the OK
button to start the water circuit priming cycle. The machine reminds you
have to insert the water spout, press the OK button.
-
The machine starts dispensing hot water.
-
The display shows the priming icon. The progress bar shows the
progress of the priming cycle.
10 The machine heats up and the display shows the temperature icon.
11 Empty the container and place it under the coffee dispensing spout.
12 The machine starts rinsing water through the coffee dispensing spout.
The display shows the rinsing icon and a progress bar.
Note: Do not interrupt the rinsing cycle.
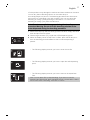
13 The display asks: AquaClean filter?
Note:If you want to install the AquaClean filter afterwards, press the ESC
button and continue with the manual rinsing cycle. For installation, see
chapter 'AquaClean filter'.
INSTALL
FILTER
14 If you want to install the AquaClean filter, press the OK button. Activation
will take 2 minutes.
-
The display reminds you to install the filter.
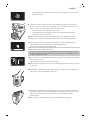
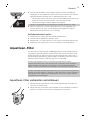
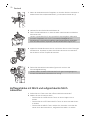
15 Remove the AquaClean filter from its packaging. Shake the filter for about
5 seconds.
16 Immerse the AquaClean filter upside down in a jug with cold water and
wait until no more air bubbles come out.
17 Insert the AquaClean filter vertically onto the filter connection. Push the
AquaClean filter to the lowest possible point. Make sure that the filter fits
tightly and the seal is in the right position, to guarantee the best
performance.
18 Fill the water tank with fresh water to the MAX level indication.
11
English

0 / 8
OFF
ON
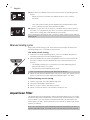
19 Select ON on the display and confirm the activation by pressing the OK
button.
-
When activation is finished, the display shows a tick to confirm
activation.
-
Then the machine ready screen appears with the AquaClean 100%
icon to indicate that the filter has been installed.
20Dispense 2 cups (0.5 l) of hot water to complete the activation. Discard
this water. To complete the activation you have to perform both the hot
water circuit rinsing and coffee brewing circuit rinsing.
After installing the AquaClean filter, you do not have to perform the manual
rinsing cycle.
Manual rinsing cycle
During the manual rinsing cycle, fresh water flows through the water and
coffee brewing circuit. This takes a few minutes.
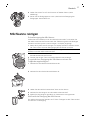
Hot water circuit rinsing
1 Insert the hot water dispensing spout (if it is not installed) and place a
container under the hot water dispensing spout.
MENU
HOT
WATER
2 Press the MENU button. Select the DRINKS function, confirm and scroll
the menu to select the HOT WATER function. Press the OK button to
confirm.
-
The display reminds you to install the hot water dispensing spout,
press the OK button to confirm.
-
The machine starts dispensing hot water.
Note: To interrupt the rinsing cycle, press the OK button.
3 When the machine has dispensed 2 cups of hot water (0.5 l) press the OK
button to stop the hot water dispensing. Repeat steps 1 to 3 twice.
Coffee brewing circuit rinsing
1 Place a cup under the coffee dispensing spout.
2 Press the ESPRESSO LUNGO button.
3 Brew 2-3 cups of coffee, discard this coffee.
4 Return to the main menu. The machine is ready for use
AquaClean filter
The AquaClean filter is designed to reduce limescale deposits in your coffee
machine and provide filtered water to preserve the aroma and flavor of each
cup of coffee. If you use a series of 8 Aquaclean filters as indicated in this
user manual, you don't have to descale your machine for 5000 cups (with a
capacity of 100 ml).
Note: Your machine has to be completely limescale-free before you start to
use the AquaClean filter. If you did not activate the filter upon first use and
12
English

brewed more than 50 cups (with 100 ml capacity), you need to descale the
machine before you activate the filter.
Note: Replace the AquaClean filter when the filter icon starts flashing on the
display. Replace the AquaClean filter at least every 3 months, even if the
machine has not yet indicated that replacement is required.
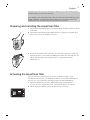
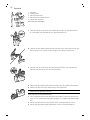
Preparing and installing the AquaClean filter
1 Remove the AquaClean filter from its packaging. Shake the filter for about
5 seconds.
2 Immerse the AquaClean filter upside down in a jug with cold water and
wait until no more air bubbles come out.
3 Insert the AquaClean filter vertically onto the filter connection. Push the
AquaClean filter to the lowest possible point. Make sure that the filter fits
tightly and the seal is in the right position, to guarantee the best
performance.
Activating the AquaClean filter
You can install the AquaClean filter at first installation as part of the
installation procedure. If you skipped installation of the AquaClean filter at
first use, you can install it by entering the menu as described below.
1 Press the MENU button, select MENU and press the OK button to
confirm. Scroll to 'AquaClean' filter. Press the OK button to confirm.
2 Select ON on the display, press the OK button to confirm.
0 / 8
OFF
ON
13
English

-
Then the machine ready screen appears with the AquaClean 100%
icon to indicate that the filter has been installed.
3 Dispense 2 cups of hot water (0.5 l) to complete the activation. Discard
this water.
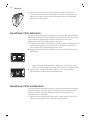
Replacing the AquaClean filter
Replace the AquaClean filter when the filter icon starts flashing on the
display. Replace the AquaClean filter at least every 3 months, even if the
machine has not yet indicated that replacement is required.
1 Take out the AquaClean filter. Follow the steps in section 'Preparing and
installing the AquaClean filter'.
1 / 8
80%
NEW?
2 Press the MENU button, select MENU and press the OK button to
confirm. Scroll to 'AquaClean' filter. Press the OK button to confirm.
1 / 8
WATER
FILTER
3 Dispense 2 cups of hot water (0.5 l) to complete the activation. Discard
this water.
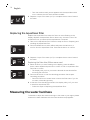
Replacing the filter after 8 filters were used
1 When the filter icon starts flashing on the display, press the MENU
button, select MENU and press OK to confirm. Scroll to 'AquaClean' filter.
Press OK to confirm.
START
CLEAN
CALC
-
The display tells you that you need to descale the machine before
activating the new filter.
2 Press the OK button to start the descaling procedure. See chapter
'Descaling procedure'.
-
Press the ESC button several times to leave the filter menu if you do
not want to descale right away.
3 At the end of the descaling procedure, the display asks you if you want
to install the AquaClean filter.
-
Follow the steps in 'Replacing the AquaClean filter'.
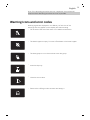
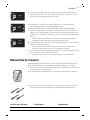
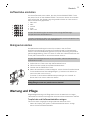
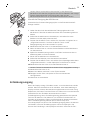
Measuring the water hardness
To be able to adjust the machine settings to the water in your region, please
measure the water hardness with the water hardness strip supplied.
14
English

1 Immerse the water hardness test strip (supplied with the machine) in tap
water for 1 second.
2 Remove the water hardness strip and and wait for 1 minute.
1
2
3
4
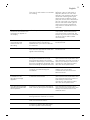
3 Check how many squares have changed into the red colour and check
the water hardness in below table.
numbers of red squares
value to be set water hardness
1 1 very soft water
2 2 soft water
3 3 hard water
4 4 very hard water
Setting the water hardness
1 To set the water hardness, press the MENU button, select menu and
scroll to select WATER HARDNESS.
2 Press the OK button and select the water hardness in your area.
3 Press the OK button to confirm.
4 Press the ESC button to return to the main menu.
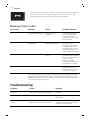
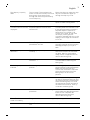
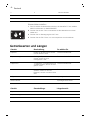
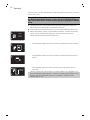
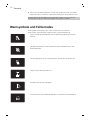
Beverage types and lengths
Beverage name Description How to select
Espresso Coffee with thick crema served in
a small cup
Button on control panel
Espresso Lungo A longer espresso with thick
crema served in a medium-sized
cup
Button on control panel
Cappuccino 1/3 espresso, 1/3 hot milk and 1/3
milk foam served in a large cup
Button on control panel
15
English

Latte Macchiato Long shot of hot milk with foam
stained with a shot of espresso
and served in a tall glass
Button on control panel
Frothed milk Hot milk with foam Special Drinks menu
Hot Water Special Drinks Menu
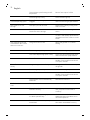
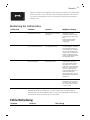
Beverage name
Standard length Length range
Espresso 40 ml 20 - 230 ml
Espresso Lungo 80 ml 20 - 230 ml
Hot water 300 ml 50 - 450 ml
Brewing coffee
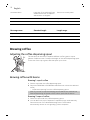
Adjusting the coffee dispensing spout
The machine can be used to dispense different coffee types in cups or
glasses of different sizes. To adjust the height of the coffee dispensing spout
to the size of the cup or glass, slide the spout up or down.
Brewing coffee with beans
Brewing 1 cup of coffee
1 Place a cup under the coffee dispensing spout.
2 Press the ESPRESSO or ESPRESSO LUNGO button to brew the selected
coffee.
-
Coffee starts pouring from the coffee dispensing spout.
Note: If you want to stop the brewing process before the machine has
finished dispensing the preset coffee volume, press the OK button.
Brewing 2 cups of coffee
1 Place two cups under the coffee dispensing spout.
2 You can brew two cups of espresso or espresso lungo simultaneously.
Press the button of the desired beverage twice. The machine
automatically carries out two grinding cycles in sequence.
16
English

Brewing milk-based beverages
The milk carafe is used to froth milk and brew milk-based coffee beverages.
How to use the milk carafe
Note: Before first use, rinse the milk carafe as described in chapter
'Maintenance and care', section 'Cleaning the milk carafe'.
Caution: Steam and hot milk may spray out of the milk froth dispensing
spout at the start of the brewing cycle.
Caution: Make sure that the milk carafe is installed and the milk froth
dispensing spout is open before you select a milk-based coffee beverage
or milk froth.
1
1
2
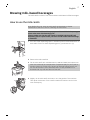
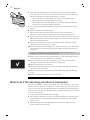
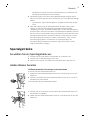
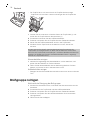
1 If the hot water dispensing spout is installed, press the release buttons on
both sides of the hot water dispensing spout (1) and remove it (2).
2 Remove the milk carafe lid.
3 Fill the milk carafe with milk between the MIN and MAX level indications.
Note: Use cold milk (at a temperature of approximately 5°C/41°F) with a
protein content of at least 3% to ensure an optimal frothing result. You
can use whole milk or semi-skimmed milk. It is also possible to use
skimmed milk, soy milk and lactose-free milk.
4 Slightly tilt the milk carafe and insert it into the guides of the machine.
Then push the bottom of the carafe towards the machine until it locks
onto the drip tray.
17
English

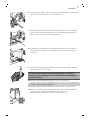
5 Pull out the milk froth dispensing spout completely to the right to froth
dispensing position.
Note: If the milk froth dispensing spout is not pulled out fully, the milk
carafe does not froth milk properly.
Brewing milk-based coffee beverages and milk froth
1 Place a cup under the open milk froth dispensing spout.
2 Choose your milk-based beverage.
-
Press the CAPPUCCINO button to brew a cappuccino.
-
Press the LATTE MACCHIATO button to brew a latte macchiato.
-
Press the MENU button, choose 'Drinks' and scroll down through the
drinks to select milk froth.
-
The machine reminds you have to install the milk carafe and pull out
the milk froth dispensing spout.
3 The machine first dispenses a preset quantity of frothed milk into the cup
or glass and then dispenses a preset quantity of coffee.
-
To stop dispensing milk or coffee, press the OK button.
4 After brewing milk-based coffee beverages, the display asks you if you
want to perform a quick clean of the milk carafe spout. You have 10
seconds to perform the quick clean.You can perform the quick clean
while leaving the milk inside the milk carafe. Remove the cup with the
beverage and place a container under the milk froth dispensing spout.
Press the OK button twice to confirm that you want to quick clean, or
press the ESC button to perform the quick clean later. It is recommended
to perform quick clean at least once a day, see chapter 'Cleaning the milk
carafe'.
Special drinks
How to select special drinks
1 Press the MENU button and select 'Drinks'.
2 Press the OK button to confirm.
3 Scroll the menu and select the desired beverage.
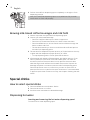
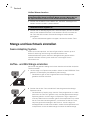
Dispensing hot water
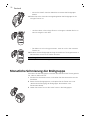
Inserting and removing the hot water dispensing spout
To insert the hot water dispensing spout:
18
English

1 Tilt the hot water dispensing spout slightly and insert it into the machine.
2 Press and turn the hot water dispensing spout downwards to lock it in the
machine.
To remove the hot water spout:
1
1
2
1 Press the release buttons on the sides of the hot water dispensing spout
to unlock it.
2 Lift the hot water dispensing spout slightly and pull it out of the machine.
Dispensing hot water
Caution: Steam and hot water may spray out of the hot water dispensing
spout when brewing starts. Wait until the cycle has ended before
removing the hot water dispensing spout.
1 Press the MENU button. Select 'Drinks', confirm and scroll to select 'Hot
water'.
Caution: Only select 'Hot water' in the menu when the hot water
dispensing spout is installed.
2 Press the OK button to confirm.The display reminds you to install the hot
water dispensing spout, press the OK button to confirm. The machine
starts dispensing hot water.
-
To stop dispensing hot water, press the OK button.
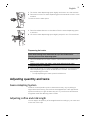
Adjusting quantity and taste
Saeco Adapting System
Coffee is a natural product and its characteristics may vary according to
origin, blend and roasting. The machine is equipped with a self-adjustment
system that allows it to get the best taste out of your favorite coffee beans.
It regulates itself after brewing some coffees.
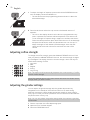
Adjusting coffee and milk length
You can adjust the quantity of beverage brewed according to your taste and
to the size of the cups.
19
English
Seite wird geladen ...
Seite wird geladen ...
Seite wird geladen ...
Seite wird geladen ...
Seite wird geladen ...
Seite wird geladen ...
Seite wird geladen ...
Seite wird geladen ...
Seite wird geladen ...
Seite wird geladen ...
Seite wird geladen ...
Seite wird geladen ...
Seite wird geladen ...
Seite wird geladen ...
Seite wird geladen ...
Seite wird geladen ...
Seite wird geladen ...
Seite wird geladen ...
Seite wird geladen ...
Seite wird geladen ...
Seite wird geladen ...
Seite wird geladen ...
Seite wird geladen ...
Seite wird geladen ...
Seite wird geladen ...
Seite wird geladen ...
Seite wird geladen ...
Seite wird geladen ...
Seite wird geladen ...
Seite wird geladen ...
Seite wird geladen ...
Seite wird geladen ...
Seite wird geladen ...
Seite wird geladen ...
Seite wird geladen ...
Seite wird geladen ...
Seite wird geladen ...
Seite wird geladen ...
Seite wird geladen ...
Seite wird geladen ...
Seite wird geladen ...
Seite wird geladen ...
Seite wird geladen ...
Seite wird geladen ...
Seite wird geladen ...
Seite wird geladen ...
Seite wird geladen ...
Seite wird geladen ...
Seite wird geladen ...
Seite wird geladen ...
Seite wird geladen ...
Seite wird geladen ...
-
 1
1
-
 2
2
-
 3
3
-
 4
4
-
 5
5
-
 6
6
-
 7
7
-
 8
8
-
 9
9
-
 10
10
-
 11
11
-
 12
12
-
 13
13
-
 14
14
-
 15
15
-
 16
16
-
 17
17
-
 18
18
-
 19
19
-
 20
20
-
 21
21
-
 22
22
-
 23
23
-
 24
24
-
 25
25
-
 26
26
-
 27
27
-
 28
28
-
 29
29
-
 30
30
-
 31
31
-
 32
32
-
 33
33
-
 34
34
-
 35
35
-
 36
36
-
 37
37
-
 38
38
-
 39
39
-
 40
40
-
 41
41
-
 42
42
-
 43
43
-
 44
44
-
 45
45
-
 46
46
-
 47
47
-
 48
48
-
 49
49
-
 50
50
-
 51
51
-
 52
52
-
 53
53
-
 54
54
-
 55
55
-
 56
56
-
 57
57
-
 58
58
-
 59
59
-
 60
60
-
 61
61
-
 62
62
-
 63
63
-
 64
64
-
 65
65
-
 66
66
-
 67
67
-
 68
68
-
 69
69
-
 70
70
-
 71
71
-
 72
72


Saeco HD8919 Benutzerhandbuch
- Kategorie
- Kaffeezubehör
- Typ
- Benutzerhandbuch
in anderen Sprachen
- English: Saeco HD8919 User manual
Verwandte Artikel
-
Philips HD8921/01 Benutzerhandbuch
-
Saeco PICOBARISTO HD8927 Benutzerhandbuch
-
-
-
Philips-Saeco SM5472 Benutzerhandbuch
-
Philips-Saeco SM7786 Xelsis Benutzerhandbuch
-
Philips-Saeco SM7583 - Xelsis Benutzerhandbuch
-
Saeco HD8859/01 Benutzerhandbuch
Andere Dokumente
-
Beko CEG 3192 B Benutzerhandbuch
-
Philips HD8829/11R1 Benutzerhandbuch
-
Gaggia Milano SUP047RG Benutzerhandbuch
-
Philips HD8827/01 Benutzerhandbuch
-
Philips HD8823/01 Benutzerhandbuch
-
Grundig Built-in Compact Automated Coffee Machine Benutzerhandbuch
-
Philips EP1224/00 Benutzerhandbuch
-
Morphy Richards 47062 Bedienungsanleitung
-
-
Philips EP3226/40 3200 SERIES SILVER Bedienungsanleitung