Silvercrest SDRB 1000 A1 Operating Instructions Manual
- Kategorie
- Eisen
- Typ
- Operating Instructions Manual

4
IAN 77154 IAN 77154
KOMPERNASS GMBH
Burgstraße 21
D-44867 Bochum
www.kompernass.com
Last Information Update · Stan informacji · Stanje informacij
Stav informací · Stav informácií · Stand der Informationen:
07 / 2012 · Ident.-No.: SDRB1000A1052012-1
STEAM BRUSH SDRB 1000 A1
STEAM BRUSH
Operating instructions
PARNA KRTAČA
Navodila za uporabo
SZCZOTKA PAROWA
Instrukcja obsługi
GB Operating instructions Page 1
PL Instrukcja obsługi Strona 11
SI Navodila za uporabo Stran 23
CZ Návod k obsluze Strana 33
SK Návod na obsluhu Strana 43
DE / AT / CH Bedienungsanleitung Seite 53
Before reading, unfold the page containing the illustrations and familiarise yourself with all functions of
the device.
Przed przeczytaniem proszę rozłożyć stronę z ilustracjami, a następnie proszę zapoznać się z wszystkimi
funkcjami urządzenia.
Pred branjem odprite stran s slikami in se nato seznanite z vsemi funkcijami naprave.
Před čtením si otevřete stranu s obrázky a potom se seznamte se všemi funkcemi přístroje.
Pred čítaním si odklopte stranu s obrázkami a potom sa oboznámte so všetkými funkciami prístroja.
Klappen Sie vor dem Lesen die Seite mit den Abbildungen aus und machen Sie sich anschließend mit allen
Funktionen des Gerätes vertraut.
NAPAROVACIA KEFA
Návod na obsluhu
PARNÍ KARTÁČ
Návod k obsluze
DAMPFBÜRSTE
Bedienungsanleitung
CV_77154_SDRB1000A1_LB4.indd 1-3CV_77154_SDRB1000A1_LB4.indd 1-3 04.07.12 13:4904.07.12 13:49

A
B
CV_77154_SDRB1000A1_LB4.indd 4-6CV_77154_SDRB1000A1_LB4.indd 4-6 04.07.12 13:4904.07.12 13:49

- 1 -
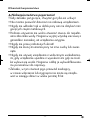
CONTENT PAGE
Introduction 2
Intended Use 2
Items supplied 2
Description of the appliance 2
Technical data 2
Safety instructions 3
Before the First Usage 6
Operation 6
Filling with water . . . . . . . . . . . . . . . . . . . . . . . . . . . . . . . . . . . . . . . . . . . . . . . . . . . . . . . . . . . .6
Attaching/detaching the brush attachment . . . . . . . . . . . . . . . . . . . . . . . . . . . . . . . . . . . . . . .7
Steam brush function . . . . . . . . . . . . . . . . . . . . . . . . . . . . . . . . . . . . . . . . . . . . . . . . . . . . . . . . .7
Clothing care . . . . . . . . . . . . . . . . . . . . . . . . . . . . . . . . . . . . . . . . . . . . . . . . . . . . . . . . . . . . . . .8
Curtain and soft furnishing care . . . . . . . . . . . . . . . . . . . . . . . . . . . . . . . . . . . . . . . . . . . . . . . .8
Fluff brush . . . . . . . . . . . . . . . . . . . . . . . . . . . . . . . . . . . . . . . . . . . . . . . . . . . . . . . . . . . . . . . . .8
Ironing function . . . . . . . . . . . . . . . . . . . . . . . . . . . . . . . . . . . . . . . . . . . . . . . . . . . . . . . . . . . . .8
After using the steam brush . . . . . . . . . . . . . . . . . . . . . . . . . . . . . . . . . . . . . . . . . . . . . . . . . . . .9
Cleaning and care 9
Scale removal . . . . . . . . . . . . . . . . . . . . . . . . . . . . . . . . . . . . . . . . . . . . . . . . . . . . . . . . . . . . . .9
Storage 9
Troubleshooting 10
Disposal 10
Warranty & Service 10
Importer 10
Read the operating instructions carefully before using the device for the first time and preserve this booklet
for later reference. Pass this manual on to whoever might acquire the device at a future date.
IB_77154_SDRB1000A1_LB4.qxp 29.05.2012 9:49 Uhr Seite 1

- 2 -
STEAM BRUSH
Introduction
Congratulations on the purchase of your new appli-
ance.
You have clearly decided in favour of a quality
product. These operating instructions are a part of
this product. They contain important information in
regard to safety, use and disposal. Before using the
product, familiarise yourself with all of these opera-
ting and safety instructions. Use the product only as
described and only for the specified areas of appli-
cation. In addition, pass these documents on, toget-
her with the product, to any future owner.
Intended Use
This Steam Brush is intended exclusively for the
smoothing and removal of crinkles, fluff and hairs
on home textiles. It may only be used indoors and
in a domestic household. All other use is deemed
improper use.
Items supplied
Steam Brush
Brush attachment
Measuring beaker
Operating instructions
Description of the appliance
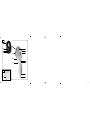
Figure A:
1 Water tank
2 Water fill opening
3 Temperature regulator
4 Unlocking device for the water tank
5 Heating-up control lamp
6 Suspension eye
7 Power cable with power plug
8 Steam blast button
9 Stand
0 Sole of the iron
q Unlocking device for brush attachment
w Brush attachment
e Fluff brush
r Clothes brush
Figure B:
t Measuring beaker
Technical data
Rated voltage: 220-240 V
~
/ 50 Hz
Output: 1000 W
IB_77154_SDRB1000A1_LB4.qxp 29.05.2012 9:49 Uhr Seite 2

- 3 -
Safety instructions
Risk of Burns!
•When the appliance is hot, grasp it only by the handle.
•Children should be supervised to ensure that they do not
play with the appliance.
•Never hold your hand over the steam spray or on hot me-
tal parts.
•You should not open the filler opening of the water reser-
voir while the steam brush is in use. First of all, remove the
plug from the mains power socket and allow the appliance
to cool down completely.
•Never use the steam brush on clothes while they are being
worn!
•Never direct jets of steam at other people or animals.
•Under no circumstance should you use the appliance if it
shows visible signs of damage, has fallen or leaks water.
Arrange for it to be repaired by qualified specialists.
•The steam brush and its connecting cable must, when the
appliance is heating up or cooling down, be kept out of re-
ach of children who are younger than 8 years old.
IB_77154_SDRB1000A1_LB4.qxp 29.05.2012 9:49 Uhr Seite 3

- 4 -
Risk of fire! Risk of Injury!
•Never leave unattended a steam brush that is hot, switched
on or connected to the mains power supply.
•Put the appliance into storage only when it has cooled
down.
•Place the appliance on level and heat resistant surfaces
only with the stand folded out. The appliance must be
stood securely when it is put down.
•When applying steam, use only the temperatures detailed
in the garment care instructions, or those suitable for the
material. Otherwise, you could damage the textiles.
Should care instructions not be given or known, start with
the lowest temperature setting.
•Never permit children to use the steam brush.
Danger of electrical shocks.
•The rating of the local power supply must tally completely
with the details given on the rating plate of the appliance.
•To avoid potential risks, arrange for a defective appliance
to be checked and possibly repaired by qualified technici-
ans, or contact our Customer Service Department..
•Arrange for defective power plugs and/or cables to be re-
placed at once by qualified technicians or our Customer
Service Department.
•To disconnect from the power source, pull only on the plug
itself, not on the cable.
•Never bend (kink) or crush the power cable. Arrange it in
such a way that it cannot come into contact with hot surfa-
ces and so that no-one can step on it or trip over it.
IB_77154_SDRB1000A1_LB4.qxp 29.05.2012 9:49 Uhr Seite 4

- 5 -
•After every usage, before cleaning the appliance and
when refilling with water, remove the plug from the mains
power socket.
•Never touch the power cable or the power plug with wet
hands.
•Under no circumstances may the appliance be submersed
in fluids or fluids be allowed to permeate the housing. Do
not expose the appliance to humidity and do not use it out-
doors. Should liquids enter the housing, unplug the appli-
ance from the mains power socket immediately and arran-
ge for it to be repaired by a qualified technician.
•NEVER use the appliance adjacent to water contained in a
bath, shower, wash basin or other vessels. The proximity of
moisture presents a danger, even when the appliance is
switched off.
•You may not open the appliance housing. Permit only au-
thorised technicians to repair a defective appliance.
•Under NO circumstance should you use the appliance if it
shows visible signs of damage, has fallen or leaks water.
Arrange for it to be repaired by qualified specialists.
•Discontinue use of the appliance if the anti-kink protection
on the power cable is damaged!
•This appliance may only be used by children aged 8 years
or more and by individuals with reduced physical, sensory
or mental capabilities or lack of experience and/or know-
ledge if they are supervised, or have been instructed in the
safe use of the appliance and have understood the potenti-
al risks. Children may not play with the appliance. Clea-
ning and user maintenance by children should not be car-
ried out without supervision of them.
IB_77154_SDRB1000A1_LB4.qxp 29.05.2012 9:49 Uhr Seite 5

- 6 -
Attention!
• Should the care instructions in the clothing item
forbid ironing (Symbol ), you may not use the
steam brush on it. Should you do so, the clothing
item could be permanently damaged.
• The water tank is to be filled exclusively with mains
water (or a mix of distilled and mains water).
You will otherwise damage the appliance.
• You may not clean the appliance with solvents,
alcohol or abrasive cleaning agents. These could
cause damage to it.
Before the First Usage
• Remove the steam brush from the packaging.
• Remove all possible adhesive tags and protective
foils from the steam iron.
• Remove the protective cap from the brush attach-
ment w.
Attention!
Plastic bags can be dangerous. To avoid fatalities
through suffocation, keep plastic bags out of the
reach of children.
• Fill the water tank 1 with water (see chapter
"Filling with water").
• Insert the power plug 7 into a correctly instal-
led and earthed mains power socket.
• Hold the steam brush horizontally.
• Place the temperature regulator 3 at the posi-
tion "MAX".
• Heat the steam brush up at the highest setting
for a few minutes. By doing this you will clear
production residues from the sole 0 of the
appliance.
• Activate the steam shot button 8 a few times, so
that steam exits from the soleplate 0.
• Then iron a redundant piece of material, this will
remove any impurites that may possibly be on
the sole of the iron
0.
Note:
On the first heating up of the appliance a small volume
of smoke and smell may be generated, caused by
production residues. This is completely normal and
is not dangerous. Provide for sufficient ventilation,
for example, open a window.
Operation
Note:
• Should the care instructions in the clothing item
forbid ironing (Symbol ), you may not use
the steam brush on it. If you do so, the clothing
item could be permanently damaged.
• Do NOT use the appliance on leather, velvet, im-
pregnated furniture or steam sensitive materials.
If you do, the material/furniture could become
damaged.
Filling with water
Attention!
Fill the watertank 1 exclusively with tap water or distil-
led water mixed with tap water. Never fill watertank 1
with chemical substances, cleaning agents (with the ex-
ception of decalcification agents) or other liquids.
Do not use chemically distilled water. This would
irreparably damage the appliance.
Should the mains water at your locality be rated as
hard, it is recommended that you mix mains water
with some distilled water. Otherwise, the jets for the
steam blast function could calcify (become blocked)
prematurely.
IB_77154_SDRB1000A1_LB4.qxp 29.05.2012 9:49 Uhr Seite 6

- 7 -
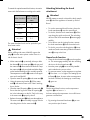
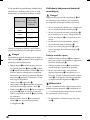
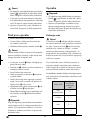
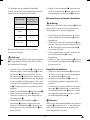
To extend the optimal steam blast function, mix mains
water with distilled water according to the table.
The water hardness level can be queried at your
local water works.
Attention!
Before refilling with water, ALWAYS remove the
plug 7 from the mains power socket! There is a
risk of electric shock!
• Lift the water tank 1 up vertically, in that you slide
the release 4 for the water tank 1 to the rear until
the water tank 1 allows itself to be lifted off. Grasp
the water tank 1 with your thumb and index finger
on the hatched markings to lift it vertically upwards.
The temperature controller 3 remains on the appli-
ance and is not lifted off.
• Open the water fill opening 2 to the water tank 1.
• Using the measuring beaker t, fill the water
tank 1 with mains water to the "Max" marking,
but no further.
• Close the water fill opening 2 to the water tank 1.
Ensure that the lug on the water fill opening 2
sits in the indentation on the lid. Only in this way
is the water tank 1 properly closed.
• Replace the water tank 1 back onto the appliance.
The water tank 1 must audibly engage with the
unlocking device for the water tank 4.
Water hardness
Ratios - distilled
water to mains
water
very soft / soft 0
medium 1: 1
hard 2: 1
very hard 3: 1
Attaching/detaching the brush
attachment
Attention!
NEVER attempt to attach or detach the brush attach-
ment w when the appliance is heated up. Risk of
Burns!
• To use the steam and brush function, place the
brush attachment w onto the steam brush.
• To do this, slide the brush attachment w all the
way along the guide to the end. The unlocking
device of the brush attachment q must engage
audibly.
• To be able to use the ironing function, remove
the brush attachment w from the steam brush.
• To do this, press the unlocking device q down-
wards and, at the same time, pull the brush attach-
ment w away to the front.
Steam brush function
• Place the brush attachment w onto the applian-
ce. This must engage audibly with the unlocking
device on the brush attachment q.
• Insert the power plug 7 into a correctly installed
and earthed mains power socket.
• To generate steam, set the temperature regulator
3 to at least ••• or higher. The heating-up con-
trol lamp 5 glows. As soon as the set temperature
has been reached, the heating-up control lamp
5 goes out.
Note:
For the steam blast function, set the temperature
regulator 3 to at least •••.
At lower settings the temperature is not sufficient to
generate a steam blast.
• By pressing the steam blast button 8 you can
now produce jets of steam.
IB_77154_SDRB1000A1_LB4.qxp 29.05.2012 9:49 Uhr Seite 7

- 8 -
Note:
To release the first steam blast after heating the appli-
ance up, it can happen that you may need to press
the steam blast button 8 several times in succession.
The appliance is now ready for use.
Attention!
The steam brush can be used with all clothing items.
Caution is to be exercised with heat-sensitive materials
such as synthetics, polyamides or artificial silk. With
these materials you should first check at a concealed
part (inside seam) that the hot steam will not cause
any damage to the garment. Do not touch these ma-
terials directly with the hot sole of the iron 0. Use
only the steam blast.
Clothing care
• Suspend the crumpled garment from a coat hanger.
• With one hand pull the garment flat, then steam it
from top to bottom. The combination of steam and
clothes brush r will gently remove all creases.
• Use light pressure with the clothes brush r and
guide the appliance from top to bottom over the
garment. You can thereby press the steam blast
button 8 in short intervals.
Note:
You can repeatedly press the steam blast button 8
until the heating-up control lamp 5 glows or water
drips from the sole of the iron 0.
Then, wait until the heating-up control lamp 5 extin-
guishes before activating a further blast of steam.
• Should the heating-up control lamp 5 start to
glow during the process, release the steam
blast button 8 and wait a few seconds until the
heating-up control lamp 5 extinguishes.
Note:
Should you press the steam blast button 8 whilst
the heating-up control lamp 5 is glowing the result
will be condensed water instead of steam, and water
will drip from the sole of the iron 0.
• Leave the garment on the clothes hanger to cool
down before putting it on.
Curtain and soft furnishing care
• Creases and wrinkles can be removed from
draperies by hanging them over a pole.
• Then simply follow the directions given under
“Clothing care”.
• Always carry out a test first at a concealed part.
• If you are using the appliance horizontally, every
now and then hold it upright so as to have the
maximum steam performance.
Fluff brush
• Threads, fluff and hairs can be easily removed
with the red fluff brush e by slowly brushing
over the garment with it from left to right.
• You can clean the fluff brush e by brushing with
it in the opposite direction (from right to left)
over, for example, a remnant of material.
Ironing function
• Dismantle the brush attachment w from the
appliance (see “Attaching/detaching the brush
attachment”).
• Connect the appliance to a correctly installed
and earthed mains power socket.
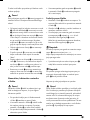
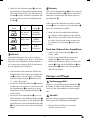
• Adjust the temperature regulator 3 as per the
international point symbols (Care Label) or
the type of material. The heating-up control lamp
5 glows. As soon as the set temperature has
been reached, the heating-up control lamp 5
goes out .
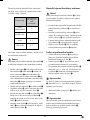
Washing label Type of
material
Temperature
regulator 3
Chemical fibres,
e.g. viscose,
polyester
•
(low
temperature)
Silk, Wool
••
(medium
temperature)
Cotton, Linen
•••
(high
temperature)
IB_77154_SDRB1000A1_LB4.qxp 29.05.2012 9:49 Uhr Seite 8

- 9 -
Note:
If doubt exists, start with a low temperature and
gradually increase it to a higher one. With sensitive
materials we recommend carrying out an ironing
test at a concealed part (inside seam).
• For heavily creased laundry, you can use the
steam function by pressing the steam shot button
8. To generate the steam, the temperature regu-
lator 3 must be set to at least ••• or higher.
• Should the heating-up control lamp 5 glow during
the process, release the steam blast button 8
and wait for a few moments until the heating-up
control lamp 5 extinguishes.
• You can repeatedly press the steam blast button
8 until the heating-up control lamp 5 glows or
water drips from the sole of the iron 0. Then,
wait until the heating-up control lamp 5 extin-
guishes before activating a further blast of
steam.
Note:
Should you press the steam blast button 8 whilst
the heating-up control lamp 5 is glowing the result
will be condensed water instead of steam, and water
will drip from the sole of the iron 0.
Should the water tank 1 become empty while the
appliance is in use, remove the plug 7 from the
power socket before refilling it.
• If you want to put the appliance down during
use, fold out the stands 9 to the front and place
the appliance on them. When you are ready to reu-
se the appliance, simply fold the stands 9 back
to the rear.
After using the steam brush
• Place the temperature regulator 3 at the position
"MIN".
• After use, ALWAYS remove the plug 7 from the
power socket.
• Pour away any water remaining in the water
tank 1 to do this, open, the water fill opening
2 of the water tank 1, turn the appliance upsi-
de down and lightly swivel it.
Cleaning and care
Risk of personal injury!
ALWAYS remove the plug 7 before cleaning the
appliance.
There is a risk of electric shock! Allow the appliance
to cool down. Risk of Burns!
Caution!
Never use aggressive cleansers. These can damage
the surfaces.
• Clean the housing with a soft, dry cloth only.
• Clean the metal components with a lightly water-
moistened cloth and a mild, non-aggressive cleaning
agent.
Scale removal
Should the steam output diminish over a period of
time, decalcify the steam brush.
• For decalcification use a standard commercial
descaling agent based on citric acid. Proceed
as detailed in the product instructions.
Storage
Attention!
Remove the plug 7 from the power socket and allow
the appliance to cool down before putting it into
storage.
Risk of fire!
Store the appliance at a dry location. You can also
hang the appliance up by the suspension eye 6.
IB_77154_SDRB1000A1_LB4.qxp 29.05.2012 9:49 Uhr Seite 9

- 10 -
Troubleshooting
The steam brush ejects no or very little steam:
The supply of water in the steam brush is exhausted.
Fill the water tank 1 with water (see "Filling with
water").
The steam brush does not heat itself up:
The appliance is not connected to mains power.
Insert the plug 7 into a wall power socket and
set the desired temperature with the temperature
regulator 3.
The steam brush is defective. Arrange for the ap-
pliance to be repaired by a qualified specialist.
The power socket is defective. Try another wall
socket.
Disposal
Do not dispose of the appliance in your
normal domestic waste. This product is
subject to the European guideline
2002/96/EC.
Dispose of the appliance through an approved dis-
posal centre or at your community waste facility.
Observe the currently applicable regulations.
In case of doubt, please contact your waste disposal
centre.
Dispose of all packaging materials in an
environmentally responsible manner.
Warranty & Service
The warranty for this appliance is for 3 years from
the date of purchase. The appliance has been ma-
nufactured with care and meticulously examined be-
fore delivery. Please retain your receipt as proof of
purchase. In the event of a warranty claim, please
make contact by telephone with our Service Depart-
ment. Only in this way can a post-free despatch for
your goods be assured.
The warranty covers only claims for material and
manufacturing defects, but not for transport dama-
ge, for wearing parts or for damage to fragile com-
ponents, e.g. buttons or batteries. This product is for
private use only and is not intended for commercial
use. The warranty is void in the case of abusive and
improper handling, use of force and internal tampe-
ring not carried out by our authorized service branch.
Your statutory rights are not restricted in any way by
this warranty.
The warranty period will not be extended by repairs
made under warranty. This applies also to replaced
and repaired parts. Any damage and defects extant
on purchase must be reported immediately after un-
packing the appliance, at the latest, two days after
the purchase date. Repairs made after the expira-
tion of the warranty period are subject to payment.
Service Great Britain
Tel.: 0871 5000 720 (£ 0.10/Min.)
E-Mail: k[email protected]
Service Ireland
Tel.: 1890 930 034
(0,08 EUR/Min., (peak))
(0,06 EUR/Min., (off peak))
E-Mail: k[email protected]
Importer
KOMPERNASS GMBH
BURGSTRASSE 21
44867 BOCHUM, GERMANY
www.kompernass.de
IAN 77154
IAN 77154
IB_77154_SDRB1000A1_LB4.qxp 29.05.2012 9:49 Uhr Seite 10

- 11 -
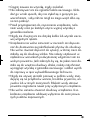
SPIS TREŚCI STRONA
Wprowadzenie 12
Zastosowanie zgodnie z przeznaczeniem 12
Zakres dostawy 12
Opis urządzania 12
Dane techniczne 12
Wskazówki bezpieczeństwa 13
Przed pierwszym użyciem 17
Obsługa 17
Napełnić wodę . . . . . . . . . . . . . . . . . . . . . . . . . . . . . . . . . . . . . . . . . . . . . . . . . . . . . . . . . . . .17
Zakładanie/zdejmowanie końcówki szczotkującej . . . . . . . . . . . . . . . . . . . . . . . . . . . . . . . .18
Funkcja szczotki z parą . . . . . . . . . . . . . . . . . . . . . . . . . . . . . . . . . . . . . . . . . . . . . . . . . . . . .18
Prasowanie ubrań . . . . . . . . . . . . . . . . . . . . . . . . . . . . . . . . . . . . . . . . . . . . . . . . . . . . . . . . . .19
Prasowanie firan i tapicerki . . . . . . . . . . . . . . . . . . . . . . . . . . . . . . . . . . . . . . . . . . . . . . . . . .19
Szczotka do czyszczenia tkanin . . . . . . . . . . . . . . . . . . . . . . . . . . . . . . . . . . . . . . . . . . . . . . .19
Funkcja prasowania . . . . . . . . . . . . . . . . . . . . . . . . . . . . . . . . . . . . . . . . . . . . . . . . . . . . . . . .19
Po użyciu szczotki na parę . . . . . . . . . . . . . . . . . . . . . . . . . . . . . . . . . . . . . . . . . . . . . . . . . . .20
Czyszczenie i konserwacja 20
Odkamienianie . . . . . . . . . . . . . . . . . . . . . . . . . . . . . . . . . . . . . . . . . . . . . . . . . . . . . . . . . . . .21
Przechowywanie 21
Usuwanie zakłóceń działania 21
Utylizacja 21
Gwarancja i serwis 21
Importer 22
Przed pierwszym użyciem urządzenia należy dokładnie przeczytać niniejszą instrukcję obsługi i zachować ją na
przyszłość. W przypadku przekazania urządzenia osobom trzecim należy przekazać im także instrukcję.
IB_77154_SDRB1000A1_LB4.qxp 29.05.2012 9:49 Uhr Seite 11

- 12 -
SZCZOTKA PAROWA
Wprowadzenie
Gratulujemy Ci zakupu naszego urządzenia.
Jest to produkt wysokiej jakości. Instrukcja obsługi
stanowi część tego produktu. Zawiera ona ważne
wskazówki dotyczące bezpieczeństwa, użytkowa-
nia i utylizacji urządzenia. Przed przystąpieniem do
użytkowania produktu zapoznaj się z wszystkimi
wskazówkami obsługi i bezpieczeństwa. Używaj
produkt zgodnie z opisem i w podanych obszarach
użytkowania. W razie przekazania produktu na-
stępnej osobie, nie zapomnij dołączyć również
instrukcji obsługi.
Zastosowanie zgodnie
z przeznaczeniem
Szczotka na parę jest przeznaczona wyłącznie do
prasowania i usuwania fałd, kłaczków i włosów
z materiałów w domu. Można go używać wyłącz-
nie w pomieszczeniach zamkniętych w prywatnych
gospodarstwach domowych. Jakiegokolwiek inne
zastosowania uważane są za niezgodne z przez-
na-czeniem.
Zakres dostawy
Szczotka na parę
Nasadka ze szczotką
Miarka
Instrukcja obsługi
Opis urządzania
Ilustracja A:
1 Zbiornik na wodę
2 Otwór do nalewania
3 Regulator temperatury
4 Odryglowanie zbiornika na wodę
5 Lampka kontrolna nagrzewania
6 Ucho do zawieszania
7 Kabel zasilający z wtyczką sieciową
8 Przycisk uderzenia pary
9 Stojak
0 Stopa do prasowania
q Odryglowanie końcówki szczotkującej
w Końcówka szczotkująca
e Szczotka do czyszczenia tkanin
r Szczotka do ubrań
Ilustracja B:
t Miarka
Dane techniczne
Napięcie nominalne: 220-240 V
~
/ 50 Hz
Moc: 1000 W
IB_77154_SDRB1000A1_LB4.qxp 29.05.2012 9:49 Uhr Seite 12

- 13 -
Wskazówki bezpieczeństwa
Niebezpieczeństwo poparzenia!
•Gdy żelazko jest gorące, chwytać go tylko za uchwyt.
•Nie można pozwolić dzieciom na zabawę urządzeniem.
•Nigdy nie wkładać rąk w obłok pary ani nie dotykać nimi
gorących części metalowych.
•Podczas używania nie wolno otwierać otworu do napełni-
ania zbiornika wody. Najpierw wyjmij wtyczkę sieciową z
gniazdka i zaczekaj, aż urządzenie ostygnie.
•Nigdy nie prasuj założonych ubrań!
•Nigdy nie kieruj strumienia pary na inne osoby lub zwier-
zęta.
•Nigdy nie używaj urządzenia z widocznymi uszkodzenia-
mi, gdy urządzenie upadnie z wysokości ani gdy ze środ-
ka wylewa się woda. Najpierw oddaj je wykwalifikowane-
mu personelowi do naprawy.
•Żelazko, w tym również jego przewód zasilający,
w czasie włączenia lub stygnięcia nie może się znajdo-
wać w zasięgu dzieci w wieku poniżej 8 lat.
IB_77154_SDRB1000A1_LB4.qxp 29.05.2012 9:49 Uhr Seite 13

- 14 -
Niebezpieczeństwo pożaru!
Niebezpieczeństwo odniesienia obrażeń!
•Nigdy nie zostawiaj gorącego, podłączonego do zasila-
nia lub włączonego żelazka bez nadzoru.
•Urządzenie chowaj tylko po całkowitym wystygnięciu.
•Urządzenie odkładaj zawsze z rozłożonym stojakiem na
płaskim i ognioodpornym podłożu. Urządzenie musi pew-
nie stać na podłożu.
•Prasuj zawsze przy ustawieniu temperatury zgodnie ze
wskazówkami podanymi na ubraniu i odpowiednio do
prasowanego materiału. W przypadku nieprzestrzegania
tych wskazówek można uszkodzić prasowany materiał.
W przypadku braku wyraźnych instrukcji dotyczących tem-
peratury prasowania, zacznij od najniższego ustawienia,
a następnie stopniowo zwiększaj temperaturę.
•Nie pozwalaj na używanie żelazka dzieciom.
Niebezpieczeństwo porażenia prądem
elektrycznym!
•Napięcie źródła zasilania musi być zgodne z informacją o
dopuszczalnym zasilaniu podaną na tabliczce znamiono-
wej.
•By uniknąć zagrożeń, uszkodzone urządzenie oddaj niez-
włocznie do autoryzowanego warsztatu naprawczego lub
zwróć się do serwisu klienta.
•Wymianę uszkodzonej wtyczki lub kabla sieciowego nale-
ży niezwłocznie zlecić wykwalifikowanemu personelowi
lub serwisowi.
IB_77154_SDRB1000A1_LB4.qxp 29.05.2012 9:49 Uhr Seite 14

- 15 -
•Ciągnij zawsze za wtyczkę, nigdy za kabel.
•Nie załamywać ani nie zgniatać kabla sieciowego. Ukła-
dać go w taki sposób, aby nie stykał się z gorącymi po-
wierzchniami, i aby nikt nie mógł na niego wejść albo się
na nim potknąć.
•Przed przystąpieniem do czyszczenia urządzenia, nala-
niem wody oraz po każdym użyciu wyjmuj wtyczkę z
gniazdka zasilania.
•Nigdy nie chwytaj ani nie dotykaj kabla lub wtyczki siecio-
wej wilgotnymi rękami.
•Urządzenia nie wolno zanurzać w cieczach ani dopuszc-
zać do dostawania się jakichkolwiek płynów do obudowy.
Nie wolno również dopuścić do sytuacji, w której ciecz do-
stałaby się do obudowy silnika. Nie należy użytkować ur-
ządzenia w warunkach podwyższonej wilgotności ani na
wolnym powietrzu. Jeśli zdarzyło by się, że jakaś ciecz do-
stała się do wnętrza obudowy silnika, należy natychmiast
wyciągnąć wtyczkę z gniazdka sieciowego i oddać wyrób
do naprawy w ręce wykwalifikowanego fachowca.
•Nigdy nie używaj szczotki parowej w pobliżu wody, znaj-
dującej się na przykład w wannie, brodziku prysznica, um-
ywalce lub w innych naczyniach. Bliskość wody stanowi
poważne zagrożenie nawet przy wyłączonym urządzeniu.
•Nie wolno samemu otwierać obudowy urządzenia. Usz-
kodzone urządzenie oddawaj wyłącznie do autoryzowa-
nych punktów naprawczych.
IB_77154_SDRB1000A1_LB4.qxp 29.05.2012 9:49 Uhr Seite 15

- 16 -
•Nigdy nie używaj urządzenia z widocznymi uszkodzenia-
mi, gdy urządzenie upadnie z wysokości ani gdy ze środ-
ka wylewa się woda. Najpierw oddaj je wykwalifikowane-
mu personelowi do naprawy.
•Nie używaj urządzenia, w którym doszło do uszkodzenia
zabezpieczenia przed zginaniem kabla sieciowego!
•Urządzenie może być użytkowane przez dzieci powyżej
8 roku życia, a także przez osoby o ograniczonej spraw-
ności fizycznej, ruchowej bądź umysłowej lub nieposiada-
jące doświadczenia i / lub wiedzy, gdy będą one przeby-
wały pod opieką lub zostaną im przekazane wskazówki
dotyczące właściwego używania urządzenia i zrozumieją
one, jakie zagrożenia wiążą się z użytkowaniem urządze-
nia. Nie dawaj urządzenia dzieciom do zabawy. Czyszc-
zeniem i konserwacją nie mogą zajmować się dzieci bez
nadzoru osoby dorosłej.
IB_77154_SDRB1000A1_LB4.qxp 29.05.2012 9:49 Uhr Seite 16

- 17 -
Uwaga!
• W przypadku gdy wskazówki na matce danego
materiału zabraniają prasowania (symbol ),
nie należy prasować. ponieważ groziłoby to
uszkodzeniem materiału.
• Do zbiornika wlewaj wyłącznie wodę wodocią-
gową (lub wodę destylowaną zmieszaną z wodą
wodociągową). Inaczej nastąpi uszkodzenie urzą-
dzenia.
• Nie można czyścić urządzenia rozpuszczalnikami,
alkoholem lub środkami do szorowania. Inaczej
można je uszkodzić.
Przed pierwszym użyciem
• Wyjmij szczotkę na parę z opakowania.
• odklej wszystkie naklejki i elementy foliowe ze
szczotki na parę.
• Zdejmij osłonę z końcówki szczotki w.
Uwaga!
Plastikowe torebki mogą stanowić zagrożenie. Aby nie
spowodować zagrożenia uduszenia, torby plastikowe
przechowuj w miejscach niedostępnych dla niemowląt
i dzieci.
• Dolej wody do zbiornika 1 (patrz „Napełnia-
nie wodą”).
• Podłącz wtyczkę sieciową 7 do prawidłowo
zainstalowanego i uziemionego gniazdka.
• Trzymaj szczotkę na parę poziomo.
• Ustaw regulator temperatury 3 w położenie
„MAX“.
• Zaczekaj kilka minut, aż szczotka parowa nagr-
zeje się do najwyższego stopnia. W ten sposób
ze stopy 0 odkleją się pozostałości środka wy-
korzystywanego do produkcji.
• Naciśnij kilka razy przycisk uderzenia pary 8,
aż ze stopy 0 zacznie wydobywać się para.
• Następnie przeprasuj niepotrzebny skrawek ma-
teriału, by usunąć ze stopy ewentualnie zanieczy-
szczenia 0.
Uwaga!
Pierwszemu nagrzewaniu urządzenia może towarzy-
szyć zapach spalenizny i dym wywołany wypalaniem
się pozostałości środków zastosowanych podczas
produkcji. Jest to zjawisko całkowicie normalne i nie
stanowi zagrożenia. Pamiętaj o zapewnieniu odpo-
wiedniej wentylacji w pomieszczeniu, np. poprzez
otwarcie okna.
Obsługa
Przygotowania:
• W przypadku gdy wskazówki na matce danego
materiału zabraniają prasowania (symbol ),
nie należy prasować. ponieważ groziłoby to
uszkodzeniem materiału.
• Nie prasuj skóry, aksamitu, mebli impregnowa-
nych ani żadnych materiałów nieodpornych na
parę. W przeciwnym razie można uszkodzić
materiały/elementy mebli.
Napełnić wodę
Uwaga!
Do zbiornika na wodę 1 wlewaj wyłącznie wodę
z kranu lub wodę destylowaną zmieszaną z wodą
z kranu. Nigdy nie wlewaj do zbiornika na wodę
1 żadnych chemicznych substancji, środków
czyszczących – z wyjątkiem środków do usuwania
osadów z kamienia – ani żadnych innych płynów.
Nie używaj wody poddanej chemicznemu proceso-
wi usunięcia wapnia. Prowadzi to do uszkodzenia
urządzenia, którego nie będzie można naprawić.
Jeśli woda w kranie jest za twarda, zaleca się mie-
szanie jej z wodą destylowaną. W przeciwnym razie
mogłoby dojść do zatkania osadem z kamienia
dysz funkcji uderzenia pary.
IB_77154_SDRB1000A1_LB4.qxp 29.05.2012 9:49 Uhr Seite 17

- 18 -
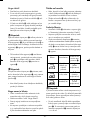
W celu przedłużenia prawidłowego działania funkcji
uderzenia pary zmieszaj wodę z kranu z wodą
destylowaną w proporcjach podanych w tabeli.
Informacje dotyczące twardości wody można
uzyskać od miejscowych wodociągów miejskich.
Uwaga!
Przed nalaniem wody do zbiornika zawsze najpierw
odłącz wtyczkę 7 z gniazdka! Istnieje zagrożenie
porażenia prądem elektrycznym!
• Zdejmij zbiornik 1 pionowo do góry, przesuwa-
jąc w tył odryglowanie 4 zbiornika 1, aż zbior-
nik 1 będzie można podnieść. Zbiornik 1 chwyć
kciukiem i palcem wskazującym za chropowate
zaznaczenia, by podnieść go pionowo. Regulator
temperatury 3 pozostaje w urządzeniu i nie wyj-
muje się go ze zbiornikiem.
• Otwórz otwór 2 w zbiorniku 1.
• Nalej wodę z miarki t maksymalnie do poziomu
zbiornika oznaczonego napisem „Max” 1.
• Zamknij otwór 2 w zbiorniku 1. Zwróć uwagę na
to, by otwór 2 sięgał do wycięcia w pokrywce.
Tylko w tym położeniu zbiornik 1 jest prawidło-
wo zamknięty.
• Załóż ponownie zbiornik 1 na urządzenie.
Zbiornik 1 musi się zatrzasnąć wyraźnie
w odryglowaniu 4.
Twardość wody
Stosunek ilości
wody destylo-
wanej do wody
kranowej
bardzo miękka /
miękka
0
średni: 1: 1
na twardo 2: 1
bardzo twarda 3: 1
Zakładanie/zdejmowanie końcówki
szczotkującej
Uwaga!
Nigdy nie zdejmuj końcówki szczotkującej w ani
nie zakładaj jej na urządzenie, gdy urządzenie
jest rozgrzane. Niebezpieczeństwo poparzenia!
• W celu skorzystania z funkcji pary i szczotki, zał-
óż na szczotkę końcówkę szczotkującą w.
• W tym celu przesuń końcówkę szczotkującą w
po prowadnicy aż do oporu. Odryglowanie ko-
ńcówki szczotkującej q musi wyraźnie się zatr-
zasnąć.
• By skorzystać z funkcji prasowania, zdejmij
ze szczotki końcówkę szczotkującą w.
• W tym celu naciśnij odryglowanie q i jedno-
cześnie wyciągnij końcówkę szczotkującą w
do przodu.
Funkcja szczotki z parą
• Załóż końcówkę szczotkującą w na urządzenie.
Musi ona wyraźnie się zatrzasnąć w ryglowaniu
końcówki szczotkującej q.
• Podłącz wtyczkę sieciową 7 do prawidłowo
zainstalowanego i uziemionego gniazdka.
• W celu wytworzenia pary, ustaw pokrętło
regulacji temperatury 3 przynajmniej na •••
lub wyżej.. Zapala się lampka kontrolna nagrze-
wania 5. Po osiągnięciu ustawionej temperatu-
ry lampka kontrolna nagrzewania 5 gaśnie.
Wskazówka:
W celu uruchomienia funkcji uderzenia parą ustaw
pokrętło regulacji temperatury 3 przynajmniej na
•••. Na niższym stopniu temperatura jest za niska
do wytworzenia uderzenia pary.
• Do prasowania z uderzeniem pary służy przy-
cisk 8.
IB_77154_SDRB1000A1_LB4.qxp 29.05.2012 9:49 Uhr Seite 18
Seite wird geladen ...
Seite wird geladen ...
Seite wird geladen ...
Seite wird geladen ...
Seite wird geladen ...
Seite wird geladen ...
Seite wird geladen ...
Seite wird geladen ...
Seite wird geladen ...
Seite wird geladen ...
Seite wird geladen ...
Seite wird geladen ...
Seite wird geladen ...
Seite wird geladen ...
Seite wird geladen ...
Seite wird geladen ...
Seite wird geladen ...
Seite wird geladen ...
Seite wird geladen ...
Seite wird geladen ...
Seite wird geladen ...
Seite wird geladen ...
Seite wird geladen ...
Seite wird geladen ...
Seite wird geladen ...
Seite wird geladen ...
Seite wird geladen ...
Seite wird geladen ...
Seite wird geladen ...
Seite wird geladen ...
Seite wird geladen ...
Seite wird geladen ...
Seite wird geladen ...
Seite wird geladen ...
Seite wird geladen ...
Seite wird geladen ...
Seite wird geladen ...
Seite wird geladen ...
Seite wird geladen ...
Seite wird geladen ...
Seite wird geladen ...
Seite wird geladen ...
Seite wird geladen ...
Seite wird geladen ...
Seite wird geladen ...
-
 1
1
-
 2
2
-
 3
3
-
 4
4
-
 5
5
-
 6
6
-
 7
7
-
 8
8
-
 9
9
-
 10
10
-
 11
11
-
 12
12
-
 13
13
-
 14
14
-
 15
15
-
 16
16
-
 17
17
-
 18
18
-
 19
19
-
 20
20
-
 21
21
-
 22
22
-
 23
23
-
 24
24
-
 25
25
-
 26
26
-
 27
27
-
 28
28
-
 29
29
-
 30
30
-
 31
31
-
 32
32
-
 33
33
-
 34
34
-
 35
35
-
 36
36
-
 37
37
-
 38
38
-
 39
39
-
 40
40
-
 41
41
-
 42
42
-
 43
43
-
 44
44
-
 45
45
-
 46
46
-
 47
47
-
 48
48
-
 49
49
-
 50
50
-
 51
51
-
 52
52
-
 53
53
-
 54
54
-
 55
55
-
 56
56
-
 57
57
-
 58
58
-
 59
59
-
 60
60
-
 61
61
-
 62
62
-
 63
63
-
 64
64
-
 65
65


Silvercrest SDRB 1000 A1 Operating Instructions Manual
- Kategorie
- Eisen
- Typ
- Operating Instructions Manual
in anderen Sprachen
- slovenčina: Silvercrest SDRB 1000 A1
- polski: Silvercrest SDRB 1000 A1
Verwandte Artikel
-
Silvercrest SDRB 1000 B1 Operating Instructions Manual
-
Silvercrest SDB 2400 A1 - IAN 66493 Bedienungsanleitung
-
-
-
-
Silvercrest SDBK 2200 A1 Operating Instructions Manual
-
Silvercrest SDMF 1300 A1 Benutzerhandbuch
-
Silvercrest SDB 2200 C1 Operating Instructions Manual
-
-
Silvercrest SDBE 2600 A1 Operating Instructions Manual