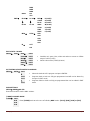
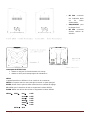
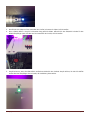
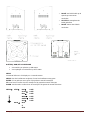
afx light PARLED-W15BK Bedienungsanleitung
- Kategorie
- Stroboskope
- Typ
- Bedienungsanleitung

© Copyright LOTRONIC 2016 PARLED-W15 Page 1
L
L
E
E
D
D
P
P
A
A
R
R
C
C
A
A
N
N
4
4
x
x
1
1
5
5
W
W
5
5
-
-
i
i
n
n
-
-
1
1
P
P
R
R
O
O
J
J
E
E
C
C
T
T
E
E
U
U
R
R
A
A
4
4
L
L
E
E
D
D
1
1
5
5
W
W
5
5
-
-
e
e
n
n
-
-
1
1
Code: 15-1674 (Black) - 15-1675 (White)
GB - INSTRUCTION MANUAL
F - MANUEL D’UTILISATION
D – BEDIENUNGSANLEITUNG
NL – HANDLEIDING
PT - MANUAL DE INSTRUÇÕES
Imported from China by
LOTRONIC SA
Avenue Zénobe Gramme 9
B – 1480 SAINTES

© Copyright LOTRONIC 2016 PARLED-W15 Page 2
Thank you for having chosen our AFX LIGHT LED PAR CAN. For your own safety, please read this user manual
carefully before installing the device.
SAFETY INTRODUCTION
• If the device has been exposed to temperature changes due to environmental changes, do not switch it on
immediately. The arising condensation could damage the device. Leave the device switched off until it has
reached room temperature.
• Make sure that the available voltage is not higher than stated at the end of this manual.
• Always disconnect from the mains, when the device is not in use or before cleaning it. Only handle the power cord
by plug. Never pull out the plug by tugging the power cord.
• DISCONNECT DEVICE: Where the MAINS plug or an appliance coupler is used as the disconnect device, the
disconnect device shall remain readily operable.
• Be very careful during installation. Since you will be working with a dangerous voltage you can suffer a
life-threatening electric shock when touching live wired.
• Never look directly into the light source, as sensitive persons may suffer an epileptic shock.
• Please be aware that damages caused by manual modifications to the device are not subject to warranty. Keep
away from children and non-professionals.
• The light doesn’t include any spare parts for repair, please check if all the parts are well installed and screws are
fitted tightly before operating. Do not use the light when the cover is open.
• Do not shake the device. Avoid brute force when installing or operating it.
• Operate the device only after having familiarized yourself with its functions. Do not permit operation by person not
qualified for operating the device. Most damages are the result of unprofessional operation.
• Please use the original packaging if the device is to be transported.
• For safety reasons, please be aware that all modifications on the device are forbidden. Furthermore, any other
operation may lead to short-circuit, burns, electric shock, lamp explosion, crash, etc. If this device will be
operated in any way different to the one described in this manual, the product may suffer damages and the
guarantee becomes void.
• Do not operate in a sealed enclosure with insufficient air flow
• Do not operate in an environment with temperatures in excess of 45deg. C.
• Do not operate store in close proximity to source of fire.
• Do not charge for more than 24 hours
• Always store with full load
• Always carry out one full discharge and charge cycle every 3 months
• Always store in a dry environment away from direct sunlight
Attention!
“AC INPUT” is the charging interface. When charging, the fixture must be turned OFF. Please
do not use the unit while it is connected to the mains unless in a case of emergency. If it
powered via the mains for a long time, the charger and battery of the fixture will overwork,
heat up and cause a risk of explosion. If the battery runs out, connect the unit to the mains. It
needs 10 minutes to recover to the normal operation. When outdoors, don’t power the unit via the mains.
The waterproof and dustproof rate of this fixture is IP44. Please avoid the leakage of electricity and the
danger of electric shock.
GB

© Copyright LOTRONIC 2016 PARLED-W15 Page 3
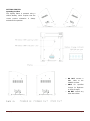
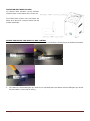
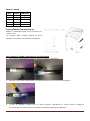
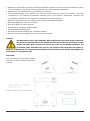
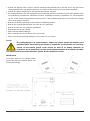
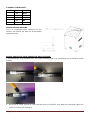
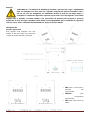
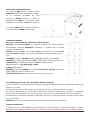
GETTING STARTED
Operating Position
This lighting fixture is powered using a
Lithium Battery which requires that the
correct product orientation is always
maintained for operation.
DO NOT connect a
DMX cable to the
POWER sockets
ONLY for specified
charger (in flightcase
or single charger)
DO NOT connect any
other data cables

© Copyright LOTRONIC 2016 PARLED-W15 Page 4
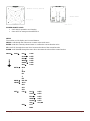
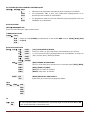
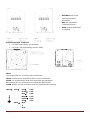
POWER ON/OFF Switch
• Set to ON for operation and charging
• Set to OFF for storage and maintenance
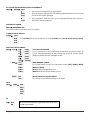
MENU
The unit has a LCD display and 4 control buttons.
MENU: scroll through the main menu or return to the main menu
ENTER: enter the currently selected menu or confirm the current function value
UP: scroll 'UP' through the menu list or increase the value of the current function
DOWN: scroll 'DOWN' through the menu list or decrease the value of the current function
MENU
STAT
Red
0-255
Green
0-255
Blue
0-255
White
0-255
Amber
0-255
Strb
0-255
AUTO
AT01
AT10
Pr1
Pr5
ADDR
001-512
CHMD
11CH
8CH
6CH
5CH
SET
CAL
Red
0-255
Green
0-255
Blue
0-255
White
0-255
Amber
0-255
USE
YES/NO
DIM
OFF
DIM1

© Copyright LOTRONIC 2016 PARLED-W15 Page 5
DIM2
DIM3
DIM4
DASE
NO
YES
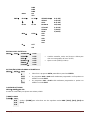
EDIT
PR.01
SC.01
RED
R.(0-255)
GREN
G.(0-255)
BLUE B.(0-255)
PR.05
SC.20
WHIT
W.(0-255)
STRB S.(0-255)
TIME T.(0-255)
FADE
F.(0-255)
INFO
LEDS
XXR
XXG
XXB
XXW
XXA
IR
OFF
ON
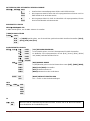
EDIT STATIC COLORS
• Combine red, green, blue, white and amber to create an infinite
range of colors (0-255)
• Set the value of the [STRB] (0-20Hz)
ACTIVATION OF AUTOMATIC PROGRAMS
• Select the desired AUTO program and press ENTER.
• Programs At01 to At10 are fully pre-programmed and will not be altered by
changes in EDIT mode.
• Programs PR01 to Pr05 are fully pre-programmed but can be edited in EDIT
mode.
DMX SETTINGS
MENU
ADDR
001-512
Enter DMX mode to set the DMX address.
[CHMD] CHANNEL MODE
Enter [CHMD] mode to select one of following DMX modes: [11CH], [8CH], [6CH] or [5CH]
MENU
STAT
RED
0-255
Green
0-255
Blue
0-255
White
0-255
Amber
0-255
Strb
0-255
MENU
AUTO
At01
At10
Pr01
Pr05
CHMD
11CH
8CH
6CH
5CH

© Copyright LOTRONIC 2016 PARLED-W15 Page 6
SPECIAL SETTINGS
[CAL] WHITE CALIBRATION
Enter CAL mode to select a different color temperature for white
There are 11 pre-programmed white colors that can be edited by using [Red],
[Green], [Blue], [White] and [Amber].
[DIM] DIMMING CURVE
Enter [DIM] mode to select a DIM mode among [OFF], [DIM1], [DIM2],
[DIM3] or [DIM4].
[OFF] means no smooth dimming curve
[DIM4] means very smooth dimming curve
[DASE] DEFAULT SETTING
Enter YES to restore to factory settings.
INFO
INFO
LEDS
XXR
XXG
XXB
XXW
XXA
IR
USING A DMX CONTROLLER
Enter into [DMX] menu to set the DMX address. You can have the same or independent DMX addresses for every
fixture.
CHANNEL ASSIGNMENT
This product has 4 DMX512 channel configurations: 11, 8, 6 and 5 channels.
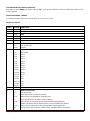
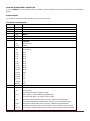
11-CHANNEL CONFIGURATION
CHANNEL
VALUE
FUNCTION
1 0-255
MASTER DIMMER
2 0-255
Red
3 0-255
Green
4 0-255
Blue
5 0-255
White
6 0-255
Amber
7
0-10
STROBE
No function
SET
CAL
R
0-255
G
0-255
B
0-255
W
0-255
A
0-255
USE
YES/NO
DIM
OFF
DIM1
DIM2
DIM3
DIM4
DASE
NO
YES
IR
OFF
ON
If you wish to use the remote control, you have to put the
IR setting to ON, otherwise the remote control will not
work

© Copyright LOTRONIC 2016 PARLED-W15 Page 7
11-255 1-20Hz
8
0-40
41-51
51-60
61-70
71-80
81-90
91-100
101-110
111-120
121-130
131-140
141-150
151-160
161-170
171-180
181-255
AUTO
No effect
AT01
AT02
AT03
AT04
AT05
AT06
AT07
AT08
AT09
AT10
Pr1
Pr2
Pr3
Pr4
Pr5
9 0-255
AUTO SPEED
10
0-10
11
12-50
51
52-90
91
92-130
131
132-170
171
172-210
211
212-250
215-255
COLOR MACRO
No function
Blue (Blue=full, RGWA=0) (step)
Blue=full, Gup (RWA=0) (proportional)
Light Blue (B=full, W=full, RGA=0 (step)
White=full, Blue->down, Red+Green+Amber=0 (proportional)
Light Amber (White=full, Amber=full, Red+Green+Blue=0) (step)
White->down, Amber=full (Red+Green+Blue=0) (proportional)
Brick-red (Red=full, Amber=full, Green+Blue+White=0) (step)
Red=full, Amber->down (Red+Green+Blue+White=0) (proportional)
Yellow (Red=full, Green=full, Blue+White+Amber=0) (step)
Green=full, Red->down, Blue+White+Amber=0 (proportional)
White (Blue=full, Amber=full, Green+White=0) (step)
Blue->down, Amber=full (Green+White=0) (proportional)
Half White (Red=half, Green=half, Blue=half, White=half, Amber=half) (step)
11
0-10
11-20
21-30
31-40
41-50
51-60
61-254
255
DIMMER SPEED
Use menu setting dimmer mode
Dimmer off
Dimmer 1
Dimmer 2
Dimmer 3
Dimmer 4
Use menu setting dimmer mode
Reset (at least 5 sec.)

© Copyright LOTRONIC 2016 PARLED-W15 Page 8
8-CHANNEL CONFIGURATION
CHANNEL
VALUE
FUNCTION
1 0-255
MASTER DIMMER
2 0-255
Red
3 0-255
Green
4 0-255
Blue
5 0-255
White
6 0-255
Amber
7
0-10
11-255
STROBE
No function
1-20Hz
8
0-10
11-20
21-30
31-40
41-50
51-60
61-254
255
DIMMER SPEED
Use menu setting dimmer mode
Dimmer off
Dimmer 1
Dimmer 2
Dimmer 3
Dimmer 4
Use menu setting dimmer mode
Reset (at least 5 sec.)
6-CHANNEL CONFIGURATION
5-CHANNEL CONFIGURATION
CHANNEL
VALUE
FUNCTION
1
0-255
MASTER DIMMER
2 0-255
Red
3 0-255
Green
4 0-255
Blue
5 0-255
White
6 0-255
Amber
CHANNEL
VALUE
FUNCTION
1 0-255
Red
2 0-255
Green
3 0-255
Blue
4 0-255
White
5 0-255
Amber

© Copyright LOTRONIC 2016 PARLED-W15 Page 9
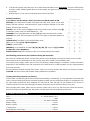
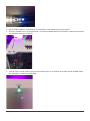
OPERATION WITH WIRELESS DMX
For wireless DMX operation, set the Wireless
ON/OFF button on the bottom of the unit to ON.
The built-in DMX receiver in the unit allows the
fixture to be placed at a range of 300m from the
W-DMX transmitter.
PAIRING PROCEDURE FOR WIRELESS DMX CONTROL
1. Keep the RESET button depressed with a sharp item while connecting the power plug to the wireless transmitter.
2. The LED on the transmitter lights up in white. Press repeatedly the Reset button until the LED lights up in BLUE.
The transmitter is now ready for pairing.

© Copyright LOTRONIC 2016 PARLED-W15 Page 10
3. Set the POWER ON/OFF switch on the bottom of the unit (black button) to ON.
4. Hold the button « WDMX REST » pressed down for 2-3 seconds while setting the ON/OFF switch of the WDMX
receiver on the bottom of the unit (red button) to ON.
5. Release the button when the LED lights up in WHITE. Press repeatedly the SIGNAL button until the LED lights
up in GREEN. The receiver is now ready for pairing.

© Copyright LOTRONIC 2016 PARLED-W15 Page 11
6. To finalize the pairing procedure press once again the Reset button on the transmitter. The LEDs will first flash
and then remain steadily lighted (blue on the transmitter and green on the unit). Transmitter and receiver are
now paired.
7. Repeat steps 4 to 7 for every new projector that needs to be paired.
REMOTE CONTROL
If you wish to use the remote control, you have to set the IR feature to ON.
[BLACK]: Press BLACKOUT button and fixture will shut down. None of the other
buttons will work anymore. Press BLACKOUT again and fixture will light up. All other
buttons will work again normally.
[AUTO]: Press AUTO and then [+]/[-] to select AUTO mode. Press SPEED and [+]/[-]
to select the speed of the auto mode between 0 – 255.
[STROBE]: Press STROBE button and then [+]/[-] to select the speed of the strobe.
[SPEED]: Only valid after having pressed AUTO. The speed is selectable between 0
and 255.
[SENSITIVITY]: Sensitivity is used in EDIT effect mode
[%]: Press % and [+]/[-] to adjust brightness
[FADE]: Gradient effect
[MANUAL]: Press MANUAL and then [R], [G], [B], [W], [A] using the [+]/[-] buttons
to adjust the color’s brightness.
Number buttons 0-9: Direct selection of the color corresponding to the number.
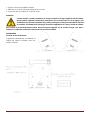
The following points have to be considered during the inspection:
All screws for installing the devices or parts of the device have to be tightly connected and must not be corroded.
There must not be any deformations on the housing, glass pane, fixations and installation spots.
The electric power supply cables must not show any damage, material fatigue or sediments. Further instructions
depending on the installation spot and usage have to be adhered to by a skilled installer and any safety problems
have to be removed.
We recommend a frequent cleaning of the device. Please use a moist, lint-free cloth. Never use alcohol or solvents.
CAUTION: Disconnect from mains before starting maintenance operation!
Cleaning and Using Frequency of Product
Please make sure that the light is power off before dismantling or maintaining, it’s very important to keep the light
clean. Frequent cleaning will ensure maximum brightness output, but also prolong the life time. It’s suggested to use
the high quality, professional glass detergent and soft cloth to clean the light. It’s not allowed to use alcohol or
chemical solvent. The inner part of the light should be cleaned by vacuum cleaner at least once a year.
When the light doesn’t work, please check if the fuse is burnt out or not. If it is, the same fuse should be replaced,
find out the faulty and restart the light. But please note the repair must be handled by professional.
TECHNICAL SPECIFICATIONS
LED ............................................................................ 4 x 15W RGBAW 5-en-1
Power ......................................................................................................... 60W
Input voltage .................................................................... 110-220Vac 60/50Hz
Battery voltage ........................................................................................ 21Vdc
Battery capacity ................................................................................... 8000mA
Charging time........................................................................................ 5 hours
Discharge time at full output ................................................................. 6 hours

© Copyright LOTRONIC 2016 PARLED-W15 Page 12
Battery ....................................................................................................Lithium
IP rating ...................................................................................................... IP44
Channels: .............................................................. 11, 8, 6 or 5 DMX Channels
Life-time of the LED ............................................................................. 50.000h
Dimensions ....................................................................... 145 x 149 x 202mm
Weight ...................................................................................................... 2,9kg
Electric products must not be put into household waste. Please bring them to a recycling centre.
Ask your local authorities or your dealer about the way to proceed.
Nous vous remercions pour l’achat de cet effet lumineux AFX LIGHT. Pour votre sécurité, lisez attentivement ce
manuel avant d’installer l’appareil.
CONSIGNES DE SECURITE ET D’UTILISATION
• Si l’appareil a été exposé à des changements de température, ne le mettez pas immédiatement sous tension. La
condensation qui peut se produire, risque d’endommager les circuits. Attendez que l’appareil ait atteint la
température ambiante avant de le mettre sous tension.
• Assurez-vous que la tension secteur ne dépasse pas celle indiquée à la fin de ce mode d’emploi.
• Débranchez toujours l‘appareil du secteur lorsqu’il n’est pas utilisé ou avant de le nettoyer. Ne tirez que sur la
fiche, jamais sur le cordon.
• Lorsque le cordon d'alimentation ou un coupleur d'appareil est utilisé comme dispositif de déconnexion, ce
dispositif doit rester facilement accessible;
• Soyez très prudent lors de l’installation. Puisque vous travaillez avec des tensions dangereuses, vous pouvez
subir un choc électrique grave si vous touchez des fils nus sous tension.
• Ne jamais regarder directement dans la source de lumière. Elle peut provoquer une crise d’épilepsie chez des
personnes sensibles.
• Les dommages résultant du non respect des instructions ou de la modification de l’appareil ne sont pas couverts
par la garantie. Tenir loin des enfants et des personnes non-qualifiées.
• L’appareil ne contient aucune pièce remplaçable. Vérifiez si toutes les pièces sont bien installées et que les vis
sont bien serrées avant la mise en service. Ne pas utiliser l’appareil lorsque le boîtier est ouvert.
• Ne pas secouer l’appareil. Ne pas forcer pendant l’installation ou l’utilisation.
• Utilisez cet appareil uniquement si vous vous êtes familiarisés avec ses fonctions. Ne pas autoriser une personne
inexpérimentée d’utiliser cet appareil. La plupart des dommages résultent d’une mauvaise utilisation.
• Conservez l’emballage d’origine pour tout transport.
• Pour des raisons de sécurité, il est interdit de modifier cet appareil de quelque sorte que ce soit. Toute
manipulation non décrite dans ce manuel peut conduire à des courts-circuits, un choc électrique, une chute, etc.
et invaliderait la garantie.
• Ne pas utiliser dans un récipient fermé sans ventilation adéquate.
• Ne pas utiliser à une température ambiante supérieure à 45°C
• Tenir à l’abri du feu.
• Ne pas charger pendant plus de 24 heures
F

© Copyright LOTRONIC 2016 PARLED-W15 Page 13
• Toujours conserver la batterie chargée
• Effectuez un cycle de décharge/charge tous les 3 mois
• Conserver dans un endroit sec à l’abri du soleil
Attention!
L’entrée secteur constitue l’interface de charge. Pendant la charge, l’appareil doit être éteint.
Ne pas utiliser l’appareil pendant qu’il est branché sur le secteur sauf en cas d’urgence. S’il
est alimenté sur le secteur pendant une période prolongée, le chargeur et la batterie risquent
de chauffer. Si la batterie est déchargée, branchez l’appareil sur le secteur. Il faut 10 minutes
pour revenir à un fonctionnement normal. Ne pas brancher l’appareil sur le secteur lorsque vous êtes à
l’extérieur. L’indice de protection contre l’eau et la poussière est IP44.
DEMARRAGE
Position de fonctionnement
L’appareil est alimenté par une batterie au
Lithium qui exige le maintien dans une
position correcte.

© Copyright LOTRONIC 2016 PARLED-W15 Page 14
NE PAS connecter
UN CORDON DMX
sur les fiches
d’alimentation
UNIQUEMENT pour
le charger fourni
NE PAS connecter
d’autres cordons de
données
Interrupteur BATTERIE M/A
• Mettre sur ON pour le fonctionnement et la charge
• Mettre sur OFF pour l’entreposage et la maintenance
MENU
L’appareil possède un afficheur LCD et 4 touches de commande.
MENU: Pour passer dans le menu principal ou revenir au menu principal
ENTER: Entrer dans le point de menu sélectionné ou confirmer le réglage
UP: Défiler vers le haut dans la liste ou augmenter la valeur affichée
DOWN: Défiler vers le bas dans la liste ou augmenter la valeur affichée
MENU
STAT
Red
0-255
Green
0-255
Blue
0-255
White
0-255
Amber
0-255
Strb
0-255
AUTO
AT01

© Copyright LOTRONIC 2016 PARLED-W15 Page 15
AT10
Pr1
Pr5
ADDR
001-512
CHMD
11CH
8CH
6CH
5CH
SET
CAL
Red
0-255
Green
0-255
Blue
0-255
White
0-255
Amber
0-255
USE
YES/NO
DIM
OFF
DIM1
DIM2
DIM3
DIM4
DASE
NO
YES
EDIT
PR.01
SC.01
RED
R.(0-255)
GREN G.(0-255)
BLUE B.(0-255)
PR.05
SC.20
WHIT
W.(0-255)
STRB S.(0-255)
TIME
T.(0-255)
FADE F.(0-255)
INFO
LEDS
XXR
XXG
XXB
XXW
XXA
IR
OFF
ON
EDITION DES COULEURS STATIQUES
• Combinez le rouge, vert, bleu, blanc et ambre pour créer une
gamme infinie de couleurs (0-255)
• Réglez la valeur de [STRB] (0-20Hz)
MENU
STAT
RED
0-255
Green
0-255
Blue
0-255
White
0-255
Amber
0-255
Strb
0-255

© Copyright LOTRONIC 2016 PARLED-W15 Page 16
ACTIVATION DES PROGRAMMES AUTOMATIQUES
• Sélectionnez le programme automatique désiré et appuyez sur ENTER.
• Les programmes At01 à At10 sont entièrement préprogrammés et ne
pourront pas être modifiés en mode Edition.
• Les programmes PR01 à Pr05 sont entièrement pré-programmés mais sont
modifiables en mode Edition.
REGLAGES DMX
MENU
ADDR
001-512
Entrez en mode DMX pour régler l’adresse DMX.
[CHMD] MODE CANAL
Entrez en mode [CHMD] pour sélectionner un des modes DMX suivants: [11CH], [8CH], [6CH]
ou [5CH]
REGLAGES SPECIAUX
[CAL] CALIBRAGE DU BLANC
Entrez en mode CAL pour sélectionner une température pour le blanc.
Il y a 11 nuances de blanc préprogrammées qui sont éditables au moyen du
[Red], [Green], [Blue], [White] et [Amber].
[DIM] COURBE DE VARIATION
Allez en mode [DIM] pour sélectionner un mode DIM parmi [OFF], [DIM1],
[DIM2], [DIM3] ou [DIM4].
[OFF] pas de courbe de variation
[DIM4] Courbe max. de variation
[DASE] REGLAGES PAR DEFAUT
Entrez YES pour revenir aux réglages par défaut.
INFO
INFO
LEDS
XXR
XXG
XXB
XXW
XXA
IR
MENU
AUTO
At01
At10
Pr01
Pr05
CHMD
11CH
8CH
6CH
5CH
SET
CAL
R
0-255
G
0-255
B
0-255
W
0-255
A
0-255
USE
YES/NO
DIM
OFF
DIM1
DIM2
DIM3
DIM4
DASE
NO
YES
IR
OFF
ON
Si vous souhaitez utiliser la télécommande, vous devez régler le point de menu IR sur ON
sinon la télécommande ne fonctionnera pas.

© Copyright LOTRONIC 2016 PARLED-W15 Page 17
UTILISATION D’UN CONTROLEUR DMX
Allez dans le menu [DMX] pour régler l’adresse DMX. Vous pouvez affecter la même ou différentes adresses pour
chaque appareil.
AFFECTATION DES CANAUX
Ce produit possède 4 modes de canaux DMX512: 11, 8, 6 et 5 canaux.
MODE 11 CANAUX
CANAL
VALEUR
FONCTION
1 0-255
VARIATEUR GENERAL
2 0-255
Rouge
3 0-255
Vert
4 0-255
Bleu
5 0-255
Blanc
6 0-255
Ambre
7
0-10
11-255
STROBSCOPE
Pas de fonction
1-20Hz
8
0-40
41-51
51-60
61-70
71-80
81-90
91-100
101-110
111-120
121-130
131-140
141-150
151-160
161-170
171-180
181-255
AUTOMATIQUE
Pas d’effet
AT01
AT02
AT03
AT04
AT05
AT06
AT07
AT08
AT09
AT10
Pr1
Pr2
Pr3
Pr4
Pr5
9 0-255
VITESSE EN MODE AUTOMATIQUE
10
0-10
11
12-50
51
52-90
91
92-130
131
MACRO COULEUR
Pas de fonction
Bleu (Bleu=100%, RGWA=0) (étapes)
Bleu=100%, Gup (RWA=0) (proportionnel)
Bleu clair (B=100%, W=100%, RGA=0 (étapes)
Blanc=100%, Bleu->down, Rouge+Vert+Ambre=0 (proportionnel)
Ambre clair (Blanc=100%, Ambre=100%, Rouge+Vert+Bleu=0) (étapes)
Blanc->down, Ambre=100% (Rouge+Vert+Bleu=0) (proportionnel)
Rouge brique (Rouge=100%, Ambre=100%, Vert+Bleu+Blanc=0) (étapes)

© Copyright LOTRONIC 2016 PARLED-W15 Page 18
132-170
171
172-210
211
212-250
215-255
Rouge=100%, Ambre->down (Rouge+Vert+Bleu+Blanc=0) (proportionnel)
Jaune (Rouge=100%, Vert=100%, Bleu+Blanc+Ambre=0) (étapes)
Vert=100%, Rouge->down, Bleu+Blanc+Ambre=0 (proportionnel)
Blanc (Bleu=100%, Ambre=100%, Vert+Blanc=0) (étapes)
Bleu->down, Ambre=100% (Vert+Blanc=0) (proportionnel)
Blanc 50% (Rouge= 50%, Vert= 50%, Bleu= 50%, Blanc= 50%, Ambre= 50%) (étapes)
11
0-10
11-20
21-30
31-40
41-50
51-60
61-254
255
VITESSE DU VARIATEUR
Utilisez le menu pour régler la variation
Dimmer éteint
Dimmer 1
Dimmer 2
Dimmer 3
Dimmer 4
Utilisez le menu pour régler la variation
Reset (au moins 5 sec.)
MODE 8 CANAUX
CANAL
VALEUR
FONCTION
1 0-255
VARIATEUR GENERAL
2 0-255
Rouge
3 0-255
Vert
4 0-255
Bleu
5 0-255
Blanc
6 0-255
Ambre
7
0-10
11-255
STROBSCOPE
Pas de fonction
1-20Hz
8
0-10
11-20
21-30
31-40
41-50
51-60
61-254
255
VITESSE DU VARIATEUR
Utilisez le menu pour régler la variation
Dimmer éteint
Dimmer 1
Dimmer 2
Dimmer 3
Dimmer 4
Utilisez le menu pour régler la variation
Reset (au moins 5 sec.)
MODE 6 CANAUX
CANAL VALEUR FONCTION
1 0-255
VARIATEUR GENERAL
2 0-255
Rouge
3 0-255
Vert
4 0-255
Bleu
5 0-255
Blanc
6 0-255
Ambre

© Copyright LOTRONIC 2016 PARLED-W15 Page 19
MODE 5 CANAUX
FONCTIONNEMENT EN DMX SANS FIL
Mettez le commutateur DMX sans fil en dessous du
boitier sur ON.
Le récepteur DMX incorporé permet de placer
l’appareil à une distance de 300m du transmetteur.
PROCEDURE DE CONNECTION SANS-FIL DU PARLED-W15
1. Tenir enfoncé le petit bouton Reset de l’émetteur à l’aide d’un objet pointu
2. Brancher le connecteur d’alimentation sur l’émetteur tout en tenant le bouton Reset appuyé
3. La LED de l’émetteur s’allume alors en couleur blanche. Sélectionnez la couleur bleue en appuyant
successivement sur le bouton Reset. L’émetteur est maintenant prêt pour l’appairage.
CANAL VALEUR FONCTION
1 0-255
Rouge
2 0-255
Vert
3 0-255
Bleu
4 0-255
Blanc
5 0-255
Ambre

© Copyright LOTRONIC 2016 PARLED-W15 Page 20
4. Mettez le bouton d’alimentation général situé sous le projecteur (bouton noir) sur ON.
5. Tenez le bouton « WDMX REST » appuyé pendant 2-3sec tout en mettant le bouton d’alimentation du récepteur
WDMX situé sous le projecteur. (bouton rouge) sur ON.
6. Relâchez le bouton lorsque la LED s’allume en BLANC. Appuyez à plusieurs reprises sur le bouton jusqu’à ce
que la LED s’allume en VERT. Le récepteur est maintenant prêt pour l’appairage.
Seite wird geladen ...
Seite wird geladen ...
Seite wird geladen ...
Seite wird geladen ...
Seite wird geladen ...
Seite wird geladen ...
Seite wird geladen ...
Seite wird geladen ...
Seite wird geladen ...
Seite wird geladen ...
Seite wird geladen ...
Seite wird geladen ...
Seite wird geladen ...
Seite wird geladen ...
Seite wird geladen ...
Seite wird geladen ...
Seite wird geladen ...
Seite wird geladen ...
Seite wird geladen ...
Seite wird geladen ...
Seite wird geladen ...
Seite wird geladen ...
Seite wird geladen ...
Seite wird geladen ...
Seite wird geladen ...
Seite wird geladen ...
Seite wird geladen ...
Seite wird geladen ...
Seite wird geladen ...
Seite wird geladen ...
Seite wird geladen ...
Seite wird geladen ...
-
 1
1
-
 2
2
-
 3
3
-
 4
4
-
 5
5
-
 6
6
-
 7
7
-
 8
8
-
 9
9
-
 10
10
-
 11
11
-
 12
12
-
 13
13
-
 14
14
-
 15
15
-
 16
16
-
 17
17
-
 18
18
-
 19
19
-
 20
20
-
 21
21
-
 22
22
-
 23
23
-
 24
24
-
 25
25
-
 26
26
-
 27
27
-
 28
28
-
 29
29
-
 30
30
-
 31
31
-
 32
32
-
 33
33
-
 34
34
-
 35
35
-
 36
36
-
 37
37
-
 38
38
-
 39
39
-
 40
40
-
 41
41
-
 42
42
-
 43
43
-
 44
44
-
 45
45
-
 46
46
-
 47
47
-
 48
48
-
 49
49
-
 50
50
-
 51
51
-
 52
52


afx light PARLED-W15BK Bedienungsanleitung
- Kategorie
- Stroboskope
- Typ
- Bedienungsanleitung
in anderen Sprachen
- français: afx light PARLED-W15BK Le manuel du propriétaire
- Nederlands: afx light PARLED-W15BK de handleiding
- português: afx light PARLED-W15BK Manual do proprietário
Verwandte Artikel


Andere Dokumente
-
 Balmani 202215 Installationsanleitung
-
 Ibiza Light STROBE150 Bedienungsanleitung
-
 Ibiza Light & Sound DJLIGHT85LED Bedienungsanleitung
-
 LTC Audio LLSCONTROLLER Bedienungsanleitung
-
 Squareled Spectrum 24x10W RGBAW 5in1 25° Bedienungsanleitung
-
EuroLite AKKU IP UP-4 Plus Benutzerhandbuch
-
CHAUVET DJ SlimPAR PRO RGBA Referenzhandbuch
-
-
-


