
PN-V701
LCD MONITOR
MONITEUR LCD
MONITOR LCD
LCD FARBMONITOR
ЖК МОНИТОР
SETUP MANUAL
MANUEL D’INSTALLATION
MANUAL DE INSTALACIÓN
INSTALLATIONSANLEITUNG
РУКОВОДСТВО ПО УСТАНОВКЕ
ENGLISH ...... E1
FRANÇAIS ..... F1
ESPAÑOL .... S1
DEUTSCH ..... D1
РУССКИЙ...... Р1
(
CD-ROM
)
ENGLISH FRANÇAIS ESPAÑOLENGLISH FRANÇAIS ESPAÑOL DEUTSCH РУССКИЙ

FOR CUSTOMERS IN U.K.
IMPORTANT
The wires in this mains lead are coloured in accordance with the following code:
GREEN-AND-YELLOW: Earth
BLUE: Neutral
BROWN: Live
As the colours of the wires in the mains lead of this apparatus may not correspond with the coloured markings identifying the
terminals in your plug proceed as follows:
• The wire which is coloured GREEN-AND-YELLOW must be connected to the terminal in the plug which is marked by the
letter E or by the safety earth
or coloured green or green-and-yellow.
• The wire which is coloured BLUE must be connected to the terminal which is marked with the letter N or coloured black.
• The wire which is coloured BROWN must be connected to the terminal which is marked with the letter L or coloured red.
Ensure that your equipment is connected correctly. If you are in any doubt consult a qualied electrician.
“WARNING: THIS APPARATUS MUST BE EARTHED.”

ENGLISH
1
E
WARNING: TO REDUCE THE RISK OF FIRE OR ELECTRIC SHOCK, DO NOT EXPOSE THIS PRODUCT
TO RAIN OR MOISTURE.
RISK OF ELECTRIC
SHOCK
DO NOT OPEN
CAUTION
CAUTION: TO REDUCE THE RISK OF ELECTRIC
SHOCK, DO NOT REMOVE COVER.
NO USER-SERVICEABLE PARTS
INSIDE.
REFER SERVICING TO QUALIFIED
SERVICE PERSONNEL.
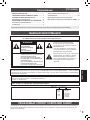
The lightning ash with arrowhead symbol, within
a triangle, is intended to alert the user to the
presence of uninsulated “dangerous voltage”
within the product’s enclosure that may be of
sufcient magnitude to constitute a risk of electric
shock to persons.
The exclamation point within a triangle is
intended to alert the user to the presence of
important operating and maintenance (servicing)
instructions in the literature accompanying the
product.
Thank you for your purchase of a SHARP LCD product. To ensure safety and many years of trouble-free operation of your
product, please read the Safety Precautions carefully before using this product.
DEAR SHARP CUSTOMER
IMPORTANT INFORMATION
Contents
Read the manuals in the provided CD-ROM. (Adobe Acrobat Reader is required to view the manuals.)
[ENGLISH]
IMPORTANT INFORMATION ............................................1
DEAR SHARP CUSTOMER .............................................. 1
SAFETY PRECAUTIONS ..................................................2
SAFETY INSTRUCTION ...................................................3
MOUNTING PRECAUTIONS ............................................4
Supplied Components ..................................................... 5
Connections .....................................................................5
Turning Power On/Off ...................................................... 8
Specications ................................................................10
Mounting Precautions
(For SHARP dealers and service engineers) ............... 10

2
E
SAFETY PRECAUTIONS
Electricity is used to perform many useful functions, but it can also cause personal injuries and property damage if improperly
handled. This product has been engineered and manufactured with the highest priority on safety. However, improper use can
result in electric shock and/or re. In order to prevent potential danger, please observe the following instructions when installing,
operating and cleaning the product. To ensure your safety and prolong the service life of your LCD product, please read the
following precautions carefully before using the product.
1. Read instructions — All operating instructions must be read and understood before the product is operated.
2. Keep this manual in a safe place — These safety and operating instructions must be kept in a safe place for future
reference.
3. Observe warnings — All warnings on the product and in the instructions must be observed closely.
4. Follow instructions — All operating instructions must be followed.
5. Cleaning — Unplug the power cord from the power outlet before cleaning the product. Use a dry cloth to clean the product.
Do not use liquid cleaners or aerosol cleaners. Do not use dirty cloths. Doing so may damage the product.
6. Attachments — Do not use attachments not recommended by the manufacturer. Use of inadequate attachments can result
in accidents.
7. Water and moisture — Do not use the product near water. Do not install the product in a place where water may splash onto
it. Be careful of equipment which drains water such as an air-conditioner.
8. Ventilation — The vents and other openings in the cabinet are designed for ventilation.
Do not cover or block these vents and openings since insufcient ventilation can cause overheating and/or shorten the life
of the product. Do not place the product on a sofa, rug or other similar surface, since they can block ventilation openings.
Do not place the product in an enclosed place such as a bookcase or rack, unless proper ventilation is provided or the
manufacturer’s instructions are followed.
9. Power cord protection — The power cords must be routed properly to prevent people from stepping on them or objects from
resting on them.
10. The LCD panel used in this product is made of glass. Therefore, it can break when the product is dropped or applied with
impact. Be careful not to be injured by broken glass pieces in case the LCD panel breaks.
11. Overloading — Do not overload power outlets or extension cords. Overloading can cause re or electric shock.
12. Entering of objects and liquids — Never insert an object into the product through vents or openings. High voltage ows in
the product, and inserting an object can cause electric shock and/or short internal parts.
For the same reason, do not spill water or liquid on the product.
13. Servicing — Do not attempt to service the product yourself. Removing covers can expose you to high voltage and other
dangerous conditions. Request a qualied service person to perform servicing.
14. Repair — If any of the following conditions occurs, unplug the power cord from the power outlet, and request a qualied
service person to perform repairs.
a. When the power cord or plug is damaged.
b. When a liquid was spilled on the product or when objects have fallen into the product.
c. When the product has been exposed to rain or water.
d. When the product does not operate properly as described in the operating instructions.
Do not touch the controls other than those described in the operating instructions. Improper adjustment of controls
not described in the instructions can cause damage, which often requires extensive adjustment work by a qualied
technician.
e. When the product has been dropped or damaged.
f. When the product displays an abnormal condition. Any noticeable abnormality in the product indicates that the product
needs servicing.
15. Replacement parts — In case the product needs replacement parts, make sure that the service person uses replacement
parts specied by the manufacturer, or those with the same characteristics and performance as the original parts. Use of
unauthorized parts can result in re, electric shock and/or other danger.
16. Safety checks — Upon completion of service or repair work, request the service technician to perform safety checks to
ensure that the product is in proper operating condition.
17. Wall mounting — When mounting the product on a wall, be sure to install the product according to the method
recommended by the manufacturer.
18. Heat sources — Keep the product away from heat sources such as radiators, heaters, stoves and other heat-generating
products (including ampliers).
19. Batteries — Incorrect use of batteries may cause the batteries to burst or ignite. A leaky battery may corrode the equipment,
dirty your hands or spoil your clothing. In order to avoid these problems, make sure to observe the precautions below:
• Use the specied batteries only.
• Install the batteries with due attention to the plus (+) and minus (-) sides of the batteries according to the instructions in the
compartment.
• Do not mix old and new batteries.
• Do not mix batteries of different types. Voltage specications of batteries of the same shape may vary.
• Replace an exhausted battery with a new one promptly.
• If you will not use the remote control for a long time, remove the batteries.
• If leaked battery uid gets on your skin or clothing, rinse immediately and thoroughly. If it gets into your eye, bathe your
eye well rather than rubbing and seek medical treatment immediately. Leaked battery uid that gets into your eye or your
clothing may cause a skin irritation or damage your eye.
20. Usage of the monitor must not be accompanied by fatal risks or dangers that, could lead directly to death, personal injury,
severe physical damage or other loss, including nuclear reaction control in nuclear facility, medical life support system, and
missile launch control in a weapon system.

ENGLISH
3
E
SAFETY INSTRUCTION
- Do not use the monitor where there is a lot of dust, where
humidity is high, or where the monitor may come into contact
with oil or steam. Do not use in an environment where
there are corrosive gases (sulfur dioxide, hydrogen sulde,
nitrogen dioxide, chlorine, ammonia, ozone, etc.). As this
could lead to re.
- Ensure that the monitor does not come into contact with
water or other uids. Ensure that no objects such as paper
clips or pins enter the monitor as this could lead to re or
electric shock.
- Do not place the monitor on top of unstable objects or in
unsafe places. Do not allow the monitor to receive strong
shocks or to strongly vibrate. Causing the monitor to fall or
topple over may damage it.
- Do not use the monitor near heating equipment or in places
where there is likelihood of high temperature, as this may
lead to generation of excessive heat and outbreak of re.
- Do not use the monitor in places where it may be exposed to
direct sunlight. Risk of cabinet deformation and failure if the
monitor is used in direct sunlight.
- Please be sure to constantly remove dust and garbage that
has attached to the ventilation opening.
If dust collects in the ventilation opening, it may lead to
excessive heat, outbreak of re, or malfunction.
- As a standard, clean the inside of the monitor once every
year. If dust collects inside the monitor, it may lead to
excessive heat, outbreak of re, or malfunction. Please
request a cleaning of the inside of the monitor from an
authorized SHARP servicing dealer or service center.
- The power outlet shall be installed near the equipment and
shall be easily accessible.
The Power Cord
- Use only the power cord supplied with the monitor.
- Do not damage the power cord nor place heavy objects on
it, stretch it or over bend it. Also, do not add extension cords.
Damage to the cord may result in re or electric shock.
- Do not use the power cord with a power tap.
Adding an extension cord may lead to re as a result of
overheating.
- Do not remove or insert the power plug with wet hands.
Doing so could result in electric shock.
- Unplug the power cord if it is not used for a long time.
- Do not attempt to repair the power cord if it is broken
or malfunctioning. Refer the servicing to the service
representative.
21. Do not stay in contact with the parts of the product that become hot for long periods of time. Doing so may result in
low-temperature burns.
22. Do not modify this product.
WARNING:
This is a Class A product. In a domestic environment this product may cause radio interference in which case the user may
be required to take adequate measures.
An apparatus with CLASS I construction shall be connected to a MAIN socket outlet with a protective earthing connection.
To maintain compliance with EMC regulations, use shielded cables to connect to the following terminals: HDMI input terminal,
D-sub input terminal, RS-232C input/output terminals, DVI-D input terminal and DisplayPort input/output terminals.
If a monitor is not positioned in a sufciently stable location, it can be potentially hazardous due to falling. Many injuries,
particularly to children, can be avoided by taking simple precautions such as:
• Using xing devices like wall mount brackets recommended by the manufacturer.
• Only using furniture that can safely support the monitor.
• Ensuring the monitor is not overhanging the edge of the supporting furniture.
• Not placing the monitor on tall furniture (for example, cupboards or bookcases) without anchoring both the furniture and the
monitor to a suitable support.
• Not standing the monitors on cloth or other materials placed between the monitor and supporting furniture.
• Educating children about the dangers of climbing on furniture to reach the monitor or its controls.
• This equipment is not suitable for use in locations where children are likely to be present unsupervised.
Especially for child safety
- Don’t allow children to climb on or play with the monitor.
- Don’t place the monitor on furniture that can easily be used as steps, such as a chest of drawers.
- Remember that children can become excited while watching a program, especially on a “larger than life” monitor. Care
should be taken to place or install the monitor where it cannot be pushed, pulled over, or knocked down.
- Care should be taken to route all cords and cables connected to the monitor so that they cannot be pulled or grabbed by
curious children.

4
E
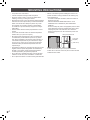
MOUNTING PRECAUTIONS
• This product is for use indoors.
• A VESA-compliant mounting bracket is required.
• Since the monitor is heavy, consult your dealer before
installing, removing or moving the monitor.
• Mounting the monitor on the wall requires special expertise
and the work must be performed by an authorized SHARP
dealer. You should never attempt to perform any of this
work yourself. Our company will bear no responsibility
for accidents or injuries caused by improper mounting or
mishandling.
• Use the monitor with the surface perpendicular to a level
surface.
• This monitor should be used at an ambient temperature
between 32°F (0°C) and 104°F (40°C).
• Be careful of high temperatures in the surrounding area.
If it is difcult to provide sufcient space for any reason
such as the installation of the monitor inside a housing, or
if the ambient temperature may be outside of the range
of 32°F (0°C) to 104°F (40°C), install a fan or take other
measures to keep the ambient temperature within the
required range.
• Temperature condition may change when using the monitor
together with the optional equipments recommended by
SHARP. In such cases, please check the temperature
condition specied by the optional equipments.
• Do not block any ventilation openings. If the temperature
inside the monitor rises, this could lead to a malfunction.
• Do not place the monitor on a device which generates heat.
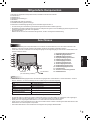
• Adhere to the following when installing the monitor in its
portrait orientation. Failing to adhere to the following may
cause malfunctions.
- To install in landscape orientation, rotate the monitor 90
degrees to the right.
- Set the PORTRAIT/LANDSCAPE INSTALL on the
MONITOR menu to PORTRAIT. (See OPERATION
MANUAL.)
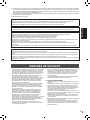
- Be sure to clamp the power cord (supplied) onto the cable
clamp attachment using the supplied cable clamp. When
clamping the power cord, take care not to stress the
terminal of the power cord. Do not bend the power cord
excessively.
Power cord
(Supplied)
Cable clamp
Cable clamp attachment
• A video wall should be only be composed of identical
models. Do not use this monitor as part of a video wall that
includes another model.

ENGLISH
5
E
Supplied Components
If any components are missing, please contact your dealer.
Liquid Crystal Display Monitor: 1
Cable clamp: 4
Cable clamp (insertion type): 2
Power cord
CD-ROM (Utility Disk for Windows): 1
Setup Manual (this manual): 1
Remote control sensor box mounting hole concealing sticker: 2
* The remote control unit is supplied with the PN-ZR02 control kit (optional).
* SHARP Corporation holds authorship rights to the Utility Disk program. Do not reproduce it without permission.
* For environmental protection!
Do not dispose of batteries in household waste. Follow the disposal instructions for your area.
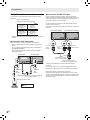
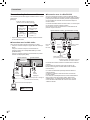
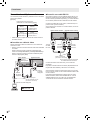
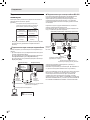
Connections
Caution
• Be sure to turn off the main power switch and disconnect the plug from the power outlet before connecting/disconnecting
cables. Also, read the manual of the equipment to be connected.
• Be careful not to confuse the input terminal with the output terminal when connecting cables. Accidentally reversing cables
connected to the input and output terminals may cause malfunctions and the other problems.
TIPS
• Set the audio input terminal used for each input mode in AUDIO SELECT on the SETUP menu. The factory settings are
shown below.
Input mode Audio input terminal (Factory setting)
DVI-D Audio input terminal
DisplayPort DisplayPort input terminal
HDMI1 HDMI1 input terminal
HDMI2 HDMI2 input terminal
D-SUB[RGB],
D-SUB[COMPONENT]
Audio input terminal
OPTION * Expansion slot
* When you have used the expansion slot to expand the functions.
• The terms HDMI and HDMI High-Denition Multimedia Interface, and the HDMI Logo are trademarks or registered trademarks
of HDMI Licensing Administrator, Inc. in the United States and other countries.
• DisplayPort is a registered trademark of Video Electronics Standards Association.
• Adobe, Acrobat, and Acrobat Reader are either registered trademarks or trademarks of Adobe Systems Incorporated in the
United States and/or other countries.
• All other brand and product names are trademarks or registered trademarks of their respective holders.
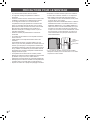
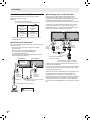
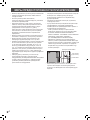
1. DisplayPort output terminal
2. HDMI1 input terminal
3. HDMI2 input terminal
4. DisplayPort input terminal
5. DVI-D input terminal
6. D-sub input terminal
7. Audio input terminal
8. Audio output terminal
9. RS-232C input terminal
10. RS-232C output terminal
11. LAN terminal
12. Control kit terminal
13. AC input terminal
13
78 9
1
2
3
4
5
6
10 11 12
For power outlet
Power cord
(Supplied)

6
E
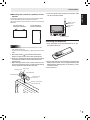
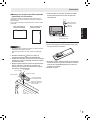
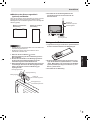
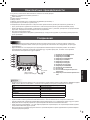
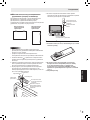
Multiple monitor connection
The monitors can be aligned and used as a large screen.
[Example]
Second monitor
Secondary
(Expansion unit)
ID No.: 2
Third monitor
Secondary
(Expansion unit)
ID No.: 3
First monitor
Primary
(Main unit)
ID No.: 1
Fourth monitor
Secondary
(Expansion unit)
ID No.: 4
Remote control sensor box
(Supplied with the PN-ZR02 (optional))
* Always install the remote control sensor box on the primary
monitor.
n
Connection with video cable
Up to 25 monitors* can be connected in a daisy chain.
*: Up to 4 monitors when the video signal is encrypted by
HDCP.
Up to 4 monitors when the rst monitor’s input mode is
D-SUB[COMPONENT].
Up to 2 monitors when the rst monitor’s input mode is
DisplayPort (MST).
To DisplayPort output terminal
First monitor Second monitor
DisplayPort
input
terminal
DisplayPort
input
terminal
DisplayPort cable that supports 4K
(commercially available)
shows the signal
flow
DisplayPort
output terminal
n
Connection with RS-232 cable
If you connect the monitor in a daisy chain using RS-232
cables, settings are copied from the primary (main unit) to the
secondary (expansion unit) and operation from the primary
can perform operation for all monitors.
Connect the RS-232 cables in order, starting with the rst
monitor (primary monitor).
If monitors are connected in a different order they may not be
operable.
RS-232 straight cable
(commercially available)
First monitor: primary
Second monitor: secondary
Third monitor: connects to
secondary RS-232C input terminal
RS-232C
input
terminal
RS-232C
output terminal
RS-232C
output
terminal
Connect in the same way to the third and subsequent
monitors.
Up to 25 monitors can be connected. (Depending on the
length of the cable used and the surrounding environment.)
Setting each ID No. in the monitor is required.
Perform operation with the rear side buttons on the primary
monitor. To automatically assign ID numbers in order from the
primary, set AUTO ASSIGN ID No. to ON in ID SETTING on
the SETUP menu.
Connections

7
E
ENGLISH
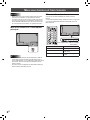
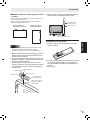
n
Mounting the control kit (optional) on the
monitor
If performing operation of the monitor with the remote control
unit, the PN-ZR02 control kit (optional) is required.
Attach the remote control sensor box as shown in the following
illustration.
For the monitor in
landscape orientation
For the monitor in
portrait orientation
Caution
• When attaching the remote control sensor box, turn the
main power switch OFF.
• Connect the monitors together in a daisy chain with RS-232
cable.
1. Peel off the sticker (
) that has been afxed to the
monitor’s remote control sensor box mounting hole.
2. Secure the mounting bracket by inserting the mounting
screw into the monitor’s remote control sensor box
mounting hole.
3. Adjust the angle of the remote control sensor box, and
secure it with the xing screw, so that it may accurately
receive signals from the remote control unit.
Angle adjustment
Mounting bracket
Mounting screw
Fixing screw
Remote control
sensor box
Remote control sensor
box mounting hole
4. Insert the remote control sensor box connection cable
into the control kit terminal.
Connection
cable
Remote control
sensor box
Control kit terminal
Installing the batteries
1. Place your nger on the part marked with the ▲, and
then pull the cover off.
2. See the instructions in the compartment and put in the
batteries (R‑03 (“AAA” size) x 2) (supplied with the PN‑
ZR02 (optional)) with their plus (+) and minus (-) sides
oriented correctly.
3. Close the cover.
Connections

8
E
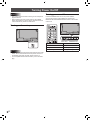
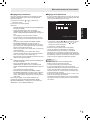
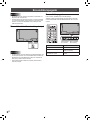
Turning Power On/Off
Caution
• Turnonthemonitorrstbeforeturningonthecomputeror
playbackdevice.
• WhenswitchingthemainpowerswitchorthePOWER
buttonoffandbackon,alwayswaitforatleast5seconds.
Ashortintervalmayresultinamalfunction.
Turning on the main power
Main power switch
Caution
• Themainpowermustbeturnedon/offwiththemainpower
switch.Donotconnect/disconnectthepowercordorturn
thebreakeron/offwhilethemainpowerswitchison.
• Foracompleteelectricaldisconnection,pulloutthemain
plug.
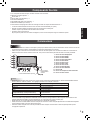
Turning power on/off
PressthePOWERbuttontoturnthepowerON/OFF.
YoucanalsoturnthepowerON/OFFbypressingthe
MONITORONbutton/MONITOROFFbuttonontheremote
controlunit.
POWER buttonPower LED
Status Status of the monitor
Greenlit Poweron
Orangelit Poweroff(Standbymode)
Greenashing Inputsignalwaitingmode

9
E
ENGLISH
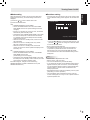
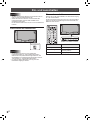
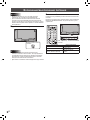
n
Mode setting
When the monitor is turned on for the rst time after being
shipped from the factory, the mode setting screen will be
displayed.
(1) Press the
or button to select YES or NO.
(2) Press the ENTER button.
YES:
• OPERATION MODE is set to MODE1.
• OFF IF NO OPERATION is set to ON, and POWER
SAVE MODE is set to ON. (These settings cannot be
changed.)
• If there is no operation for 4 hours or more, the monitor
automatically enters standby mode.
• Compared to when POWER SAVE MODE is set to OFF,
the current consumption is reduced while the monitor
is in standby mode, but the startup time from standby
mode becomes longer.
• While the monitor is in standby mode, control via LAN
will be disabled.
• While the monitor is in standby mode, only certain
RS-232C commands can be used.
• While the monitor is in standby mode, the remote
control unit cannot be used to operate the display of the
secondary unit.
NO:
• OPERATION MODE is set to MODE2.
• OFF IF NO OPERATION is set to OFF, and POWER
SAVE MODE is set to OFF.
(These settings can be changed.)
• Compared to when POWER SAVE MODE is set to ON,
the startup time from standby mode is reduced, but more
power will be consumed in standby mode.
Even after being set, changes can be made using
OPERATION MODE, located in MONITOR menu. (See
OPERATION MANUAL.)
Turning Power On/Off
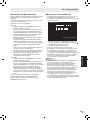
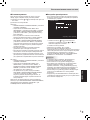
n
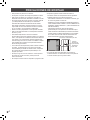
Date/time setting
• If the time has yet to be set when the monitor is rst turned
on, the date/time setting screen appears. Set the date and
time.
DATE/TIME SETTING
//
OK:[ENTER] CANCEL:[RETURN]
: :
01 01 17
/
00 00
:/ 20
1. Press the or button to select the date and time, and
press the
or button to change the numerical values.
2. Press the ENTER button.
• Be sure to set the date and time.
• The date/time setting screen will close automatically if
no operation is performed for about 15 seconds. The
date and time can be set using DATE/TIME SETTING
from the SETUP menu when the date/time setting screen
disappears.
TIPS
• Set the date in “Day/Month/Year” order.
• Set the time on a 24-hour basis.
• The clock is maintained by the internal battery.
• If you already set the time but the date/time setting screen
appears when the power is turned on, the internal battery
may be exhausted. Please contact an authorized SHARP
servicing dealer or service center for assistance with
battery replacement.
• Estimated service life of the internal battery: About 5 years
(depending on monitor operation)
• The initial battery was inserted at the factory when the
monitor was shipped, so it may run out of power before its
expected operation life.

10
E
Model PN-V701
Power requirement AC 100 V - 240 V, 4.2 A, 50/60 Hz
Operating temperature
*
32°F to 104°F (0°C to 40°C)
Operating humidity 20% to 80% (no condensation)
Power consumption (Maximum) 380 W
Dimensions (excluding protrusions) inch (mm)
Approx. 60-3/4 (W) x 4-13/16 (D) x 34-1/4 (H) (1543.7 x 122 x 870.4)
Weight lbs. (kg)
Approx. 81.6 (37)
PN-ZR02 (optional): Approx. 0.220 (0.1)
* Temperature condition may change when using the monitor together with the optional equipments recommended by SHARP. In such
cases, please check the temperature condition specied by the optional equipments.
As a part of our policy of continuous improvement, SHARP reserves the right to make design and specication changes for product improvement
without prior notice. The performance specication gures indicated are nominal values of production units. There may be some deviations from
these values in individual units.
Specications
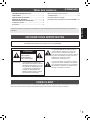
• When installing, removing or moving the monitor, ensure that this is carried out by at least 2 people.
• Be sure to use a wall-mount bracket designed or designated for mounting the monitor.
• This monitor is designed to be installed on a concrete wall or pillar. Reinforced work might be necessary for some materials
such as plaster / thin plastic board / wood before starting installation.
• This monitor and bracket must be installed on a wall which can endure at least 4 times or more the weight of the monitor.
Install by the most suitable method for the material and the structure.
• To attach a VESA-compliant mounting bracket, use M6 screws that are 5/16 inch (8 mm) to 3/8 inch (10 mm) longer than the
thickness of the mounting bracket.
Screws (M6)
Mounting bracket
Monitor mounting
5/16 - 3/8 inch (8-10 mm)
• Do not use an impact driver.
• When moving the monitor, be sure to hold it with the handles. Do not hold the top, bottom, or sides of the monitor. Do not
hold the LCD panel. Also, do not orient the monitor so that the LCD panel faces the ground. This may cause product damage,
failure, or injury.
• When performing an installation where the monitor is stacked, please install it such that load is not placed on the monitor.
• After mounting, please carefully ensure the monitor is secure, and not able to come loose from the wall or mount.
• Do not use any screw holes other than VESA holes for installation.
Mounting Precautions
(For SHARP dealers and service engineers)

FRANÇAIS
1
F
Table des matières
[FRANÇAIS]
AVERTISSEMENT : POUR RÉDUIRE LE RISQUE D’INCENDIE OU DE DÉCHARGE ÉLECTRIQUE, NE PAS
EXPOSER CE PRODUIT À LA PLUIE OU À LA POUSSIÈRE.
RISQUE DE
DÉCHARGE
ÉLECTRIQUE
NE PAS OUVRIR
ATTENTION
ATTENTION : POUR RÉDUIRE LE RISQUE DE
DÉCHARGE ÉLECTRIQUE, NE PAS
RETIRER LE COUVERCLE. IL N’Y A
AUCUNE PIÈCE RÉPARABLE PAR
L’UTILISATEUR À L’INTÉRIEUR.
AVERTIR LE PERSONNEL DE
SERVICE QUALIFIÉ POUR TOUTE
PROCÉDURE D’ENTRETIEN.
Le symbole représenté par l’éclair à la tête en
pointe de èche à l’intérieur d’un triangle, est
placé pour alerter l’utilisateur de la présence
d’une “tension dangereuse” non isolée à l’intérieur
du produit. Cette tension peut avoir une valeur
sufsante pour constituer un risque
d’électrocution à toute personne.
Le point d’exclamation à l’intérieur d’un triangle
est placé pour alerter l’utilisateur de la présence
d’une procédure particulière ou d’une procédure
de maintenance (entretien) importante dans les
manuels accompagnant le produit.
INFORMATIONS IMPORTANTES
CHER CLIENT
Nous vous remercions d’avoir acheté cet appareil SHARP à écran LCD. An de garantir le bon fonctionnement de ce moniteur,
nous vous conseillons de lire attentivement cette brochure et de la conserver pour toute référence ultérieure.
Lisez les manuels se trouvant dans le CD-ROM fourni. (Adobe Acrobat Reader est nécessaire pour pouvoir visualiser les
manuels.)
INFORMATIONS IMPORTANTES ....................................1
CHER CLIENT ................................................................... 1
PRÉCAUTIONS DE SÉCURITÉ .......................................2
MESURES DE SÉCURITÉ ................................................3
PRÉCAUTIONS POUR LE MONTAGE .............................4
Composants fournis ........................................................5
Connexions ......................................................................5
Mise sous tension et hors tension .................................8
Caractéristiques ............................................................. 10
Précautions pour le montage
(À l’attention des revendeurs et techniciens SHARP)
...10

2
F
L’électricité remplit de nombreuses fonctions utiles, mais elle peut provoquer des blessures et des dégâts matériels si elle n’est
pas utilisée correctement. Cet appareil a été conçu et fabriqué en attachant la plus grande importance à la sécurité. Cependant,
une utilisation inadéquate peut entraîner une décharge électrique et/ou un incendie. An d’éviter tout danger potentiel, veuillez
respecter les consignes suivantes lors de l’installation, de l’utilisation et du nettoyage de l’appareil. An d’assurer votre propre
sécurité et de prolonger la durée de service de votre moniteur LCD, veuillez lire attentivement les précautions ci-dessous avant
d’utiliser l’appareil.
1. Lisez ces explications — Vous devez lire et comprendre toutes les informations relatives au fonctionnement de l’appareil
avant de l’utiliser.
2. Conservez cette brochure dans un endroit sûr — Ces explications concernant la sécurité et le fonctionnement doivent être
conservées dans un endroit sûr pour vous y référer en cas de besoin.
3. Respectez les avertissements — Tous les avertissements gurant sur l’appareil et dans ce mode d’emploi doivent être
strictement respectés.
4. Suivez les instructions — Toutes les explications sur le fonctionnement doivent être respectées.
5. Nettoyage — Débranchez le cordon d’alimentation au niveau de la prise d’alimentation secteur avant de nettoyer l’appareil.
Servez-vous d’un linge sec, et n’employez pas de détergents liquides ou en atomiseur. N’utilisez pas de linges sales. Cela
risquerait d’endommager l’appareil.
6. Accessoires — N’utilisez pas d’accessoires non recommandés par le fabricant, car cela pourrait provoquer des accidents.
7. Eau et humidité — N’utilisez pas cet appareil près de l’eau. N’installez pas le produit à un endroit où il pourrait recevoir de
l’eau. Évitez en particulier les emplacements sous les appareils à vidange d’eau tels que les climatiseurs.
8. Ventilation — Des ouïes et autres ouvertures sont prévues dans le coffret de l’appareil pour sa ventilation. Ne recouvrez
pas et ne bouchez pas ces ouvertures car une ventilation insufsante peut provoquer une surchauffe et réduire la durée de
vie de l’appareil. Ne placez pas l’appareil sur un sofa, un tapis ou toute autre surface analogue car cela pourrait obstruer
les ouvertures de ventilation. Cet appareil n’est pas conçu pour une installation encastrée; ne le placez donc pas dans
un endroit fermé comme une bibliothèque ou une baie à moins qu’une ventilation adéquate ne soit prévue et que les
consignes du fabricant ne soient respectées.
9. Protection du cordon d’alimentation — Faites passer les cordons d’alimentation à un endroit où ils ne seront pas écrasés
ou coincés par d’autres objets.
10. Le panneau de l’écran à cristaux liquides (LCD) de cet appareil est fabriqué en verre et, par conséquent, il peut se briser
si l’appareil tombe ou s’il reçoit un fort impact. Veillez à ne pas vous blesser par les éclats de verre si le panneau LCD se
brise.
11. Surcharge — Ne surchargez pas les prises d’alimentation secteur ou les rallonges car cela peut entraîner un risque d’incendie
ou d’électrocution.
12. Insertion de solides ou de liquides — N’introduisez jamais des objets par les orices de cet appareil, car ils pourraient
provoquer une électrocution et/ou un court-circuit en touchant des pièces internes sous haute tension.
Pour la même raison, ne renversez jamais de l’eau ou un liquide sur l’appareil.
13. Entretien — N’essayez pas de réparer vous-même l’appareil. Le démontage des couvercles peut vous exposer à une
haute tension ou à d’autres dangers. Conez toute réparation à un personnel qualié.
14. Réparation — Dans les cas suivants, débranchez le cordon d’alimentation au niveau de la prise d’alimentation secteur et
demandez à un personnel qualié d’effectuer les réparations.
a. Dégât sur le cordon ou la prise de courant.
b. Inltration d’un liquide ou pénétration d’un objet à l’intérieur de l’appareil.
c. Exposition de l’appareil à la pluie ou à l’eau.
d. Fonctionnement anormal malgré une conformité aux explications du mode d’emploi.
Ne réglez que les commandes dont il est fait mention dans le mode d’emploi. Un réglage incorrect des autres
commandes peut provoquer des dégâts qui nécessiteraient des réparations complexes par un technicien spécialisé.
e. Chute ou dégâts subis par l’appareil.
f. Tout changement notoire ou situation anormale de l’appareil indique qu’une réparation est nécessaire.
15. Pièces de rechange — Lorsque des pièces doivent être remplacées, assurez-vous que le technicien a utilisé les pièces
spéciées par le fabricant ou des pièces dont les performances et les caractéristiques sont identiques. Des changements
non autorisés de pièces peuvent entraîner un incendie, une électrocution et/ou d’autres dangers.
16. Contrôles de sécurité — Après une intervention d’entretien ou de réparation, demandez au technicien de procéder à un
contrôle pour être sûr que l’appareil peut être utilisé en toute sécurité.
17. Installation sur paroi — Si l’appareil doit être xé sur une paroi, installez-le en respectant la méthode recommandée par le
fabricant.
18. Sources de chaleur — Tenez l’appareil à l’écart de sources de chaleur, telles que radiateurs, dispositifs de chauffage,
poêles et autres appareils dégageant de la chaleur (y compris les amplicateurs).
19. Piles — Une utilisation incorrecte des piles peut les faire éclater ou prendre feu. Une pile qui fuit peut causer des corrosions
dans l’équipement, des salissures aux mains ou abîmer vos vêtements. An d’éviter ces problèmes, assurez-vous que les
précautions suivantes sont appliquées :
• Utilisez seulement des piles prescrites.
• Installez les piles en faisant bien attention aux polarités plus (+) et moins (-) des piles selon les instructions dans le
compartiment.
• Ne mélangez pas des piles usagées avec des neuves.
• Ne mélangez pas des piles de différents types. Les spécications de voltage des piles du même format peuvent varier.
• Remplacez rapidement une pile épuisée par une nouvelle.
• Si vous n’avez pas l’intention d’utiliser la télécommande pendant une longue période, retirez les piles.
• Si le liquide provenant d’une pile qui fuit touche votre peau ou vos habits, rincez immédiatement et complètement
les parties touchées. Si un œil est touché, faites immédiatement un bain d’œil plutôt que de le frotter et cherchez
immédiatement un traitement médical. Le liquide provenant de la fuite d’une pile qui atteint votre œil ou vos habits peut
causer une irritation de la peau ou des dommages à votre œil.
PRÉCAUTIONS DE SÉCURITÉ

FRANÇAIS
3
F
20. L’utilisation de ce moniteur ne doit pas entraîner des risques mortels ou des dangers qui pourraient provoquer directement
la mort, des dommages corporels, des dommages physiques sévères ou d’autres destructions, y compris dans le contrôle
des réactions nucléaires dans les installations nucléaires, dans le système médical de réanimation, et dans le contrôle de
lancement des missiles dans les systèmes d’armes.
21. N’entrez pas en contact direct avec les parties du produit ayant chauffé pendant de longues périodes. Il pourrait en résulter
des brûlures à basse température.
22.Nemodiezpasceproduit.
AVERTISSEMENT :
Il s’agit d’un appareil de classe A. Dans un environnement résidentiel, cet appareil peut provoquer des interférences
radioélectriques. Dans ce cas, il peut être demandé à l’utilisateur de prendre des mesures appropriées.
Un appareil de CLASSE I doit être raccordé à une prise de courant principal par une prise de terre.
AndesatisfaireauxnormesEMC,utiliserdescâblesblindéspourconnecterlesbornessuivantes:Borned’entréeHDMI,
borne d’entrée D-sub, bornes d’entrée/sortie RS-232C, borne de entrée DVI-D et bornes d’entrée/sortie DisplayPort.
Unmoniteurplacésurunsupportinstableestdangereuxenraisondesrisquesdechutequ’ilprésente.Denombreuses
blessures,touchantenparticulierlesenfants,peuventêtreévitéesenprenantquelquesprécautionssimples:
•Utiliserlesdispositifsdexationtelsquelessupportsmurauxfournisparlefabricant.
•Utiliseruniquementdesmeublescapablesd’accueillirlemoniteurentoutesécurité.
•Vérierquelemoniteurnedépassepasduborddumeublesurlequelilestposé.
•Nepasplacerlemoniteursurdesmeubleshauts,armoiresouétagères,parexemple,sansxerlemeubleconcernéetle
moniteur à un support approprié.
•Nepasintercalerdetissuoutouteautrematièreentrelemoniteuretlemeublesurlequelilestposé.
•Expliquerauxenfantsqu’ilestdangereuxdegrimpersurlesmeublespouratteindrelemoniteurousesboutonsde
commande.
•Cetéquipementn’estpasdestinéàêtreutilisédansdesendroitsoùilpeutyavoirdesenfantslaisséssanssurveillance.
En particulier pour la sécurité des enfants
- Ne laissez pas les enfants grimper sur ou jouer avec le moniteur.
- Ne placez pas le moniteur sur des meubles qui peuvent facilement se transformer en marches comme une commode avec
tiroirs.
-Souvenez-vousquelesenfantss’excitentsouventenvisionnantunprogramme,surtoutsurunmoniteur“plusgrandquela
normale”.Ilfautfaireensorted’installerlemoniteurlàoùilnepeutpasêtrepoussé,tiré,nibasculé.
-Ilfautfaireensortedeplacerleslsetlescâblesconnectésaumoniteurdefaçonàcequedesenfantscurieuxnepuissent
pas les tirer ni les saisir.
MESURES DE SÉCURITÉ
-
N’utilisezpaslemoniteurdansunendroitoùilyabeaucoup
depoussières,oùledegréd’humiditéestélevé,ouencore
làoùilpourraitsetrouverencontactavecdel’huileoude
la vapeur. Ne l’utilisez pas non plus dans un environnement
contenantdesgazcorrosifs(dioxydedesoufre,sulfure
d’hydrogène,dioxyded’azote,chlore,ammoniac,ozone,
etc.). Cela pourrait provoquer un début d’incendie.
- Assurez-vous que le moniteur ne se trouve pas en contact
avecdel’eauoud’autresuides.Assurez-vousqu’aucun
objet tel que des agrafes et des trombones ne pénètre
dans le moniteur, car cela pourrait provoquer un début
d’incendie ou un choc électrique.
- N’installez pas le moniteur au dessus des objets instables
ou dans des endroits peu sûrs. Faites attention que le
moniteurnereçoivepasdechocsviolentsnidefortes
vibrations. Provoquer la chute du moniteur ou le culbuter
peut l’endommager.
- N’utilisezpaslemoniteuràproximitéd’unappareilde
chauffageoudansdesendroitsoùlatempératureest
élevée, car cela pourrait conduire à un dégagement
excessifdechaleuretprovoquerundébutd’incendie.
- N’utilisezpaslemoniteurdansdesendroitsexposés
directement à la lumière du soleil. Il y a risque de
déformation et de dysfonctionnement du coffret de l’appareil
si le moniteur est utilisé à la lumière directe du soleil.
- Veillez à nettoyer fréquemment la poussière et les débris
accumulés sur les ouvertures de ventilation.
L’accumulation de poussière sur les ouvertures de
ventilation risque d’entraîner une surchauffe, un incendie
ou un dysfonctionnement.
- Il est recommandé de nettoyer l’intérieur du moniteur une
fois par an. L’accumulation de poussière à l’intérieur du
moniteur risque d’entraîner une surchauffe, un incendie
ou un dysfonctionnement. Faites nettoyer l’intérieur du
moniteurparunrevendeurSHARPouuncentrede
services autorisé.
- La prise d’alimentation secteur doit être installée près de
l’équipement et être facilement accessible.
Le cordon d’alimentation
- Utilisez seulement le cordon d’alimentation fourni avec le
moniteur.
- N’endommagez pas le cordon d’alimentation, ne déposez
pas d’objets lourds sur le cordon d’alimentation, ne tirez
pasdessusetnelepliezpasdemanièreexcessive.De
même, n’ajoutez pas de rallonges. Tout endommagement
du cordon d’alimentation peut provoquer un début
d’incendie ou un choc électrique.
- Ne branchez pas le cordon d’alimentation sur une prise
multiple. Ajouter une rallonge peut entraîner une surchauffe
et provoquer un début d’incendie.
- Ne débranchez pas ni ne branchez la prise d’alimentation
avec des mains humides. En ce faisant, vous risquez un
choc électrique.
-
Débranchez le cordon d’alimentation si l’équipement n’est pas
utilisé pendant une longue période.
- Ne tentez pas de réparer le cordon d’alimentation s’il est
coupé ou s’il ne fonctionne pas correctement. Veuillez
prendre contact avec le service après-vente et suivre ses
recommandations.

4
F
PRÉCAUTIONS POUR LE MONTAGE
• Ce produit est destiné à être utilisé en intérieur.
• Un support de montage compatible avec VESA est
nécessaire.
•
Comme le moniteur est lourd, consultez votre revendeur avant
l’installation, le démontage ou le déplacement du moniteur.
• Le montage du moniteur sur le mur demande des
compétences techniques spéciales et le travail doit être
fait par un revendeur agréé par SHARP. Vous ne devez
jamais tenter de faire ce travail vous-même. Notre société
déclinera toute responsabilité pour les accidents ou
blessures causés par un montage incorrect ou par une
mauvaise manipulation.
• Utilisez le moniteur perpendiculairement à la surface
horizontale.
•
Ce moniteur doit être utilisé sous une température ambiante
entre 0°C et 40°C.
• Faites attention aux températures élevées autour des
moniteurs.
S’il est difficile de laisser un espace suffisant pour une
raison ou pour une autre (installation du moniteur dans une
enceinte, par exemple) ou si la température ambiante est
susceptible de dépasser la plage de valeurs prévue (de 0 à
40°C), installez un ventilateur ou prenez d’autres mesures
appropriées pour maintenir la température ambiante dans
la plage de valeurs requise.
•
La température de fonctionnement du moniteur peut être
différente de celle des accessoires additionnels recommandés
par SHARP. Lorsque c’est le cas, veuillez vérifier la
température de fonctionnement des accessoires additionnels.
•
Ne bloquez pas les ouvertures de ventilation. Si la température dans
le moniteur s’élève, ceci pourrait causer un dysfonctionnement.
•
Ne placez le moniteur sur un équipement qui dégage de la chaleur.
• Respectez la condition suivante quand vous installez le
moniteur dans la direction verticale. Le non respect de
cette condition peut causer des dysfonctionnements.
- Pour installer le moniteur horizontalement, faites pivoter
ce dernier de 90° vers la droite.
- Réglez le PORTRAIT/LANDSCAPE INSTALL <INSTALL.
PORTRAIT/PAYSAGE> sur PORTRAIT dans le menu
MONITOR <MONITEUR>. (Voir le MODE D’EMPLOI.)
- Veillez à accrocher le cordon d’alimentation (fourni) sur
la xation du serre-câble à l’aide du serre-câble fourni.
Lorsque vous accrochez le cordon d’alimentation, veillez
à ne pas exercer une force excessive sur la borne du
cordon d’alimentation. Ne pliez pas excessivement le
cordon d’alimentation.
Cordon
d’alimentation
(fourni)
Serre-câbles
Fixation du serre-câble
• Un mur vidéo ne doit être composé que de modèles
identiques. N’utilisez pas ce moniteur dans un mur vidéo
comportant un autre modèle.

FRANÇAIS
5
F
Composants fournis
Si un composant venait à manquer, veuillez contacter votre revendeur.
Moniteur à cristaux liquides : 1
Serre-câble : 4
Serre-câble (type de xation) : 2
Cordon d’alimentation
CD-ROM (Utility Disc pour Windows) : 1
Manuel d’Installation (ce manuel) : 1
Autocollant de masquage de l’orice de montage du boîtier du capteur de télécommande : 2
* L’unité de la télécommande est fournie avec le kit de contrôle PN-ZR02 (en option).
* SHARP Corporation détient les droits d’auteur du programme de l’Utility Disc.
Veuillez ne pas le reproduire sans autorisation de la société.
* Pensez à votre environnement !
Ne pas jeter les piles avec les ordures ménagères; la mise au rebut des piles exige un traitement spécial.
Connexions
Attention
• Veillez à bien mettre hors tension l’interrupteur principal puis débranchez la prise de l’alimentation secteur avant de connecter
ou de déconnecter les câbles. Lisez également le manuel de l’équipement à connecter.
• Veillez à ne pas confondre la borne d’entrée avec la borne de sortie quand vous connectez les câbles. En confondant les
câbles branchés aux bornes d’entrée et de sortie, vous pouvez causer des dysfonctionnements et d’autres problèmes.
1. Borne de sortie DisplayPort
2. Borne d’entrée HDMI1
3. Borne d’entrée HDMI2
4. Borne d’entrée DisplayPort
5. Borne d’entrée DVI-D
6. Borne d’entrée D-sub
7. Borne d’entrée audio
8. Borne de sortie audio
9. Borne d’entrée RS-232C
10. Borne de sortie RS-232C
11. Borne LAN
12. Borne du récepteur de télécommande
13. Borne d’entrée secteur
Conseils
• Réglez la borne d’entrée audio utilisée pour chaque mode d’entrée dans AUDIO SELECT <SÉLECTION ENTRÉE AUDIO>
du menu SETUP <INSTALLATION>. Les réglages par défaut sont indiqués ci-dessous.
Mode d’entrée Borne d’entrée audio (paramètre d’origine)
DVI-D Borne d’entrée audio
DisplayPort Borne d’entrée DisplayPort
HDMI1 Borne d’entrée HDMI1
HDMI2 Borne d’entrée HDMI2
D-SUB[RGB] <D-SUB [RVB]>,
D-SUB[COMPONENT] <D-SUB [COMPOSANT]>
Borne d’entrée audio
OPTION * Logement d’extension
* Quand vous avez utilisé le logement d’extension pour augmenter les fonctions.
• Les termes HDMI et High-Denition Multimedia Interface ainsi que le logo HDMI sont des marques commerciales ou des
marques déposées de HDMI Licensing Administrator, Inc. aux États-Unis et dans d’autres pays.
• DisplayPort est une marque déposée de Video Electronics Standards Association.
• Adobe, Acrobat et Acrobat Reader sont des marques de commerce ou des marques déposées de la société Adobe Systems
Incorporated aux Etats-Unis et/ou dans d’autres pays.
• Toutes les autres marques et les noms de produits sont des marques commerciales ou des marques déposées par les
compagnies respectives.
13
78 9
1
2
3
4
5
6
10 11 12
Vers la prise
d’alimentation
secteur
Cordon d’alimentation (fourni)

6
F
Connexion de plusieurs moniteurs
Les moniteurs peuvent être alignés et utilisés comme un seul
grand écran.
[Exemple]
Second moniteur
Esclave
(moniteur suppl.)
N° ident. : 2
Troisième moniteur
Esclave
(moniteur suppl.)
N° ident. : 3
Premier moniteur
Maître
(moniteur principal)
N° ident. : 1
Quatrième moniteur
Esclave
(moniteur suppl.)
N° ident. : 4
Boîtier du capteur de télécommande
(fournie avec le PN-ZR02 (optionnel))
* Toujours installer le boîtier du capteur de télécommande
sur le moniteur maître.
n
Connexion avec le câble vidéo
Vous pouvez raccorder jusqu’à 25 moniteurs* en série.
*: Jusqu’à 4 moniteurs lorsque le signal vidéo est chiffré par
HDCP.
Jusqu’à 4 moniteurs lorsque le mode d’entrée du
premier moniteur est D-SUB[COMPONENT] <D-SUB
[COMPOSANT]>.
Jusqu’à 2 moniteurs lorsque le mode d’entrée du premier
moniteur est DisplayPort (MST).
Borne de sortie
DisplayPort
Borne
d’entrée
DisplayPort
Borne
d’entrée
DisplayPort
Premier moniteur Second moniteur
Vers la borne de sortie DisplayPort
Câble DisplayPort prenant en charge 4K
(en vente dans le commerce)
montre le sens de
circulation du signal.
n
Connexion avec le câble RS‑232
Si vous connectez le moniteur en série à l’aide des câbles
RS-232, les réglages sont copiés du moniteur maître (moniteur
principal) vers le moniteur esclave (moniteur supplémentaire)
et il est possible de contrôler tous les moniteurs depuis le
moniteur maître.
Connectez les câbles du RS-232 dans l’ordre, en commençant
par le premier moniteur (moniteur maître).
Si les moniteurs sont connectés dans un ordre différent ils
peuvent ne pas fonctionner.
Câble direct RS-232
(en vente dans le commerce)
Premier moniteur : maître
Second moniteur : esclave
Troisième moniteur : à brancher sur le port
d’entrée RS-232C du moniteur esclave
Borne
d’entrée
RS-232C
Borne de sortie
RS-232C
Borne de
sortie
RS-232C
Connectez de la même manière le troisième et les moniteurs
suivants.
Il est possible de raccorder jusqu’a 25 moniteurs. (En
fonction de la longueur du câble utilisé et des conditions
environnantes.)
Un numéro d’identication spécique doit être affecté à
chaque moniteur.
Contrôlez le système à l’aide des boutons à l’arrière du
moniteur maître.
Pour attribuer automatiquement des numéro d’identication
dans l’ordre à partir du moniteur maître, réglez AUTO
ASSIGN ID No. <ATTRIBUTION AUTO ID NO.> sur ON
sur ID SETTING <RÉGLAGE ID> dans le menu SETUP
<INSTALLATION>.
Connexions

FRANÇAIS
7
F
Connexions
n
Montage du récepteur de télécommande
(optionnel) sur le moniteur
Le récepteur de télécommande PN-ZR02 (optionnel) est
nécessaire pour pouvoir contrôler le moniteur à l’aide de la
télécommande.
Fixez le boîtier du capteur de télécommande, comme illustré
ci-dessous.
Pour le moniteur en
position horizontale
Pour le moniteur en
position verticale
Attention
• Lors de la xation du boîtier du capteur de télécommande,
ETEIGNEZ l’interrupteur principal.
• Branchez les moniteurs en série à l’aide d’un câble RS-
232.
1. Décollez l’autocollant (
) placé sur l’orice de
montage du boîtier du capteur de télécommande.
2. Fixez le bras de xation en insérant la vis de montage à
l’intérieur de l’orice de montage du boîtier du capteur
de la télécommande.
3. Réglez l’angle du boîtier du capteur de télécommande
et xez ce dernier à l’aide de la vis de xation de
manière à ce qu’il reçoive avec précision les signaux
transmis par la télécommande.
Réglage de l’angle
Bras de fixation
Vis de montage
Vis de fixation
Boîtier du capteur
de télécommande
Orifice de montage du
boîtier du capteur de
télécommande
4. Insérez le câble de connexion du boîtier du capteur
de télécommande dans la borne du récepteur de
télécommande.
Boîtier du capteur
de télécommande
Câble de
connexion
Borne du récepteur
de télécommande
Mise en place des piles
1. Placer votre doigt sur la pièce marquée d’un ▲, puis
tirer pour enlever le couvercle.
2. Reportez‑vous aux instructions dans le compartiment
et insérez les piles (2 piles du format R‑03, ou “AAA”)
(fournies avec le PN‑ZR02 (optionnel)) en veillant à
respecter les polarités.
3. Refermer le capot.

8
F
Attention
• Mettez sous tension le moniteur d’abord avant de mettre
sous tension l’ordinateur ou l’équipement de lecture.
• Lors de la mise hors tension et de la remise sous tension,
ou lorsque vous appuyez sur l’interrupteur principal ou le
bouton POWER, attendez toujours au moins 5 secondes.
Un court intervalle peut entraîner un dysfonctionnement.
Mise sous tension de l’interrupteur
principal
Interrupteur principal
Attention
• La mise sous/hors tension doit être effectuée à l’aide de
l’interrupteur principal. Ne branchez/débranchez pas le
cordon d’alimentation ou ne mettez pas le disjoncteur sous/
hors tension lorsque l’interrupteur d’alimentation est en
position marche.
• Pour déconnecter complètement l’alimentation électrique,
retirez la che principale de la prise.
Mise sous tension et hors tension
Mise sous/hors tension
Appuyez sur le bouton POWER pour mettre sous/hors
tension.
Vous pouvez également mettre sous/hors tension en appuyant
sur le bouton MONITOR ON/bouton MONITOR OFF de la
télécommande.
Diode d’alimentation Bouton POWER
(alimentation)
État État du moniteur
Allumé en vert Power en position marche
Allumé en orange
Power en position arrêt
(mode veille)
Clignotement en vert
Mode attente du signal
d’entrée
Seite wird geladen ...
Seite wird geladen ...
Seite wird geladen ...
Seite wird geladen ...
Seite wird geladen ...
Seite wird geladen ...
Seite wird geladen ...
Seite wird geladen ...
Seite wird geladen ...
Seite wird geladen ...
Seite wird geladen ...
Seite wird geladen ...
Seite wird geladen ...
Seite wird geladen ...
Seite wird geladen ...
Seite wird geladen ...
Seite wird geladen ...
Seite wird geladen ...
Seite wird geladen ...
Seite wird geladen ...
Seite wird geladen ...
Seite wird geladen ...
Seite wird geladen ...
Seite wird geladen ...
Seite wird geladen ...
Seite wird geladen ...
Seite wird geladen ...
Seite wird geladen ...
Seite wird geladen ...
Seite wird geladen ...
Seite wird geladen ...
Seite wird geladen ...
Seite wird geladen ...
Seite wird geladen ...
Seite wird geladen ...
Seite wird geladen ...
-
 1
1
-
 2
2
-
 3
3
-
 4
4
-
 5
5
-
 6
6
-
 7
7
-
 8
8
-
 9
9
-
 10
10
-
 11
11
-
 12
12
-
 13
13
-
 14
14
-
 15
15
-
 16
16
-
 17
17
-
 18
18
-
 19
19
-
 20
20
-
 21
21
-
 22
22
-
 23
23
-
 24
24
-
 25
25
-
 26
26
-
 27
27
-
 28
28
-
 29
29
-
 30
30
-
 31
31
-
 32
32
-
 33
33
-
 34
34
-
 35
35
-
 36
36
-
 37
37
-
 38
38
-
 39
39
-
 40
40
-
 41
41
-
 42
42
-
 43
43
-
 44
44
-
 45
45
-
 46
46
-
 47
47
-
 48
48
-
 49
49
-
 50
50
-
 51
51
-
 52
52
-
 53
53
-
 54
54
-
 55
55
-
 56
56


Sharp PNV701A Bedienungsanleitung
- Typ
- Bedienungsanleitung
- Dieses Handbuch eignet sich auch für
in anderen Sprachen
- English: Sharp PNV701A Owner's manual
- français: Sharp PNV701A Le manuel du propriétaire
- español: Sharp PNV701A El manual del propietario
- русский: Sharp PNV701A Инструкция по применению
Verwandte Artikel
-
Sharp PN-V551 Bedienungsanleitung
-
Sharp PN-E603 Bedienungsanleitung
-
Sharp PNV602A Bedienungsanleitung
-
-
Sharp PN-V602 Bedienungsanleitung
-
Sharp PNR496 Bedienungsanleitung
-
-
Sharp PNR603 Bedienungsanleitung
-
Sharp PN-R903A Bedienungsanleitung
-
Sharp PN-85TH1 Bedienungsanleitung