Lionelo Bastiaan One Baby car seat Benutzerhandbuch
- Kategorie
- Autositze
- Typ
- Benutzerhandbuch

‑ 1 ‑
Bas aan One
Baby car seat
Fotelik smochodowy
Kindersitz
Детское автокресло
Seggiolino auto per bambini
Siège-auto bébé
Silla de coche
Autostoeltje
Automobilinė kėdutė
Autosedačka
Autós gyermekülés
Scaun auto
Seggiolino auto per bambini
www.lionelo.com
Manual de usuario
Handleiding
Naudojimo instrukcija
Návod k obsluze
Használa utasítás
Manual u lizare
User manual
Instrukcja obsługi
Bedienungsanleitung
Инструкция по эксплуатации
Manuale d’uso
Manuel de l’U lisateur

‑ 2 ‑
12
3

‑ 3 ‑
3
4

‑ 4 ‑
56
7
8

‑ 5 ‑
9
10
11
12

‑ 6 ‑
14
15
16
17
18
13

‑ 7 ‑
19 20
22
21

‑ 8 ‑
23 24a
25
26
24b

‑ 9 ‑ EN
NOTICE
When using for groups 0+, I, II, III, „universal” category:
The child restraint system is categorized as „universal”. It has been
granted a cercate of approval in accordance with the regulaons
no. 44, amendments series 04, for general use in vehicles and is t for
installaon on most car seats.
A proper installaon is possible if the vehicle manufacturer has declared
in the vehicle manual that this vehicle is t for installaon of the child
restraint system in „universal” category for this age group.
This child restraint system has been classied as „universal” in more
demanding condions than condions applicable in previous designs
not supplied with this informaon.
In case of any doubts, please consult the manufacturer or retailer of the device.
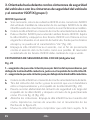
When using for groups 0+, I, II, III, „semi-universal” category”:
This child restraint system has been classied for use in „semi-universal”
categories and is t for installaon on seats in the following cars:
CAR FRONT REAR
Outer Centre Outer Centre
(model) NO NO YES NO
The model list is at the end of the user manual.
This device may be t for installaon also on seats of other car models. In
case of any doubts, please consult the manufacturer or retailer of the device.
It is t for installaon only when cered vehicles are equipped with three-point
safety belts with retractor which have been granted a cercate of approval in
accordance with the regulaons UN/ECG no. 16 or other equivalent standards.
If assembled in a rear-facing posion: do not assemble the child safety
seat on seats equipped with airbags.
EN

‑ 10 ‑EN
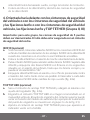
As for ISOFIX installaon:
NOTE
1.
It is ISOFIX CHILD RESTRAINT SYSTEM. It has been granted a cercate
of approval in accordance with the regulaons no. 44, amendments
series 04 for general use in vehicles equipped with ISOFIX system.
2.
It ts vehicles with posions approved as ISOFIX posions (pursuant
to the vehicle operang manual), depending on child safety seat
category and xing.
3.
ISOFIX weight group and size class the device is intended for: D
(groups 0+, I)
Dear customer!
Before you use the child safety seat for the rst me, please read this
manual carefully.
Should you have any remarks or quesons concerning the product, please
do not hesitate to contact us: [email protected]om
The product is allowed for ECE R44/04 as the safety seat for weight
categories 0+, I, II and III (0-36kg).
A failure to follow the manual may lead to accidents. The product
must always be used and installed in the way described in this manual.
Producer:
BrandLine Group Sp. z o. o.
ul. A. Kręglewskiego 1, 61-248 Poznań, Poland
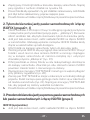
IMPORTANT
Please read this manual before the rst use and keep it. The manual
provides a descripon on how to assemble the safety seat properly. An
unsuitable assembly may pose a threat to child’s heath. The manufacturer
shall not be held responsible for potenal hazards caused by unsuitable
assembly of the safety seat.

‑ 11 ‑ EN
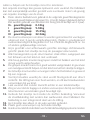
1. This safety seat is intended for weight categories (groups) 0+, I, II
i III, which means that it can be used by children whose weight does
not exceed 36 kg (aged up to 11).
0+ weight group: 0-13kg
I weight group: 9-18kg
II weight group: 15-25kg
III weight group: 22-36kg
2.
The safety seat is intended for vehicles equipped with 3-point
safety seats granted a cercate of approval in accordance with
the Regulaons no. 16 ECG/UN or other equivalent standards.
3.
Applies to rear-facing installaons only: Do not place the safety seat
on the front passenger’s seat when the passenger’s airbag is acve.
4.
All safety seat belts must be ght, adapted to child’s body and must
not be twisted.
5.
All lap belts must be carried low so that the child’s pelvis is properly supported.
6.
Buckles must be done up properly and securely. In case of emergency,
a proper assembly of buckles lets you take the child out of the safety
seat easily.
7.
The device must be replaced if subject to rapid loads during accident.
8. Do not modify the product in any way.
9.
Avoid situaons in which the safety seat is exposed to direct sunlight.
Otherwise it may heat up and in eect cause the child to scald itself.
10.
Do not leave the child in the safety seat unaended. Make sure
the luggage and other items which may lead to injuries in case of
accident have been secured.
11.
Do not use the safety seat without material cover. Do not replace
the cover with other than recommended by the manufacturer. The
cover is an integral part of the safety seat.
12. The safety seat must be used in the car only.
13. It is forbidden to place any items on the child’s safety seat.
14.
Hard elements and plasc parts of the child holding device must be
placed and installed in a way that they are not trapped by a movable
seat and vehicle door during regular operaon of the vehicle.
15.
Before every travel, make sure the safety seat has been properly
and securely mounted.

‑ 12 ‑EN
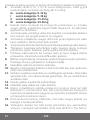
16. During the travel, the safety seal must be properly aached to the
car’s seat by means of the car safety belt or ISOFIX and Top Tether,
even when there is no child.
17.
Do not use load bearing points of contact other than those described
in the instrucons and marked on the child restraint
18.
For rearward facing installaon: do not install the child seat on
seats with airbags.
19. Install the rearward-facing seat if the child weighs less than 9 kg
20.
If in doubt about the posion of the adult seat belt buckle in relaon
to major load-bearing contact points, contact the manufacturer.
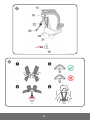
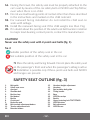
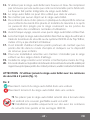
CAUTION!
Never use the safety seat with 2-point seat belts (g. 1).
g. 2
Suitable posion of the safety seat in the car
Not suitable posion of the safety seat in the car
?1 Place the safety seat facing forward. Do not place the safety seat
on the passenger’s front seat when the passenger’s airbag is acve
?2 Installaon is possible only if three-point seat belts and ISOFIX
anchorages are present.
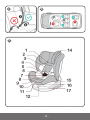
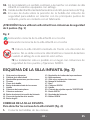
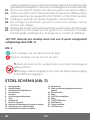
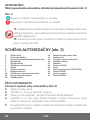
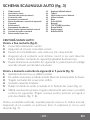
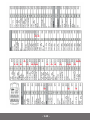
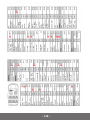
SAFETY SEAT OUTLINE (g. 3)
1. Belt guide
2. Safety seat cover
3. Arm pad
4. Shoulder belt
5. Buckle clasp
6. Red buon
7. Buckle
8. Crotch pad
9. Reducon pad
10. Belt tension adjustment buon
11. Tension adjustment belt
12. Rotaon buon
13. Headrest height adjustment
14. Headrest
15. Red and blue belt guide
16. Tilng handle
17. Base
18. ISOFIX overlays
19. Buckle
20. Upper fastening belt TOPTETHER
21. ISOFIX buon
22. Belt adjustment
23. ISOFIX arms

‑ 13 ‑ EN
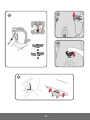
SAFETY SEAT BELTS
To fasten belts in the safety seat (g. 4):
1. Connect belt clasps together.
2. Make sure the connecon is proper
3. Insert them into the fastening, you will hear a disncve click.
4.
Make sure the belts have been properly ghtened and are not
twisted. To undo the belts, press the red buon.
5.
Aer undoing the seat belts, you can put them in special hooks
located on the side of the seat.
To disassemble 5-point belts of the safety seat (g. 5):
1. Press the red buon and loosen the belts.
2.
Remove the loose belts from the connectors in the back of the
safety seat.
3. Take the belts from the safety seat through holes.
4. Remove arm pads.
5.
Roll up shoulder belts and place them in the safety seat holes (g. 6).
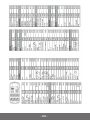
6.
Loosen the crotch belt, take the buckle located under the safety
seat and remove the belt. Pull the crotch belt and pull through the
hole (g. 7, 8).
To assemble the belts again, retake the acons above in reversed order.
Make sure the belts have been properly inserted in the buckles and are
not twisted (g. 9).
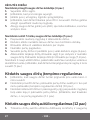
Safety seat belts tension adjustment
1. Make sure the safety seat belts t ght to the child’s body and are
not twisted.
2. To ghten the belts, pull the shoulder belts upwards and pull the
tension adjustment belt at the same me (g. 10).
3.
To loosen the belts and adjust their length, press the buon between
the child’s legs and pull the shoulder arms. Make sure you pull the
belts, not shoulder pads (g. 11).

‑ 14 ‑EN
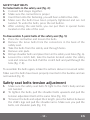
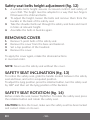
Safety seat belts height adjustment (g. 12)
1.
A suitable belts height assures increased comfort and safety of
your child. The height must be adapted in a way that two ngers
t between the child and belts.
2. To adjust the height, loosen the belts and remove them from the
buckles in the back of the safety seat.
3.
Take the shoulder belts out through the safety seat holes and insert
in holes at relevant height.
4. Assemble the belts in buckles again.
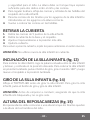
REMOVING COVER
1. Remove 5-point belts of the safety seat.
2. Remove the cover from the base and backrest.
3. Set a top posion of the headrest.
4. Remove the cover.
To apply the cover again, retake the aforesaid acons
in reversed order.
NOTE: Never use the safety seat without the cover.
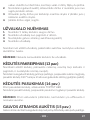
SAFETY SEAT INCLINATION (g. 13)
To incline the safety seat, grab the handle located between the safety
seat and base, and set in a required posion.
To adjust the lying posion, press the rotaon buon, turn the safety seat
by 180° and then set the lying posion of the backrest.
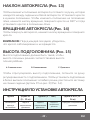
SAFETY SEAT ROTATION (g. 14)
Before rotate the seat, loosen TopTether. To rotate the safety seat, press
the rotaon buon and rotate the safety seat.
CAUTION: Before the travel, make sure the safety seat has been locked
and cannot rotate on its own.

‑ 15 ‑ EN
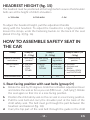
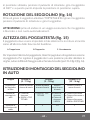
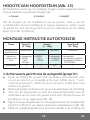
HEADREST HEIGHT (g. 15)
The headrest must be posioned at the height which assures that shoulder
belts are at the height of child’s shoulders.
A. TOO LOW B. TOO HIGH C. OK
To adjust the headrest height, pull the adjustment handle
along with the headrest. To adjust the headrest to a higher posion:
loosen the straps, undo the fastening buckle on the back of the seat
(detail 19 in g. 3) (g. 16)
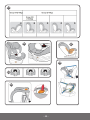
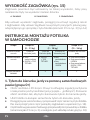
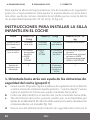
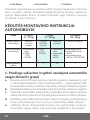
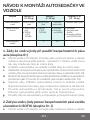
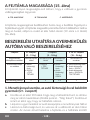
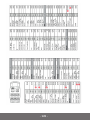
HOW TO ASSEMBLE SAFETY SEAT IN
THE CAR
Group Group 0+
(0 – 13 kg)
Group I
(9 – 18 kg)
Group II and III (15
– 36 kg)
Posion of child safety
seat in the car
Rear-facing
posion
Rear-facing
posion
Forward-fac-
ing posion
Forward-facing
posion
How to install in
the car
• Seat belts
• ISOFIX
+ TOP
TETHER
• ISOFIX
+ TOP
TETHER
• Seat belts
• Seat belts
and ISOFIX
• Seat belts
• Seat belts and
ISOFIX
• Seat belts, ISOFIX
and TOP TETHER
Seat inclinaon level 5 5 1-4 1
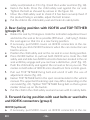
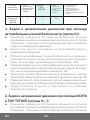
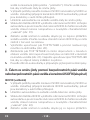
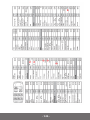
1. Rear-facing posion with seat belts (group 0+)
a.
Rotate the seat by 90 degrees. Grab the inclinaon adjustment lever
and incline the seat as far as you can (h level - „half-lying”). Rotate
the seat again so that it is in a rear-facing posion.
b.
Posion the child safety seat on the car seat in a rear-facing posion.
c.
Pull the seat belt and carry the shoulder part at the back of the
child safety seat. The belt must go through the part between the
headrest and backrest (g. 18).
d.
Carry the hip part of the seat belt through the guide in the child

‑ 16 ‑EN
safety seat (marked as 15 in g. 3) and then under seat liner (g. 18).
e.
Fasten the belts. Press the child safety seat against the car seat.
Tighten the belt as showed by arrows in the gure 18.
f. Move the child safety seat to check if it has been securely xed. If
the product xing is unstable, adjust the belt tension.
g. Put the child in the child safety seat and fasten its safety belts.
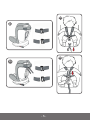
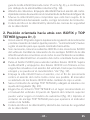
2. Rear-facing posion with ISOFIX and TOP TETHER
(groups 0+, I)
a.
Rotate the seat by 90 degrees. Grab the inclinaon adjustment lever
and incline the seat as far as possible (h level - „half-lying”). Rotate
the seat again so that it is in a rear-facing posion.
b.
If necessary, put ISOFIX covers on ISOFIX connectors in the car.
They help you sck ISOFIX fasteners when the car connectors are
hard to access.
c.
Posion the child safety seat on the car seat in a rear-facing posion.
d.
Press ISOFIX buon to pull out both ISOFIX arms. Grab the child
safety seat and slide two ISOFIX arms into fasteners located in the car
seat unl they engage and you can hear a disncve „click” (g. 19).
e.
Push the child safety seat against the car seat as far as you can. The
marker on both sides of ISOFIX arms should turn from red into green.
f.
Pull out TOP TETHER xing belt and unroll it with the use of
adjustment device (g. 20).
g. Fasten TOP TETHER belt in the spot recommended in the vehicle
manual. The upper belt fastening spot may dier, depending on the
car model (g. 21). Tighten TOP TETHER xing belt so that a green
marker shows up on the buckle.
h.
Put the child in the child safety seat and secure with its safety belts.
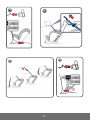
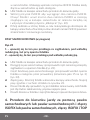
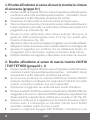
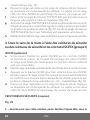
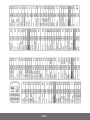
3. Forward-facing posion with seat belts or seat belts
and ISOFIX connectors (group I)
ISOFIX (oponal)
a.
If necessary, put ISOFIX covers on ISOFIX connectors in the car.

‑ 17 ‑ EN
They help you sck ISOFIX fasteners when car connectors are
hard to access.
b.
Posion the child safety seat on the car seat in a forward-facing posion.
c.
Press ISOFIX buon to pull out both ISOFIX arms. Grab the child
safety seat and slide both ISOFIX arms into fasteners located in the car
seat unl arms engage and you can hear a disncve „click” (g. 22).
d. Push the child safety seat against the car seat as far as you can. The
marker on both sides of ISOFIX arms should turn from red into green.
CAR SEATS (required)
Fig. 23
1 – make sure this belt goes behind the headrest, under seat liner,
just by the child safety seat backrest.
2 – make sure this belt goes under the seat liner.
a.
Posion the child safety seat on the car seat in a forward-facing posion.
b. Pull the car seat and carry its shoulder part between the headrest
and backrest of the child safety seat (g. 23).
c.
Carry the hip part of the car seat along the child safety seat backrest
and then through the guide (marked as 15 in g. 3) (g. 23).
d.
Fasten the belts. Press the child safety seat against the car seat.
Tighten the belts as showed by arrows in gure 23.
e. Move the child safety seat to check if it has been securely xed. If
xing of the child safety seat is unstable, adjust belt tension.
f.
Put the child in the child safety seat and secure with its safety belts.
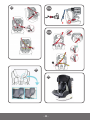
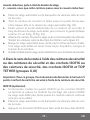
4. Forward-facing posion with seat belts or seat belts
and ISOFIX connectors or seat belts, ISOFIX connectors
and TOP TETHER (groups II, III)
Important: for this group disassemble 5-point safety belts. The child
must be secured with car seat belt.

‑ 18 ‑EN
ISOFIX (oponal)
a.
If necessary, put ISOFIX covers on ISOFIX connectors in the car.
They help you sck ISOFIX fasteners when car connectors are
hard to access.
b.
Posion the child safety seat on the car seat in a forward-facing posion.
c. Press ISOFIX buon to pull out both ISOFIX arms. Grab the child
safety seat and slide two ISOFIX arms into fasteners located in the
car seat unl they engage and you can hear a disncve „click”.
d.
Push the child safety seat against the car seat as far as you can.
The marker on both sides of ISOFIX arms should turn from red into
green (g. 24a).
TOP TETHER (oponal)
a.
Pull out TOP TETHER xing belt and unroll it with the use of
adjustment device (g. 24a).
b.
Fasten TOP TETHER in the spot recommended in the vehicle manual.
The upper belt fastening spot may dier, depending on the car model
(the example of locaon of fastening spots has been showed in the
example of group 0+ in g. 21).
c. Fasten TOP TETHER xing belt so that a green indicator shows up
on the buckle
CAR SEAT BELTS (required)
a.
Posion the child safety seat on the car seat in a forward-facing posion.
b. Put the child in the child safety seat.
c. Pull the car seat belt and carry its shoulder part through belt guide
in the headrest (element marked as 1 in g. 3).
d. Carry the hip part of the car seat belt through the guide (marked
as 15 in g. 3) (g. 24b).
e.
Fasten the belts. Press the child safety seat against the car seat.
Tighten the belts as showed by arrows in gure 24b. Make sure
they are not too ght and do not limit the child.
f. Move the child safety seat to check it is has been securely xed. If
xing of the product is unstable, adjust the belt tension.

‑ 19 ‑ EN | PL
Make sure the shoulder belt goes between points marked in g. 24B as
a and b, that is between the child’s neck and arm
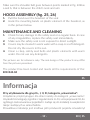
HOOD ASSEMBLY (g. 25, 26)
1. Pull the hood over the headrest of the seat
2.
Hook the mounng bands on plasc element of the headrest, as
in the picture below.
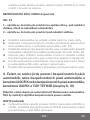
MAINTENANCE AND CLEANING
1. Check for any damage to the safety seat on a regular basis. In case
of any irregularies, replace the safety seat immediately.
2. Make sure the safety seat is not exposed to direct sunlight.
3.
Covers may be cleaned in warm water with a soap or a so detergent.
Do not dry the covers in the sun.
4.
Clean a clasp, safety seat belts and plasc elements with warm
water. Do not use any detergents.
The pictures are for reference only. The real design of the products may dier
from the pictures presented.
The product has been tested and meets all the requirements of the:
ECE R44.04
PL
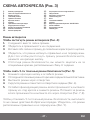
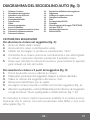
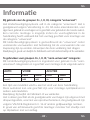
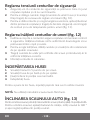
Informacja
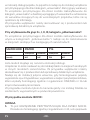
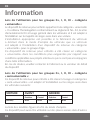
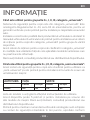
Przy użytkowaniu dla grup 0+, I, II, III, kategoria „uniwersalne”:
Urządzenie przytrzymujące dla dzieci należy do kategorii „uniwersalne”.
Uzyskało homologację zgodnie z regulaminem nr 44, seria poprawek 04, do
ogólnego zastosowania w pojazdach i nadaje się do instalacji na większości
miejsc siedzących w samochodzie.
Prawidłowa instalacja jest możliwa jeśli producent pojazdu oświadczył

‑ 20 ‑PL
w instrukcji obsługi pojazdu, że pojazd ten nadaje się do instalacji urządzenia
przytrzymującego dla dzieci kategorii „uniwersalne” dla tej grupy wiekowej.
To urządzenie przytrzymujące dla dzieci zostało zaklasykowane do
kategorii „uniwersalne” w bardziej wymagających warunkach w odniesieniu
do warunków stosujących się do wcześniejszych projektów, które nie są
opatrzone tą informacją.
W przypadku wątpliwości należy skonsultować się z producentem lub
sprzedawcą detalicznym urządzenia.
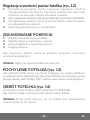
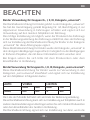
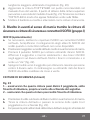
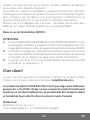
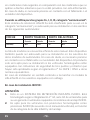
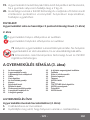
Przy użytkowaniu dla grup 0+, I, II, III, kategoria „półuniwersalne”:
To urządzenie przytrzymujące dla dzieci zostało zaklasykowane do
użycia w kategoriach „półuniwersalne” i nadaje się do zainstalowania
w miejscach siedzących w następujących samochodach:
SAMOCHÓD PRZÓD TYŁ
Zewnętrzne Środkowe Zewnętrzne Środkowe
(model) NIE NIE TAK NIE
Lista modeli znajduje się na końcu instrukcji obsługi.
Urządzenie to może nadawać się do instalacji także na miejscach siedzących
w innych modelach samochodów. W przypadku wątpliwości należy
skonsultować się z producentem lub sprzedawcą detalicznym urządzenia.
Nadaje się do instalacji jedynie wówczas, gdy homologowane pojazdy
wyposażone są w trzypunktowe, wyposażone w zwijacz pasy bezpieczeństwa,
które uzyskały homologację zgodnie z regulaminem ONZ/EKG nr 16 lub
innymi równoważnymi normami.
W przypadku montażu tyłem do kierunku jazdy: nie instaluj fotelika na
siedzeniach, wyposażonych w poduszki powietrzne.
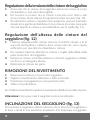
W przypadku montażu ISOFIX:
UWAGA
1.
To jest URZĄDZENIE PRZYTRZYMUJĄCE DLA DZIECI ISOFIX.
Posiada ono homologację zgodną z regulaminem nr 44, seria poprawek
Seite wird geladen ...
Seite wird geladen ...
Seite wird geladen ...
Seite wird geladen ...
Seite wird geladen ...
Seite wird geladen ...
Seite wird geladen ...
Seite wird geladen ...
Seite wird geladen ...
Seite wird geladen ...
Seite wird geladen ...
Seite wird geladen ...
Seite wird geladen ...
Seite wird geladen ...
Seite wird geladen ...
Seite wird geladen ...
Seite wird geladen ...
Seite wird geladen ...
Seite wird geladen ...
Seite wird geladen ...
Seite wird geladen ...
Seite wird geladen ...
Seite wird geladen ...
Seite wird geladen ...
Seite wird geladen ...
Seite wird geladen ...
Seite wird geladen ...
Seite wird geladen ...
Seite wird geladen ...
Seite wird geladen ...
Seite wird geladen ...
Seite wird geladen ...
Seite wird geladen ...
Seite wird geladen ...
Seite wird geladen ...
Seite wird geladen ...
Seite wird geladen ...
Seite wird geladen ...
Seite wird geladen ...
Seite wird geladen ...
Seite wird geladen ...
Seite wird geladen ...
Seite wird geladen ...
Seite wird geladen ...
Seite wird geladen ...
Seite wird geladen ...
Seite wird geladen ...
Seite wird geladen ...
Seite wird geladen ...
Seite wird geladen ...
Seite wird geladen ...
Seite wird geladen ...
Seite wird geladen ...
Seite wird geladen ...
Seite wird geladen ...
Seite wird geladen ...
Seite wird geladen ...
Seite wird geladen ...
Seite wird geladen ...
Seite wird geladen ...
Seite wird geladen ...
Seite wird geladen ...
Seite wird geladen ...
Seite wird geladen ...
Seite wird geladen ...
Seite wird geladen ...
Seite wird geladen ...
Seite wird geladen ...
Seite wird geladen ...
Seite wird geladen ...
Seite wird geladen ...
Seite wird geladen ...
Seite wird geladen ...
Seite wird geladen ...
Seite wird geladen ...
Seite wird geladen ...
Seite wird geladen ...
Seite wird geladen ...
Seite wird geladen ...
Seite wird geladen ...
Seite wird geladen ...
Seite wird geladen ...
Seite wird geladen ...
Seite wird geladen ...
Seite wird geladen ...
Seite wird geladen ...
Seite wird geladen ...
Seite wird geladen ...
Seite wird geladen ...
Seite wird geladen ...
Seite wird geladen ...
Seite wird geladen ...
Seite wird geladen ...
Seite wird geladen ...
Seite wird geladen ...
Seite wird geladen ...
Seite wird geladen ...
Seite wird geladen ...
Seite wird geladen ...
Seite wird geladen ...
Seite wird geladen ...
Seite wird geladen ...
Seite wird geladen ...
Seite wird geladen ...
Seite wird geladen ...
Seite wird geladen ...
Seite wird geladen ...
Seite wird geladen ...
Seite wird geladen ...
Seite wird geladen ...
Seite wird geladen ...
Seite wird geladen ...
Seite wird geladen ...
Seite wird geladen ...
Seite wird geladen ...
Seite wird geladen ...
Seite wird geladen ...
Seite wird geladen ...
Seite wird geladen ...
Seite wird geladen ...
Seite wird geladen ...
Seite wird geladen ...
Seite wird geladen ...
Seite wird geladen ...
Seite wird geladen ...
Seite wird geladen ...
Seite wird geladen ...
Seite wird geladen ...
Seite wird geladen ...
Seite wird geladen ...
Seite wird geladen ...
Seite wird geladen ...
-
 1
1
-
 2
2
-
 3
3
-
 4
4
-
 5
5
-
 6
6
-
 7
7
-
 8
8
-
 9
9
-
 10
10
-
 11
11
-
 12
12
-
 13
13
-
 14
14
-
 15
15
-
 16
16
-
 17
17
-
 18
18
-
 19
19
-
 20
20
-
 21
21
-
 22
22
-
 23
23
-
 24
24
-
 25
25
-
 26
26
-
 27
27
-
 28
28
-
 29
29
-
 30
30
-
 31
31
-
 32
32
-
 33
33
-
 34
34
-
 35
35
-
 36
36
-
 37
37
-
 38
38
-
 39
39
-
 40
40
-
 41
41
-
 42
42
-
 43
43
-
 44
44
-
 45
45
-
 46
46
-
 47
47
-
 48
48
-
 49
49
-
 50
50
-
 51
51
-
 52
52
-
 53
53
-
 54
54
-
 55
55
-
 56
56
-
 57
57
-
 58
58
-
 59
59
-
 60
60
-
 61
61
-
 62
62
-
 63
63
-
 64
64
-
 65
65
-
 66
66
-
 67
67
-
 68
68
-
 69
69
-
 70
70
-
 71
71
-
 72
72
-
 73
73
-
 74
74
-
 75
75
-
 76
76
-
 77
77
-
 78
78
-
 79
79
-
 80
80
-
 81
81
-
 82
82
-
 83
83
-
 84
84
-
 85
85
-
 86
86
-
 87
87
-
 88
88
-
 89
89
-
 90
90
-
 91
91
-
 92
92
-
 93
93
-
 94
94
-
 95
95
-
 96
96
-
 97
97
-
 98
98
-
 99
99
-
 100
100
-
 101
101
-
 102
102
-
 103
103
-
 104
104
-
 105
105
-
 106
106
-
 107
107
-
 108
108
-
 109
109
-
 110
110
-
 111
111
-
 112
112
-
 113
113
-
 114
114
-
 115
115
-
 116
116
-
 117
117
-
 118
118
-
 119
119
-
 120
120
-
 121
121
-
 122
122
-
 123
123
-
 124
124
-
 125
125
-
 126
126
-
 127
127
-
 128
128
-
 129
129
-
 130
130
-
 131
131
-
 132
132
-
 133
133
-
 134
134
-
 135
135
-
 136
136
-
 137
137
-
 138
138
-
 139
139
-
 140
140
-
 141
141
-
 142
142
-
 143
143
-
 144
144
-
 145
145
-
 146
146
-
 147
147
-
 148
148
-
 149
149
-
 150
150
-
 151
151
-
 152
152


Lionelo Bastiaan One Baby car seat Benutzerhandbuch
- Kategorie
- Autositze
- Typ
- Benutzerhandbuch
in anderen Sprachen
- français: Lionelo Bastiaan One Baby car seat Manuel utilisateur
- español: Lionelo Bastiaan One Baby car seat Manual de usuario
- italiano: Lionelo Bastiaan One Baby car seat Manuale utente
- slovenčina: Lionelo Bastiaan One Baby car seat Používateľská príručka
- română: Lionelo Bastiaan One Baby car seat Manual de utilizare

