Emerio 123520 Bedienungsanleitung
- Kategorie
- Raclettes
- Typ
- Bedienungsanleitung
Dieses Handbuch eignet sich auch für


- 1 -
Content – Inhoud – Teneur – Inhalt – Treść – Obsah
Instruction manual – English ...................................................................................... - 2 -
Gebruiksaanwijzing – Dutch ....................................................................................... - 6 -
Mode d‘emploi – French .......................................................................................... - 11 -
Bedienungsanleitung – German ............................................................................... - 16 -
Instrukcja obsługi – Polish ........................................................................................ - 21 -
Návod k použití – Czech ........................................................................................... - 26 -

- 2 -
Instruction manual – English
SAFETY INSTRUCTIONS
Before use make sure to read all of the below instructions in
order to avoid injury or damage, and to get the best results
from the appliance. Make sure to keep this manual in a safe
place. If you give or transfer this appliance to someone else
make sure to also include this manual.
In case of damage caused by user failing to follow the
instructions in this manual the warranty will be void. The
manufacturer/importer accepts no liability for damages
caused by failure to follow the manual, a negligent use or use
not in accordance with the requirements of this manual.
1. This appliance can be used by children aged from 8 years
and above and persons with reduced physical, sensory or
mental capabilities or lack of experience and knowledge if
they have been given supervision or instruction concerning
use of the appliance in a safe way and understand the
hazards involved.
2. Children shall not play with the appliance.
3. Cleaning and user maintenance shall not be made by
children unless they are older than 8 years and supervised.
4. Keep the appliance and its cord out of reach of children less
than 8 years.
5. If the supply cord is damaged, it must be replaced by the
manufacturer, its service agent or similarly qualified
persons in order to avoid a hazard.
6. Regarding the instructions for cleaning the surfaces which
come in contact with food or oil, please refer to the
paragraph “cleaning and maintenance” of the manual.
7. This appliance is not intended to be operated by means of
an external timer or separate remote-control system.
8. Before inserting the plug into the mains socket, please
check that the voltage and frequency comply with the
specifications on the rating label.

- 3 -
9. Disconnect the mains plug from the socket when the
appliance is not in use and before cleaning.
10. Ensure that the mains cable is not hung over sharp edges
and keep it away from hot objects and open flames.
11. Do not immerse the appliance or the mains plug in water
or other liquids. There is danger to life due to electric shock!
12. To remove the plug from the plug socket, pull the plug. Do
not pull the power cord.
13. Do not touch the appliance if it falls into water. Remove the
plug from its socket and send it to an authorized service
center for repair.
14. Do not plug or unplug the appliance from the electrical
outlet with a wet hand.
15. Never attempt to open the housing of the appliance, or to
repair the appliance yourself. This could cause electric
shock.
16. Never leave the appliance unattended during use.
17. This appliance is not designed for commercial use.
18. Do not use the appliance for other than intended use.
19. Do not wind the cord around the appliance and do not
bend it.
20. Place the appliance on a stable, level surface from which it
cannot fall off.
21. If you use products with non-stick surfaces, please make
sure no birds are in the same room and that the room can
be completely closed off and well-ventilated.
22. WARNING!!
Please do not touch surface while in use. The
temperature of accessible surfaces may be high
when the appliance is operating.

- 4 -
ST-123520 EN
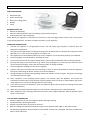
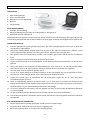
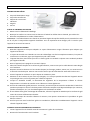
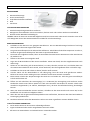
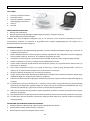
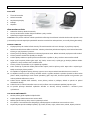
PARTS DESCRIPTION
1. Red power light
2. Green control light
3. Non-stick cooking plates
4. Handle
5. Catch
BEFORE INTITIAL USE
1. Remove all packaging.
2. Clean the toasting surfaces with a soft damp cloth and then dry them.
3. Unwind the mains cable completely.
NOTE: When your appliance is heated for the first time, it may emit slight smoke or odor. This is normal with
many heating appliances. This does not affect the safety or your appliance.
OPERATING INSTRUCTIONS
1. Connect the appliance to an appropriate socket. The red power light will glow to indicate when the
appliance is switched on.
2. The green control light will turn off during heating. Once the temperature is reached, then the green control
light will turn on. This means the appliance is ready for use.
3. The appliance must be heated up before you toast a sandwich. In the meantime prepare your sandwich.
4. Open the appliance at the handle by unlocking the catch.
5. Put the slices of bread on the lower toasting surface. Ensure that the buttered sides are facing outwards.
6. Now put the filling on the bread slices (e.g. cheese, ham, pineapple, etc.) and cover this with the second
slice of bread. Once again, ensure that the buttered sides are facing outwards.
7. Close the appliance making sure the catch is engaged.
8. Caution: If the slices of bread have too much filling on them, it will not be possible to close the appliance.
Take some of the filling off. Never use force to close the appliance.
9. During toasting the temperature regulating thermostat switches off and on again. The green control light
also switches off and on again.
10. After completion of the toasting process (approx. 2-4 minutes) open the appliance and remove the
sandwiches with the help of a flat wooden or plastic spatula. Never use sharp or metal objects (e.g. knives,
metal spatulas, etc.) as this will damage the non-stick coating.
11. If you wish to toast more sandwiches, close the appliance again and wait until the toasting surfaces have
reheated sufficiently.
12. When the control light illuminates again you can repeat the toasting process as described above.
13. After completion of the toasting process disconnect the mains plug immediately. With the appliance open
allow it to cool down.
TIPS FOR TASTY SANDWICHES
1. Allow the appliance to heat up completely before you begin toasting.
2. Lay the buttered side facing outwards.
3. All kinds of spiced butters and lards can be used.
4. With fruit fillings the toasted bread will be crispier if you sprinkle a little sugar on the buttered side.
5. The following ingredients are particularly recommended: cheese, ham, pineapple, tomatoes, cooked meat,
onions, herbs and spices.

- 5 -
CLEANING AND MAINTENANCE
1. First, disconnect the mains plug!
2. Only clean when the appliance has completely cooled down.
3. Clean the housing surface and the toasting surfaces of the sandwich toaster with a soft, damp cloth.
4. It is easiest to remove toast or food crumbs with a very soft brush.
5. Never use abrasive cleaning agents or sharp objects (e.g. scrubbing brush or knife) for cleaning.
6. Caution: Do not immerse the appliance in water or other liquids. There is danger to life due to electric shock!
TECHNICAL DATA
Operating voltage: 220-240V ~ 50-60Hz
Power: 750W
ENVIRONMENT FRIENDLY DISPOSAL
Recycling – European Directive 2012/19/EU
This marking indicates that this product should not be disposed with other household wastes. To
prevent possible harm to the environment or human health from uncontrolled waste disposal, recycle
it responsibly to promote the sustainable reuse of material resources. To return your used device,
please use the return and collection systems or contact the retailer where the product was purchased. They can
take this product for environmental safe recycling.
Emerio Holland B.V.
Zomervaart 1A
2033 DA Haarlem
The Netherlands
T: +31(0)23 3034369

- 6 -
Gebruiksaanwijzing – Dutch
VEILIGHEIDSVOORSCHRIFTEN
Voor gebruik dient u alle onderstaande instructies te lezen om
letsel en schade te voorkomen en om de beste resultaten met
het apparaat te bereiken. Bewaar deze handleiding op een
veilige plek. Mocht u dit apparaat aan iemand anders
overhandigen, dient u ook de gebruiksaanwijzing te
overhandigen.
In geval van schade die wordt veroorzaakt doordat de
gebruiker de instructies in deze gebruiksaanwijzing niet in
acht heeft genomen, komt de garantie te vervallen. De
fabrikant/importeur is niet aansprakelijk voor schade die
wordt veroorzaakt door het niet in acht nemen van de
gebruiksaanwijzing, door nalatig gebruik of gebruik dat niet in
overeenstemming is met de bepalingen van deze
gebruiksaanwijzing.
1. Dit apparaat mag worden gebruikt door kinderen vanaf 8
jaar en personen met beperkte fysische, visuele of mentale
vaardigheden, of die een gebrek aan ervaring en kennis
hebben, indien ze gepaste instructies hebben gekregen
zodat ze het apparaat op een veilige manier kunnen
gebruiken, op de hoogte zijn van de gevaren die het gebruik
van het apparaat met zich meebrengt en deze gevaren
begrijpen.
2. Laat kinderen niet met het apparaat spelen.
3. Laat het reinigen en het onderhoud van het apparaat niet
uitvoeren door kinderen tenzij ze ouder zijn dan 8 jaar en
onder toezicht staan.
4. Houd het apparaat en snoer buiten het bereik van kinderen
jonger dan 8 jaar.
5. Als het snoer is beschadigd, moet het worden vervangen
door de fabrikant, zijn klantenservice of gelijksoortig
geschoolde personen om gevaar te vermijden.

- 7 -
6. Met het oog op de instructies voor de reiniging van de
oppervlakken die in contact kunnen komen met voedsel of
olie, dient u de instructies in de paragraaf "Reiniging en
onderhoud" van de gebruiksaanwijzing in acht te nemen.
7. Dit apparaat is niet bestemd voor gebruik door middel van
een externe timer of een afzonderlijk op afstand bestuurd
systeem.
8. Voordat u de stekker in het stopcontact steekt, dient u te
controleren of de stroom en de frequentie overeen komen
met de specificaties van het typeplaatje.
9. Trek de stekker uit het stopcontact als het apparaat niet in
gebruik is en voordat u het apparaat reinigt.
10. Let op dat de stroomkabel niet over scherpe randen hangt
en niet in de buurt komt van hete voorwerpen en open vuur.
11. Dompel het apparaat of de stekker niet onder in water of
andere vloeistoffen. Er bestaat levensgevaar als gevolg van
een elektrische schok!
12. Om de stekker uit het stopcontact te halen, dient u aan de
stekker zelf te trekken. Trek niet aan de stroomkabel.
13. Raak het apparaat niet aan als het in water is gevallen. Trek
de stekker uit het stopcontact en breng het ter reparatie
naar een geautoriseerd servicecenter.
14. Steek de stekker niet in het stopcontact en haal hem er niet
uit als u natte handen heeft.
15. Probeer nooit de behuizing van het apparaat te openen en
probeer nooit zelf het apparaat te repareren. Dit kan een
elektrische schok veroorzaken.
16. Laat het apparaat nooit onbeheerd achter wanneer het in
gebruik is.
17. Dit apparaat werd niet ontworpen voor commercieel
gebruik.
18. Gebruik het apparaat niet voor andere doeleinden dan het
beoogde doel.
19. Draai de kabel niet om het apparaat en buig hem niet.
20. Plaats het apparaat op een stabiele, vlakke ondergrond
waar het niet vanaf kan vallen.

- 8 -
21. Als u producten met een antiaanbaklaag gebruikt, dient u
ervoor te zorgen dat zich geen vogels in dezelfde ruimte
bevinden en dat de ruimte compleet kan worden gesloten
en goed geventileerd wordt.
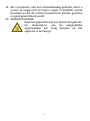
22. WAARSCHUWING!!
Raak het oppervlak niet aan tijdens het gebruik.
De temperatuur van de toegankelijke
oppervlakken kan hoog oplopen als het
apparaat in werking is.

- 9 -
ST-123520 NL
ONDERDELEN
1. Rode voedingslampje
2. Groen controlelampje
3. Bakplaten met anti-aanbaklaag
4. Handvat
5. Vergrendeling
VOOR EERSTE GEBRUIK
1. Verwijder alle verpakking.
2. Reinig de baklaag met een zachte en vochtige doek en droog deze af.
3. Wikkel het netsnoer helemaal af.
Let op: Wanneer het apparaat voor de eerste keer wordt verwarmd, kan het een beetje rook of geur afgeven. Dit
is normaal bij veel apparaten die verwarmd worden. Dit heeft geen invloed op uw veiligheid of het apparaat zelf.
GERRUIKSINSTRUCTIES
1. Sluit het apparaat aan op een geschikt stopcontact. Het rode voedingslampje brandt om aan te geven dat
het apparaat is ingeschakeld.
2. Het groene indicatielampje schakelt tijdens het verwarmen uit. Zodra de temperatuur is bereikt, zal het
groene indicatielampje oplichten om aan te geven dat het apparaat klaar voor gebruik is.
3. Het apparaat moet voorverwarmd zijn voordat u een sandwich gaat toasten. Maak intussen uw sandwich
klaar.
4. Open het apparaat bij het handvat door de grendel los te maken.
5. Leg de sneetjes brood op de onderste bakplaat. Let op dat de met boter besmeerde kant naar buiten toe is
gekeerd.
6. Doe nu het beleg op de sneetjes brood (bijvoorbeeld kaas, ham, ananas etc.) en doe het tweede sneetje
brood eroverheen. Let er weer op dat de met boter besmeerde kant naar buiten toe is gekeerd.
7. Sluit het apparaat en let op dat de grendel vast zit.
8. Let op: als er teveel vulling op de sneetjes brood zit, zal het niet mogelijk zijn om het apparaat te sluiten.
Haal dat wat van de vulling af. Oefen nooit kracht uit om het apparaat te sluiten.
9. Tijdens het toasten gaat de thermostaat die de temperatuur regelt aan en uit. Ook het groene
controlelampje gaat aan en uit.
10. Open de vergrendeling wanneer het toasten klaar is (ca. 2-4 minuten) en verwijder de sandwiches met
behulp van een platte houten of plastic spatel. Gebruik nooit scherpe of metalen voorwerpen (zoals messen,
metalen spatels etc.), de antiaanbaklaag raakt hierdoor beschadigd.
11. Als u meer sandwiches wilt toasten, sluit het apparaat dan weer en wacht totdat de bakplaten voldoende
zijn voorverwarmd.
12. Als het controlelampje weer brandt kunt u het toasten herhalen zoals boven beschreven.
13. Trek als het toasten klaar is de stekker meteen uit het stopcontact. Laat het apparaat openstaan zodat deze
kan afkoelen.
TIPS VOOR SMAKELIJKE SANDWICHES
1. Laat het apparaat eerst volledig opwarmen voordat u met het toasten begint.
2. Leg de met boter besmeerde kant naar buiten toe gekeerd neer.
3. Alle soorten gekruide boter en reuzel kunnen worden gebruikt.

- 10 -
4. Het geroosterde brood met fruitvulling zal knapperiger worden als u wat suiker over de met boter besmeerde
kant strooit.
5. De volgende ingrediënten worden met name aanbevolen: kaas, ham, ananas, tomaten, gekookt vlees, uien,
kruiden and specerijen.
REINIGING EN ONDERHOUD
1. Haal eerst de stekker uit het stopcontact!
2. Maak het apparaat pas schoon als het helemaal is afgekoeld.
3. Maak met een zachte, vochtige doek de buitenkant en de baklaag van de sandwichtoaster schoon.
4. U kunt de toast - en voedselkruimels eenvoudig verwijderen met behulp van een zeer zachte borstel.
5. Gebruik nooit schurende schoonmaakmiddelen of scherpe voorwerpen (bijvoorbeeld een boender of mes)
om schoon te maken.
6. Waarschuwing: Dompel het apparaat niet onder in water of andere vloeistoffen. Dit kan een elektrische
schok veroorzaken met de dood tot gevolg!
TECHNISCHE GEGEVENS
Bedrijfsspanning: 220-240V ~ 50-60Hz
Stroomverbruik: 750W
MILIEUVRIENDELIJKE AFVALVERWERKING
Recycling – Europese Richtlijn 2012/19/EU
Deze markering betekent dat dit product niet samen met ander huishoudelijk afval mag worden
afgedankt. Om het milieu en de volksgezondheid niet in gevaar te brengen en het hergebruik van
grondstoffen te bevorderen, moet dit product op verantwoordelijke wijze worden afgevoerd. Lever
verbruikte apparatuur a.u.b. in bij de hiervoor bestemde inzamelpunten of bij de winkel waar het product was
aangeschaft. Zij zullen dit product accepteren voor milieuvriendelijke afvalverwerking.
Emerio Holland B.V.
Zomervaart 1A
2033 DA Haarlem
The Netherlands
T: +31(0)23 3034369

- 11 -
Mode d‘emploi – French
CONSIGNES DE SÉCURITÉ
Avant d’utiliser l’appareil, lisez toutes les consignes suivantes
pour éviter des blessures et des dommages, et pour optimiser
les performances de votre appareil. Conservez cette notice
d’utilisation dans un endroit sûr. Si vous donnez ou transférez
cet appareil à un tiers, veillez à lui remettre également cette
notice d’utilisation.
En cas de détérioration due au non-respect par l’utilisateur
des instructions de cette notice d’utilisation, la garantie est
annulée. Le fabricant/importateur rejette toute
responsabilité en cas de dommages dus au non-respect des
instructions de la notice d’utilisation, à un usage négligent ou
à l’usage non conforme aux exigences de cette notice
d’utilisation.
1. Cet appareil peut être utilisé par des enfants âgés de 8 ans
et plus et les personnes ayant des capacités physiques,
sensorielles ou mentales, ou un manque d'expérience et de
connaissances si elles ont été formées et encadrées pour
l'utilisation de cet appareil en toute sécurité et de
comprendre la risques impliqués.
2. Les enfants ne doivent pas jouer avec l'appareil.
3. Le nettoyage et la maintenance ne doivent pas être réalisés
par les enfants sauf s’ils sont âgés de 8 ans et plus et s’ils
sont supervisés.
4. Gardez l'appareil et son câble hors de la portée des enfants
de moins de 8 ans.
5. Si le câble d'alimentation est endommagé, il doit être
remplacé par le fabricant, son service après vente ou des
personnes de qualification similaire afin d'éviter un danger.
6. Pour obtenir des instructions sur comment nettoyer les
surfaces qui sont en contact avec des aliments ou de l’huile,
reportez-vous au paragraphe « nettoyage et entretien » du
mode d’emploi.

- 12 -
7. Les appareils ne sont pas destinés à être mis en
fonctionnement au moyen d'une minuterie extérieure ou
par un système de commande à distance séparé.
8. Avant d’insérer la fiche de l’appareil dans une prise secteur,
vérifiez que la tension et la fréquence du secteur
correspondent aux spécifications indiquées sur la plaque
signalétique.
9. Débranchez la fiche électrique de la prise électrique quand
l’appareil n’est pas utilisé et avant de le nettoyer.
10. Veillez à ce que le cordon d’alimentation ne pende pas sur
des arêtes coupantes et maintenez-le éloigné des objets
chauds et des flammes nues.
11. N'immergez jamais l'appareil ou sa fiche dans de l'eau ni
dans aucun autre liquide. Cela peut provoquer un choc
électrique !
12. Pour débrancher la fiche de la prise, saisissez la fiche et
tirez-la hors de la prise. Ne tirez pas sur le cordon
d’alimentation.
13. Ne touchez pas l’appareil s’il tombe dans de l’eau.
Débranchez la fiche de la prise électrique et rapportez-le au
centre de réparation agréé pour le faire réparer.
14. Ne branchez pas et ne débranchez pas l’appareil de la prise
électrique avec les mains mouillées.
15. N’essayez pas d’ouvrir le boîtier de l’appareil ni de réparer
l’appareil vous-même. Cela peut provoquer un choc
électrique.
16. Ne laissez jamais l'appareil sans surveillance quand il est en
fonctionnement.
17. Cet appareil n’est pas conçu pour un usage commercial.
18. N’utilisez pas cet appareil à un usage autre que celui pour
lequel il a été conçu.
19. N’enroulez pas le cordon d’alimentation autour de
l’appareil et ne le pliez pas.
20. Placez l’appareil sur une surface horizontale et stable, de
laquelle il ne peut pas tomber.

- 13 -
21. Si vous utilisez des produits antiadhésifs, veillez à ce qu’il
n’y ait aucun oiseau dans la pièce et à ce que la pièce soit
complètement fermée et bien aéré.
22. AVERTISSEMENT !!
Ne touchez pas les surfaces de l’appareil
pendant l’utilisation. La température des
surfaces accessibles peut être élevée quand
l'appareil est en fonctionnement.

- 14 -
ST-123520 FR
DESCRIPTION DES PIÈCES
1. Voyant d'alimentation rouge
2. Voyant de contrôle vert
3. Plaques de cuisson anti-
adhésives
4. Poignée
5. Verrou
AVANT LA PREMIERE UTILISATION
1. Retirez tous les éléments d'emballage.
2. Nettoyez les surfaces en contact avec les aliments à l'aide d'un chiffon doux et humide, puis séchez-les.
3. Déroulez complètement le cordon d'alimentation.
REMARQUE : la machine émettra une fumée et une odeur légères lorsqu’elle chauffe pour la première fois. Cela
est le cas pour la majorité des appareils chauffants. Ceci ne représente aucun danger pour la santé ni pour
l’appareil et est tout à fait normal.
INSTRUCTIONS D'UTILISATION
1. Branchez l'appareil sur une prise adaptée. Le voyant d’alimentation rouge s’illuminera pour indiquer que
l’appareil est allumé.
2. Le voyant de contrôle vert s’éteindra au cours du réchauffage. Une fois la température atteinte, le voyant de
contrôle vert va s’allumer, signe que l’appareil est prêt à être utilisé.
3. L'appareil doit être chaud avant que vous ne fassiez griller un sandwich. Préparez votre sandwich pendant
que l'appareil chauffe.
4. Ouvrez l’appareil par la poignée en ouvrant le loquet.
5. Placez les tranches de pain sur la surface de grill inférieure, assurez-vous que les côtés beurrés soient dirigés
vers l'extérieur.
6. Disposez ensuite les aliments sur les tranches de pain (ex: fromage, jambon, ananas, etc.) et recouvrez avec
la seconde tranche de pain. Assurez-vous une fois encore que les côtés beurrés soient dans le bon sens.
7. Fermez l’appareil en veillant à ce que le loquet se remette en place.
8. Attention: Si les tranches de pain sont trop chargées, il ne sera pas possible de refermer l'appareil. Retirez
un peu de garniture, ne forcez jamais pour refermer l'appareil.
9. Lorsque le sandwich chauffe, le thermostat de régulation de la température s'allume et s'éteint
fréquemment. La lumière de contrôle verte s'allume et s'éteint également.
10. Une fois les sandwiches grillés (environ 2–4 minutes), ouvrez le loquet et retirez les sandwiches à l'aide d'une
spatule en plastique ou en bois. N'utilisez jamais d'ustensiles coupants ou d'objets métalliques (ex: couteaux,
spatules métalliques, etc.) car ils endommageraient le revêtement en téflon.
11. Si vous désirez faire griller d'avantage de sandwiches, refermez l'appareil et attendez que les surfaces de grill
soient de nouveau suffisamment chaudes.
12. Lorsque les lampes de contrôle s'allument à nouveau, vous pouvez recommencer la procédure de grille
décrite ci-dessus.
13. Une fois que vous avez fini de faire griller vos sandwiches, débranchez immédiatement l'appareil. Laissez
refroidir l'appareil ouvert.
CONSEILS POUR DES SANDWICHES SAVOUREUX
1. Laissez l'appareil finir de chauffer avant de commencer à griller les sandwiches.
2. Orientez les faces beurrées vers l'extérieur.

- 15 -
3. Il est possible d'utiliser toutes sortes de beurres épicés ou de saindoux.
4. Avec des garnitures à base de fruits, les pains grillés seront plus croustillants si vous saupoudrez les faces
beurrées d'un peu de sucre.
5. Les ingrédients suivants sont particulièrement recommandés: fromage, jambon, ananas, tomates, viandes
cuites, oignons, herbes et épices.
NETTOYAGE ET ENTRETIEN
1. Avant toute chose, déconnectez le cordon d'alimentation!
2. Ne nettoyez l'appareil qu'une fois qu'il a complètement refroidi.
3. Nettoyez la surface du boîtier et les surfaces de grill avec un chiffon doux et humide.
4. Il est plus facile de retirer les miettes et restes d'aliments à l'aide d'une brosse très douce.
5. N'utilisez jamais de produits de nettoyage abrasifs ou d'objets coupants (ex: brosses à récurer ou couteau)
pour le nettoyage.
6. Attention: N'immergez jamais l'appareil dans l'eau ou tout autre liquide. Il y a un risque d'électrocution fatale!
DONNEES TECHNIQUES
Tension de fonctionnement: 220-240V ~ 50-60Hz
Puissance: 750W
APPAREIL RESPECTUEUX DE L’ENVIRONNEMENT
Recyclage – Directive européenne 2012/19/EU
Ce symbole indique que le produit ne doit pas être jeté avec les ordures ménagères. Pour limiter les
risques pour l’environnement et la santé entraînés par le rejet non contrôlé des déchets, recyclez ce
dernier pour promouvoir une réutilisation responsable de ses matériaux. Pour recycler votre produit,
utilisez les réseaux de collecte de votre région ou prenez contact avec le revendeur du produit. Ce dernier pourra
vous aider à le recycler.
Emerio Holland B.V.
Zomervaart 1A
2033 DA Haarlem
The Netherlands
T: +31(0)23 3034369

- 16 -
Bedienungsanleitung – German
SICHERHEITSHINWEISE
Lesen Sie vor dem Gebrauch unbedingt die nachfolgenden
Anleitungen, um Verletzungen oder Beschädigungen zu
vermeiden und das beste Ergebnis mit dem Gerät zu erzielen.
Bewahren Sie diese Bedienungsanleitung an einem sicheren
Ort auf. Wenn Sie dieses Gerät an eine andere Person
weitergeben, stellen Sie sicher, dass Sie auch diese
Bedienungsanleitung aushändigen.
Im Falle von Beschädigungen, die durch die Missachtung der
Anleitungen in dieser Bedienungsanleitung verursacht
wurden, wird die Garantie ungültig. Der Hersteller/Importeur
haftet nicht für Schäden, die durch Missachtung der
Bedienungsanleitung, fahrlässigen Gebrauch oder Benutzung,
die nicht in Ü bereinstimmung mit den Anforderungen dieser
Bedienungsanleitung erfolgt, verursacht wurden.
1. Dieses Gerät kann von Kindern ab 8 Jahren und Personen
mit eingeschränkten körperlichen, sensorischen oder
geistigen Fähigkeiten oder mangelnder Erfahrung und
Kenntnis benutzt werden, wenn sie beaufsichtigt werden
oder in die sichere Benutzung des Gerätes unterwiesen
werden und die damit verbundenen Gefahren verstehen.
2. Kinder dürfen nicht mit dem Gerät spielen.
3. Die Reinigung und vom Benutzer auszuführende
Wartungsarbeiten sollten nicht von Kindern durchgeführt
werden; es sei denn, sie sind älter als 8 Jahre und werden
beaufsichtigt.
4. Halten Sie das Gerät und sein Netzkabel außer Reichweite
von Kindern unter 8 Jahren.
5. Wenn das Netzkabel beschädigt ist, muss es vom Hersteller,
seinem Kundendienst oder einer ähnlich qualifizierten
Person ausgewechselt werden, um Gefahren zu vermeiden.
6. Um Informationen zur Reinigung der Flächen zu erhalten,
die mit Lebensmitteln oder Ö l in Berührung kommen, lesen

- 17 -
Sie bitte den Abschnitt „Reinigung und Wartung“ in der
Bedienungsanleitung.
7. Dieses Gerät ist nicht für die Bedienung über einen
externen Timer oder ein separates Fernbedienungssystem
bestimmt.
8. Bevor Sie den Stecker mit der Netzsteckdose verbinden,
prüfen Sie bitte, ob die Spannung und die Frequenz mit den
Angaben auf dem Typenschild übereinstimmen.
9. Ziehen Sie den Netzstecker aus der Steckdose, wenn das
Gerät nicht benutzt und bevor es gereinigt wird.
10. Achten Sie darauf, dass das Netzkabel nicht über scharfe
Kanten hängt und halten Sie es von heißen Objekten und
offenen Flammen fern.
11. Tauchen Sie das Gerät oder den Netzstecker nicht in Wasser
oder andere Flüssigkeiten. Es besteht Lebensgefahr
aufgrund von Stromschlag!
12. Um den Stecker aus der Steckdose zu entfernen, ziehen Sie
am Stecker. Ziehen Sie nicht am Kabel.
13. Berühren Sie das Gerät nicht, wenn es ins Wasser gefallen
ist. Ziehen Sie den Stecker aus der Steckdose und schicken
Sie es an einen autorisierten Kundendienst zwecks
Reparatur.
14. Den Netzstecker des Gerätes nicht mit einer nassen Hand
aus der Steckdose ziehen oder mit der Steckdose verbinden.
15. Versuchen Sie unter keinen Umständen, das Gehäuse des
Gerätes zu öffnen oder das Gerät selbst zu reparieren. Dies
könnte einen Stromschlag verursachen.
16. Lassen Sie das Gerät während des Gebrauchs niemals
unbeaufsichtigt.
17. Dieses Gerät ist nicht für den gewerblichen Gebrauch
konzipiert.
18. Verwenden Sie das Gerät nur zu seinem
bestimmungsgemäßen Zweck.
19. Wickeln Sie das Kabel nicht um das Gerät und knicken Sie
es nicht.

- 18 -
20. Stellen Sie das Gerät auf eine stabile, ebene Fläche, von der
es nicht herunterfallen kann.
21. Wenn Sie Produkte mit Antihaftbeschichtung benutzen,
stellen Sie bitte sicher, dass sich keine Vögel im gleichen
Zimmer befinden und dass das Zimmer komplett
geschlossen und gut belüftet werden kann.
22. WARNUNG!
Bitte berühren Sie während des Gebrauchs
nicht die Oberfläche. Die Temperatur der
zugänglichen Oberflächen kann sehr hoch sein,
wenn das Gerät in Betrieb ist.

- 19 -
ST-123520 DE
BESCHREIBUNG
1. Rote Betriebsanzeige
2. Grüne Kontrolllampe
3. Antihaftbeschichtete Kochfläche
4. Griff
5. Verschluss
VOR ERSTER INBETRIEBNAHME
1. Sämtliche Verpackungsmaterialien entfernen.
2. Reinigen Sie die Toastflächen mit einem weichen, feuchten Tuch und trocknen Sie diese anschließend.
3. Wickeln Sie das Netzkabel vollständig ab.
HINWEIS: Wenn Ihr Gerät zum ersten Mal aufgeheizt wird, kann etwas Rauch oder Geruch entstehen. Dies ist für
viele Heizgeräte normal. Die Gerätesicherheit wird dadurch nicht beeinträchtigt.
BEDIENUNGSHINWEISE
1. Schließen Sie das Gerät an eine geeignete Steckdose an. Die rote Betriebsanzeige leuchtet auf und zeigt
damit an, dass das Gerät eingeschaltet wurde.
2. Die grüne Kontrolllampe erlischt während des Aufheizens. Sobald die erforderliche Temperatur erreicht ist,
leuchtet die grüne Kontrolllampe auf. Das Gerät ist jetzt betriebsbereit.
3. Das Gerät muss aufgeheizt werden, bevor Sie ein Sandwich toasten können. Bereiten Sie in der Zwischenzeit
Ihr Sandwich vor.
4. Ö ffnen Sie das Gerät am entriegelten Griff.
5. Legen Sie die Brotscheiben auf die untere Toastfläche. Achten Sie darauf, dass die eingefettete Seite nach
außen zeigt.
6. Geben Sie nun die Füllung auf die Brotscheiben (z. B. Käse, Schinken, Ananas usw.) und decken diese mit
der zweiten Brotscheibe ab. Noch einmal, achten Sie darauf, dass die eingefettete Seite nach außen zeigt.
7. Schließen Sie das Gerät und achten Sie darauf, dass der Griff einrastet.
8. Vorsicht: Wenn auf den Brotscheiben zu viel Füllung liegt, kann das Gerät nicht geschlossen werden.
Nehmen Sie etwas von der Füllung herunter. Schließen Sie das Gerät niemals mit Gewalt.
9. Beim Toasten schaltet der Temperaturregler das Gerät aus und wieder ein. Auch die grüne Kontrolllampe
erlischt und leuchtet auf.
10. Ö ffnen Sie nach Abschluss des Toastvorgangs (ca. 2-4 Minuten) die Verriegelung und entfernen Sie die
Sandwiches mittels eines flachen Spatels aus Holz oder Kunststoff. Verwenden Sie niemals scharfe oder
metallische Gegenstände (z. B. Messer, Metallspatel usw.), da diese die Teflonbeschichtung beschädigen
können.
11. Wenn Sie weitere Sandwiches toasten möchten, schließen Sie das Gerät wieder und warten Sie, bis die
Backflächen sich ausreichend aufgeheizt haben.
12. Wenn die rote und die grüne Kontrolllampe beide erneut aufleuchten, können Sie den oben beschriebenen
Toastvorgang wiederholen.
13. Nach dem Gebrauch sofort den Netzstecker ziehen. Das Gerät in geöffneter Position abkühlen lassen.
TIPPS FÜ R LECKERE SANDWICHES
1. Lassen Sie das Gerät vor dem Toasten vollständig aufheizen.
2. Legen Sie die Brotscheibe mit der eingefetteten Seite nach außen.
3. Alle Arten von Kräuterbutter und Schmalz können verwendet werden.
Seite wird geladen ...
Seite wird geladen ...
Seite wird geladen ...
Seite wird geladen ...
Seite wird geladen ...
Seite wird geladen ...
Seite wird geladen ...
Seite wird geladen ...
Seite wird geladen ...
Seite wird geladen ...
-
 1
1
-
 2
2
-
 3
3
-
 4
4
-
 5
5
-
 6
6
-
 7
7
-
 8
8
-
 9
9
-
 10
10
-
 11
11
-
 12
12
-
 13
13
-
 14
14
-
 15
15
-
 16
16
-
 17
17
-
 18
18
-
 19
19
-
 20
20
-
 21
21
-
 22
22
-
 23
23
-
 24
24
-
 25
25
-
 26
26
-
 27
27
-
 28
28
-
 29
29
-
 30
30


Emerio 123520 Bedienungsanleitung
- Kategorie
- Raclettes
- Typ
- Bedienungsanleitung
- Dieses Handbuch eignet sich auch für
in anderen Sprachen
- English: Emerio 123520 Owner's manual
- français: Emerio 123520 Le manuel du propriétaire
- Nederlands: Emerio 123520 de handleiding
- slovenčina: Emerio 123520 Návod na obsluhu
- polski: Emerio 123520 Instrukcja obsługi
Verwandte Artikel
-
Emerio ST-109724.12 Benutzerhandbuch
-
Emerio ST-120889 Sandwich Toaster Benutzerhandbuch
-
-
-
-
-
Emerio 122248 Bedienungsanleitung
-
