Yamaha CP5 Benutzerhandbuch
- Kategorie
- Digitale Klaviere
- Typ
- Benutzerhandbuch
Dieses Handbuch eignet sich auch für

1 CP5 /CP50 Reference Manual
Yamaha Corp. reserves the right to update or modify this manual at any time without prior notice.
The most up-to-date version is freely available for download from the following web page.
http://www.yamaha.co.jp/manual/
Contents
Reference Guides ..........................................................................................2
Using this Reference Manual ........................................................................2
Internal Design of the CP5 & CP50 3
Principal Components ...................................................................................3
Tone Generator .............................................................................................4
Song Setting Area .......................................................................................10
Controller ....................................................................................................11
Reference 12
Left & Right Parts ........................................................................................12
Song Setting Area .......................................................................................35
TRACK Part .................................................................................................39
MIC INPUT Part (CP5 only) .........................................................................40
Settings for All Parts ....................................................................................42
Settings for All Performances ......................................................................43
Appendix 54
MIDI .............................................................................................................54
Reference Manual

2 CP5/CP50 Reference Manual
Reference Guides
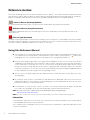
Reference Guides
Your CP5 or CP50 stage piano comes with three different reference guides — the Owner’s Manual, the Reference Manual
(this document), and the Data List. While the Owner’s Manual is packaged together with the stage piano as a hardcopy
booklet, this Reference Manual and the Data List are provided as pdf documents on the bundled CD-ROM.
Owner’s Manual (hardcopy booklet)
The Owner’s Manual describes how to set up your CP5 or CP50 and how to perform basic operations.
Reference Manual (this pdf document)
This Reference Manual describes the internal design of your CP5 or CP50 and the various parameters that can be
adjusted and set.
Data List (pdf document)
The Data List document provides a list of all CP5 or CP50 presets (or Performances); a breakdown of the types of Modu-
lation Effect and Power-Amplifier / Compressor
*
blocks available for selection; a list of the parameters that can be set for
each of these blocks; and MIDI-related reference material. (
*
: CP5 only)
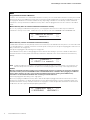
Using this Reference Manual
The first page of the section Internal Design of the CP5 & CP50 contains a block diagram illustrating the vari-
ous components of your stage piano’s sound production system, and by clicking any of the arrows within
this diagram, you can conveniently jump to a description of the corresponding component.
Using the tabs along the right side of each page from the Reference section, you can easily access details
regarding the parts making up each Performance and the various setting areas opened by pressing buttons
on the control panel. These tabs also serve as a useful means of quickly getting to grips with the internal
design of your CP5 or CP50 and with how the various setting areas and control-panel buttons are related to
each other. Furthermore, you can also click on the Internal Design of the CP5 & CP50 and Appendix tabs at
the top and bottom of the list to jump to the corresponding sections.
You can click on any page number from the Table of Contents or within descriptive text to jump to the corre-
sponding page.
By clicking on items or topics you would like to read about from the Bookmarks index on the left of the main
pdf display window, you can jump to the corresponding page. (Click the Bookmarks tab in the top-left corner
to open this index if it is not already displayed.)
For information on a specific topic, function, or feature, select Find or Search from the Adobe Reader Edit
menu and enter a keyword to locate the related information anywhere within this document.
NOTE The most-recent version of Adobe Reader can be downloaded from the following web page.
http://www.adobe.com/products/reader/
NOTE The names and positions of menu items may vary depending on the version of Adobe Reader being used.
Information
• The illustrations and LCD screens as shown in this manual are for instructional purposes only, and may appear
somewhat different from those on your instrument.
• The company names and product names in this manual are the trademarks or registered trademarks of their
respective companies.

3 CP5/CP50 Reference Manual
Internal Design of the CP5 & CP50
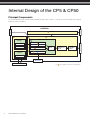
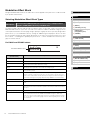
Principal Components
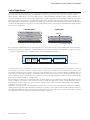
The internal design of your CP5 or CP50 is divided into three main sections — namely, the Tone Generator, the Song Set-
ting area, and the Controller.
CP5/CP50
MIDI IN
Controller
MIDI OUT
Tone Generator Song Setting Area
User Songs
Preset Drum Patterns
Audio record
and play
Wave
USB flash-memory device
Performances
LEFT1/LEFT RIGHT1/RIGHT
LEFT2
*
RIGHT2
*
TRACK
MIC INPUT
*
Reverb
block
Master
Compressor
block
Master
Equalizer
block
MIC INPUT
*
*
: Components available on CP5 only.
Click from the diagram to jump to the corresponding page.
MIDI record
and play
Audio output

4 CP5/CP50 Reference Manual
Internal Design of the CP5 & CP50 > Tone Generator
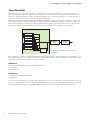
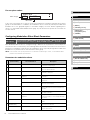
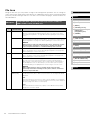
Tone Generator
Your stage piano's Tone Generator produces sounds based on performance data that you create by playing the key-
board, operating the sequencer, and using various controllers. In specific terms, the Tone Generator is made up of Per-
formances, a Master Compressor block, and a Master Equalizer block. The term “Performance” is used to describe a
single preset that allows a number of voices to be produced together.
Meanwhile, the Master Compressor block and the Master Equalizer block are used to adjust the dynamics and tone of
the sounds produced by individual Performances. Master Compressor and Master Equalizer settings are stored sepa-
rately from Performances; therefore, they affect the stage piano as a whole and can be adjusted to perfectly match the
environment in which it is being played. The basic flow of signals between these components is as follows.
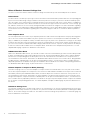
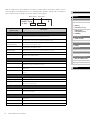
Each Performance comprises a number of different parts and a Reverb block. As shown below, CP5 Performances con-
tain six different parts, while CP50 Performances have three. Furthermore, the types of sound that can be handled vary
from part to part. For more information on parts, see page 5.
CP5 Parts
• Left and right parts: LEFT1, LEFT2, RIGHT1, and RIGHT2
• TRACK part
• MIC INPUT part
CP50 Parts
• Left and right parts: LEFT and RIGHT
• TRACK part
The sound of each Performance is completed by applying a common reverb effect to the sound of each of the selected
parts. As a final step, furthermore, the sound of the stage piano itself can be perfectly matched to its playing environment
by setting the Master Compressor and Master Equalizer blocks, which affect all Performances in the same way.
Performance
LEFT1/LEFT
LEFT2
*
RIGHT1/RIGHT
RIGHT2
*
TRACK
MIC INPUT
*
Parts
Reverb
block
Master
Compressor
block
Master
Equalizer
block
*
:The LEFT2, RIGHT2, and MIC INPUT parts are available
on the CP5 only.

5 CP5/CP50 Reference Manual
Internal Design of the CP5 & CP50 > Tone Generator
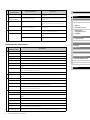
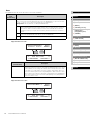
Left & Right Parts
The left and right parts that make up each Performance respond to your playing of the keyboard or to MIDI input and use
the built-in Tone Generator to produce the appropriate sounds in response. The CP5 has four such parts — LEFT1,
LEFT2, RIGHT1, and RIGHT2 — while the CP50 has two — LEFT and RIGHT. Regardless of the number available, you
can freely arrange these parts in a layered configuration or a split configuration for left and right hands to best suit your
playing style. When layering parts, overlapping playing sections are defined by setting note limits for each (page 32).
When splitting parts, meanwhile, a split point is set (page 31) so that notes to the left and right of that point can be played
using the left and right parts, respectively. Layering and splitting can be setup using the Split parameter (page 31) from
the Common Settings area.
Each CP5 part is subdivided into four distinct blocks known as the Voice block, the Pre-Amplifier block, the Modulation
Effect block, and the Power-Amplifier / Compressor block. In the CP50, meanwhile, three blocks are used for each part
— namely, the Voice block, the Pre-Amplifier block, and the Modulation Effect block.
In these blocks, we have recreated the unique sounds not only of acoustic pianos and classic electric pianos, but also of
a wide range of effect units, amplifiers, and other devices commonly used with each in actual performance and record-
ing settings. Using the Piano Customize function to freely assemble blocks, you can both replicate standard vintage set-
tings and also create original hardware combinations that would never be possible in the real world. Furthermore, your
CP5 or CP50 also comes complete with many other voices such as strings and guitars, and these can be combined with
piano voices to produce unique, exciting sounds.
Each Performance allows the sounds produced by its various parts to be sent through the common Reverb block for fin-
ishing. In addition, Performances also contain a Common Settings area that allows a name, a keyboard mode, and con-
troller parameters to be set for each. These common settings can be used to make final adjustments to the individual
Performances that you create.
Meanwhile, your CP5 or CP50 is pre-loaded with an impressive selection of Preset Performances, specially created by
artfully combining the above-described parts and blocks to produce just the right sounds. Finally, the Master Compres-
sor and Master Equalizer blocks, which affect all Performances in the same way, can be used to ensure that the sound of
your stage piano is always perfectly matched to its playing environment.
Layered parts
LEFT1 or LEFT
LEFT2
*
RIGHT1 or RIGHT
RIGHT2
*
Split parts
Split point
RIGHT1 or RIGHT LEFT1 or LEFT
RIGHT2
*
LEFT2
*
*
Parts available on CP5 only.
Parts
Voice
block
Pre-Amplifier
block
Modulation
Effect block
Power-Amplifier /
Compressor block
*
*
Only CP5 parts feature a Power-Amplifier / Compressor block.

6 CP5/CP50 Reference Manual
Internal Design of the CP5 & CP50 > Tone Generator
Roles of Blocks & Common Settings Area
The roles of each of the blocks and the Common Settings area that make up CP5 and CP50 parts are as follows.
Voice Block
The Voice block is used to specify the type of musical-instrument sound that will be produced for the corresponding part
by the Tone Generator. Using a range of advanced sound-synthesis techniques, your CP5 or CP50 can faithfully repro-
duce the unique sonic characteristics of a broad spectrum of acoustic pianos and classic electric pianos. In addition to
piano sounds, furthermore, Voice blocks also offer a selection of other types of musical instruments, such as strings, gui-
tar, and bass, and these are conveniently arranged into different instrument categories. For more information regarding
piano voices (as selected from the PIANO and E.PIANO categories), refer to Voice Block (page 12) from the Reference
section below. For more information regarding other instrument categories and voices, refer to the Data List pdf docu-
ment.
Pre-Amplifier Block
The Pre-Amplifier block is used to set pre-amplifier parameters and to make other adjustments uniquely affecting piano
voices. As such, this block is available only when a piano voice has been selected (from the PIANO or E.PIANO cate-
gory). In addition to pre-amplifiers actually used with various types of pianos in live performance settings, the Pre-Ampli-
fier block also replicates many other parameters perfectly configured for the enhancement of piano sounds. Whenever
you select a voice from the PIANO or E.PIANO category within the Voice block, a specific set of parameters for that par-
ticular voice will be made available in the Pre-Amplifier block. For details on Pre-Amplifier block parameters, see Pre-
Amplifier Block (page 13) from the Reference section below.
Modulation Effect Block
Within each Modulation Effect block, you will find a versatile collection of modulation-type effects that are indispensable
to piano sound design for stage and recording environments. Positioned immediately after the Voice and Pre-Amplifier
blocks for the corresponding part, this block processes to the raw instrument sound. Whenever a non-piano voice is
selected within the Voice block, furthermore, the Modulation Effect block functions as an insertion effect. Using Modula-
tion Effect blocks, individual parts can be processed with different effects, each of which features a number of freely-
adjustable parameters. For details on the types of modulation effect available for use and the corresponding parameters,
see Modulation Effect Block (page 15) from the Reference section below.
Power-Amplifier / Compressor Block (CP5 only)
For further shaping of voices, the Power-Amplifier / Compressor block contained within each CP5 part can be used to
select either a power amplifier or a compressor, each of which is modeled with remarkable levels of precision. Positioned
immediately after the part’s Modulation Effect block, this block adjusts the overall tone. Whenever a non-piano voice is
selected within the Voice block, furthermore, the Power-Amplifier / Compressor block functions as an insert-type effect.
Using Power-Amplifier / Compressor blocks, individual parts can be processed with different effects, each of which fea-
tures a number of freely-adjustable parameters. For details on the types of power-amplifier and the compressor available
for use and the corresponding parameters, see Power-Amplifier / Compressor Block (page 25) from the Reference sec-
tion below.
Common Settings Area
The Common Settings area is used to assign names to your Performances, to specify a keyboard mode for the left and
right parts, and to setup controllers. If you wish to use your CP5 or CP50 as a master keyboard for controlling other MIDI
devices, the relevant settings are made here. For details on Common Settings area parameters, see Common (page 31)
from the Reference section below.

7 CP5/CP50 Reference Manual
Internal Design of the CP5 & CP50 > Tone Generator
TRACK Part
Each CP5 or CP50 Performance can also contain a backing track for playing back as an accompaniment to your key-
board performances. Three different types of backing track can be selected — namely, Preset Drum Patterns, User
Songs, and Wave files. Whenever you select a Preset Drum Pattern or a Wave file located on a USB flash-memory
device, the TRACK part can be used to set its volume, pan, and reverb send level. For more details on these parameters,
see TRACK Part (page 39) from the Reference section below.
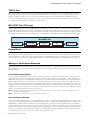
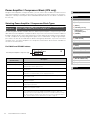
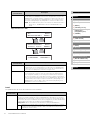
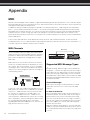
MIC INPUT Part (CP5 only)
With the CP5, a microphone can be plugged into the MIC INPUT connector so that you can conveniently sing along as
you play. Each CP5 Performance features a MIC INPUT part that can be used to adjust the volume, pan, and effect set-
tings for the audio input via this connector. Furthermore, this audio can also be processed using a noise gate, compres-
sor, equalizer, and insertion effect. For more details, see MIC INPUT Part (page 40) from the Reference section below.
Reverb Block
The Reverb block on your CP5 or CP50 provides a host of exquisite reverb algorithms originally developed by Yamaha
for use in professional-audio applications. This block allows a common reverb effect to be applied to all parts from the
current Performance, and each features a number of freely configurable parameters. For details on the types of reverb
effect available for use and the corresponding parameters, see Reverb (page 42) from the Reference section below.
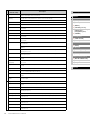
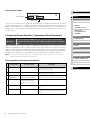
Makeup of Performance Memories
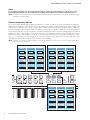
Your CP5 or CP50 can store Performances in three main memory areas — namely, the Preset Performance memory, the
User Performance memory, and an External Performance memory. The specific roles of each of these memory areas are
described below.
Preset Performance Memory
Accessed using the [PRE] button, the Preset Performance memory is used to hold the Performance presets that come
ready-made with your CP5 or CP50. This memory area contains three individual memory banks — PRE1, PRE2, and
PRE3. Each time you press the [PRE] button, a different Preset Performance memory bank will be selected. Four memory
groups (A, B, C, and D) are contained within each memory bank, and each one of these groups can hold ten Perfor-
mances. Press one of the group buttons [A] to [D] followed by one of the number buttons [1] to [10] to choose the corre-
sponding Performance from the currently selected External Performance memory bank. In order that they will always be
available for use, Preset Performances cannot be overwritten with other Performances that you have modified or created.
As such, the Preset Performance memory is read-only.
NOTE Performance 1 from Group A within the PRE1 memory bank will always be selected when you press the [PRE] button while
holding down the [EXIT] button.
NOTE For a list of all Preset Performances, see the Data List pdf document.
User Performance Memory
Accessed using the [USER] button, the User Performance memory is used to store original Performances that you have
created. This memory area contains three individual memory banks — USR1, USR2, and USR3. Each time you press the
[USER] button, a different User Performance memory bank will be selected. Four memory groups (A, B, C, and D) are
contained within each memory bank, and each one of these groups can hold ten Performances. Press one of the group
buttons [A] to [D] followed by one of the number buttons [1] to [10] to choose the corresponding Performance from the
currently selected User Performance memory bank. In the stage piano's default condition, the User Performance mem-
ory contains exactly the same content as the Preset Performance memory.
MIC INPUT Part
MIC INPUT Insertion EffectNoise Gate Compressor EQ

8 CP5/CP50 Reference Manual
Internal Design of the CP5 & CP50 > Tone Generator
NOTICE
If you overwrite a Performance in the User Performance memory, it will be permanently deleted. In order to avoid loosing
irreplaceable data, therefore, you should take special care when selecting where to store newly-created Performances.
NOTE Performance 1 from Group A within the USR1 memory bank will always be selected when you press the [USER] button while
holding down the [EXIT] button.
External Performance Memory
Accessed using the [EXT] button, an External Performance memory is read into your CP5 or CP50 from a plugged-in
USB flash-memory device. This memory area can be used to store original Performances that you have created, and it
contains three individual memory banks — EXT1, EXT2, and EXT3. Each time you press the [EXT] button, a different
External Performance memory bank will be selected. Four memory groups (A, B, C, and D) are contained within each
memory bank, and each one of these groups can hold ten Performances. Press one of the group buttons [A] to [D] fol-
lowed by one of the number buttons [1] to [10] to choose the corresponding Performance from the currently selected
External Performance memory bank. In order to use an External Performance memory stored on a USB flash-memory
device, the memory device must be plugged into your CP5 or CP50, and the stage piano must have loaded the corre-
sponding data into a dedicated section of its internal memory (DRAM).
NOTE Performance 1 from Group A within the EXT1 memory bank will always be selected when you press the [EXT] button while
holding down the [EXIT] button.
Preset Performance Memory User Performance Memory
Group A
PRE1 bank PRE2 bank PRE3 bank
Group B
PRE1 bank
Performance
Numbers 1 to 10
Group A
Performance
Numbers 1 to 10
Group A
Performance
Numbers 1 to 10
Group B
Performance
Numbers 1 to 10
Group B
Performance
Numbers 1 to 10
Group B
Performance
Numbers 1 to 10
Group C
Performance
Numbers 1 to 10
Group C
Performance
Numbers 1 to 10
Group C
Performance
Numbers 1 to 10
Group D
Performance
Numbers 1 to 10
Group D
Performance
Numbers 1 to 10
Group D
Performance
Numbers 1 to 10
PRE1 bank USR2 bank USR3 bankUSR1 bank
Group A
Performance
Numbers 1 to 10
Group A
Performance
Numbers 1 to 10
Group A
Performance
Numbers 1 to 10
Group B
Performance
Numbers 1 to 10
Group B
Performance
Numbers 1 to 10
Performance
Numbers 1 to 10
Group C
Performance
Numbers 1 to 10
Group C
Performance
Numbers 1 to 10
Group C
Performance
Numbers 1 to 10
Group D
Performance
Numbers 1 to 10
Group D
Performance
Numbers 1 to 10
Group D
Performance
Numbers 1 to 10
External Performance Memory
Group B
EXT2 bank EXT3 bank EXT1 bank
Group A
Performance
Numbers 1 to 10
Group A
Performance
Numbers 1 to 10
Group A
Performance
Numbers 1 to 10
Group B
Performance
Numbers 1 to 10
Group B
Performance
Numbers 1 to 10
Performance
Numbers 1 to 10
Group C
Performance
Numbers 1 to 10
Group C
Performance
Numbers 1 to 10
Group C
Performance
Numbers 1 to 10
Group D
Performance
Numbers 1 to 10
Group D
Performance
Numbers 1 to 10
Group D
Performance
Numbers 1 to 10

9 CP5/CP50 Reference Manual
Internal Design of the CP5 & CP50 > Tone Generator
HINT
Using External Performance Memories
In order to save Performances in an External Performance memory or to use an External Performance memory from a USB
flash-memory device, the USB flash-memory device in question must be plugged into your CP5 or CP50. When you do so,
the stage piano will behave in a number of different ways depending on whether or not it already contains an External
Performance memory and when the USB flash-memory device was last plugged in. Each of these actions is described
below.
Root directory does not contain an External Performance memory:
As soon as you plug in a USB flash-memory device, your stage piano will check its root directory for an External
Performance memory. If none exists, it will create one in the form of a file named EXTBANK.C5E or EXTBANK.C6E.
Root directory contains an External Performance memory:
If an External Performance memory already exists in the root directory of the USB flash-memory device, the action taken will
— as described below — depend on whether or not that specific memory device was previously plugged in and removed
after you turned on the stage piano.
• Not previously plugged in after turning on the stage piano:
If the USB flash-memory device is being plugged in for the first time after turning on your CP5 or CP50, the data from its
External Performance memory will be automatically loaded into a dedicated section of the instrument's internal memory
(DRAM).
NOTE If a different USB flash-memory device has already been plugged in and removed after turning on the stage piano, the
instrument will operate in line with the description from Previously plugged in after turning on the stage piano (below).
NOTICE
Whenever an External Performance memory from a USB flash-memory device is loaded into the stage piano, all External
Performance memory data from the DRAM and data in the Edit Buffer will be overwritten. Before plugging in a USB flash-
memory device, therefore, be sure to store any important External Performances residing in the DRAM and any
Performances located within the Edit Buffer and containing unsaved modifications.
• Previously plugged in after turning on the stage piano:
Whenever you plug in a USB flash-memory device that has already been plugged in and removed at least once after
turning on the stage piano, you will be asked whether or not its External Performance memory should be loaded. If the
External Performance memory currently loaded into the stage piano contains irreplaceable Performances with unsaved
modifications, be sure to press Knob 3 (NO [PUSH]) at this time.

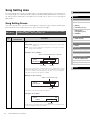
10 CP5/CP50 Reference Manual
Internal Design of the CP5 & CP50 > Song Setting Area
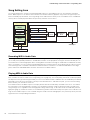
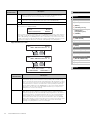
Song Setting Area
The Song Setting area is used to record and play MIDI sequences and audio files for use as Performance backing
tracks. MIDI sequences can take the form of built-in Preset Drum Patterns (playback only) or User Songs that you can
both record and play. Meanwhile, the Song Setting area’s audio functions allow you to record Wave files to a USB flash-
memory device and to play back Wave files previously stored on such a device.
Recording MIDI & Audio Data
Recording of User Songs and Wave files is carried out using the Record screen (page 37). In the case of User Songs,
you record your keyboard performance as MIDI data, and this can be played back using the sound created by the cur-
rent Performance’s left and right parts. When creating Wave files for direct storage as audio data on a USB flash-memory
device, meanwhile, you can record your keyboard performance together with the Preset Drum Pattern or User Song set
as the backing track. It should be noted that Preset Drum Patterns cannot be re-recorded as MIDI data on the stage
piano, and that recorded MIDI data cannot be stored as Preset Drum Patterns.
Playing MIDI & Audio Data
For each Performance, you can choose a single Preset Drum Pattern, User Song, or Wave file for playback as a backing
track, and this selection is made on the Song Setting screen (page 35). The actual part(s) that will be used for playback
will depend on the type of backing track that you select. Preset Drum Patterns and Wave files are handled by the TRACK
part (page 7) from the Tone Generator’s currently-selected Performance, and within this part, you can set the backing
track’s volume, pan, and effect send level.
Preset Drum Patterns are MIDI sequences that play built-in drum kit sounds totally unrelated to the voices selected for
the Performance’s left and right parts; therefore, they will always play back using the drum kit sounds selected on the
Song Setting screen, regardless of left and right part settings. User Songs, on the other hand, are handled by left and
right parts (page 5), and for this reason, the sound that they produce will be affected by these parts’ voice and effect set-
tings. As these MIDI sequences are recorded using the sound of the left and right parts, they function perfectly as back-
ing tracks for the corresponding Performance.
Song Setting Area
MIDI record
and play
User Songs
Preset Drum
Patterns
Audio record
and play
Wave
USB flash-memory device
Tone Generator
Performances
Reverb
block
Master
Compressor
block
Master
Equalizer
block
Audio output
*
Parts available on CP5 only.
LEFT1/LEFT RIGHT1/RIGHT
LEFT2
*
RIGHT2
*
TRACK
MIC INPUT*

11 CP5/CP50 Reference Manual
Internal Design of the CP5 & CP50 > Controller
Controller
Your stage piano’s Controller consists of the keyboard, pitch bend wheel, knobs, foot pedals, and other input devices
used while playing. It is important to bear in mind that the keyboard itself does not generate any sound; instead, it sends
note, velocity, and other performance-related signals to a tone generator, which then produces sounds in response. In
the same way, the other Controller devices also send signals to the tone generator whenever they are operated. Specifi-
cally speaking, the signals produced and sent by the keyboard and other devices are MIDI messages, and therefore,
they can also be sent to other MIDI devices or a computer via the MIDI OUT connector or the USB TO HOST port. Please
note, however, that data produced by the knobs is not output from the instrument in this way.

Internal Design of the CP5 & CP50
Reference
Left & Right Parts
[VOICE]
[PRE-AMP]
[MOD-FX]
[PWR-AMP] (CP5 only)
[LEFT1]/[LEFT2]/[RIGHT1]/
[RIGHT2] (CP5)
[LEFT]/[RIGHT] (CP50)
[COMMON]
Song Setting Area
[SONG SETTING]
[RECORD]
TRACK Part
[TRACK]
MIC INPUT Part
[MIC INPUT] (CP5 only)
Settings for All Parts
[REVERB]
Settings for All Performances
[MASTER COMPRESSOR]
[UTILITY]
[FILE]
Appendix
12 CP5/CP50 Reference Manual
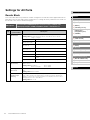
Reference
This section provides a detailed description of the parameters used to configure your CP5 or CP50.
Left & Right Parts
The following describes the parameters that can be set for left and right parts on a block-by-block
basis. These descriptions apply to the LEFT1, LEFT2, RIGHT1, and RIGHT2 parts on the CP5, and
to the LEFT and RIGHT parts on the CP50.
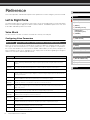
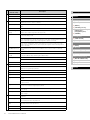
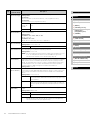
Voice Block
The Voice block is used to set a basic sound for the currently selected part.
Configuring Voice Parameters
Voices on your CP5 or CP50 are arranged into a number of different categories based on instru-
ment type or sound characteristics (i.e., piano, guitar, bass, etc.). For the purpose of explanation,
this section will introduce the voices from the PIANO and E.PIANO (electric piano) categories as
typical examples of the voices available on your stage piano. For details regarding all categories
and voices, refer to the Data List pdf document.
Edit Sequence Press the [VOICE] button Turn Knob 1 and Knob 2 or press buttons [1] to [10]
Voice name Description
PIANO Category
CF Grand* The CF Grand piano has a straightforward sound, making it suitable for practically all musical
genres. Featuring a broad dynamic range, this piano type provides for highly expressive perfor-
mances.
S6 Grand*
(CP5 only)
In contrast to the two CF-series pianos, the S6 Grand has a more compact, woody sound. Allowing
you to play with both warmth and power, it is ideal for a diverse range of musical genres.
E. PIANO Category
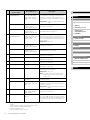
CP80* Reproducing the classic sound of the Yamaha CP80 Electric Grand Piano, the CP80 piano type can
also be used to recreate an unique “Eighties” feel by boosting the high frequencies with the accom-
panying pre-amplifier.
CP88* The CP88 piano and accompanying pre-amplifier deliver a nostalgia-laden sound distinctive of the
Yamaha CP80 Electric Grand Piano, particularly in the mid-frequency range.
71Rd I
(CP5 only)
The 71Rd I is the earliest-sounding of the CP5's Rd-series electric pianos. With the soft attack and
fast decay distinctive of felt hammers, it produces a mellow, hollow tone.
73Rd I
(CP5 only)
The 73Rd I piano replicates an electric piano with rubber-topped hammers, and compared to the
71 Rd I, it has a slightly brighter, more sustained tone. Overall, this Rd-series piano produces a
dark, heavy sound.
75Rd I The 75Rd I piano reproduces the bright, sustained sound of an electric piano featuring high-perfor-
mance versions of tines, pickups, and other sound-generating components.
78Rd II
(CP5 only)
Replicating the effect of plastic hammers and a high-fidelity, integrated-circuit pre-amplifier, the
78Rd II boasts the brightest sound of the Rd series.
Dyno
(CP5 only)
The Dyno piano type significantly boosts the high-frequency range of the 78Rd II to give a sparkling
“Eighties” sound.
69Wr In contrast to the Rd piano types provided by the CP5 or CP50. the 69Wr is characterized by a gen-
tle attack and fast decay. Furthermore, this piano type features a tight dynamic range.
77Wr Rounding off the vintage electric piano lineup of CP5 or CP50, the 77Wr piano type features a stron-
ger attack and more brilliant overall tone than the 69Wr.
DX Legend The DX Legend reproduces the indispensable vintage sound of the DX electric piano, which
remains a classic even to this day.

Internal Design of the CP5 & CP50
Reference
Left & Right Parts
[VOICE]
[PRE-AMP]
[MOD-FX]
[PWR-AMP] (CP5 only)
[LEFT1]/[LEFT2]/[RIGHT1]/
[RIGHT2] (CP5)
[LEFT]/[RIGHT] (CP50)
[COMMON]
Song Setting Area
[SONG SETTING]
[RECORD]
TRACK Part
[TRACK]
MIC INPUT Part
[MIC INPUT] (CP5 only)
Settings for All Parts
[REVERB]
Settings for All Performances
[MASTER COMPRESSOR]
[UTILITY]
[FILE]
Appendix
13 CP5/CP50 Reference Manual
NOTE Piano types marked with an asterisk (*) can have their tuning adjusted by setting the TunCrv parameter (Tuning Curve)
to “stretch” (page 44).
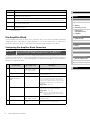
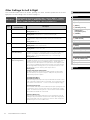
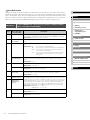
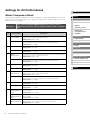
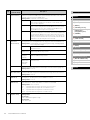
Pre-Amplifier Block
The Pre-Amplifier block has an effect on the sound only when a voice from the PIANO or E.PIANO
category has been selected for the part in question. In such a case, furthermore, a unique set of
parameters specifically for the selected type of piano will be made available in this block.
Configuring Pre-Amplifier Block Parameters
Pre-Amplifier block parameters are chosen automatically based on the type of piano voice selected
so that the sound of that voice can be perfectly adjusted. For this reason, the parameters displayed
will vary from voice to voice. In the following table, you will find a description of all of this block’s
parameters in alphabetic order.
DX Woody With its rich, woody body, the DX Woody voice delivers a mellower electric-piano sound.
DX FTine Recreating a classic voice from the DX electric piano, the DX FTine shows off the characteristic
attack sound of this instrument.
DX 7 II With the body portion of the sound changing in response to how you play, the DX 7 II will allow you
to experience the wonderful richness of expression for which the DX electric piano was renowned.
DX Mellow The DX Mellow voice is gentle and well suited to ballads; however, powerful playing will still pro-
duce a much harder sound.
DX Crisp Although relatively full-bodied, the DX Crisp remains highly present within an ensemble thanks to its
unique attack sound.
Edit Sequence
Press and hold the [PRE-AMP] button (for at least one second) Navigate to the
required page using the [ PAGE] and [PAGE ] buttons Turn Knobs 1 to 3
On-screen name
(and full name)
Associated voices Description
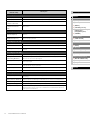
B Bass CP80, CP88, 71Rd I,
73Rd I, 75Rd I, 78Rd II,
Dyno, 69Wr, and 77Wr
This parameter is used to adjust the volume of the
low-frequency component.
Brill. (Brilliance) CP80 and CP88 This parameter is used to adjust the brightness of
the sounds produced.
D DampReso
(Damper Resonance
Level)
CF Grand and S6 Grand This parameter is used in combination with a con-
nected Sustain pedal to recreate the sound of
strings resonating in response to pressing of an
acoustic piano's damper pedal. In specific terms,
the DampReso parameter sets the depth of this
resonance.
Setting values: -16 to +16
Decay (Decay Time) All piano voices This parameter is used to adjust how fast a note
decays while the key is being held down.
Setting values: -16 to +16
NOTE The same setting can be made using the
EGDcy parameter (page 29) from the Part
Setting screen.
Depth (Vibrato Depth) 71Rd I, 73Rd I, 75Rd I,
78Rd II, 69Wr, and 77Wr
This parameter is used to adjust the depth of the
pre-amplifier vibrato.
G Gain (Input Gain) All voices from E.PIANO
category
This parameter is used to adjust the volume of the
signal input into the Pre-Amplifier block.
Voice name Description

Internal Design of the CP5 & CP50
Reference
Left & Right Parts
[VOICE]
[PRE-AMP]
[MOD-FX]
[PWR-AMP] (CP5 only)
[LEFT1]/[LEFT2]/[RIGHT1]/
[RIGHT2] (CP5)
[LEFT]/[RIGHT] (CP50)
[COMMON]
Song Setting Area
[SONG SETTING]
[RECORD]
TRACK Part
[TRACK]
MIC INPUT Part
[MIC INPUT] (CP5 only)
Settings for All Parts
[REVERB]
Settings for All Performances
[MASTER COMPRESSOR]
[UTILITY]
[FILE]
Appendix
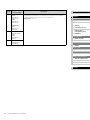
14 CP5/CP50 Reference Manual
NOTE Output from the Pre-Amplifier block will be muted briefly whenever one of the following tone-control parameters is
modified.
• CP80 or CP88 pre-amplifier: Bass, Middle, Treble, or Brill
• 71Rd I, 73Rd I, or 75Rd I pre-amplifier: Bass
• 78Rd II pre-amplifier: Tre b l e
• Dyno pre-amplifier: Bass or Overtone
H Hammer
(Hammer Stiffness)
CP5 only — CF Grand,
S6 Grand, CP80, CP88,
71Rd I, 73Rd I, 75Rd I,
78Rd II, Dyno, 69Wr, and
77Wr
This parameter is used to adjust the apparent soft-
ness or hardness of the piano sound in much the
same way as if softer or harder hammers were
used to strike the strings. It is available on the CP5
only.
Setting values: Soft2, Soft1, Normal, Hard1, and
Hard2
High DX Legend, DX Woody,
DX FTine, DX 7 II,
DX Mellow, and DX Crisp
This parameter is used to adjust the volume of the
high-frequency component.
HighMid (High Middle) DX Legend, DX Woody,
DX FTine, DX 7 II,
DX Mellow, and DX Crisp
This parameter is used to adjust the volume of the
high-middle frequency component.
K Key-off
(Key-off Noise Level)
CF Grand, S6 Grand,
CP80, CP88, 71Rd I, 73Rd
I, 75Rd I, 78Rd II, Dyno,
69Wr, and 77Wr
This parameter is used to recreate the sound of
dampers pressing against the strings when you
remove your fingers from the keyboard. In specific
terms, the Key-off parameter sets the volume of
this key-off noise.
Setting values: -16 to +16
L Low DX Legend, DX Woody,
DX FTine, DX 7 II,
DX Mellow, and DX Crisp
This parameter is used to adjust the volume of the
low-frequency component.
LowMid (Low middle) DX Legend, DX Woody,
DX FTine, DX 7 II,
DX Mellow, and DX Crisp
This parameter is used to adjust the volume of the
low-middle frequency component.
M Middle CP80 and CP88 This parameter is used to adjust the volume of the
mid-frequency component.
MidBoost (Mid Boost) 69Wr and 77Wr This parameter is used to adjust the volume of the
mid-frequency component.
N Normal Dyno This parameter is used to adjust the volume of the
mid-frequency component.
O Overtone Dyno This parameter is used to adjust the volume of the
high-frequency component.
R Release (Release Time) All piano voices This parameter is used to adjust how fast a note
decays after the key is released.
Setting values: -16 to +16
NOTE The same setting can be made using the
EGRel parameter (page 29) from the Part
Setting screen.
S Speed (Vibrato Speed) 71Rd I, 73Rd I, 75Rd I,
and 78Rd II
This parameter is used to adjust the speed of the
pre-amplifier vibrato.
StrkPos (Striking Position) 71Rd I, 73Rd II, 75Rd I,
78Rd II, Dyno, 69Wr, and
77Wr
This parameter is used to replicate the effect of
changing the position at which the resonators are
struck by the hammers.
Setting values: Top3 to Top1, Default, or Rear1 to
Rear3
T Tre bl e CP80, CP88, 71Rd I,
73Rd , 75Rd I, 78Rd II,
69Wr, and 77Wr
This parameter is used to adjust the volume of the
high-frequency component.
V Volume All voices from E.PIANO
category
This parameter is used to adjust the output vol-
ume. If set to 100 or greater when 71Rd I, 73Rd I,
75Rd I, 78Rd II, Dyno, 69Wr, or 77Wr has been set
as the part's voice, drive will also be added to the
sound.
On-screen name
(and full name)
Associated voices Description

Internal Design of the CP5 & CP50
Reference
Left & Right Parts
[VOICE]
[PRE-AMP]
[MOD-FX]
[PWR-AMP] (CP5 only)
[LEFT1]/[LEFT2]/[RIGHT1]/
[RIGHT2] (CP5)
[LEFT]/[RIGHT] (CP50)
[COMMON]
Song Setting Area
[SONG SETTING]
[RECORD]
TRACK Part
[TRACK]
MIC INPUT Part
[MIC INPUT] (CP5 only)
Settings for All Parts
[REVERB]
Settings for All Performances
[MASTER COMPRESSOR]
[UTILITY]
[FILE]
Appendix
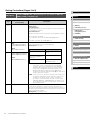
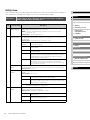
15 CP5/CP50 Reference Manual
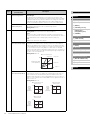
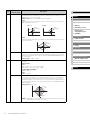
Modulation Effect Block
Using a Modulation Effect block, an audio effect can be applied to the part’s voice in order to mod-
ify its spatial characteristics.
Selecting Modulation Effect Block Types
The following tables identify and describe the different types of effect that can be selected in each
Modulation Effect block. If you have selected a voice from the PIANO or E.PIANO category for the
current part, this block’s selection page will give priority to a group of effects specially designed for
piano voices (i.e., the modulation effects). A range of additional general-purpose effects can also
be selected from the block’s Other group. Meanwhile, if you have selected a non-piano voice, all of
these effects
— including those primarily for piano voices — will be available for selection by cate-
gory as insertion effects.
For PIANO and E.PIANO voices:
Edit Sequence
Press and hold the [MOD-FX] button (for at least one second) Navigate to Page 1
using the [
PAGE] button if necessary Turn Knobs 1 to 3
On-screen name
(and full name)
Description
SmallPha (Small Phaser) Small Phaser operates like a vintage phaser, applying a unique sweeping effect.
Max90 Max90 emulates a vintage phaser, producing a more traditional-sounding effect.
Max100 Another vintage-type phaser, Max100 can modify the sound in a number of differ-
ent ways based on its Mode parameter setting.
Flanger The Flanger effect reproduces the sound of a vintage flanger.
TouchWah (Touch Wah) Touch Wah produces a classic filter-sweep effect in response to how hard or soft
the keyboard is played.
PedalWah (Pedal Wah) Another classic filter-sweep effect, Pedal Wah is operated using a pedal or
another controller. In order to use this effect, it is necessary to specify which con-
troller is to be used, and this can be done by selecting the controller on Page 4 of
the Common Settings screen (page 34) and setting “MdEffect” as its destination.
Chorus The Chorus effect applies a standard chorus.
D Chorus D Chorus produces a chorus effect that is more natural sounding, softer, and
wider.
816Cho (816Chorus) Famous for combining eight DX7s in a single rack unit, Yamaha's TX816 featured
a thick, detuned chorus sound that is reproduced here by the 816Chorus modula-
tion effect.
Sympho (Symphonic) Symphonic uses multi-stage modulation to produce a wider-sounding chorus.
Other The Other group contains general-purpose effects that are suitable for use with
voices other than those from the PIANO and E.PIANO categories. Within this
group, you can select from a wide range of effects in a number of different catego-
ries. See the table on the following page for more details regarding these catego-
ries and effects.
Selected modulation effect

Internal Design of the CP5 & CP50
Reference
Left & Right Parts
[VOICE]
[PRE-AMP]
[MOD-FX]
[PWR-AMP] (CP5 only)
[LEFT1]/[LEFT2]/[RIGHT1]/
[RIGHT2] (CP5)
[LEFT]/[RIGHT] (CP50)
[COMMON]
Song Setting Area
[SONG SETTING]
[RECORD]
TRACK Part
[TRACK]
MIC INPUT Part
[MIC INPUT] (CP5 only)
Settings for All Parts
[REVERB]
Settings for All Performances
[MASTER COMPRESSOR]
[UTILITY]
[FILE]
Appendix
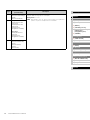
16 CP5/CP50 Reference Manual
After selecting Other as the modulation effect type, you will be able to use Knobs 2 and 3 to choose
effect categories and individual effects. The following table identifies and describes the different
types of effect that are available for selection within the Other group.
On-screen name
(and full name)
Description
Effect category: Delay (DLY)
CrsDly (Cross Delay) Cross Delay contains two individual delays with cross-over feedback to produce a
sound that swirls between the left and right channels.
T-CrsDly (Tempo Cross Delay) Tempo Cross Delay processes sound in the same way as Cross Delay, but allows
the delay times to be synchronized with the playback tempo.
T-DlyMono
(Tempo Delay Mono)
Tempo Delay Mono is a monaural delay effect that allows the delay time to be syn-
chronized with the playback tempo.
T-DlySt (Tempo Delay Stereo) Tempo Delay Stereo is a stereo delay effect that allows the delay time to be syn-
chronized with the playback tempo.
DlyLR (Delay LR) Delay LR features a pair of left and right feedback-type delays.
DlyLCR (Delay LCR) Delay LCR features three individual delays, one each for the left, center, and right.
DlyLR(St) (Delay LR (Stereo)) Delay LR (Stereo) processes sound in the same way as Delay LR but has fully inde-
pendent left and right channels.
Effect category: Chorus (CHO)
G Cho (G Chorus) G Chorus produces a rich, deep chorus with complex modulation.
2Mod (2 Modulator) 2 Modulator is a chorus effect allowing pitch and amplitude modulation to be
adjusted for a more natural, spacious tone.
SPX Cho (SPX Chorus) The SPX Chorus effect enhances modulation and spaciousness using a three-
phase LFO.
Ensemble (Ensemble Detune) Ensemble Detune adds a slightly pitch-shifted sound to produce a modulation-free
chorus.
Effect category: Flanger (FLG)
ClscFlg (Classic Flanger) As its name suggests, Classic Flanger produces a conventional flanger effect.
T-Flg (Tempo Flanger) Tempo Flanger features an LFO that can be synchronized with the playback tempo.
DynaFlg (Dynamic Flanger) The Dynamic Flanger effect can control its delay modulation in real time based on
the level of the input signal.
Effect category: Phaser (PHA)
T-Pha (Tempo Phaser) Tempo Phaser features an LFO that can be synchronized with the playback tempo.
DynaPha (Dynamic Phaser) The Dynamic Phaser effect can control its phase shift in real time based on the
level of the input signal.
Effect category: Tremolo & Rotary (T&R)
AutoPan (Auto Pan) Auto Pan is an effect that cyclically moves the sound between left and right in the
stereo field.
Tremolo Tremolo is used to cyclically modulate the volume of the input signal.
Rotary (Rotary Speaker) Rotary Speaker simulates the unique sound of a classic rotary-type speaker.
Effect category Effect name

Internal Design of the CP5 & CP50
Reference
Left & Right Parts
[VOICE]
[PRE-AMP]
[MOD-FX]
[PWR-AMP] (CP5 only)
[LEFT1]/[LEFT2]/[RIGHT1]/
[RIGHT2] (CP5)
[LEFT]/[RIGHT] (CP50)
[COMMON]
Song Setting Area
[SONG SETTING]
[RECORD]
TRACK Part
[TRACK]
MIC INPUT Part
[MIC INPUT] (CP5 only)
Settings for All Parts
[REVERB]
Settings for All Performances
[MASTER COMPRESSOR]
[UTILITY]
[FILE]
Appendix
17 CP5/CP50 Reference Manual
Effect category: Distortion (DST)
AmpSim1 (Amp Simulator 1) Amp Simulator 1 replicates the sound produced by guitar amplifiers.
AmpSim2 (Amp Simulator 2) Amp Simulator 2 replicates the sound produced by guitar amplifiers.
CmpDst
(Compressor-Distortion)
Compressor & Distortion combines compression and distortion effects.
CmpDst+
(Compression-Distortion-
Delay)
The Compression-Distortion-Delay effect combines compression, distortion, and
delay effects.
Effect category: Compressor (CMP)
ClscCmp
(Classic Compressor)
Relatively fast-acting, the Classic Compressor effect is well suited to solo perfor-
mances.
MCmp
(Multiband Compressor)
Multiband Compressor can be used to apply compression independently in three
specific frequency bands.
Effect category: Lo-fi (L-F)
Lo-Fi Lo-Fi is used to creatively degrade the audio quality of the incoming signal.
Noisy The Noisy effect can be used to intentionally add noise to the input signal.
D-Turn (Digital Turntable) Digital Turntable adds the noise, clicks, and pops characteristic of old analog
records.
Effect category: Tech (TEC)
RingMod (Ring Modulator) Ring Modulator gives the input signal a more metallic sounding character.
DynaRing
(Dynamic Ring Modulator)
The Dynamic Ring Modulator effect can control its oscillator frequency in real time
based on the level of the input signal.
DynaFlt (Dynamic Filter) Dynamic Filter can control its filter cutoff frequency in real time based on the level
of the input signal.
Auto Syn (Auto Synth) The Auto Syn effect uses delay and modulation to make the input signal sound as if
it was produced using a synthesizer.
Isoltr (Isolator) Isolator uses powerful filters to control the volume of individual frequency bands.
TechMod (Tech Modulation) The Tech Modulation effect applies a special type of modulation to the input signal.
Effect category: Misc (MSC)
EQ501 (EQ 501) EQ 501 is a five-band equalizer utilizing Yamaha’s Virtual Circuitry Modeling (VCM)
technology.
Enhans (Harmonic Enhancer) Harmonic Enhancer adds higher-order harmonics to enhance a sound’s presence.
TalkMod (Talking Modulator) The Talking Modulator effect adds a vowel-type formant to the input signal.
PchChg (Pitch Change) As its name suggests, Pitch Change can modify the pitch of the input signal.
ER (Early Reflections) Early Reflections is a type of reverb effect that replicates the sound of the input sig-
nal being reflected once or twice off a simulated room’s hard surfaces without the
subsequent full reverberation.
On-screen name
(and full name)
Description

Internal Design of the CP5 & CP50
Reference
Left & Right Parts
[VOICE]
[PRE-AMP]
[MOD-FX]
[PWR-AMP] (CP5 only)
[LEFT1]/[LEFT2]/[RIGHT1]/
[RIGHT2] (CP5)
[LEFT]/[RIGHT] (CP50)
[COMMON]
Song Setting Area
[SONG SETTING]
[RECORD]
TRACK Part
[TRACK]
MIC INPUT Part
[MIC INPUT] (CP5 only)
Settings for All Parts
[REVERB]
Settings for All Performances
[MASTER COMPRESSOR]
[UTILITY]
[FILE]
Appendix
18 CP5/CP50 Reference Manual
For non-piano voices:
In the case of non-piano voices, effects can be selected from the categories that make up the Other
group as described above. In addition, the modulation effects, which are primarily for PIANO and
E.PIANO voices, are grouped together in the MOD category. For more details regarding these
effects, see For PIANO and E.PIANO voices (page 15). All effects for non-piano voices function as
insertion effects.
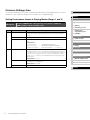
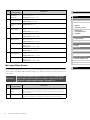
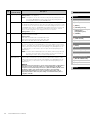
Configuring Modulation Effect Block Parameters
Each Modulation Block effect is configured using a different set of parameters, which adjust the
sound of the effect in various ways. The following tables will describe the functions of each of these
parameters in alphabetic order, first for the modulation effects (specially designed for PIANO and
E.PIANO voices) and then for the effects from the Other group.
NOTE For more details on the specific parameters associated with each different type of effect, see the Modulation Effect
parameter list in the Data List pdf document.
Parameters for modulation effects
Edit Sequence
Press and hold the [MOD FX] button (for at least one second) Navigate to the second
and subsequent pages using the [
PAGE] and [PAGE ] buttons Turn Knobs 1 to 3
On-screen name
(and full name)
Associated effects Description
B Bottom Touch Wah and Pedal Wah This parameter is used to set the lowest point
in the filter's sweep range.
C Color Small Phaser This parameter is used to adjust the way in
which the phaser sweeps.
D Delay Symphonic This parameter is used to set an offset for the
modulation delay time.
Depth Flanger, Chorus, 816Chorus, and
Symphonic
This parameter is used to adjust the depth of
modulation.
Drive Small Phaser and Max90 This parameter is used to set the phaser's
input level.
Touch Wah and Pedal Wah This parameter is used to adjust the way in
which the sound distorts.
F Feedback Flanger and 816Chorus This parameter is used adjust the degree to
which output from the effect is fed back into
its input.
M Manual Flanger This parameter is used to set the offset value
for delay modulation.
Mix Flanger, Chorus, 816Chorus, and
Symphonic
This parameter is used to adjust the volume
of the wet sound (i.e., the sound produced by
the effect).
Mode Max100 This parameter is used to select the phaser
mode.
P PdlCtrl
(Pedal Control)
Pedal Wah This parameter is used to set the cutoff fre-
quency for the wah filter.
Phase 816Chorus This parameter is used to set the phase offset
for the chorus effect.
Effect category
Effect name

Internal Design of the CP5 & CP50
Reference
Left & Right Parts
[VOICE]
[PRE-AMP]
[MOD-FX]
[PWR-AMP] (CP5 only)
[LEFT1]/[LEFT2]/[RIGHT1]/
[RIGHT2] (CP5)
[LEFT]/[RIGHT] (CP50)
[COMMON]
Song Setting Area
[SONG SETTING]
[RECORD]
TRACK Part
[TRACK]
MIC INPUT Part
[MIC INPUT] (CP5 only)
Settings for All Parts
[REVERB]
Settings for All Performances
[MASTER COMPRESSOR]
[UTILITY]
[FILE]
Appendix
19 CP5/CP50 Reference Manual
Parameters for Other effects
R Rate Small Phaser This parameter is used to adjust the modula-
tion speed.
Reso
(Resonance Offset)
Touch Wah and Pedal Wah This parameter is used to set the resonance
offset value.
S Sens. (Sensitivity) Touch Wah This parameter is used to adjust how sensi-
tive the filter-sweep effect is to playing veloc-
ity.
Speed Max90, Max100, Flanger, Chorus,
816Chorus, and Symphonic
This parameter is used to adjust the modula-
tion speed.
T To p Touch Wah and Pedal Wah This parameter is used to set the highest
point in the filter's sweep range.
Ty pe Max90 This parameter is used to select the phaser
type.
D Chorus This parameter is used to select the chorus
type.
On-screen name
(and full name)
Description
A AEG Phase This parameter is used to offset the AEG phase.
AM Depth This parameter is used to set the depth of amplitude modulation.
AM Inverse R This parameter is used to adjust the phase of the right channel’s amplitude modulation.
AM Speed This parameter is used to adjust the speed of amplitude modulation.
AM Wave This parameter is used to select a waveform for amplitude modulation.
AMP Type This parameter is used to set the type of amplifier to be simulated.
Analog Feel This parameter is used to add the sonic characteristics of an analog flanger to the effect
sound.
Attack This parameter is used to set the amount of time that elapses between arrival of an input
signal and activation of the compressor.
Attack Time This parameter is used to adjust the envelope follower’s attack time.
B Bit Assign This parameter is used to set the way in which the Word Length setting affects the input
signal.
C Click Density This parameter is used to adjust the frequency of clicks added to the input signal.
Click Level This parameter is used to adjust the volume of clicks added to the input signal.
Common Release Affecting all three compression bands, this parameter is used to set the amount of time
that elapses until the sound is no longer being compressed.
Compress This parameter is used to set the input-signal level at which the compressor starts to
process the sound (i.e., the threshold).
D Decay This parameter is used to control the way in which the reverb sound decays.
Delay Level C This parameter is used to set the delay volume for the center channel.
Delay Mix This parameter is used to set the delay volume in cases where multiple effects are
applied.
Delay Offset This parameter is used to set an offset for the modulation delay time.
Delay Time This parameter is used to set the delay time as a note value or absolute time.
Delay Time C, L, R These parameters are used to set delay times for the center, left, and right channels.
Delay Time L>R This parameter is used to set the time that elapses between input of sound via the left
channel and output via the right channel.
Delay Time Ofst R This parameter is used to set the delay time for the right channel as an offset.
On-screen name
(and full name)
Associated effects Description

Internal Design of the CP5 & CP50
Reference
Left & Right Parts
[VOICE]
[PRE-AMP]
[MOD-FX]
[PWR-AMP] (CP5 only)
[LEFT1]/[LEFT2]/[RIGHT1]/
[RIGHT2] (CP5)
[LEFT]/[RIGHT] (CP50)
[COMMON]
Song Setting Area
[SONG SETTING]
[RECORD]
TRACK Part
[TRACK]
MIC INPUT Part
[MIC INPUT] (CP5 only)
Settings for All Parts
[REVERB]
Settings for All Performances
[MASTER COMPRESSOR]
[UTILITY]
[FILE]
Appendix
20 CP5/CP50 Reference Manual
D Delay Time R>L This parameter is used to set the time that elapses between input of sound via the right
channel and output via the left channel.
Density Reverb effects: This parameter is used to set the reverb density.
Early Reflections: This parameter is used to set the density of early reflections.
Depth This parameter is used to set the depth of the simulated room.
Detune This parameter is used to set the degree to which pitches are detuned.
Device This parameter is used to select one of a number of devices that distort the sound in dif-
ferent ways.
Diffusion This parameter is used to adjust the spaciousness of the sound produced.
Direction This parameter is used to set the direction of envelope-follower modulation.
Divide Freq High This parameter is used to set the mid-to-high frequency when splitting the sound into
three bands.
Divide Freq Low This parameter is used to set the low-to-mid frequency when splitting the sound into
three bands.
Drive Distortion effects, Noisy, and Slice: This parameter is used to adjust the way in which the
sound distorts.
Miscellaneous effects: This parameter is used to set the degree to which the effect is
applied.
Drive Horn This parameter is used to set the depth of modulation produced through rotation of the
high-frequency horn.
Drive Rotor This parameter is used to set the depth of modulation produced through rotation of the
low-frequency rotor.
Dry Level This parameter is used to adjust the volume of the dry sound (i.e., the unprocessed
sound).
Dry LPF Cutoff
Frequency
This parameter is used to set the cutoff frequency for the low pass filter applied to the
dry sound.
Dry Mix Level This parameter is used to adjust the volume of the dry sound (i.e., the unprocessed
sound).
Dry Send to Noise This parameter is used to adjust how much of the dry signal is sent to the noise effect.
Dry/Wet Balance This parameter is used to set the balance between the dry sound and the wet sound
(i.e., the sound produced by the effect).
Dyna Level Offset This parameter is used to set an offset for adjusting the level of the envelope follower’s
output.
Dyna Threshold
Level
This parameter is used to set the minimum level at which the envelope follower affects
the input signal.
E Edge This parameter is used to specify a curve that determines how the sound is distorted.
Emphasis This parameter is used to change the high-frequency characteristics of the processed
sound.
EQ Frequency This parameter is used to set the EQ frequency.
EQ Gain This parameter is used to set how much the EQ will boost or cut the sound at the corre-
sponding frequency.
EQ High Frequency This parameter is used to set the center frequency of the high-frequency EQ band.
EQ High Gain This parameter is used to set the amount by which the high-frequency EQ band is
boosted or cut.
EQ Low Frequency This parameter is used to set the center frequency of the low-frequency EQ band.
EQ Low Gain This parameter is used to set the amount by which the low-frequency EQ band is
boosted or cut.
EQ Mid Frequency This parameter is used to set the center frequency of the mid-frequency EQ band.
EQ Mid Gain This parameter is used to set the amount by which the mid-frequency EQ band is
boosted or cut.
On-screen name
(and full name)
Description
Seite wird geladen ...
Seite wird geladen ...
Seite wird geladen ...
Seite wird geladen ...
Seite wird geladen ...
Seite wird geladen ...
Seite wird geladen ...
Seite wird geladen ...
Seite wird geladen ...
Seite wird geladen ...
Seite wird geladen ...
Seite wird geladen ...
Seite wird geladen ...
Seite wird geladen ...
Seite wird geladen ...
Seite wird geladen ...
Seite wird geladen ...
Seite wird geladen ...
Seite wird geladen ...
Seite wird geladen ...
Seite wird geladen ...
Seite wird geladen ...
Seite wird geladen ...
Seite wird geladen ...
Seite wird geladen ...
Seite wird geladen ...
Seite wird geladen ...
Seite wird geladen ...
Seite wird geladen ...
Seite wird geladen ...
Seite wird geladen ...
Seite wird geladen ...
Seite wird geladen ...
Seite wird geladen ...
Seite wird geladen ...
Seite wird geladen ...
Seite wird geladen ...
-
 1
1
-
 2
2
-
 3
3
-
 4
4
-
 5
5
-
 6
6
-
 7
7
-
 8
8
-
 9
9
-
 10
10
-
 11
11
-
 12
12
-
 13
13
-
 14
14
-
 15
15
-
 16
16
-
 17
17
-
 18
18
-
 19
19
-
 20
20
-
 21
21
-
 22
22
-
 23
23
-
 24
24
-
 25
25
-
 26
26
-
 27
27
-
 28
28
-
 29
29
-
 30
30
-
 31
31
-
 32
32
-
 33
33
-
 34
34
-
 35
35
-
 36
36
-
 37
37
-
 38
38
-
 39
39
-
 40
40
-
 41
41
-
 42
42
-
 43
43
-
 44
44
-
 45
45
-
 46
46
-
 47
47
-
 48
48
-
 49
49
-
 50
50
-
 51
51
-
 52
52
-
 53
53
-
 54
54
-
 55
55
-
 56
56
-
 57
57


Yamaha CP5 Benutzerhandbuch
- Kategorie
- Digitale Klaviere
- Typ
- Benutzerhandbuch
- Dieses Handbuch eignet sich auch für
in anderen Sprachen
- English: Yamaha CP5 User manual
- français: Yamaha CP5 Manuel utilisateur
- español: Yamaha CP5 Manual de usuario
- italiano: Yamaha CP5 Manuale utente
- русский: Yamaha CP5 Руководство пользователя
- Nederlands: Yamaha CP5 Handleiding
- português: Yamaha CP5 Manual do usuário
- dansk: Yamaha CP5 Brugermanual
- polski: Yamaha CP5 Instrukcja obsługi
- čeština: Yamaha CP5 Uživatelský manuál
- svenska: Yamaha CP5 Användarmanual
- Türkçe: Yamaha CP5 Kullanım kılavuzu
- suomi: Yamaha CP5 Ohjekirja
- română: Yamaha CP5 Manual de utilizare
Verwandte Artikel
-
Yamaha V1 Datenblatt
-
Yamaha CP88 Bedienungsanleitung
-
-
Yamaha CP1 Datenblatt
-
-
-
-
-
Yamaha CP40 Stage Datenblatt
-