
LAGAN
GB
DE
FR
AA-2134281-1
© Inter IKEA Systems B.V. 2018
Design and Quality
Ikea of Sweden

ENGLISH 3
DEUTSCH 30
FRANÇAIS 61

3/EN
TABLE OF CONTENTS
Safety information 4
Purpose of usage ..................................... 4
Child, vulnerable person and pet safety 5
Electrical safety......................................... 6
Transportation safety ............................... 7
Installation safety ..................................... 8
Safety of use ............................................. 8
Temperature warnings ........................... 8
Accessory use ........................................... 9
Cooking safety .......................................... 9
Maintenance and cleaning safety ......... 10
Product description 11
Product control panel introduction and
usage .................................................. 12
Oven control ............................................ 12
First use .................................................... 13
First cleaning ........................................... 13
How to operate the oven 14
General information on oven usage .... 14
Operation of the oven control unit....... 14
Oven operating functions ...................... 15
Use of product accessories .................... 16
General information about
cooking 17
General warnings about cooking in the
oven .................................................... 17
Pastries and oven food........................... 17
Meat, Fish and Poultry............................ 19
Grill ........................................................... 20
Test foods................................................. 21
Care and cleaning 22
General cleaning information .............. 22
Cleaning the accessories....................... 23
Cleaning the control panel ................... 23
Cleaning the inside of the oven (cooking
area) ................................................... 23
Easy Steam Cleaning ............................. 23
Cleaning the oven door ......................... 24
Removing the inner glass of the oven
door.................................................... 25
Cleaning the oven lamp ........................ 26
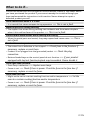
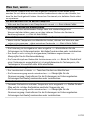
What to do if... 27
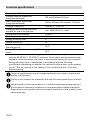
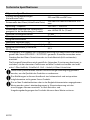
Technical specifications......................... 28
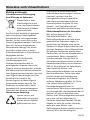
Environmental Instructions 29
Waste regulation .................................... 29
Compliance with the WEEE Directive and
Disposing of the Waste Product .... 29
Package information ............................. 29
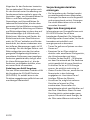
Recommendations for energy saving . 29

4/EN
Safety information
• This section contains safety
instructions that will help
prevent any risks of
personal injuries or material
damage.
• If the product is transferred
to another person or used
second hand, the operating
manual, product labels,
other relevant documents
and accessories should be
delivered with the product.
• Our company shall not be
held responsible for any
damage that may occur as a
result of failure to comply
with these instructions.
• Failure to comply with these
instructions shall render
any warranty void.
• Always have the
installation and repair work
performed by the
manufacturer, the
authorized service or a
person specified by the
importer.
• Use genuine spare parts
and accessories only.
• Do not attempt to repair
or replace any part of the
product unless it is clearly
specified in the operating
manual.
• Do not perform technical
modifications on the
product.
Purpose of usage
• This product is designed for
home use. It is not suitable
for commercial use.
• Do not use the product in
gardens, balconies or other
outdoor environments. The
appliance is intended to be
used in household and staff
kitchen areas in shops,
offices and other working
environments.
•WARNING: This product
should be used for cooking
purposes only. It should not
be used for different
purposes, such as heating
the room.
• The oven can be used to
defrost, bake, fry and grill
food.
• This product; should not be
used for heating, plate
heating, hanging towels or

5/EN
clothes on the handle for
drying.
Child, vulnerable
person and pet safety
• This product can be used by
children 8 years of age and
older, and people who are
underdeveloped in physical,
sensory or mental skills, or
lack of experience and
knowledge, as long as they
are supervised or trained
about the safe use and
hazards of the product.
• Children should not play
with the product. Cleaning
and user maintenance
should not be performed by
children unless there is
someone overseeing them.
• This product should not be
used by people with limited
physical, sensory or mental
capacity (including children),
unless they are kept under
supervision or receive the
necessary instructions.
• Children should be
supervised to ensure that
they do not play with the
product.
• Electrical products are
dangerous for children and
pets. Children and pets
must not play with, climb on,
or enter the product.
• Do not put objects that
children may reach on the
product.
•WARNING: During use, the
accessible surfaces of the
product are hot. Keep
children away from the
product.
• Keep the packaging
materials out of the reach
of children. There is a
hazard of injury and
suffocation.
• When the door is open, do
not put any heavy objects
on it or allow children to sit
on it. You may cause the
oven to tip over or damage
the door hinges.
•(Not all products are
supplied with a plug, so if
your product DOES have a
plug) For the safety of
children, disconnect the
power plug and make the
product inoperable before
disposing of the product.

6/EN
Electrical safety
• Connect the product into a
grounded outlet protected
by a fuse that matches the
current ratings indicated on
the type label. Have the
grounding installation
made by a qualified
electrician. Do not use the
product without grounding
in accordance with local /
national regulations.
• The plug or the electrical
connection of the product
should be in an easily
accessible place (where it
will not be affected by the
flame of the stove). If this is
not possible, there should
be a mechanism (fuse,
switch, switch, etc.) on the
electrical installation to
which the product is
connected, in compliance
with the electrical
regulations and separating
all poles from the network.
• The product must not be
connected into the outlet
during installation, repair,
and transportation.
• Connect the product into an
outlet that meets the
voltage and frequency
values specified on the type
label.
•(Not all products are
supplied with a supply
cord, so if your product
DOES NOT have a supply
cord) Use only the
connecting cable specified
in the "Technical
specifications" section.
• Do not jam the power cord
under and behind the
product. Do not put a heavy
object on the power cord.
The power cord should not
be bent, crushed, and come
into contact with any heat
source.
• While the oven is operating,
its back surface also gets
hot. Power cords must not
touch the back surface,
connections may be
damaged.
• Do not jam the electric
cables into the oven door
and pass them over hot
surfaces. You may cause the
oven to short circuit and

7/EN
catch fire as a result of the
cable melting.
• Use original cable only. Do
not use cut or damaged
cables or extension leads.
• If the power cord is
damaged, it must be
replaced by a manufacturer,
an authorized service or a
person to be specified by
the importer company in
order to prevent possible
dangers.
•WARNING: Before
replacing the oven lamp, be
sure to disconnect the
product from the mains
supply to avoid the risk of
electric shock. Switch off the
product or turn off the fuse
from the fuse box.
(Not all products are
supplied with a plug, so if
your product DOES have a
plug)
• Do not plug the product
into an outlet that is loose,
has come out of its socket,
is broken, dirty, oily, with
risk of water contact (for
example, water that may
leak from the counter).
• Never touch the plug with
wet hands! To unplug, do
not hold the cord, always
hold the plug.
• Make sure that the product
plug is securely plugged
into the outlet to avoid
arcing.
Transportation safety
• Disconnect the product
from the mains before
transporting the product.
• The product is heavy, carry
the product with at least
two people.
• Do not use the door and /
or handle to transport or
move the product.
• Do not put other items on
the product and carry the
product upright.
• When you need to transport
the product, wrap it with
bubble wrap packaging
material or thick cardboard
and tape it tightly. Secure
the product tightly with
tape to prevent the
removable or moving parts
of the product and the
product from damage.

8/EN
• Check the overall
appearance of the product
for any damage that may
have occurred during
transportation.
Installation safety
• Before the product is
installed, check the product
for any damage. If the
product is damaged, do not
install it.
• Do not install the product
near heat sources (radiators,
stoves, etc.).
• Keep all ventilation ducts
open around the product.
• To prevent overheating, the
product should not be
installed behind decorative
doors.
Safety of use
• Make sure that the product
is turned off after each use.
• If you do not use the
product for a long time,
disconnect it or turn off the
fuse from the fuse box.
• Do not operate defective or
damaged product. If any,
disconnect the electricity /
gas connections of the
product and call the
authorized service.
• Do not use the product with
the front door glass
removed or broken.
• Do not climb on the product
to reach anything or for any
other reason.
• Do not use the product in
situations that may affect
your judgment, such as
drug intake and / or alcohol
use.
• Flammable objects kept in
the cooking area may catch
fire. Never store flammable
objects in the cooking area.
• The oven handle is not a
towel dryer. When using the
product, do not hang towels,
gloves or similar textiles.
• The hinges of the product
door move and tighten
when opening and closing
the door. When opening /
closing the door, do not
hold the part with the
hinges.
Temperature warnings
•WARNING: While the
product is operating,
exposed parts will be hot.

9/EN
Do not touch the product
and heating elements.
Children under the age of 8
should not be brought close
to the product without an
adult.
• Do not place flammable /
explosive materials near the
product, as the edges will
be hot while it is operating.
• As steam may be exhaled,
keep away while opening
the oven door. The steam
may burn your hand, face
and / or eyes.
• The product may be hot
during use. Do not touch
the hot compartments, the
interior parts of the oven,
the heating elements, etc.
• When placing food in the
hot oven, removing the
food, etc. always use heat
resistant oven gloves.
Accessory use
• It is important that the wire
grill and tray are placed
properly on the wire shelves.
For detailed information,
refer to the section "Usage
of accessories".
• Accessories can damage the
door glass when closing the
product door. Always push
the accessories to the end
of the cooking area.
Cooking safety
• Be careful when using
alcohol in your food.
Alcohol evaporates at high
temperatures and may
catch fire when exposed to
hot surfaces, causing a fire.
• Food waste, oil, etc. in the
cooking area may catch fire.
Before cooking, remove
such coarse dirt.
• Food Poisoning Hazard: Do
not keep food in the oven
for more than an hour
before and after cooking.
Otherwise it may cause
food poisoning or diseases.
• Do not heat closed tin cans
and glass jars. Built up
pressure may cause the jar
to burst.
• Place the greaseproof
paper in a cookware or on
the oven accessory (tray,
wire grill, etc.) with food
and place it in the
preheated oven. Remove

10/EN
any excessive pieces of
greaseproof paper hanging
from the accessory or
container to avoid the risk
of touching the oven
heating elements. Never
use greaseproof paper at
an oven temperature higher
than the maximum use
temperature specified on
the greaseproof paper you
are using. Never place
greaseproof paper on the
oven base.
• Do not place baking trays,
plates or aluminum foil
directly on the bottom of
the oven. The accumulated
heat can damage the base
of the oven.
• Close the oven door during
grilling. Hot surfaces may
cause burns!
• Food not suitable for
grilling carries a fire hazard.
Grill only food that is
suitable for heavy grill fire.
Also, do not place the food
too far in the back of the
grill. This is the hottest area
and fatty foods may catch
fire.
Maintenance and
cleaning safety
• Wait for the product to cool
before cleaning the product.
Hot surfaces may cause
burns!
• Never wash the product by
spraying or pouring water
on it! There is an electric
shock hazard!
• Do not clean the product
with steam cleaners as this
may cause electric shock.
• Do not use harsh abrasive
cleaners, metal scrapers,
wire wool or bleach
materials to clean the oven
front door glass / (if present)
oven upper door glass.
These materials can cause
glass surfaces to be
scratched and broken.

11/EN
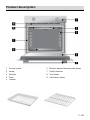
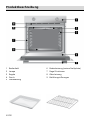
Product description
1
Control panel
2
Lamp
3
S
helves
4
Door
5
Handle
6
Bottom heater (bottom steel plate)
7
Shelf positions
8
To
p heater
9
Ventilation holes

12/EN
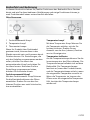
Product control panel introduction and usage
In this section, you can find the overview and basic uses of the product's control panel.
There may be differences in images and some features depending on the type of
product.
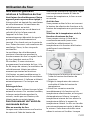
Oven control
1
Function selection knob
2
Temperature knob
3 Thermostat lamp
If there are knob (s) controlling your
product, these knob (s) may be recessed
in the panel that come out when pressed
in on some models. For settings to be
made with these knobs, first push the
relevant knob in and pull out the knob.
After making your adjustment, press it in
again and replace the knob.
Function selection knob
You can select the oven operating
functions with the function selection
knob. Turn left / right from closed (top)
position to select.
Temperature knob
You can select the temperature you want
to cook with the temperature knob. Turn
clockwise from the closed (top) position
to select.
Temperature indicator
You can understand the oven interior
temperature from the temperature lamp.
The temperature lamp is located on the
control panel. The temperature lamp
turns on when the product starts, and
the temperature lamp turns off when it
reaches the set temperature. When the
temperature inside the oven drops
below the set temperature, the
temperature lamp turns on again.

13/EN
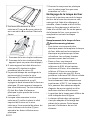
First use
Before you start using your product, it is
recommended to do the following in the
following sections.
First cleaning
1. Remove all packaging materials.
2. Remove all accessories from the oven
provided within the product.
3. Turn the product on for 30 minutes
and then, turn it off. This way, residues
and layers that may have remained in
the oven during production are burned
and cleaned.
4. When operating the product, select the
highest temperature and the operating
function that all the heaters in your
product operate. See "Oven operating
functions". You can learn how to
operate the oven in the following
section.
5. Wait for the oven to cool.
6. Wipe the surfaces of the product with a
wet cloth or sponge and dry with a
cloth.
Before using the accessories;
Clean the accessories you remove from
the oven with detergent water and a soft
cleaning sponge.
NOTICE
The surface might get
damaged by some
detergents or cleaning
materials. Do not use
aggressive detergents,
cleaning powders/creams
or any sharp objects during
cleaning.
NOTICE
Smoke and smell may emit
for a couple of hours during
the initial operation. This is
quite normal. Ensure that
the room is well ventilated
to remove the smoke and
smell. Avoid directly
inhaling the smoke and the
smell that emits.

14/EN
How to operate the oven
General information on oven
usage
Cooling fan (It may not exist on your
product.)
Your product has a cooling fan. The
cooling fan is activated automatically
when necessary and cools both the front
of the product and the furniture. It is
automatically deactivated when the
cooling process is finished. Hot air comes
out over the oven door. Do not cover
these ventilation openings with anything.
Otherwise, the oven may overheat.
The cooling fan continues to operate
during oven operation or after the oven
is turned off (approximately 20-30
minutes). If you cook by programming
the oven timer, at the end of the cooking
time, the cooling fan turns off with all
functions. The cooling fan running time
cannot be determined by the user. It
turns on and off automatically. This is not
an error.
Oven lighting
The oven lamp is turned on when the
oven starts cooking. In some models, the
lamp is on during cooking, while in some
models it turns off after a certain time.
Operation of the oven control
unit
Turning on the oven
When you select a operating function
you want to cook with using the function
selection knob and set a certain
temperature with using the temperature
knob, the oven starts operating.
Turning off the oven
You can turn the oven off by turning the
function selection knob and temperature
knob to the off (up) position.
Selecting the temperature and oven
operating function
You can cook by making the manual
control (under your control) by selecting
the temperature and operating function
specific to your food.
Example:
1. Select the operating function you want
to cook using the function selection
knob.
2. Set the temperature you want to cook
using the temperature knob.
» Your oven will start operating
immediately at the selected function and
temperature, and the temperature lamp
will light up. When the temperature
inside the oven reaches the set
temperature, the temperature lamp
turns off. The oven does not switch off
automatically after starting cooking. You
have to control cooking yourself and turn
it off. When your cooking is completed,
turn off the oven by turning the function
selection knob and the temperature
knob to the off (up) position.

15/EN
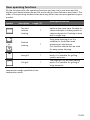
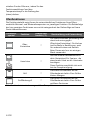
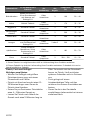
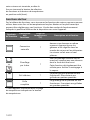
Oven operating functions
On the function table; the operating functions you can use in your oven and the
highest and lowest temperatures that can be set for these functions are shown. The
order of the operating modes shown here may differ from the arrangement on your
product.
Function
symbol
Function
description
Temperature
range (°C) Description and use
Top and
bottom
heating
*
Food is heated from above and
below at the same time. Suitable for
cakes and stews in baking molds or
cakes and pastries. Cooking is done
with a single tray.
Bottom
heating *
Only lower heating is on. It is
suitable for foods that need
browning on the bottom.
This function should also be used
for easy steam cleaning.
Low grill *
The small grill on the oven ceil
ing
works. It is suitable for grilling
smaller amounts.
Full grill *
The large grill on the oven ceiling
works. It is suitable for grilling in
large amounts.
* Your product operates in the
temperature range specified on the
temperature knob.

16/EN
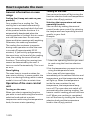
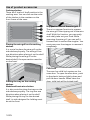
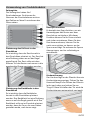
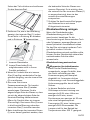
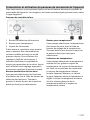
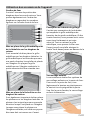
Use of product accessories
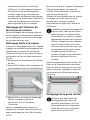
Cooking shelves
There are 5 levels of shelf position in the
cooking area. You can also see the order
of the shelves in the numbers on the
front frame of the oven.
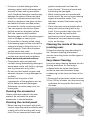
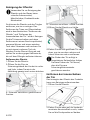
Placing the wire grill on the cooking
shelves
It is crucial to place the wire grill on the
side shelves properly. The wire grill has
one direction when placing it on the shelf.
While placing the wire grill on the
desired shelf, the open section must be
on the front.
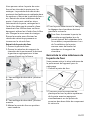
Placing the tray on the cooking
shelves
Models without wire shelves:
It is also crucial to place the trays on the
side shelves properly. The tray has one
direction when placing it on the shelf.
While placing the tray on the desired
shelf, its side designed for holding must
be on the front.
Stopper function of the wire grill
There is a stopper function to prevent
the wire grill from tipping out of the wire
shelf. With this function, you can easily
and safely take out your food. While
removing the wire grill, you can pull it
forward until it reaches the stopper. You
must pass over the stopper to remove it
completely.
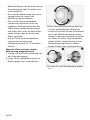
Child lock
The oven has child lock system on the
oven door. To open the oven door, push
to the plastic button slightly down and
pull the door handle. When close the
door, child lock will be locked itself.

17/EN
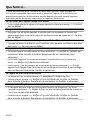
General information about cooking
This section describes tips on preparing
and cooking your food.
In addition, you can also find some of the
foods tested as producers and the most
appropriate settings for these foods.
Appropriate oven settings and
accessories for these foods are also
indicated.
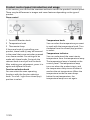
General warnings about
cooking in the oven
• While opening the oven door during or
after cooking, hot-burning steam may
emerge. The steam may burn your
hand, face and / or eyes. When
opening the oven door, stay away.
• Intense steam generated during
cooking may form condensed water
drops on the interior and exterior of
the oven and on the upper parts of the
furniture due to the temperature
difference. This is a normal and
physical occurrence.
• The cooking temperature and time
values given for foods may vary
depending on the recipe and amount.
For this reason, these values are given
as ranges.
• Always remove unused accessories
from the oven before you start cooking.
Accessories that will remain in the
oven may prevent your food from
being cooked at the correct values.
• For foods that you will cook according
to your own recipe, you can reference
similar foods given in the cooking
tables.
• Using the supplied accessories ensures
you get the best cooking performance.
Always observe the warnings and
information provided by the
manufacturer for the external
cookware you will use.
• Cut the greaseproof paper you will use
in your cooking in suitable sizes to the
container you will cook. Greaseproof
papers that are overflowing from the
container can create a risk of burns
and affect the quality of your cooking.
Use the greaseproof paper you will use
in the temperature range specified.
• For good cooking performance, place
your food on the recommended
correct shelf. Do not change the shelf
position during cooking.
Pastries and oven food
General Information
• We recommend using the accessories
of the product for a good cooking
performance. If you are going to use
an external cookware, prefer dark,
non-sticking and heat resistant ware.
• If preheating is recommended in the
cooking table, be sure to put your food
in the oven after preheating.
• If you are going to cook using
cookware on the wire grill, place it in
the middle of the wire grill, not near
the back wall.
• All materials used in making pastry
should be fresh and at room
temperature.
• The cooking status of the products
may vary depending on the amount of
food and the size of the cookware.
• Metal, ceramic and glass molds extend
the cooking time and the bottom
surface of pastry foods do not brown
evenly.
• If you use cooking paper during
cooking, a little browning may be
observed on the bottom surface of the

18/EN
food. In this case, you may need to
extend your cooking time about 10
minutes.
• The values specified in the cooking
tables are determined as a result of the
tests carried out in our laboratories.
Values suitable for you may differ from
these values.
• Place your food on the appropriate
shelf recommended in the cooking
table. Refer to the bottom shelf of the
oven as shelf 1.
• Cook the foods recommended in the
cooking table with a single tray.
Tips for baking cakes
• If the cake is too dry, increase the
temperature by 10 ° C and shorten the
baking time.
• If the cake is moist, use a small amount
of liquid or reduce the temperature by
10 ° C.
• If the top of the cake is burnt, put it on
the lower shelf, lower the temperature
and increase the baking time.
• If it is cooked well inside but the
outside is sticky, use a smaller amount
of liquid, reduce the temperature and
increase the cooking time.
Tips for cooking pastries
• If the pastry is too dry, increase the
temperature by 10 ° C and shorten the
cooking time. Wet the dough sheets
with a sauce consisting of milk, oil, egg
and yoghurt mixture.
• If the pastry is getting cooked slowly,
make sure that the thickness of the
pastry you have prepared does not
overflow the tray.
• If the pastry is browned on the surface
but the bottom is not cooked, make
sure that the amount of sauce you will
use for the pastry is not too much at
the bottom of the pastry. For an even
browning, try to spread the sauce
evenly between the dough sheets and
the pastry.
• Bake your pastry in the position and
temperature appropriate to the
cooking table. If the bottom is still not
browned enough, place it on a bottom
shelf for the next cooking.
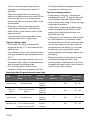
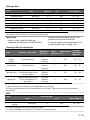
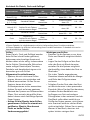
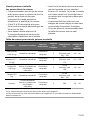
Cooking table for pastries and oven food
Food Accessory to be
used
Operating
function
Shelf
position
Temperature
(°C)
Cooking
time (min)
(approx.)
Cakes in tray Standard tray*
Top and
bottom
heating
3 180 30 … 40
Cakes in
mold
Cake mold on wire
grill**
Top and
bottom
heating
2 180 30 … 40
Small cakes Standard tray*
Top and
bottom
heating
3 160 25 … 35
Sponge cake
Round cake mold, 26
cm in diameter with
clamp on wire grill**
Top and
bottom
heating
2 160 30 … 40

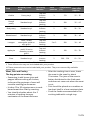
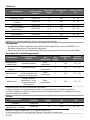
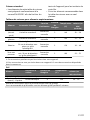
19/EN
Food Accessory to be
used
Operating
function
Shelf
position
Temperature
(°C)
Cooking
time (min)
(approx.)
Cookie Pastry tray*
Top and
bottom
heating
3 170 25 … 35
Dough
pastry Standard tray*
Top and
bottom
heating
2 200 35 … 45
Rich pastry Standard tray*
Top and
bottom
heating
2 200 20 … 30
Whole bread Standard tray*
Top and
bottom
heating
3 200 30 … 40
Lasagna
Glass / metal
rectangular mold on
wire grill**
Top and
bottom
heating
2 or 3 200 30 … 40
Apple pie
Round black metal
mold, 20 cm in
diameter on wire
grill**
Top and
bottom
heating
2 180 50 … 70
Pizza Standard tray*
Top and
bottom
heating
2 200 … 220 10 … 20
Preheating is recommended for all food.
* These accessories may not be included with your product.
** These accessories are not included with your product. They are commercially available
accessories.
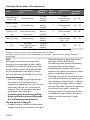
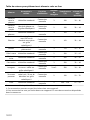
Meat, Fish and Poultry
The key points on roasting
• Seasoning it with lemon juice and
pepper before cooking all chicken,
turkey and large pieces of meat will
increase cooking performance.
• It takes 15 to 30 minutes more to cook
boned meat than fillet by roasting.
• You should calculate about 4 to 5
minutes of cooking time per
centimeter of the meat thickness.
• After the cooking time is over, leave
the meat in the oven for about
10 minutes. The juice of the meat is
better distributed to the fried meat
and does not come out when the meat
is cut.
• Fish should be placed on a medium or
low level shelf in a heat resistant plate.
• Cook the foods recommended in the
cooking table with a single tray.

20/EN
Cooking table for meat, fish and poultry
Food Accessory to be
used
Operating
function
Shelf
position
Temperature
(°C)
Cooking
time (min)
(approx.)
Steak (whole) /
Roast (1 kg) Standard tray*
Top and
bottom
heating
3
15 mins.
250/max, then
180 ... 190
60 ... 80
Lamb's shank
(1.5 - 2.0 kg) Standard tray*
Top and
bottom
heating
3
15 mins.
250/max, then
170
110 ... 120
Roasted
chicken (1.8-2
kg)
Wire grill*
Place one tray on a
lower shelf
Top and
bottom
heating
2
15 mins.
250/max, then
190
60 ... 80
Turkey (5.5 kg) Standard tray*
Top and
bottom
heating
1
25 mins.
250/max, then
180 ... 190
150 ... 210
Fish
Wire grill*
Place one tray on a
lower shelf
Top and
bottom
heating
3 200 20 ... 30
Preheating is recommended for all food.
* These accessories may not be included with your product.
** These accessories are not included with your product. They are commercially available
accessories.
Grill
Red meat, fish and poultry meat will
quickly turn brown when grilled, hold a
beautiful crust and do not dry out. Fillet
meats, skewer meats, sausages as well
as juicy vegetables (tomatoes, onions,
etc.) are particularly suitable for grilling.
General warnings
• Food not suitable for grilling carries a
fire hazard. Grill only food that is
suitable for heavy grill fire. Also, do not
place the food too far in the back of
the grill. This is the hottest area and
fatty foods may catch fire.
•Close the oven door during grilling.
Never grill with the oven door open.
Hot surfaces may cause burns!
The key points of the grill
• Prepare foods of similar thickness and
weight as much as possible for the grill.
• Place the pieces to be grilled on the
wire grill or wire grill tray by
distributing them without exceeding
the dimensions of the heater.
• Depending on the thickness of the
pieces to be grilled, the cooking times
given in the table may vary.
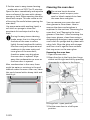
• Slide the wire grill or the wire grill tray
to the desired level in the oven. If you
are cooking on the wire grill, slide the
oven tray to the lower shelf to collect
the oils. The oven tray you are going to
slide should be sized to cover the
entire grill area. This tray may not be
included with the product. Put some
water into the oven tray for easy
cleaning.
Seite laden ...
Seite laden ...
Seite laden ...
Seite laden ...
Seite laden ...
Seite laden ...
Seite laden ...
Seite laden ...
Seite laden ...
Seite laden ...
Seite laden ...
Seite laden ...
Seite laden ...
Seite laden ...
Seite laden ...
Seite laden ...
Seite laden ...
Seite laden ...
Seite laden ...
Seite laden ...
Seite laden ...
Seite laden ...
Seite laden ...
Seite laden ...
Seite laden ...
Seite laden ...
Seite laden ...
Seite laden ...
Seite laden ...
Seite laden ...
Seite laden ...
Seite laden ...
Seite laden ...
Seite laden ...
Seite laden ...
Seite laden ...
Seite laden ...
Seite laden ...
Seite laden ...
Seite laden ...
Seite laden ...
Seite laden ...
Seite laden ...
Seite laden ...
Seite laden ...
Seite laden ...
Seite laden ...
Seite laden ...
Seite laden ...
Seite laden ...
Seite laden ...
Seite laden ...
Seite laden ...
Seite laden ...
Seite laden ...
Seite laden ...
Seite laden ...
Seite laden ...
Seite laden ...
Seite laden ...
Seite laden ...
Seite laden ...
Seite laden ...
Seite laden ...
Seite laden ...
Seite laden ...
Seite laden ...
Seite laden ...
Seite laden ...
Seite laden ...
Seite laden ...
Seite laden ...
-
 1
1
-
 2
2
-
 3
3
-
 4
4
-
 5
5
-
 6
6
-
 7
7
-
 8
8
-
 9
9
-
 10
10
-
 11
11
-
 12
12
-
 13
13
-
 14
14
-
 15
15
-
 16
16
-
 17
17
-
 18
18
-
 19
19
-
 20
20
-
 21
21
-
 22
22
-
 23
23
-
 24
24
-
 25
25
-
 26
26
-
 27
27
-
 28
28
-
 29
29
-
 30
30
-
 31
31
-
 32
32
-
 33
33
-
 34
34
-
 35
35
-
 36
36
-
 37
37
-
 38
38
-
 39
39
-
 40
40
-
 41
41
-
 42
42
-
 43
43
-
 44
44
-
 45
45
-
 46
46
-
 47
47
-
 48
48
-
 49
49
-
 50
50
-
 51
51
-
 52
52
-
 53
53
-
 54
54
-
 55
55
-
 56
56
-
 57
57
-
 58
58
-
 59
59
-
 60
60
-
 61
61
-
 62
62
-
 63
63
-
 64
64
-
 65
65
-
 66
66
-
 67
67
-
 68
68
-
 69
69
-
 70
70
-
 71
71
-
 72
72
-
 73
73
-
 74
74
-
 75
75
-
 76
76
-
 77
77
-
 78
78
-
 79
79
-
 80
80
-
 81
81
-
 82
82
-
 83
83
-
 84
84
-
 85
85
-
 86
86
-
 87
87
-
 88
88
-
 89
89
-
 90
90
-
 91
91
-
 92
92


in anderen Sprachen
- English: IKEA LAGAN User manual
- français: IKEA LAGAN Manuel utilisateur
Sonstige Unterlagen
-
Blomberg BEO 7422 Benutzerhandbuch
-
Privileg PCCF 30201061 W Bedienungsanleitung
-
-
Siemens HB56M550 Benutzerhandbuch
-
-
Bosch HSA720120 Herd Bedienungsanleitung
-
Bauknecht ELCK 7263/PT Benutzerhandbuch
-
Siemens HA724220 Herd Bedienungsanleitung
-
-