Community Playthings H560 Benutzerhandbuch
- Typ
- Benutzerhandbuch

Community Playthings
Brightling Road, Robertsbridge, TN32 5DR UK
Phone: 0800 387 457
www.communityplaythings.co.uk sales@communityplaythings.co.uk
Retain these instructions for future reference.
© 2005 by Community Products (UK) Ltd
MY75 Eu 0413 Revision 02
Drying rack
Recommended Use
The Drying rack provides space for 20 A2 size plastic
coated wire racks and one A2 size plastic tray. The
spacing may be adjusted to provide for paper or model/
construction drying. There is also space at the bottom
to store extra wire racks.
WARNING
cThis product is intended for use by children of immature
judgment, therefore supervision is required at all times.
CAUTION
cFor indoor use only. The Drying rack is not waterproof.
Assembly
H560 DRYING RACK comes in 2 cartons
• 1 H562 carton with 10 wire racks
• 1 H561 carton with the Drying rack and one plastic tray
If your shipment is incomplete, please call Customer
Service.
Accessories
10 extra wire racks
Construction
The wooden components are manufactured from solid birch
and birch plywood protected with a child-safe finish. The wire
racks are coated in plastic and the tray is plastic.
Cleaning
Wipe with a damp cloth and mild detergent. Dry immediately.
Leaving water or cleaning agent on the surface may damage
the finish.
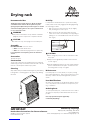
Mobility
It is important to understand how to operate the mobility
feature, which can be easily engaged, and disengaged using
the following procedure:
1. With one person at each end of the unit, tip slightly
back, allowing the toe trim to pivot.
2. One person keeps the item tipped, while the other
rotates the toe trim to the desired position by pulling or
pushing on one of the handholds at each end of the toe
trim. (Fig. A)
CAUTION
cNever change the position of the toe trim with less than
two people.
cAlways use the handholds provided at each end of the
toe trim. (Fig. A)
cAfter disengaging the wheels, give item a small sideways
push to settle the wheels into place. You will notice the
item sitting down securely on its glides.
Maintenance
Periodically inspect for cracks, breaks, loose parts, missing
parts, and/or malfunctions. Remove the product from service
when any condition develops that might make operation
unsafe.
User Modifications
We cannot be responsible for modifications made by custom-
ers to our products in the field without our supervision, test-
ing, or evaluation.
Ordering Parts
To order replacement parts, contact Customer Service with a
description of the part(s) needed and the ID Code from the
product.
Use only replacement parts supplied by
Community Playthings.
IMPORTANT
Figure A

© 2005 by Community Products (UK) Ltd
MY75 Eu 0413 Revision 02
Trockenwagen
Verwendungsrichtlinien
Der Trockenwagen bietet Platz für 20 kunststoffbe-
schichtete Drahtgitter in A2-Größe und eine Kunst-
stoffwanne in A2-Größe. Die Abstände zwischen den
Gittern lassen sich zum Trocknen von Papierbögen oder
sonstigen Bastelprojekten anpassen. An der Unterseite
befindet sich zusätzlicher Stauraum zur Aufbewahrung
von Drahtgittern.
ACHTUNG
cDiese Produkte sind für Kinder bestimmt. Kinder können
die Folgen ihrer Handlungen oft nicht abschätzen. Eine
Beaufsichtigung ist daher immer erforderlich.
VORSICHT
cNur für die Verwendung in Innenräumen. Der Trockenwa-
gen ist nicht wetterfest.
Zusammenbau
Der H560 TROCKENWAGEN wird in zwei Kartons geliefert:
• 1 H562-Karton mit 10 Drahtgittern
• 1 H561-Karton mit dem Trockenwagen und einer Kunststoff-
wanne
Bitte nehmen Sie Kontakt mit unserem Kundendienst
auf, wenn Ihre Lieferung unvollständig ist.
Zubehör
10 zusätzliche Drahtgitter
Konstruktion
Die hölzernen Teile sind aus Birke massiv oder Birke Multi-
plex gefertigt und mit kindersicherem Wasserlack lackiert.
Die Drahtgitter sind mit Kunststoff beschichtet; die Wanne
besteht aus Kunststoff.
Reinigung
Mit feuchtem Tuch und mildem Reinigungsmittel abwischen.
Sofort abtrocknen. Wenn Wasser oder Reinigungsmittel auf
der Oberfläche bleiben, können Lackschäden auftreten.
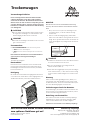
Mobilität
Bitte machen Sie sich mit der Mobilitätseinrichtung
vertraut, die einfach aktiviert und deaktiviert warden
kann:
1. Mit je einer Person an jeder Seite den Wagen leicht
nach hinten kippen, so dass die Fußleiste bewegt
werden kann.
2. Eine Person hält den Wagen gekippt, während die
andere Person die Fußleiste in die gewünschte Position
bringt. Dieses geschieht durch Ziehen oder Drücken an
einem der Handgriffe am jeweiligen Ende der Fußleiste.
(Abb. A).
VORSICHT
cVerändern Sie niemals die Position der Fußleisten alleine!
Es erfordert mindestens zwei Personen.
cBitte stets die Handgriffe am jeweiligen Ende der
Fußleiste benutzen (Abb. A).
cWenn die Rollen weggeklappt werden, bitte den Wagen
etwas seitlich anstoßen, so dass die Rollen in die richtige
Position kommen und der Wagen sicher auf den Leisten
steht.
Wartung
Prüfen Sie das Produkt regelmäßig auf Risse, Brüche, lose
oder fehlende Teile und Fehlfunktionen hin. Stellen Sie das
Produkt außer Dienst, wenn sich ein Zustand entwickelt, der
die sichere Benutzung fraglich erscheinen lässt.
Veränderungen durch den Benutzer
Für Veränderungen, die Kunden an unseren Produkten ohne
unsere Kontrolle, Tests und Bewertung vornehmen, können
wir keine Verantwortung übernehmen.
Bestellung von Ersatzteilen
Bitte nehmen Sie Kontakt mit dem Community Playthings
Kundendienst auf, wenn Sie Ersatzteile benötigen. Dabei
sollten Sie die ID-Nummer Ihres Produktes angeben.
Benutzen Sie nur Ersatzteile von Community Playthings.
Abbildung A
WICHTIG Bitte heben Sie diese Anleitung
zum späteren Nachlesen gut auf.
Community Playthings
Brightling Road, Robertsbridge, TN32 5DR UK
Deutscher Kundendienst:
Tel: 0800 266 7529 Fax: 0800 266 7530
www.communityplaythings.de; info@communityplaythings.de
-
 1
1
-
 2
2


Community Playthings H560 Benutzerhandbuch
- Typ
- Benutzerhandbuch
in anderen Sprachen
Andere Dokumente
-
Dostmann 31.1028 Bedienungsanleitung
-
Candy CCVM513NB/E Benutzerhandbuch
-
-
Nordmende CSG91IX Benutzerhandbuch
-
-
-
Proline CP561 STE-2 Benutzerhandbuch
-
Hoover HOC3UB5858BI/1 Benutzerhandbuch
-