
VeloxTM
User Manual
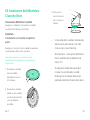
Magnetic Wireless Charging
Dash & Windshield Mount

VeloxTM
User Manual
Magnetic Wireless Charging
Dash & Windshield Mount
English
French
Italian
German
Spanish
04
12
20
28
36

5
Product Information
At a Glance
Device Compatibility
Product Specifications
Installing the Velox Dash Mount
Attaching the Dash Mount
Connecting to Power
Mounting Your iPhone
01
02
Index
For optimal mounting and charging, please follow
the detailed instructions within this manual when
using the Velox Magnetic Wireless Charging Dash
& Windshield Mount.
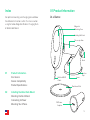
01 Product Information
Magnetic
Mounting Face
Lever
Suction
Cup
Built-in USB-C
Cable
Dashboard Pad
Pivot
Knob
12V Power
Adapter
Rotating Ball Joint
Telescopic Arm
At a Glance

76 EN
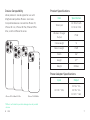
Device Compatibility
Velox products are designed for use with
MagSafe compatible iPhones and cases.
Compatible devices include the iPhone 13,
iPhone 13 mini, iPhone 13 Pro, iPhone 13 Pro
Max, and the iPhone 12 series.
iPhone 13 Pro Max & 13 Pro iPhone 13 & 13 Mini
Input Output
DC 12V ~ 24V
DC 5V ~ 3A
DC 9V ~ 2A
DC 12V ~ 1.5A
Product Specifications
Power Adapter Specifications
Item Specification
Total Input DC 9.0V-1.67A
DC 5.0V-2.0A
Wireless Charger
Output 7.5 W
Cable Length 5′
Mount Length 3.58″
Width 2.6″
Height 4.7″
Weight 8.05 oz
iOttie is not liable for possible damages due to product
misuse.
*

98 EN
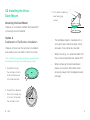
Attaching the Dash Mount
Choose an installation method: dashboard/flat
surface (A) or windshield (B).
Option A
Dashboard or Flat Surface Installation
Choose a flat area on the vehicle’s dashboard
and wipe any dust or debris from the surface.
1. Peel o the film on
the dashboard pad &
attach to the desired
installation location.
2. Peel o the protective
film on the suction cup
and press firmly onto
the dashboard pad.
3. Push down the locking
lever to engage
suction.
• The dashboard pad is mounted with a
semi-permanent adhesive tape. Once
removed, it cannot be re-mounted.
• When mounting, it is recommended that
the surface and product be above 40°F.
• When removing the dashboard pad,
please use caution. We recommend
removing slowly from the edge to avoid
damage.
02 Installing the Velox
Dash Mount
*If your vehicle has a leather dashboard we recommend
windshield mounting to avoid damaging your dash.

1110 EN
Additional Information
To reuse the suction cup,
simply rinse under warm
water and let air dry to
restore tacky suction.
Option B
Windshield Installation
Choose a location on the windshield and wipe
any dust or debris from the surface.
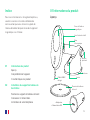
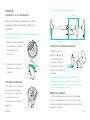
Connecting to Power
Connect the attached
USB-C cable to the
included 12V adapter
and plug the adapter
into your vehicle’s
auxiliary power outlet.
Mounting Your Phone
Simply tap your phone against the mount and
the magnets will hold it in place. Charging will
begin automatically. You are now ready to start
driving.
*The Velox Dash Mount does not have an on/o switch.
Once the cable is plugged in and the vehicle is turned
on, the mount will stay on.
*The dashboard pad is not recommended for windshield
mounting.
*Telescopic arm extends from 4 inches to 6 inches.
6"5"
4"
1. Peel o the protective
film on the suction cup
and press firmly onto
the windshield.
2. Push down the locking
lever to engage
suction.

13
Informations du produit
Aperçu
Compatibilité de l’appareil
Caractéristiques du produit
Installation du support de tableau de
bord Velox
Fixation du support de tableau de bord
Connexion à l’alimentation
Installation de votre téléphone
01
02
Indice
Pour une installation et un chargement optimaux,
veuillez suivre les instructions détaillées de
ce manuel lorsque vous utilisez le support de
tableau de bord et de pare-brise de chargement
magnétique sans fil Velox.
01 Informations du produit
Face de fixation
magnétique
Levier
Ventouse
Câble USB-C
intégré
Coussin de tableau
de bord
Bouton
pivotant
Adaptateur
d’alimentation 12V
Joint à rotule rotatif
Bras
télescopique
Aperçu

1514 FR
Compatibilité des appareils
Ce produits Velox est uniquement compatible
avec les iPhones et les étuis de la série
MagSafe. Les iPhones compatibles MagSafe
comprennent les iPhone 13, iPhone 13 Mini,
iPhone 13 Pro, iPhone 13 Pro Max, et la série
iPhone 12.
iPhone 13 Pro Max & 13 Pro iPhone 13 & 13 Mini
Entrée Sortie
DC 12V ~ 24V
DC 5V ~ 3A
DC 9V ~ 2A
DC 12V ~ 1,5A
Caractéristiques du produit
Caractéristiques du adaptateur
d’alimentation
Article Caractéristique
Entrée totale DC 9,0V-1,67A
DC 5,0V-2,0A
Sortie du chargeur
sans fil 7,5W
Longueur du câble 152,4 cm
Longueur du support 9,1 cm
Largeur 6,6 cm
Hauteur 11,94 cm
Poids 228.2 g
iOttie n’est pas responsable des dommages éventuels
causés par une mauvaise utilisation du produit.
*

1716 FR
Fixation du support pour tableau de bord
Choisissez une méthode d’installation : tableau de
bord/surface plane (A) ou pare-brise (B).
Option A
Installation sur tableau de bord ou surface
plane
Choisissez une surface plane sur le tableau de bord
du véhicule et essuyez toute poussière ou débris de
la surface.
1. Décollez le film sur le
coussin du tableau
de bord et fixez-le
à l’emplacement
d’installation souhaité.
2. Décollez le film protecteur
de la ventouse et appuyez
fermement sur le pare-
brise.
3. Abaissez le levier
de verrouillage pour
activer la ventouse.
• Le coussin du tableau de bord est fixé
d’un ruban adhésif semi-permanent. Une
fois retiré, il ne peut pas être remonté.
• Lors du montage, il est recommandé que
la surface et le produit soient au-dessus
de 4°C.
• Lors du retrait du coussin du tableau de
bord, veuillez faire preuve de prudence.
Nous vous recommandons de retirer
lentement du bord pour éviter tout
dommage.
02 Installation du support de
tableau de bord Velox
*Si votre véhicule est équipé d’un tableau de bord en
cuir, nous vous recommandons une fixation au pare-
brise pour éviter d’endommager votre tableau de bord.

1918 FR
Pour réutiliser la ventouse,
il sut de la rincer à l’eau
tiède et de la laisser sécher
à l’air libre pour rétablir
l’aspiration collante.
Informations
supplémentaires
Option B
Installation au pare-brise
Choisissez un emplacement sur le pare-brise et
essuyez toute poussière ou débris de la surface.
Connexion à l’alimentation
Connectez le câble
USB-C fourni à
l’adaptateur 12V inclus
et branchez l’adaptateur
dans la prise de courant
auxiliaire de votre
véhicule.
*Le support de tableau de bord Velox n’a pas
l’interrupteur marche/arrêt. Une fois le câble branché et
le véhicule allumé, le support restera allumé.
*Le coussin de tableau de bord n’est pas recommandé
pour le montage sur pare-brise.
*Le bras télescopique s’étend de 10 centimètres à 15
centimètres.
15 cm 12 cm
10 cm
1. Décollez le film protecteur
de la ventouse et appuyez
fermement sur le pare-
brise.
2. Abaissez le levier
de verrouillage pour
activer la ventouse.
Installation de votre téléphone
Tapez simplement votre téléphone contre le
support et les aimants le maintiendront en place.
La charge commencera automatiquement. Vous
êtes maintenant prêt(e) à conduire.

21
Informazioni del prodotto
Sommario
Compatibilità del dispositivo
Specifiche del prodotto
Installazione Montatura Cruscotto
Velox
Connessione Montatura Cruscotto
Collegamento all’alimentazione
Montatura del vostro telefono
01
02
Indice
Per una montatura e una ricarica ottimale, seguire
le istruzioni dettagliate di questo manuale
della Montatura Wireless Magnetica Velox per
Parabrezza e Cruscotto.
01 Informazioni del prodotto
Lato Montatura
Magnetica
Leva
Ventosa
Cavo USB-C
Integrato
Cuscinetto Cruscotto
Perno
Adattatore 12V
Giunto Rotativo
Braccio
Telescopico
Sommario

2322 IT
Compatibilità del dispositivo
I prodotti Velox sono compatibili solo con
iPhone e le custodie della serie MagSafe. Gli
iPhone compatibili con MagSafe includono
l’iPhone 13, iPhone 13 Mini, iPhone 13 Pro,
iPhone 13 Pro Max, e iPhone serie 12.
iPhone 13 Pro Max & 13 Pro iPhone 13 & 13 Mini
Input Output
DC 12V ~ 24V
DC 5V ~ 3A
DC 9V ~ 2A
DC 12V ~ 1,5A
Specifiche del prodotto
Specifiche dell’adattatore
Descrizione Specifiche
Input Totale DC 9,0V-1,67A
DC 5,0V-2,0A
Output Ricarica
Wireless 7,5W
Lunghezza Cavo 152,4 cm
Lunghezza Montatura 9,1 cm
Larghezza 6,6 cm
Altezza 11,94 cm
Peso 228,2 g
iOttie non è responsabile per evuantuali danni causati da
un uso impropio del prodotto.
*

2524 IT
Connessione Montatura Cruscotto
Scegliere un metodo di installazione: cruscotto/
superficie piatta (A) o parabrezza (B).
Opzione A
Installazione sul cruscotto o superficie
piatta
Scegliere un’area piatta del cruscotto del veicolo e
pulire polvere o detriti dalla superficie.
1. Rimuovere la pellicola
del cuscinetto &
connettere all’area di
installazione.
2. Rimuovere la pellicola
protettiva della ventosa,
e premere fermamente
sul cuscinetto del
cruscotto.
3. Abbassare la
leva di sicurezza
per assicurare la
ventosa.
• Il cuscinetto del cruscotto è montato con
adesivo semi-permanente. Una volta
rimosso, non si può rimontare.
• Alla montatura, si consiglia di controllare
che la superficie ed il prodotto siano
sopra i 4°C.
• Si prega di fare attenzione quando si
rimuove il cuscinetto del cruscotto.
Si consiglia di rimuovere lentamente
partendo dall’estremità per evitare danni.
02 Installazione della Montatura
Cruscotto Velox
*Se il vostro veicolo ha un cruscotto in pelle,
raccomandiamo l’installazione sul parabrezza per
evitare danni.

2726 IT
Per riusare la ventosa,
sciacquare sotto acqua
tiepida e lasciare
asciugare all’aria.
Ulteriori
Informazioni
Opzione B
Installazione sul parabrezza
Scegliere un’area del parabrezza e pulire
polvere o detriti dalla superficie.
Collegamento all’alimentazione
Connettere il cavo
USB-C all’adattatore
incluso a 12V, e inserire
l’adattatore alla presa
ausiliaria della vostra
macchina.
Montatura del vostro telefono
Poggiare il vostro telefono contro la montatura e
i magneti la manterranno assicurata. La ricarica
partirà automaticamente. Siete ora pronti per la
guida.
*La Montatura Cruscotto Velox non ha accensione/
spegnimento. Una volta che il cavo è collegato e il
veicolo in moto, la montatura rimarrà fissata.
*Il cuscinetto del cruscotto non è raccomandato per
montatura sul parabrezza.
*Il braccio telescopico si estende da 10 centimetri a 15
centimetri.
1. Rimuovi la pellicola
protettivo della ventosa,
e premere fermamente
sul parabrezza.
2. Abbassare la leva
di sicurezza per
assicurare la ventosa.
15 cm 12 cm
10 cm

29
Produktinformationen
Auf einen Blick
Kompatibilität der Geräte
Produktspezifikationen
Montage der Velox-
Armaturenbrettbefestigung
Anbringen der Armaturenbrettbefestigung
Anschließen an die Stromversorgung
Befestigung Ihres Telefons
01
02
Index
Für eine optimale Montage und optimales
Aufladen folgen Sie bei Verwendung der Velox
magnetischen kabellosen Ladevorrichtung für
Armaturenbrett und Windschutzscheibe bitte den
detaillierten Anweisungen in dieser Anleitung.
01 Produktinformationen
Magnetische
Montagefläche
Hebel
Saugnapf
Eingebautes
USB-C-Kabel
Armaturenbrett-Pad
Drehknopf
12V-Netzadapter
Drehbares
Kugelgelenk
Teleskoparm
Auf einen Blick

3130 DE
Gerätekompatibilität
Dieses Produkt ist ausschließlich mit iPhones
und Hüllen der MagSafe-Serie kompatibel.
Zu den mit MagSafe kompatiblen iPhones
gehören das iPhone 13, iPhone 13 Mini, iPhone
13 Pro, iPhone 13 Pro Max, und iPhone 12 serie.
iPhone 13 Pro Max & 13 Pro iPhone 13 & 13 Mini
Eingabe Ausgabe
Gleichstrom 12V~ 24V
Gleichstrom 5V~ 3A
Gleichstrom 9V~ 2A
Gleichstrom 12V ~ 1,5A
Produktspezifikationen
Spezifikationen des Netzteils
Daten Spezifikation
Gesamteingang Gleichstrom 9,0V-1,67A
Gleichstrom 5,0V-2,0A
Ausgabe für kabelloses
Aufladen 7,5W
Kabellänge 152,4 cm
Länge der Befestigung 9,1 cm
Breite 6,6 cm
Höhe 11,94 cm
Gewicht 228.2 g
iOttie haftet nicht fücht mögliche schäden, die auf
grund einer unsachgemäßen verwendung des produkts
entstehen.
*

3332 DE
Anbringen der Armaturenbrettbefestigung
Wählen Sie eine Installationsmethode:
Armaturenbrett/glatte Oberfläche (A) oder
Windschutzscheibe (B).
Option A
Installation auf dem Armaturenbrett oder
einer flachen Oberfläche
Wählen Sie eine flache Stelle auf dem Armaturenbrett
des Fahrzeugs und entfernen Sie Staub und Schmutz
von der Oberfläche.
1. Ziehen Sie die Folie vom
Armaturenbrett-Pad ab und
befestigen Sie sie an der
gewünschten Einbaustelle.
2. Ziehen Sie die Schutzfolie
vom Saugnapf ab und
drücken Sie ihn fest auf das
Armaturenbrett-Pad.
3. Drücken Sie den
Verriegelungshebel
nach unten, um
die Ansaugung zu
aktivieren.
• Das Armaturenbrett-Pad wird mit einem
semipermanenten Klebeband befestigt.
Einmal entfernt, kann es nicht wieder
angebracht werden.
• Bei der Montage wird empfohlen, dass
die Oberfläche und das Produkt eine
Temperatur von über 4°C haben.
• Gehen Sie beim Entfernen des
Armaturenbrett-Pads bitte vorsichtig vor.
Wir empfehlen, das Pad langsam von der
Ecke aus zu entfernen, um Schäden zu
vermeiden.
02 Montage der Velox-
Armaturenbrettbefestigung
*Wenn Ihr Fahrzeug ein ledernes Armaturenbrett hat,
empfehlen wir die Montage an der Windschutzscheibe,
um eine Beschädigung des Armaturenbretts zu
vermeiden.

3534 DE
Um den Saugnapf
wiederzuverwenden, spülen
Sie ihn einfach unter warmem
Wasser ab und lassen Sie ihn
an der Luft trocknen, damit er
wieder haftet.
Zusätzliche Informationen
Option B
Einbau an der Windschutzscheibe
Wählen Sie eine Stelle auf der Windschutzscheibe
und entfernen Sie Staub und Schmutz von der
Oberfläche.
Anschließen an die Stromversorgung
Schließen Sie das
beiliegende USB-C-Kabel
an den mitgelieferten
12-VAdapter an und
stecken Sie den Adapter
in die Hilfssteckdose
Ihres Fahrzeugs.
Befestigung Ihres Telefons
Halten Sie Ihr Handy einfach an die Halterung,
und die Magnete halten es an Ort und Stelle. Der
Ladevorgang wird automatisch gestartet. Schon
können Sie losfahren.
*Der Velox-Armaturenbrettbefestigung hat keinen
Ein/Aus-Schalter. Sobald das Kabel eingesteckt ist
und das Fahrzeug eingeschaltet wird, ist die Halterung
eingeschaltet.
*Das Armaturenbrett-Pad wird nicht für die Montage
an der Windschutzscheibe empfohlen.
*Der Teleskoparm reicht von 10 cm bis 15 cm.
1. Ziehen Sie die Schutzfolie
vom Saugnapf ab und
drücken Sie ihn fest auf die
Windschutzscheibe.
2. Drücken Sie den
Verriegelungshebel nach
unten, um die Ansaugung
zu aktivieren.
15 cm 12 cm
10 cm

37
Información del producto
A simple vista
Compatibilidad de dispositivos
Especificaciones del producto
Instalación del Soporte para Tableros de
Velox
Instalando el soporte para tableros y
parabrisas
Conectar a la corriente
Montar su teléfono
01
02
Índice
Para un montaje y carga óptima, siga las
instrucciones detalladas en este manual al usar
el soporte y cargador para tableros y parabrisas
mágnetico Velox.
01 Información del producto
Cara de montaje
magnética
Palanca
Ventosa
Cable USB-C
incorporado
Almohadilla de
tablero
Botón de
pivote
Adaptador de
corriente de 12V
Articulación de
rótula giratoria
Brazo
telescópico
A simple vista

3938 ES
Compatibilidad de Dispositivos
Los productos Velox solo son compatible con
iPhones y fundas de la serie MagSafe. Los
iPhones compatibles con MagSafe incluyen
iPhone 13, iPhone 13 Mini, iPhone 13 Pro,
iPhone 13 Pro Max, y iPhone serie 12.
iPhone 13 Pro Max & 13 Pro iPhone 13 & 13 Mini
Entrada Salida
DC 12V ~ 24V
DC 5V ~ 3A
DC 9V ~ 2A
DC 12V ~ 1,5A
Especificaciones del producto
Especificaciones del adaptador de
corriente
Elemento Especificación
Entrada Total DC 9,0V-1,67A
DC 5,0V-2,0A
Salida del cargador sin
cables 7,5W
Longitud del cable 152,4 cm
Longitud de la montura 9,1 cm
Ancho 6,6 cm
Altura 11,94 cm
Peso 228,2 g
iOttie no es responsable por posibles daños debidos al
uso incorrecto del producto.
*
Seite wird geladen ...
Seite wird geladen ...
Seite wird geladen ...
Seite wird geladen ...
Seite wird geladen ...
-
 1
1
-
 2
2
-
 3
3
-
 4
4
-
 5
5
-
 6
6
-
 7
7
-
 8
8
-
 9
9
-
 10
10
-
 11
11
-
 12
12
-
 13
13
-
 14
14
-
 15
15
-
 16
16
-
 17
17
-
 18
18
-
 19
19
-
 20
20
-
 21
21
-
 22
22
-
 23
23
-
 24
24
-
 25
25


in anderen Sprachen
- English: iOttie MGSFIO101 User manual
- français: iOttie MGSFIO101 Manuel utilisateur
- español: iOttie MGSFIO101 Manual de usuario
- italiano: iOttie MGSFIO101 Manuale utente
Verwandte Artikel
-
iOttie Velox Benutzerhandbuch
-
 iOttie MGSFIO104 Velox Magnetic Flush Mount Benutzerhandbuch
-
iOttie Easy One Touch 6 Benutzerhandbuch
-
 iOttie Velox Magnetic Mini Flush Mount Car Phone Holder Benutzerhandbuch
-
 iOttie Auto Sense Benutzerhandbuch
-
iOttie One Touch Wireless 2 Benutzerhandbuch
-
iOttie 606MGIO202 Bedienungsanleitung
-
 iOttie MGSFIO202 Benutzerhandbuch
-
 iOttie iTap 2 Benutzerhandbuch
-


