Bresser 8010071000000 Bedienungsanleitung
- Typ
- Bedienungsanleitung

Instruction manual
EN
Digital alarm clock with temperature display · Digitalwecker mit Temperaturanzeige
MyTime Echo FXR/FXL
Bedienungsanleitung
DE
Art. No. 8010071 CM3GYE / GYEGYE / QT5GYE
Art. No. 8010072 CM3GYE / GYEGYE / QT5GYE

DE
Besuchen Sie unsere Website über den folgenden QR Code oder Weblink um weitere Informationen zu diesem Produkt
oder die verfügbaren Übersetzungen dieser Anleitung zu finden.
EN
Visit our website via the following QR Code or web link to find further information on this product or the available
translations of these instructions.
FR
Si vous souhaitez obtenir plus d’informations concernant ce produit ou rechercher ce mode d’emploi en d’autres langues,
rendez-vous sur notre site Internet en utilisant le code QR ou le lien correspondant.
NL
Bezoek onze internetpagina via de volgende QR-code of weblink, voor meer informatie over dit product of de beschikbare
vertalingen van deze gebruiksaanwijzing.
IT
Desidera ricevere informazioni esaustive su questo prodotto in una lingua specifica? Venga a visitare il nostro sito Web
al seguente link (codice QR Code) per conoscere le versioni disponibili.
ES
¿Desearía recibir unas instrucciones de uso completas sobre este producto en un idioma determinado? Entonces visite
nuestra página web utilizando el siguiente enlace (código QR) para ver las versiones disponibles.
PT
Deseja um manual detalhado deste produto numa determinada língua? Visite a nossa Website através da seguinte
ligação (QR Code) das versões disponíveis.
www.bresser.de/P8010071000000

www.bresser.de/warranty_terms
GARANTIE · WARRANTY · GARANTÍA · GARANZIA
Instruction manual ................................................... 6
Bedienungsanleitung ...............................................14

4
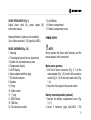
Fig. (2)
Fig. (3)
Fig. (1)
(A) (B)
MyTime Echo FXR
B

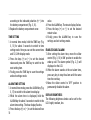
5
MyTime Echo FXL
Fig. (2)
Fig. (3)
Fig. (1)
(A)
(B)
B

6
GENERAL INFORMATION
About this Instruction Manual
Read the safety instructions and the instruction
manual carefully before using this device.
Keep this instruction manual in a safe place for
future reference. When the device is sold or given
to someone else, the instruction manual must be
provided to the new owner/user of the product.
Intended use
This device is for personal use only. It was
developed as an electronic medium for the use of
multimedia services.
This product is available in several shapes and
colours. The instruction manual refers to all avai-
lable variants.
DANGER!
You will find this symbol before every section of
text that deals with the risk of minor to severe
injuries resulting from improper use.
ATTENTION!
You will find this symbol in front of every section
of text which deals with the risk of damage to
property or the environment.
GENERAL WARNINGS
DANGER OF SUFFOCATION!
This product contains small parts that can be
swallowed by children! There is a DANGER OF
CHOKING!
RISK OF ELECTRIC SHOCK!
This unit contains electronic parts that are
powered by a power source (AC adapter and/or
batteries). Follow the instructions carefully and
do not attempt to power this device with anything

7
other than power sources recommended in this
instruction manual, otherwise there is a DANGER
of an ELECTRIC SHOCK!
DANGER OF BURNS!
Leaking battery acid can lead to chemical burns.
Avoid contact of battery acid with skin, eyes and
mucous membranes. In the event of contact with
acid, rinse the affected region immediately with
a plenty of water and seek for medical attention.
FIRE/EXPLOSION HAZARD!
Do not expose the device to high temperatures.
Use only the supplied AC adapter or the
recommended batteries. Do not short-circuit the
device or batteries or dispose of in fire! Excessive
heat and improper handling can cause short
circuits, fires and even explosions!
DANGER of material damage!
Do not disassemble the device. In the event of
a defect, please contact your dealer. They will
contact the Service Center and can arrange the
return of this device for repair if necessary.
Do not immerse the unit in water.
Do not expose the device to strong shocks,
vibrations, dust, permanently high temperatures or
extreme humidity. This can lead to malfunctions,
short circuits, damage to batteries and
components.
This device cannot be operated
simultaneously with batteries and a power
adapter. The simultaneous use will cause
irreparable damage to the device, for which the
manufacturer is not liable!
Use only the recommended batteries. Always
replace weak or empty batteries with a new,
complete set of batteries at full capacity. Do not
use batteries from different brands or types or

8
with different capacities. Remove batteries from
the device if it is not to be used for a longer period
of time!
The manufacturer is not liable for voltage
damage due to improperly inserted batteries or
through the use of an improper power adapter!
CLEANING AND MAINTENANCE
Disconnect the device from the power supply
(remove plug or batteries) before cleaning!
Clean the device only externally with a dry cloth.
Do not use cleaning fluid to avoid damage to the
electronics.
Protect the device from dust and moisture!
Remove batteries from the device if it is not to be
used for a longer period of time!
EC DECLARATION OF CONFORMITY
A "Declaration of conformity" in
accordance with the applicable
directives and corresponding
standards has been prepared by Bresser GmbH.
This can be viewed at www.bresser.de/
download/8010071000000/CE
DISPOSAL
Dispose of the packaging materials by
type. Contact your local waste-disposal
service or environmental authority for
information on the proper disposal.
Do not dispose of electronic devices in the
household garbage! According to the
European Directive 2002/96/EU on Waste
Electrical and Electronic Equipment and its
transposition into national law, used
electrical equipment must be collected
separately and recycled in an
environmentally sound manner.

9
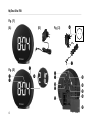
SCOPE OF DELIVERY (Fig. 1)
Digital alarm clock (A), power dapter (B),
instruction manual
Required batteries (optional, not included):
3 pcs. Micro batteries (1.5V, type AAA/LR03)
PARTS OVERVIEW (Fig. 2-3)
1. Housing
2. Time display (current time or alarm time)
3. Symbol for activated wake-up time
4. Temperature display
5. LOOP display
6. Mains adapter with Euro plug
7. DC Barrel connector
8. Speaker
9. (+) key
10. Slider control
11. (–) key
12. RESET Knob
13. TIME key
14. DC connection socket
15. ALARM key
16. Battery compartment
17. Battery compartment cover
POWER SUPPLY
NOTE!
Never operate the device with batteries and the
mains adapter at the same time!
Mains power operation
1. Put the DC barrel connector (Fig. 3, 7) of the
mains adapter (Fig. 1, B) into the DC connection
socket (Fig. 3, 14) of the clock alarm clock (Fig.
1, A).
2. Insert the Euro plug into the power socket.
Battery-powered operation (optional)
1. Remove the battery compartment cover (Fig.
3, 17).
2. Insert 3 batteries (type AAA/LR03, 1.5V)

10
according to the indicated polarities (+/–) into
the battery compartment (Fig. 3, 16).
3. Replace the battery compartment cover.
TIME SETTING
1. In normal time mode, hold the TIME key (Fig.
3, 13) for about 3 seconds to switch to time
setting mode. Here you can set the current time
and 12/24 Hr display mode.
2. Press the keys (+) or (–) to set the desired
values and press the TIME key to switch to the
next setting item.
3. Finally, press the TIME key to save the settings
and exit settings mode.
ALARM TIME SETTING
1. In normal time mode, press the ALARM key (Fig.
3, 15) to switch to the alarm time display.
2. While the alarm time is displayed, hold the
ALARM key for about 3 seconds to switch to the
alarm time setting. The hour display flashes.
3. Press the keys (+) or (–) to set the desired hour
value.
4.
Press the ALARM key. The minute display flashes.
5. Press the keys (+) or (–) to set the desired
minute value.
6. Finally, press the ALARM key to save the
settings and exit settings mode.
ENABLE/DISABLE ALARM
7. After setting the alarm time, move the slider
control (Fig. 3, 10) to 'ON' position to enable the
wake-up call. The alarm symbol (Fig. 2, 3) will
displayed on the LCD.
8. When the alarm sounds at the set alarm time,
press any key to stop the alarm until the same
time the next day.
9. Move the slider control to 'OFF' position to
permanently disable the alarm.
DISPLAY BRIGHTNESS
The following brightness levels can be set for the
LCD: bright, medium, low.

11
In normal display mode, press the (+) key to set
the desired brightness level.
NOTE: The dimming function can only be used if
the device is operated with mains power.
ENERGY SAVING MODE
When powered by batteries, the alarm clock is
operated in energy-saving mode. In this mode the
LCD is not lit permanently, but can be activated for
8 seconds by pressing any key. Also the display
brightness can not be changed.
NIGHT MODE
When night mode is set to ON, the display
automatically changes to the darkest brightness
level. You can set the time when night mode is
activated or deactivated.
1. In normal time mode, press the TIME key (Fig.
3, 13) two times, to switch to the night mode.
2. Press the keys (+) or (–) to set the night mode
ON or OFF.
3. Press and hold the TIME key for 3 seconds to
enter night mode time settings.
4. First you can set the time to enter the night
mode and then the time to exit the night mode.
5. Press the keys (+) or (–) to set the desired
values and press the TIME key to switch to the
next setting item.
6. Press the TIME key to save the settings and exit
settings mode.
TEMPERATURE DISPLAY
This digital alarm clock also measures the current
ambient temperature, which can be shown on the
display manually or in continuous alternation with
the time.
Manual display change
In normal display mode, press the TIME key (Fig.
3, 13) to switch to the temperature display (Fig. 2,
4) for 5 seconds.

12
°C/°F temperature display
MyTime Echo FXR (Art. No. 8010071):
In normal display mode, press and hold the (–)
key (Fig. 3, 11) for 3 seconds to toggle between
°C and °F.
MyTime Echo FXL (Art. No. 8010072):
1. Switch to the temperature mode by pressing the
TIME key.
2. Press the (–) key to toggle between °C and °F.
Automatic display change
MyTime Echo FXR (Art. No. 8010071):
In normal display mode, press the (–) key to set a
different display mode.
Press (–) 1x = (dP-1):
Display time only
Press (–) 2x = (dP-2):
Time/temperature cycle display
MyTime Echo FXL (Art. No. 8010072):
1. In normal display mode, press and hold the (+)
key to activate the Timte/temperature cycle
display (loop is displayed).
2. Press and hold the (+) again to deactive the
loop mode.

13
WARRANTY & SERVICE
The regular guarantee period is 5 years and begins
on the day of purchase. You can consult the full
guarantee terms at www.bresser.de/warranty_
terms.

14
ALLGEMEINE INFORMATIONEN
Zu dieser Anleitung
Lesen Sie vor der Benutzung des Geräts aufmerk-
sam die Sicherheitshinweise und die Bedienungs-
anleitung.
Bewahren Sie diese Bedienungsanleitung für die
erneute Verwendung zu einem späteren Zeitpunkt
auf. Bei Verkauf oder Weitergabe des Gerätes ist
die Bedienungsanleitung an jeden nachfolgenden
Besitzer/Benutzer des Produkts weiterzugeben.
Verwendungszweck
Dieses Produkt dient ausschließlich der privaten
Nutzung. Es wurde entwickelt als elektronisches
Medium zur Nutzung multimedialer Dienste.
Dieses Produkt ist in mehreren Form- und Farbva-
rianten erhältlich. Die Bedienungsanleitung gilt für
alle erhältlichen Varianten.
GEFAHR!
Dieses Zeichen steht vor jedem Textabschnitt, der
auf Gefahren hinweist, die bei unsachgemäßer
Anwendung zu leichten bis schweren Verletzun-
gen führen.
ACHTUNG!
Dieses Zeichen steht vor jedem Textabschnitt, der
auf Sach- oder Umweltschädigungen bei unsach-
gemäßer Anwendung hinweist.
ALLGEMEINE WARNHINWEISE
ERSTICKUNGSGEFAHR!
Dieses Produkt beinhaltet Kleinteile, die von Kin-
dern verschluckt werden können! Es besteht ER-
STICKUNGSGEFAHR!

15
GEFAHR EINES STROMSCHLAGS!
Dieses Gerät beinhaltet Elektronikteile, die über
eine Stromquelle (Netzteil und/oder Batterien)
betrieben werden. Die Nutzung darf nur, wie in
der Anleitung beschrieben, erfolgen, andernfalls
besteht GEFAHR eines STROMSCHLAGS!
VERÄTZUNGSGEFAHR!
Ausgelaufene Batteriesäure kann zu Verätzungen
führen! Vermeiden Sie den Kontakt von Batterie-
säure mit Haut, Augen und Schleimhäuten. Spülen
Sie bei Kontakt mit der Säure die betroffenen Stel-
len sofort mit reichlich klarem Wasser und suchen
Sie einen Arzt auf.
BRAND-/EXPLOSIONSGEFAHR!
Setzen Sie das Gerät keinen hohen Temperaturen
aus. Benutzen Sie nur das mitgelieferte Netzteil
oder die empfohlenen Batterien. Gerät und Bat-
terien nicht kurzschließen oder ins Feuer werfen!
Durch übermäßige Hitze und unsachgemäße
Handhabung können Kurzschlüsse, Brände und
sogar Explosionen ausgelöst werden!
GEFAHR von Sachschäden!
Bauen Sie das Gerät nicht auseinander! Wenden
Sie sich im Falle eines Defekts an Ihren Fach-
händler. Er nimmt mit dem Service-Center Kontakt
auf und kann das Gerät ggf. zwecks Reparatur
einschicken.
Tauchen Sie das Gerät nicht in Wasser.
Setzen Sie das Gerät keinen starken Stößen, Er-
schütterungen, Staub, dauerhaft hohen Tempera-
turen oder extremer Feuchtigkeit aus. Dies kann
zu Fehlfunktionen, Kurzschlüssen, Beschädigung
der Batterien und Bauteile führen.
Dieses Gerät kann nicht gleichzeitig mit Batte-
rien und einem Stromadapter betrieben werden.

16
Die gleichzeitige Verwendung führt zu irreparablen
Schäden am Gerät, für die der Hersteller keine Haf-
tung übernimmt!
Benutzen Sie nur die empfohlenen Batterien.
Ersetzen Sie schwache oder verbrauchte Batterien
immer durch einen komplett neuen Satz Batterien
mit voller Kapazität. Verwenden Sie keine Batteri-
en unterschiedlicher Marken, Typen oder unter-
schiedlich hoher Kapazität. Entfernen Sie Batteri-
en aus dem Gerät, wenn es längere Zeit nicht
benutzt wird!
Für Spannungsschäden in Folge falsch einge-
legter Batterien oder durch die Nutzung eines
nicht geeigneten Netzteils übernimmt der Herstel-
ler keine Haftung!
REINIGUNG UND WARTUNG
Trennen Sie das Gerät vor der Reinigung von der
Stromquelle (Netzstecker ziehen oder Batterien
entfernen)!
Reinigen Sie das Gerät nur äußerlich mit einem
trockenen Tuch. Benutzen Sie keine Reinigungs-
üssigkeit, um Schäden an der Elektronik zu ver-
meiden.
Schützen Sie das Gerät vor Staub und Feuchtig-
keit! Entfernen Sie Batterien aus dem Gerät, wenn
es längere Zeit nicht benutzt wird!
EG-KONFORMITÄTSERKLÄRUNG
Eine „Konformitätserklärung“ in
Übereinstimmung mit den
anwendbaren Richtlinien und
entsprechenden Normen ist von der Bresser
GmbH erstellt worden. Diese kann eingesehen
werden unter www.bresser.de/
download/8010071000000/CE

17
ENTSORGUNG
Entsorgen Sie die Verpackungsmaterialien
sortenrein. Informationen zur ordnungsge-
mäßen Entsorgung erhalten Sie beim kom-
munalen Entsorgungsdienstleister oder Um-
weltamt.
Werfen Sie Elektrogeräte nicht in den Haus-
müll! Gemäß der Europäischen Richtlinie
2002/96/EG über Elektro- und Elektro-
nik-Altgeräte und deren Umsetzung in nati-
onales Recht müssen verbrauchte Elektro-
geräte getrennt gesammelt und einer
umweltgerechten Wiederverwertung zuge-
führt werden.
LIEFERUMFANG (Fig. 1)
Digitaler Wecker (A), Netzadapter (B), Bedienungs-
anleitung
Erforderliche Batterien (optional, nicht im Liefer-
umfang enthalten):
3 Stck. Micro-Batterien (1.5V, Typ AAA/LR03)
TEILEÜBERSICHT (Fig. 2-3)
1. Gehäuse
2. Zeitanzeige (aktuelle Uhrzeit oder Weckzeit)
3. Symbol für aktivierte Weckzeit
4. Temperaturanzeige
5. LOOP-Anzeige
6. Netzadapter mit Euro-Stecker
7. DC-Hohlstecker
8. Lautsprecher
9. (+)Taste
10. Schieberegler
11. (–)Taste
12. RESET-Knopf
13. TIME-Taste

18
14. DC-Anschlussbuchse
15. ALARM-Taste
16. Batteriefach
17. Batteriefachdeckel
SPANNUNGSVERSORGUNG
HINWEIS!
Das Gerät niemals gleichzeitig mit Batterien und
dem Netzadapter betreiben!
Netzbetrieb
1. DC-Hohlstecker (Fig. 3, 7) des Netzadapters
(Fig. 1, B) in die DC-Anschlussbuchse (Fig. 3,
14) des Uhrenweckers (Fig. 1, A) stecken.
2. Den Euro-Netzstecker in die Steckdose stecken.
Batteriebetrieb (optional)
1. Den Batteriefachdeckel (Fig. 3, 17) entfernen.
2. 3 Batterien (Typ AAA/LR03, 1.5V) entsprechend
den angegebenen Polaritäten (+/–) in das Bat-
teriefach (Fig. 3, 16) einsetzen.
3. Den Batteriefachdeckel wieder einsetzen.
ZEITEINSTELLUNG
1. Im normalen Zeitmodus die TIME-Taste (Fig. 3,
13) etwa 3 Sekunden gedrückt halten, um zur
Zeiteinstellung zu wechseln. Hier kann die aktu-
elle Uhrzeit und der 12/24 Std. Anzeigemodus
eingestellt werden.
2. Die Tasten (+) oder (–) drücken, um die ge-
wünschten Werte einzustellen und die Taste
TIME drücken, um zur nächsten Einstellfunktion
zu wechseln.
3. Die TIME-Taste abschließend drücken, um die
Einstellungen zu speichern und den Einstel-
lungsmodus zu verlassen.
WECKZEITEINSTELLUNG
1. Im normalen Zeitmodus die ALARM-Taste (Fig.
3, 15) drücken, um zur Weckzeitanzeige zu wech-
seln.
2. Während der Weckzeitanzeige die ALARM-Taste
etwa 3 Sekunden gedrückt halten, um zur Weck-

19
zeiteinstellung zu wechseln. Die Stundenanzei-
ge blinkt.
3. Die Tasten (+) oder (–) drücken, um den ge-
wünschten Stunden-Wert einzustellen.
4. Die ALARM-Taste drücken. Die Minutenanzeige
blinkt.
5. Die Tasten (+) oder (–) drücken, um den ge-
wünschten Minuten-Wert einzustellen.
6. Die ALARM-Taste abschließend drücken, um
die Einstellungen zu speichern und den Einstel-
lungsmodus zu verlassen.
WECKRUF AKTIVIEREN/DEAKTIVIEREN
7. Nach dem Einstellen der Weckzeit den Schiebe-
regler (Fig. 3, 10) in die Position ‚ON‘ bewegen,
um den Weckruf zu aktivieren. Das Weck-Sym-
bol (Fig. 2, 3) wird auf dem Display angezeigt.
8. Beim Ertönen des Weckrufs zur eingestellten
Weckzeit eine beliebige Taste drücken, um den
Weckruf bis zur gleichen Zeit am nächsten Tag
zu stoppen.
9. Den Schieberegler in die Position ‚OFF‘ bewe-
gen, um den Weckruf dauerhaft zu deaktivieren.
HELLIGKEIT DER ANZEIGE
Für die LED-Anzeige können folgende Helligkeits-
stufen eingestellt werden: hell, mittel, schwach.
Im normalen Anzeigemodus die Taste (+) drücken,
um die gewünschte Helligkeitsstufe einzustellen.
HINWEIS: Die Dimmfunktion kann nur genutzt wer-
den, wenn das Gerät mit dem Netzteil betrieben
wird.
ENERGIESPARMODUS
Bei der Stromversorgung mittels Batterien wird
der Wecker im Energiesparmodus betrieben. In
diesem Modus leuchtet die LED-Anzeige nicht
dauerhaft, sondern kann durch drücken einer be-
liebigen Taste für etwa 8 Sekunden aktiviert wer-
den. Auch die Helligkeit der Anzeige kann nicht
verändert werden.

20
NACHTMODUS
Wenn der Nachtmodus auf EIN gesetzt wird, wech-
selt die Anzeige automatisch auf die dunkelste
Helligkeitsstufe. Sie können die Zeit bestimmen,
wann der Nachtmodus aktiviert oder deaktiviert
wird.
1 Im normalen Anzeigemodus die TIME-Taste
zweimal drücken, um in den Nachtmodus zu
wechseln.
2. Die Tasten (+) oder (-) drücken, um den Nacht-
modus ein- oder auszuschalten.
3. Die Taste TIME 3 Sekunden lang gedrückt hal-
ten, um die Zeiteinstellungen für den Nachtmo-
dus einzugeben.
4. Zuerst wird die Uhrzeit für den Eintritt in den
Nachtmodus und dann die Uhrzeit für das Ver-
lassen des Nachtmodus eingestellt.
5. Die Tasten (+) oder (-) drücken, um die ge-
wünschten Werte einzustellen und die Taste
TIME drücken, um zur nächsten Einstellfunkti-
on zu wechseln.
6. Die Taste TIME drücken, um die Einstellungen
zu speichern und den Einstellungsmodus zu
verlassen.
TEMPERATURANZEIGE
Dieser digitale Wecker misst gleichzeitig die ak-
tuelle Umgebungstemperatur, die auf dem Display
manuell oder im stetigen Wechsel mit der Uhrzeit
angezeigt werden kann.
Manueller Anzeigewechsel
Im normalen Anzeigemodus die TIME-Taste (Fig.
3, 13) drücken, um für 5 Sekunden auf die Anzeige
der Umgebungstemperatur umzuschalten.
°C/°F Temperatur-Anzeige
MyTime Echo FXR (Art. No. 8010071):
Im normalen Anzeigemodus die (–) Taste (Fig. 3,
11) für 3 Sekunden gedrückt halten, um zwischen
°C und °F zu wechseln.
Seite wird geladen ...
Seite wird geladen ...
Seite wird geladen ...
Seite wird geladen ...
-
 1
1
-
 2
2
-
 3
3
-
 4
4
-
 5
5
-
 6
6
-
 7
7
-
 8
8
-
 9
9
-
 10
10
-
 11
11
-
 12
12
-
 13
13
-
 14
14
-
 15
15
-
 16
16
-
 17
17
-
 18
18
-
 19
19
-
 20
20
-
 21
21
-
 22
22
-
 23
23
-
 24
24


Bresser 8010071000000 Bedienungsanleitung
- Typ
- Bedienungsanleitung
in anderen Sprachen
- English: Bresser 8010071000000 Owner's manual
Verwandte Artikel
-
Bresser MyTime Pro Projection Alarm Clock black Bedienungsanleitung
-
Bresser 8010070 Bedienungsanleitung
-
-
-
-
-
-
-
-
Bresser 8020210GYE000 Bedienungsanleitung