
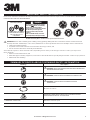
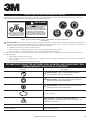
OPERATOR’S MANUAL & SAFETY INSTRUCTIONS
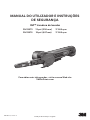
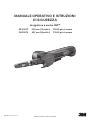
3M™ File Belt Sander
PN 33573 330 mm (13 in.) 17,000 RPM
PN 33575 457 mm (18 in.) 17,000 RPM
For more information visit our website
3MCollision.com
2017-02-21, Version 2
Translation of Original Instructions


1Translation of Original Instructions
English
TABLE OF CONTENTS
TABLE OF CONTENTS .........................................................1
IMPORTANT SAFETY INFORMATION .........................................3
SUMMARY OF DEVICE LABELS CONTAINING SAFETY INFORMATION ..........3
EXPLANATION OF SIGNAL WORD CONSEQUENCES ...........................4
GENERAL POWER TOOL SAFETY PRECAUTIONS: .............................. 4
!
WARNING ..............................................................5
!
CAUTION ...............................................................6
NOTICE .....................................................................6
INTENDED USE ..............................................................6
PRODUCT CONFIGURATION/SPECIFICATIONS ...............................6
EXPLODED SANDER (PARTS) VIEW ............................................ 7
PARTS LIST .................................................................. 7
MAINTENANCE/LUBRICATING and OPERATING INSTRUCTIONS ...............8
TO INSTALL/REMOVE THE ABRASIVE BELT. . . . . . . . . . . . . . . . . . . . . . . . . . . . . . . . . . . 10
TO INSTALL/REMOVE THE CONTACT ARMS ..................................11
TO INSTALL/CHANGE THE CONTACT WHEEL ................................ 12
REPLACEMENT PARTS ...................................................... 13
DECLARATION OFCONFORMITY ........................................... 14
3M LIMITED ONE YEARWARRANTY ......................................... 15


3Translation of Original Instructions
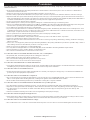
IMPORTANT SAFETY INFORMATION
Please read, understand, and follow all safety information contained in these instructions prior to the use of this device. RETAIN THESE
INSTRUCTIONS FOR FUTURE REFERENCE.
Exposure to DUST generated from workpiece
and/or abrasive materials can result in lung
damage and/or other physical injury.
Use dust capture or local exhaust as stated in
the SDS. Wear government-approved
respiratory protection and eye and skin
protection.
Failure to follow this warning can result in
serious lung damage and/or physical injury.
Read the Safety Data Sheets (SDS)
before using any materials.
Contact the suppliers of the workpiece
materials and abrasive materials for
copies of the SDS if one is not
readily available.
SDS
WARNING
Health Hazard by Dust – California Proposition 65 Statement
!
WARNING! Various dust created by power sanding, sawing, grinding, drilling and other construction activities contains chemicals
known [to the State of California] to cause cancer, birth defects or other reproductive harm. Some examples of these chemicalsare:
• Lead from lead-based paints,
• Crystalline silica from bricks and cement and other masonry products, and
• Arsenic and chromium from chemically treated lumber.
Your risk from exposure to these chemicals varies, depending on how often you do this type of work. To reduce your exposure to
thesechemicals:
• Work in a well-ventilated area, and
• Work with approved safety equipment, such as those dust masks that are specially designed to filter out microscopic particles.
• Wash hands after handling
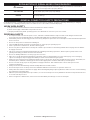
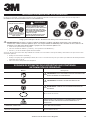
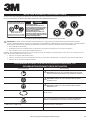
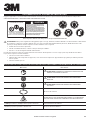
SUMMARY OF DEVICE LABELS CONTAINING SAFETY INFORMATION
Markings Description
!
WARNING: READ AND UNDERSTAND INSTRUCTION MANUAL
BEFORE OPERATINGTOOL.
!
WARNING: ALWAYS WEAR APPROVED EYE PROTECTION.
!
WARNING: ALWAYS WEAR APPROVED HEARING
PROTECTION
Direction of rotation
WARNING: HAND/WRIST/ARM INJURY CAN OCCUR WITH
PROLONGED EXPOSURE TO VIBRATION
17,000 RPM / 4100 SFPM Maximum rotational speed
90 PSIG / 6.2 BAR MAX Maximum air pressure

4 Translation of Original Instructions
EXPLANATION OF SIGNAL WORD CONSEQUENCES
!
WARNING:
Indicates a potentially hazardous situation, which, if not avoided, could result in
death or serious injury and/or property damage.
!
CAUTION:
Indicates a potentially hazardous situation, which, if not avoided, may result in minor
or moderate injury and/or property damage.
NOTICE:
Indicates a potentially hazardous situation, which, if not avoided, may result in
property damage.
GENERAL POWER TOOL SAFETY PRECAUTIONS:
For multiple hazards, read and understand the safety instructions before installing, operating, repairing, maintaining or changing
accessories on, or working near the power tool. Failure to do so can result in serious bodily injury.
WORK AREA SAFETY
a) Keep work area clean and well lit. Cluttered or dark areas invite accidents.
b) Dust can be highly combustible. Keep work area clean.
c) Keep bystanders away while operating a power tool. Distractions can cause you to lose control.
PERSONAL SAFETY
• As compressed air is used as the power source, it must be remembered that compressed air can be dangerous when used
incorrectly. The user should take time to read and understand these operating instructions fully.
• Immediately release the start trigger in the event of any disruption of pressure. Do not attempt to restart until the disruption has
been corrected.
• Do not use the power tool if it has been damaged.
• The tool RPM should be checked on a regular basis to ensure proper operating speed.
• Never operate the tool with loose, broken or missing parts.
• Do not carry the tool by the air hose. Always be careful to prevent the tool from being started when carrying the tool with the
air supply connected.
• This tool is not protected against hazards inherent in grinding and cutting operations, which require a guard, and no such
grinding and cutting products should ever be attached.
• Do not use damaged abrasives or wrong type of accessories.
• Take care to avoid entanglement with the moving parts of the tool with clothing, ties, hair, cleaning rags or loose hanging
objects. If entangled, stop air supply immediately to avoid contact with moving tool parts.
• Always use personal protective equipment. Always wear eye protection. Protective equipment such as gloves, dust mask, non-
skid safety shoes, hard hat or hearing protection used for appropriate conditions will reduce personal injuries.
• Do not overreach. Keep proper footing, balance and grip at all times. This enables better control of the power tool in
unexpected situations.
• Always ensure the material being worked is firmly affixed to avoid movement.
• Do not allow persons to use this power tool if unfamiliar with these instructions or operation of the tool.
• Always disconnect this tool from the air supply when attaching/adjusting/replacing abrasives and accessories or when starting
any maintenance/cleaning tasks.
• Whenever performing maintenance procedures, use care to avoid exposure to any hazardous substances deposited on the tool
as a result of work processes.
• If the tool appears to malfunction, remove from use immediately and arrange for service and repair.

5Translation of Original Instructions
!
WARNING
To reduce the risks associated with impact from abrasive product or tool breakup, sharp edges, hazardous pressure, rupture,
vibration and noise:
• Read, understand and follow the safety information contained in these instructions prior to the use of this tool. Retain these
instructions for future reference.
• Only personnel who are properly trained should be allowed to service this tool.
• Practice safety requirements. Work alert, have proper attire, and do not operate tool under the influence of alcohol or drugs.
• Operators and other personnel must always wear protection for eyes, ears and respiratory protection when in the work area or
while operating this product. Follow your employer’s safety policy for Personal Protective Equipment (PPE) and/or ANSI Z87.1 or
local/national standards for eyewear and other personal protective equipment requirements.
• Proper eye protection must be worn at all times.
• Wear leather apron or other protective apparel, taking into consideration the type of work being done.
• Never exceed marked maximum input pressure (90 psi / 0.62Mpa / 6.2 Bars). Exceeding maximum marked pressure rating will
result in device operating at an unintended speed and therefore enhances the possibility of serious injury.
• Tool shall not be operated in the presence of bystanders.
• If you notice any abnormal noise or vibration when operating the product, immediately discontinue its use and inspect for worn
or damaged components. Correct or replace the suspect component. If abnormal noise or vibration still exists, return the tool to
3M for repair or replacement. Refer to warranty instructions.
• Never operate this tool without all safety measures in place and in proper working order.
• Never use a damaged tool until it has been repaired.
• Never over-ride or disable the safety features of the start-stop control such that it is in the on position.
• If the tool is jammed, shut off the tool and ease it free.
• Make sure the tool is disconnected from its air source before servicing, inspecting, maintaining, cleaning, and before changing
abrasive product.
• Prior to use, or if dropped or jammed, inspect mounting hardware, drive pulley and abrasive product for possible chips, cracks or
other damage and ensure the abrasive product is correctly secured.
• Only use accessories supplied or recommended by 3M.
• Use only with mounting hardware recommended by 3M; check with 3M for mounting hardware requirements.
• Never allow this tool to be used by children or untrained people.
• Do not leave an unattended tool connected to an air source.
To reduce the risks associated with skin abrasion, burns, cuts, or entrapment:
• Keep hands, hair, and clothing away from the cutting part of the tool.
• Wear suitable protective gloves while operating tool.
• Do not touch the rotating parts during operation for any reason.
• Do not force tool or use excessive force when using tool.
To reduce the risk of all hazards associated with vibration:
• If any physical hand/wrist discomfort is experienced, work should be stopped promptly to seek medical attention. Hand, wrist
and arm injury may result from repetitive work, motion and overexposure to vibration.
To reduce the risks associated with loud noise:
• Always wear hearing protection while operating this tool. Follow your employer’s safety policy or local/national standards for
personal protective equipment requirements.
To reduce the risks associated with fire or explosion:
• Do not operate the tool in explosive atmospheres, such as in the presence of flammable liquids, gases or dust. The abrasives are
able to create sparks when working material, resulting in the ignition of the flammable dust or fumes.
• Refer to SDS of material being worked as to potential for creating fire or explosion hazard.
To reduce the risks associated with hazardous dust inhalation or eye/skin exposure:
• Use appropriate respiratory and skin protection, or local exhaust as stated in the SDS of the material being worked on.
• Exposure to dust generated in the workplace and/or abrasive materials can result in lung damage and/or other physical injury.
• Use dust capture or local exhaust as stated on the SDS. Wear government approved respiratory protection and eye and
skinprotection.
• Failure to follow this warning can result in serious lung damage and/or physical injury.
To reduce the risk of foot injury from dropped tools:
• Wear safety shoes with a reinforced toe to help protect your feet from injury caused by a dropped tool. Safety footwear comes
in a variety of styles and is widely available. Choose footwear that offers traction for your work site.
To reduce the risks associated with hazardous voltage:
• Do not allow this tool to come into contact with electrical power sources as the tool is not insulated against electrical shock.

6 Translation of Original Instructions
!
CAUTION
To reduce the risk associated with whipping or hazardous pressure-rupture:
• Ensure supply hose is oil resistant and is properly rated for required work pressure.
• Do not use tools with loose or damaged air hoses or fittings.
• Be aware that incorrectly installed hoses and fittings might unexpectedly come loose at any time and create a whipping/
impacthazard.
To reduce the risk associated with fly off of abrasive product or parts:
• Use care in attaching abrasive product and mounting hardware; follow the instructions to ensure that they are securely attached
to the tool before use or free-spinning.
• Never point this product in the direction of yourself or another person, or start tool unintentionally.
• Never over-tighten accessory fasteners.
NOTICE
To maximize the life of the system:
• Do not operate tool without a properly attached 3M™ abrasive.
• Reference Maintenance/Lubricating and Operating Instructions section for proper lubrication procedures.
INTENDED USE
The 3M™ File Belt Sander is intended for use in industrial locations, and used only by skilled, trained professionals in accordance with
the instructions in this manual. The 3M™ File Belt Sander is designed to effectively remove spot welds with less manual effort and
force than spot weld drills. The tool can also be used to remove gaskets and sealants. Only accessories specifically recommended by
3M should be used with this tool. Use in any other manner or with other accessories could lead to unsafe operating conditions.
• Do not operate tool in water or in an excessively wet application.
• Do not use abrasive products that have a Max RPM less than the Max RPM rating marked on the tool.
• Maintain labels and nameplates. These carry important information. If unreadable or missing, contact a 3M service facility for a
free replacement.
At the end of its useful life, recycle or dispose of tool according to federal, state, and local regulations.
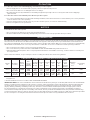
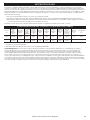
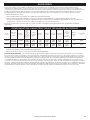
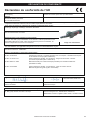
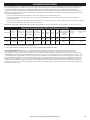
PRODUCT CONFIGURATION/SPECIFICATIONS
Model
No.
Belt Size
In. (mm)
Motor
Speed
(RPM)
Belt
Speed
SFPM
(SMPM)
Product
Net Wt
lb (kg)
Height
In.
(mm)
Length
In.
(mm)
Width
In.
(mm)
Motor
hp
(W)
Noise
Level
dBA
Pressure
(Power)
Vibration
Level
m/s
2
Uncertainty
Km/s
2
33573
1/2 × 13
(13×300)
17,000
4100
(1250)
1.91
(0.87)
2.87
(73)
12.50
(320)
3.80
(96)
.65
(485)
87.0
(98.0)
1.71 0.66
33575
1/2 × 18
(13×457)
17,000
4100
(1250)
2.03
(0.92)
2.87
(73)
15.15
(385)
3.80
(96)
.65
(485)
87.5
(98.5)
1.92 0.68
* Declared noise level; measurements carried out in accordance with EN ISO 15744. It is recommended to wear ear protection while
using this tool.
** Declared vibration level in accordance with standard EN ISO 28927.
IMPORTANT NOTE: The noise and vibration values stated are from laboratory testing in conformity with stated codes and standards
and are not sufficient risk evaluation for all exposure scenarios. Values measured in a particular work place may be higher than the
declared values. Exposure to high noise levels can cause permanent, disabling hearing loss and other problems, such as tinnitus
(ringing, buzzing, whistling or humming in the ears). Therefore, risk assessment and the implementation of appropriate controls
for these hazards are essential. The actual exposure values and amount of risk or harm experienced to an individual is unique to
each situation and depends upon the surrounding environment, the way in which the individual works, the particular material being
worked, work station design, as well as upon the exposure time and the physical condition of the user. 3M cannot be held responsible
for the consequences of using declared values instead of actual exposure values for any individual risk assessment.

7Translation of Original Instructions
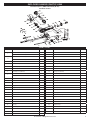
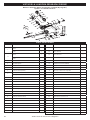
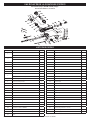
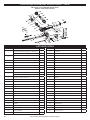
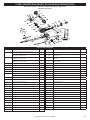
EXPLODED SANDER PARTS VIEW
PN 33573 (13 in.) AND PN 33575 (18 IN.)
File Belt Sander
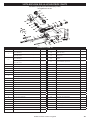
PARTS LIST
ITEM DESCRIPTION QTY ITEM DESCRIPTION QTY
1
18 in. Contact Arm Assembly- 10 mm Wheel 1 24 Parallel Key 1
18 in. Contact Arm Assembly- 13 mm Wheel 1 25 Rotor Blade 5
1-1
13 in. Contact Arm Assembly- 10 mm Wheel 1 26 Cylinder 1
13 in. Contact Arm Assembly- 13 mm Wheel 1 27 Rear End Plate 1
2 Stopper Pin 1 28 Ball Bearing (608ZZ) 1
3 Guard Bushing 1 29 O-Ring 1
4 Tension Spring 1 30 Cap 1
5 Guard Body 1 31 Safety Lever Assembly 1
6 Head Cap Screw (M5×15) 1 32 Spring Pin (Ø 3×20) 1
7
Shoe For 18 in. 1 33 Valve Body 1
Shoe For 13 in. 1 34 O-Ring 1
8 Hex. Socket Headless Set Screw 1 35 O-Ring 1
9 Dust Cover 1 36 O-Ring 1
10 Spring Pin (Ø 2.5×10) 1 37 Valve Stem 1
11 Stopper 1 38 O-Ring 1
12 Stopper Spring 1 39 Valve Spring 1
13 Hex. Nut (M6) 1 40 Air Regulator 1
14 Washer (M6) 1 41 O-Ring 2
15 Drive Pulley 1 42 External Stop Ring 1
16 Button Head Screw 1 43 Ring 1
17 Knurled Head Screw 1 44 Muffler 1
18 Belt Cover 1 45 Exhaust Diffuser 1
19 Housing 1 46 Inlet Bushing 1
20 Ball Bearing (6000ZZ) 1 47 Hex. Wrench - 1.5 mm 1
21 Front End Plate 1 48 Hex. Wrench - 40 mm 1
22 Spacer 1 49 Set Screw 1
23 Rotor 1

8 Translation of Original Instructions
MAINTENANCE/LUBRICATING AND OPERATING INSTRUCTIONS
PRIOR TO THE OPERATION
The tool is intended to be operated as a hand held tool. It is always recommended that while using the tool, operators stand on a solid
floor, in a secure position with a firm grip and footing. Be aware the sander can develop a torque reaction. Reference “GENERAL POWER
TOOL SAFETY PRECAUTIONS” section.
Use a clean lubricated air supply that will give a measured air pressure at the tool of 6.2 bar (90 psig) when the tool is running with the
trigger fully depressed. It is recommended to use an approved 9.52 mm (3/8 in) x 8 m (25 ft) maximum length airline.
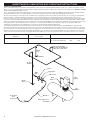
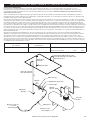
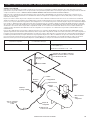
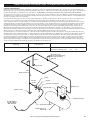
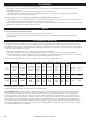
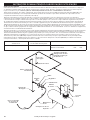
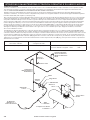
Do not connect the tool to the airline system without incorporating an easily accessible air shut off valve. It is strongly recommended
that an air filter, regulator and lubricator (FRL) be used as shown in Figure A as this will supply clean, lubricated air at the correct
pressure to the tool. In any case appropriate air pressure regulators shall be used at all times while operating this tool where the supply
pressure exceeds the marked maximum of the tool. Details of such equipment can be obtained from your tool distributor. Adjust airline
lubricator equipment such that two drops of 3M™ Air Tool Lubricant PN 20451 (or equivalent 10 centistoke oil) per minute are provided
through the hose to the air inlet of the tool. If excessive oil is noted in the exhaust air, reduce the drip rate of the airline lubricator
equipment accordingly. If such equipment is not used, the tool should be manually lubricated.
To manually lubricate the tool, disconnect the airline and put two to three drops of 3M™ Air Lubricant PN 20451 (or equivalent 10
centistoke oil) into the air inlet of the tool. Reconnect tool to the air supply and run tool slowly for a few seconds to allow air to circulate
the oil. If the tool is used frequently, lubricate it on a daily basis or lubricate it if the tool starts to slow or lose power. It is recommended
that the air pressure at the tool be 6.2 bar (90 psig) while the tool is running so the maximum RPM is not exceeded. The tool can run at
lower pressures but should never be run higher than 6.2 bar (90 psig). If run at lower pressure the performance of the tool is reduced.
Recommended Airline Size –
Minimum
Recommended Maximum
Hose Length
Air Pressure
9.52 mm (3/8 in) 8 meters (25 feet) Maximum Working Pressure 6.2 Bar 90 psig
Recommended Minimum N/A N/A
Air Compressor
and Tank
Air
Flow
Closed Loop Pipe
System Sloped in the
direction of air flow
Drain
Leg
Ball Valve
Ball
Valve
Filter
Ball
Valve
To Tool
Station
Drain
Valve
Lubricator
Regulator
To Coupler
at or
near Tool
Air Hose
Air
Dryer

9Translation of Original Instructions
GENERAL SET UP AND USE:
• Read all instructions before using this tool. All operators must be fully trained in its use and aware of all safety rules. All service
and repair must be carried out by trained personnel.
• The tool RPM should be checked on a regular basis to ensure proper operating speed.
• Make sure the tool is disconnected from the air supply and then attach 3M abrasive belt to the sander. Always wear required
safety equipment when using this tool.
• When sanding always start the tool just prior to contacting the work piece. Stop air flow to the tool as it is removed from the
work piece.
• Always remove the air supply to the sander before fitting, adjusting or removing the abrasive.
• Use only 3M approved parts.
• Prior to installing any File Belt Sander accessory, always check that its marked maximum operating speed is equal to or higher
than the rated speed of this tool.
SETTING & TESTING TOOL SPEED:
1. Ensure the Trigger is not depressed
2. Connect the compressed airline
3. Press the Trigger slowly and increase force until tool is at full speed
4. Use a Rotary Tachometer to check the speed
5. Check speed regularly

10 Translation of Original Instructions
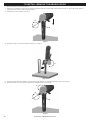
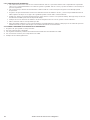
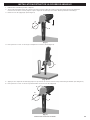
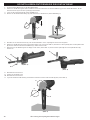
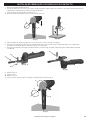
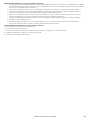
TO INSTALL/REMOVE THE ABRASIVE BELT
1. Disconnect the tool from the air line.
2. Hold the tool with the contact arm pointing downward. Push the contact arm against a hard surface to gain some slack until the
safety latch (A) clicks into the locking position.
3. Unfasten the set screw (B). (See Fig. 1)
B
A
(Fig. 1)
4. Rotate the belt cover (C) and replace the belt.(See Fig. 2)
(Fig. 2)
C
5. Press the safety latch (A) until the contact arm springs back to its original extended position. (See Fig. 3).
6. Rotate the belt cover into the closed position and tighten the set screw (B).
B
C
A
(Fig. 3)

11Translation of Original Instructions
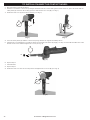
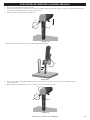
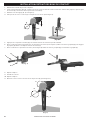
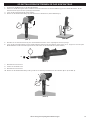
TO INSTALL/REMOVE THE CONTACT ARMS
1. Disconnect the tool from the air line.
2. Hold the tool with the contact arm facing downward. Push the contact arm against a hard surface until the safety latch (A) clicks
into the locking position.
3. Release the set screw (B).(See Fig. 1)
4. Rotate the belt cover (C) and remove the belt.(See Fig. 2)
(Fig. 1)
B
A
(Fig. 2)
C
5. Press the safety latch (A) to release the contact arm to its original position.
6. Place the tool in horizontal position with the cap facing upward (See Fig. 3). Use a pin punch (D) to tap out the pin (E). Remove and
replace the contact arm (F).
7. Place the tool with the cap facing downward. (See Fig. 4). Use a pin punch (D) to install the pin (E).
D
F
E
(Fig. 3)
D
(Fig. 4)
8. Repeat Step 2.
9. Install the belt.
10. Repeat Step 5.
11. Flip back the belt cover and tighten the set screw (B). (See Fig. 5)
B
C
A
(Fig. 5)

12 Translation of Original Instructions
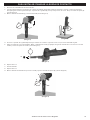
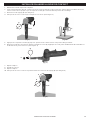
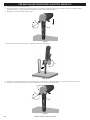
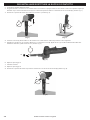
TO INSTALL/CHANGE THE CONTACT WHEEL
1. Disconnect the tool from the air line.
2. Hold the tool with the contact arm pointing downward. Push the contact arm against a hard surface to gain some slack until the
safety latch (A) clicks into the locking position. Unfasten the set screw (B).(See Fig. 1)
3. Rotate the belt cover (C) and remove the belt.(See Fig. 2)
(Fig. 1)
B
A
(Fig. 2)
C
4. Press the safety latch (A) until the contact arm springs back to its original extended position.
5. Unfasten the screw (D) with a screw driver. Remove and replace the wheel (E). Apply one drop of removable threadlocker on the
threads of the screw and then tighten the screw. (See Fig. 3)
(Fig. 3)
D
E
6. Repeat Step 2.
7. Install the belt.
8. Repeat Step 5.
9. Rotate the belt cover into the closed position and tighten the set screw (B). (See Fig. 4)
(Fig. 4)
B
A
C

13Translation of Original Instructions
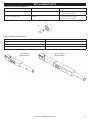
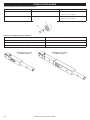
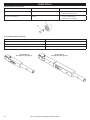
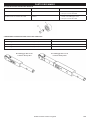
REPLACEMENT PARTS
CONTACT WHEEL REPLACEMENT KIT
KIT DESCRIPTION PART NUMBER CONTENT
10 mm Contact Wheel Kit 33583 1. 10 mm - Wheel Assembly
2. Screw for 10 mm Wheel
13 mm Contact Wheel Kit 33584 1. 13 mm –Wheel Assembly
2. Screw for 13 mm Wheel
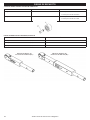
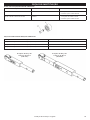
CONTACT ARM ASSEMBLY PARTS
DESCRIPTION PART NUMBER
330 mm (13 in) Contact Arm Assembly – 10 mm Wheel 33585
330 mm (13 in) Contact Arm Assembly - 13 mm Wheel 33586
457 mm (18 in) Contact Arm Assembly – 13 mm Wheel 33588
13 in. Contact
Arm Assembly
18 in. Contact
Arm Assembly

14 Translation of Original Instructions
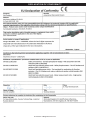
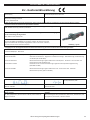
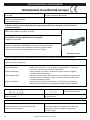
DECLARATION OFCONFORMITY

15Translation of Original Instructions
3M LIMITED ONE YEARWARRANTY
Product Use: Many factors beyond 3M’s control and uniquely within user’s knowledge
and control can affect the use and performance of a 3M product in a particular application.
Given the variety of factors that can affect the use and performance of a 3M product, user
is solely responsible for evaluating the 3M product and determining whether it is fit for a
particular purpose and suitable for user’s method of application.
Warranty, Limited Remedy and Disclaimer: 3M warrants this tool against defects in
workmanship and materials under normal operating conditions for one (1) year from the
date of purchase. 3M MAKES NO OTHER WARRANTIES OR CONDITIONS, EXPRESS OR
IMPLIED, INCLUDING, BUT NOT LIMITED TO, ANY IMPLIED WARRANTY OR CONDITION
OF MERCHANTABILITY OR FITNESS FOR A PARTICULAR PURPOSE OR ANY IMPLIED
WARRANTY OR CONDITION ARISING OUT OF A COURSE OF DEALING, CUSTOM OR
USAGE OF TRADE. If the 3M product does not conform to this warranty, then the sole
and exclusive remedy is, at 3M’s option, replacement of the 3M product or refund of the
purchase price.
This warranty extends only to the original purchaser and does not cover a defect or
product malfunction resulting from abuse, misuse, neglect, or any use not in conformity
with the printed directions. Any attempt to repair or adjust any electrical or mechanical
functions on this unit will void the warranty. This warranty does not cover part failure due
to normal wear or tool abuse. 3M also identifies: Merchandise that has become damaged
or inoperative because of ordinary wear, misuse, cold, heat, rain, excessive humidity,
freeze damage, use of improper chemicals, negligence, accident, failure to operate
the product in accordance with the instructions provided in the Operator’s Manual(s)
supplied with the product, improper maintenance, the use of accessories or attachments
not recommended by 3M, or unauthorized repair or alterations.
To make a claim under the warranty, you must first contact the 3M service center
at 1-877-MMM-CARS (1-877-666-2277) to receive a return authorization number.
Merchandise must be returned freight prepaid by the purchaser, to the service location
address given by the 3M Customer Service center. Upon validation of the warranty claim,
3M will replace or repair the merchandise, at 3M’s option, and return it to the purchase at
3M’s expense, including parts, labor and return shipping charges. If it is determined that
the claim is not covered by the warranty, the purchaser will be given the option to have
the merchandise repaired outside of the warranty. An estimate of parts and labor will be
provided by 3M and must be approved by the purchaser in advance.
Limitation of Liability: Except where prohibited by law, 3M will not be liable for any
loss or damage arising from the 3M product, whether direct, indirect, special, incidental
or consequential, regardless of the legal theory asserted, including warranty, contract,
negligence or strict liability.


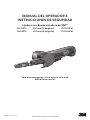
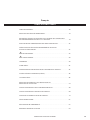
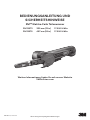
MANUAL DEL OPERADOR E
INSTRUCCIONES DE SEGURIDAD
Lijadora con Banda Limadora de 3M™
PN 33573 330 mm (13 pulgadas) 17,000 RPM
PN 33575 457 mm (18 pulgadas) 17,000 RPM
Para más información, visite nuestro sitio web
3MCollision.com/es
2017-02-21, Version 2
Traducción de las Instrucciones Originales

Seite laden ...
Seite laden ...
Seite laden ...
Seite laden ...
Seite laden ...
Seite laden ...
Seite laden ...
Seite laden ...
Seite laden ...
Seite laden ...
Seite laden ...
Seite laden ...
Seite laden ...
Seite laden ...
Seite laden ...
Seite laden ...
Seite laden ...
Seite laden ...
Seite laden ...
Seite laden ...
Seite laden ...
Seite laden ...
Seite laden ...
Seite laden ...
Seite laden ...
Seite laden ...
Seite laden ...
Seite laden ...
Seite laden ...
Seite laden ...
Seite laden ...
Seite laden ...
Seite laden ...
Seite laden ...
Seite laden ...
Seite laden ...
Seite laden ...
Seite laden ...
Seite laden ...
Seite laden ...
Seite laden ...
Seite laden ...
Seite laden ...
Seite laden ...
Seite laden ...
Seite laden ...
Seite laden ...
Seite laden ...
Seite laden ...
Seite laden ...
Seite laden ...
Seite laden ...
Seite laden ...
Seite laden ...
Seite laden ...
Seite laden ...
Seite laden ...
Seite laden ...
Seite laden ...
Seite laden ...
Seite laden ...
Seite laden ...
Seite laden ...
Seite laden ...
Seite laden ...
Seite laden ...
Seite laden ...
Seite laden ...
Seite laden ...
Seite laden ...
Seite laden ...
Seite laden ...
Seite laden ...
Seite laden ...
Seite laden ...
Seite laden ...
Seite laden ...
Seite laden ...
Seite laden ...
Seite laden ...
Seite laden ...
Seite laden ...
Seite laden ...
Seite laden ...
Seite laden ...
Seite laden ...
Seite laden ...
Seite laden ...
Seite laden ...
Seite laden ...
Seite laden ...
Seite laden ...
Seite laden ...
Seite laden ...
-
 1
1
-
 2
2
-
 3
3
-
 4
4
-
 5
5
-
 6
6
-
 7
7
-
 8
8
-
 9
9
-
 10
10
-
 11
11
-
 12
12
-
 13
13
-
 14
14
-
 15
15
-
 16
16
-
 17
17
-
 18
18
-
 19
19
-
 20
20
-
 21
21
-
 22
22
-
 23
23
-
 24
24
-
 25
25
-
 26
26
-
 27
27
-
 28
28
-
 29
29
-
 30
30
-
 31
31
-
 32
32
-
 33
33
-
 34
34
-
 35
35
-
 36
36
-
 37
37
-
 38
38
-
 39
39
-
 40
40
-
 41
41
-
 42
42
-
 43
43
-
 44
44
-
 45
45
-
 46
46
-
 47
47
-
 48
48
-
 49
49
-
 50
50
-
 51
51
-
 52
52
-
 53
53
-
 54
54
-
 55
55
-
 56
56
-
 57
57
-
 58
58
-
 59
59
-
 60
60
-
 61
61
-
 62
62
-
 63
63
-
 64
64
-
 65
65
-
 66
66
-
 67
67
-
 68
68
-
 69
69
-
 70
70
-
 71
71
-
 72
72
-
 73
73
-
 74
74
-
 75
75
-
 76
76
-
 77
77
-
 78
78
-
 79
79
-
 80
80
-
 81
81
-
 82
82
-
 83
83
-
 84
84
-
 85
85
-
 86
86
-
 87
87
-
 88
88
-
 89
89
-
 90
90
-
 91
91
-
 92
92
-
 93
93
-
 94
94
-
 95
95
-
 96
96
-
 97
97
-
 98
98
-
 99
99
-
 100
100
-
 101
101
-
 102
102
-
 103
103
-
 104
104
-
 105
105
-
 106
106
-
 107
107
-
 108
108
-
 109
109
-
 110
110
-
 111
111
-
 112
112
-
 113
113
-
 114
114


3M File Belt Sanders Benutzerhandbuch
- Kategorie
- Elektrowerkzeuge
- Typ
- Benutzerhandbuch
in anderen Sprachen
- français: 3M File Belt Sanders Manuel utilisateur
- español: 3M File Belt Sanders Manual de usuario
- italiano: 3M File Belt Sanders Manuale utente
- português: 3M File Belt Sanders Manual do usuário
Verwandte Papiere
Sonstige Unterlagen
-
Sioux Tools SPS10P6 Bedienungsanleitung
-
Sioux Tools SAS10A324 Original Instructions Manual
-
Parkside PMBS 105 A1 Operation and Safety Notes
-
-
 RED ROOSTER RRS-60323K Bedienungsanleitung
-
Andis 65925 Use & Care Instructions
-
-
Kampmann KLIMANAUT 60 Installationsanleitung
-
