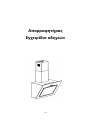
Candy CVMAD60/1N/S Benutzerhandbuch
- Kategorie
- Dunstabzugshauben
- Typ
- Benutzerhandbuch

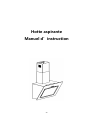
CVMAD60/1N/S
CookerHood
InstructionManual
ENGLISH(EN)--------------------------------------------------------------------------------page 001
CZECH (CS)----------------------------------------------------------------------------------page 013
GERMAN (DE) ------------------------------------------------------------------------------page 025
SPANISH (ES) -------------------------------------------------------------------------------page 037
FRENCH (FR)--------------------------------------------------------------------------------page 050
GREEK(GR) ----------------------------------------------------------------------------------page 062
CROATIAN (HR) ----------------------------------------------------------------------------page 074
ITALIAN (IT) ----------------------------------------------------------------------------------page 086
POLISH (PL) ---------------------------------------------------------------------------------page 098
SLOVENIA (SL) -----------------------------------------------------------------------------page 111
SERBIAN (SR) ------------------------------------------------------------------------------page 123

1
CookerHood
InstructionManual

2
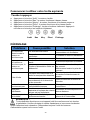
Content
1…………………………………..………………………………Safetyinstructions
2…………………………………..………………………………Installation
3…………………………………..………………………………Startusingyourcookerhood
4…………………………………..………………………………Troubleshooting
5…………………………………..………………………………Maintenanceandcleaning
6…………………………………..………………………………Environmentprotection

3
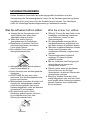
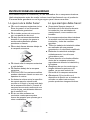
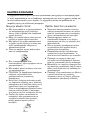
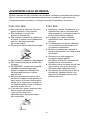
SAFETYINSTRUCTIONS
Thismanualexplainstheproperinstallationanduseofyourcookerhood,
pleasereaditcarefullybeforeusingevenifyouarefamiliarwiththeproduct.
Themanualshouldbekeptinasafeplaceforfuturereference.
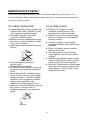
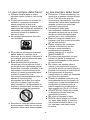
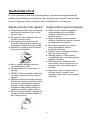
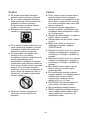
Nevertodo:
● D o not try to use the cooker hood
without the grease filters or if the filters
are excessively greasy!
●Do not install above a cooker with a
high level grill.
●Do not leave frying pans unattended
during use because overheated fats or
oils might catch fire.
●Never leave naked flames under the
cooker hood.
●If the cooker hood is damaged, do not
attempt to use.
●Do not flambé under the cooker hood.
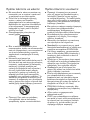
●
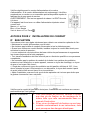
CAUTION: Accessible parts may
become hot when used with cooking
appliances.
●The minimum distance between the
supporting surface for the cooking
vessels on the hob and the lowest part
of the cooker hood. (When the cooker
hood is located above a gas appliance,
this distance shall be at least 65 cm)
●
The air must not be discharged into a
flue that is used for exhausting fumes
from appliances burning gas or other
fuels.
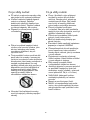
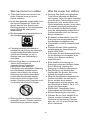
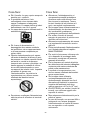
Alwaystodo:
● Important! Always switch off the
electricity supply at the mains during
installation and maintenance such as
light bulb replacement.
●
The cooker hood must be installed in
accordance with the installation
instructions and all measurements
followed.
●
All installation work must be carried
out by a competent person or qualified
electrician.
●Please dispose of the packing material
carefully. Children are vulnerable to it.
● P ay attention to the sharp edges
inside the cooker hood especially
during installation and cleaning.
●Make sure the ducting has no bends
sharper than 90 degrees as this will
reduce the efficiency of the cooker
hood.
●Warning: Failure to install the screws
or fixing device in accordance with
these instructions may result in
electrical hazards.

4
Alwaystodo:
●Always put lids on pots and pans
when cooking on a gas cooker.
●When in extraction mode, air in the
room is being removed by the cooker
hood. Please make sure that proper
ventilation measures are being
observed. The cooker hood removes
odours from room but not steam.
●Cooker hood is for domestic use only.
●If the supply cord is damaged, it must
be replaced by the manufacturer, its
service agent or similarly qualified
persons in order to avoid a hazard.
●This appliance can be used by
children aged from 8 years and above
and persons with reduced physical,
sensory or mental capabilities or lack
of experience and knowledge if they
have been given supervision or
instruction concerning use of the
appliance in a safe way and
understand the hazards involved.
Children shall not play with the
appliance. Cleaning and user
maintenance shall not be made by
children without supervision.
●Warning: Before obtaining access to
terminals, all supply circuits must be
disconnected.
Alwaystodo:
● Caution: The appliance and its
accessible parts can become hot
during operation. Be careful to avoid
touching the heating elements.
Children younger than 8 years old
should stay away unless they are
under permanent supervision.
● There shall be adequate ventilation of
the room when the cooker hood is
used at the same time as appliances
burning gas or other fuels.
●There is a fire risk if cleaning is not
carried out in accordance with the
instructions.
●Regulations concerning the discharge
of air have to be fulfilled.
●Clean your appliance periodically by
following the method given in the
chapter MAINTENANCE.
●For safety reason, please use only the
same size of fixing or mounting screw
which are recommended in this
instruction manual.
●Regarding the details about the
method and frequency of cleaning,
please refer to maintenance and
cleaning section in the instruction
manual.
●Cleaning and user maintenance shall
not be made by children without
supervision.
●When the cooker hood and
appliances supplied with energy other
than electricity are simultaneously in
operation, the negative pressure in the
room must not exceed 4 Pa (4 x 10⁻⁵
bar).
●WARNING: Danger of fire: do not
store items on the cooking surfaces.
●
A steam cleaner is not to be used.
●
NEVER try to extinguish a fire with
water, but switch off the appliance and
then cover flame e.g. with a lid or a
fire blanket.

5
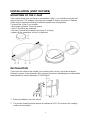
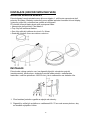
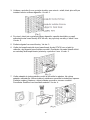
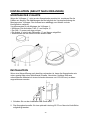
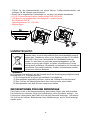
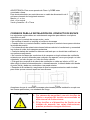
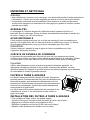
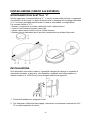
INSTALLATION(VENTOUTSIDE)
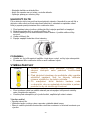
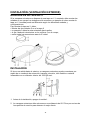
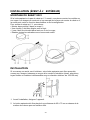
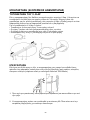
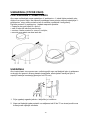
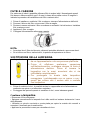
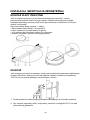
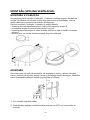
MOUNTINGOFTHEV-FLAP
If the cooker hood does not have an assembled V-flap 1, you should mount the half-
parts to its body. The images only show an example of how to mount the V-flap,the
outlet may be various according to different models and configuration.
To mount the V-flap 1 you should:
• Mount two half-parts 2 into the body 6
• a pin 3 should be top oriented;
• the axis 4 should be inserted in the holes 5 on body;
• repeat all the operations for the 2nd half-part
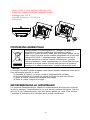
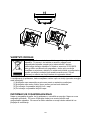
INSTALLATION
If you have an outlet to the outside, your cooker hood can be connected as below
picture by means of an extraction duct (enamel, aluminum, flexible pipe or inflammable
material with an interior diameter of 120/150mm)
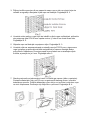
1. Before installation, turn the unit off.
2. The cooker hood should be placed at a distance of 65~75cm above the cooking
surface for best effect.

6
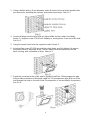
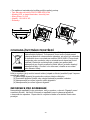
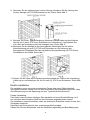
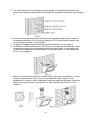
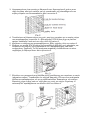
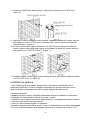
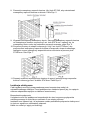
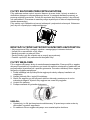
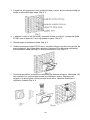
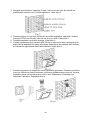
3. Using a drill bit with an 8 mm diameter, make 8 holes in the wall at the position that
you reserve for installing the chimney and cooker hood body. See Pic 2.
4. Insert wall plugs into the holes that you have drilled for the cooker hood body,
fasten 2 × support screw ST4*40 mm halfway in, leaving them 2 mm out of the wall.
See Pic 2.
5. Hang the cooker hood onto the support screws.See pic 3.
6. Insert self-tap screw ST4*30 mm into the safety holes and fully fasten it to ensure
the cooker hood is well fixed. Note: The two safety vents are positioned on the
back housing, with a diameter of 6mm. See pic 3.
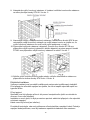
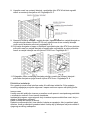
7. Equip the converter to the outlet, and fix by tape.Install the 120mm expansion pipe
to the outlet converter and fixed with cable tie. Lift up expansion pipe till it out of the
wall through the hole on the wall. Note:The expansion is not included in the product.
See Pic 4.

7
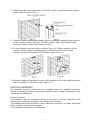
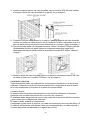
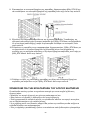
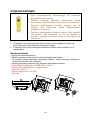
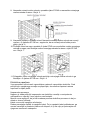
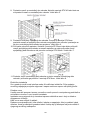
8. Install the inside chimney bracket:Use ST4*40 screws to install the inside chimney
bracket onto the wall.See Pic 5.
9. Equip the inside chimney and outside chimney: Install the outside chimney bracket
on the outside chimney with 2pcs ST4*8mm screws, make sure that the inside
chimney could be moved inside freely, see Pic 6.
10. Fix the chimneys onto the cooker hood:Use 2pcs of ST4*8mm screws to fix the
outside chimney bracket onto the cooker hood bracket, then fix the outside
chimney bracket on the wall with ST4*40mm screws.See Pic 7.
11. Adjust the height of the inside chimney to the position of the inside chimney bracket
and fix it with 2pcs ST4*8mm screws. See Pic 8.
Electrical Installation
All installation must be carried out by a competent person or qualified electrician.
Before connecting the mains supply ensure that the mains voltage corresponds to the
voltage on the rating plate.
Direct Connection
The appliance must be connected directly to the mains using an omnipolar circuit
breaker with a minimum opening of 3mm between the contacts.
The installer must ensure that the correct electrical connection has been made and
that it complies with the wiring diagram.
The cable must not be bent or compressed.

8
Regularly check the power plug and power cord for damage. If the
supply cord is damaged, it must be replaced by a special cord or
assembly available from the manufacturer or its service agent.
WARNING: This is a Class I appliance and MUST be earthed
This appliance is supplied with a 3 core mains cable coloured as follows:
Brown = L or Live
Blue = N or Neutral
Green and Yellow = E or Earth
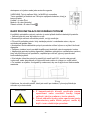
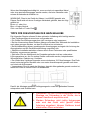
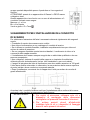
HINTSFOREXHAUSTDUCTINSTALLATION
The following rules must be strictly followed to obtain optimal air extraction:
• Keep exhaust duct short and straight
• Do not reduce the size or restrict exhaust duct
• When using flexible duct always install the duct pulled taut to minimize pressure loss
• Failure to observe these basic instructions will reduce the performance and increase
noise levels of the cooker hood.
• Any installation work must be carried out by a qualified electrician or competent
person.
• Do not connect the ducting system of the hood to any existing ventilation system
which is being used for any other appliance ,such as warmer tube, gas tube , hot wind
tube.
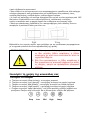
• The angle of the bend of the ventilation pipe should not be less than 120º; you must
direct the pipe horizontally, or, alternatively, the pipe should go up from the initial point
and should be led to an outer wall.
• After the installation ,make sure that the cooker hood is level to avoid grease
collection at on end.
Ensure the exhaust ducting selected for installation complies with relevant standards
and is fire retardant.
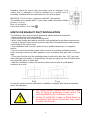
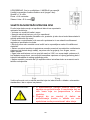
WARNING:
For safety reason, please use only the same
size of fixing or mounting screws which are
recommended in this instruction manual.
Failure to install the screws or fixing device in
accordance with these instructions may result
in electrical hazards.

9
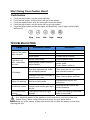
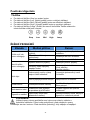
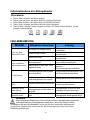
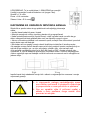
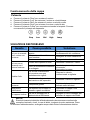
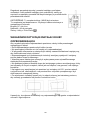
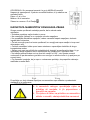
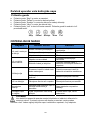
StartUsingYourCookerHood
Pushbutton
a. Push the stop button, and the motor will stop.
b. Push the low button, and the motor will run at low speed.
c. Push the middle button, and the motor will run at mid speed.
d. Push the high button, and the motor will run at high speed.
e. Push the lamp button and the two lights will illuminate. Push it again and the light
will turn off.
Stop Low Mid High Lamp
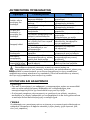
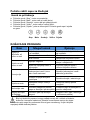
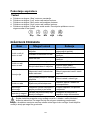
TROUBLESHOOTING
Fault PossibleCause Solution
Light on, but motor
does not work
Fan switch turned off Select a fan switch position.
Fan switch failed Contact service center.
Motor failed Contact service center.
Light does not
work, motor does
not work
House fuses blown Reset/Replace fuses.
Mains power cable is loose or
disconnected
Refit mains power cable to
power outlet.
Switch power outlet on.
Oil leakage
One way valve and the outlet
are not tightly sealed
Take down the one way valve
and seal with sealant.
Leakage from the connection of
chimney and cover
Take chimney down and seal.
Lights not working Broken or faulty bulbs
Replace blubs as per this
instruction.
Insufficient suction
The distance between the
cooker hood and the gas top is
too far
Refit the cooker hood to the
correct distance.
The Cooker hood
inclines
The fixing screw is not tight
enough
Tighten the hanging screw and
make it horizontal.
NOTE:
Any electrical repairs to this appliance must conform to your local, state and
federal laws. Please contact the service centre if in any doubt before
undertaking any of the above. Always disconnect the unit from the power source when
opening the unit.

10
MAINTENANCEANDCLEANING
Caution:
• Before maintenance or cleaning is carried out, the cooker hood should be
disconnected from the mains power supply. Ensure that the cooker hood is switched
off at the wall socket.
• External surfaces are susceptible to scratches and abrasions, so please follow the
cleaning instructions to ensure the best possible result is achieved without damage.
GENERAL
Cleaning and maintenance should be carried out with the appliance cold especially
when cleaning.Avoid leaving alkaline or acid substances (lemon juice, vinegar etc.) on
the surfaces.
STAINLESS STEEL
The stainless steel must be cleaned regularly (e.g.weekly) to ensure a long life
expectancy.Dry with a clean soft cloth. A specialized stainless steel cleaning fluid may
be used.
NOTE:
Ensure that wiping is done along with the grain of the stainless steel to prevent any
unsightly crisscross scratching patterns from appearing.
CONTROL PANEL SURFACE
The inlay control panel can be cleaned using warm soapy water. Ensure the cloth is
clean and well wrung before cleaning. Use a dry soft cloth to remove any excess
moisture left after cleaning.
Important
Using neutral detergents and avoid using harsh cleaning chemicals, strong household
detergents or products containing abrasives,as this will affect the appearance of the
appliance and potentially remove any printing of artwork on the control panel and will
void manufactures warrantee.
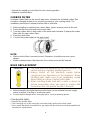
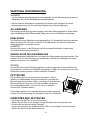
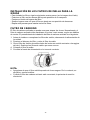
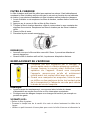
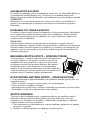
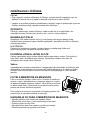
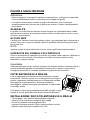
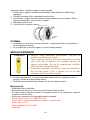
GREASE MESH FILTERS
The mesh filters can be cleaned by hand. Soak them for about
3 minute in water with a mild detergent and then brush it gently
with a soft brush. Please do not apply too much pressure so as
to avoid any damage to it . (Leave to dry naturally out of direct
sun light)
Filters should be washed separately to crockery and kitchen
utensils. It is advisable not to use rinse aid.
INSTALLING GREASE MESH FILTERS
• To install filters for the following four steps:
- Angle the filter into the slots at the back of the hood.
- Push the button on the handle of the filter.

11
- Release the handle once the filter fits into a resting position.
- Repeat to install all filters.
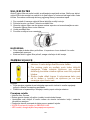
CARBON FILTER
Activated carbon filter can be used to trap odors. Normally the activated carbon filter
should be changed at three or six months according to your cooking habits. The
installation procedure of activated carbon filter is as below:
1. Before installing or replacing the carbon filters, please remove power to the unit.
2. Press the filter lock and remove the mesh filter.
3. Turn the carbon filter on both sides of the motor anti-clockwise. Replace the carbon
filters with the new carbon filters.
4. Place the mesh filter.
5. Connect the power supply to the wall socket.
NOTE:
Make sure the filter is securely locked. Otherwise, it would loosen and cause
danger.
When activated carbon filter attached, the suction power will be lowered.
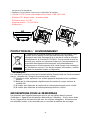
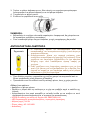
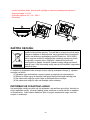
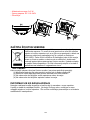
BULB REPLACEMENT
Important :
The bulb must be replaced by the manufacturer, its
service agent or similarly qualified persons.
Always switch off the electricity supply before
carrying out any operations on the appliance. When
handling bulb, make sure it has completely cooled
down before any direct contact with hands.
When handling bulbs hold with a cloth or gloves to
ensure perspiration does not come in contact with
the bulb as this can reduce the life of the bulb.
Note:
Before changing the lights that the cooker hood can be isolated from the supply
mains by means of a plug or an all-pole switch.
Protect against danger when changing lights, such as wearing gloves.
Changing the lights:
• Remove the grease filter.
• Push the lamp out of the cavity by hand and slowly pull out the lamp cable.
• Use a small flat-blade screwdriver to pry open the terminal box and disassemble the
terminal for replacement

12
• Apply the reverse procedure to reinstall the light.
• ILCOS D code for this lamp is: DBR-2/65-H-64
– LED modules: round lamp
– Max wattage: 2×2 W
– Voltage range: AC110-240V
– Dimensions:
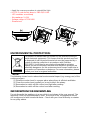
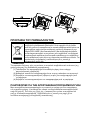
ENVIRONMENTALPROTECTION:
This product is marked with the symbol on the selective sorting of
waste electronic equipment. This means that this product must not
be disposed of with household waste but must be supported by a
system of selective collection in accordance with Directive
2012/19/EU. It will then be recycled or dismantled to minimize
impacts on the environment, electrical and electronic products are
potentially dangerous for the environment and human health due to
the presence of hazardous substances.For more information, please
contact your local or regional authorities.
NOTE:
The following shows how to reduce total environmental impact (e.g. energy use) of the
cooking process).
(1) Install the cooker hood in a proper place where there is efficient ventilation.
(2) Clean the cooker hood regularly so as not to block the airway.
(3) Remember to switch off the cooker hood light after cooking.
(4) Remember to switch off the cooker hood after cooking.
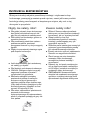
INFORMATION FOR DISMANTLING
Do not dismantle the appliance in a way which is not shown in the user manual. The
appliance could not be dismantled by user. At the end of life, the appliance should
not be disposed of with household waste. Check with your Local Authority or retainer
for recycling advice.

13
Digestoř
Návodkobsluze

14
Obsah
1…………………………………..………………………………Bezpečnostnípokyny
2…………………………………..………………………………Instalace
3…………………………………..………………………………Používánídigestoře
4…………………………………..………………………………Řešeníproblémů
5…………………………………..………………………………Údržbaačištění
6…………………………………..………………………………Ochranaživotníhoprostředí

15
BEZPEČNOSTNÍPOKYNY
Tentonávodvysvětlujesprávnouinstalaciapoužívánídigestoře;předpoužitímsiho
pozorněpřečtěte,ikdyžvýrobekdobřeznáte.Návodbyseměluschovatnabezpečném
místěprobudoucípoužití.
Conikdynedopustit:
● Nepokoušejte se používat digestoř bez
tukových filtrů nebo v případě, že jsou
filtry nadměrně zanesené tukem!
● Neinstalujte digestoř nad sporák
s vysoko umístěným grilem.
● Během používání nenechávejte pánve
bez dozoru, protože přehřátý tuk nebo
olej by mohl vzplanout.
● Nikdy nenechte pod digestoří otevřený
plamen.
● Pokud je digestoř poškozená,
nepoužívejte ji.
● Pod digestoří neflambujte.
● POZOR: Přístupné součásti mohou být
při používání kuchyňských spotřebičů
horké.
● Dodržujte minimální vzdálenost mezi
plochou plotny, na kterou se pokládají
nádoby na vaření, a nejnižší součástí
digestoře. (Když je digestoř umístěna
nad plynovým sporákem, tato
vzdálenost musí být alespoň 65 cm.)
● Vzduch se nesmí odvádět do kouřovodu,
který slouží k odvodu kouře ze
spotřebičů spalujících plyn nebo jiná
paliva.
Cojevždynutné:
● Důležité! Při instalaci a údržbě,
například výměně žárovky, vždy
vypněte přívod síťového napájení.
● Digestoř se musí být instalovat podle
pokynů k instalaci a je nutné dodržet
všechny rozměry.
● Veškerou instalaci musí provádět
kompetentní osoba nebo kvalifikovaný
elektrikář.
● Pečlivě zlikvidujte obalový materiál.
Mohl by ohrozit děti.
● Věnujte pozornost ostrým hranám
uvnitř digestoře, zejména při instalaci
a čištění.
● Zajistěte, aby potrubní vedení nemělo
ohyby ostřejší než 90 stupňů, protože
tím by se snížila účinnost digestoře.
● Varování: Pokud nebudou šrouby nebo
upevňovací prvky namontovány podle
těchto pokynů, mohlo by dojít k úrazu
elektrickým proudem.

16
Cojevždynutné:
● Při vaření na plynovém sporáku vždy
zakrývejte hrnce a pánve pokličkami.
● Vrežimu odsávání odsává digestoř
vzduch z místnosti. Zajistěte
dodržování náležitých opatření pro
dostatečné větrání. Digestoř odsává
z místnosti zápachy, ale ne páru.
● Digestoř je určena pouze k použití
v domácnosti.
● Pokud se poškodí napájecí kabel,
výměnu musí provést výrobce, jeho
servisní zástupce nebo osoby
s podobnou kvalifikací, aby se
vyloučilo riziko.
● Tento spotřebič mohou používat děti
starší osmi let a osoby s omezenými
fyzickými, smyslovými nebo duševními
schopnostmi nebo osoby nezkušené a
neznalé za předpokladu, že mají
zajištěný dohled nebo byly poučeny o
bezpečném používání spotřebiče a
chápou související rizika. Děti si
nesmějí hrát se spotřebičem. Děti
nesmějí provádět čištění a
uživatelskou údržbu bez dozoru.
● Varování: Než zpřístupníte svorky,
musí být odpojeny všechny napájecí
obvody.
Cojevždynutné:
● Pozor: Spotřebič a jeho přístupné
součásti se mohou při používání
zahřívat. Dávejte pozor, abyste se
nedotkli topných těles. Děti mladší
osmi let by se neměly přibližovat,
pokud nejsou pod stálým dozorem.
● Pokud je digestoř používána
v místnosti, kde jsou další spotřebiče
spalující plyn nebo jiná paliva, musí být
zajištěno dostatečné větrání.
● Pokud není prováděno čištění podle
pokynů, hrozí riziko požáru.
● Musí být dodržovány předpisy pro
odvod vzduchu.
● Pravidelně čistěte spotřebič způsobem
popsaným v kapitole ÚDRŽBA.
● Z bezpečnostních důvodů používejte
pouze upevňovací nebo montážní
šrouby stejné velikosti, jaká je uvedena
v tomto návodu.
● Podrobnosti o způsobu a četnosti
čištění najdete v části Údržba a čištění
v tomto návodu k obsluze.
● Děti nesmějí provádět čištění
a uživatelskou údržbu bez dozoru.
● Jestliže je digestoř v provozu společně
se spotřebiči napájenými jinak než
elektrickou energií, podtlak v místnosti
nesmí překročit 4 Pa (4 x 10⁻⁵ bar).
● VAROVÁNÍ: Nebezpečí požáru:
neskladujte předměty na varném
povrchu.
● Nesmí se používat parní čistič.
● NIKDY se nepokoušejte hasit požár
vodou, ale vypněte spotřebič a potom
zakryjte plamen např. pokličkou nebo
hasicí rouškou.

17
INSTALACE(ODVODVZDUCHUVEN)
MONTÁŽKLÍNOVÉKLAPKY
Pokud digestoř nemá nainstalovanou klínovou klapku 1, měli byste namontovat obě
poloviny do tělesa. Obrázky znázorňují pouze příklad způsobu montáže klínové klapky,
výstup se může lišit v závislosti na modelu a konfiguraci.
Při montáži klínové klapky byste měli postupovat takto:
• Namontujte obě poloviny 2 do tělesa 6.
• Čep 3 by měl směrovat nahoru.
• Osa 4 by měla být vložena do otvorů 5 v tělese.
• Opakujte všechny úkony pro druhou polovinu.
INSTALACE
Pokud máte výstup vzduchu ven, lze digestoř připojit k odvodnímu potrubí
(smaltovanému, hliníkovému, ohebnému potrubí nebo potrubí z nehořlavého
materiálu s vnitřním průměrem 120/150 mm), jak je znázorněno na obrázku níže.
1. Před instalací jednotku vypněte a odpojte od zásuvky.
2. Digestoř by měla být umístěna ve vzdálenosti 65~75 cm nad varnou plochou, aby
se dosáhlo nejlepšího účinku.

18
3. Vrtákem o průměru 8 mm vyvrtejte do stěny osm otvorů v místě, které jste určili pro
instalaci komínu a tělesa digestoře. Viz obr. 2.
4. Do otvorů, které jste vyvrtali pro těleso digestoře, zasuňte hmoždinky a napůl
zašroubujte dva nosné šrouby ST4*40 mm, aby vyčnívaly ze stěny v délce 2 mm.
Viz obr. 2.
5. Zavěste digestoř na nosné šrouby. Viz obr. 3.
6. Vložte do bezpečnostních otvorů samořezné šrouby ST4*30 mm a úplně je
utáhněte, aby digestoř pevně držela na místě. Poznámka: Na zadní straně skříně
se nacházejí dva bezpečnostní průduchy o průměru 6 mm. Viz obr. 3.
7. Vložte adaptér do jednocestného ventilu a upevněte ho páskou. Na výstup
adaptéru nainstalujte 120mm trubkový nástavec a upevněte ho kabelovou sponou.
Zvedejte trubkový nástavec, dokud nebude vyrovnán s otvorem ve stěně.
Poznámka: Rozšíření není součástí produktu. Viz obr. 4.

19
8. Nainstalujte vnitřní komínový nástavec: K instalaci vnitřního komínového nástavce
na stěnu použijte šrouby ST4*40. Viz obr. 5.
9. Namontujte vnitřní a vnější komínový nástavec: Pomocí dvou šroubů ST4*8 mm
nainstalujte vnější komínový nástavec na vnější stranu komínu a ujistěte se, že
vnitřní komínový nástavec se uvnitř může volně pohybovat, viz obr. 6.
10. Připevněte komínové nástavce k digestoři: Pomocí dvou šroubů ST4*8 mm
připevněte vnější komínový nástavec k držáku digestoře a potom pomocí šroubů
ST4*40 mm připevněte vnější komínový nástavec ke stěně. Viz obr. 7.
11. Seřiďte výšku vnitřního komínu podle polohy vnitřního komínového nástavce a
připevněte ho dvěma šrouby ST4*8 mm. Viz obr. 8.
Elektrická instalace
Veškerou instalaci musí provádět kvalifikovaná osoba nebo kvalifikovaný elektrikář.
Před připojením síťového napájení se ujistěte, že síťové napětí odpovídá napětí na
typovém štítku.
Přímé spojení
Spotřebič musí být připojen přímo k síti pomocí omnipolárního jističe s minimálním
otvorem 3 mm mezi kontakty.
Instalátor se musí ujistit, že bylo provedeno správné elektrické připojení a že odpovídá
schématu zapojení.
Kabel nesmí být ohnutý ani stlačený.
Pravidelně kontrolujte, zda není poškozena síťová zástrčka a napájecí kabel. Pokud je
napájecí kabel poškozen, musí být nahrazen speciálním kabelem nebo sestavou
Seite wird geladen ...
Seite wird geladen ...
Seite wird geladen ...
Seite wird geladen ...
Seite wird geladen ...
Seite wird geladen ...
Seite wird geladen ...
Seite wird geladen ...
Seite wird geladen ...
Seite wird geladen ...
Seite wird geladen ...
Seite wird geladen ...
Seite wird geladen ...
Seite wird geladen ...
Seite wird geladen ...
Seite wird geladen ...
Seite wird geladen ...
Seite wird geladen ...
Seite wird geladen ...
Seite wird geladen ...
Seite wird geladen ...
Seite wird geladen ...
Seite wird geladen ...
Seite wird geladen ...
Seite wird geladen ...
Seite wird geladen ...
Seite wird geladen ...
Seite wird geladen ...
Seite wird geladen ...
Seite wird geladen ...
Seite wird geladen ...
Seite wird geladen ...
Seite wird geladen ...
Seite wird geladen ...
Seite wird geladen ...
Seite wird geladen ...
Seite wird geladen ...
Seite wird geladen ...
Seite wird geladen ...
Seite wird geladen ...
Seite wird geladen ...
Seite wird geladen ...
Seite wird geladen ...
Seite wird geladen ...
Seite wird geladen ...
Seite wird geladen ...
Seite wird geladen ...
Seite wird geladen ...
Seite wird geladen ...
Seite wird geladen ...
Seite wird geladen ...
Seite wird geladen ...
Seite wird geladen ...
Seite wird geladen ...
Seite wird geladen ...
Seite wird geladen ...
Seite wird geladen ...
Seite wird geladen ...
Seite wird geladen ...
Seite wird geladen ...
Seite wird geladen ...
Seite wird geladen ...
Seite wird geladen ...
Seite wird geladen ...
Seite wird geladen ...
Seite wird geladen ...
Seite wird geladen ...
Seite wird geladen ...
Seite wird geladen ...
Seite wird geladen ...
Seite wird geladen ...
Seite wird geladen ...
Seite wird geladen ...
Seite wird geladen ...
Seite wird geladen ...
Seite wird geladen ...
Seite wird geladen ...
Seite wird geladen ...
Seite wird geladen ...
Seite wird geladen ...
Seite wird geladen ...
Seite wird geladen ...
Seite wird geladen ...
Seite wird geladen ...
Seite wird geladen ...
Seite wird geladen ...
Seite wird geladen ...
Seite wird geladen ...
Seite wird geladen ...
Seite wird geladen ...
Seite wird geladen ...
Seite wird geladen ...
Seite wird geladen ...
Seite wird geladen ...
Seite wird geladen ...
Seite wird geladen ...
Seite wird geladen ...
Seite wird geladen ...
Seite wird geladen ...
Seite wird geladen ...
Seite wird geladen ...
Seite wird geladen ...
Seite wird geladen ...
Seite wird geladen ...
Seite wird geladen ...
Seite wird geladen ...
Seite wird geladen ...
Seite wird geladen ...
Seite wird geladen ...
Seite wird geladen ...
Seite wird geladen ...
Seite wird geladen ...
Seite wird geladen ...
Seite wird geladen ...
Seite wird geladen ...
-
 1
1
-
 2
2
-
 3
3
-
 4
4
-
 5
5
-
 6
6
-
 7
7
-
 8
8
-
 9
9
-
 10
10
-
 11
11
-
 12
12
-
 13
13
-
 14
14
-
 15
15
-
 16
16
-
 17
17
-
 18
18
-
 19
19
-
 20
20
-
 21
21
-
 22
22
-
 23
23
-
 24
24
-
 25
25
-
 26
26
-
 27
27
-
 28
28
-
 29
29
-
 30
30
-
 31
31
-
 32
32
-
 33
33
-
 34
34
-
 35
35
-
 36
36
-
 37
37
-
 38
38
-
 39
39
-
 40
40
-
 41
41
-
 42
42
-
 43
43
-
 44
44
-
 45
45
-
 46
46
-
 47
47
-
 48
48
-
 49
49
-
 50
50
-
 51
51
-
 52
52
-
 53
53
-
 54
54
-
 55
55
-
 56
56
-
 57
57
-
 58
58
-
 59
59
-
 60
60
-
 61
61
-
 62
62
-
 63
63
-
 64
64
-
 65
65
-
 66
66
-
 67
67
-
 68
68
-
 69
69
-
 70
70
-
 71
71
-
 72
72
-
 73
73
-
 74
74
-
 75
75
-
 76
76
-
 77
77
-
 78
78
-
 79
79
-
 80
80
-
 81
81
-
 82
82
-
 83
83
-
 84
84
-
 85
85
-
 86
86
-
 87
87
-
 88
88
-
 89
89
-
 90
90
-
 91
91
-
 92
92
-
 93
93
-
 94
94
-
 95
95
-
 96
96
-
 97
97
-
 98
98
-
 99
99
-
 100
100
-
 101
101
-
 102
102
-
 103
103
-
 104
104
-
 105
105
-
 106
106
-
 107
107
-
 108
108
-
 109
109
-
 110
110
-
 111
111
-
 112
112
-
 113
113
-
 114
114
-
 115
115
-
 116
116
-
 117
117
-
 118
118
-
 119
119
-
 120
120
-
 121
121
-
 122
122
-
 123
123
-
 124
124
-
 125
125
-
 126
126
-
 127
127
-
 128
128
-
 129
129
-
 130
130
-
 131
131
-
 132
132
-
 133
133
-
 134
134
-
 135
135


Candy CVMAD60/1N/S Benutzerhandbuch
- Kategorie
- Dunstabzugshauben
- Typ
- Benutzerhandbuch
in anderen Sprachen
- English: Candy CVMAD60/1N/S User manual
- français: Candy CVMAD60/1N/S Manuel utilisateur
- español: Candy CVMAD60/1N/S Manual de usuario
- italiano: Candy CVMAD60/1N/S Manuale utente
- polski: Candy CVMAD60/1N/S Instrukcja obsługi
- čeština: Candy CVMAD60/1N/S Uživatelský manuál
Verwandte Artikel
Andere Dokumente
-
Hoover HMB6600/1X Benutzerhandbuch
-
OK. OHO310 Benutzerhandbuch
-
-
Hoover HBG750X Benutzerhandbuch
-
-
Fagor CFC-40AX Benutzerhandbuch
-
-
Fagor 7CFT-NERO ISL Bedienungsanleitung
-
Franke FDB 14078 I Instructions for Use and Installation
-
Beko CWB 950 Bedienungsanleitung