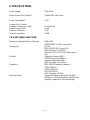
DJ-Tech cd encoder 10 Benutzerhandbuch
- Kategorie
- CD-Spieler
- Typ
- Benutzerhandbuch


E-1
Warning: to prevent fire or shock hazard, do not expose this appliance to rain or moisture.
These markings are located on the bottom, side or back of the unit.
Caution: to prevent the risk of electric shock, don’t remove cover (or back). No user-
serviceable parts inside. Refer servicing to qualified service personnel.
The lightning flash with arrowhead symbol, within an equilateral triangle, is intended to alert
the user to the presence of uninsulated “dangerous voltage” within the product’s enclosure
that may be of sufficient magnitude to constitute a risk of electric shock to persons.
The exclamation point within an equilateral triangle is intended to alert the user to the
presence of important operating and maintenance (servicing) instructions in the literature
accompanying the appliance.
Dripping warning: ”The product shall not be exposed to dripping or splashing and that no
objects filled with liquids, such as vases, shall be placed on the product.”
Warning: the normal ventilation of the product shall not be impeded for intended use.
LASER SAFETY
This unit employs laser. Only a qualified service person should remove the cover or
attempt to service this device, due to possible eye injury.
“Caution: use of controls or adjustments or performance of procedure other than specified
herein may result in hazardous radiation exposure.”
Danger: invisible laser radiation when open and interlock failed or defeated avoid direct
exposure to beam.
Caution: hazardous laser radiation when open and interlock feated.

E-2
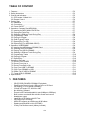
TABLE OF CONTENT
1. Features ……………………………………………………………………………………......... E-2
2. Safety Instructions ………………………………………………………………………........... E-3
3. Control and Indicators ……………………………………………………………………......... E-5
3.1 CD Encoder 10 Main Unit ………………………………………………………………..... E-6
3.2 Remote Control …………………………………………………………………………...... E-6
4. Getting Start ……………………………………………………………………………….......... E-7
4.1 Installation …………………………………………………………………………………… E-7
4.2 Connections …………………………………………………………………………………. E-7
4.3 Power ON/OFF ……………………………………………………………………………… E-7
5. Operation: Compact Disc/MP3/WMA ……………………………………………………........ E-7
5.1 Inserting the MP3/ WMA-CD/CD Disc ……………………………………………………. E-7
5.2 Playing the Entire Disc ……………………………………………………………………… E-7
5.3 Selecting A Different Track During Play …………………………………………………. E-8
5.4 Programming Tracks ………………………………………………………………………. E-8
5.5 Playing A Program …………………………………………………………………………. E-8
5.6 Clear Program Tracks ……………………………………………………………………… E-8
5.7 Repeat Play (For CD) ………………………………………………………………………. E-8
5.8 Repeat Play (For MP3/WMA-CD/CD) ……………………………………………………. E-9
6. Operation: USB/SD/MMC …………………………………………………………………....... E-9
6.1 Inserting the USB Memory/SD/MMC/Card ……………………………………………… E-9
6.2 Selecting USB Or SD/MMC ………………………………………………………………... E-9
6.3 Playing The USB Or SD/MMC …………………………………………………………….. E-9
6.4 Selecting A Different Track During Play ………………………………………………….. E-9
6.5 Programming Tracks ……………………………………………………………………….. E-10
6.6 Playing A Program ………………………………………………………………………….. E-10
6.7 Repeat Play ………………………………………………………………………………….. E-10
7. Operation: Recorder ………………………………………………………………………......... E-10
7.1 Record From CD/MP3 ……………………………………………………………………… E-10
7.2 Record From Line In ………………………………………………………………………… E-11
7.3 Record From Built-in Mic …………………………………………………………………… E-11
7.4 Copy From USB To SD/MMC ……………………………………………………………… E-11
7.5 Copy From SD/MMC to USB ……………………………………………………………… E-11
7.6 Delete File Of USB Or SD/MMC ………………………………………………………….. E-12
7.7 Format USB Or SD/MMC …………………………………………………………………... E-12
8. Specifications ……………………………………………………………………………………. E-13
1. FEATURES
- CD/CD-R/CD-RW/MP3-CD/WMA-CD playback
- Play/Encode Directly from/to USB pen drive or SD Card
- CD Ripping (1x or 2x speed selectable)
- 3 Ways to Encode: CD, AUX IN or MIC
- No need Any Software
- Encode in MP3 with adjustable bit rate (64Kbps to 256Kbps)
- Built-in stereo condenser Mic with Mic record level control
- Headphone output
- Large Blue LCD Display with ID3 Text
- CD Playlist up to 32 songs
- USB & SD support up to 999 songs & 99 folders
- Speaker and Amplifier built-in (2W RMS)
- 21-Key Flat Remote control (battery included)

E-3
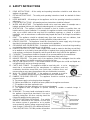
2. SAFETY INSTRUCTIONS
1. READ INSTRUCTIONS - All the safety and operating instructions should be read before the
appliance is operated
2. RETAIN INSTRUCTIONS - The safety and operating instruction should be retained for future
reference.
3. HEED WARNINGS - All warnings on the appliance and in the operating instructions should be
adhered to.
4. FOLLOW INSTRUCTIONS - All operating and use instructions should be followed.
5. WATER AND MOISTURE - The appliance should not be used near water, for example near a
bathtub, washbowl, kitchen sink, laundry tub,swimming pool or in a wet basement.
6. VENTILATION - The appliance should be situated so that its location or position does not
interfere with its proper ventilation. For example, the appliance should not be situated on a bed,
sofa, rug or similar surface that may block the ventilation openings; or, placed in a built-in
installation, such as a bookcase or cabinet that may impede the flow of air through the ventilation
openings.
7. HEAT - The appliance should be situated away from heat sources such as radiators, heat
registers, stoves, or other appliances (including amplifiers) that produce heat.
8. POWER SOURCES - The appliance should be connected to a power supply only of the type
described in the operating instructions or as marked on the appliance.
9. GROUNDING AND POLARIZATION - Precautions should be taken to insure that the grounding
or polarization means of an appliance is not defeated.
10. POWER CORD PROTECTION - Power- supply cords should be routed so that they are not likely
to be walked on or pinched by items placed upon or against them, paying particular attention to
cords at plugs, convenience receptacles, and the point at which they exit from the appliance.
11. CLEANING - The appliance should be cleaned only as recommended by the manufacturer.
12. POWER LINES - An outdoor antenna should be located away from power lines.
13. NONUSE PERIODS - The power cord of the appliance should be unplugged from the outlet
when the appliance is to be left unused for a long period of time.
14. OBJECT and LIQUID ENTRY - Care should be taken so that objects do not fall and liquids are
not spilled into the enclosure through openings.
15. CARTS AND STANDS - The appliance should be used only with a cart or
stand that is recommended by the manufacturer. An appliance and cart
combination should be moved with care. Quick stops, excessive force, and
uneven surfaces may cause the appliance and cart combination to overturn.
16. WALL OR CEILING MOUNTING - If the appliance is mounted to a wall or
ceiling it should be mounted only as recommended by the manufacturer.
17. DAMAGE REQUIRING SERVICE – The appliance should be serviced by qualified service
personnel when:
A. The power-supply cord or plug has been damaged.
B. Objects have fallen into, or liquid has been spilled into the appliance enclosure.
C. The appliance has been exposed to rain.
D. The appliance has been dropped, or the enclosure damaged.
E. The appliance does not appear to operate normally or exhibits a marked change in
performance.
18. SERVICING - The user should not attempt to service
the appliance beyond that described in the user’s
operating instructions. All other servicing should be
referred to qualified service personnel.
19. OUTDOOR ANTENNA GROUNDING - If an outside
antenna is connected to the receiver, be sure that
the antenna system is grounded so as to provide
some protection against voltage surges and built up
static charges. Section 810 of the National Electrical
Code, ANS/-NFPA No. 70-1984 provides information

E-4
with respect to proper grounding of the mast and supporting structure, grounding of the lead-in
wire to an antenna discharge unit, size of grounding conductors, location of antenna discharge
unit, connection to grounding electrodes, and requirements for the grounding electrode.
20.
PROTECTIVE ATTACHMENT PLUG –The appliance is equipped with an attachment plug having
overload protection. This is a safety feature. See instruction Manual for replacement or resetting
of protective device. If replacement of the plug is required, be sure the service technician has
used a replacement plug specified by the manufacturer that has the same overload protection as
the original plug.
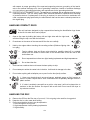
HANDLING COMPACT DISCS
This unit has been designed to play compact discs bearing the identification logo shown
at the left. No other discs can be played.
1. Open a disc case by holding the bottom left and right sides with the right hand,
and then lifting the top cover with the left hand.
2. Press down on the center of the case and lift the disc out carefully.
3. Hold by the edges without touching the recording surface (Rainbow lighting side
is to play).
1. Foreign objects, dust and finger prints should be carefully wiped off in a straight
motion from the inside to the out side of the recorded side of the disc with a soft
cloth before use.
2. Do not expose discs to direct sun light, heating implements and high temperatures.
3. Do not bend the disc.
1. Avoid serious scratches that could cause the laser pickup to skip.
2. Do not attempt to widen the center hole in the disc. It will result in damage to the disc.
3. Do not write anything with a ballpoint pen or pencil on the disc (level) surface.
1. Never use chemicals such as record sprays, antistatic sprays or fluid, benzine or
thinner to clean compact discs. Such chemicals would irrepairably damage the disc’s
plastic surface.
2. If a disc is suddenly removed from a cold to a hot area, it will not be played due to
moisture on the disc surface. So wipe off with a soft cloth. Do not use a hair dryer to
dry moisture on discs.
HANDLING THE DISC
A. Remove the CD from the Disc tray of your unit, if it is not going to be used for a long period.
B. Keep the disc in a disc case when storing.
C. Do not store the disc where it may be exposed to:
1. Direct sunlight for a long time.
2. High temperatures via any heating implements.
3. High humidity.

E-5
3. CONTROL AND INDICATORS
1
2
3
4
5
6
7
8
9
10
11
12
13
14
15
16
17
18
19
20
21
22
23
24
25
26
27
28
29
30
31
32
1
2
3
4
5
6
7
8
9
10
11
12
13
14
15
16
17
18
19
20
21

E-6
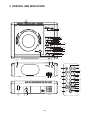
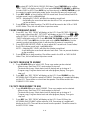
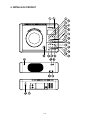
3.1 CD ENCODER 10 MAIN UNIT
1. USB SOCKET
2. SD/MMC SOCKET
3. RECORD FROM MIC key
4. RECORD FROM LINE-IN key
5. RECORD FROM CD key
6. CONFIRM key
7. RECORD TO SD/MMC key
8. RECORD TO USB key
9. MIC/LINE IN REC LEVEL- key
10. MIC/LINE IN REC LEVEL+ key
11. VOLUME- key
12. VOLUME+ key
13. FOLDER- key
14. FOLDER+ key
15. INFO key
16. PLAY LIST key
17. PREVIOUS
key
18. NEXT
key
19. REPEAT key
20. SD-USB-CD key
21. STOP Key
22. PLAY/PAUSE
Key
23. RECORD key
24. OPEN/CLOSE BUTTON
25. LEFT MIC
26. REMOTE SENSOR : To receive
signals from the remote control.
27. RIGHT MIC
28. LINE IN JACK
• Audio Input Jack 3.5mm.
29. PHONES JACK
• Connection for phones
30. POWER button
• Press to turn the power ON/OFF
31. LINE OUT LEFT
32. LINE OUT RIGHT
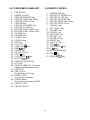
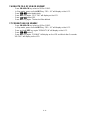
3.2 REMOTE CONTROL
1. STANDBY/ON key
2. RECORD TO SD/MMC key
3. RECORD TO USB key
4. RECORD FROM MIC key
5. RECORD FROM LINE-IN key
6. RECORD FROM CD key
7. FOLDER + key
8. REC LEVEL+ key
9. VOLUME + key
10. FOLDER - key
11. REC LEVEL- key
12. VOLUME - key
13. SD-USB-CD key
14. REPEAT key
15. PLAY LIST key
16. REW
key
17. PLAY/PAUSE
key
18. FF
key
19. INFO/CONFIRM key
20. STOP
key
21. RECORD key

E-7
4. GETTING START
4.1 INSTALLATION
• Unpack all parts and remove protective material.
• Insert the batteries (CR2025) into the remote control transmitter as shown in the
battery compartment.
• Do not connect the unit to the mains before checking the main voltage or before all
other connections have been made.
• Do not cover any vents and make sure that there is a space of 10 centimeters
around the unit for ventilation.
4.2 CONNECTIONS
A. LINE-IN input. For connection of other sound sources. (e.g. TV or VCR audio output).
B. LINE-OUT. For connection to other amplifier as sound sources.
4.3 POWER ON/OFF
When you first plug the unit into the mains, the unit will go into standby mode.
• You can press POWER (main unit) or STANDBY/ON (Remote Control) to switch
on the unit.
• The unit will remain standby it is switched on.
• Pull the main plug out of the wall socket if you want to switch off the main voltage
completely.
5. OPERATION: COMPACT DISC/MP3/WMA
Press SD-USB-CD key to select CD/MP3 mode.
5.1 INSERTING THE MP3/WMA-CD/CD DISC
1. Press OPEN/CLOSE to open the CD door.
2. Insert an MP3-CD/CD in the tray.
3. Press OPEN/CLOSE again to close the CD door.
4. The MP3-CD/CD-player starts and scans the contents list of the MP3/WMA-CD/CD.
FOR CD:
After a few seconds, the total playing time and number of tracks will appear on the display.
FOR MP3/WMA:
After a few seconds, the total number of tracks, albums and MP3 or WMA will appear on the
display.
5.2 PLAYING THE ENTIRE DISC
1. Press PLAY/PAUSE .
• Play starts with the first track.
• The display shows the current track number and its elapsed playing time.

E-8
• When all the tracks have been played, the MP3-CD/CD stops and returns to pristine
display.
2. To stop play, press STOP .
3. To interrupt play, press PLAY/PAUSE .
4. To resume play, press PLAY/PAUSE again.
5.3 SELECTING A DIFFERENT TRACK DURING PLAY
• Press or until the required track number appears in the display.
• MP3-CD mode only:
Press FOLDER+ or FOLDER-once or more to find your desired album. Starting again with
the track that is currently playing by pressing once. The track will be started again from the
beginning.
Searching for a passage during play by holding or to search for the required
passage. If you release the button, play will continue.
TEXT DISPLAY (ID3 DISPLAY)
During MP3/WMA-CD playing, press INFO key (on the main unit) or INFO/CONFIRM key (on
the remote) to switch text display mode, it will show the filename / title / artist name / album of
the current track. Press INFO key (on the main unit) or INFO/CONFIRM key (on the remote)
again to return to the track playing time. ID3 information: File name / Title / Artist name / Album.
5.4 PROGRAMMING TRACKS
Up to 32 tracks can be stored in the memory.
1. Load an MP3/WMA-CD/CD as described previously.
2. Press PLAY LIST to start programming.
3. Press or to locate a particular track or album/track (for WMA or MP3). Press PLAY
LIST to store it in the memory.
4. Continue this process until you have selected all the tracks you require.
5.5 PLAYING A PROGRAM
1. Press PLAY/PAUSE
.
2. Play starts with the first track of the program.
3. When all tracks have been played, the MP3/WMA-CD/CD player stops.
5.6 CLEAR PROGRAM TRACKS
Press STOP or open and close the CD tray will erase all programmed tracks
5.7 REPEAT PLAY (For CD)
If at any time you wish to listen to a disc or program over and over again, the REPEAT function
will allow you to do so.
1. Press REPEAT once.
2. "REPEAT1" will be displayed on the LCD.
3. Press REPEAT twice, "REPEAT ALL" will be displayed on the LCD.
4. Press REPEAT again to cancel the repeat function.

E-9
5.8 REPEAT PLAY (For MP3/WMA-CD)
1. Press REPEAT button once.
2. "REPEAT 1" will be displayed on the LCD.
3. Press REPEAT twice, "
REPEAT ALBUM
" will be displayed on the LCD.
4. Press REPEAT three times, "
REPEAT ALL
" will be displayed on the LCD.
5. Press REPEAT four times to cancel the repeat function.
6. OPERATION: USB/SD/MMC
6.1 INSERTING THE USB MEMORY/SD/MMC CARD
1. Insert a USB memory into the USB socket.
2. Insert a SD/MMC memory card into the SD/MMC slot.
6.2 SELECT USB OR SD/MMC
1. Press SD-USB-CD continuously to select USB or CARD mode.
2. If there’s a USB inserted, and you select the USB mode, the information of USB, the
total number of tracks, albums and USB, MP3 (or WMA) will appear on the display.
3. If there’s a SD/MMC inserted, and you select the CARD mode, the information of
SD/MMC, the total number of tracks, CARD, MP3 (or WMA) will appear on the display.
6.3 PLAYING THE USB OR SD/MMC
1. Press PLAY/PAUSE
.
• Play starts with the first track.
• The display shows the current track number and its elapsed playing time.
• When all the tracks have been played, the USB
or
SD/MMC stops and returns
pristine display.
2. To stop play, press STOP .
3. To interrupt play, press PLAY/PAUSE .
4. To resume play, press PLAY/PAUSE again.
6.4 SELECTING A DIFFERENT TRACK DURING PLAY
1. Press or until the required track number appears in the display.
2. Press FOLDER+ or FOLDER- once or more to find your desired album. Starting again
with the track that is currently playing by pressing once. The track will be started
again from the beginning.
Searching for a passage during play by holding or to search for the required
passage. If you release the button, play will continue.
TEXT DISPLAY (ID3 DISPLAY)
During MP3/WMA-CD playing, press INFO key (on the main unit) or INFO/CONFIRM key (on
the remote) to switch text display mode, it will show the filename / title / artist name / album of
the current track.
Press INFO key (on the main unit) or INFO/CONFIRM key (on the remote) again to return to the
track playing time. ID3 information: File name / Title / Artist name/ Album.

E-10
6.5 PROGRAMMING TRACKS
Up to 32 tracks can be stored in the memory.
1. Load a
USB
or
SD/MMC
as described previously.
2. Press PLAY LIST to start programming.
3. Press or to locate a particular track or album/track.
4. Press PLAY LIST to store it in the memory.
5. Continue this process until you have selected all the tracks you require.
6.6 PLAYING A PROGRAM
1. Press PLAY/PAUSE
.
2. Play starts with the first track of the program.
3. When all tracks have been played, the
USB
or
SD/MMC
player stops.
6.7 REPEAT PLAY
1. Press REPEAT button once.
2. "REPEAT1" will be displayed on the LCD.
3. Press REPEAT twice, "
REPEAT ALBUM
" will be displayed on the LCD.
4. Press REPEAT three times, "
REPEAT ALL
" will be displayed on the LCD.
5. Press REPEAT four times to cancel the repeat function.
7. OPERATION: RECORDER
7.1 REC FROM CD/MP3
1. Press SD-USB-CD key to select CD after reading TOC.
Three record modes can be selected.
-The entire DISC record. Start from STOP mode, go to step no. 2.
-The desire track record. Select desire track to play then go to step no. 2.
-Program record. Program desire track and enter program playing then go to step no. 2.
2. Press REC key, “REC FROM” will display on the LCD. Press “RECORD FROM CD”
key to select record from CD. “X1” “X2” will display on the LCD. Press or to
select synchronize record or double speed record. Press CONFIRM key to confirm.
“BIT RATE” will display on the LCD. Press or to select BIT RATE (64-96-128-
192-256) kbps for synchronize (X1) record, (64-96) kbps for double speed record,
press CONFIRM key to confirm, “USB” “CARD” will display on the LCD, then press
RECORD TO SD/MMC or USB key to select record to CARD or USB. “REC”, “USB”
or “SD” will flash on the LCD. Press INFO key (on the main unit) or INFO/ CONFIRM
key (on the remote) to switch text display mode. It will show the file name of current
track.
3. When the track ends, the audio track will be made automatically MP3 format and
saved as the last song in the USB or CARD AUDIO folder.
Note: - While recording CD song, pressing STOP key will cannel recording.
-There will be no sound from the speaker when in double speed recording.
4. While recording MP3/DISC, the MP3/WMA file of DISC will be copied to USB or CARD.
Percentage of complete will be displayed on the LCD. There will be no sound from the
speaker. Files will be saved in the USB or CARD FCOPY folder.
7.2 REC FROM LINE IN
1. Press REC key. “REC FROM” will display on the LCD. Press RECORD FROM LINE-
IN key to select record from LINE IN. “BIT RATE” will display on the LCD. Press or

E-11
to select BIT RATE (64-96-128-192-256) kbps. Press CONFIRM key to confirm.
“USB” “CARD” will display on the LCD, then press RECORD TO SD/MMC or USB key
to select CARD or USB. Press INFO key (on the main unit) or INFO/CONFIRM key (on
the remote) to switch text display mode and to show the file name of current track.
2. Press REC LEVEL +/- key to adjust LINE-IN record level. Green/Yellow/ Red LEDs
indicate record Level: Low/Middle/High.
NOTE: - Adjusting REC LEVEL will affect the speaker sound level.
- Avoid letting the record level indicator reach Red. This can prevent distortion
on the recording
3. Press STOP key to stop recording. The MP3 file will be saved in the USB or CARD
AUDIO folder. Thus, the unit will return to previous mode.
7.3 REC FROM BUILT-IN MIC
1. Press REC key, “REC FROM” will display on the LCD. Press RECORD FROM MIC
key to select record from MIC. “BIT RATE” will display on the LCD. Press or to
select BIT RATE (64-96-128-192-256) kbps. Press CONFIRM key to confirm. “USB”
“CARD” will display on the LCD. Press RECORD TO SD/MMC or USB key to select
CARD or USB. Press INFO key (on the main unit) or INFO/CONFIRM key (on the
remote) to switch text display mode. It will show the file name of current track.
2. Press
MIC/LINE IN REC LEVEL
+/- key to adjust MIC record level. Green/Yellow/
Red LEDs indicate record level: Low/Middle/High.
NOTE: - Adjusting REC LEVEL will affect the speaker sound level.
- Avoid letting the record level indicator reach Red. This can prevent distortion
on the recording
3. Press STOP key to stop recording. File will be saved in the USB or CARD AUDIO
folder. Thus, the unit will return to previous mode.
7.4 COPY FROM USB TO SD/MMC
1. Press SD-USB-CD key to select USB. Three copy modes can be selected.
-All track copy. Start from STOP mode and go to step no.2.
-The desire track copy. Select desire track to playing and go to step no.2.
- Program copy. Program desire track and enter program playing. Then go to
step no.2
2. Press REC key, “REC FROM” will display on the LCD. Press SD/MMC key, the
MP3/WMA file of USB will be copied to SD/MMC. Percentage of complete will display
on the LCD. There will be no sound from the speaker. File will be saved in the
SD/MMC FCOPY folder.
7.5 COPY FROM SD/MMC TO USB
1. Press SD-USB-CD key to select SD/MMC. Three copy modes can be selected.
-All track copy. Start from STOP mode and go to step no.2.
-The desire track copy. Select desire track to playing and go to step no.2.
- Program copy. Program desire track and enter program playing. Then go to
step no.2
2. Press REC key, “REC FROM” will display on the LCD. Press USB key, the
MP3/WMA file of SD/MMC will be copied to USB. Percentage of complete will
display on the LCD. There will be no sound from the speaker. File will be saved in
the USB FCOPY folder.

E-12
7.6 DELETE FILE OF USB OR SD/MMC
- Press SD-USB-CD key select to USB or CARD.
- In Stop mode, press and hold REC key. “DEL- -01” will display on the LCD.
- Press or select delete track.
- Press REC key again. “YES” “NO” will display on the LCD.
- Press or select YES
- Press REC key again. The track will be deleted.
7.7 FORMAT USB OR SD/MMC
- Press SD-USB-CD key select to USB or CARD.
- In Stop mode, press and hold REC key. “DEL- -01” will display on the LCD.
- Press and hold REC key again “FORMAT Y/N” will display on the LCD.
- Press or select Y
- Press REC key again, “FORMAT” will display on the LCD and finish after 5 seconds.
“NO FILE” will display on the LCD.

E-13
8. SPECIFICATIONS
Power Supply 240V/50Hz
Output Power (Per Channel) 2 watts RMS into 8 ohm
Power Consumption 17 W
Compact Disc Section
Frequency Response (-6dB) 20-15,000 Hz
Signal-to-noise Ratio 50 dB
Harmonic Distortion 0.4%
Channel Separation 40 dB
CD & MP3 /WMA FUNCTIONS
Maximum Supported Device Capacity 8GB (USB)
4GB(SD/MMC) (SDHC supported)
Playing Disc CD-DA
MP3 (MPEG1/2/2.5 Layer 2/3)
WMA (Version 7.0 /8.0/9.0)
Pressed CD/CD-R/CD-RW, Multi-session
Disc
Bit Rate Support full range of MP3
/ WMA bit rate (8~384kbps)
Support Variable Bit Rate
MP3 Encoding:
64~256 kbps
Frequency MP3 / WMA Sampling Frequency
32/44.1/48 KHz
16/22.05/24 KHz
8/11.025/12 KHz
MP3 Encoding: 44.1kHz
Directory Depth Support 16 levels of directories for MP3 /
WMA disc. Total 99 directories and 999 files
playable. (Depend on Filename length)

CONTENU
1. CONSIGNES DE SÉCURITÉ ET RECYCLAGE ………………………………………………
F-2
1.1 Conseil important concernant le recyclage ………………………………………………..
F-2
1.2 Conseils importants sur les piles et leur recyclage ……………………………………….
F-2
2. VOTRE NOUVEL ENCODEUR ………………… ……………………………………………..
F-3
2.1 Chère cliente, Cher client, ………………………………………………………………….
F-3
2.2 Caractéristiques ……………………………………………………………………………..
F-3
2.3 Contenu ………………………………………………………………………………….......
F-3
3. DONNÉES TECHNIQUES ……………………………………………………………………..
F-3
4. DÉTAILS DU PRODUIT ………………………………………………………………………..
F-4
5. DÉTAILS DU PRODUIT ………………………………………………………………………...
F-5
5.1 Ports mémoires externes …………………………………………………………………...
F-5
5.2 Choix type enregistrement(RECORD FROM) ……………………………………………
F-5
5.3 Choix media stockage (RECORD TO) …………………………………………………....
F-5
5.4 Touches réglage de volume …………………………………………………………….....
F-5
5.5 Touches de lecture ………………………………………………………………………....
F-5
5.6 Face avant ………………………………………………………………………………......
F-5
5.7 Arrière ……………………………………………………………………………………......
F-5
6. PRÉPARATION ……………………………………………………………………………........
F-5
6.1 Montage ………………………………………………………………….......…………......
F-5
6.2 Branchement avec d’autres appareils ………………………………….......………….....
F-5
6.3 Allumer/éteindre ………………………………………………………….......………….....
F-5
7. LECTURE …………………………………………………………………….......………….....
F-6
7.1 Lecture d’un CD ………………………………………………………….......………….....
F-6
7.2 Lecture d’une carte SD ou MMC ………………………………………………………….
F-6
7.3 Lecture d’un appreil USB ……………………………………………………………….....
F-6
7.4 Commencer une lecture ……………………………………………………………………
F-6
7.5 Sélection fichier, titre ou dossier …………………………………………………………..
F-6
7.6 Afficher informations titre fichier …………………………………………………………..
F-6
7.7 Répéter une lecture …………………………………………………………………..........
F-6
7.8 Créer une liste de lecture ……………………………………………………...................
F-7
8. ENREGISTREMENT …………………………………………………………….....................
F-7
8.1 Enregistrer un CD ………………………………………………………….......................
F-7
8.2 Enregistrer une entrée auxiliaire …………………………………………......................
F-8
8.3 Enregistrer l’entrée microphone …………………………………………………………..
F-8
8.4 Copier depuis une mémoire USB vers une carte SD/MMC …………………………….
F-8
8.5 Copier depuis une carte SD/MMC vers un appareil USB ………………………………
F-9
8.6 Supprimer des fichiers d’appareils USB et cartes mémoires ………………………….
F-9
8.7 Formater un appareil USB ou une carte mémoire ………………………………………
F-9
9. ANNEXE …………………………………………………………………………………………
F-10
9.1 Changer la pile de la télécommande ……………………………………………………..
F-10
9.2 Dépannage au branchement des cartes et mémoires USB …………………………….
F-10
F-1

F-2
1. CONSIGNES DE SÉCURITÉ ET RECYCLAGE
• Ce mode d’emploi vous permet de vous servir correctement du produit.Gardez-le
précieusement an de pouvoir le consulter à tout moment.
• Ne démontez pas l’appareil, sous peine de perdre toute garantie.
• N’essayez pas de réparer l’appareil vous-même. Ne le modiez pas.Risque de blessure!
• Faites attention lorsque vous manipulez votre produit. Une chute ou un coup peuvent
l’abîmer.
• Ne l’exposez pas à l’humidité ni à la chaleur. Ne pas recouvrir. Ne le plongez pas dans
l’eau.
• Maintenez hors de portée des enfants. Ce produit n’est pas un jouet.
ATTENTION: N’utilisez l’appareil que comme indiqué dans la notice. Aucune
garantie ne pourra être appliquée en cas de mauvaise utilisation. Nous ne
sommes pas responsables des conséquences inhérentes à un dommage.Le
fabricant se réserve le droit de modier les caractéristiques techniques sans notication
préalable pouvant ainsi entraîner des divergences dans ce manuel.
1.1 Conseil important concernant le recyclage
Cet appareil électronique ne doit PAS être jeté dans la poubelle de déchets ménagers. Votre
nouveau produit a été développé avec le plus grand soin et avec des composants de haute
qualité. Il devra cependant être un jour recyclé. Le symbole de la poubelle barrée signie
que votre produit devra être recyclé séparément des ordures ménagères à la n de sa
durée de vie. A l’avenir, veuillez amener tous les appareils électriques ou électroniques aux
points de ramassage publics de votre municipalité. Ceux-ci prennent en charge vos déchets
pour un recyclage écologique. Vous évitez ainsi les conséquences négatives sur l’homme
et l’environnement pouvant découler d’une mauvaise prise en charge des produits à la n
de leur durée de vie. Les détails concernant l’emplacement de tels points de ramassage et
des éventuelles restrictions de quantité existantes par jour/mois/année ainsi que sur des frais
éventuels de collecte sont disponibles dans votre municipalité.
1.2 Conseils importants sur les piles et leur recyclage
Les piles ne doivent PAS être jetées dans la poubelle classique. Chaque consommateur est
aujourd’hui obligé de jeter les piles utilisées dans les poubelles spécialement prévues à cet
effet.
Vous pouvez laisser vos piles dans les déchetteries municipales et dans les lieux ou elles sont
vendues.
• Ne pas ouvrir les piles, ne pas les jeter au feu.
• Les piles dont s’échappe du liquide sont dangereuses. Ne les manipulez pas sans gants
adaptés.
• Maintenez les piles hors de portée des enfants.
• Sortez les piles de l’appareil, si vous ne comptez pas l’utiliser pendant un long moment.
consignes de sécurité et recyclage

F-3
2. VOTRE NOUVEL ENCODEUR
2.1 Chère cliente, Cher client,
Nous vous remercions pour l’achat de cet encodeur CD professionnel. Cet appareil haut de
gamme de DJ-Tech convertit vos CDs favoris au format MP3 et lit vos CDs et MP3 avec un
son parfait. Transférez directement la musique d’un CD vers un lecteur MP3 sans passer par
un ordinateur.
An d’utiliser au mieux votre nouvel appareil, veuillez lire attentivement ce mode d’emploi et
respecter les consignes et astuces suivantes.
2.2 Caractéristiques
• Enceintes stéréo intégrées
• Lecture directe depuis les appareils USB et cartes SD
• Copie la musique directement depuis le CD
• Aucun logiciel requis
• Grand écran
2.3 Contenu
• Encodeur et lecteur CD
• Télécommande
• Pile
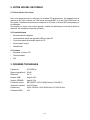
3. DONNÉES TECHNIQUES
Fréquence: 20-15000 Hz
Rapport signal/bruit: 50 dB
Distorsion: 0,4 %
Support USB: jusqu’à 8 Go
Support SD/MMC: jusqu’à 4 Go
Format de lecture: MP3 (MPEG 1/2/2.5) WMA (Version 7.0/8.0/9.0)
Vitesse de transfert: 64 à 256 kbps
Fréquences: 32/44,1/48 KHz, 16/22,05/24 KHz, 8/11,025/12 KHz
Puissance RMS: 2 W

F-4
4. DÉTAILS DU PRODUIT

F-5
5.1 Ports mémoires externes
1. Port USB
2. Port SD/MMC
5.2 Choix type enregistrement
(RECORD FROM)
3. MIC: enregistrer le micro
4. LINE-IN: enregistrer l’entrée
auxiliaire
5. CD: enregistrer un CD
6. CONFIRM: conrmer choix
5.3 Choix media stockage (RECORD TO)
7. SD/MMC : enregistrer vers carte
mémoire
8. USB: enregistrer vers mémoire USB
5.4 Touches réglage de volume
9. MIC REC LEVEL-: baisser volume
micro
10. MIC/REC LEVEL+: augmenter
volume micro
11. VOLUME- : baisser volume
12. VOLUME+: augmenter volume
5.5 Touches de lecture
13. FOLDER- : dossier précédent
14. FOLDER+: dossier suivant
15. INFO: Info
16. PLAY LIST: Liste de lecture
17. SD-USB-CD: choix média de
lecture
18. REPEAT: répéter
19. F NEXT: suivant
20. B REW: précédent
21. RECORD: Enregistrer
22. RP PLAY/PAUSE : Lecture/Pause
23. C STOP: Stop
24. PRESS TO OPEN: Ouvrir lecteur
CD
5.6 Face avant
25. Microphone gauche
26. REMOTE SENSOR: Récepteur
télécommande
27. Microphone droite
28. LINE IN: Entrée auxiliaire
29. PHONE: port casque
5.7 Arrière
30. POWER: Marche/Arrêt
31. LINE OUT: Sortie signal
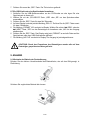
6. PRÉPARATION
6.1 Montage
1. Retirez le lm de protection et placez les piles dans la télécommande Respectez les
consignes du paragraphe „Changer la pile de la télécommande“ (voir p. F-10).
2. Branchez l’encodeur CD avec tous les périphériques voulus.
3. Vériez que les aérations ne soient pas bloquées et que l’appareil ne soit pas dans un
endroit trop conné (10 cm de chaque côté minimum).
4. Branchez l’encodeur CD au réseau électrique. L’appareil est en mode „Standby“.
6.2 Branchement avec d’autres appareils
LINE-IN: branchez une source audio externe comme un lecteur MP3 ou un ordinateur par
exemple.
PHONE: port microphone.
LINEOUT: branchez un amplicateur ou autre appareil de diffusion audio.
6.3 Allumer/éteindre
Une fois l’encodeur CD branché à l’alimentation, il est en mode „Standby“ (veille). Vous pouvez
allumer l’encodeur CD avec la touche Marche/Arrêt à l’arrière ou sur la télécommande. L’écran
afche „Hello“.
5. DÉTAILS DU PRODUIT

F-6
Une nouvelle pression de la touche passe l’appareil en mode „Standby“. L’écran afche le
message „Good Bye“. Pour éteindre totalement l’appareil, débranchez l’alimentation.
NOTE: ne coupez pas l’alimentation pendant que l’encodeur CD est en marche.
7. LECTURE
L’encodeur CD peut lire les chiers WAVE, MP3 et WMA depuis les CDs, cartes mémoires et
mémoires USB.
7.1 Lecture d’un CD
Insérez un CD dans le lecteur. Appuyez sur la touche „SD-USB-CD“ jusqu’à ce que l’écran
afche „CD“ en haut à gauche. Le nombre de morceaux et le temps total du CD apparaît après
quelques secondes.
7.2 Lecture d’une carte SD ou MMC
Insérez une carte SD ou MMC dans la fente SD de l’encodeur CD. Appuyez sur la touche „SD-
USB-CD“ jusqu’à ce que l’écran afche „SD“ en haut à gauche. Le nombre de morceaux MP3
et WMA ainsi que les dossiers de la carte mémoire apparaissent après quelques secondes.
7.3 Lecture d’un appreil USB
Branchez un appareil USB (comme une clé USB ou un lecteur MP3) au port USB de l’encodeur
CD. Appuyez sur les touches „SD-USB-CD“ jusqu’à ce que l’écran afche „USB“ en haut à
gauche. Le nombre de morceaux MP3 et WMA ainsi que les dossiers de la carte mémoire USB
apparaissent après quelques secondes.
7.4 Commencer une lecture
Appuyez sur la touche RP „PLAY“. La lecture démarre avec le premier chier en enchaîne
la lecture dans l’ordre. La lecture s’arrête quand tous les chiers ont été lus. Appuyez sur la
touche C „STOP“ pour stopper la lecture ou RP „PLAY“ pour la suspendre.
Reprenez ensuite la lecture avec la touche RP „PLAY“.
7.5 Sélection chier, titre ou dossier
Appuyez sur B „REW“ ou F „NEXT” pour passer au chier précédent/suivant. Lors de la
lecture de chiers MP3, changez de dossier avec la touche „FOLDER“.
7.6 Afcher informations titre chier
Appuyez sur la touche „INFO“ pour afcher les informations du chier en lecture. Si les
informations sont disponibles, elles s’afchent dans l’ordre „Nom chier/Titre/Artiste /Album“.
Appuyez à nouveau sur la touche „INFO“ pour revenir à l’afchage normal.
7.7 Répéter une lecture
Lors de la lecture d’un CD ou d’une liste de lecture, appuyez sur la touche „REPEAT“ pour
dénir le type de répétition. Appuyez une fois sur la touche „REPEAT“ pour répéter le titre
actuel. L’écran afche „REPEAT 1“. Appuyez sur la touche „REPEAT“ une seconde fois
et le CD complet ou la liste de lecture sera répétée en boucle. L’écran afche le message
„REPEAT ALL“. Appuyez une troisième fois sur la touche „REPEAT“ pour annuler la fonction
de répétition.
Seite wird geladen ...
Seite wird geladen ...
Seite wird geladen ...
Seite wird geladen ...
Seite wird geladen ...
Seite wird geladen ...
Seite wird geladen ...
Seite wird geladen ...
Seite wird geladen ...
Seite wird geladen ...
Seite wird geladen ...
Seite wird geladen ...
Seite wird geladen ...
Seite wird geladen ...
Seite wird geladen ...
-
 1
1
-
 2
2
-
 3
3
-
 4
4
-
 5
5
-
 6
6
-
 7
7
-
 8
8
-
 9
9
-
 10
10
-
 11
11
-
 12
12
-
 13
13
-
 14
14
-
 15
15
-
 16
16
-
 17
17
-
 18
18
-
 19
19
-
 20
20
-
 21
21
-
 22
22
-
 23
23
-
 24
24
-
 25
25
-
 26
26
-
 27
27
-
 28
28
-
 29
29
-
 30
30
-
 31
31
-
 32
32
-
 33
33
-
 34
34
-
 35
35


DJ-Tech cd encoder 10 Benutzerhandbuch
- Kategorie
- CD-Spieler
- Typ
- Benutzerhandbuch
in anderen Sprachen
- English: DJ-Tech cd encoder 10 User manual
- français: DJ-Tech cd encoder 10 Manuel utilisateur
Andere Dokumente
-
Auna NR-620 - 10007044 Bedienungsanleitung
-
Roadstar HIF-6880USMPT Benutzerhandbuch
-
Denver MRD-165 Benutzerhandbuch
-
Hama 00055453 Bedienungsanleitung
-
-
VIETA CCM4000R Benutzerhandbuch
-
Roadstar HIF-8888TUMPN Benutzerhandbuch
-
Yamaha AW2400 Benutzerhandbuch
-
Roadstar HIF-6850USMP Bedienungsanleitung
-