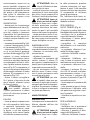
Berkel B200-0000 Benutzerhandbuch
- Kategorie
- Schneidemaschinen
- Typ
- Benutzerhandbuch
Dieses Handbuch eignet sich auch für

USER MANUAL
MANUALE D’USO
GEBRAUCHSANLEITUNG
MANUEL D’INSTRUCTIONS
NÁVOD K POUŽITÍ
BETJENINGSVEJLEDNING
EN
DE
CS
IT
FR
DA
MANUAL DEL USUARIO
HANDLEIDING
BRUKSANVISNING
MANUAL DE INSTRUÇÕES
MANUAL DE INSTRUCTIUNI
BRUKSANVISNING
NO
RO
NL
PT
ES
SV
Red.
Since 1898.
CODE: MANUALE-VOLANO/BK
VOLANO SERIES
VOLANO B2, VOLANO B3,
VOLANO TRIBUTE, VOLANO P15,
VOLANO B114, VOLANO B114 YATCH,
VOLANO L16, VOLANO B116

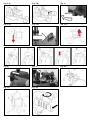
(Fig. 3-A) (Fig. 3-B) (Fig. 4)
(Fig. 6)
(Fig. 7)
(Fig. 11) (Fig. 12)
(Fig. 5-A) (Fig. 5-B) (Fig. 5-C)
(Fig. 8) (Fig. 9) (Fig. 10)

3
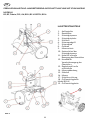
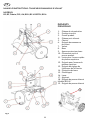
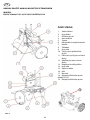
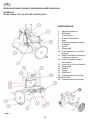
USER MANUAL: FLYWHEEL SLICER
MODELS:
B2, B3, Tribute, P15, L16, B114, B114 YATCH, B116
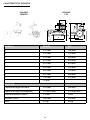
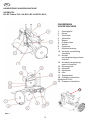
MAIN
COMPONENTS
1. Receiving plate
2. Slice deector
3. Top clamp
4. Meat table
5. Carriage
6. Flywheel operating handle
7. Flywheel
8. Casing
9. Blade protection
10. Vertical sliding top clamp
11. Feed plate fast forward
lever
12. Feed plate forward handle
13. Slice thickness regulating
knob
14. Blade cover
15. Foot
16. Blade
17. Sharpener
18. Product holder handle
For model B114Y:
19. Product holder handle
EN
Fig. 1
19

4
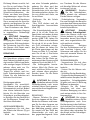
DESCRIPTION
Manual, ywheel slicer ma-
chine, equipped with a circular
blade, suitable for cutting only
the food products of the types
and within the dimensional
limits indicated in this manual.
The main parts of the machine
are shown in the general com-
ponent diagram reported in
picture 1.
SAFETY
The machines described in this
manual comply with the latest
European hygiene and safety
standards.
Pay attention to the following
basic safety precautions:
- read all the instructions be-
fore using the machine;
- this product is not intended
to be used by children;
- operate the machine only if
properly trained and in perfect
psycho-physical conditions;
- do not use the machine in any
way other than what indicated
in this manual;
- use the machines only in full
structural, mechanical and sys-
tem efciency;
- install the machine in con-
formity to the instructions
indicated in the “Installation”
section;
- install the machine in a loca-
tion out of the reach of person-
nel unauthorized to operate it
and especially out of the reach
of minors;
- stay highly concentrated when
using the machine and avoid any
distraction during use;
- do not allow the machine to
be used by others who have
not read and fully understood
the content of this manual;
- do not wear baggy clothing or
clothing with open sleeves;
- do not allow anyone else,
other than the operator, to ap-
proach during product cutting
operations;
- do not remove, cover or
modify the tags located on the
machine body and, in case of
damage of these, replace them
promptly;
- do not remove, modify or
bypass any mechanical protec-
tive devices;
- slice only the permitted prod-
ucts, do not attempt cuts on
prohibited type products;
- always keep clean and dry the
sliced product resting surface,
the work area all around the
machine and the operator oor
area;
- do not use the machine as
a resting surface and do not
place any objects on it other
than food used for cutting op-
erations;
- do not use the slicer when,
due to normal wear, the dis-
tance between the edge of
the blade and the blade guard
ring exceeds 6 mm. In this case,
contact the manufacturer or
one of the Authorized Service
Centers to change the blade.
- Immediately stop the ma-
chine in the event of a defect,
abnormal operation, suspicion
of breakdown, incorrect move-
ment, unusual noises;
- use protective gloves for
cleaning and maintenance op-
erations;
- place and remove the goods
to be sliced on the sliding plate
only with the carriage com-
pletely pulled back and put the
blade protection in safety posi-
tion;
- for movement of the meat
table during cutting operations
use only the ywheel;
- never put your hands on the
food product while slicing. Al-
ways keep your hands far from
the blade;
- use of cutting accessories
which were not provided by
the manufacturer with the ma-
chine is prohibited.
The manufacturer declines any
responsibility coming from in-
appropriate use, modications
and/or repairs carried out by
the user or unauthorized per-
sonnel, use of replacement
parts, which are not original
or not specic for the machine
model.
Operating conditions:
- Temperature from -5°C to
+40°C
- Max. humidity 95%
DO NOT SLICE:
- frozen food products;
- food products with bones;
- vegetables in general
- any other product not intend-
ed for food use.
Residual risks
The safety ring around the
blade protects the operator
from incidental contact with
the blade although, in order
to allow the sharpening oper-
ations, the protection in the
sharpening area may not en-
tirely eliminate the risk of cut-
ting.
WARNING: during
the blade cleaning and
sharpening operations, pay
extra attention to keep your
hands as far as possible from
the unprotected area. Use of
protective gloves is recom-
mended.
INSTALLATION
OF THE MACHINE
If you do not use the stand (op-
!

5
tional), install the machine on
a at, smooth and dry surface
suitable for supporting the
weight of the machine itself
plus the goods to be sliced. The
recommended height of the
worktop is approximately 80
cm. Lift the machine careful-
ly and insert all the feet in the
specic lodgings in the base.
For some models, the front
support feet can be unscrewed
and placed in the desired posi-
tion depending on the depth of
the worktop.
To prevent damage, some mod-
els are packaged separately
from the disassembled y-
wheel during transport. If the
received machine ywheel is
not assembled, follow these in-
structions:
- insert the ywheel on the
shaft, checking correct cor-
respondence with the y-
wheel-shaft sleeve holes (Fig.
3-A);
- insert the taper pin in the
sleeve with the tapered end
(smaller diameter) turned to-
ward the sleeve itself (Fig. 3-B);
CAUTION! If the pin is
correctly positioned, it
will insert almost entirely with-
out being forced.
- hammer down the pin to in-
sert it fully.
OPERATION
- Make sure that the blade is
properly protected from the
blade protection: use the blade
protection locking lever, if
present (Fig.4). Check that the
thickness adjustment knob is
in the safety position (position
“0”) (13);
- using the ywheel handle,
rotate the ywheel (7) to bring
the carriage (5) fully forward
(toward the operator);
- pull back (away from the
blade) the meat table (4) using
the meat table rapid advance
device (11) or meat table ad-
vance mechanism (12);
- place the product to be sliced
on the sliding meat table;
- according to the model: a)
grip both top clamp handles
(10 – 18) and push them simul-
taneously toward the bottom
until the product is locked; b)
grip the top clamp sliding lever
(10), lower it to the sliding end,
grip the locking handle (18)
and push it on the product un-
til it is locked; c) lock with the
product press holder (19), ap-
plying pressure;
- arrange the desired slice
thickness, rotating the knob at
the same time and selecting a
thickness;
- move the meat table with
product forward (toward the
blade), using the meat table
rapid advance device (11) or
meat table advanced mecha-
nism (12);
CAUTION! Leave a space
of 0.5 - 1 cm between the
blade and the product.
- take off the protection from
the blade using the locking le-
ver, if present, or by moving the
blade protection in its stand-by
position to uncover the blade;
CAUTION Sharp blade,
cutting hazard! When
the blade is not covered by the
guard, be extremely careful to
keep your hands as far away
from the unprotected area as
possible.
- activate the ywheel by hav-
ing it rotate it in the clockwise
direction.
WARNING: risk of dam-
ages! Never turn the y-
wheel anti-clockwise, reverse
ywheel rotation may serious-
ly damage the machine.
- during the return movement
of the carriage (towards the
operator) the meat table will
automatically move towards
the blade;
- when the meat table gets to
limit advancing towards the
blade, stop slicing and lift up
the top clamp. Use the meat
table rapid advance device or
the meat table advance mech-
anism to pull the meat table
away from the blade. Reposi-
tion the product, relock it with
the top clamp and restart slic-
ing.;
- unload the product following
the operations in the reverse
order.
CAUTION Cutting haz-
ard! After the cutting
operation has been completed,
turn the lever in the opposite
direction: the protective ring
will overlap the blade, elimi-
nating the hazard.
CLEANING
Clean the machine at the end
of their use and always before
using, after a long period of
inactivity. Use cut and tear re-
sistant gloves and perform all
operations with great care.
Products for cleaning:
use only water and biode-
gradable mild detergent, us-
ing a soft, spongy cloth and a
semi-rigid nylon brush for the
sharp areas of the plate and the
product holder. Do not clean
the machine with jets of water
or steam or similar methods.
DISMANTLING
- Check that the blade protec-
tion duly covers the blade (9);
- if the slice deector is held by
!
!
!
!
!

6
a screw, unscrew it and remove
the slice deector. If the slice
deector is not held by a screw,
open it by having it rotate from
right to left;
- remove the waste tray (Fig. 5-A);
- rotate the grip and remove
the product press holder (Fig.
12);
- remove the meat table: a) if
there is a locking lever present
(Fig. 5-B), rotate it in the coun-
ter-clockwise direction, lift the
plate only and remove it; b) if
there is a knob on the plate,
unscrew it and lift the plate
together with the top clamp
(Fig. 5-C) and remove it; c) if no
locking devices are present, lift
the plate together with the top
clamp and remove it (Fig. 5-C);
- slide off the receiving plate. If
the plate is locked by two lat-
eral pins, loosen them before
sliding off the plate.
WARNING! For some
models, push the meat
table forward before lifting it
with its top clamp arm.
CLEANING
- The blade: press a damp cloth
on the surface of the blade and
move it slowly from the center
toward the outside on the
blade cover side and the oppo-
site side. In the same way, dry it
using a dry cloth;
WARNING! Never acti-
vate the ywheel while
cleaning the blade.
- the safety ring: use a soft
brush to clean the area be-
tween the blade and the safety
ring;
WARNING! Sharp blade,
cutting hazard! When
the blade is not covered by the
guard, be extremely careful to
keep your hands as far away
from the unprotected area as
possible.
- the machine body: use a
damp cloth or a sponge. Dry
carefully.
REASSEMBLING
- Check that the blade protec-
tion duly covers the blade (9);
- put the waste tray in its spe-
cic position;
- close the slice deector;
- using the ywheel handle,
rotate the ywheel (7) to bring
the sliding meat table (4) fully
forward (towards the opera-
tor);
- with a vertical movement
from top to bottom, place the
meat table in its position.
WARNING: risk of inju-
ry from sharp blade! For
some models, after placing the
meat table, push it forward in
order to secure it completely
in the carriage. If present, close
the lever or tighten the knob
on the meat table.
MAINTENANCE
Blade Sharpening
Frequency and duration of
sharpening depend on the use
of the equipment.
WARNING: risk of in-
jury from sharp blade!
When the blade is not covered
with the blade protection, pay
extra attention to keep your
hands as far as possible from
the unprotected area.
For sharpening, follow the
instruction according to the
model:
FOR MODELS
B2, B3, TRIBUTE (Fig. 6)
- Clean the blade, freeing it of
greasy residue;
- check that the guard is cover-
ing the blade properly;
- loosen the meat table from
the blade;
- check the cover of the sharp-
ener: if it is removable, just lift
it up;
- if present, loosen the locking
knob (A);
- lift the sharpener and rotate
it 180°;
- lower the sharpener with
care. The blade will be auto-
matically centred between the
two grinding wheels;
- if present, re-lock the knob.
- Press the button (B) for ap-
proximately 10-15 seconds
and simultaneously rotate the
ywheel. Release the button
(B), press the button (C) for 2-3
seconds and then release it;
- stop turning the ywheel;
- only when the blade is xed,
return the sharpener to its
original position and relock the
knob;
- close the cover, if present.
FOR MODEL
P15 (Fig. 7)
- Check that the blade protec-
tion duly covers the blade;
- loosen the sharpener-locking
knob (A);
- lift the sharpener and rotate
it 180°;
- lower the sharpener back
down with care; the blade will
automatically center between
the two grinding wheels;
- re-lock the knob;
- pull the lever (B) in an anti-
clockwise for approximately
10-15 seconds and simultane-
ously rotate the ywheel;
- stop turning the ywheel;
- only when the blade is xed,
return the sharpener to its
original position and relock the
knob.
FOR MODEL
!
!
!
!
!

7
B114 (Fig. 8)
- Clean the blade, freeing it of
greasy residue;
- check that the guard is cover-
ing the blade properly;
- loosen the meat table from
the blade;
- lift the sharpener and rotate
it 180°;
- lower the sharpener with
care. The blade will be auto-
matically centred between the
two grinding wheels;
- push the sharpening lever
(B) for approximately 10-15
seconds and simultaneously
rotate the ywheel;
- release the sharpening lever,
press the button (C) for 2-3
seconds and then release it;
- stop turning the ywheel;
- only when the blade is xed,
return the sharpener to its
original position and relock the
knob;
- close the cover, if present.
FOR MODEL
B116 (Fig. 9)
- Clean the blade, freeing it of
greasy residue;
- check that the guard is cover-
ing the blade properly;
- loosen the meat table from
the blade;
- lift the sharpener cover;
- lift the sharpener and rotate
it 180° in the direction of the
blade;
- lower the sharpener with
care. The blade will be auto-
matically centred between the
two grinding wheels;
- press the button (A) for ap-
proximately 10-15 seconds
and simultaneously rotate the
ywheel. Release the button
(A), pull the lever (B) for 2-3
seconds and then release it;
- stop turning the ywheel;
- only when the blade is xed,
return the sharpener to its
original position and relock the
knob;
- close the cover.
FOR MODEL
L16, (Fig. 10)
- Check that the blade protec-
tion duly covers the blade;
- loosen the sharpener-locking
knob;
- lift the sharpener and rotate
it 180°;
- lower the sharpener back
down with care; the blade will
automatically center between
the two grinding wheels;
- re-lock the knob;
- pull the lever anticlockwise
for approximately 10-15 sec-
onds and simultaneously ro-
tate the ywheel;
- turn the lever clockwise for
approximately 2-3 seconds
and simultaneously rotate the
ywheel;
- stop turning the ywheel;
- only when the blade is xed,
return the sharpener to its
original position.
WARNING: risk of dam-
ages! Do not excessively
force (more than 2-3 seconds)
the deburring operation to
prevent damaging of the blade.
Lubrication (Fig. 11)
- Put some drops of oil over the
bar (1) and in the junction of
the slice thickness-regulating
knob (2);
- put some drops of oil in the
holes (3 and 4);
- put some drops of oil on the
ywheel in its junction to the
tree (5);
- briey activate the ywheel.
For lubrication only use acid
free oil (we recommend Vase-
line oil). Do not use vegetable
oil.
SERVICE
No user-serviceable parts are
inside. Refer servicing to qual-
ied personnel. All the repair
and replacement operations
(like blade replacement, repair
of structural parts, repair and/
or re-placement of sub-base-
plate components, or similar)
shall be executed exclusively
by personnel authorized by the
manufacturer.
In the event service is need-
ed, you may return your food
slicer to the manufacturer or
to one of the Authorized Ser-
vice Centers. For information
about service, centers please
contact us at:
service@berkelinternational.com.
WARNING: risk of in-
jury from sharp blade!
The blade replacement is
mandatory if distance be-
tween the edge of the blade
and the internal edge of the
guard exceeds 6 mm.
WARRANTY AND
RESPONSIBILITY
The manufacturer supplies The
manufacturer supplies ma-
chines with a limited war-ranty
of 24 months from the pur-
chasing date. The warran-ty is
extended only to defects that
arise under intended use condi-
tions and proper use. The war-
ranty does not cover defects
resulting from faults caused by
transport, purchas-er’s incom-
petence or negligence, improp-
er installation, unauthorised
interventions, natural wear
and tear greater than 10% of
the nominal value. More-over,
the warranty does not cover
components intrinsically sub-
ject to wear, such as blades and
!
!

8
grinders, except in the event
of evident manufactur-ing de-
fects.
The manufacturer declines any
direct and indirect responsibil-
ity coming from:
- failure to observe the instruc-
tions in this manual;
- use which does not conform
to prevailing specic regula-
tions in the country of instal-
lation;
- unauthorized modications
and/or repairs carried out on
the machine;
- use of non-original accesso-
ries and replacement parts;
- exceptional events.
Transfer of ownership of the
machine automatically de-
faults the manufacturer’s lia-
bility for the machine in ques-
tion.
The Identication tag on the
base-plate indicates manufac-
turer, machine, technical infor-
mation.

9
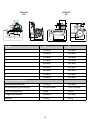
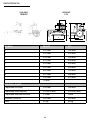
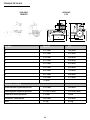
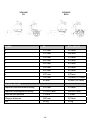
MODEL TRIBUTE P15
A 210 mm 180 mm
B 270 mm 210 mm
C 210 mm 180 mm
D 470 mm 430 mm
E 415 mm 250 mm
F 555 mm 505 mm
G 805 mm 720 mm
H 670 mm 600 mm
I 700 mm 570 mm
L 70 mm
SPECIFICATIONS
Circular cutting capacity 210 mm 180 mm
Rectangular cutting capacity 270x210 mm 210x180 mm
Max slice thickness 1,5 mm 3 mm
Blade diameter 300 mm 285 mm
Weight 52 Kg 60 kg
DATA SHEET
G
F
D
E
H
I
A
B
C
VOLANO
TRIBUTE
VOLANO
P15

10
MODEL L16 B2
A 210 mm 160 mm
B 260 mm 190 mm
C 200 mm 150 mm
D 305 mm 395 mm
E 640 mm 265 mm
F 880 mm 465 mm
G 600 mm 680 mm
H 545 mm 530 mm
I 750 mm 540 mm
SPECIFICATIONS
Circular cutting capacity 210 mm 160 mm
Rectangular cutting capacity 260x200 mm 190x150 mm
Max slice thickness 4 mm 2 mm
Blade diameter 350 mm 265 mm
Weight 105 Kg 60 kg
VOLANO
L16
VOLANO
B2
G
H
E
F
D
I
B
C
A
G
F
D
E
H
I
A
B
C

11
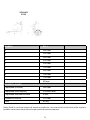
MODEL B3 B114 (B114Y)
A 210 mm 215 mm
B 270 mm 280 mm
C 210 mm 215 mm
D 460 mm 470 mm
E 405 mm 415 mm
F 550 mm 555 mm
G 805 mm 825 mm
H 670 mm 670 mm
I 700 mm 700 mm (770 mm)
L 65 mm 95 mm (29,5 mm)
SPECIFICATIONS
Circular cutting capacity 210 mm 215 mm
Rectangular cutting capacity 270x210 mm 280x215 mm
Max slice thickness 1,5 mm 1,5 mm
Blade diameter 300 mm 319 mm
Weight 46 Kg 55 kg
VOLANO
B3
VOLANO
B114

12
MODEL B116
A 260 mm
B 290 mm
C 260 mm
D 590 mm
E 550 mm
F 755 mm
G 960 mm
H 780 mm
I 720 mm
L 60 mm
SPECIFICATIONS
Circular cutting capacity 260 mm
Rectangular cutting capacity 290x260 mm
Max slice thickness 4 mm
Blade diameter 370 mm
Weight 80 Kg
Note: As we actually strive to improve our products, specications are necessarily subject to change
without notice.
VOLANO
B116

13
MANUALE D’USO: AFFETTATRICE MANUALE A VOLANO - VERSIONE EU
MODELLI:
B2, B3, Tribute, P15, L16, B114, B114 YATCH, B116
COMPONENTI
PRINCIPALI
1. Piatto raccoglitore
2. Parafetta
3. Pressamerce
4. Piatto portamerce
scorrevole
5. Carrello
6. Maniglia di manovra volano
7. Volano
8. Basamento
9. Paralama
10. Maniglia scorrimento
verticale pressamerce
11. Leva ritorno rapido
sovrappiatto
12. Volantino avanzamento
sovrappiatto
13. Regolazione spessore fetta
14. Coprilama
15. Piedino di appoggio
16. Lama
17. Aflatoio
18. Maniglia bloccaggio
pressamerce
Per il modello B114Y:
19. Maniglia bloccaggio
pressamerce
IT
Fig. 1
19

14
DESCRIZIONE
Macchine affettatrici a volano
con lama circolare, progettate
per affettare esclusivamente
prodotti alimentari del tipo e
nei limiti dimensionali indicati
nel presente manuale. Le parti
principali che compongono la
macchina sono illustrate alla
gura 1.
SICUREZZA
Le macchine descritte in que-
sto manuale rispettano gli
standard Europei di igiene e
sicurezza imposti dalle ultime
normative.
Per la vostra sicurezza, fate at-
tenzione alle seguenti istruzioni:
- leggere attentamente tutte
le istruzioni prima di usare la
macchina;
- il prodotto non è indicato per
l’utilizzo da parte dei bambini;
- utilizzare la macchina solo se
propriamente istruiti e in per-
fetto stato psico-sico;
- non usare la macchina in al-
cun modo differente da come
indicato nel presente manuale;
- installare la macchina in con-
formità alle istruzioni riportate
al paragrafo ‘installazione’;
- installare la macchina in luo-
go al di fuori dalla portata di
personale estraneo alle opera-
zioni relative all’impiego della
stessa e soprattutto di minori;
- utilizzare la macchina con
grande concentrazione ed evi-
tare di distrarsi;
- non permettere l’utilizzo del-
la macchina ad alcuno che non
abbia letto e compreso piena-
mente il presente manuale;
- non indossare indumenti svo-
lazzanti o con maniche aperte;
- non permettere ad alcuno di
avvicinarsi durante l’operazio-
ne di taglio del prodotto;
- non rimuovere, coprire o mo-
dicare le targhette collocate
sul corpo della macchina e, in
caso di danneggiamento delle
stesse, sostituirle prontamente;
- non rimuovere le protezioni e
non modicare o escludere le
protezioni meccaniche;
- affettare unicamente i pro-
dotti di tipo consentito, non
tentare alcuna prova di taglio
con prodotti di tipo proibito;
- mantenere la zona di appog-
gio del prodotto affettato, la
zona tutt’intorno alla macchina
ed il piano pavimento operato-
re sempre puliti ed asciutti;
- non utilizzare la macchina
come supercie di appoggio e
non appoggiarvi alcuno ogget-
to estraneo alle normali opera-
zioni di taglio;
- non usare l’affettatrice quan-
do, a seguito di normale usura,
la distanza tra il lo della lama
e l’anello para lama ha supera-
to i 6 mm, in tal caso contattare
il produttore o uno dei Centri
Servizio Autorizzati per cam-
biare la lama;
- arrestare immediatamente la
macchina e richiedere l’inter-
vento di personale di assisten-
za autorizzato in caso di fun-
zionamento anomalo, sospetto
di rotture, movimenti non cor-
retti, rumori insoliti, ecc.;
- utilizzare sempre guanti del
tipo resistente al taglio ed alla
lacerazione per le operazioni di
pulizia e di manutenzione;
- porre e rimuovere la merce
da affettare sul sovrappiatto
scorrevole solo con il piatto
completamente retratto (lon-
tano dalla lama) ed il carrello
totalmente verso l’operatore;
- far scorrere il piatto durante
le operazioni di taglio solo ed
esclusivamente mediante l’uti-
lizzo del volano;
- non toccare mai con le mani il
prodotto durante l’operazione
di taglio. Mantenere sempre le
mani lontane dalla lama;
- non è ammesso l’uso di acces-
sori per il taglio che non siano
stati forniti dal costruttore del-
la macchina.
Il costruttore declina ogni
responsabilità derivante da
un uso inappropriato, modi-
che e/o riparazioni effettuate
dall’utente o da personale non
autorizzato, utilizzo di parti di
ricambio non originali o non
speciche per il modello di
macchina.
Condizioni ambientali d’uso:
- Temperatura da -5° C a +40° C
- Umidità max 95%
NON AFFETTARE:
- prodotti alimentari congelati;
- prodotti alimentari surgelati;
- prodotti alimentari con ossa
(carne e pesce);
- ogni altro prodotto non desti-
nato all’uso alimentare.
Rischi residui
L’anello di protezione intorno
alla lama protegge l’operatore
dal contatto accidentale con la
lama tuttavia, al ne di consen-
tire le operazioni di aflatura,
la protezione non elimina com-
pletamente il rischio di taglio.
ATTENZIONE! Durante
le operazioni di pulizia
e aflatura della lama, fare
estrema attenzione a man-
tenere le mani il più lontano
possibile dall’area non protet-
ta. Si raccomanda di utilizzare
guanti di protezione.
INSTALLAZIONE
Se non si utilizza la colonna di
supporto (opzionale) installare
la macchina su di un piano ben
!

15
livellato, asciutto ed adatto a
sostenere il peso della mac-
china stessa più la merce da
affettare. L’altezza consigliata
del piano di lavoro è di circa 80
cm. Vericare che non ci siano
impedimenti al movimento del
volano, alla corsa del carrello
ed al caricamento della merce
da affettare. Sollevare la mac-
china con attenzione ed inse-
rire i piedini in gomma nelle
relative sedi del basamento.
Per alcuni modelli, i piedini di
appoggio anteriori possono
essere svitati e collocati nella
posizione desiderata in funzio-
ne della profondità del piano di
lavoro. Per evitare danneggia-
menti, durante il trasporto al-
cuni modelli sono imballati con
il volano a parte, non montato.
Se il volano della macchina ri-
cevuta non è montato, seguire
le istruzioni:
- inserire il volano sull’albero
vericando la corretta corri-
spondenza delle forature mani-
cotto volano-albero (Fig. 3-A);
- inserire nel manicotto la spi-
na conica con l’estremità ra-
stremata (diametro minore) ri-
volta verso il manicotto stesso
(Fig. 3-B);
ATTENZIONE Se la spi-
na è posizionata corret-
tamente, si inserirà quasi com-
pletamente senza forzature.
- battere la spina per inserirla
completamente.
USO DELL’AFFETTATRICE
- Vericare che la lama sia ben
protetta dal paralama: utiliz-
zando la leva di bloccaggio
protezione lama, se presente
(Fig. 4), controllando che la ma-
nopola di regolazione spessore
sia in posizione di sicurezza
(posizione “0”) (13);
- azionando il volano (7) in sen-
so orario portare il carrello (5)
totalmente in avanti (verso l’o-
peratore);
- arretrare completamente
(lontano dalla lama) il piatto
porta merce (4) usando il siste-
ma di avanzamento rapido (11)
oppure sul sistema di avanza-
mento del piatto (12);
- porre il prodotto da affettare
sul piatto porta merce;
- far scorrere il pressamerce
verso il basso per bloccare il
prodotto, a seconda dei mo-
delli: a) impugnare entrambe le
maniglie del pressamerce (10
e 18) e spingerle contempora-
neamente verso il basso no a
bloccare il prodotto; b) impu-
gnare la leva di scorrimento del
pressamerce (10), abbassarla
no a ne scorrimento, impu-
gnare la maniglia di bloccaggio
(18) e spingerla sul prodotto
no a bloccarlo; c) bloccare con
il pressamerce (19) esercitan-
do una certa pressione;
- predisporre lo spessore fetta
desiderato ruotando la mano-
pola allo stesso tempo e sele-
zionare lo spessore;
- avvicinare il piatto portamer-
ce (verso la lama) intervenendo
sul sistema di avanzamento ra-
pido del piatto (11) o sul siste-
ma di avanzamento (12);
ATTENZIONE Lasciare
uno spazio da 0,5 a 1 cm
tra la lama e il prodotto.
- scoprire la lama dalla sua
protezione, utilizzando la leva
di bloccaggio, se presente, op-
pure spostando la protezione
della lama nella sua postazione
di riposo per scoprire la lama
stessa (Fig. 4);
ATTENZIONE Lama af-
lata, pericolo di taglio!
Quando la lama non è coper-
ta dalla protezione, prestare
estrema attenzione nel man-
tenere le mani il più possibile
lontano dall’area non protetta.
- azionare il volano facendolo
ruotare in senso orario;
ATTENZIONE rischio di
danneggiamento! Non
ruotare il volano del carrello in
senso contrario, la rotazione in-
versa del volano può seriamen-
te danneggiare la macchina.
- durante la corsa di ritorno del
carrello (verso l’operatore) vie-
ne azionato il dispositivo mec-
canico che fa avanzare, in sen-
so trasversale, il sovrappiatto
verso la lama;
- quando il piatto portamerce
raggiunge il limite di avanza-
mento verso la lama, fermar-
si e sollevare il pressamerce.
Utilizzando il sistema di avan-
zamento del piatto o quello di
avanzamento rapido, allonta-
nare il piatto dalla lama. Ripo-
sizionare il prodotto, bloccarlo
nuovamente con il pressamer-
ce e ricominciare ad affettare;
- scaricare il prodotto ese-
guendo le operazioni in senso
inverso.
ATTENZIONE Pericolo
di taglio! Terminata l’o-
perazione di taglio, ruotare la
leva in senso opposto: l’anello
di protezione si sovrappone
alla lama eliminando la condi-
zione di pericolo.
PULIZIA
Le macchine devono essere ac-
curatamente pulite al termine
del loro utilizzo. Dopo un pe-
riodo di inattività devono es-
sere pulite anche prima dell’u-
tilizzo. Utilizzare guanti di
protezione resistenti al taglio
ed alla lacerazione ed eseguire
tutte le operazioni con grande
attenzione.
Prodotti per la pulizia: usare
!
!
!
!
!

16
esclusivamente acqua con un
panno morbido, spugnoso ed
eventualmente uno spazzolino
di nylon semi rigido per le zone
del piatto e del pressamerce.
Non pulire la macchina con
getti d’acqua o vapore o con
metodi similari.
SMONTAGGIO
- Assicurarsi che la protezione
copra debitamente la lama (9);
- se il parafetta è tenuto da
una vite, svitarla e rimuovere
il parafetta. Se il parafetta non
è tenuto da una vite, aprirlo fa-
cendolo ruotare da destra ver-
so sinistra;
- rimuovere la vaschetta (Fig. 5-A);
- ruotare l’impugnatura e sla-
re il pressamerce (Fig. 12);
- rimuovere il piatto portamer-
ce: a) se sul piatto è presente
una leva di bloccaggio (Fig. 5-B),
ruotarla in senso antiorario,
sollevare il solo piatto e rimuo-
verlo; b) se sul piatto è presente
una manopola, svitarla e solle-
vare il piatto insieme al pressa-
merce (Fig. 5-C) e rimuoverlo; c)
se non sono presenti dispositivi
di bloccaggio, sollevare il piatto
insieme al pressamerce e ri-
muoverlo (Fig. 5-C);
- slare il piatto raccoglitore.
Se il piatto è bloccato da due
perni laterali, allentarli prima
di slare il piatto.
ATTENZIONE! Per al-
cuni modelli, spingere
il piatto portamerce in avanti
prima di sollevarlo insieme al
porta merce.
PULIZIA
- Lama: premere un panno umi-
do sulla supercie della lama
e spostarlo lentamente dal
centro verso l’esterno, come
in gura, e sul lato opposto.
Asciugare, nello stesso modo,
utilizzando un panno asciutto;
ATTENZIONE! Non at-
tivare l’affettatrice men-
tre si pulisce la lama.
- anello di sicurezza: usare uno
spazzolino di nylon semirigido
per pulire l’area compresa tra
la lama e l’anello di protezione;
ATTENZIONE Lama af-
lata, pericolo di taglio!
Quando la lama non è coper-
ta dalla protezione, prestare
estrema attenzione nel man-
tenere le mani il più possibile
lontano dall’area non protetta.
- corpo macchina: pulire il cor-
po macchina con un panno umi-
do o una spugna risciacquando
acqua. Asciugare con cura.
RIASSEMBLAGGIO
- Controllare che la protezione
copra debitamente la lama (9);
- rimettere la vaschetta nella
sua posizione;
- chiudere il parafetta;
- utilizzando la manopola del
volano, ruotare il volano (7)
per portare completamente in
avanti (verso l’operatore) il piat-
to portamerce scorrevole (4);
- con un movimento verticale
dall’alto verso il basso, rimet-
tere il piatto portamerce nella
sua posizione iniziale.
ATTENZIONE: per alcu-
ni modelli, dopo aver po-
sizionato il piatto porta merce,
spingerlo per ssarlo al suppor-
to piatto. Se presente, chiudere
la leva o stringere la manopola
sul piatto portamerce.
MANUTENZIONE
Aflatura lama
La frequenza e la durata dell’af-
latura dipende dall’uso che
viene effettuato.
ATTENZIONE Lama af-
lata, pericolo di taglio!
Quando la lama non è coper-
ta dalla protezione, prestare
estrema attenzione nel man-
tenere le mani il più possibile
lontano dall’area non protetta.
Si raccomanda di utilizzare
guanti di protezione.
Per l’aflatura della lama, se-
guire le istruzioni a seconda del
modello indicato:
PER I MODELLI
B2, B3, TRIBUTE (Fig. 6)
- Eseguire la pulizia della lama
liberandola dai residui di grasso;
- vericare che la protezione
copra debitamente la lama;
- allontanare il piatto porta-
merce dalla lama;
- controllare la capottina
dell’aflatoio: se è removibile,
sollevarla;
- se presente, allentare il po-
mello (A) di bloccaggio ;
- sollevare l’aflatoio e ruotar-
lo di 180°;
- abbassare l’aflatoio con
cura, la lama si centrerà auto-
maticamente tra le due mole;
- se presente, ribloccare il po-
mello;
- premere il pulsante (B) per
circa 10-15 secondi e contem-
poraneamente ruotare il vo-
lano. Lasciare il pulsante (B),
premere il pulsante (C) per 2-3
secondi e lasciarlo;
- interrompere la rotazione del
volano;
- solo quando la lama è ferma,
riposizionare l’aflatoio nella
sua posizione originale e avvi-
tare il pomello;
- chiudere la capottina, se pre-
sente.
PER IL MODELLO
P15 (Fig. 7)
- Vericare che la protezione
copra debitamente la lama;
- allentare il pomello di bloc-
caggio dell’aflatoio (A);
- sollevare l’aflatoio e ruotar-
!
!
!
!
!

17
lo di 180°;
- abbassare l’aflatoio con
cura, la lama si centrerà auto-
maticamente tra le due mole;
- ribloccare il pomello;
- girare la leva (B) in senso an-
tiorario per circa 10-15 secon-
di e contemporaneamente ruo-
tare il volano;
- interrompere la rotazione del
volano;
- solo quando la lama è ferma,
rimettere l’aflatoio nella sua
posizione originale e avvitare
il pomello.
PER IL MODELLO
B114 (Fig. 8)
- Eseguire la pulizia della lama
liberandola dai residui di grasso;
- vericare che la protezione
copra debitamente la lama;
- allontanare il piatto porta-
merce dalla lama;
- sollevare l’aflatoio e ruotar-
lo di 180°;
- abbassare l’aflatoio con
cura, la lama si centrerà auto-
maticamente tra le due mole;
- spingere la leva e tenerla pre-
muta per 10-15 secondi: af-
latura e sbavatura della lama
avvengono contemporanea-
mente;
- lasciare la leva di aflatura;
- interrompere la rotazione del
volano;
- solo quando la lama è ferma,
riposizionare l’aflatoio nella
sua posizione originale.
PER IL MODELLO
B116 (Fig. 9)
- eseguire la pulizia della lama
liberandola dai residui di grasso;
- vericare che la protezione
copra debitamente la lama;
- allontanare il piatto porta-
merce dalla lama;
- sollevare la capottina dell’af-
latoio;
- sollevare l’aflatoio e ruo-
tarlo di 180° in direzione della
lama;
- abbassare l’aflatoio con
cura, la lama si centrerà auto-
maticamente tra le due mole;
- premere il pulsante (1) per
circa 10-15 secondi e contem-
poraneamente ruotare il vola-
no. Lasciare il pulsante (1), tira-
re la leva (2) per 2-3 secondi e
lasciarla;
- interrompere la rotazione del
volano;
- solo quando la lama è ferma,
riposizionare l’aflatoio nella
sua posizione originale e avvi-
tare il pomello;
- chiudere la capottina.
PER IL MODELLO
L16 (Fig. 10)
- Vericare che la protezione
copra debitamente la lama;
- allentare il pomello di bloc-
caggio dell’aflatoio;
- sollevare l’aflatoio e ruotar-
lo di 180°;
- abbassare l’aflatoio con
cura, la lama si centrerà auto-
maticamente tra le due mole;
- avvitare il pomello;
- girare la leva (B) in senso ora-
rio per circa 10-15 secondi e
contemporaneamente ruotare
il volano;
- girare la leva (B) in senso an-
tiorario per circa 2-3 secondi e
contemporaneamente ruotare
il volano;
- interrompere la rotazione del
volano;
- solo quando la lama è ferma,
rimettere l’aflatoio nella sua
posizione originale.
ATTENZIONE: rischio di
danneggiamento! Non
prolungare eccessivamente
(non più di 2-3 secondi) l’ope-
razione di sbavatura per evita-
re di danneggiare la lama.
Lubricazione (Fig. 11)
- Versare alcune gocce di olio
sulla barra (1) e nella giunzio-
ne della manopola regolazione
spessore fetta (2);
- versare alcune gocce di olio
nei buchi (3 e 4);
- versare alcune gocce di olio
nella giunzione tra volano e
corpo dell’affettatrice (5);
- azionare brevemente il volano.
Per la lubricazione usare solo
oli senza acidi (si consiglia olio
di vaselina). Non usare oli ve-
getali.
ASSISTENZA
Non sono forniti pezzi di ri-
cambio all’interno dell’imballo.
Tutte le attività di riparazione
e sostituzione (quali sostitu-
zione o riparazione di lama,
cinghia, componenti elettrici,
parti strutturali, etc.) devono
essere svolte esclusivamente
da personale autorizzato dal
produttore stesso.
Nel caso fosse necessaria una
riparazione, si raccomanda di
ritornare la macchina al pro-
duttore o ad un Centro Servizi
Autorizzato.
Per informazioni riguardo i
centri servizi, rivolgersi a:
service@berkelinternational.com.
ATTENZIONE! E’ ob-
bligatorio sostituire la
lama quando la distanza tra il
lo della lama stessa ed il bor-
do interno della protezione
supera i 6 mm.
GARANZIA
E RESPONSABILITA’
Il produttore fornisce macchi-
ne con una garanzia di durata
24 mesi, a partire dalla data di
acquisto. La garanzia copre solo
i difetti riscontrati facendone
!
!

18
un uso appropriato e secondo
le condizioni d’uso previste
dal manuale. La garanzia non
copre difetti dovuti a traspor-
to, incompetenza o negligenza
dell’acquirente, installazione
o posizionamento improprio,
danni da usura, voltaggio su-
periore al 10% del valore no-
minale. Inoltre, la garanzia non
copre componenti intrinseca-
mente soggetti a usura, quali
la lama e le mole dell’aflatoio,
eccetto nel caso di evidente di-
fetto di produzione.
Il produttore declina qualsiasi
responsabilità diretta e indi-
retta derivante da:
- mancata osservanza delle
istruzioni presenti nel manuale;
- uso non conforme alla nor-
mativa dominante nel paese di
installazione;
- modiche e/o riparazioni sul-
la macchina non autorizzate;
- uso di accessori e parti di ri-
cambio non originali;
- eventi eccezionali.
Il trasferimento di proprietà
della macchina, comporta
l’immediato sollevamento da
ogni responsabilità da parte
del produttore. La targhetta di
identicazione sulla base della
macchina registra il produtto-
re, la macchina, le informazioni
tecniche.

19
MODELLO TRIBUTE P15
A 210 mm 180 mm
B 270 mm 210 mm
C 210 mm 180 mm
D 470 mm 430 mm
E 415 mm 250 mm
F 555 mm 505 mm
G 805 mm 720 mm
H 670 mm 600 mm
I 700 mm 570 mm
L 70 mm
SPECIFICHE
Capacità di taglio circolare 210 mm 180 mm
Capacità di taglio rettangolare 270x210 mm 210x180 mm
Massimo spessore fetta 1,5 mm 3 mm
Diametro lama 300 mm 285 mm
Peso 52 Kg 60 kg
CARATTERISTICHE TECNICHE
G
F
D
E
H
I
A
B
C
VOLANO
TRIBUTE
VOLANO
P15

20
MODELLO L16 B2
A 210 mm 160 mm
B 260 mm 190 mm
C 200 mm 150 mm
D 305 mm 395 mm
E 640 mm 265 mm
F 880 mm 465 mm
G 600 mm 680 mm
H 545 mm 530 mm
I 750 mm 540 mm
SPECIFICHE
Capacità di taglio circolare 210 mm 160 mm
Capacità di taglio rettangolare 260x200 mm 190x150 mm
Massimo spessore fetta 4 mm 2 mm
Diametro lama 350 mm 265 mm
Peso 105 Kg 60 kg
VOLANO
L16
VOLANO
B2
G
H
E
F
D
I
B
C
A
G
F
D
E
H
I
A
B
C
Seite wird geladen ...
Seite wird geladen ...
Seite wird geladen ...
Seite wird geladen ...
Seite wird geladen ...
Seite wird geladen ...
Seite wird geladen ...
Seite wird geladen ...
Seite wird geladen ...
Seite wird geladen ...
Seite wird geladen ...
Seite wird geladen ...
Seite wird geladen ...
Seite wird geladen ...
Seite wird geladen ...
Seite wird geladen ...
Seite wird geladen ...
Seite wird geladen ...
Seite wird geladen ...
Seite wird geladen ...
Seite wird geladen ...
Seite wird geladen ...
Seite wird geladen ...
Seite wird geladen ...
Seite wird geladen ...
Seite wird geladen ...
Seite wird geladen ...
Seite wird geladen ...
Seite wird geladen ...
Seite wird geladen ...
Seite wird geladen ...
Seite wird geladen ...
Seite wird geladen ...
Seite wird geladen ...
Seite wird geladen ...
Seite wird geladen ...
Seite wird geladen ...
Seite wird geladen ...
Seite wird geladen ...
Seite wird geladen ...
Seite wird geladen ...
Seite wird geladen ...
Seite wird geladen ...
Seite wird geladen ...
Seite wird geladen ...
Seite wird geladen ...
Seite wird geladen ...
Seite wird geladen ...
Seite wird geladen ...
Seite wird geladen ...
Seite wird geladen ...
Seite wird geladen ...
Seite wird geladen ...
Seite wird geladen ...
Seite wird geladen ...
Seite wird geladen ...
Seite wird geladen ...
Seite wird geladen ...
Seite wird geladen ...
Seite wird geladen ...
Seite wird geladen ...
Seite wird geladen ...
Seite wird geladen ...
Seite wird geladen ...
Seite wird geladen ...
Seite wird geladen ...
Seite wird geladen ...
Seite wird geladen ...
Seite wird geladen ...
Seite wird geladen ...
Seite wird geladen ...
Seite wird geladen ...
Seite wird geladen ...
Seite wird geladen ...
Seite wird geladen ...
Seite wird geladen ...
Seite wird geladen ...
Seite wird geladen ...
Seite wird geladen ...
Seite wird geladen ...
Seite wird geladen ...
Seite wird geladen ...
Seite wird geladen ...
Seite wird geladen ...
Seite wird geladen ...
Seite wird geladen ...
Seite wird geladen ...
Seite wird geladen ...
Seite wird geladen ...
Seite wird geladen ...
Seite wird geladen ...
Seite wird geladen ...
Seite wird geladen ...
Seite wird geladen ...
Seite wird geladen ...
Seite wird geladen ...
Seite wird geladen ...
Seite wird geladen ...
Seite wird geladen ...
Seite wird geladen ...
Seite wird geladen ...
Seite wird geladen ...
-
 1
1
-
 2
2
-
 3
3
-
 4
4
-
 5
5
-
 6
6
-
 7
7
-
 8
8
-
 9
9
-
 10
10
-
 11
11
-
 12
12
-
 13
13
-
 14
14
-
 15
15
-
 16
16
-
 17
17
-
 18
18
-
 19
19
-
 20
20
-
 21
21
-
 22
22
-
 23
23
-
 24
24
-
 25
25
-
 26
26
-
 27
27
-
 28
28
-
 29
29
-
 30
30
-
 31
31
-
 32
32
-
 33
33
-
 34
34
-
 35
35
-
 36
36
-
 37
37
-
 38
38
-
 39
39
-
 40
40
-
 41
41
-
 42
42
-
 43
43
-
 44
44
-
 45
45
-
 46
46
-
 47
47
-
 48
48
-
 49
49
-
 50
50
-
 51
51
-
 52
52
-
 53
53
-
 54
54
-
 55
55
-
 56
56
-
 57
57
-
 58
58
-
 59
59
-
 60
60
-
 61
61
-
 62
62
-
 63
63
-
 64
64
-
 65
65
-
 66
66
-
 67
67
-
 68
68
-
 69
69
-
 70
70
-
 71
71
-
 72
72
-
 73
73
-
 74
74
-
 75
75
-
 76
76
-
 77
77
-
 78
78
-
 79
79
-
 80
80
-
 81
81
-
 82
82
-
 83
83
-
 84
84
-
 85
85
-
 86
86
-
 87
87
-
 88
88
-
 89
89
-
 90
90
-
 91
91
-
 92
92
-
 93
93
-
 94
94
-
 95
95
-
 96
96
-
 97
97
-
 98
98
-
 99
99
-
 100
100
-
 101
101
-
 102
102
-
 103
103
-
 104
104
-
 105
105
-
 106
106
-
 107
107
-
 108
108
-
 109
109
-
 110
110
-
 111
111
-
 112
112
-
 113
113
-
 114
114
-
 115
115
-
 116
116
-
 117
117
-
 118
118
-
 119
119
-
 120
120
-
 121
121
-
 122
122


Berkel B200-0000 Benutzerhandbuch
- Kategorie
- Schneidemaschinen
- Typ
- Benutzerhandbuch
- Dieses Handbuch eignet sich auch für
in anderen Sprachen
- français: Berkel B200-0000 Mode d'emploi
- español: Berkel B200-0000 Guía del usuario
- italiano: Berkel B200-0000 Guida utente
- Nederlands: Berkel B200-0000 Gebruikershandleiding
- português: Berkel B200-0000 Guia de usuario
- dansk: Berkel B200-0000 Brugervejledning
- română: Berkel B200-0000 Manualul utilizatorului
Andere Dokumente
-
Axis Axis VOLANO 12 RED Benutzerhandbuch
-
Magimix 85110F Bedienungsanleitung
-
Sammic GAE-350 Benutzerhandbuch
-
Palson Melina 30429 Bedienungsanleitung
-
-
Graef 172 MASTER Bedienungsanleitung
-
H.Koenig MSX220 lame 22 cm Bedienungsanleitung
-
-
-
Melissa 646-040 Benutzerhandbuch