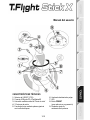
Thrustmaster T Flight Stick X Benutzerhandbuch
- Kategorie
- Spielsteuerung
- Typ
- Benutzerhandbuch


1/12
User Manual
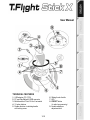
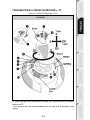
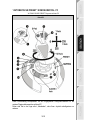
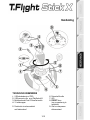
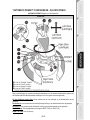
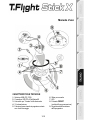
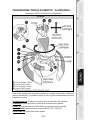
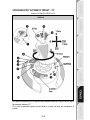
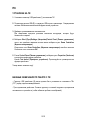
TECHNICAL FEATURES
1. USB selector (PC / PS3) 6. Sliding thumb throttle
2. PC and PlayStation®3 USB connector 7. LED
3. Multidirectional “Point Of View” hat-switch 8. PRESET button
4. 12 action buttons (to select programming)
5. Rudder function via twisting handle 9. Handle resistance
with locking screw adjustment dial

2/12
PC
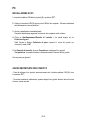
INSTALLATION ON PC
1. Set your joystick’s USB selector (1) to the “PC” position.
2. Connect the USB connector (2) to one of your computer’s USB ports. Windows will
automatically detect the new device.
3. The drivers are installed automatically.
Follow the on-screen instructions to complete the installation.
4. Click Start/Settings/Control Panel and then double-click Game Controllers.
The Game Controllers dialog box displays the joystick’s name with OK status.
5. In the Control Panel, click Properties to configure your joystick.
Test device: Lets you test and view all of your joystick’s functions.
You are now ready to play!
IMPORTANT NOTES FOR PC
- Your joystick’s USB selector (1) must always be set to the “PC” position before connecting
your joystick.
- When connecting your joystick: Leave the handle and rudder centered and do not move
them (to avoid any calibration problems).

3/12
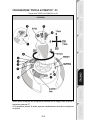
“AUTOMATIC PRESET” CONFIGURATION - PC
“AUTOMATIC PRESET” diagram on PC
RED LED
This preset corresponds to the default configurations for most aerial simulation games on
PC.
It will therefore allow you to start playing your game right away, without having to reconfigure
your joystick.

4/12
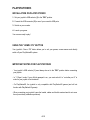
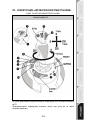
PLAYSTATION®3
INSTALLATION ON PLAYSTATION®3
1. Set your joystick’s USB selector (1) to the “PS3” position.
2. Connect the USB connector (2) to one of your console’s USB ports.
3. Switch on your console.
4. Launch your game.
You are now ready to play!
USING THE “HOME / PS” BUTTON
Your joystick’s “Home / PS” button allows you to exit your games, access menus and directly
switch off your PlayStation®3 system.
IMPORTANT NOTES FOR PLAYSTATION®3
- Your joystick’s USB selector (1) must always be set to the “PS3” position before connecting
your joystick.
- In “1 Player” mode: If your official gamepad is on, you must switch it to “controller port 2” in
order for your joystick to be functional.
- On PlayStation®3, the joystick is only compatible with PlayStation®3 games (and will not
function with PlayStation® 2 games).
- When connecting your joystick: Leave the handle, rudder and throttle centered and do not move
them (to avoid any calibration problems).

5/12
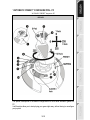
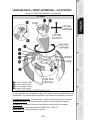
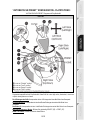
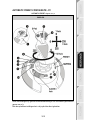
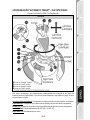
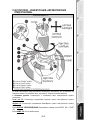
“AUTOMATIC PRESET” CONFIGURATION - PLAYSTATION®3
“AUTOMATIC PRESET” diagram on PlayStation®3
RED LED
This preset corresponds to the default configurations for most aerial simulation games on PlayStation®3.
It will therefore allow you to start playing your game right away, without having to reconfigure your
joystick.
The 4 handle directions: Correspond to the 4 directions on your gamepad’s left mini-stick.
The throttle (6): Corresponds to the Up/Down directions on your gamepad’s right mini-stick.
The rudder (5): Corresponds to the Left/Right directions on your gamepad’s right mini-stick.
MAPPING button: Simultaneously press SELECT (SE) + START (ST).
HOME / PS button: Simply press the button.

6/12
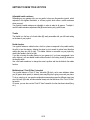
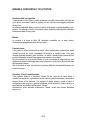
GETTING TO KNOW YOUR JOYSTICK
Adjustable handle resistance
Depending on your gaming style, you may prefer to have an ultra-sensitive joystick, which
responds to the slightest movement, or a firmer joystick, which offers a certain resistance
when you use it.
Your joystick’s handle resistance is adjustable, in order to adapt to all gamers. To adjust it,
use the handle resistance adjustment dial (9) located under your joystick’s base.
Throttle
The throttle is in the form of a thumb slider (6), easily accessible with your left hand resting
on the base of your joystick.
Rudder function
Your joystick features a rudder function, which in a plane corresponds to the pedals used by
the pilot to turn the steering, allowing the plane to pivot around its vertical axis (therefore
making the plane turn left or right). This rudder function is accessible on your joystick by
rotating the handle to the left or right.
If you are not using the rudder function in your games (or if you have programmed it onto
action buttons), you can disable handle rotation thanks to the locking screw (5) located on
the handle’s base.
Use a flat head screwdriver to change the screw’s position and thus lock/unlock the rudder
function.
Multidirectional “Point Of View” hat-switch
Your joystick features a “Point Of View” hat-switch (3) which, as its name indicates, allows
you (in games which permit) to instantly view everything that’s going on around your plane.
To do so, simply go to your game’s configuration menu and program the different views (rear
view, left view, right view, and also external views) onto the directions of the “Point Of View”
hat-switch.
Of course, you can also use the “Point Of View” hat-switch for other functions instead (firing,
etc.).

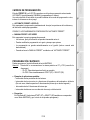
7/12
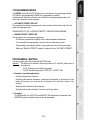
2 PROGRAMMING MODES
The PRESET button (8) and LED (7) allow you to view the type of programming selected:
AUTOMATIC (preprogrammed) or MANUAL (programmed by yourself).
A single press of this button will allow you to switch from one programming mode to the
other, even during the course of a game.
• AUTOMATIC PRESET: RED LED
This represents the default programming: the axes, positions of the buttons and of the hat-
switch are preprogrammed.
PLEASE REFER TO THE “AUTOMATIC PRESET” CONFIGURATION DIAGRAMS.
• MANUAL PRESET: GREEN LED
This represents your own person programming:
- The buttons, axes and the hat-switch can be switched between themselves.
- You can modify the programming to suit your taste and whenever you like.
- Programming is automatically saved in your joystick (even when it is disconnected).
- When your “MANUAL PRESET” is blank, it is identical to the “AUTOMATIC PRESET”.
PROGRAMMING / MAPPING
You can program your joystick using the MAPPING button.
Attention: This button is not located in the same position on PC and PS3 (please refer to
the diagrams):
- On PC: Directly press the button in question.
- On PS3: Simultaneously press START (ST) + SELECT (SE).
• Examples of possible applications:
- Switching the positions of buttons.
- Switching axes between themselves = directions of the handle, of the throttle or of the
rudder (In this case, you must map the 2 directions of the first axis to those of the
second.)
- Switching the 2 directions of the same axis.
- Switching buttons with a direction of an axis or of the hat-switch.
• Exception:
On PlayStation®3, the START (ST) and SELECT (SE) buttons also correspond to the
MAPPING button (and therefore may not be reprogrammed).

8/12
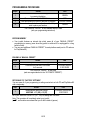
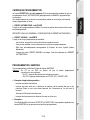
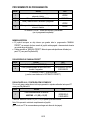
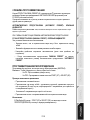
PROGRAMMING PROCEDURE
Steps
Action
LED
1
Enable MANUAL PRESET (8)
by pressing the button.
GREEN
2
Press and release the MAPPING button.
OFF
3
Press and release the button or direction to program.
FLASHES GREEN
4
Press and release the button or direction onto which you
wish to place your function.
GREEN
Your “MANUAL PRESET” is now enabled and up to date
(with your programming carried out).
EEPROM MEMORY
• Your joystick features an internal chip which saves all of your “MANUAL PRESET”
programming in memory (even when the joystick is switched off or unplugged for a long
period of time).
• You can save a different “MANUAL PRESET” for each platform used (one for PC and one
for PlayStation®3).
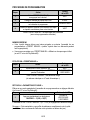
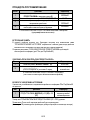
ERASING A “MANUAL PRESET”
Steps
Action
LED
1
Enable your MANUAL PRESET (8).
GREEN
2
Press and hold the MAPPING button
for 2 seconds.
FLASHES GREEN
2 SECONDS
Your “MANUAL PRESET” is now blank
(and once again identical to the “AUTOMATIC PRESET”).
RETURNING TO “FACTORY SETTINGS”
You can erase all of your programming or settings carried out on both PC and PlayStation®3
with a single step:
Step
Action
LED
1
Simultaneously press the buttons
MAPPING + 11 (SE) + 12 (ST)
FLASHES GREEN/RED
2 SECONDS
All of your “MANUAL PRESETS” (PC + PS3) or settings are now blank.
Note: This operation will completely restart your joystick
(on PC, we therefore recommend that you do this outside of games).

9/12
TROUBLESHOOTING AND WARNING
• My joystick doesn’t function correctly or appears to be improperly calibrated:
- Switch off your computer or your console, disconnect your joystick, reconnect your joystick
and then re-launch your game.
- When connecting your joystick: Leave the handle, rudder and throttle centered and do not
move them (to avoid any calibration problems).
- Exit your game, disconnect your joystick, verify that the USB selector (PC / PS3) (1) is set
to the proper position, then reconnect your joystick.
• I can’t configure my joystick:
- In your game’s “Options / Controller / Gamepad or Joystick” menu: Select the most
appropriate configuration or completely reconfigure the controller options.
- Please refer to your game’s user manual or online help for more information.
- You can also use your joystick’s “MAPPING” function to resolve this type of problem.
• My joystick is too sensitive or not sensitive enough:
- Your joystick self-calibrates on its own after you have made a few movements on the
different axes.
- In your game’s “Options / Controller / Gamepad or Joystick” menu: Adjust the sensitivity or
dead zones for your controller (if this option is available).
- Adjust the handle resistance using the dial (9) located under your joystick’s base.

10/12
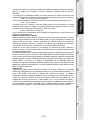
Consumer warranty information
Worldwide, Guillemot Corporation S.A., whose registered office is located at Place du Granier, B.P.
97143, 35571 Chantepie, France (hereinafter “Guillemot”) warrants to the consumer that this
Thrustmaster product shall be free from defects in materials and workmanship, for a warranty period
which corresponds to the time limit to bring an action for conformity with respect to this product. In the
countries of the European Union, this corresponds to a period of two (2) years from delivery of the
Thrustmaster product. In other countries, the warranty period corresponds to the time limit to bring an
action for conformity with respect to the Thrustmaster product according to applicable laws of the country
in which the consumer was domiciled on the date of purchase of the Thrustmaster product (if no such
action exists in the corresponding country, then the warranty period shall be one (1) year from the original
date of purchase of the Thrustmaster product).
Notwithstanding the above, rechargeable batteries are covered by a warranty period of six (6) months
from the date of original purchase.
Should the product appear to be defective during the warranty period, immediately contact Technical
Support, who will indicate the procedure to follow. If the defect is confirmed, the product must be returned
to its place of purchase (or any other location indicated by Technical Support).
Within the context of this warranty, the consumer’s defective product shall, at Technical Support’s option,
be either replaced or returned to working order. If, during the warranty period, the Thrustmaster product is
subject to such reconditioning, any period of at least seven (7) days during which the product is out of use
shall be added to the remaining warranty period (this period runs from the date of the consumer’s request
for intervention or from the date on which the product in question is made available for reconditioning, if
the date on which the product is made available for reconditioning is subsequent to the date of the
request for intervention). If permitted under applicable law, the full liability of Guillemot and its subsidiaries
(including for consequential damages) is limited to the return to working order or the replacement of the
Thrustmaster product. If permitted under applicable law, Guillemot disclaims all warranties of
merchantability or fitness for a particular purpose.
This warranty shall not apply: (1) if the product has been modified, opened, altered, or has suffered
damage as a result of inappropriate or abusive use, negligence, an accident, normal wear, or any other
cause unrelated to a material or manufacturing defect (including, but not limited to, combining the
Thrustmaster product with any unsuitable element, including in particular power supplies, rechargeable
batteries, chargers, or any other elements not supplied by Guillemot for this product); (2) in the event of
failure to comply with the instructions provided by Technical Support; (3) to software, said software being
subject to a specific warranty; (4) to consumables (elements to be replaced over the product’s lifespan:
disposable batteries, audio headset or headphone ear pads, for example); (5) to accessories (cables,
cases, pouches, bags, wrist-straps, for example); (6) if the product was sold at public auction.
This warranty is nontransferable.
The consumer’s legal rights with respect to laws applicable to the sale of consumer goods in his or her
country are not affected by this warranty.
Additional warranty provisions
During the warranty period, Guillemot shall not provide, in principle, any spare parts, as Technical Support
is the only party authorized to open and/or recondition any Thrustmaster product (with the exception of
any reconditioning procedures which Technical Support may request that the consumer carry out, by way
of written instructions – for example, due to the simplicity and the lack of confidentiality of the
reconditioning process – and by providing the consumer with the required spare part(s), where
applicable).
Given its innovation cycles and in order to protect its know-how and trade secrets, Guillemot shall not
provide, in principle, any reconditioning notification or spare parts for any Thrustmaster product whose
warranty period has expired.
In the United States of America and in Canada, this warranty is limited to the product’s internal
mechanism and external housing. In no event shall Guillemot or its affiliates be held liable to any third
party for any consequential or incidental damages resulting from the breach of any express or implied
warranties. Some States/Provinces do not allow limitation on how long an implied warranty lasts or
exclusion or limitation of liability for consequential or incidental damages, so the above limitations or
exclusions may not apply to you. This warranty gives you specific legal rights, and you may also have
other rights which vary from State to State or Province to Province.

11/12
Liability
If permitted under applicable law, Guillemot Corporation S.A. (hereinafter “Guillemot”) and its subsidiaries
disclaim all liability for any damages caused by one or more of the following: (1) the product has been
modified, opened or altered; (2) failure to comply with assembly instructions; (3) inappropriate or abusive
use, negligence, an accident (an impact, for example); (4) normal wear. If permitted under applicable law,
Guillemot and its subsidiaries disclaim all liability for any damages unrelated to a material or
manufacturing defect with respect to the product (including, but not limited to, any damages caused
directly or indirectly by any software, or by combining the Thrustmaster product with any unsuitable
element, including in particular power supplies, rechargeable batteries, chargers, or any other elements
not supplied by Guillemot for this product).

12/12
FCC STATEMENT
1. This device complies with Part 15 of the FCC Rules. Operation is subject to the following two
conditions:
(1) This device may not cause harmful interference, and
(2) This device must accept any interference received, including interference that may cause
undesired operation.
2. Changes or modifications not expressly approved by the party responsible for compliance could void the
user's authority to operate the equipment.
COPYRIGHT
© 2015 Guillemot Corporation S.A. All rights reserved. Thrustmaster® is a registered trademark of
Guillemot Corporation S.A. PlayStation® is a registered trademark of Sony Computer Entertainment, Inc.
Windows® is a registered trademark of Microsoft Corporation in the United States and/or other countries.
All other trademarks are the property of their respective owners. Illustrations not binding. Contents, designs
and specifications are subject to change without notice and may vary from one country to another. Made in
China.
ENVIRONMENTAL PROTECTION RECOMMENDATION
At the end of its working life, this product should not be disposed of with standard
household waste, but rather dropped off at a collection point for the disposal of Waste
Electrical and Electronic Equipment (WEEE) for recycling.
This is confirmed by the symbol found on the product, user manual or packaging.
Depending on their characteristics, the materials may be recycled. Through recycling
and other forms of processing Waste Electrical and Electronic Equipment, you can make
a significant contribution towards helping to protect the environment.
Please contact your local authorities for information on the collection point nearest you.
Retain this information. Colours and decorations may vary.
This product conforms to all standards regarding children 14 years of age and older. This product is not
suitable for use by children less than 14 years of age.
www.thrustmaster.com
TECHNICAL SUPPORT
http://ts.thrustmaster.com

1/12
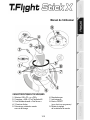
Manuel de l'utilisateur
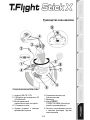
CARACTERISTIQUES TECHNIQUES
1. Sélecteur USB « PC » ou « PS3 » 6. Manette des gaz
2. Connecteur « USB » PC et PlayStation®3 7. Led lumineuse
3. Croix Multidirectionnelle « Point de vue » 8. Bouton PRESET
4. 12 boutons d’action (pour choisir son programme)
5. Palonnier par rotation du manche 9. Molette de réglage
avec vis de blocage de la résistance du manche

2/12
PC
INSTALLATION SUR PC
1. Mettre le sélecteur USB (1) de votre Joystick en position « PC »
2. Reliez le connecteur USB (2) à l'un des ports USB de votre unité centrale.
Windows détectera automatiquement le nouveau périphérique.
3. L'installation des pilotes est automatique.
Suivez les instructions affichées à l'écran pour terminer l'installation.
4. Sélectionnez Démarrer/Paramètres/Panneau de configuration puis double-cliquez sur
Contrôleurs de jeu
La boîte de dialogue Contrôleurs de jeu affichera le nom du Joystick avec l'état OK.
5. Dans le Control Panel, cliquez sur Propriétés pour configurer votre Joystick.
Test du périphérique : vous permet de tester et visualiser l’ensemble des fonctions.
Vous êtes maintenant prêt à jouer !
REMARQUES IMPORTANTES SUR « PC »
- Le sélecteur USB (1) de votre Joystick doit toujours être positionné sur « PC » avant de le
connecter
- Lorsque vous branchez votre Joystick : laissez le manche, le palonnier et la manette des
gaz centrés et évitez de les déplacer (pour éviter tout problème de calibration).

3/12
CONFIGURATION DU « PRESET AUTOMATIQUE » - PC
Schéma du « PRESET AUTOMATIQUE » sur PC
LED ROUGE
Ce preset correspond aux configurations par défaut de la plupart des jeux de simulation
aérienne sur PC.
Il vous permettra donc de lancer directement votre jeu sans avoir à reconfigurer votre
Joystick.

4/12
PLAYSTATION®3
INSTALLATION SUR « PLAYSTATION®3 »
1. Mettez le sélecteur USB (1) de votre Joystick en position « PS3 ».
2. Branchez le connecteur USB (2) sur un port USB de la console.
3. Allumez votre console.
4. Lancez le jeu.
Vous êtes maintenant prêt à jouer !
UTILISATION DU BOUTON « HOME / PS »
Le bouton « Home / PS » de votre Joystick vous permettra de quitter vos jeux, d’accéder aux
menus et d’éteindre directement votre système PlayStation®3
REMARQUES IMPORTANTES SUR PLAYSTATION®3
- Le sélecteur USB (1) de votre Joystick doit toujours être positionné sur « PS3 » avant de le
connecter.
- En mode « 1 Joueur » si votre manette officielle est allumée, il est alors nécessaire de basculer
celle-ci en « port manette 2 » afin que votre Joystick soit fonctionnel.
- Sur PlayStation®3, le Joystick n’est compatible qu’avec les jeux PlayStation®3
(et ne fonctionnera pas avec les jeux PlayStation® 2).
- Lorsque vous branchez votre Joystick : laissez le manche et le palonnier centrés et évitez de les
déplacer (pour éviter tout problème de calibration).

5/12
CONFIGURATION DU « PRESET AUTOMATIQUE » - PLAYSTATION®3
Schéma du « PRESET AUTOMATIQUE » sur PlayStation®3
LED ROUGE
Ce preset correspond aux configurations par défaut de la plupart des jeux de simulation aérienne sur
PlayStation®3. Il vous permettra de lancer directement votre jeu sans avoir à reconfigurer votre Joystick.
Les 4 directions du manche : Correspondent aux 4 directions du mini-stick gauche de votre manette.
La manette des gaz (6) : Correspond à la direction Haut/Bas du mini-stick droit de votre manette.
Le palonnier (5) : Correspond à la direction Gauche/Droite du mini-stick droit de votre manette.
Bouton MAPPING : Appuyez simultanément sur SELECT (SE) + START (ST).
Bouton HOME / PS : Appuyez simplement sur le bouton.

6/12
A LA DECOUVERTE DE VOTRE JOYSTICK
Résistance du manche ajustable
Selon votre façon de jouer, vous voudrez un joystick ultra-sensible, qui réponde à la moindre
impulsion, ou au contraire un joystick plus dur, qui présente une certaine résistance lorsque
vous le manipulez.
La résistance du manche de votre Joystick est ajustable pour s’adapter à tous les joueurs.
Utilisez pour cela la molette de réglage de la résistance (9) située sous la base de votre
joystick.
Manette des gaz
La manette des gaz est représentée sous la forme d’une molette (6), facilement accessible
avec la main gauche reposant sur la base de votre Joystick.
Fonction Palonnier
Votre Joystick dispose d’une fonction palonnier, qui correspond dans un avion aux pédales
actionnées par le pilote pour faire braquer la gouverne de direction, qui permet de faire
pivoter l’avion autour de son axe vertical (entraînant ainsi un virage de l’avion vers la gauche
ou la droite). Cette fonction palonnier est accessible sur votre joystick par rotation du
manche vers la gauche ou la droite.
Si vous n’utilisez pas la fonction palonnier dans vos jeux (ou que vous l’avez programmée
sur des boutons d’action), vous pouvez désactiver la rotation du manche grâce à la vis de
blocage (5) située à la base du manche.
Utilisez un tournevis à tête plate pour modifier sa position et ainsi verrouiller/déverrouiller la
fonction palonnier.
Croix Multidirectionnelle « Point de vue »
Votre Joystick est doté d’une Croix Point de vue (3) qui, comme son nom l’indique, vous
permettra (dans les jeux le permettant) de surveiller instantanément tout ce qui se passe
autour de votre avion. Il vous suffit pour cela, depuis le menu de configuration de votre jeu,
de programmer les différentes vues (vue arrière, vue sur la gauche, vue sur la droite, mais
aussi vues externes) sur les directions de la croix Point de vue.
Vous pouvez bien entendu réserver la Croix Point de vue à d’autres utilisations (tir, etc.).

7/12
2 MODES DE PROGRAMMATION
Le bouton PRESET (8) et la Led Lumineuse (7) vous permettent de visualiser le type de
programmation choisi : AUTOMATIQUE (préprogrammé) ou MANUEL (programmé par
vous-même).
Une simple pression sur ce bouton vous permettra (même en cours de jeu) de basculer
d’une programmation à l’autre.
• PRESET AUTOMATIQUE : Led ROUGE
Il s’agit ici de la programmation par défaut : les axes, la position des boutons et de la croix
sont préprogrammés
REPORTEZ-VOUS AUX SCHEMAS « CONFIGURATION DU PRESET AUTOMATIQUE ».
• PRESET MANUEL : Led VERTE
Il s’agit ici de vos programmations personnelles :
- Les boutons, les axes et la croix peuvent être inversés entre eux.
- Vous pouvez modifier à votre convenance et à volonté ces programmations.
- Elles sont automatiquement sauvegardées à l’intérieur de votre Joystick (même
débranché).
- Lorsque que votre «PRESET MANUEL» est vierge, il est alors identique au «PRESET
AUTOMATIQUE».
PROGRAMMATION / MAPPING
Vos programmations s’effectuent à l’aide du bouton MAPPING.
Attention : Sur PC ou sur PS3, ce bouton n’a pas le même emplacement
(reportez vous aux schémas) :
- Sur PC : appuyez directement sur le bouton concerné
- Sur PS3 : appuyez simultanément sur START (ST) + SELECT (SE)
• Exemples d’applications possibles :
- Inverser la position des boutons
- Inverser des axes entre eux = directions du manche, de la manette des gaz ou du
palonnier (Dans ce cas, vous devez basculer les 2 directions du 1er
axe vers le
second.)
- Inverser les 2 directions du même axe
- Inverser des boutons avec la direction d’un axe ou de la croix
• Exception :
Sur PlayStation®3, les boutons START(ST) et SELECT(SE) correspondent également au
bouton MAPPING (et ne peuvent donc pas être reprogrammés)
Seite wird geladen ...
Seite wird geladen ...
Seite wird geladen ...
Seite wird geladen ...
Seite wird geladen ...
Seite wird geladen ...
Seite wird geladen ...
Seite wird geladen ...
Seite wird geladen ...
Seite wird geladen ...
Seite wird geladen ...
Seite wird geladen ...
Seite wird geladen ...
Seite wird geladen ...
Seite wird geladen ...
Seite wird geladen ...
Seite wird geladen ...
Seite wird geladen ...
Seite wird geladen ...
Seite wird geladen ...
Seite wird geladen ...
Seite wird geladen ...
Seite wird geladen ...
Seite wird geladen ...
Seite wird geladen ...
Seite wird geladen ...
Seite wird geladen ...
Seite wird geladen ...
Seite wird geladen ...
Seite wird geladen ...
Seite wird geladen ...
Seite wird geladen ...
Seite wird geladen ...
Seite wird geladen ...
Seite wird geladen ...
Seite wird geladen ...
Seite wird geladen ...
Seite wird geladen ...
Seite wird geladen ...
Seite wird geladen ...
Seite wird geladen ...
Seite wird geladen ...
Seite wird geladen ...
Seite wird geladen ...
Seite wird geladen ...
Seite wird geladen ...
Seite wird geladen ...
Seite wird geladen ...
Seite wird geladen ...
Seite wird geladen ...
Seite wird geladen ...
Seite wird geladen ...
Seite wird geladen ...
Seite wird geladen ...
Seite wird geladen ...
Seite wird geladen ...
Seite wird geladen ...
Seite wird geladen ...
Seite wird geladen ...
Seite wird geladen ...
Seite wird geladen ...
Seite wird geladen ...
Seite wird geladen ...
Seite wird geladen ...
Seite wird geladen ...
-
 1
1
-
 2
2
-
 3
3
-
 4
4
-
 5
5
-
 6
6
-
 7
7
-
 8
8
-
 9
9
-
 10
10
-
 11
11
-
 12
12
-
 13
13
-
 14
14
-
 15
15
-
 16
16
-
 17
17
-
 18
18
-
 19
19
-
 20
20
-
 21
21
-
 22
22
-
 23
23
-
 24
24
-
 25
25
-
 26
26
-
 27
27
-
 28
28
-
 29
29
-
 30
30
-
 31
31
-
 32
32
-
 33
33
-
 34
34
-
 35
35
-
 36
36
-
 37
37
-
 38
38
-
 39
39
-
 40
40
-
 41
41
-
 42
42
-
 43
43
-
 44
44
-
 45
45
-
 46
46
-
 47
47
-
 48
48
-
 49
49
-
 50
50
-
 51
51
-
 52
52
-
 53
53
-
 54
54
-
 55
55
-
 56
56
-
 57
57
-
 58
58
-
 59
59
-
 60
60
-
 61
61
-
 62
62
-
 63
63
-
 64
64
-
 65
65
-
 66
66
-
 67
67
-
 68
68
-
 69
69
-
 70
70
-
 71
71
-
 72
72
-
 73
73
-
 74
74
-
 75
75
-
 76
76
-
 77
77
-
 78
78
-
 79
79
-
 80
80
-
 81
81
-
 82
82
-
 83
83
-
 84
84
-
 85
85


Thrustmaster T Flight Stick X Benutzerhandbuch
- Kategorie
- Spielsteuerung
- Typ
- Benutzerhandbuch
in anderen Sprachen
Verwandte Artikel
-
Thrustmaster T-FLIGHT STICK X Bedienungsanleitung
-
Thrustmaster T.FLIGHT HOTAS X Bedienungsanleitung
-
Thrustmaster 2960623 Benutzerhandbuch
-
-
-
-
-
-
-
