Sealife DC600 Benutzerhandbuch
- Kategorie
- Unterwasserkameragehäuse
- Typ
- Benutzerhandbuch
Seite wird geladen ...

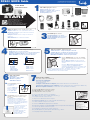
Prepare housing
a. Carefully inspect the O-ring and O-ring contact surfaces for cuts, scratches, or any other damage.
b. O-ring and O-ring contact surfaces must be perfectly clean. No hair, sand, or other debris.
Use cleaning brush to clean.
c
.
C
heck that O-ring is completely seated into o-ring groove, and that o-ring is not twisted before sealing the housing.
Refer to instruction manual on how to remove and install o-ring.
d
.
I
nsert one
M
oisture Muncher
d
esiccant capsule (SL911) in slot provided.
e. Inside of housing and inner camera must be totally dry. Remove strap from camera.
f. Make sure there are no obstructions when closing the waterproof housing. Latch must “click” into place.
Preparar la carcasa
a. Detenidamente examine la junta y las superficies de contacto de la junta para ver si tienen cortes, rayones o
cualquier otro daño.
b
.
L
a junta y las superficies de contacto de la junta deben estar perfectamente limpias. Sin pelos, arena u otros residuos.
Use un cepillo para limpiarlas.
c
.
A
ntes de cerrar herméticamente la carcasa, verifique que la junta está completamente asentada en su ranura y que
n
o está retorcida. Consulte el manual de instrucciones para ver como se quita y se instala la junta.
d. Inserte una cápsula de absorbente de humedad Moisture Muncher (SL911) en la ranura provista.
e. El interior de la carcasa y el interior de la cámara deben estar totalmente secos. Retire la correa de la cámara.
f. Asegúrese de que no haya ningún impedimento al cerrar la carcasa hermética. El pestillo debe encajar en su sitio
c
on un “clic”.
Preparare la custodia
a. Ispezionare attentamente l'O-ring e le relative superfici di contatto per verificare che non siano presenti tagli,
graffi o altri danni.
b. L'O-ring e le relative superfici di contatto devono essere perfettamente puliti e privi di capelli, sabbia o altri residui.
Pulire con un apposito spazzolino.
c. Prima di chiudere la custodia, verificare che l'O-ring sia perfettamente alloggiato nell'apposita scanalatura e che non
sia attorcigliato. Per indicazioni su come rimuovere e installare l'O-ring, consultare il manuale d'istruzioni.
d
.
I
nserire una capsula di essiccante
M
oisture Muncher
(
SL911) nell'apposita fessura.
e. L'interno della custodia e quello della fotocamera devono essere completamente asciutti. Rimuovere il cinturino
dalla fotocamera.
f. Quando si chiude la custodia impermeabile, assicurarsi che non vi siano ostruzioni. Il dispositivo di chiusura deve
s
cattare in posizione con un “clic”.
Préparation du boîtier
a. Inspectez le joint d’étanchéité et ses surfaces de contact pour vous assurer qu’il n’y a aucune coupure, rayure ni
u
n autre dommage.
b. Le joint et les surfaces de contact doivent être parfaitement propres, sans grain de sable, cheveu ou autre débris.
Utilisez un pinceau pour les nettoyer si besoin.
c. Vérifiez que le joint est bien à fond dans sa rainure et qu’il n’est pas entortillé avant de fermer le boîtier. Pour enlever
et replacer le joint, consultez le manuel d’utilisation.
d
.
I
nsérez une capsule de déshydratant
M
oisture Muncher
(
SL911) à l’emplacement prévu.
e. L’intérieur du boîtier et celui de l’appareil photo doivent être totalement secs. Enlevez la dragonne de l’appareil.
f. Vérifiez que rien ne fait obstruction lorsque vous fermez le boîtier étanche. Sa fermeture doit s’encliquer nettement.
Gehäuse vorbereiten
a. Sorgfältig den O-Ring inspizieren sowie die Oberfläche des O-Rings auf Schnitte, Kratzer oder andere Schäden prüfen.
b. O-Ring und O-Ring-Dichtungsflächen müssen vollkommen sauber sein, fr
e
i von Haaren, Sand, oder
V
e
rschmutzungen. Benutzen Sie eine feine Bürste zum Säubern.
c. Prüfen Sie, dass der O-Ring vollständig in der O-Ring-Rille liegt, und dass er vor dem Schliessen des Gehäuses nicht
v
erdr
eht ist.
Die Gebrauchsanweisung erklärt das Entfer
nen und Einlegen des O-Rings.
d. Fügen Sie eine „Moistur
e Muncher“
Anti-Beschlag T
r
ockenmittelkapsel (Art. Nr
.
SL911) ein.
e. Die Innenseite des Gehäuses und die innere Kamera müssen vollständig trocken sein. Entfernen Sie das Trageband von der inneren Kamera.
f. Stellen Sie sicher, dass die Kamera leicht und ohne Hindernisse schliesst. Der Verschluss muss „einklicken“.
8
8
U
nderwater
Bajo el agua
In acqua
Utilisation sous-marine
Unter Wasser
a.
b.
c.
d.
e.
f.
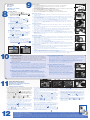
Test housing for leaks.
a. Advance test at home: Wrap small weight in paper towel and place inside sealed housing (without
camera). Do not trap towel under o-ring. Immerse in water for minimum one hour
.
Carefully inspect
towel and housing for water
b. Before each dive, hold the housing (with camera inside) face-up underwater for a few seconds. Keep
t
he camera face-up and inspect for water drops thr
ough the LCD window. Now, hold the
housing face-up underwater for a few minutes. Keep the camera face-up and inspect for water dr
ops
t
hrough the LCD window.
Pruebe a ver si la carcasa tiene fugas.
a
. Prueba avanzada en casa:
E
nvuelva un pequeño peso en una toallita de papel y póngalo dentro de
la carcasa herméticamente cerrada (sin la cámara). No pille la toallita bajo la junta. Sumérjala en agua
durante un mínimo de una hora. Examine detenidamente la toallita y la carcasa para ver si tiene agua.
b
. Antes de cada inmersión,
s
ostenga la carcasa (con la cámara dentr
o) mirando hacia arriba bajo el
agua durante unos segundos. Mantenga la cámara mirando hacia arriba y fíjese si caen gotas de agua
p
or la ventanilla del LCD. Ahora, sostenga la carcasa hacia arriba bajo el agua durante unos minutos.
Mantenga la cámara hacia arriba y fíjese si caen gotas de agua por la ventanilla del LCD.
V
erificar
e che non vi siano infiltrazioni nella custodia.
a. Test avanzato da eseguire in casa: avvolgere un peso non troppo grande in un tovagliolo di carta e
collocarlo all'interno della custodia sigillata (senza la fotocamera) Non incastrare il tovagliolo sotto
l'O-ring. Immer
ger
e
la custodia in acqua per cir
ca un'ora. Ispezionar
e
accuratamente il tovagliolo e la
custodia per verificar
e la pr
esenza di acqua.
b.
Prima di ciascuna immersione
, tener
e l'involucr
o (con dentr
o la fotocamera) rivolto verso l'alto
sott'acqua per qualche secondo. T
enere la fotocamera rivolta verso l'alto e analizzare eventuali gocce
d'acqua sul display LCD. A questo punto, tenere sott'acqua l'involucro rivolto verso per qualche
minuto. T
ener
e la fotocamera rivolta verso l'alto e analizzar
e eventuali gocce d'acqua sul display LCD.
Testez l’étanchéité du boîtier.
a.
T
e
st d’étanchéité à la maison :
enveloppez un petit objet lour
d dans une serviette en papier et mettez-le
d
ans le boîtier (sans l’appareil), sans coincer le papier dans le joint. Immergez le boîtier dans l’eau pendant
au moins une heur
e
. Vérifiez bien que la serviette et l’intérieur du boîtier sont restés secs.
b
. A
vant chaque plongée,
m
aintenez le boîtier (avec l’appareil photo à l’intérieur) face avant sous l’eau
pendant quelques secondes. Conservez l’appar
eil photo dans cette position et vérifiez s’il y a des
gouttes d’eau à travers la fenêtre du LCD. Maintenant, maintenez le boîtier face avant sous l’eau
pendant quelques minutes. Conservez l’appar
e
il photo dans cette posi-
tion et vérifiez s’il y a des gouttes d’eau à travers la fenêtr
e du LCD.
Testen des Gehäuses auf Lecks.
a. Zu Hause: Wickeln Sie ein kleines Gewicht in eine Papierserviette und
f
üllen Sie dieses in das Gehäuse ohne Kamera. Kein Papier auf dem O-
Ring einquetschen. Mindestens eine Stunde in Wasser eintauchen. Dann
a
btrocknen, vorsichtig öffnen und das Papier auf Wasserflecken prüfen.
b. Halten Sie das Kameragehäuse (mit der eingelegten Kamera) vor jedem
Tauchgang einige Sekunden lang mit der Vorderseite nach oben unter
Wasser. Halten Sie die Kamera weiterhin mit der Vorderseite nach oben,
und prüfen Sie durch das LCD-Fenster, ob sich im Gehäuse
W
a
ssertr
opfen befinden. Halten Sie das Gehäuse jetzt einige Minuten
l
ang mit der Vorderseite nach oben unter Wasser. Halten Sie die Kamera
weiterhin mit der Vorderseite nach oben, und prüfen Sie durch das LCD-
Fenster nochmals, ob sich im Gehäuse W
assertr
opfen befinden.
a. For great underwater pictures: Dive in crystal clear water; keep your shooting
distance within 6ft/2m, don’t stir up the sand, control your buoyancy, be calm
and move slowly; hold camera steady; shoot up with water in background;
practice and learn from your mistakes.
b. If using the SeaLife Exter
nal Flash , you can adjust the brightness by
setting to Normal, Macro or Far flash, depending on the shooting distance.
Push the Flash Button and select the proper flash setting.
Try different settings and watch the result on the LCD. Refer to manual
to learn about other adjustment options.
c. When in SEA or EXT FLASH modes, push the LCD button to select
between Camera , Playback and Video modes.
d. Care: After each use rinse in fresh water and dry the camera before
opening. Keep latch open for long term storage.
a. Para obtener excelentes fotos subacuáticas: Bucee en aguas cristalinas;
no revuelva la arena, controle su flotabilidad, esté tranquilo y muévase
despacio; sujete la cámara de forma que no se mueva; dispare con
agua de fondo; practique y aprenda de sus errores.
b. Si usa el Flash Externo SeaLife , puede ajustar la luminosidad poniéndolo
en Normal, Macro o Far flash, dependiendo de la distancia de donde se
dispare. Presione el Flash Button y seleccione la posición de flash ade-
cuada. Pruebe distintas posiciones y observe el resultado en la pantalla LCD.
c. En los modos MAR o FLASH EXTERNO, pulse para seleccionar entre
los modos , y .
d. Cuidados: Después de cada uso enjuague con agua dulce y seque la
cámara antes de abrirla. Mantenga el pestillo abierto para un
almacenamiento pr
olongado.
a. Per straordinarie immagini subacquee: immergersi in acque cristalline;
non agitare il fondale sabbioso, controllare il galleggiamento, muoversi
lentamente e con estrema calma; tenere salda la fotocamera, puntare
l'obiettivo verso l'alto con l'acqua sullo sfondo; esercitarsi e imparare
dai pr
opri errori.
b. Se si utilizza SeaLife External Flash (flash esterno) , è possibile
regolare la luminosità impostando il flash sulle opzioni Normal (Normale),
Macro (Macro) o Far (Lontano), a seconda della distanza dal soggetto.
Premere Flash Button e selezionare l'impostazione del flash corretta.
Provare varie impostazioni e osservare i risultati sul display LCD.
c. Quando nelle modalità SEA o EXT FLASH, premere per selezionare
una delle modalità , e .
d. Manutenzione: dopo l'uso, sciacquare con acqua dolce e asciugare la
fotocamera prima di aprirla. Se si intende riporre la fotocamera per
lungo tempo, lasciare il dispositivo di chiusura aperto.
a. Pour réussir de splendides photos sous-marines: plongez en eau
limpide, ne remuez pas le sable du fond, contrôlez votre stabilité, restez
calme et déplacez-vous lentement. Tenez votre appareil photo bien
stable et prenez les photos vers le haut avec l’eau en arrière-plan.
Exercez-vous et sachez tirer les leçons de vos erreurs.
b. Si vous utilisez le flash externe SeaLife , vous pouvez régler la
luminosité en choisissant Normal, Macro ou Far flash (flash éloigné) ,
en fonction de la distance de prise de vue. Essayez dif
férents réglages
et observez le résultat sur l’écran LCD.
c. En mode Océan or Ext. Flash, poussez le bouton pour commuter
entre les modes , et .
d. Entretien: après chaque utilisation, rincez le boîtier à l’eau claire et
séchez-le avant de l’ouvrir. Rangez-le en laissant sa fermeture ouverte.
a.
Tips für beste Unterwasserfotos:
Kristallklar
es Wasser, keinen Sand
aufwirbeln, gut tarieren, ruhig und langsam bewegen, die Kamera still
halten, die Kamera aufwärts zielen mit Wasser im Hintergrund.
b. Im Modus „Ext. Flash“ können Sie die Helligkeit regulieren durch
Einstellung auf Normal-, Macro- oder Fern-Blitz , je nach Entfernung.
Probieren Sie verschiedene Einstellungen und beobachten Sie das
Ergebnis auf dem Monitor.
c. Wenn bei der Kamera das Motiv MEER oder EXT. BLITZ eingestellt ist,
wählen Sie mit der Taste die Modi , oder .
d. Pflege: Nach jedem Tauchgang die Kamera in Süsswasser aufbewahren,
abspülen und dann gut abtrocknen. Verriegelung während längerer
Lagerung offen lassen.
Taking underwater pictures.
Toma de fotos subacuáticas.
Realizzazione di fotografie subacquee.
Photos sous-marines.
Unterwasserfotos machen.
a.
For important warnings, more information, and for service, warranty, and troubleshooting: See instruction booklet, CD or check online at www.sealife-cameras.com/service/manuals.html
Para informarse de advertencias importantes, servicio, garantía, resolución de problemas y otras informaciones adicionales: Vea el folleto de instrucciones o consúltelo en línea en
www
.sealife-cameras.com/service/manuals.html
Per avvisi importanti, ulteriori informazioni, manutenzione, garanzia e risoluzione dei problemi consultare l'opuscolo delle istruzioni o il sito www.sealife-cameras.com/service/manuals.html
Avertissements importants, informations supplémentaires, service après-vente, garantie et dépannage : consultez le manuel complet ou visitez notre site Internet à l’adresse www.sealife-cameras.com/service/manuals.html
Wichtige W
ar
nungen
, weiter
e Informationen, Sevice, Garantie, und Tips für Fehlersuche sind in den deutschen Gebrauchsanweisungen enthalten. Siehe
www
.sealife-cameras.com/service/manuals.html
d.
a.
b.
O-Ring
11
11
12
12
c.
b.
b.
Moisture
Muncher
9
9
Configurar la cámara.
a. Importante: Ajuste la cámara al modo ( ) Captura
b
.
A
juste el modo de escena subacuático. Pulse el botón
“MENU”. Pulse el botón “SET”. Seleccione
MAR ( ) o
FLASH EXTERNE ( ) con los botones 6 o 5. Pulse el
b
otón “SET” y el botón “MENU” para salir del menú.
Configurare la fotocamera.
a. Importante: Impostare la fotocamera in modalità ( ) Cattura
b. Impostare la modalità di scena subacquea. Premere il
pulsante “MENU”. Premere il pulsante “SET”. Scegliere
MARE ( ) o FLASH ESTERNE ( ) utilizzando i pulsanti
6 e 5.
Premere il pulsante “SET” e il pulsante “MENU” per
c
hiudere il menu.
Réglage de l’appareil.
a
.
I
mportant: Configurez l’appareil photo en mode ( ) Capture
b. Définissez le mode Scène sous-marin. Appuyez sur le bou-
t
on “MENU”. Appuyez sur le bouton “SET”. Sélectionnez
MERS ( ) ou FLASH EXTERNEL ( ) en utilisant les
boutons
6 ou 5. Appuyez sur le bouton “SET” et le
b
outon “MENU” pour quitter le menu.
Kamera vorber
eiten.
a
.
W
ichtig: Stellen Sie bei der Kamera den ( ) Aufnahmemodus ein.
b. Stellen Sie den Motivmodus Unterwasser ein. Drücken Sie
auf die “MENU”-Taste. Drücken Sie auf die “SET”-Taste.
W
ählen Sie mit den Tasten
6 u
nd
5 d
ie Option
M
EER
(
)
o
der
E
XTERNER BLITZ
(
). Drücken Sie auf die “SET”-
T
aste und auf die “MENU”-Taste, um das Menü zu beenden.
Set-up camera.
a. Important: Set camera to capture ( ) mode
b
.
S
et underwater Scene mode. Push “MENU” button. Push
“SET” button. Select
SEA ( ) or EXTERNAL FLASH ( )
using the
6and 5 button. Push the “SET” button and
“MENU” button to exit the menu.
a.
10
10
-
 1
1
-
 2
2


Sealife DC600 Benutzerhandbuch
- Kategorie
- Unterwasserkameragehäuse
- Typ
- Benutzerhandbuch
in anderen Sprachen
- English: Sealife DC600 User manual
- français: Sealife DC600 Manuel utilisateur
- español: Sealife DC600 Manual de usuario
- italiano: Sealife DC600 Manuale utente
Verwandte Artikel
-
Sealife DC500 Benutzerhandbuch
-
Sealife DC800 Benutzerhandbuch
-
-
-
Sealife DC600 Benutzerhandbuch
-
-
-
-
-