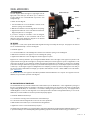
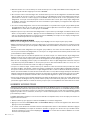
Celestron 11068 Benutzerhandbuch
- Kategorie
- Teleskope
- Typ
- Benutzerhandbuch

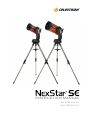
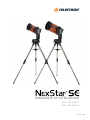
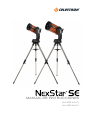
INSTRUCTION MANUAL
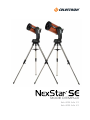
Model #11068- NexStar 6 SE
Model #11069- NexStar 8 SE

ENGLISH I 1
INTRODUCTION . . . . . . . . . . . . . . . . . . . . . . . . . . . . . . . . . . . . . . . . . . . . . . 2
WHAT’S IN THE BOX . . . . . . . . . . . . . . . . . . . . . . . . . . . . . . . . . . . . . . . . . . . 3
ASSEMBLING THE NEXSTAR SE . . . . . . . . . . . . . . . . . . . . . . . . . . . . . . . . . . . . 4
GETTING STARTED- USING THE NEXSTAR+ HAND CONTROL . . . . . . . . . . . . . . . . . . . 8
OVERVIEW OF POPULAR ALIGNMENT METHODS . . . . . . . . . . . . . . . . . . . . . . . . . . 10
USING A WEDGE WITH EQ NORTH/EQ SOUTH ALIGNMENT . . . . . . . . . . . . . . . . . . . 15
POLAR ALIGN . . . . . . . . . . . . . . . . . . . . . . . . . . . . . . . . . . . . . . . . . . . . . . . 17
OBSERVING . . . . . . . . . . . . . . . . . . . . . . . . . . . . . . . . . . . . . . . . . . . . . . . . 17
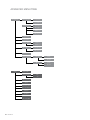
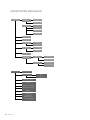
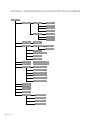
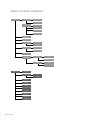
ADVANCED MENU TREE . . . . . . . . . . . . . . . . . . . . . . . . . . . . . . . . . . . . . . . . . 24
NEXSTAR+ HAND CONTROL FOR NEXSTAR SE MENU TREE . . . . . . . . . . . . . . . . . . . .26
TELESCOPE MAINTENANCE . . . . . . . . . . . . . . . . . . . . . . . . . . . . . . . . . . . . . . .30
APPENDIX A: SPECIFICATIONS . . . . . . . . . . . . . . . . . . . . . . . . . . . . . . . . . . . . . 32
APPENDIX B: USB CONNECTION. . . . . . . . . . . . . . . . . . . . . . . . . . . . . . . . . . . .33
APPENDIX C: UPDATING THE HAND CONTROL’S FIRMWARE . . . . . . . . . . . . . . . . . . . 34
CELESTRON TWO YEAR LIMITED WARRANTY . . . . . . . . . . . . . . . . . . . . . . . . . . . . 35
TABLE OF CONTENTS

2 I ENGLISH
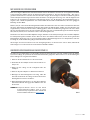
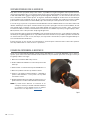
Congratulations on your purchase of the Celestron NexStar SE! This revolutionary telescope has ushered in a whole new generation of
computer-automated technology. Intuitive and user-friendly, NexStar SE is up and running after locating just three bright objects in the
night sky. It’s the perfect combination of power and portability. If you are new to astronomy, you may wish to start by using the NexStar
SE’s built-in Sky Tour feature, which commands the NexStar to find the most interesting objects currently visible and automatically slew
to each one. If you are an experienced amateur, you will appreciate the telescope’s comprehensive database of over 40,000 celestial
objects, including customized lists of all the best deep-sky objects, bright double stars and variable stars. No matter your experience
level, NexStar SE will reveal the wonders of the Universe to you and your friends.
Some of the NexStar SE’s many standard features include:
• Incredible 5°/second slew speed.
• Fully enclosed motors and optical encoders for position location.
• NexStar+ hand control built into the side of the fork arm.
• Storage for programmable user defined objects.
• Many other high-performance features!
NexStar SE’s deluxe features combined with Celestron’s legendary optical standards give amateur astronomers one of the most
sophisticated and easy-to-use telescopes available on the market today.
Take time to read through this manual before embarking on your journey through the Universe. It may take a few observing sessions
to become familiar with your NexStar SE, so keep this manual handy until you have fully mastered your telescope’s operation. The
NexStar+ hand control has built-in instructions that guide you through the alignment procedures, so you can have the telescope up
and running in minutes. Use this manual in conjunction with the hand control’s on-screen instructions.
Your NexStar SE telescope will give you years of fun and rewarding observations. However, there are a few things to consider before
using your telescope to ensure your safety and protect your equipment.
INTRODUCTION
SOLAR WARNING
• Never look directly at the Sun with the naked eye or with a telescope (unless you have the proper solar filter).
Permanent and irreversible eye damage may result.
• Never use your telescope to project an image of the Sun onto any surface. Internal heat build-up can damage
the telescope and any accessories attached to it.
• Never use an eyepiece solar filter or a Herschel wedge. Internal heat build-up inside the telescope can cause these devices
to crack or break, allowing unfiltered sunlight to pass through to the eye.
• Never leave the telescope unsupervised. Make sure an adult who is familiar with the correct operating procedures is with your
telescope at all times, especially when children are present.

ENGLISH I 3
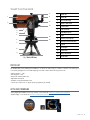
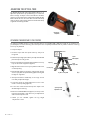
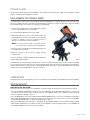
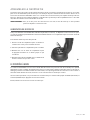
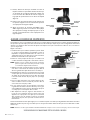
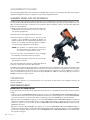
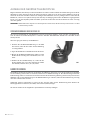
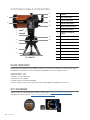
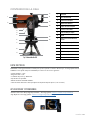
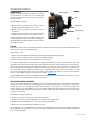
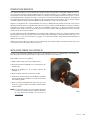
1Optical Tube
2Dovetail Bar
3 Liquid Crystal Display
4NexStar+ Hand Control
5Fork Arm Mount
6Power Connection
7Tripod Mounting Plate
8Tripod
9Accessory Tray/Leg Brace
10 StarPointer Red Dot finderscope
11 Eyepiece
12 Star Diagonal
13 Focuser Knob
14 Battery Compartment
15 On/Off Switch
The NexStar SE comes partially pre-assembled so it can be up and running in a matter of minutes. The telescope is
conveniently packaged in one reusable shipping carton that contains all the following accessories:
PARTS LIST
• 25mm eyepiece – 1.25”
• Star diagonal – 1.25”
• StarPointer red dot finderscope
• Adjustable steel tripod
• NexStar+ computerized hand control
• 13mm open-end wrench for upper tripod leg tightening (if needed)
WHAT’S IN THE BOX
3
5
6
7
8
9
4
11
10
12
13
14
15
Fig. 1 NexStar 8SE Shown
1
2
APPS AND PROGRAMS
• Starry Night Special Edition astronomy software – Free download: celestron.com/astronomy-software/se
• SkyPortal App – Free download: celestron.com/pages/skyportal-mobile-app

4 I ENGLISH
ASSEMBLING THE NEXSTAR SE
Start by removing the telescope from its shipping carton and setting the round base of the mount on a flat surface. It is
best to carry the telescope by holding it from the lower portion of the fork arm and the bottom of the base. Remove all the
accessories from their individual boxes. Save all the containers so that they can be used to transport the telescope later.
Before the batteries can be installed, the telescope tube should be positioned parallel to the ground. To do this, gently
rotate the front of the tube upwards.
WARNING: While the tube can be slowly raised by hand, the telescope base should never be moved in azimuth by hand.
To power the telescope with AA batteries:
1. Remove the battery cover from the center of the base by
gently lifting on the round portion of the cover.
2. Insert the batteries into the battery compartment on the base.
3. Reattach the battery compartment door by gently pushing
down on the cover until it snaps into place.
4. Turn on the power by flipping the on/off switch, located on
the base of the fork arm, to the “ON” position.
POWERING THE NEXSTAR SE
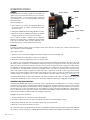
You’ll find the NexStar+ hand control on the side of the fork arm. You can remove it from its cradle for handheld use or use it
while attached to the fork. The hand control attaches to the fork arm by resting on two posts on the bottom of the hand control
cradle, and a clip inside the fork arm. To remove the hand control from the fork arm cradle, gently lift the hand control upwards
and pull out.
Once the telescope is powered on, you can use the hand control to move the optical tube in altitude (up and down) and
azimuth (side to side) by pressing the directional arrow buttons.
Next, we’ll attach the included visual accessories to the telescope.
THE HAND CONTROL
You can power your NexStar SE with eight AA batteries (not included), an optional 12v AC adapter, or any of Celestron’s
PowerTank external power sources. The battery compartment is in the center of the telescope’s base.
Fig. 2

ENGLISH I 5
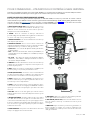
VISUAL ACCESSORIES
THE EYEPIECE
The eyepiece, or ocular, is the optical element that magnifies the image focused by the telescope. The eyepiece can either fit
into the visual back directly or into the star diagonal.
To install the eyepiece:
1. Loosen the thumbscrew on the star diagonal so that the screw clears the opening on the star diagonal.
2. Slide the chrome barrel of the eyepiece into the star diagonal opening.
3. Tighten the thumbscrew on the star diagonal to hold the eyepiece in place.
Eyepieces are commonly referred to by focal length and barrel diameter. The focal length of each eyepiece is printed on the
eyepiece barrel. The longer the focal length (i.e., the larger the number), the lower the eyepiece’s power or magnification is. The
shorter the focal length (i.e., the smaller the number), the higher the magnification is. Generally, you will use low-to-moderate
power when viewing. To determine an eyepiece’s power when used with your telescope, use this simple equation: Focal Length
of Telescope ÷ Focal Length of eyepiece = Magnification. For example, if your telescope has a focal length of 700mm and you
are using an eyepiece with a 25mm focal length, your equation will look like this: 700mm ÷ 25mm =28X. For more information,
go to celestron.com.
The NexStar SE series uses eyepieces with industry-standard 1.25” barrel diameters. You may also use eyepieces with a 2”
diameter, but you’ll need an optional 2” star diagonal.
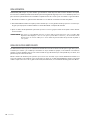
THE STAR DIAGONAL
The star diagonal diverts the light at a right angle from the
light path of the telescope. This allows you to observe in
positions that are more comfortable than if you were to look
straight through.
To attach the star diagonal:
1. Turn the thumbscrew on the visual back so that the screw
clears the opening on the visual back.
2. Slide the chrome barrel of the star diagonal into the opening.
3. Tighten the thumbscrew on the visual back to hold the star
diagonal in place. Do not overtighten.
If you wish to change the orientation of the star diagonal,
loosen the thumbscrew on the visual back until the star
diagonal rotates freely. Rotate the diagonal to the desired
position and tighten the thumbscrew.
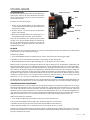
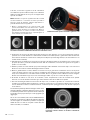
THE STARPOINTER RED DOT FINDERSCOPE
Your NexStar SE telescope includes a StarPointer red dot finderscope. The StarPointer is a zero-magnification pointing tool
that uses a coated glass window to superimpose the image of a small red dot onto the night sky. The red dot is produced by
a light-emitting diode (LED), not a laser beam, so it and cannot damage the glass window or your eye. It is equipped with a
variable brightness control, two axes alignment control and a quick-release dovetail mounting bracket. Before you can use the
StarPointer, it must be installed on the telescope tube and properly aligned.
To install the StarPointer finderscope:
1. Loosen the two mounting screws near the bottom of the finderscope.
2. Locate the dovetail mounting bracket on the rear cell of the optical tube.
3. Slide the base of the finderscope over the dovetail mounting bracket.
4. Tighten the screws to secure the finderscope in place.
Your StarPointer red dot finderscope is shipped with a clear plastic tab between the lithium battery (CR2032) and the contact
to prevent the battery from accidentally being discharged during shipment. Pull this tab out before using your finderscope.
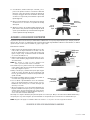
Eyepiece
Star DIagonal
Visual Back
Fig. 3
StarPointer finderscope

6 I ENGLISH
ADJUSTING THE OPTICAL TUBE
The NexStar SE dovetail quick-release bracket allows you to
adjust the optical tube for proper balancing or to remove the
tube for storage. To adjust or remove the tube from the base,
simply loosen the quick-release clamp knob and slide the tube
back towards the rear cell of the tube. Hold the tube firmly
when mounting or dismounting and ensure the dovetail clamp
is tight before releasing the tube.
Quick Release
Clamp Knob Fig. 4
Tripod Leg Height
Adjustment Screw
Fig. 6
Fig. 5
Tripod Leg
Accessory Tray
Captive
Mounting Bolts
Center
Support Rod
Leg Brace Locking Knob
Bubble Level
ATTACHING THE NEXSTAR TO THE TRIPOD
The Celestron NexStar tripod is a sturdy, heavy-duty base for your NexStar 6SE or 8SE. This tripod can go anywhere, from
your backyard to a remote observing site. The tripod comes completely assembled and only needs to have the center leg
accessory tray attached.
To set up the tripod:
1. Hold the tripod with the tripod head up, away from
the ground.
2. Pull the 3 tripod legs apart until they are fully extended and
place the tripod on the ground.
3. Remove the leg brace locking knob and slide the accessory
tray onto the center support rod (figure 5).
4. Align the 3 arms of the accessory tray with the inside curve
of each tripod leg.
5. Reinstall and tighten the leg brace locking knob until the
accessory tray arms are pressed firmly against each leg and
the legs are supported.
6. The tripod should now stand firmly on its 3 legs. You are
now ready to adjust the height.
7. Locate the tripod leg height adjustment screw on the
inside of each tripod leg (figure 6).
8. Loosen each screw and raise the tripod to adjust to the
desired height for each leg.
9. Place the included bubble level (figure 5) on the top of the
tripod mounting plate to help fine tune your adjustments
and ensure the tripod is level.
10. When you are satisfied, tighten the leg height
adjustment screws.

ENGLISH I 7
11. Next, attach the assembled telescope and mount to the
tripod. Start by setting the base of the telescope on the
tripod mounting plate so that the hole in the center of
the mount base aligns with the positioning pin on top of
the tripod (figure 7).
12. Rotate the telescope mount so the 3 feet align with the
3 recesses on the tripod mounting plate.
13. Tighten the captive mounting bolts (figure 5) attached
to the underside of the tripod mounting plate until the
telescope mount is firmly secured against the tripod
mounting plate.
YOUR NEXSTAR SE IS NOW READY TO EXPLORE THE UNIVERSE!
Tripod
mounting plate
Mount
Positioning
Pin
Mount Base
Hole
Fig. 7
ALIGNING THE STARPOINTER FINDERSCOPE
To align the finderscope:
1. Take the telescope outside during the day. Using your
naked eye, find an easily recognizable object, such as
a streetlight, car license plate, or tall tree. The further
away the object, the better. The minimum recommended
distance is one quarter mile.
2. Remove the main dust cover from the telescope and install
your 25mm eyepiece and star diagonal as described above.
NOTE: Always use your longest focal length (lowest power)
eyepiece when aligning the finderscope.
3. Turn power on to the mount and move the telescope left and
right or up and down so that it is roughly pointing toward the
object you chose in step 1.
4. Look through the telescope and move the telescope until
the object you chose lies in the center of the view. If the
image is blurry, gently turn the focus knobs until it comes
into sharp focus.
5. Turn on the finderscope by rotating the power switch knob
clockwise as far as it will go.
6. With your head positioned about a foot behind the finder-
scope, look through the round window and locate the red dot.
It will probably be close to, but not on top of, the object you
see when you are looking through the eyepiece.
7. Without moving the telescope, adjust the two knobs on the
side and underneath the finderscope until the red dot
appears over the same object you are observing in the
eyepiece. One knob controls the left-right motion of the
dot, while the other controls the up-down motion.
The first time you assemble your telescope, you will need to align the StarPointer with the main optics of the telescope. Although this
step can be done at night, it is significantly easier during the day. Once you have completed the finderscope alignment, you should
not have to repeat this step unless the finderscope is bumped, dropped, or removed.
Fig. 8a
Window
Up/Down
Adjustment Knob
Left/Right
Adjustment Knob
Mounting
Screws
Battery
Compartment
Next, choose some other distant targets to practice aiming your telescope. Look through the StarPointer finderscope window
and place the red dot on the target you are trying to view. Then verify that it is in the eyepiece of the scope.
NOTE: Be sure to turn off the StarPointer finderscope when not in use to conserve battery power.
Fig. 8b
On/Off Switch
and Brightness Control

8 I ENGLISH
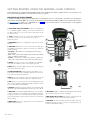
Fig. 9
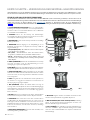
Your NexStar telescope is equipped with the NexStar+ hand control. The hand control features a USB connector so you can link it to your
PC to perform firmware updates or control the telescope via your computer.
MAKE SURE YOU HAVE THE LATEST FIRMWARE
To update the firmware, simply plug a mini USB cable (not included) into the port on the bottom of the hand control, and plug the
other end into an available USB port on your PC. Run Celestron Firmware Manager (CFM), available for free from the support section
on Celestron.com. For details, go to APPENDIX C on page 34 of this document. Below is a brief description of the individual
components of the NexStar+ hand control.
1. LIQUID CRYSTAL DISPLAY (LCD) WINDOW: Features red backlighting
for comfortable nighttime viewing of telescope information and
scrolling text. (Be sure to remove the clear protective tape from the
screen before use.)
2. ALIGN: Instructs the telescope to begin the default alignment
procedure. It is also used to select star or object as an
alignment position.
3. DIRECTION KEYS: Allow you to manually slew your telescope in any
direction.
4. CATALOG KEYS: Allow direct access to each of the main catalogs in
the database of thousands of objects. Your telescope contains the
following catalogs:
• Solar System – All 7 planets in our Solar System plus the Moon,
Sun and Pluto
• Stars – Custom lists of all the brightest stars, double stars, variable
stars, constellations and asterisms
• Deep Sky – Custom lists of all the best galaxies, nebulae and
clusters, the complete Messier catalog, and select NGC objects.
5. IDENTIFY: Searches your telescope’s database and displays the
name and offset distances to the nearest matching objects.
6. MENU: Displays setup and utilities functions, such as tracking rate,
user-defined objects, and others.
7. OPTION (CELESTRON LOGO): Works similar to the SHIFT key on a
keyboard and can be used in combination with other keys to access
more advanced features and functions.
8. ENTER: Allows you to select any of your telescope’s functions, accept
entered parameters, and slew the telescope to displayed objects.
9. BACK: Takes you out of the current menu and display the previous
level of the menu path. Press BACK repeatedly to get back to a main
menu or erase data entered by mistake.
10. SKY TOUR: Activates the tour mode, which seeks out all of the best
objects in the sky and automatically slews your telescope to those objects.
11. SCROLL KEYS: Scroll UP and DOWN within any of the menu lists. A
double arrow symbol on the right side of the LCD indicates that the
scroll keys can be used to view additional information. The buttons
have an angled shape to make it easier to press the correct button
without looking.
12. MOTOR SPEED: Allows you to change the motor’s speed when the
direction keys are pressed.
13. OBJECT INFO: Displays coordinates and valuable information about
objects selected from your telescope’s database.
14. MINI USB PORT (cable not included): Links to PC to control you telescope
via your desktop computer or perform firmware updates.
15. HELP MENU: In future firmware updates, this button will offer
troubleshooting tips. For your convenience, it currently functions as
a shortcut to the Messier catalog.
GETTING STARTED- USING THE NEXSTAR+ HAND CONTROL
1
9
8
13
4
12
2
3
4
5
6
7
15
11
10
14
14

ENGLISH I 9
Fig. 9
SELECTING AN OBJECT
Once the telescope is properly aligned, you can choose an object
from any of the catalogs in the NexStar+ hand control’s database.
The hand control has a key designated for each category of objects
in its database— Solar System objects, Stars and Deep Sky objects.
• Solar System – The Solar System catalog will display all of the planets
(and Moon) in our Solar System that are currently visible in the sky.
To allow the Sun to be displayed as an option in the database, see
Allow Sun option in the Database Setup section of the manual.
• Stars – The Stars catalog displays custom lists of all the brightest
stars, double (binary) stars, variable stars, constellations and
selected asterisms.
• Deep Sky – The Deep Sky catalog displays a list of all of the best
Galaxies, Nebulae and Clusters, as well as the complete Messier
and select NGC objects. There is also an alphabetical list of all
deep sky objects in order by their common name.
Use the SCROLL keys to scroll through the catalogs to find the
object you wish to view.
When scrolling through a long list of objects, holding down either
the UP or DOWN key will allow you to scroll through the catalog at
a rapid speed.
SLEWING TO AN OBJECT
Once the desired object is displayed on the hand control screen, you
have two options:
• Press the OBJECT INFO Key. This will give you useful information about
the selected object such as magnitude, constellation and extended
information about the most popular objects.
o Use the UP/DOWN arrow buttons to scroll through the displayed
object info.
o Use the BACK button to return to the object database.
• Press the ENTER Key. This will automatically slew the telescope to the
coordinates of the object displayed on the hand control. While the
telescope is slewing to the object, the user can still access many of
the hand control functions (such as displaying information about
the object).
NOTE: The Messier, NGC and SAO catalogs require the user
to enter a numeric designation. Once you have selected
the appropriate catalog button and selected the Messier,
NGC or SAO catalog, you will see a flashing cursor
indicating you are in numeric entry mode.
Enter the catalog number for the object you want to view. Press
ENTER to slew to the object, or hold the OPTION button (the Celestron
logo) and press OBJECT INFO to see information about the object
you selected.
CAUTION: Never slew the telescope when someone is looking
into the eyepiece. The telescope can move rapidly and
may hit the observer.
MOTOR SPEED BUTTON
The MOTOR SPEED button allows you to instantly change the speed
rate of the motors from from a high-speed slew rate to a precise
guiding rate and anywhere in between. Each rate corresponds to
a number on the hand control key pad. The number 9 button is
the fastest rate and is used for slewing between objects and
locating alignment stars. The number 1 button on the hand
control is the slowest rate (half sidereal) and can be used for accurate
centering of objects in the eyepiece.
To change the speed of the motors:
• Press the MOTOR SPEED key on the hand control. The LCD will
display the current motor speed
• Press the number on the hand control that corresponds to the
desired speed
The hand control has a “double button” feature that allows you to
instantly speed up the motors without having to choose a speed. To
use this feature, simply press the arrow button that corresponds to
the direction that you want to move the telescope. While holding that
button down, press the opposite direction button. This will increase
the speed to the maximum slew rate.
When using the hand control’s up and down direction buttons, the
slower slew rates (6 and lower) move the motors in the opposite
direction than the faster slew rates (7- 9). The hand control is
configured this way so that an object will move in the appropriate
direction when looking into the eyepiece (i.e. pressing the UP arrow
button will move the star upwards in the field of view of the eyepiece).
However, if any of the slower slew rates (rate 6 and below) are used
to center an object in the StarPointer, you may need to press the
opposite directional button to make the telescope move in the
desired direction.
THE HAND CONTROL MENU
The “Hand Control” menu allows you to customize certain features
of the NexStar+ hand control. To access this menu, press the MENU
button and use the scroll buttons to select “Hand Control.” Then press
ENTER. Use the scroll buttons to select from the following options:
• Lights Control: Independently adjust the brightness of the number
keypad and the LCD.
• Scrolling Menu: Adjust how fast words move across the face of the LCD.
• Toggle Bold Font: Change the format of the font displayed on the LCD
from normal to boldface.
• Set Contrast: Use the scroll keys to adjust the contrast of the LCD.
• Set Language: Change the displayed language on the LCD.
NOTE: The Set Language feature may also appear the first time
you use your new hand control. You may also initiate it at
any time by holding down the Option button (the Celestron
logo) for 10 seconds while powering up the telescope.

10 I ENGLISH
Before you begin SkyAlign, set up your telescope in an outside location with all its accessories (eyepiece, diagonal and
finderscope) attached and the lens cover removed. Make sure that the tripod is leveled. To begin:
1. Power on the telescope by flipping the switch located at the base of the fork arm.
2. Press ENTER to choose SkyAlign. Pressing ALIGN will bypass the other alignment options and the scrolling text and
automatically begin SkyAlign.
3. Press ENTER again and the hand control will default to the time setting. Press BACK to temporarily bypass this setting. The hand
control display will then ask for the following time/site information:
LOCATION
• Use the SCROLL UP and SCROLL DOWN buttons to select City Database or Custom Site. City Database will allow you to
select the closest city to your observing site from a list of either international or U.S. location. Custom Site allows you to enter
the exact longitude and latitude of your observing site. Your location will be saved in the hand control’s memory and automatically
displayed the next time you align. To choose a location city, select City Database and press ENTER.
• The hand control will allow you to choose from either U.S. or international locations. For a listing of U.S. locations by state
and then by city, press ENTER while United States is displayed. For international locations, use the SCROLL UP or SCROLL
DOWN buttons to select International and press ENTER.
• Use the SCROLL UP and SCROLL DOWN buttons to choose your current state (or country if International locations was
selected) from the alphabetical listing and press ENTER.
• Use the SCROLL UP and SCROLL DOWN buttons to choose the closest city to your location from the list and press ENTER.
• Alternately, if you know your observing sites exact coordinates you can achieve greater alignment accuracy by entering your
local coordinates using the Custom Site option.
•
Once the location is established, the display will ask the current time.
TIME
• Enter the current time in your time zone. You can enter either the local time (i.e. 8:00), or you can enter military time (i.e. 20:00).
• Select PM or AM. (If military time was entered, the hand control will bypass this step.)
•
Choose Standard time or Daylight Saving time by using the SCROLL UP and SCROLL DOWN buttons to toggle
between options.
• Select the time zone that you are observing from. Again, use the SCROLL UP and SCROLL DOWN buttons to scroll through
the choices. For time zone information, refer to the Time Zone map in the appendix of this manual.
DATE
• Enter the month, day, and year of your observing session. The display will read: mm/dd/yy.
NOTE: If you make a mistake when entering information into the hand control, the BACK button will act as a backspace so that
you can re-enter information.
HINT: The next time you align your telescope, the hand control will automatically display the last location (either a city or
coordinates) that was entered. Press ENTER to accept these parameters if they still apply. Press the BACK button to
select a new city location or coordinates.
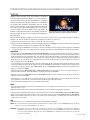
SKYALIGN
SkyAlign is the easiest way to get your NexStar aligned and
ready to observe. Even if you do not know a single star in
the sky, the NexStar+ hand control will have you aligned in
minutes by asking for basic information like the date, time and
location. Then simply point the telescope at any three bright
celestial objects. You don’t need to know the names of the
objects. They can be stars, planets, or even the Moon. Once
SkyAlign is complete, the telescope is ready to find and track
any of the objects in its database. To watch How to use Sky Align to Align your Telescope,
click on the image above
OVERVIEW OF POPULAR ALIGNMENT METHODS

ENGLISH I 11
4. Next, use the arrow buttons on the hand control to slew the telescope towards any bright celestial object in the sky. Align the
object with the red dot of the finderscope and press ENTER.
5. If the finderscope has been properly aligned with the telescope tube, the alignment star should now be visible inside the field
of view of the eyepiece. The hand control will prompt you to precisely center the bright alignment star in the center of the
eyepiece and press the ALIGN button. This will accept the star as the first alignment position. There is no need to adjust the
slewing rate of the motors after each alignment step. The NexStar+ automatically selects the best slewing rate for aligning
objects in both the finderscope and the eyepiece.
6. For the second alignment object, choose a bright star or planet as far as possible from the first alignment object. Once
again, use the arrow buttons to center the object in the finderscope and press ENTER. Once centered in the eyepiece,
press ALIGN.
7. Repeat the process for the third alignment star. When the telescope has been aligned to the final stars, the display will read
“Match Confirmed”. Press BACK to display the names of the three bright objects you aligned to, or press ENTER to accept
these three objects for alignment. You are now ready to find your first object.
TIPS FOR USING SKYALIGN
Remember the following alignment guidelines to make using SkyAlign as simple and accurate as possible.
• Level the tripod before you begin alignment. The time/site information along with a level tripod will help the telescope better
predict the available bright stars and planets that are above the horizon.
• Select alignment stars that are as far apart in the sky as possible. For best results, make sure that the third alignment star
does not lie in a straight line between the first two stars. This may result in a failed alignment.
• Don’t worry about confusing planets for stars when selecting alignment objects. SkyAlign works with the four brightest
planets (Venus, Jupiter, Saturn and Mars) and the Moon. In addition to the planets, the hand control has more than 80 bright
alignment stars to choose from (down to 2.5 magnitude).
• In rare instances, SkyAlign may not be able to determine which three alignment objects were selected. This can
happen when a bright planet or the Moon passes near one of the brighter stars. In situations like these, it is best to
try to again and avoid aligning to either of these objects.
• When centering the objects, slew the telescope with the same final movements as the direction of the GoTo approach. For
example, if the scope normally finishes a GoTo with the front of the scope moving right and up, center all three alignment
objects in the eyepiece using the right and up arrow buttons last. (The up/down arrows reverse at slew rates of 6 or lower).
Approaching the star from this direction will eliminate much of the backlash between the gears and provide the most
accurate alignment possible. The default approach will be up and right on a first alignment or after a factory reset.
• Defocusing the image during alignment can make it easier to determine the center of the eyepiece. With a bright star
defocused to about the apparent size of a small coin, the edges of the circle can be adjusted through the motor controls
until they are equidistant from the edges of the eyepiece.
AUTO TWO-STAR ALIGN
Auto Two-Star Align requires all the same time/site information as SkyAlign. Once you enter this information, NexStar will
prompt you to select and point the telescope at one known star in the sky. The NexStar SE now has all the information it
needs to automatically choose a second star that will assure the best possible alignment. Once selected, the telescope will
automatically slew to that second alignment star to complete the alignment.
With the NexStar SE set up outside with its accessories attached and the tripod leveled, follow these steps to perform an
Auto Two-Star Align:
1. Once the telescope is powered on, press ENTER to begin alignment.
2. Use the SCROLL UP and SCROLL DOWN buttons to select Auto Two-Star Align. Press ENTER.
3. The hand control will display the last time and location information that was entered into the hand control. Press ENTER
to accept the current information or press BACK to manually edit the information (see SkyAlign section on page 10
for detailed instruction on entering time/site information).

12 I ENGLISH
4. The display will now prompt you to select a bright star from the displayed list on the hand control. Use the SCROLL UP
and SCROLL DOWN buttons to scroll to view your options. Then, select the desired star and press ENTER.
5. Use the arrow buttons to slew the telescope to the star you selected. Center the star in the finderscope and press ENTER.
Next, center the star in the eyepiece and press ALIGN.
6. Next, the hand control will automatically display the most suitable second alignment star that is above the horizon. Press
ENTER to automatically slew the telescope to the displayed star. If, for some reason, you do not wish to select this star
(perhaps it is behind a tree or building), you can either:
• Press the BACK button to display the next most suitable star for alignment.
• Use the SCROLL UP and SCROLL DOWN buttons to manually select any star you wish from the entire list of available stars.
Once the telescope finishes slewing, the display will ask you to use the arrow buttons to center align the selected star in
the red dot finderscope. Once this is done, press ENTER. The display will then instruct you to center the star in the field of
view of the eyepiece. When the star is centered, press ALIGN to accept this star as your second alignment star. When the
telescope has been aligned to both stars the display will read “Align Success.” You are now ready to find your first object.
TWO-STAR ALIGN
With the two-star alignment method, the NexStar SE requires the user to know the positions of two bright stars in order to
accurately align the telescope with the sky and begin finding objects. Here is an overview of the two-star alignment procedure:
1. Once the telescope is powered on, use the SCROLL UP and SCROLL DOWN buttons to select Two-Star Align.
Press ENTER.
2. The hand control will display the last time and location information that was entered into the hand control. Press ENTER
to accept the current information or press BACK to manually edit the information (see SkyAlign section on page 10
for detailed instruction on entering time/site information).
3. The SELECT STAR 1 message will appear in the top row of the display. Use the SCROLL UP and SCROLL DOWN
buttons to choose the star you wish to use as the first alignment star. Press ENTER.
4. The hand control will then prompt you to center the alignment star you selected. Use the direction arrow buttons
to slew the telescope to the alignment star and carefully center the star in the finderscope. Press ENTER when the
object is centered.
5. Then, center the star in the eyepiece. Press ALIGN.
HINT: In order to accurately center the alignment star in the eyepiece, you may wish to decrease the slew rate of the motors
for fine centering. You can do this by pressing the MOTOR SPEED button on the hand control and selecting the
number that corresponds to the speed you desire (9 = fastest, 1 = slowest).
6. The hand control will then prompt you to select and center a second alignment star. Press ENTER when this star is cen-
tered in the finderscope. Next, center the star in the eyepiece. Use the same motor slew directions and GoTo approach
angle as noted previously. Press the ALIGN button. It is best to choose alignment stars that are a good distance away
from one another. Stars that are at least 40º to 60º apart will give you a more accurate alignment than stars that are closer
to each other.
Once the second star alignment is completed, the display will read “Align Successful”, and you should hear the tracking
motors turn on and begin to track.

ENGLISH I 13
One-Star Align requires you to input all the same information as you would for the Two-Star Align procedure. However, instead
of slewing to two alignment stars for centering and alignment, the NexStar uses only one star to model the sky based on the
information given. This will allow you to roughly slew to the coordinates of bright objects like the moon and planets and gives
the NexStar SE the information it needs to track objects in altazimuth in any part of the sky.
One-Star Align is not meant to accurately locate small or faint deep-sky objects or to track objects accurately for
photography. To use One-Star Align:
1. Once the telescope is powered on, use the SCROLL UP and SCROLL DOWN buttons to select One-Star Align.
Press ENTER.
2. The hand control will display the last time and location information that was entered into the hand control. Press ENTER
to accept the current information or press BACK to manually edit the information (see SkyAlign section on page 10
for detailed instruction on entering time/site information).
3. The SELECT STAR 1 message will appear in the top row of the display. Use the SCROLL UP and SCROLL DOWN
buttons to choose the star you wish to use as the first alignment star. Press ENTER.
4. The hand control will then prompt you to center the alignment star you selected. Use the direction arrow buttons to slew
the telescope to the alignment star. Carefully center the star in the finderscope. Press ENTER.
5. Then, center the star in the eyepiece. Press ALIGN.
6. Once in position, the NexStar SE will model the sky based on this information and display “Align Successful”.
ONE-STAR ALIGN
SOLAR SYSTEM ALIGN
Solar System Align is designed to provide excellent tracking and GoTo performance by using solar system objects (the Sun,
Moon and planets) to align the telescope with the sky. Solar System Align is a great way to align your telescope for daytime
viewing and a quick way to align the telescope for basic nighttime observing.
WARNING: Never look directly at the Sun with the naked eye or with a telescope (unless you have the proper solar
filter). Permanent and irreversible eye damage may result.
To perform a Solar System Align:
1. Once the telescope is powered on, use the SCROLL UP and SCROLL DOWN buttons to select Solar System
Align. Press ENTER.
The hand control will display the last time and location information that was entered into the hand control. Press ENTER
to accept the current information or press BACK to manually edit the information (see SkyAlign section on page 10
for detailed instruction on entering time/site information).
2. The SELECT OBJECT message will appear in the top row of the display. Use the SCROLL UP and SCROLL
DOWN buttons to chose a Solar System object (a planet, the Moon, etc.) to use for alignment. Press ENTER.
3. The hand control will then prompt you to use the direction arrow buttons to slew the telescope to the alignment
object and carefully center it in the finderscope. Press ENTER when centered.
4. Then center the object in the eyepiece. Press ALIGN.
Once in position, the NexStar SE will model the sky based on this information and display “Align Successful.”

14 I ENGLISH
NOTE: For safety purposes, the Sun will not be displayed in any of the hand control’s customer object lists unless it is enabled
from the Utilities Menu. To allow the Sun to be displayed on the hand control, follow these steps:
1. Press the BACK button until the display reads “NexStar SE.”
2. Press the MENU button and use the SCROLL UP and SCROLL DOWN buttons to select the Utilities Menu. Press ENTER.
3. Use the SCROL UP and SCROLL DOWN buttons to select Sun Menu and press ENTER.
4. Press ENTER again to allow the Sun to appear on the hand control display.
The Sun can be removed from the display using the same procedure.
TIPS FOR USING SOLAR SYSTEM ALIGN
SYNC
The Sync feature can improve your telescope’s pointing accuracy in a specific region of the sky. Sync is a very useful feature
when used in conjunction with the Constellation Tour and Identify features, in which you will be exploring smaller areas of
the sky. To Sync on an object:
1. Select a desired star (or object) from the STARS or DEEP SKY database and slew to it.
2. Once the object is centered in the eyepiece, press the BACK button until you arrive at the main menu.
3. When the display reads “NexStar SE,” press the ALIGN button on the hand control.
4. Use the SCROLL UP and SCROLL DOWN buttons and select the Sync option. Press ENTER.
5. Align the Sync object in the center of the finderscope. Press ENTER.
6. Carefully center the object in the eyepiece. Press ALIGN.
Your telescope’s pointing accuracy will now be improved in that area of the sky.
UNDO SYNC
A Sync can negatively affect your pointing accuracy in other parts of the sky, so it may be necessary to ‘Un-Sync” your telescope
when you would like to exploring areas of the sky beyond the initial Sync area. An Undo Sync will restore the pointing of your
telescope to its original alignment. Additionally, if you wish to add calibration stars or re-alignment stars, you will be asked to
Undo Sync before you proceed.
SOLAR WARNING
• Never look directly at the Sun with the naked eye or with a telescope (unless you have the proper solar filter).
Permanent and irreversible eye damage may result.
• Never use your telescope to project an image of the Sun onto any surface. Internal heat build-up can damage the
telescope and any accessories attached to it.
• Never use an eyepiece solar filter or a Herschel wedge. Internal heat build-up inside the telescope can cause these devices
to crack or break, allowing unfiltered sunlight to pass through to the eye.
• Never leave the telescope unsupervised. Make sure an adult who is familiar with the correct operating procedures is with your
telescope at all times, especially when children are present.

ENGLISH I 15
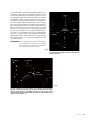
EQ AUTO ALIGN
EQ North and EQ South Alignments allow you to polar align the telescope when using an optional equatorial wedge. Like the
altazimuth alignments described earlier, the equatorial alignments give you the choice of performing an AutoAlign, Two-Star
Align, One-Star Align, or Solar System Align. For help in polar aligning your NexStar SE, see the Polar Align section later in
this manual (page 17).
The EQ AutoAlign uses all the same time/site information as the alt-az alignments. However, it also requires you to position
the tube so that the altitude index markers are aligned (see figure 10), and then rotate the telescope base until the tube
is pointed towards the meridian (see figure 11). Based on this information, the NexStar SE will automatically slew to two
selected alignment stars to be centered and aligned. To use EQ AutoAlign:
1. Once the telescope is powered on, use the SCROLL UP and SCROLL DOWN buttons to select EQ North or EQ South
Align. Press ENTER.
Fig. 10
Altitude Index Markers
4. Next, the hand control screen will display Find Meridian. Use the left and right arrow buttons to move the telescope base
until the optical tube is pointing towards the meridian.
5. Based on this information, the hand controller will automatically display the most suitable alignment stars that are above
the horizon. Press ENTER to automatically slew the telescope to the displayed star. If, for some reason, you do not wish
to select one of these stars (perhaps it is behind a tree or building), you can either:
• Press the BACK button to display the next most suitable star for alignment.
• Use the SCROLL UP and SCROLL DOWN buttons to manually select any star you wish from the entire list of
available stars.
6. The hand control will then prompt you to use the direction arrow buttons to slew the telescope to the alignment object.
Carefully center it in the finderscope and press ENTER.
7. Center the object in the eyepiece and press ALIGN.
8. The telescope will automatically slew to a second alignment star. Repeat steps 7 and 8 to complete the alignment.
2. The hand control will display the last time and location information that was en-
tered into the hand control. Press ENTER to accept the current information or
press BACK to manually edit the information (see SkyAlign section on page
10 for detailed instruction on entering time/site information).
3. The hand control screen will display Set Alt to Index. Use the up and down
arrow buttons to move the telescope tube upwards until the altitude index
markers are aligned. The altitude index markers are located at the top of the
fork arm (see figure 10).
USING A WEDGE WITH EQ NORTH/EQ SOUTH ALIGNMENT

16 I ENGLISH
The EQ Two-Star Align follows most of the same steps as the alt-az
Two-Star Align. This alignment method does not require the user to
align the altitude index markers or point towards the meridian, but
it does require the user to locate and align the telescope on two
bright stars. When selecting alignment stars, it is best to choose
stars that:
• Have a large separation in azimuth AND
• Are either both positive or both negative in declination.
Following these two guidelines will result in a more accurate EQ
Two-Star alignment.
EQ TWO-STAR ALIGN
EQ One-Star Align operates much the same way as EQ Two-Star Align. However, it only relies on the alignment of a single star
to align the telescope.
EQ ONE-STAR ALIGN
EQ Solar System Align allows you to use only one Solar System object to equatorially align the telescope for daytime use.
EQ SOLAR SYSTEM ALIGN
Horizon
Meridian
Zenith
North Celestial Pole
South
North
Fig. 11
ALIGNMENT STARS
Alignment stars allow you to replace any of the stars you used in your original alignment with new stars or celestial objects.
This will improve the pointing accuracy of your telescope without having to re-enter information.
To replace an existing alignment star with a new alignment star:
1. Select the desired star (or object) from the STARS or DEEP SKY database and slew to it.
2. Once centered, press the BACK button until you arrive at the main menu.
3. When the display reads “NexStar SE,” press the ALIGN button on the hand control.
4. Use the SCROLL UP and SCROLL DOWN buttons and select Alignment Stars. Press ENTER.
5. The display will then ask you which alignment star you want to replace. Use the SCROLL UP and SCROLL DOWN
buttons to select the correct star and press ENTER. It is usually best to replace the star closest to the new object in
the sky. This will ensure that your alignment stars are properly spaced across the sky.
6. Align the new star in the center of the finderscope. Press ENTER.
7. Carefully center the object in the eyepiece. Press ALIGN.

ENGLISH I 17
The Polar Align feature requires the NexStar SE to be mounted on the optional polar wedge. The Polar Align procedure
guides you through the polar alignment technique.
POLAR ALIGN
STARS, DEEP SKY, SKY TOUR BUTTONS
There are two ways to select objects from the database—scrolling through the named object lists and entering object numbers:
• Pressing the SOLAR SYSTEM button will allow you to use the SCROLL UP and SCROLL DOWN buttons to scroll through
and select the seven planets, the Sun, the Moon, and Pluto. Press OBJECT INFO to access detailed information about the
selected object. Press ENTER to slew to it.
• Press the STARS button and use the SCROLL UP and SCROLL DOWN buttons to access the Constellations, Double Stars,
Named Stars, SAO, Variable Stars, and Asterisms catalogs. After selecting any one of these options you may use the SCROLL
UP and SCROLL DOWN buttons to display an alphabetical list of objects.
• Pressing the DEEP SKY button will allow you to SCROLL UP and SCROLL DOWN to access the Named Objects, NGC,
Abell, Caldwell, CCD Objects, IC, and Messier catalogs. Press ENTER to select the displayed catalog. Use the SCROLL UP
and SCROLL DOWN buttons to scroll through the catalog.
SELECTING AN OBJECT
OBSERVING
Now that the telescope is properly aligned, you can choose an object from any of the catalogs in the NexStar+ hand control’s database.
The simplest way to perform a basic polar alignment with your NexStar SE is to angle the tilt plate on the equatorial wedge
accessory so that the fork arm (or polar axis) is pointed towards the star Polaris. For help in locating Polaris, refer to the Finding
the North Celestial Pole section below. To polar align your NexStar SE:
POLAR ALIGNMENT (WITH OPTIONAL WEDGE)
1. Level the tripod and position it so the wedge plate is facing
north or south depending on your hemisphere.
2. Loosen the latitude adjustment lock on the wedge.
3. Slowly tilt the telescope north (or south) until the scale on the
latitude adjustment is equal to the latitude of your observing
location. For example, if using your telescope from Los
Angeles, you would set the scale to 34 degrees.
NOTE: To view your current latitude, select View Time-Site
menu feature after completing a successful alignment.
4. Once in position, securely tighten the latitude adjustment lock
to hold the telescope in place
5. Adjust the tripod so the fork arm is roughly pointing
toward Polaris.
You are now ready to complete an EQ North (South) Alignment
to begin finding celestial objects.
The NexStar has two equatorial wedge alignment modes (one for the northern hemisphere and one for the southern) that will help
you polar align your telescope when using an optional equatorial wedge. After performing the rough alignment described above,
complete the alignment by pressing the hand controller ALIGN button and scrolling to the appropriate EQ North or EQ South
alignment option. Press ENTER and follow the screen prompts.
Fig. 12

18 I ENGLISH
The NexStar SE includes a tour feature that allows you to view a curated list of the most interesting objects currently visible
based on your exact date, time, and location information. The automatic tour will only display objects within your set filter
limits. To activate the tour mode, press the SKY TOUR button on the hand control.
• To view information and data about the displayed object, press the OBJECT INFO button.
• To slew to the object, press ENTER.
• To see the next tour object, press the SCROLL DOWN button.
SKY TOUR BUTTON
NOTE: Never slew the telescope when someone is looking into the eyepiece. The telescope can move at fast slew speeds
and hit an observer in the eye.
Once the desired object is displayed on the hand control screen, you have two options:
• Press the OBJECT INFO button. This will give you useful information about the selected object such as magnitude,
constellation and fascinating facts about many of the objects.
• Press the ENTER button. This will automatically slew the telescope to the object. While the telescope is slewing, you can
still access many of the hand control functions, such as OBJECT INFO.
NOTE: If you attempt to slew to an object below the horizon, the hand control will display a message that you have
selected an object outside of your slew limits (see Slew Limits on page 20).
• Press BACK to go back and select a new object.
• Press ENTER to ignore the message and continue the slew. The hand control will only display objects that are below the
horizon if the Filter Limits are set below 0º in altitude. See Filter Limits in the Utility Feature section (page 20) for more
information on setting the filter limits.
Object information can be obtained without doing a star alignment. After the telescope is powered on, pressing the SOLAR
SYSTEM, STARS, or DEEP SKY button allows you to scroll through object lists or enter catalog numbers and view the
object information.
SLEWING TO AN OBJECT
In addition to the SKY TOUR, the NexStar SE telescope has a Constellation Tour that allows the user to take a tour of all
the best objects within a constellation. Press the STARS button and scroll to the Constellation option. Press ENTER and
scroll to the desired constellation. The display will only show constellations that are currently above the horizon. Once you
have selected a constellation, you can choose from any of the database object catalogs to produce a list of all the available
objects in that constellation.
• To see details and data about the selected object, press OBJECT INFO.
• To slew to the object, press ENTER.
• To see the next tour object, press BACK, then SCROLL DOWN.
When entering the number of an SAO star, you are only required to enter the first four digits of the object’s six-digit SAO
number. Once you have entered the first four digits, the hand control will automatically list all the available SAO objects
beginning with those numbers. This allows you to scroll through only the SAO stars in the database.
THE CONSTELLATION OPTION

ENGLISH I 19
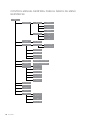
The NexStar+ hand control contains many user-defined setup functions designed to give you more control over the
telescope’s many advanced features. You can access all the setup and utility features by pressing the MENU button and
scrolling through the options:
TRACKING MODE: Once the telescope is aligned, the tracking motors will automatically turn on and begin tracking the sky.
However, tracking can be turned off for terrestrial use:
ALT-AZ: This is the default tracking mode. It is used when the telescope is placed on a flat surface or tripod without
the use of an equatorial wedge. The telescope must be aligned before it can track in alt-az.
EQ NORTH: This mode is used to track the sky when the telescope is polar aligned using an equatorial wedge in the
Northern Hemisphere.
EQ SOUTH: This mode is used to track the sky when the telescope is polar aligned using an equatorial wedge in the
Southern Hemisphere.
OFF: When using the telescope for terrestrial (land) observation, the tracking can be turned off completely.
TRACKING RATE: In addition to being able to move the telescope with the hand control buttons, the telescope will continually track
a celestial object as it moves across the night sky. The tracking rate can be changed depending on what type
of object is being observed:
SIDEREAL: This rate compensates for the rotation of the earth by moving the telescope at the same rate as the earth’s
rotation, but in the opposite direction. When the telescope is polar aligned, this can be accomplished by
moving the telescope in Right Ascension only. When mounted in alt-az mode, the telescope must make
corrections in both altitude and azimuth to follow given Right Ascension and declination location in the sky.
LUNAR: Used for tracking the Moon when observing the lunar landscape.
SOLAR: Used for tracking the Sun when solar observing using a proper solar filter.
VIEW TIME-SITE: View Time-Site will display the last saved time and longitude/latitude entered in the hand control.
HAND CONTROL: These options allow you to configure the hand control display to suit your personal comfort.
LIGHT CONTROL: This feature allows you to scroll between keypad brightness and display brightness. Use the SCROLL UP and
SCROLL DOWN buttons to adjust the brightness of each to your comfort level.
SCROLLING MENU: Speed up the scrolling text by pressing the SCROLL UP button or slow down the scrolling text by pressing
the SCROLL DOWN button.
TOGGLE BOLD FONT: Press ENTER to toggle between standard or bold display characters.
SET CONTRAST: Press the SCROLL UP and SCROLL DOWN keys to increase or decrease the display contrast.
SET LANGUAGE: Press the SCROLL UP or SCROLL DOWN buttons to select the display language.
MENU BUTTON
For example, in searching for the SAO star 40186 (Capella), the first four digits would be “0401.” Entering this number will
display the closest match from the SAO stars available in the database. From there, you can scroll down the list and select
the desired object.
You may also access a specific catalog object directly using the numeric keypad to type in that object’s catalog number. The
Messier and Caldwell objects have three-digit catalog numbers while the NGC, IC, and Abell objects have four-digit catalog
numbers. If the catalog number for the desired Messier or Caldwell object is lower than 100, or is the catalog number for
the desired NGC, IC, or Abell object is lower than 1000, the keypad entry must be prefixed with the proper number of zeros
to make a complete three- or four-digit catalog number. For instance, if in the Messier catalog you desire the Crab Nebula,
enter “001” or for the Orion Nebula, enter “042.”
Holding down the SCROLL UP or SCROLL DOWN button allows you to scroll through the catalog at a rapid speed.
Seite laden ...
Seite laden ...
Seite laden ...
Seite laden ...
Seite laden ...
Seite laden ...
Seite laden ...
Seite laden ...
Seite laden ...
Seite laden ...
Seite laden ...
Seite laden ...
Seite laden ...
Seite laden ...
Seite laden ...
Seite laden ...
Seite laden ...
Seite laden ...
Seite laden ...
Seite laden ...
Seite laden ...
Seite laden ...
Seite laden ...
Seite laden ...
Seite laden ...
Seite laden ...
Seite laden ...
Seite laden ...
Seite laden ...
Seite laden ...
Seite laden ...
Seite laden ...
Seite laden ...
Seite laden ...
Seite laden ...
Seite laden ...
Seite laden ...
Seite laden ...
Seite laden ...
Seite laden ...
Seite laden ...
Seite laden ...
Seite laden ...
Seite laden ...
Seite laden ...
Seite laden ...
Seite laden ...
Seite laden ...
Seite laden ...
Seite laden ...
Seite laden ...
Seite laden ...
Seite laden ...
Seite laden ...
Seite laden ...
Seite laden ...
Seite laden ...
Seite laden ...
Seite laden ...
Seite laden ...
Seite laden ...
Seite laden ...
Seite laden ...
Seite laden ...
Seite laden ...
Seite laden ...
Seite laden ...
Seite laden ...
Seite laden ...
Seite laden ...
Seite laden ...
Seite laden ...
Seite laden ...
Seite laden ...
Seite laden ...
Seite laden ...
Seite laden ...
Seite laden ...
Seite laden ...
Seite laden ...
Seite laden ...
Seite laden ...
Seite laden ...
Seite laden ...
Seite laden ...
Seite laden ...
Seite laden ...
Seite laden ...
Seite laden ...
Seite laden ...
Seite laden ...
Seite laden ...
Seite laden ...
Seite laden ...
Seite laden ...
Seite laden ...
Seite laden ...
Seite laden ...
Seite laden ...
Seite laden ...
Seite laden ...
Seite laden ...
Seite laden ...
Seite laden ...
Seite laden ...
Seite laden ...
Seite laden ...
Seite laden ...
Seite laden ...
Seite laden ...
Seite laden ...
Seite laden ...
Seite laden ...
Seite laden ...
Seite laden ...
Seite laden ...
Seite laden ...
Seite laden ...
Seite laden ...
Seite laden ...
Seite laden ...
Seite laden ...
Seite laden ...
Seite laden ...
Seite laden ...
Seite laden ...
Seite laden ...
Seite laden ...
Seite laden ...
Seite laden ...
Seite laden ...
Seite laden ...
Seite laden ...
Seite laden ...
Seite laden ...
Seite laden ...
Seite laden ...
Seite laden ...
Seite laden ...
Seite laden ...
Seite laden ...
Seite laden ...
Seite laden ...
Seite laden ...
Seite laden ...
Seite laden ...
Seite laden ...
Seite laden ...
Seite laden ...
Seite laden ...
Seite laden ...
Seite laden ...
Seite laden ...
Seite laden ...
Seite laden ...
Seite laden ...
Seite laden ...
Seite laden ...
Seite laden ...
Seite laden ...
Seite laden ...
Seite laden ...
Seite laden ...
Seite laden ...
Seite laden ...
-
 1
1
-
 2
2
-
 3
3
-
 4
4
-
 5
5
-
 6
6
-
 7
7
-
 8
8
-
 9
9
-
 10
10
-
 11
11
-
 12
12
-
 13
13
-
 14
14
-
 15
15
-
 16
16
-
 17
17
-
 18
18
-
 19
19
-
 20
20
-
 21
21
-
 22
22
-
 23
23
-
 24
24
-
 25
25
-
 26
26
-
 27
27
-
 28
28
-
 29
29
-
 30
30
-
 31
31
-
 32
32
-
 33
33
-
 34
34
-
 35
35
-
 36
36
-
 37
37
-
 38
38
-
 39
39
-
 40
40
-
 41
41
-
 42
42
-
 43
43
-
 44
44
-
 45
45
-
 46
46
-
 47
47
-
 48
48
-
 49
49
-
 50
50
-
 51
51
-
 52
52
-
 53
53
-
 54
54
-
 55
55
-
 56
56
-
 57
57
-
 58
58
-
 59
59
-
 60
60
-
 61
61
-
 62
62
-
 63
63
-
 64
64
-
 65
65
-
 66
66
-
 67
67
-
 68
68
-
 69
69
-
 70
70
-
 71
71
-
 72
72
-
 73
73
-
 74
74
-
 75
75
-
 76
76
-
 77
77
-
 78
78
-
 79
79
-
 80
80
-
 81
81
-
 82
82
-
 83
83
-
 84
84
-
 85
85
-
 86
86
-
 87
87
-
 88
88
-
 89
89
-
 90
90
-
 91
91
-
 92
92
-
 93
93
-
 94
94
-
 95
95
-
 96
96
-
 97
97
-
 98
98
-
 99
99
-
 100
100
-
 101
101
-
 102
102
-
 103
103
-
 104
104
-
 105
105
-
 106
106
-
 107
107
-
 108
108
-
 109
109
-
 110
110
-
 111
111
-
 112
112
-
 113
113
-
 114
114
-
 115
115
-
 116
116
-
 117
117
-
 118
118
-
 119
119
-
 120
120
-
 121
121
-
 122
122
-
 123
123
-
 124
124
-
 125
125
-
 126
126
-
 127
127
-
 128
128
-
 129
129
-
 130
130
-
 131
131
-
 132
132
-
 133
133
-
 134
134
-
 135
135
-
 136
136
-
 137
137
-
 138
138
-
 139
139
-
 140
140
-
 141
141
-
 142
142
-
 143
143
-
 144
144
-
 145
145
-
 146
146
-
 147
147
-
 148
148
-
 149
149
-
 150
150
-
 151
151
-
 152
152
-
 153
153
-
 154
154
-
 155
155
-
 156
156
-
 157
157
-
 158
158
-
 159
159
-
 160
160
-
 161
161
-
 162
162
-
 163
163
-
 164
164
-
 165
165
-
 166
166
-
 167
167
-
 168
168
-
 169
169
-
 170
170
-
 171
171
-
 172
172
-
 173
173
-
 174
174
-
 175
175
-
 176
176
-
 177
177
-
 178
178
-
 179
179
-
 180
180
-
 181
181
-
 182
182
-
 183
183
-
 184
184
-
 185
185


Celestron 11068 Benutzerhandbuch
- Kategorie
- Teleskope
- Typ
- Benutzerhandbuch
in anderen Sprachen
- English: Celestron 11068 User manual
- français: Celestron 11068 Manuel utilisateur
- español: Celestron 11068 Manual de usuario
- italiano: Celestron 11068 Manuale utente
Verwandte Papiere
-
Celestron 51630 Benutzerhandbuch
-
Celestron 91531 Benutzerhandbuch
-
-
-
-
Celestron 22462 Benutzerhandbuch
-
-
Celestron Cosmos 90GT WiFi Telescope Benutzerhandbuch
-
Celestron 21063 Bedienungsanleitung
-
Celestron AstroMaster EQ Telescope Series Benutzerhandbuch