Kicker KMXL Bedienungsanleitung
- Kategorie
- Autolautsprecher
- Typ
- Bedienungsanleitung


2English
Contents
Overview ..........................3
Specifications .............................4
Installation ........................5
Wiring Configuration ....................5
LED Wiring Configuration ............6
Mounting ....................................7
Mounting: KMXL65 in 2014–Newer
Harley Davidson® FLHT ...............9
Mounting: KMXL69 in
46HDBL69 Saddle Bag Lids ..... 12
Warranty ........................13
Garantía | Garantie ..........48
48KMXL-c

3English
Overview
IMPORTANT SAFETY WARNING
PROLONGED CONTINUOUS OPERATION OF AN AMPLIFIER, SPEAKER, OR
SUBWOOFER IN A DISTORTED, CLIPPED OR OVER-POWERED MANNER
CAN CAUSE YOUR AUDIO SYSTEM TO OVERHEAT, POSSIBLY CATCHING
FIRE AND RESULTING IN SERIOUS DAMAGE TO YOUR COMPONENTS
AND/OR VEHICLE. AMPLIFIERS REQUIRE UP TO 4 INCHES (10CM) OPEN
VENTILATION. SUBWOOFERS SHOULD BE MOUNTED WITH AT LEAST 1
INCH (2.5CM) CLEARANCE BETWEEN THE FRONT OF THE SPEAKER AND
ANY SURFACE. KICKER PRODUCTS ARE CAPABLE OF PRODUCING SOUND
LEVELS THAT CAN PERMANENTLY DAMAGE YOUR HEARING! TURNING UP A
SYSTEM TO A LEVEL THAT HAS AUDIBLE DISTORTION IS MORE DAMAGING
TO YOUR EARS THAN LISTENING TO AN UNDISTORTED SYSTEM AT THE
SAME VOLUME LEVEL. THE THRESHOLD OF PAIN IS ALWAYS AN INDICATOR
THAT THE SOUND LEVEL IS TOO LOUD AND MAY PERMANENTLY DAMAGE
YOUR HEARING. PLEASE USE COMMON SENSE WHEN CONTROLLING
VOLUME.
The KICKER KMXL speakers are the ultimate
full-range speakers for marine and outdoor
environments that money can buy. Whether
upgrading an existing audio system or decking out
a new one, these coaxial speakers featuring a horn-
loaded tweeter can be mounted in free air locations
or in KICKER’s award-winning line of marine tower
enclosures. The KMXL deliver top-quality sound while
taking the punishment of being out on the open water
or exposed to the elements. As always, KICKER uses
advanced materials and construction techniques
to ensure optimal performance for years to come.
We hope you have the chance to combine these
new coaxial speakers with our whole line of marine
products, including subwoofers and amplifiers, for the
best audio experience money can buy!

4English
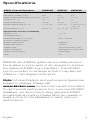
Specifications
KMXL Coaxial Speakers KMXL65 KMXL8 KMXL69
Woofer [in, mm] 6-1/2, 165 8, 200 6x9, 160x230
Peak Power Handling [ Watts] 300 500 300
Recommended Amplifier Power [Watts RMS] 15-150 15-250 15-150
Sensitivity [1W, 1m] 92 93 92
Frequency Response [Hz] 90–20k 60–20k 70–20k
Mounting Hole Diameter [in, mm] 5-7/16,139 6-5/8, 168 5-13/16 X 8-9/16
148 X 218
Mounting Depth [in, mm] 3-3/16, 81 3-11/16, 93 3-3/8, 85
Specifications Common to All Models
Tweeter [in, mm] 1.25, 32
Rated Impedance [Ω] 4
Recommened Highpass Crossover 80Hz 12/octave
for Maximum Power Handling
Tweeter Magnet Material Neodymium
Tweeter Dome Material Aluminum
Tweeter Design Compression Driver & Horn
Woofer Cone Material Polypropylene & Carbon Fiber
Woofer Surround Material Treated Cloth
Grilles Yes
Note: All specifications and performance figures are
subject to change. Please visit
www.kicker.com for the most current information.
To get the best performance from your new KICKER
speakers, we recommend using genuine KICKER
accessories and wiring. Please allow two weeks of
break-in time for the speakers to reach optimum
performance.
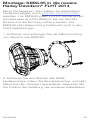
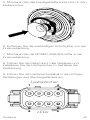
KMXL65 and KMXL8 grilles can be rotated around
the speaker in increments of 45-degrees to achieve
the desired KICKER logo orientation. The KICKER
logo is provided on a badge so that it may also be
rotated in 180-degree increments.

5English
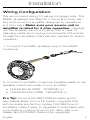
Wiring Configuration
We recommend using 16 gauge (or larger) wire. The
KMXL Speakers are rated at 4 ohms and work with
any source unit or amplifier designed to operate at
a 4 ohm load. Make sure your source unit or
amplifier is rated for 4 ohm operation. Carefully
run the speaker wire in a location that is clear of
standing water and moving components of the boat.
At least two amplifier channels are needed for stereo
operation
1. Connect the KMXL speaker plug to the KMXL
crossover.
Pro Tip: You’re a KICKER KXM amplifier and a
few cables away from a full system upgrade that
will dominate any factory system! KICKER line of
amplifiers make it easy to upgrade to solid bass with
your existing or stock source unit. Also, ask your
dealer about KICKER Subwoofer upgrades.
Installation
2. Connect the KMXL crossover speaker leads to the
speaker output terminals of your amplifier.
a. CLEAR BLUE WIRE - POSITIVE (+)
b. CLEAR BLACK WIRE - NEGATIVE (-)

6English
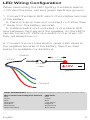
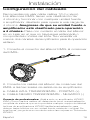
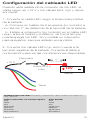
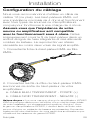
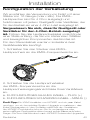
LED Wiring Configuration
When hard-wiring the LED lighting, the black lead is
+12V and the blue, red and green leads are ground.
1. Connect the black LED wire to the positive terminal
of the battery.
a. Place a 2-amp fuse (not included) no further than
7” away from the battery terminal.
b. Install a switch (not included) on the black LED
wire between the fuse and the speaker, so the LED’s
can be turned off. Without a switch to turn them off,
they will always be on.
2. Connect the red, blue and/or green LED wires to
the negative terminal of the battery. See the chart
below for available combinations.
12V
Ground
+12V
Switch
2A fuse
(max)
≤7”
(17.5cm)
battery
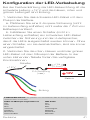
Color Combinations: Splice and combine the ground wires to yield a different color.
Wires Connected to Negative Terminal LED Color
Red Red
Green Green
Blue Blue
Red/Green Lime Green
Red/Blue Magenta
Blue/Green Aquamarine
Red/Green/Blue Blue-White

7English
Mounting
The sound produced by the KMXL coaxials is
directional. Find the best location for stereophonic
sound. If necessary, add more KMXL coaxial
speakers to the system to help distribute and balance
the sound-stage.
After determining the best mounting locations,
carefully check the areas where the mounting
hardware will be placed. If a mounting location does
not already exist, cut a hole in the desired location
using the templates from the KMXL product page
at KICKER.com. If necessary, pre-drill the mounting
screw holes using a 7/64” (2.5mm) bit following the
template. For KMXL65 and KMXL8 only: Note the
screw holes that will be used to secure the grille
in the desired orientation. Install four screws in the
other holes not to be used for the grille to secure the
speaker to the surface.
Use masking tape to help prevent damage to the
paint in the locations to be cut or drilled. If you are
mounting the speaker to a surface made from thin,
soft material such as aluminum, use the provided
stainless steel speed nuts to provide threads for the
stainless steel mounting screws. If the speaker cut-
out locations require you to cut metal, avoid structural
metal and braces. If the panel cannot support the
weight of the speaker, an optional reinforcing ring may
be fastened or adhered to it.
Make sure the mounting screws and speed nuts will
not puncture the fuel cell, wiring, or interfere with any
mechanical parts on the underside of the mounting
surface. If the supplied hardware is not applicable
to your installation, some other means of securely
attaching the speakers to the boat must be used,
such as the KMTC Towers.

8English
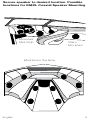
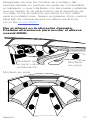
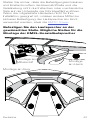
Mounted in the Bow
Mounted
Mid-Ship Stern
Mounted
Secure speaker to desired location. Possible
locations for KMXL Coaxial Speaker Mounting

9English
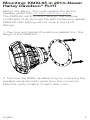
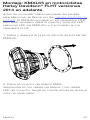
Mounting: KMXL65 in 2014–Newer
Harley Davidson® FLHT
Before You Begin: You must replace the factory
speaker grilles with KICKER 45HDSG grilles.
The KMXL65 will fit in FLHT fairings, but requires
modification that removes the LED bridge and gasket.
KMXL65 LED lighting will not work in the FLHT
fairings.
1. Remove and discard the silicone gasket from the
flange of the KMXL65.
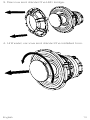
2. Remove the KMXL Speaker Plug by unpinning the
speaker wires and LED wires from the connector.
Note the cavity location of each wire color.

10English
3. Remove and discard the LED bridge.
4. Unthread, remove and discard the installed horn.

11English
5. Install the provided short horn into the speaker.
6. Remove the factory grilles from the inner fairing.
7. Install the KICKER 45HDSG grilles in the inner
fairing.
8. Route the wires though the enclosure and install
the speakers into the fairing’s enclosures.
9. Insert the speaker wire leads into the correct
cavities of the connector housing.
1
8
4
5
Speakers
LEDs

12English
Mounting: KMXL69 in 46HDBL69
Saddle Bag Lids
The KMXL69 bolts directly into the KICKER
46HDBL69 saddle bag lids. Discard the grilles for
mounting in this application.
1. Install the KMXL69 speakers into the Kicker
46HDBL69 saddle bag lids per the 46HDBL69
Installation Instructions.
2. Extend the speakers wires considering the
mounting location of the crossover.
1 - 16AWG Clear Blue
2 - 16AWG Clear Black
3 - 16AWG Clear Insulation Silver
4 - 16AWG Clear Insulation Gold
5 - 22AWG Blue
6 - 22AWG Red
7 - 22AWG Green
8 - 22AWG Black

13English
Warranty
When purchased from an Authorized KICKER Dealer, KICKER
warrants this product to be free from defects in material and
workmanship under normal use for a period of TWO (2) YEARS from
date of original purchase with receipt. If this product is identified as
“Refurbished” or “B Goods”, the warranty is limited to a period of
THREE (3) MONTHS from the date of original purchase. In all cases
you must have the original receipt. Should service be necessary
under this warranty for any reason due to manufacturing defect
or malfunction during the warranty period, KICKER will repair or
replace (at its discretion) the defective merchandise with equivalent
merchandise. Warranty replacements may have cosmetic scratches
and blemishes. Discontinued products may be replaced with more
current equivalent products. This warranty is valid only for the original
purchaser and is not extended to owners of the product subsequent
to the original purchaser. Any applicable implied warranties are limited
in duration to a period of the express warranty as provided herein
beginning with the date of the original purchase at retail, and no
warranties, whether express or implied, shall apply to this product
thereafter. Some states do not allow limitations on implied warranties;
therefore, these exclusions may not apply to you. This warranty gives
you specific legal rights; however you may have other rights that vary
from state to state.
WHAT TO DO IF YOU NEED WARRANTY OR SERVICE:
Defective merchandise should be returned to your local Authorized
Stillwater Designs (KICKER) Dealer for warranty service. Assistance
in locating an Authorized Dealer can be found at www.KICKER.com
or by contacting Stillwater Designs directly. You can confirm that
a dealer is authorized by asking to see a current authorized dealer
window decal.
If it becomes necessary for you to return defective merchandise
directly to Stillwater Designs (KICKER), call the KICKER Customer
Service Department at (405) 624-8510 for a Return Merchandise
Authorization (RMA) number. Package only the defective items in a
package that will prevent shipping damage, and return to:
Stillwater Designs
3100 North Husband St
Stillwater, OK 74075

14English
The RMA number must be clearly marked on the outside of the
package. Please return only defective components. The return
of functioning items increases your return freight charges. Non-
defective items will be returned freight collect to you. For example,
if a subwoofer is defective, only return the defective subwoofer, not
the entire enclosure. Include a copy of the original receipt with the
purchase date clearly visible, and a “proof-of-purchase” statement
listing the Customer’s name, Dealer’s name and invoice number, and
product purchased. Warranty expiration on items without proof-of-
purchase will be determined from the type of sale and manufacturing
date code. Freight must be prepaid; items sent freight-collect, or
COD, will be refused.
WHAT IS NOT COVERED?
This warranty is valid only if the product is used for the purpose for
which it was designed. It does not cover:
o Damage due to improper installation
o Subsequent damage to other components
o Damage caused by exposure to moisture, excessive heat,
chemical cleaners, and/or UV radiation
o Damage through negligence, misuse, accident or abuse. Repeated
returns for the same damage may be considered abuse
o Any cost or expense related to the removal or reinstallation of
product
o Speakers damaged due to amplifier clipping or distortion
o Items previously repaired or modified by any unauthorized repair
facility
o Return shipping on non-defective items
o Products with tampered or missing barcode labels
o Products with tampered or missing serial numbers
o Products returned without a Return Merchandise Authorization
(RMA) number
o Products purchased from an UNAUTHORIZED dealer
o Freight Damage
o The cost of shipping product to KICKER
o Service performed by anyone other than KICKER
HOW LONG WILL IT TAKE?
KICKER strives to maintain a goal of one-week service for all
acoustics (subwoofers, midrange drivers, tweeters, crossovers, etc)
returns. Delays may be incurred if lack of replacement inventory or
parts is encountered. Failure to follow these steps may void your
warranty. Any questions can be directed to the KICKER Customer
Service Department at (405) 624-8510. Contact your International
KICKER dealer or distributor concerning specific procedures for your
country’s warranty policies.

15Español
Contenido
Descripción general ........16
Especificaciones ......................17
Instalación ......................18
Configuración del cableado .......18
Configuración del cableado LED 19
Montaje ....................................20
Montaje: KMXL65 en motocicletas Har-
ley Davidson® FLHT versiones 2014 en
adelante ...................................22
Montaje: KMXL69 en las tapas de alforja
46HDBL69 ...............................25
Garantía | Garantie ..........48

16Español
Descripción general
ADVERTENCIA IMPORTANTE DE SEGURIDAD
LA OPERACIÓN CONTINUA Y PROLONGADA DE UN AMPLIFICADOR,
ALTAVOZ O SUBWOOFER EN UNA FORMA DISTORSIONADA, CORTADA O
CON DEMASIADA POTENCIA PUEDE RECALENTAR SU SISTEMA DE AUDIO
Y LLEGAR A INCENDIARLO, ESTO PODRÍA CAUSAR DAÑOS SERIOS A
SUS COMPONENTES Y/O VEHÍCULO. LOS AMPLIFICADORES REQUIEREN
DE UN MÁXIMO DE 4 PULGADAS (10 CM) DE VENTILACIÓN ABIERTA. LOS
SUBWOOFERS DEBEN INSTALARSE CON AL MENOS 1 PULGADA (2.5
CM) DE ESPACIO ENTRE LA PARTE FRONTAL DEL ALTAVOZ Y CUALQUIER
SUPERFICIE. ¡LOS PRODUCTOS KICKER TIENEN LA CAPACIDAD DE
PRODUCIR NIVELES DE SONIDO QUE PUEDEN DAÑAR DE FORMA
PERMANENTE SU AUDICIÓN! AUMENTAR EL VOLUMEN DE UN SISTEMA
HASTA UN NIVEL QUE GENERE DISTORSIÓN AUDIBLE ES MÁS DAÑINO
PARA SUS OÍDOS QUE ESCUCHAR UN SISTEMA SIN DISTORSIONES AL
MISMO NIVEL DE VOLUMEN. EL UMBRAL DEL DOLOR ES SIEMPRE UN
INDICADOR DE QUE EL NIVEL DE SONIDO ES DEMASIADO ELEVADO Y
PUEDE DAÑAR PERMANENTEMENTE SU AUDICIÓN. UTILICE EL SENTIDO
COMÚN CUANDO CONTROLE EL VOLUMEN.
Los altavoces KMLX KICKER son los altavoces de
gama completa más avanzados para ambientes
marinos y exteriores que el dinero puede comprar.
Si se actualiza un sistema de audio existente o se
instala uno nuevo, estos altavoces coaxiales con un
tweeter instalado en la bocina pueden montarse en
ubicaciones al aire libre o en la línea galardonada
de carcasas para torres marinas de KICKER. El
KMXL ofrece sonido de máxima calidad y, al mismo
tiempo, elimina los problemas que se generan al
estar en aguas abiertas o expuesto a la intemperie.
Como siempre, KICKER utiliza materiales y técnicas
de construcción avanzadas para garantizar un
desempeño óptimo por muchos años. Esperamos
que tenga la oportunidad de combinar estos nuevos
altavoces coaxiales con nuestra línea completa de
productos para uso en altamar, como subwoofers y
amplificadores, ¡para tener la mejor experiencia de
audio que el dinero pueda comprar!

17Español
Especificaciones
Altavoces coaxiales KMXL KMXL65 KMXL8 KMXL69
Woofer [pulgadas, mm] 6-1/2, 165 8, 200 6 x 9,
160 x 230
Manejo de potencia máxima [Watts] 300 500 300
Potencia recomendada para el amplificador
[Watts RMS]
15-150 15-250 15-150
Sensibilidad [1W, 1m] 92 93 92
Respuesta de frecuencia [Hz] 90–20k 60–20k 70–20k
Diámetro del orificio de montaje
[pulgadas, mm]
5-7/16,139 6-5/8, 168 5-13/16 X
8-9/16
148 X 218
Profundidad de montaje [pulgadas, mm] 3-3/16, 81 3-11/16, 93 3-3/8, 85
Especificaciones aplicables a todos los modelos
Tweeter [pulgadas, mm] 1.25, 32
Impedancia nominal [Ω] 4
Crossover de paso alto recomendado para un
manejo de potencia máximo
80Hz 12/octava
Material del imán del Tweeter Neodimio
Material del domo del Tweeter Aluminio
Diseño del Tweeter Controlador de compresión y bocina
Material del cono del Woofer Polipropileno y fibra de carbono
Material envolvente del Woofer Paño tratado
Rejillas Sí
Nota: Todas las especificaciones y cifras de
desempeño están sujetas a cambio. Visite
www.kicker.com para encontrar la información
más reciente. Para obtener el mejor desempeño de
sus nuevos altavoces KICKER, le recomendamos
usar accesorios y cables KICKER. Espere dos
semanas para que los altavoces se adapten y
alcancen su desempeño óptimo.
Las rejillas de KMXL65 y KMXL8 pueden rotar
alrededor del altavoz en incrementos de 45 grados
para lograr la orientación deseada del logo de
KICKER. El logo de KICKER va en una placa de forma
tal que también pueda rotar en incrementos de 180
grados.

18Español
Configuración del cableado
Recomendamos usar cable calibre 16 (o mayor).
Los altavoces KMXL tienen una clasificación de
4ohmios y funcionan con cualquier unidad fuente
o amplificador diseñado para operar a una carga de
4ohmios. Asegúrese de que su unidad fuente o
amplificador esté clasificado para operación
a 4ohmios. Pase con cuidado el cable del altavoz
en un lugar en el que no haya agua estancada o
componentes móviles del bote. Se necesitan al
menos dos canales del amplificador para la operación
estéreo
1. Conecte el conector del altavoz KMXL al crossover
del KMXL.
Consejo de profesionales: ¡Está a solo un amplificador KICKER
KXM y unos cuantos cables de distancia de tener una actualización
completa de sistema que se impondrá a cualquier equipo de fábrica!
La línea de amplificadores KICKER facilita la actualización para
obtener bajos sólidos con su unidad fuente existente u original. De
igual forma, pregunte a su vendedor sobre las mejoras en Subwoofer
KICKER.
Instalación
2. Conecte los cables del altavoz de crossover del
KMXL a las terminales de salida de su amplificador.
a. CABLE AZUL TRANSPARENTE - POSITIVO (+)
b. CABLE NEGRO TRANSPARENTE - NEGATIVO (-)

19Español
Configuración del cableado LED
Cuando esté realizando la conexión de los LED, el
cable negro es +12V y los cables azul, rojo y verde
son tierra.
1. Conecte el cable LED negro a la terminal positiva
de la batería.
a. Coloque un fusible de 2amperios (no incluido) a
no más de 7" de distancia de la terminal de la batería.
b. Instale un interruptor (no incluido) en el cable LED
negro entre el fusible y el altavoz, de forma tal que
pueda apagar los LED. Si no instala un interruptor
para apagarlos, siempre estarán encendidos.
2. Conecte los cables LED rojo, azul o verde a la
terminal negativa de la batería. Consulte la tabla a
continuación para ver las combinaciones disponibles.
12V
Tierra
+12 V
Interruptor
Fusible de 2 A
(máx.)
≤7"
(17.5 cm)
batería
Combinaciones de color: empalme y combine los cables de tierra para lograr un
color diferente.
Cables conectados a la terminal negativa Color del LED
Rojo Rojo
Verde Verde
Azul Azul
Rojo/verde Verde limón
Rojo/azul Magenta
Azul/verde Aguamarina
Rojo/verde/azul Azul-Blanco

20Español
Montaje
El sonido producido por los coaxiales KMXL es
direccional. Encuentre la mejor ubicación para el
sonido estereofónico. De ser necesario, agregue más
altavoces coaxiales KMLX al sistema para ayudar a
distribuir y equilibrar el audio envolvente.
Una vez que haya determinado la mejor ubicación
para el montaje, revise cuidadosamente dónde
colocará los accesorios de montaje. Si la ubicación
para el montaje ya no existe, haga un agujero en la
ubicación deseada con las plantillas de la página del
producto KMXL en KICKER.com. De ser necesario,
perfore previamente los agujeros para los tornillos
de montaje con una broca de 7/64" (2.5mm)
siguiendo la plantilla. Solo para KMXL65 y KMXL8:
con respecto a los agujeros para los tornillos, tenga
en cuenta que se utilizarán para asegurar la parrilla en
la orientación deseada. Instale cuatro tornillos en los
otros agujeros que no se utilizarán para la rejilla a fin
de asegurar el altavoz a la superficie.
Use cinta de enmascarar para evitar que se dañe la
pintura de las ubicaciones que cortará o perforará.
Si va a montar el altavoz en una superficie de un
material blando y delgado, como es el caso del
aluminio, coloque las tuercas rápidas de acero
inoxidable incluidas para proporcionar roscas para
los tornillos de montaje de acero inoxidable. Si las
ubicaciones de las aberturas del altavoz requieren
que corte metal, evite las estructuras metálicas y
los soportes. Si el panel no puede soportar el peso
del altavoz, se puede fijar o adherir a este un aro de
refuerzo opcional.
Seite wird geladen ...
Seite wird geladen ...
Seite wird geladen ...
Seite wird geladen ...
Seite wird geladen ...
Seite wird geladen ...
Seite wird geladen ...
Seite wird geladen ...
Seite wird geladen ...
Seite wird geladen ...
Seite wird geladen ...
Seite wird geladen ...
Seite wird geladen ...
Seite wird geladen ...
Seite wird geladen ...
Seite wird geladen ...
Seite wird geladen ...
Seite wird geladen ...
Seite wird geladen ...
Seite wird geladen ...
Seite wird geladen ...
Seite wird geladen ...
Seite wird geladen ...
Seite wird geladen ...
Seite wird geladen ...
Seite wird geladen ...
Seite wird geladen ...
Seite wird geladen ...
-
 1
1
-
 2
2
-
 3
3
-
 4
4
-
 5
5
-
 6
6
-
 7
7
-
 8
8
-
 9
9
-
 10
10
-
 11
11
-
 12
12
-
 13
13
-
 14
14
-
 15
15
-
 16
16
-
 17
17
-
 18
18
-
 19
19
-
 20
20
-
 21
21
-
 22
22
-
 23
23
-
 24
24
-
 25
25
-
 26
26
-
 27
27
-
 28
28
-
 29
29
-
 30
30
-
 31
31
-
 32
32
-
 33
33
-
 34
34
-
 35
35
-
 36
36
-
 37
37
-
 38
38
-
 39
39
-
 40
40
-
 41
41
-
 42
42
-
 43
43
-
 44
44
-
 45
45
-
 46
46
-
 47
47
-
 48
48


Kicker KMXL Bedienungsanleitung
- Kategorie
- Autolautsprecher
- Typ
- Bedienungsanleitung
in anderen Sprachen
- English: Kicker KMXL Owner's manual
- français: Kicker KMXL Le manuel du propriétaire
- español: Kicker KMXL El manual del propietario
Verwandte Artikel
-
Kicker KM604 Benutzerhandbuch
-
Kicker 2014 KM Coaxial Speakers Bedienungsanleitung
-
-
-
-
-
-
Kicker KSS269 Bedienungsanleitung
-
-
Kicker PS5250 Benutzerhandbuch