
Technische
Daten
AnschlieBen des MC-DC2 (Abbildungl)
,.
Schalten
Sie
die Kamera
aus.
2.
Entfernen
Sie
die Abdeckung fur den
Zubehbranschluss der Kamera.
3
Drehen
Sie
den
Stecker
mit der durch
"A"
gekennzeichneten
Seite
zur
Ruck-
seite
der
Kamera
(der
Seite
mit dem
Dis-
play)
und
fUhren
Sie
ihn
wie
in
Abbildung
2gezeigt
in
den
Zubeh6ranschluss
ein.
4 Schalten
Sie
die
Kamera
ein
Verwenden
des
MC-DC2
Wenn der Auslbser
des
MC-DO
betatigl
wird, reagiert die
Kamera
ebenso wie
bei
der Betatigung
des
Auslbsers
an
der Kame-
ra
selbst.
Nahere Einzelheiten linden
Sie
in
der Bedienungsanleilung der
Kamera.
Wenn der Auslbser
des
MC-DC2 ganz
nach unten gedruckt wird, kann dieser
arretiert werden, indem die Auslbserar-
retierung in die Halteposition geschaben
wird (Abbildung
3).
Die Arretierung des
Auslbsers wird aufgehoben, wenn die
Ar-
retierung in die entgegengeselzte
Rich-
tung geschoben wird.
Warnhinweise
fur
die
Verwendung.
SchlieGen
Sie
den
MC-DO
nicht
an
und trennen
Sie
diesen nicht, wahrend
die Kamera eingeschallet
ist.
Andern-
falls
kbnnen Fehlfunktionen auftreten.
Um eine problemlose Bedienung
zu
gewahrleisten, stellen
Sie
sicher,
dass
der Stecker sicher verbunden
ist
, Tragen
Sie
die Kamera nicht
am
Kabel
des
MC-DO
und selzen
Sie
die Kamera
oder
das
Kabel
keinen physischen
Be-
lastungen
aus,
wahrend der Fernauslb-
sekabel angeschlossen
ist
Andernfalls
besteht die Gefahr,
dass
die Kabelver-
bindung getrennt wird.
Setzen
Sie
die Abdeckung
fUr
den
Zu-
behbranschluss der
Kamera
wieder
ein,
wenn der
MC
-DO
nicht verwendet wird.
Vielen Dank fur Ihr Vertrauen in Nikon-
Technik. Der Fernauslbsekabel MC-DC2
fUr
kompatible Nikon-Digitalkameras bie-
tet Ihnen folgende Mbglichkeiten:
Sie
kbnnen die Kamera bei Makroauf-
nahmen und
in
anderen Gelegenhei-
ten,
in
denen jede Erschutterung der
Kamera
zu
vermeiden
ist,
fernauslbsen.
Der Auslbser
lasst
sich
fUr
Langzeitbe-
lichtungen
(B)
oder Serienaufnahmen
arretieren.
Bei
kompatiblen
Kameras
wird der MC-
DC2
im Benurzerhandbuch im Abschnitt
uber aptionales Zubehbr aufgefuhrt.
Symbol fur
die
getrennte Entsorgung in
europaischen Landern
Durch dieses Symbol wird an-
)t
gezeigt,
dass
dieses
Produkt ge-
trennt emsorgt werden
muss.
Foigendes
gilt
fur Verbraucher in
europaischen Landern: •
•
Dieses
Produkt muss an ei-
ner geeigneten Sammelstelle _
separat emsorgt werden.
Eine
Entsorgung Dber den HausmDll ist unzulassig.
.
Weitere
Informationen erhalten
Sie
bei
Ihrem
Fachhandleroder
bei
den
fUr
die
Abfallentsorgung
zustandigen
Behbrden
bzw.
Unternehmen.
Gewicht
Circa
45
9
Abmessungen
Circa16mmx2Jmmx81mm
(H
x Bx
T)
(ohne
Kabel)
Kabelliinge
Circa
1000
mm
Deutsch
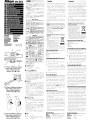
Komp-onenten
des
MC-DC2
(j)Auslbser
Q) Auslbserarretierung
@Kabel
@Stecker
~p-ecifications
Weight
Approximalely
45
gl1.60l
Dimensions
ApprOXimately
2J
mm
x
81
mm
x
16
mm/
(WxDxH)
O.9in.x32in.xO.6m.
(excludrngcordl
Length
of
cord
Approximat~y'OOO
mm
(39.4
in.
1
Symbol for
Separate
Collection
in
European
Countries
This
symbol Indicates that
this
)t
product
is
to
be
collected
sepa-
rately.
The
following apply
o.nl
Y
to
users
in European countries: •
•
This
product
is
deSignated
for
separate collection
at
an
ap- _
propriate collection point. Do
not dispose of
as
household
waste.
.
For
more information, contact the retailer or the
local authorities
in
charge
of
waste management.
Notice
for
customers in
the
State
of
California
WARNING:
Handling the cord on this product will
expose
you
to
lead.
achemical known to the
State
of
California to
cause
birth defects or other repro·
ductive harm. Wash hands
after
handling.
Nikon
Inc.,
1300
Walt
Whitman
Road,
Melville,
NY
11747-3064,
U.s.A.
Tel.:
631-547-4200
English
Thankyou for your purchase
of
an
MC-DC2
remote cord for compatible Nikon digital
cameras.
The
MC-DO
can
be
used
to:
operate the camera remotely when
taking photographs at close range and
in
other situations
in
which the slight-
est camera movement would produce
blurring
keep theshutter-release buttonpressed
for long lime-exposures (bulb) and
burst photography
Compatible cameras list the MC-DC2
in
aptional accessories section
of
the
User's
Manual.
Parts
of
the
MC-DC2
Do
not
connect or disconnect the
Me
-DO
while the camera
is
on. Failure
to observe this precaution could result
in
malfunetion.
For
trauble-free operation, make
sure
that the plug
is
securely connected.
Do notcarrythecamera by the
MC-DC2
or subject the camera or cord ta physi-
cal
shocks while the card
is
connected.
Failure
to observe this precaution could
result
in
the cord becoming discon-
nected.
Replace the camera accessory terminal
cover when the MCDC2
is
not
in
use.
CD
Shutter-release button
@Shutter-release button lock
G)Cord
@Plug
Connecting
the
MC-DC2
(tlgure
lL
1.
Turn the camera
off
2 Open the cover protecting the cam-
era
accessory terminal.
3.
Keeping the side marked with A to-
ward the back
of
the camera (the side
with
the monitor), insert the plug into
the accessory terminal
as
shown in
Figure
2.
4.
Turn the camera on.
Using
the
MC-DC2
The
camera responds to the shutter-re-
lease
buttonon the
MC
-DO
as
it would ta
the shutter-release button on the camera
body.
See
the camera manual for details.
The
MC
-DO
shutter-release button can
be locked
in
the fully-pressed position by
sliding the lock
to
the
HOLD
position (Fig-
ure
3).
To
release
the lock, slide it
in
the
opposite direction.
Precautions
for
Use
,l'j45g
j(.]23mmxBlmmx
16mm
(llOx!:;;H~;;;x~c)
(:::J- O':3a'Jr)
l:\J1000mm
-
-
6"~""
tUI
(1If!i",au)
"'ffl!~<'ll!l"'f!i11g
&
l>0)1:'~.
/1IO)<!'\,>i!i(I;:I'lI$9']1«a:.<'lS
(:/i'/1I
Q)lIi%lt~.~t.)
tJilitJ1n-C1.
\~T
0
~
01l"'~'
I,lJt
(VC"'C)I:t1«"LC)
O)mnf!i
11gl>0)1:'~.
/1IO)<!'\,>i!i(
1;:j;lI$9']"I,lJt<'lS tli'
. ll1lIQ)!I'8lti1WtMlI:)
1Ji1i1Jln"'Cl.\~To
C
.1l""'.n~"'W~~gLC(~~~gLC)'"
g;11gl>0)1:'~.
1lIl00<I>\,>i!i(/;:JlI$B91«W:IlJ<'lS
(1i'IllO)"i!i"'''''l!l'''Ili~W~)
b'lIb'nn)~~.
I
.-t._l1i
I
~I*.
ilRO)ilH
nO)i!5glllili1:',"
®
;tM[,"'~."ll!\'>
tl:,lftL,t&:l.lL.C:
&J!:~t..ta:1.''::C:
o
701
(Y1.1:::Z.
'tjy
!l!\
..
\'>n~!l!JlfIO
Ij:;';7;JcO)sl:A:f1
;till Jt
J;91:t1J'a:JI;;l~c
IlellJl;IJt;1jA\'>lB!illa:JJB,
7;J'Ja:~0
.,.g\l!i!i1:'IleIlJ.,.
gc.
1I11\,>*WO)
~""Ff,J:cti:J:J"'("'
MHlilc1«~~~.
®
~lll[,.
<'l1lltJ'aw
['",c~",.awlll
I
&.0
I
mMMJlIi:~~Mnl'Jl.\L.c
if,Lh
..
n"'H~b~l
!!l1l[,Tc~.
~Illil\
o 1:'ljlJ'",.,.gl!i1!l
~
tJ.l.\L.C
c"~~~.I&l\!2<
!iI'Ull.
!!!llIo)l!il!lc1«g
iJrc!<J:=:J::;.ttj-
L.
cO
i
i61J
a:
To
.,.<ClO
IOAlill!lll;:IUI'"
tf;"liUI~
mtl
L,
r <
t.:"C!l.
\0
o
"'~~o)'l'o)lii;IJ'''C:]
Ci.:i3/.:_<CC.
*1i::>11r.:t>.
*~
llJ<il'U.
,jlJ
'O)!iiI!lC1«'"
@
IJ'Ij"'~
...
(05OS
lAtOL-ta:L''::c
,~
'::cli;fjIJ~-Vo
*b'I111Jtll*\'>!!llllo)!;!1!l
c,,~~.,..
:::J-O'&
s~IJ\...'rc.r.:<~gO).;J~.
~o)~5:mL'I&7}L.
~~GL
l,l~~o
<!5{fl.lj':!J.QB'iiIO:::
r'$t'~..tox::a:;@;J
1,£J:.<
asmJto)...t.
LEG
\"
\75)lL".l)ffL
,<t.:<:!l,'~
<:(])
rJZ'~...to)L:)1~J
Ict~t!iJ~3(:i::I'::iEL,<cl'31fl.'l.\r.:r':f!.
35td:ftt-'ft!!o)Aq"0)1iiW'f.l~J¥:"O)m~:f*~I.:tv:iJ.t9Qn:
dJ!=.~:grn~;1~JGl!v
<:l,'~~o
r3g~l1IlML,
Z:-!)'5;t;>::~
cl5M!ihl,'r.:..rc~,
SMt:Ji(;:t&:::;l!t\il<J;.:,
(f:Hfl,\(i:TJ~ntJ,l,\:)
z.'1:J~snQc;:'::'(;:I0~~fiL,
r<rc(!l,lo
i1f"iRc:Itl(fI~;:t:O)J:'5I;:Jd,:J
rl,'if'~
0
L.O)flm~.iJlL,L.
gbr.:lNt>ml,H~TQc.
& af5 Ab·JELiI=r.:I6
••
~ft5iiJlJgf!1J·2!Jl<!nQ
!"J3'E:mt..rl,\ifTo
M _ ('1><'")
!l!*9!fl~'1;r.
•
t.J)<5cC1)m~JJ;n
1
1J'><50)1l'l'll!1;'OFFI~Lifgo
2.
t.I;<
So)J'?t'+tI)-5'-"'T
)[,t.I)(-1;'mJl:I
if
1r,
3
MC-DC20)75:7IC®Q"'o)Thi!,,,1;'1J)i5CV~
iili
(t.I.><
50):ili,\/,'E=
5'-iIllllci5jl:l.
1J'><
50)7'
?t+t
I)
-9-'"
T I['IC
75:71;'
L
ooIJ''J
1::";'
L
~~ifg.75:70)~;;;1;'~oo~";'L~~c.
~
ti'lO)J);;['Jc
Td'-6>O)C
2;E!1!< n'<!L
1.
(1i!l2)
4
1J'><50)
iw.{tONICLifg.
•
!¥f'F1j;n
·
MC-DC20)y~
~9-it:9/1<t.
'!'JlPLLTcf,§
<3.
lijj;ifcjIjlL~fvT':\!!<3c1'JIC1J)i50)~~·Y
9-m9/c.&~lJt.Lif~
1J'><So)~~~
5'
- it:
5'
/CVjJt"~IC:JL
\e::
l<t.
1J'><
50)i~ffiID1
Df1,~1;'L:~<r"cl\o
1J.><50)!'iItlji\i;J;1<icl<t
MC-DC2CV~~
C)
5'-m5'/liili'l'I:ii!!!~L~.
1J
'><50)~~~5'-m5'/1;'jIjlL~I::;;;c
••
~3
;r;cll,P;o
·
MC-DC20)~~
~5'-m9/1;'ra1JiifcjljlLi6fv
T':1X!!!!c.
O'Y?A5-{5"-1;'
rHOLOJ Il!IICA
5-{O'(~3)g-6>c.
~~~9-m9/1;'jIjlL~
fv~1X~o)if",~~g-6>LCljC;;;",g.
y~~
9-it:9;;0)1§I~1;'liIrilig-6>tgt"iI<t.
&'l'!ll'IlCA5
-{
~Le::<T.:cL'o
•
1ffflJ:(1)L:;U:~
·
1J'><
5
o):'I'UIiIJ'
ON
o)1X~~c.
MC-DC21;'jJj;<!il!
L L
1Jl
lC
<
rcc
c\0
1iY~O)J);;I2OI::TJ:-6>
tJilt"iIJ'®
IJ
ifg.
·
1J'><
5t>0)~i'l'!lE1;'flJjJ!:g.Qrclb.
l~lill<tOli)l(IC
iT:>Z"<T':<!L,\"
·
MC-DC21;'f.b~1J'><51;'f.'f5.t11Tc'J.
m~{t,,>
jtrc'J
L1JL1C<T.:cLl. :::J- O'O)I!liI>!t>llllill'Jl5:l
o)Mlllo)"'~I::1J'Ja:g.
ifTc. MC-DC2c1J'><5
o)~li<ICI<tD~?lJif,~/)'i15lJif~fvo)c.
1J'><5/)'
SWlf-6>"lt"iIJ'i15lJ"'9o
· MC·
DC2
1;'~ffi
L1JL\\\It''il<t.
1J'><
50)7'
?
t':l
Ij-5'-"'T)['1JI(-HIIGn,,'f';;'l't;JtLe::<
r':C::L
~u
.i±~
•
§$:8~
(lEI
1)
(f
Y1
7
'y?-It\'?::t
"
O'Y?A5-{5'-
Co)TcV'la.
Ij'l:_
t--:J-
O'MC-DC2 (eTe fMC-
DC2J
clciltL"'g)
1;'S>l:Ll.t11L1TcT':;;;. iV'J
/)'c52iOL1",g.
*~50I<t'l'!l[,;g-6>=:::J/T:/9
)['-IIIiL.01J-"51fl0)1)
'1:-
t-:::J- O'C. ;;<:0),>;5
1Jli!Ill'ICiffIJC9.
·
~~l\l~1Jc.
",,'Lc1'J'F7u1;'IlJ;<fTd\c;;;t>.
:::J-O'~0).~c1J-"5~S~n~~~~9-m
9/1;'liHI'LTcl\l,!;lt;
·~~~9-~YY~~G~~~~~~~g~~~
L.
&llijfs9il'iHJJ
(iC)['7)
1,,1;;t>~li<Ii!~1JcHJ
l.t'r.:l
...
\~t5
'l'!l[,;g
-6>=:::J
/T:/9
}[,-gli!u71J'>< 50)lJtl'!'IC:J
Ll~I<t.
2~1fl0)1J'><
50)~lflillBjj
(8
1
1Jl:J'?t
ijJj_
)
CL5i~<t.:c:\",o
Printed
in
Japan
6MDR01F2-01
...
2
Manual
do
utIllzador
Manua"
d'uso
InstrukQi
obslugi
Illp'fffi
1iMl~OO.
Al-HI!lAi
Cable
de
Teltkommande
Fjiirrstyrningssladd
Fernauslosekabel
Flessibile
elettrico
per
comando
remoto
Afstandsbedieningskabel
Remote Cord
Langallinen
kaukolaukaisin
AKCTaHI.IKOHHblM
WHyp
Cabo
de
controlo
remoto
Przewodowy
w~:i:yk
spustowy
Cable
de
Control
Remoto
~
I
~
.
\.".)
@
~
l/Figure
l/Abbildungl/Figure
11
Figura
l/Figur
l/Kuva
l/PKc.
11
Figuur
l/Figura
l/Figura
11
Rysunek
1I1!l1/1illl1
~~
1
1
~
2/Figure 2/Abbildung 2/Figure
21
Figura 2/Figur 2/Kuva
2/PKC.
21
Figuur 2/Figura 2/Figura
21
Rysunek
21
I!l
2/11121
~
~
2
~
3/Figure 3/Abbildung 3/Figure
31
Figura 3/Figur 3/Kuva
3/PMC.
3/
Figuur 3/Figura 3/Figura
31
Rysunek 3/1!l31
~
31
~
~
3
Nikon
MC~DC2
1m
1m
Im!'
II
m
m
II
ma
1m
II
m
II
[D
tiD
III
Ifffl~lI.ij.
UIer'sManual
Ilenutzerhandbudl
Man.m
d'utliisatlon
ManualdellllUllrio
AnYandarhandboll
Kiyttiiohje
~-
Gellruibbondleiding
Seite wird geladen ...
Seite wird geladen ...
Seite wird geladen ...
-
 1
1
-
 2
2
-
 3
3
-
 4
4


in anderen Sprachen
- English: Nikon MC-DC2 User manual
- français: Nikon MC-DC2 Manuel utilisateur
- español: Nikon MC-DC2 Manual de usuario
- italiano: Nikon MC-DC2 Manuale utente
- Nederlands: Nikon MC-DC2 Handleiding
- português: Nikon MC-DC2 Manual do usuário
- polski: Nikon MC-DC2 Instrukcja obsługi
- svenska: Nikon MC-DC2 Användarmanual
- suomi: Nikon MC-DC2 Ohjekirja
Verwandte Artikel
Andere Dokumente
-
Breo Scalp Mini Pro Head & Body Massager Benutzerhandbuch
-
Panasonic HX-WA20 Bedienungsanleitung
-
Westermo MCI-211G Benutzerhandbuch
-
-
Silvercrest RFH 2401 Benutzerhandbuch
-
Martin Mania DC2 Benutzerhandbuch
-
-
-
ROSIERES FR RBL 220 Benutzerhandbuch
-
Schneider Electric TeSys™ T LTM R CANopen Motormanagement-Controller Schnellstartanleitung