
Operating instructions
Mode d’emploi
Manual de utilizaçao
Instrucciones de funcionamiento
Carl-Wery-Straß
Siemens - Electrogeräte GmbH
e 34
81739 München
Gebrauchsanweisung
Gebruiksaanwijzing
en
de
fr
it
es
pt
nl
tr
www.siemens-home.com
Cod. 3422100737 F
Kullanma KIlavuzu
Avvertenze per l’uso

1
Dear customer,
We would like to thank and congratulate you for your choice.
This practical modern appliance has been made using materials of
the highest quality, which have been put through the strictest of
Quality Controls during manufacture and meticulously tested to
ensure that they meet all of your cooking demands. To make life
easier, this instructions booklet is divided up into two sections:
instructions of use and installation instructions.
We kindly ask you to read and follow these simple instructions
in order to guarantee first-class results from the very start. This
booklet contains important information not only concerning use,
but also concerning your own personal safety and maintenance of
the appliance.
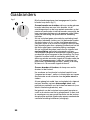
Our products need to be carefully packed to protect them during
transportation. All the material used for packing is considered
essential for this purpose and is also completely recyclable. You
too can contribut towards protecting the environment by disposing
of this material at your nearest recyclable refuse collection point.
Do not dispose of used cooking oil down the kitchen sink. Oil may
seriously damage the environment. Dispose of it in a closed container
at your nearest collection point or, failing this, dispose of it in your
rubbish bin. Although this last solution is far from perfect, your oil
will be taken to a controlled refuse dump where it will not be allowed
to pollute water. You and your children will appreciate it.
Render your old appliance useless before disposing of it at your
nearest recyclable refuse collection centre.
Your local authority will be pleased to inform you where your nearest
centre is.
/1"$, 5)& "11-*"/$& "/% %*4104& 0' 5)& 1"$,"(*/(
*/ "/ &/7*30/.&/5"--:H3&410/4*#-& ."//&3
)*4 "11-*"/$& *4 -"#&--&% */ "$$03%"/$& 8*5) 5)&
6301&"/ *3&$5*7& $0/$&3/*/( 64&%
&-&$53*$"- "/% &-&$530/*$ "11-*"/$&4 8"45& &-&$53*$"-
"/% &-&$530/*$ &26*1.&/5 !
)& (6*%&-*/& %&5&3.*/&4 5)& '3".&803, '03 5)& 3&563/
"/% 3&$:$-*/( 0' 64&% "11-*"/$&4 "4 "11-*$"#-&
follow these instructions:
If the symbol
appears on the specifications plate,
IMPORTANT:
not meet your expectations in terms of quality, please inform us as
In the unlikely event that the appliance should arrive damaged or
not have been tampered with, or used inappropriately.
soon as possible. For the warranty to be valid, the appliance must

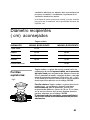
CONTENTS
Safety Warnings 3
Your new hob 5
Gas Burners 6
Recommended receptacle diameters 7
Cooking recommendations 8
Electric plates 8
With continuous energy setting 9
With conventional knob 10
Warnings of use 11
Cooking 11
Cleaning and maintenance 12
Troubleshooting 13
Conditions of warranty 14
2

3
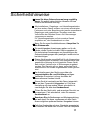
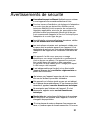
Safety warnings
Read this manual carefully in order to cook efficiently
and safely.
Check all measurements before proceeding to install
your new hob.
These instructions are only valid for the countries indicated
on the appliance. Refer to the technical instructions to
adapt the appliance to the conditions of use for the
relevant country.
This appliance must be installed in a position with the
proper level of ventilation.
The appliance should not be exposed to strong draughts,
as these may blow the burners out.
This appliance leaves the factory set for the gas supply
indicated on the characteristics plate. Call the Service
Centre this it needs to be altered.
Do not tamper inside the appliance. If necessary, call
your local Service Centre.
Look after these instructions of use and installation so
as to be able to produce them should the appliance ever
change hands.
If your hob is supplied with a glass cover, do not subject
it to excessive force. If the glass should become detached
from the hob, call the Service Centre immediately for
them to repair or replace it.
Do not use a damaged appliance.
of gas must be carried out by an authorised installation
technician, respecting all applicable regulations,
standards and the country's electrical and gas supply
All installation, regulation and adaptation to other types
companies' specifications.
It is recommended that you call our Technical
Assistance Service for adaptation to other types of gas.
not for commercial or professional use. This appliance
cannot be installed on yachts or in caravans. The
warranty will only be valid if the appliance is used for
This appliance has been designed for home use only,
the purpose for which it was designed.

4
Overheated fat or oil can easily catch fire. Never leave
the appliance unattended when cooking food with fat or
oil, e.g. chips.
Never pour water on burning fat or oil. DANGER OF
BURNS! Cover the receptacle to smother the flames
and turn the hob off.
In the event of a fault, cut the gas and electricity supplies
to the appliance. Call our Service Centre to repair the
fault.
Do not use unstable or uneven-based receptacles on
cooking plates or burners. They may accidentally tip
over.
If a gas supply knob/valve jams, do not force it. Call your
official Service Centre immediately for them to repair or
replace it.
The illustrations used in this booklet are only intended
as a guide.
electrocution.
Do not use steam clearing machines to clean the
hotplate, as there is risk of
IF THESE INSTRUCTIONS ARE NOT FOLLOWED,
THE MANUFACTURER ACCEPTS NO
RESPONSIBILITY.
This appliance is not intended for use by persons
(including children) with reduced physical, sensory or
knowledge, unless they have been given supervision or
instruction concerning use of the appliance by a person
responsible for their safety.
mental capabilities, or lack of experience and
Never leave the appliance unattended during operation.
The surfaces on heating and cooking appliances get hot
when in use. Be careful. Keep children away from the
appliance.
Only use your appliance for the preparation of food and
never for room-heating purposes.

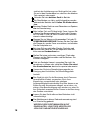
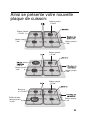
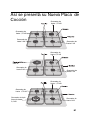
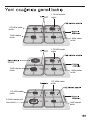
Your New Hob:
5
Burner up
to 1,75 kW
Burner up
to 1,75 kW
Burner up
to 3 kW
Burner up
to 1 kW
Burner up
to 1,75 kW
1500 W
Burner up
to 1 kW
Burner up
to 3 kW
Burner up
to 1,75 kW
to 1,75 kW
Burner up
Triple flamme
burner up to
Burner up
to 1 kW
3,6 kW

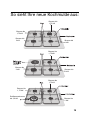
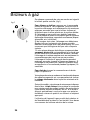
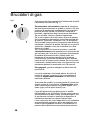
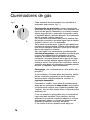
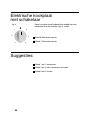
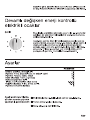
Gas burners
Each control knob indicates which burner it controls.
fig 1.
To light a burner, push in the knob for the burner you
wish to use and turn it in an anti-clockwise direction to
the lighting position. Hold the knob at the maximum
position for a few seconds until the burner ignites and
then release and set the knob to the desired setting. If
the burner does not light at the first attempt, repeat the
operation.
If your hob does not come with any kind of automatic
ignition system, then light the burners with a naked flame
(cigarette lighter, matches, etc.).
If the spark plugs are dirty, then a fault may occur in the
ignition system. Keep them completely clean. Clean the
spark plugs using a small brush, remembering that the
plugs must not receive any kind of violent impact.
If your hob is equipped with burners with safety valves
which prevent gas from being released should the burners
accidentally go out, proceed to light as described above,
but keep the control knob pressed in until the burners
light and then for a few more seconds once alight. If
complete ignition does not occur, repeat the operation
keeping the knob pressed in for approx. 10 seconds
To turn the burners off, turn the control knob in a
clockwise direction to the 0 setting.
Your modern functional hob is equipped with progressive
valves which permit you to find the perfect flame setting
between maximum and minimum.
Depending on the model that you have purchased, your
hob may come with a triple-flame burner, the perfect
system for cooking paellas, using woks, etc.
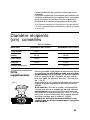
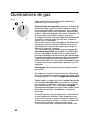
Gas appliances create both heat and humidity in the
room they are used in. Make sure that your kitchen is
properly ventilated: keep natural ventilation outlets open
or install a mechanical ventilation system (extractor fan).
When using your appliance for a prolonged period of
time, it may be necessary to provide additional ventilation
e.g. by opening a window (without creating a draught)
or turning up the setting on your mechanical ventilation
system.
6
fig 1.

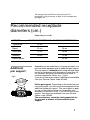
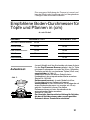
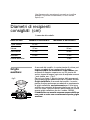
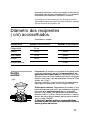
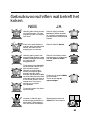
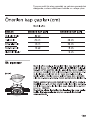
Recommended receptacle
diameters (cm.)
Depending on model:
BURNER MINIMUM Ø RECEPTACLE MAXIMUM Ø RECEPTACLE
Triple flame: 22 cm
Rapid: 22 cm 26 cm
Semi-rapid: 12 cm 20 cm
Auxiliary: 10 cm 12 cm
Electric plates: 14 cm
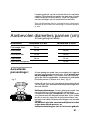
Depending on the model that you have purchased, your
hob may come equipped with an additional pan support.
This pan support is essential when using the triple-flame
burner for receptacles with diameters of more than 26
cm, griddles, terracotta casseroles and all kinds of
concave receptacles (Woks, etc...) (fig 2).
If you do not have a pan support, then these are available
from your Service Centre, code 363300.
Coffee pot support: Depending on the model that you
have purchased, your hob may come equipped with an
additional coffee pot support. This pan support is only
for use on the auxiliary burner for receptacles with
diameters of less than 10 cm. If you do not have a pan
support, then these are available from your Service
Centre, code 184200.
The manufacturer cannot be held responsible for
the non-use or misuse of these additional pan
support.
Additional
pan support:
7
fig 2.
An orange-coloured flame is normal and it is
produced in the presence of dust in the atmosphere,
spillages, etc.

These recommendations are only intended as a guide
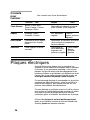
Electric plates
Before using it for the first time, heat the electric plate
at maximum power with no receptacle for a period of
five minutes. Smoke and smells are normally given off
during this time. These will disappear with use. With the
exception of this first time, do not use your plates
without receptacles.
When you start the cooking process, you are
recommended to set the control knob to the maximum
position and then lower it to a mid position for the rest
of the process depending on the quantity and quality of
the food you are using.
You can turn the cooking plate off a little before the end
of the cooking process and make use of the heat inertia
created. This will help you save on energy bills and will
not affect the cooking process, which will continue thanks
to the heat accumulated on the plate.
Use receptacles with perfectly flat, thick bases similar
in size to the plate in use, never smaller.
Cooking
recommendations
8
Very strong Strong Medium Slow
Triple flame Boiling, stewing, grilling, Re-heating and keeping food
browning off, paellas, oriental warm: prepared food,
food (Wok) pre-cooked food
Rapid Escalope, steak, omelette, Rice, white Steaming:
fried food sauce, ragout. fish,
vegetables.
Semi-rapid Steamed potatoes, fresh Re-heating and keeping food
vegetables, pasta warm: pre-cooked food and
delicate stews.
Auxiliary Stews, rice pudding, caramel. Thawing and Making/melting:
slow boiling: Butter,
pulses, fruit, chocolate,
frozen food jelly

Avoid liquids boiling over onto the plate surface and do
not use wet receptacles.
Depending on the model that you have purchased, your
electric plates may be controlled by either continuous
control or a six-position knob.
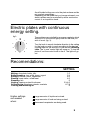
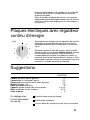
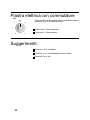
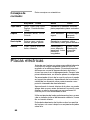
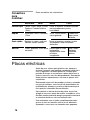
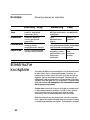
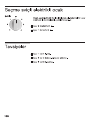
Electric plates with continuous
energy setting.
These plates are controlled by an energy regulator which
allows you to choose the right power for the food you
wish to cook, (fig. 3).
Turn the knob in an anti-clockwise direction to the setting
for the food you wish to cook according to the desired
cooking method, the amount of food and the following
.
The "in use" control light will come on. To turn the
plate off, set the control knob to the 0. The light will go
out.
Recomendations:
SETTING
Melting: chocolate, butter, jelly 1-2
Boiling/cooking: rice, white sauce, ragout 2-3
Boiling: potatoes, pasta, vegetables 4-5
Stewing: meat stews, rolled meat 4-5
Steaming: fish 5
Heating, keeping cooked food warm 2-3-4-5
Grilling/frying: escalopes, steaks, omelette 6-7-8
Cooking and browning off 9
Large amounts of liquid are involved.
Large amounts of food are being cooked.
Uncovered receptacles are being used.
9
fig.3
Higher settings
are needed
when:
1
2
3
4
5
6
7
8
9
table

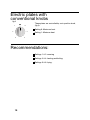
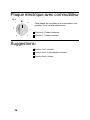
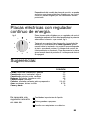
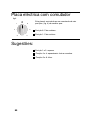
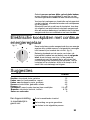
Electric plates with
conventional knobs
These plates are controlled by a six-position knob,
(fig 4):
Setting 6: Maximum heat.
Setting 1: Minimum heat
Recommendations:
Settings 1 & 2: warming
Settings 3 & 4: heating and boiling.
Settings 5 & 6: frying.
10
fig.4
1
2
3
4
5
6

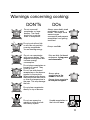
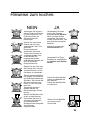
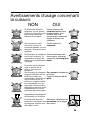
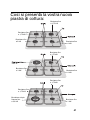
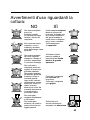
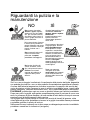
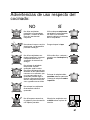
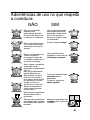
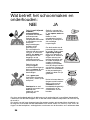
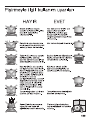
DON'Ts DOs
11
Do not use small
receptacles on large
burners. The flame
should not touch the
sides of receptacles.
Do not cook without lids
or with lids only partially
covering receptacles.
You are wasting energy.
Do not use receptacles
with uneven bases. They
lengthen cooking times and
increase energy
consumption.
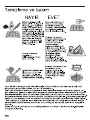
Do not place receptacles on
burners off centre. They
could tip over.
Do not use wide-based
receptacles on the burners
nearest to the controls.
When centred on the burner,
they could touch the controls
or raise the temperature in
the area. This may damage
the hob.
Do not place receptacles
directly on top of burners.
Do not use excessive
weights or strike the hob
with heavy objects.
Always use suitably sized
receptacles on each
burner. This helps avoid
excessive gas
consumption and prevents
receptacles from getting
tarnished.
Always use lids.
Only use thick-,flat-based
saucepans, frying pans
and casseroles.
Always place
receptacles in the
middle of burners.
Always place receptacle
on the pans support
Handle receptacles on
the hob with care.
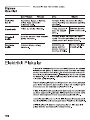
Warnings concerning cooking:

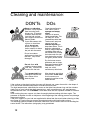
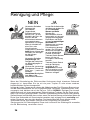
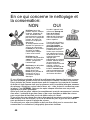
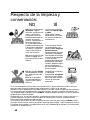
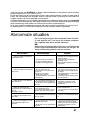
Cleaning and maintenance:
If the coating on the electric plates has worn off through use, smear them with a few drops of
oil or one of the maintenance products available on the market.
The high temperatures suffered by the cover on the triple-flame burner ring and the stainless
steel parts on your hob (plate rings, grease trays, area around burners, etc) may become
discoloured over time. This is NORMAL. Clean them after use with a product suitable for stainless
steel.
After washing the pans support, dry them thoroughly before cooking with them again. The
presence of droplets of water or dampness at the beginning of the cooking process may damage
the enamel surface.
If the pans support on your hob are supplied with rubber feet, be careful when cleaning as they
may come off, leaving the pan support unprotected and scratching the hob surface.
The cleaning product suitable for stainless steel must not be used in the area surrounding the
control knobs. The indications (serigraphy) may get deleted.
DON'Ts DOs
12
Never use abrasive
products, sharp objects,
steel scouring pads,
knives, etc., to remove
stubborn food remains
from the hob surface,
pans support, burners or
electric plates.
Do not use steam
appliances to clean the
hob with. They could
damage it.
Do not allow acid
products (vinegar, lemon
juice, etc.) to come into
contact with the hob.
Try to prevent salt from
coming into contact with
the surface of the
electric plate.
The burners and pans
support must be
cleaned regularly to
keep them clean. This is
done by submerging
them in soapy water and
scrubbing them with a
non-metal brush to keep
the holes and slits free
from obstruction so they
can give a perfect flame.
Dry the burner covers
whenever wet or damp.
Remove all excess liquid
immediately. This will
help you avoid
unnecessary effort later.
After cleaning and drying
the burners, make sure
that the covers are
properly in position on the
flame diffuser.
Once the appliance is
cold, clean it with a
sponge and soapy
water.
Remove all excess
liquid immediately. This
will help you avoid
unnecessary effort later.
If your hob comes with
a glass or aluminium
panel, do not use
knives, scrapers or
similar utensils to clean
the join with the metal.

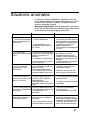
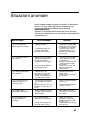
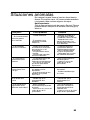
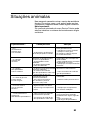
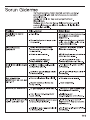
Troubleshooting
13
...if none of the electrical
system works?
-Faulty fuse. -Check the fuse in the
main fuse box and
-The automatic circuit breaker
or mains differential has been
triggered.
-Check to see if the circuit
breaker or a differential has
been triggered in the mains
...if the electric ignition system
does not work?
-There may be food or cleaning
product particles between the
spark plugs and the burners.
-The burners are wet. -Dry the burner covers and
spark plugs carefully.
-Check that the covers
have been put in the
proper position.
-The covers on the burners are
not in the right position.
...if the flame on the burners is
not evenly distributed?
-The burner components have
not been assembled properly.
-The gas outlets on the burners
are dirty.
-Put the components in their
correct positions.
-Clean the gas outlets on the
burners.
...if the gas flow does not seem
normal or there is no gas flow
at all?
-The gas flow has been cut at
an intermediate stopcock.
-If the gas is supplied from a
gas bottle, it may be empty.
- Open any intermediate
stopcocks.
-Replace the gas bottle with
a full one.
...if the kitchen smells of gas? -One of the valves has been
left open.
-Possible leak on the gas bottle
coupling.
-Check to see if a valve has
been left open.
-Check that the coupling on
the gas bottle is in order.
What´s wrong
Possible cause Solution
-The gap between the spark
plug and the burner needs to
be cleaned carefully.
It is not always necessary to call the Service Centre. In
some cases, you may be able to solve the problem
yourself. This table contains some useful information.
Important information:
Only authorised personnel from our Service Centre are
qualified to work on the main gas and electric systems.
...if the safety devices on the
different burners do not work?
-The control knob has not been
kept pressed in for long
enough.
-The outlets on the burners are
dirty.
-Once ignited, keep the
control knob pressed in for
a few seconds.
-Clean the gas outlets on the
burners.
replace it if it is faulty.
supply box.

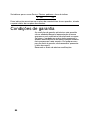
Conditions of warranty
The conditions of warranty are those set out by our
company's representatives in the country where you
purchased your appliance. The salesperson that sold
you the appliance will be only too pleased to inform you
as to the details of these conditions. Proof of purchase
must be produced when making any kind of claim against
the warranty.
The manufacturer reserves the right to modify these
conditions.
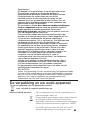
Should you need to contact our Service Centre, please quote the following information:
E - NR FD
These indications appear on your appliance's characteristics plate on the bottom of
your appliance.
14

15
Sehr geehrte Kundin, sehr geehrter Kunde,
wir danken Ihnen für Ihr Vertrauen und beglückwünschen Sie zu Ihrer
Kaufentscheidung.
Dieses praktische, moderne und zweckmäßige Gerät wurde aus
hochwertigen Materialien hergestellt, die während des ganzen
Produktionsprozesses einer strikten Qualitätskontrolle und genauen
Tests unterzogen wurden, um alle Ansprüche an ein perfektes Gerät
zu erfüllen. Wir haben diese Gebrauchsanleitung der Übersichtlichkeit
halber in zwei Abschnitte unterteilt: Bedienungsanweisungen und
Installationsanweisungen.
Wir bitten Sie deshalb, diese einfachen Anweisungen sorgfältig zu
lesen und zu befolgen. Dies garantiert Ihnen beste Resultate vom
ersten Einschalten an. Das Handbuch enthält wichtige Informationen,
nicht nur zum Gebrauch, sondern auch hinsichtlich Sicherheit und
Instandhaltung.
Unsere Produkte werden für den Transport mit einer Schutzverpackung
versehen. Diesbezüglich haben wir uns auf das absolut Notwendigste
beschränkt. Die gesamte Verpackung ist hundertprozentig recyclebar.
Entsorgen Sie die Verpackungsmaterialien im nächstgelegenen, für
diesen Zweck bestimmten Wertstoffcontainer.
Sie sollten gebrauchtes Speiseöl nicht einfach in das Spülbecken
schütten, da dies die Umwelt stark belastet. Bewahren Sie es in einem
geschlossenen Behälter auf, und geben Sie diesen in einer
Annahmestelle ab, oder entsorgen Sie ihn direkt im Hausmüll (der im
zwar nicht unbedingt die sauberste Lösung, sie verhindern damit jedoch
eine Wasserverschmutzung). Ihre Kinder und Sie selbst werden es
Bevor Sie ein ausgedientes Geräts entsorgen, müssen Sie es
unbrauchbar machen. Geben Sie es anschließend in einem
Recyclingcenter ab.
Bei der für Sie zuständigen Gemeindeverwaltung können Sie sich über
die nächstgelegene Annahmestelle informieren.
Endeffekt auf einer kontollierten Mülldeponie gelagert wird; dies ist
zuschätzenwissen.
Sie können damit, ebenso wie wir, zum Umweltschutz beitragen.
befolgen Sie diese Anweisungen:
Wenn das Typenschild Ihres Gerätes das Symbol
aufweist,
WICHTIG:
Falls das Gerät wider Erwarten Schäden aufweisen oder Ihre
so schnell wie möglich in Kenntnis. Zur gültigen Einlösung der
Qualitätsanforderungen nicht erfüllen sollte, setzen Sie uns davon
Garantie darf das Gerät nicht unbefugt manipuliert bzw. benutzt
worden sein.

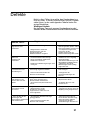
INHALT
Sicherheitshinweise
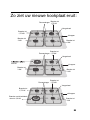
So sieht Ihre neue Kochmulde aus
Gasbrenner
Empfohlene Durchmesser von Töpfen und Pfannen
Kochtipps
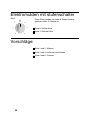
Elektromulden
Mit stufenloser Energieregelung
Mit Stufenschalter
Gebrauchshinweise
Zum Kochen
Zu Reinigung und Pflege
Defekte
Garantiebedingungen
16
17
19
20
21
22
22
23
24
25
25
26
27
28

17
Sicherheitshinweise
Lesen Sie diese Gebrauchsanweisung sorgfältig
durch. Sie enthält viele nützliche Hinweise für eine
sichere und effiziente Nutzung.
Bevor Sie Ihr neues Kochfeld einbauen, überprüfen Sie
die Einbaumaße.
Die nachfolgenden Anweisungen gelten nur für die
Länder, deren Symbol auf dem Gerät angegeben ist.
Die technischen Anweisungen zur Anpassung an die
Gebrauchsbedingungen des jeweiligen Landes sind zu
berücksichtigen.
Der Aufstellungsort des Geräts muss über die
vorgeschriebene Be- und Entlüftung verfügen.
Vermeiden Sie starken Luftzug, da dieser die
Brennerflamme löschen könnte.
Dieses Gerät ist werkseitig auf die Gasart eingestellt,
die auf dem Typenschild angegeben ist. Falls eine
Umstellung auf eine andere Gasart erforderlich ist,
verständigen Sie bitte den Kundendienst.
Öffnen Sie das Gerät nicht, und versuchen Sie nicht, es
zu reparieren. Falls erforderlich, rufen Sie unseren
Kundendienst an.
Bewahren Sie die Bedienungs-und Montageanleitung
gut auf, damit Sie diese, zusammen mit dem Gerät,
einem möglichen späteren Besitzer übergeben können.
Falls Ihre Kochmulde mit einer Glasplatte ausgestattet
ist, belasten Sie diese nicht zu stark. Falls die Glasplatte
auf eine andere Gasart müssen von einem
Alle Installations-, Regelungs- und Umstellungsarbeiten
autorisierten
Fachmann und unter Beachtung der jeweils anwendbaren
Regelungen und gesetzlichen
Vorgaben sowie der
Vorschriften der örtlichen Strom- und Gasversorger
vorgenommen werden.
Für Umstellungsarbeiten auf eine andere Gasart
empfehlen wir, den Kundendienst zu rufen.
Dieses Gerät wurde ausschließlich für
gewerbliche Nutzung ist nicht gestattet.
Garantie gilt nur dann, wenn das Gerät
ausschließlich für seinen vorgesehenen
die Verwendung
in Privathaushalten
entworfen; eine kommerzielle oder
Dieses Gerät
darf nicht auf Jachten oder
in Wohnwagen eingebaut
werden. Die
Zweck genutzt
wird.

18
Benutzen Sie das Gerät nur zum Zubereiten von Speisen,
nie als Raumheizung.
Sehr heißes Fett und Öl fängt leicht Feuer. Lassen Sie
während der Essenszubereitung Töpfe oder Pfannen
mit Fett und Öl, wie z.B. beim Fritieren von Kartoffeln,
niemals unbeaufsichtigt.
Giessen Sie nie Wasser auf brennendes Fett oder Öl.
VERBRENNUNGSGEFAHR! Decken Sie den Topf oder
die Pfanne ab, um das Feuer zu ersticken, und schalten
Sie die Kochplatte aus.
Bei einer Störung schließen Sie den Gashahn und
Stellen Sie keine verformten, wackligen Töpfe oder
Pfannen auf die Elektromulden und die Brenner. Sie
könnten umkippen.
Falls ein Gashahn klemmt, versuchen Sie nicht, ihn
gewaltsam zu öffnen oder schließen. Rufen Sie sofort
den Kundendienst an, damit er ihn repariert oder ersetzt.
Die Abbildungen in dieser Gebrauchsanweisung sind
zur Orientierung gedacht.
klemmen das Gerät ab. Für die Reparatur rufen Sie
bitte unseren Kundendienst an.
Verwenden Sie keine Dampfreinigungsgeräte zur
Reinigung des Kochfeldes, da
Stromschlaggefahr
besteht.
WERDEN DIESE BESTIMMUNGEN NICHT
EINGEHALTEN, LEHNT DER HERSTELLER
JEGLICHE GARANTIELEISTUNGEN AB.
Das Gerät ist nicht für die Benutzung durch Personen
(einschließlich Kinder)
vorgesehen, die in ihrer
körperlichen, sensorischen oder geistigen
Leistungsfähigkeit beeinträchtigt sind oder denen es an
Erfahrung oder Kenntnissen mangelt, es sei denn, sie
stehen unter Beaufsichtigung oder wurden von
einer für
ihre Sicherheit verantwortlichen Person in der Benutzung
des Gerätes unterrichtet.
Lassen Sie das Gerät während des Betriebes nicht
unbeaufsichtigt.
sich bei der Auslieferung vom Gerät gelöst hat, rufen
Sie sofort den Kundendienst an, damit er die defekten
Teile repariert oder ersetzt.
Nehmen Sie kein defektes Gerät in Betrieb.
Die Oberflächen von Heiz- und Kochgeräten werden
während des Betriebs heiß. Halten Sie Kinder davon
fern.

19
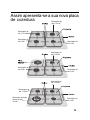
So sieht Ihre neue Kochmulde aus:
1500 W
1,75 kW
Brenner bis
1,75 kW
Brenner bis
3 kW
Brenner bis
1 kW
Brenner bis
1,75 kW
Brenner bis
3 kW
Brenner bis
1 kW
Brenner bis
1,75 kW
Brenner bis
1,75 kW
Brenner bis
1 kW
Dreiflammenbrenner
bis 3,6 kW
Brenner bis
Seite wird geladen ...
Seite wird geladen ...
Seite wird geladen ...
Seite wird geladen ...
Seite wird geladen ...
Seite wird geladen ...
Seite wird geladen ...
Seite wird geladen ...
Seite wird geladen ...
Seite wird geladen ...
Seite wird geladen ...
Seite wird geladen ...
Seite wird geladen ...
Seite wird geladen ...
Seite wird geladen ...
Seite wird geladen ...
Seite wird geladen ...
Seite wird geladen ...
Seite wird geladen ...
Seite wird geladen ...
Seite wird geladen ...
Seite wird geladen ...
Seite wird geladen ...
Seite wird geladen ...
Seite wird geladen ...
Seite wird geladen ...
Seite wird geladen ...
Seite wird geladen ...
Seite wird geladen ...
Seite wird geladen ...
Seite wird geladen ...
Seite wird geladen ...
Seite wird geladen ...
Seite wird geladen ...
Seite wird geladen ...
Seite wird geladen ...
Seite wird geladen ...
Seite wird geladen ...
Seite wird geladen ...
Seite wird geladen ...
Seite wird geladen ...
Seite wird geladen ...
Seite wird geladen ...
Seite wird geladen ...
Seite wird geladen ...
Seite wird geladen ...
Seite wird geladen ...
Seite wird geladen ...
Seite wird geladen ...
Seite wird geladen ...
Seite wird geladen ...
Seite wird geladen ...
Seite wird geladen ...
Seite wird geladen ...
Seite wird geladen ...
Seite wird geladen ...
Seite wird geladen ...
Seite wird geladen ...
Seite wird geladen ...
Seite wird geladen ...
Seite wird geladen ...
Seite wird geladen ...
Seite wird geladen ...
Seite wird geladen ...
Seite wird geladen ...
Seite wird geladen ...
Seite wird geladen ...
Seite wird geladen ...
Seite wird geladen ...
Seite wird geladen ...
Seite wird geladen ...
Seite wird geladen ...
Seite wird geladen ...
Seite wird geladen ...
Seite wird geladen ...
Seite wird geladen ...
Seite wird geladen ...
Seite wird geladen ...
Seite wird geladen ...
Seite wird geladen ...
Seite wird geladen ...
Seite wird geladen ...
Seite wird geladen ...
Seite wird geladen ...
Seite wird geladen ...
Seite wird geladen ...
Seite wird geladen ...
Seite wird geladen ...
Seite wird geladen ...
Seite wird geladen ...
Seite wird geladen ...
Seite wird geladen ...
Seite wird geladen ...
-
 1
1
-
 2
2
-
 3
3
-
 4
4
-
 5
5
-
 6
6
-
 7
7
-
 8
8
-
 9
9
-
 10
10
-
 11
11
-
 12
12
-
 13
13
-
 14
14
-
 15
15
-
 16
16
-
 17
17
-
 18
18
-
 19
19
-
 20
20
-
 21
21
-
 22
22
-
 23
23
-
 24
24
-
 25
25
-
 26
26
-
 27
27
-
 28
28
-
 29
29
-
 30
30
-
 31
31
-
 32
32
-
 33
33
-
 34
34
-
 35
35
-
 36
36
-
 37
37
-
 38
38
-
 39
39
-
 40
40
-
 41
41
-
 42
42
-
 43
43
-
 44
44
-
 45
45
-
 46
46
-
 47
47
-
 48
48
-
 49
49
-
 50
50
-
 51
51
-
 52
52
-
 53
53
-
 54
54
-
 55
55
-
 56
56
-
 57
57
-
 58
58
-
 59
59
-
 60
60
-
 61
61
-
 62
62
-
 63
63
-
 64
64
-
 65
65
-
 66
66
-
 67
67
-
 68
68
-
 69
69
-
 70
70
-
 71
71
-
 72
72
-
 73
73
-
 74
74
-
 75
75
-
 76
76
-
 77
77
-
 78
78
-
 79
79
-
 80
80
-
 81
81
-
 82
82
-
 83
83
-
 84
84
-
 85
85
-
 86
86
-
 87
87
-
 88
88
-
 89
89
-
 90
90
-
 91
91
-
 92
92
-
 93
93
-
 94
94
-
 95
95
-
 96
96
-
 97
97
-
 98
98
-
 99
99
-
 100
100
-
 101
101
-
 102
102
-
 103
103
-
 104
104
-
 105
105
-
 106
106
-
 107
107
-
 108
108
-
 109
109
-
 110
110
-
 111
111
-
 112
112
-
 113
113


in anderen Sprachen
- français: Bosch PCH615DEU/10 Le manuel du propriétaire
- español: Bosch PCH615DEU/10 El manual del propietario
- italiano: Bosch PCH615DEU/10 Manuale del proprietario
- Nederlands: Bosch PCH615DEU/10 de handleiding
- português: Bosch PCH615DEU/10 Manual do proprietário