Bresser 7000023 - Thermo Hydro Quadro NLX Bedienungsanleitung
- Kategorie
- Wecker
- Typ
- Bedienungsanleitung
Dieses Handbuch eignet sich auch für

Weather Station · Wetterstation ·
Thermo Hygro Quadro NLX
EN Instruction manual
DE Bedienungsanleitung

DE
Besuchen Sie unsere Website über den folgenden QR Code oder Weblink um weitere
Informationen zu diesem Produkt oder die verfügbaren Übersetzungen dieser Anleitung zu
finden.
EN
Visit our website via the following QR Code or web link to find further information on this
product or the available translations of these instructions.
FR
Si vous souhaitez obtenir plus d’informations concernant ce produit ou rechercher ce mode
d’emploi en d’autres langues, rendez-vous sur notre site Internet en utilisant le code QR ou le
lien correspondant.
NL
Bezoek onze internetpagina via de volgende QR-code of weblink, voor meer informatie over dit
product of de beschikbare vertalingen van deze gebruiksaanwijzing.
ES
¿Desearía recibir unas instrucciones de uso completas sobre este producto en un idioma
determinado? Entonces visite nuestra página web utilizando el siguiente enlace (código QR)
para ver las versiones disponibles.
IT
Desidera ricevere informazioni esaustive su questo prodotto in una lingua specifica? Venga
a visitare il nostro sito Web al seguente link (codice QR Code) per conoscere le versioni
disponibili.
www.bresser.de/P7000023
www.bresser.de/warranty_terms
GARANTIE · WARRANTY · GARANTÍA · GARANZIA


4
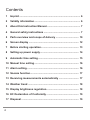
Contents
1 Imprint .....................................................................................6
2 Validity information................................................................6
3 About this Instruction Manual...............................................7
4 General safety instructions ...................................................7
5 Parts overview and scope of delivery ................................10
6 Screen display ......................................................................12
7 Before starting operation.....................................................13
8 Setting up power supply......................................................14
9 Automatic time setting.........................................................15
10 Manual time setting..............................................................16
11 Alarm setting.........................................................................16
12 Snooze function....................................................................17
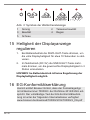
13 Receiving measurements automatically ............................17
14 Weather trend .......................................................................18
15 Display brightness regulation.............................................18
16 EC Declaration of Conformity .............................................19
17 Disposal ................................................................................19


6 / 40
1 Imprint
Bresser GmbH
Gutenbergstr. 2
46414 Rhede
Germany
http://www.bresser.de
If you wish to submit a warranty claim or service request,
please refer to the “Warranty” and “Service” information in
this document. Please be aware that any requests or sub-
missions sent directly to the manufacturer cannot be pro-
cessed.
Errors excepted. Subject to technical modifications.
© 2019 Bresser GmbH
All rights reserved.
Reproduction of this document, including extracts, in any
form (photocopied, printed etc.) or the use and distribution
of this document by electronic means (image file, website
etc.) is not permitted without the prior written consent of the
manufacturer.
The terms and brand names of the respective companies
used in this document are protected by brand, patent or
product law in Germany, the European Union and/or other
countries.
2 Validity information
This documentation is valid for the products with the article
numbers listed below:
7000023
Manual version: v0319

7 / 40
Manual description:
Manual_7000023_Thermo-Hydro-Quadro-NLX_en-
de_BRESSER_v032019a
With any service inquiries, please state these information.
3 About this Instruction Manual
NOTICE
These operating instructions are to be considered a
component of the device.
Please read the safety instructions and the operating in-
structions carefully before use.
Keep these instructions for renewed use at a later date.
When the device is sold or given to someone else, the in-
struction manual must be provided to the new owner/user of
the product.
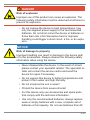
4 General safety instructions
DANGER
Risk of electric shock
This device has electronic parts operated via a power
source (power supply and/or batteries). Improper use of this
product can cause an electric shock. An electric shock can
cause serious or potentially fatal injuries. The following
safety information must be observed at all times.
• Children must only use the device under adult supervi-
sion! Only use the device as described in the manual;
otherwise, you run the risk of an electric shock.

8 / 40
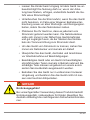
• Disconnect the device from the power supply by pulling
the power plug when it is not used or in case of longer
interruption of operation and before starting any work
on maintenance and cleaning.
• Position your device so that it can be disconnected
from the power supply at any time. The power socket
should be installed near the device and should be eas-
ily accessible as the mains cable plug is used to dis-
connect the device from the power supply.
• To disconnect the device from the power supply, al-
ways pull on the plug. Never pull on the cable.
• Before starting up the device, check the device, the
cables and the connections for signs of damage.
• Never use a damaged device or a device with dam-
aged live parts. Damaged parts must be immediately
replaced by an authorised service company.
• Only use the device in complete dry environment and
do not touch it with wet or moist parts of your body.
DANGER
Risk of suffocation
Improper use of this product can result in suffocation. This
is particularly dangerous for children. The following safety
information must be observed at all times.
• Keep packaging materials (plastic bags, rubber bands
etc.) away from children. They can cause suffocation.
• This product contains small parts that could be swal-
lowed by children. There is a risk of choking!

9 / 40
DANGER
Risk of explosion
Improper use of this product can cause an explosion. The
following safety information must be observed at all times to
prevent an explosion.
• Do not expose the device to high temperatures. Use
only the supplied power supply or the recommended
batteries. Do not short-circuit the device or batteries or
throw them into a fire! Excessive heat or improper
handling could trigger a short circuit, a fire, or an explo-
sion.
NOTICE
Risk of damage to property
Improper handling can result in damage to the device and/
or to the accessories. Always observe the following safety
information when using the device.
• Never disassemble the device. In the event of a fault,
please contact your specialist retailer. The specialist re-
tailer will contact the service centre and send the
device for repair if necessary.
• Do not expose this device to higher temperatures and
protect it from water and high humidity.
• Do not immerse the unit in water!
• Protect the device from severe shocks!
• For this device only use accessories and spare parts
that comply with the technical information.
• Use only the recommended batteries. Always replace
weak or empty batteries with a new, complete set of
batteries at full capacity. Do not use batteries from dif-

10 / 40
ferent brands or with different capacities. Remove the
batteries from the unit if it has not been used for a long
time.
• Never use rechargeable batteries.
NOTICE
Risk of voltage damage!
The manufacturer is not liable for voltage damage due to
improperly inserted batteries or through the use of an im-
proper power adapter!
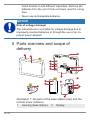
5 Parts overview and scope of
delivery
RESET
1 2 3
AAA 1.5V
AAA 1.5V
1
2
7
3
4
5
6
10
9
14
15
16
17
13
11
12
19
8
A
B
C
18
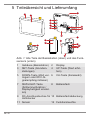
Illustration1: All parts of the base station (top) and the
remote snsor (bottom).
1 Housing (base station) 2 Display

11 / 40
3 Set button (basic set-
tings)
4 UP button (increase
value)
5 DOWN button (decrease
value or initiate RCC sig-
nal receivement)
6 CH button (channel se-
lection)
7 SNZ/LIGHT button
(snooze function / set
display brightness)
8 Battery compartment
9 DC connection socket
for coaxial/barrel con-
nector
10 Battery compartment
cover
11 Sensor 12 Function indicator
13 Battery compartment
cover
14 Wall mount fixture
15 BaBattery compartment 16 RESET button (reset all
settings)
17 Slide control for the
channel selection
18 Table stand
19 DC power adapter with
coaxial/barrel plug
Delivery content:
Weather station (A), Thermo-hygrosensor (B) (3 pcs.),
power adapter (C)

12 / 40
6 Screen display
5
4
6
7
8
1
3
9
10
11
12
13
14
15
16
18
17
2
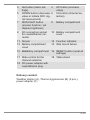
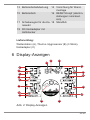
Illustration2: Screen display
1 Current time 2 Symbol for enabled
alarm
3 Display of seconds or
symbol for the alarm
time (depending on the
selected mode)
4 Trend symbol 'falling'
5 Temperature indoors (in
°C or °F)
6 Symbol for the temperat-
ure
7 Symbol for the humidity 8 Indoor humidity (in %)
9 Temperature outdoors
(in °C or °F) (remote
sensor 1)
10 Symbol for the sensor
connection status
11 Humidity outdoors (in
%) (remote sensor 1)
12 Trend symbol 'rising'

13 / 40
13 Outdoor temperature (in
°C or °F) (remote sensor
2)
14 Humidity outdoors (in %)
(remote sensor 2)
15 Temperature outdoors
(in °C or °F) (remote
sensor 3)
16 Humidity outdoors (in
%) (remote sensor 3)
17 Weather trend symbol
(better, steady, worse)
18 Weather forecast graph-
ics (12 hours)
7 Before starting operation
NOTICE
Avoid connectivity disruptions!
To avoid connectivity disruptions between the devices, con-
sider the following points before starting operation.
1. Place base station (receiver) and remote sensor
(sender) together as close as possible.
2. Set up power supply for the base station and wait until
the indoor temperature is displayed.
3. Set up power supply for the remote sensor.
4. Position the base station and the remote sensor within
the effective transmission range.
5. Ensure that the base station and remote sensor are as-
signed to the same channel.
When changing batteries always change batteries in the
main unit as well as all remote units and replace them in the
correct order, so the remote connection can be re-estab-
lished. If either of the devices is mains-powered, the power
supply must be disconnected for a short moment also for
this device when exchanging the batteries. If batteries are

14 / 40
exchanged in only one of the devices (i.e. the remote
sensor) the signal can’t be received or can’t be received
correctly.
Note, that the effective range is vastly affected by building
materials and position of the main and remote units. Due to
external influences (various RC devices and other sources
of interference), the maximum distance can be greatly re-
duced. In such cases we suggest to position the main unit
and the remote sensor at other places. Sometimes all it
takes is a relocation of one of these components of a few
inches! Though the remote unit is weather proof, it should
be placed away from direct sunlight, rain or snow.
8 Setting up power supply
Base device
1. Insert the DC connector into the connection socket of
the base station.
2. Insert the mains plug into the power outlet.
3. The device is energized directly.
4. Wait until the indoor temperature is displayed on the
base station.
NOTICE!For permanent operation, mains power
supply is recommended. Alternatively a power sup-
ply with batteries is also possible, to keep the time
setting in case of power failure. Proceed as follows:
5. Remove the battery compartment cover.
6. Insert the batteries into the battery compartment. En-
sure that the battery polarity (+/-) is correct.
7. Replace the battery compartment cover.

15 / 40
8. Wait until the indoor temperature is displayed on the
base station.
NOTICE!When switching from mains power supply
to battery power supply or vice versa, the power
supply is being disabled for a short moment for
technical reasons. Exception: permanent battery op-
eration.
Remote sensor
9. Remove the battery compartment cover.
10. Insert the batteries into the battery compartment. En-
sure that the battery polarity (+/-) is correct.
11. Set the channel selector switch to the desired channel.
NOTICE!This weather station can be operated with
one or more remote sensors. Each remote sensor
being connected must be operated on a different
channel. If only one remote sensor is connected, it
should be operated on channel 1.
12. Replace the battery compartment cover.
9 Automatic time setting
After the power supply was established, the clock will auto-
matically search for the radio signal. This will take approxim-
ately 3 to 8 minutes to finish this process.
If the radio signal is received correctly, the date and time
will be set automatically and the radio control signal icon
turns on.
If the clock fails to receive the time signal, go ahead with the
following steps:

16 / 40
1. Press and hold the DOWN button for approx. 2
seconds to re-initialize radio signal reception.
2. Is the device still not receiving the signal, the time must
be set manually.
Read the detailed manual for more information about
manual time and alarm time settings (see download inform-
ation on page 2).
10 Manual time setting
1. In normal display mode, press SET button for approx. 3
seconds to switch to time settings mode.
2. Digits to be set are flashing.
3. Press UP or DOWN button to change the value.
4. Press SET button to confirm and continue to the next
setting.
5. Settings order: time zone > hours > minutes > year >
month > day > 12/24-hours mode
6. Finally press the SET button to save the settings and
exit the setting mode.
11 Alarm setting
Alarm time setting
1. In normal display mode, press SET button to switch to
alarm time display (AL).
2. Press and hold SET button for approx. 3 seconds to
enter alarm time setting mode.
3. Digits to be set are flashing.
4. Press UP or DOWN button to change the value.

17 / 40
5. Press SET button to confirm and continue to the next
setting.
6. Settings order: hours > minutes
7. Finally press the SET button to save the settings and
exit the setting mode.
Enable/disable alarm
8. In normal display mode, press SET button to switch to
alarm time display (AL).
9. Press DOWN button to enable the alarm. The symbol
will be displayed.
10. Press DOWN button again to disable the alarm. The
symbol will disappear from the display.
12 Snooze function
1. When the alarm sounds, press SNZ button to activate
the snooze function. The alarm will sound again in 5
minutes.
2. Press any other button when the alarm sounds to inter-
rupt the alarm until the alarm time will be reached
again.
13 Receiving measurements
automatically
Once the power supply is enabled, the base station will dis-
play the measurement readings. Readings from the remote
sensor will be displayed within 3 minutes after powering it
on.
If no signal is received, go ahead with the following steps:

18 / 40
Press and hold the CH button for 3 seconds to re-initialize
RC signal receiving.
Read the detailed manual for more information about read-
ings (see download information on page 2).
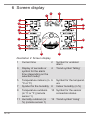
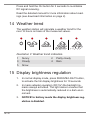
14 Weather trend
The weather station will calculate a weather trend for the
next 12 hours on basis of the measured values.
1
2
3
4
5
Illustration3: Weather trend indicators
1 Sunny 2 Partly cloudy
3 Cloudy 4 Rain
5 Snow
15 Display brightness regulation
1. In normal display mode, press SNOOZE/LIGHT button,
to activate the full display brightness for 10 seconds.
2. In mains adapter operation (DC 5V) the backlight re-
mains always activated. The light sensor ensures that
the brightness is automatically reduced in a dark envir-
onment.
3. NOTICE!In battery mode the display brightness reg-
ulation is disabled.

19 / 40
16 EC Declaration of Conformity
Hereby, Bresser GmbH declares that the equipment type
with item number 7000023 : is in compliance with Directive:
2014/30/EU. The full text of the EU declaration of conform-
ity is available at the following internet address:
www.bresser.de/download/7000023/CE/7000023_CE.pdf
17 Disposal
Dispose of the packaging materials properly, accord-
ing to their type, such as paper or cardboard. Contact
your local waste-disposal service or environmental au-
thority for information on the proper disposal.
Do not dispose of electronic devices in the household
garbage!
As per Directive 2012/19/EC of the European Parlia-
ment on waste electrical and electronic equipment and
its adaptation into German law, used electronic
devices must be collected separately and recycled in
an environmentally friendly manner.
Do not dispose of batteries and rechargeable batteries
with the household waste. You are legally required to
return used batteries and rechargeable batteries. After
they are used, the batteries can be returned free of
charge to our point of sale or to a nearby location (for
example, retailers or municipal collecting points).
Batteries and rechargeable batteries are marked with a
symbol of a crossed-out dustbin and the chemical sym-
bol of the pollutant. “Cd” stands for Cadmium, “Hg”
stands for mercury and “Pb” stands for lead.

20 / 40
18 Warranty
The regular guarantee period is 2 years and begins on the
day of purchase. To benefit from an extended voluntary
guarantee period as stated on the gift box, registration on
our website is required.
You can consult the full guarantee terms as well as informa-
tion on extending the guarantee period and details of our
services at www.bresser.de/warranty_terms.
Seite wird geladen ...
Seite wird geladen ...
Seite wird geladen ...
Seite wird geladen ...
Seite wird geladen ...
Seite wird geladen ...
Seite wird geladen ...
Seite wird geladen ...
Seite wird geladen ...
Seite wird geladen ...
Seite wird geladen ...
Seite wird geladen ...
Seite wird geladen ...
Seite wird geladen ...
Seite wird geladen ...
Seite wird geladen ...
Seite wird geladen ...
Seite wird geladen ...
Seite wird geladen ...
Seite wird geladen ...
-
 1
1
-
 2
2
-
 3
3
-
 4
4
-
 5
5
-
 6
6
-
 7
7
-
 8
8
-
 9
9
-
 10
10
-
 11
11
-
 12
12
-
 13
13
-
 14
14
-
 15
15
-
 16
16
-
 17
17
-
 18
18
-
 19
19
-
 20
20
-
 21
21
-
 22
22
-
 23
23
-
 24
24
-
 25
25
-
 26
26
-
 27
27
-
 28
28
-
 29
29
-
 30
30
-
 31
31
-
 32
32
-
 33
33
-
 34
34
-
 35
35
-
 36
36
-
 37
37
-
 38
38
-
 39
39
-
 40
40


Bresser 7000023 - Thermo Hydro Quadro NLX Bedienungsanleitung
- Kategorie
- Wecker
- Typ
- Bedienungsanleitung
- Dieses Handbuch eignet sich auch für
in anderen Sprachen
Verwandte Artikel
-
Bresser 7000023 - Thermo Hydro Quadro NLX Bedienungsanleitung
-
-
-
-
-
Bresser 7000023 Bedienungsanleitung
-
-
-
Bresser Wireless Weatherstation Transparent Bedienungsanleitung
-