
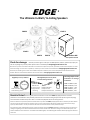
EDGE
The Ultimate In-Wall / In-Ceiling Speakers
EDGE-2
EDGE-4
EDGE-5
EDGE-6
EDGE-8
EDGE Glass-606
See separate manual
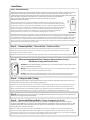
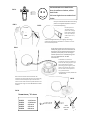
Check for damage: We know you will be eager to install your new EDGE Speakers, however, please firstly inspect your
units for any damage. If you find a problem please contact us immediately at sales@edgespeakersonline.com
Nous savons que vous serez désireux d'installer vos nouveaux haut-parleurs de pointe, cependant, veuillez d'abord inspecter vos unités
de tout dommage. Si vous trouvez un problème, n'hésitez pas à nous contacter immédiatement à
Wir wissen, Sie werden gerne zu Ihrem neuen EDGE Lautsprecher installieren, aber erstens überprüfen Sie bitte Ihre Einheiten für
Schäden. Wenn Sie ein Problem kontaktieren Sie uns bitte sofort an sales@edgespeakersonline.com
Supplied /
Fourni / Geliefert
Not supplied /
Non fourni / Nicht
im Lieferumfang enthalten
Mounting Depth needed
Profondeur de montage
Einbautiefe
Grille Tool & Gum
Template
Wall cut tool
Mur outil de coupe
Wand geschnitten
Philips screw driver
Philips tournevis
EDGE-2 100mm / ϰ͘Ϭ͟
EDGE-4 135mm / ϱ͘ϯ͟
EDGE-5 75mm / ϯ͘Ϭ͟
EDGE-6 80mm / ϯ͘Ϯ͟
Grille Werkzeug & Gum
Werkzeug
Philips Schraubendreher
Stud finder
EDGE-8 95mm / 3.8͟
Break in Period: Premium grade parts and materials are used in these EDGE-2/4/5/6/8 products so maximum
performance can be obtained in damp and dusty environments such as wall and ceiling cavity. Break In period is appx 10-20 playing
hours after which time Bass will improve. There is no need to limit playback volume at all during this time.
Pièces et matériaux de première qualité sont utilisés dans ces produits afin EDGE-2/4/5/6/8 performance maximale peut être obtenue
dans des environnements humides et poussiéreux tels que murs et faux-plafond. Période de rodage est appx 10-20 heures de jeu,
après quoi Bass améliorer. Il n'est pas nécessaire de limiter le volume de lecture du tout pendant ce temps.
Premium-Klasse Teile und Materialien werden in diesen Produkten verwendet EDGE-2/4/5/6/8 so maximale Leistung in feuchten und
staubigen Umgebungen wie Wand-und Decken-Hohlraum erhalten werden kann. Brechen In beträgt ca 10-20 Stunden spielen, nach
welcher Zeit Bass wird sich verbessern. Es besteht keine Notwendigkeit, um die Wiedergabe Lautstärke überhaupt begrenzen während
dieser Zeit.
R

Installation:
Step 1: Advanced Planning
Decide the placement for your speakers. Advance planning in regards to the placement of your speakers is critical. It is imperative
that the wall or ceiling cavity be free from debris, moisture, insulation, and any materials that are easily combustible. The
mounting location must also be void of wall studs or bracing in the location for the cutout. Adequate depth to allow speakers to fit
flush to the wall or ceiling surface is important. If you are unsure of the contents of the wall in which you
wish to mount the speakers, Electronic Stud Finders work very well (see FIG 1), otherwise a
professional installer can assist here.
Décider le placement de vos enceintes. La planification préalable en ce qui concerne le placement de vos
enceintes est essentiel. Il est impératif que la cavité du mur ou du plafond soit exempt de débris, l'humidité,
l'isolation et les matériaux qui sont facilement inflammables. Le lieu de montage doit également être vide de
poteaux de cloison ou contreventement à l'emplacement de la découpe. profondeur suffisante pour les haut-
parleurs pour s'adapter au ras de la paroi ou surface de plafond est importante. Si vous n'êtes pas sûr du
contenu de la paroi dans laquelle vous souhaitez monter les haut-parleurs, électronique Stud Finders
fonctionnent très bien (voir FIG 1), sinon un installateur professionnel peut vous aider ici.
Stud Finder
Entscheiden die Platzierung für Ihre Lautsprecher. Eine vorausschauende Planung in Bezug auf die Platzierung der Lautsprecher ist
entscheidend. Es ist zwingend notwendig, dass die Wand oder Decke Hohlraum frei von Ablagerungen, Feuchtigkeit, Isolierung,
und alle Materialien, die leicht brennbar sind sein. Der Montageort muss auch frei von Wand Stollen oder Verspannung in der Lage
für den Ausschnitt sein. Angemessene Tiefe für die Lautsprecher bündig an der Wand oder an der Decke Oberfläche ist wichtig.
Wenn Sie unsicher sind, den Inhalt der die Wand, in dem Sie die Lautsprecher, Elektronische Stud Finders (siehe FIG 1) Arbeit sehr
gut montieren, da sonst ein Fachmann kann hier helfen.
Step 2: Removing Grilles /
Retrait Grilles / Entfernen Gitter
Using supplied Grille Removal Tool, insert into grille hole and gently lift. Rotate to several outer holes for best results.
Utilisation de l'outil de suppression Grille fourni, insérez dans le trou grille et soulevez doucement. Tournez à plusieurs
trous extérieurs pour de meilleurs résultats.
Mit geliefert Grille Removal Tool, in Gitter Loch legen und heben. Drehen, um mehrere äußeren Löcher für beste Ergebnisse.
Step 3: Mark correct perforated line / Marquez ligne perforée correct /
Markieren richtige perforierten Linie
Template: Use the supplied template and mark the cut-out on the wall or ceiling. To mark, simply trace with
a pencil, along perforated line (see FIG 2).
Cut
Out
line
Modèle: Utiliser le modèle fourni et marquer la découpe sur le mur ou au plafond. Pour marquer, il suffit de
tracer avec un crayon, le long de la ligne perforée (voir FIG 2).
Vorlage: Verwenden Sie das mitgelieferte Schablone und markieren Sie die Aussparung an der Wand oder
Decke. So markieren Sie einfach mit einem Bleistift zu verfolgen, perforierten Linie entlang (siehe FIG 2).
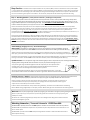
Step 4: Cutting the Wall / Ceiling
Using the appropriate wall-cutting tool, blade or Stanley knife, accurately cut the hole in the wall material, based on the correct
cut-out dimension (see FIG 3). Ensure your markings are perfectly level.
Utilisation de l'outil de coupe approprié au mur, un couteau ou lame Stanley, couper avec précision le trou dans le matériau de la
paroi, sur la base de la dimension de découpe appropriée (voir figure 3). Vérifiez que vos marques sont parfaitement à niveau
Mit der entsprechenden Wand-Schneidwerkzeug, Messer oder Teppichmesser, genau schneiden das Loch in der Wand Material,
auf dem richtigen Schnitt-out-Dimension (siehe Figur 3). Stellen Sie sicher, Ihre Markierungen sind vollkommen eben.
Step 5: Install speaker cable(s) from the receiver or amplifier to the inside of the wall or ceiling, and leave enough slack in the
wire so that it can hang out of the hole. (See FIG 4).
Step 6: Red-to-red & Black to Black / Rouge à rouge et noir à noir
Connect the speaker wire from the positive (RED+) terminal on the receiver to the positive (RED+) terminal on the speaker.
Connect the negative (BLACK-) the same way to the negatives. Note: If you inadvertently reverse one of the connections (i.e. RED
to BLACK) you will notice a severe lack of Bass from your system. This is called wiring your system ͞KƵƚ of WŚĂƐĞ͘͟If this occurs,
check the wiring and reconnect as necessary.
Branchez le câble de l'enceinte de la borne positive (ROUGE +) de la borne sur le récepteur à la borne positive (ROUGE +) de
l'enceinte. Connectez le (BLACK-) de la même façon négative à la forme négative. Note: Si par mégarde vous inversez l'une des
connexions (ie rouge au noir), vous remarquerez un grave manque de basses de votre système. C'est ce qu'on appelle le câblage de
votre système "Out of Phase". Si cela se produit, vérifier le câblage et reconnecter au besoin.

Step 6 weiter: Schließen Sie das Lautsprecherkabel von der positiven (RED +) Anschluss des Receivers an den positiven (RED
+)- Pol am Lautsprecher. Verbinden Sie den negativen (BLACK-) auf die gleiche Weise auf den Negativen. Hinweis: Wenn Sie umkehren
versehentlich eine der Verbindungen (dh rot bis schwarz) wird ein gravierender Mangel an Bass von Ihrem System zu bemerken. Dies
nennt man Verdrahtung Ihres Systems "Out of Phase". Ist dies der Fall, überprüfen Sie die Verdrahtung und wieder wie nötig.
Step 7: Attaching Speakers /
Haut-parleurs attachés / Anbringen Lautsprecher
Insert the entire speaker into the hole. Move Speaker Wire away from back of cone to avoid a possible rattle. Using a Phillips head
screwdriver, tighten the screws attached to the dog clamps until you feel Dog Clamps take grip (see FIG 6). At this point you can see
the gap between Speaker Frame and wall/ceiling close fully. Then, NIP THESE UP - DO NOT OVERTIGHTEN. See FIG 5. Note: If you are
unable to install these speakers yourself, please contact an authorized electrician or installation contractor.
Insérez l'ensemble de haut-parleur dans le trou. Déplacez Speaker Wire loin de l'arrière du cône pour éviter un hochet possible.
L'utilisation d'un tournevis cruciforme, serrez les vis fixées sur les bornes de chien jusqu'à ce que vous vous sentez colliers de chien
prennent grip (voir figure 6). À ce stade, vous pouvez voir le fossé entre le cadre et le haut-parleur mural / plafond fermer
complètement. Ensuite, PIN UP CES - NE PAS TROP. Voir figure 5. Remarque: Si vous ne parvenez pas à installer ces enceintes vous, s'il
vous plaît communiquer avec un électricien ou un entrepreneur d'installation.
Legen Sie die gesamte Lautsprecher in das Loch. Bewegen Speaker Wire weg von der Rückseite des Konus zu einer Rassel möglich zu
vermeiden. Mit einem Kreuzschlitzschraubendreher die Schrauben an den Klemmen Hund, bis er spürbar Dog Schellen nehmen Griff
(siehe 6). An dieser Stelle können Sie die Lücke zwischen Speaker Rahmen und Wand / Decke enger voll. Dann NIP DIESE UP - NICHT
ZU FEST. Siehe Figur 5. Hinweis: Wenn Sie nicht installieren diese Lautsprecher selbst sind, wenden Sie sich bitte an einen autorisierten
Elektriker oder Installateur.
Sound Settings / Réglages du son / Sound-Einstellungen
Boost switch.
Adjust Bass and Treble switches to suit your sound preference. If using a Subwoofer set both to
(+) to fully maximize performance. Note: EDGE-4 and 5 do not have switches but are factory preset to Max Boost (+).
Ajuster les basses et les commutateurs aigus en fonction de vos préférences sonores. Si vous utilisez un subwoofer à
la fois pour (+) De maximiser la performance. Note: EDGE-4 et 5 n'ont pas de contact mais sont préréglés en usine pour Max Boost (+).
Passen Bass und Treble Schalter, um Ihren Sound Vorlieben. Wenn Sie einen Subwoofer gesetzt, um sowohl (+) In vollem Umfang die
Leistung zu maximieren. Hinweis: EDGE-4 und 5 nicht haben Schalter, sondern sind werkseitig auf Max Boost (+).
Eyeball Tweeters. You can adjust the angle of the Tweeter slightly in order to compensate for poor mounting locations. Do this by
adjusting Tweeter casing. DO NOT touch the Tweeter in any way as permanent damage may occur.
Vous pouvez régler l'angle du tweeter légèrement afin de compenser pour les emplacements de
montage pauvres. Pour ce faire, en ajustant boîtier de tweeter. NE PAS toucher le tweeter en
aucune façon comme des dommages irréversibles peuvent se produire.
Sie können den Winkel der Hochtöner leicht, um für arme Einbauplätze kompensieren. Tun Sie dies,
indem Tweeter Gehäuse. Berühren Sie NICHT die Tweeter in irgendeiner Weise als bleibende Schäden auftreten.
Painting / Peinture / Malerei: Remove grilles using Grille removal Tool (supplied), apply 2 coats Water based paint and use
painting mask template (supplied) to protect from over spray. Paint grilles separately and both sides for best results.
Retirer les grilles à l'aide de l'outil de retrait de grille (fournie), appliquer 2 couches de peinture à base d'eau et
l'utilisation modèle de masque de peinture (fourni) pour protéger contre toute pulvérisation. Peinture grilles
séparément et les deux côtés pour de meilleurs résultats.
Entfernen Gitter mit Grille Removal Tool (im Lieferumfang enthalten), 2 Schichten Lack auf Wasserbasis und Nutzung
Malerei Maske Vorlage (mitgeliefert) aus über Spray schützen. Malen Gitter getrennt und beide Seiten für beste Ergebnisse.
Black Gum: Use 3-4 pieces (supplied) per speaker by laying this gum into bottom of trough and pressing metal grille into same.
Utilisez 3-4 pièces (fourni) par haut-parleur en posant cette gomme dans le fond du bac et en appuyant sur grille
métallique en même.
Verwenden Sie 3-4 Stücke (mitgeliefert) pro Lautsprecher durch Auflegen dieses Kaugummi in Boden der Wanne
und Pressen Metallgitter in gleiche.
Matching Subwoofer / Passende Subwoofer EDGE Glass-606:
140 Watts RMS is perfectly matched to ALL EDGE Speakers. Available in Hi-Gloss White or Black. See sep. Manual
140 Watts RMS est parfaitement adapté à tous les présidents de pointe. Disponible dans Salut-lustré blanc ou noir.
Voir le manuel séparé.
140 Watt RMS ist perfekt auf allen EDGE-Lautsprecher abgestimmt. Erhältlich in Hallo-Gloss Weiß oder Schwarz.
Siehe separate Anleitung

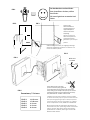
FIG 1.
FIG 2. FIG 3.
EDGE
For Best Results use a Stud Finder.
Pour de meilleurs résultats, utilisez
Stud Finder.
Für beste Ergebnisse verwenden Stud
Finder.
Once you have
determined the final
mounting position use
supplied template to
mark and cut-out the
wall/ceiling.
Une fois que vous avez
déterminé la position de
montage finale utiliser
gabarit fourni pour marquer
plafond.
Sobald Sie festgestellt haben, die endgültige Einbaulage
verwenden mitgelieferten Schablone zu markieren und
Cut-Out an der Wand / Decke.
FIG 5.
FIG 4.
# full turns
see FIG 6
.
FIG 6.
Screw turns /
Vis tours
EDGE-2 11-12 turns
EDGE-4 17-18 turns
EDGE-5 4-5 turns
EDGE-6 4-5 turns
EDGE-8 8-9 turns
Using a Phillips head screw driver
(do not use a battery drill), tighten the
screws attached to the Dog Clamps until you feel Dog
Clamps take grip (see FIG 6). At this point you can see the
gap between Speaker Frame and Wall/Ceiling close fully.
Then, NIP THESE UP ʹ DO NOT
OVERTIGHTEN.
L'utilisation d'un tournevis cruciforme, serrez les vis fixées
sur les bornes de chien jusqu'à ce que vous sentez colliers de
chien prennent grip (voir figure 6). À ce stade, vous pouvez
voir le fossé entre le cadre et le haut-parleur mur / plafond
fermer complètement. Ensuite, PIN UP CES - NE PAS TROP.
Mit einem Kreuzschlitz-Schraubendreher die Schrauben an
den Schellen Hund, bis er spürbar Dog Schellen nehmen Griff
(siehe 6). An dieser Stelle können Sie die Lücke zwischen
Speaker Rahmen und Wand / Decke enger voll. Dann NIP
DIESE UP - NICHT ZU FEST.

.
FIG 1.
For Best Results use a Stud Finder.
Pour de meilleurs résultats, utilisez
Stud Finder.
Für beste Ergebnisse verwenden Stud
Finder.
FIG 2.
FIG 3.
EDGE
Once you have determined the final mounting
position use supplied template to mark and
cut-out the wall/ceiling.
Une fois que vous
avez déterminé la
position de montage
finale utiliser gabarit
fourni pour marquer
et découpe le mur /
plafond.
Sobald Sie festgestellt haben, die endgültige Einbaulage
verwenden mitgelieferten Schablone zu markieren und Cut-
Out an der Wand / Decke.
FIG 4.
Using a Phillips head screw driver (do not use a
battery drill), tighten the screws attached to the
Dog Clamps until you feel Dog Clamps take grip
(see FIG 6). At this point you can see the gap
between Speaker Frame and Wall/Ceiling close
fully. Then, NIP THESE UP ʹ DO NOT
OVERTIGHTEN
L'utilisation d'un tournevis
cruciforme, serrez les vis fixées sur
les bornes de chien jusqu'à ce que
vous sentez colliers de chien
prennent grip (voir figure 6). À ce
stade, vous pouvez voir le fossé
entre le cadre et le haut-parleur
mur / plafond fermer
complètement. Ensuite, PIN UP CES
- NE PAS TROP.
Mit einem Kreuzschlitz-Schraubendreher die
Schrauben an den Schellen Hund, bis er spürbar Dog
Schellen nehmen Griff (siehe 6). An dieser Stelle
können Sie die Lücke zwischen Speaker Rahmen und
Wand / Decke enger voll. Dann NIP DIESE UP - NICHT
ZU FEST.
FIG 5.
FIG 6.
Screw turns /
Vis tours
EDGE-2 11-12 turns
EDGE-4 17-18 turns
EDGE-5 4-5 turns
EDGE-6 4-5 turns
EDGE-8 8-9 turns
# full
turns see
FIG 6.

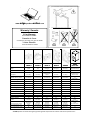
All EDGE Speaker Systems are made with highest grade magnets & components for Hi-Power handling performance
www.edgespeakersonline.com
Warranty / Garantie
3 Year Warranty.
See website for details.
Garantie de 3 ans.
Consultez le site Web pour plus de détails.
3 Jahre Garantie.
Siehe Website für Details.
EDGE-2
EDGE-4
EDGE-5
EDGE-6
EDGE-8
EDGE
Glass-606
Shape
Round
Oval
Rectangular
Rectangular
Rectangular
Upright in Gloss
Black or Gloss White
Suited for
Ceiling
Ceiling
Centre / Wall
Wall / Ceiling
Wall / Ceiling
Floor Subwoofer
Description
ϲ͘ϱ͟ 2 Way
ϲ͘ϱ͟ 2 Way
Twin ϱ͟2 Way
Dedicated Centre
Speaker
ϲ͘ϱ͟ 2 Way
ϴ͟ 2 Way
Hi Gloss enclosure
with Down-firing 8"
͞DŽŶƐƚĞƌ͟ driver
Tweeter size mm / inches
28mm / 1.1"
Pure Silk Dome
28mm / 1.1"
Pure Silk Dome
28mm / 1.1"
Pure Silk Dome
28mm / 1.1"
Pure Silk Dome
28mm / 1.1"
Pure Silk Dome
n/a
Power Handling
110 W RMS
140 W RMS
140 W RMS
110 W RMS
140 W RMS
140 Watt RMS
Output
Nom. Impedance
6 Ohms
6 Ohms
6 Ohms
6 Ohms
6 Ohms
n/a
Sensitivity
92 db
91db
91db
91db
91db
n/a
Frequency Resp.
41Hz-21kHz
43Hz-21kHz
65Hz-21kHz
42Hz-21kHz
40Hz-21kHz
35-200Hz
Min. Mounting Depth mm/ "
100mm / 4.0"
135mm / 5.3"
75mm / 3.0"
80mm / 3.2"
95mm 3.5"
n/a
Tweeter Boost switch
YES
NO
NO
YES
YES
n/a
Eyeball tweeter
YES
YES
YES
YES
YES
n/a
Paintable Faces & Grills
YES
YES
YES
YES
YES
n/a
Tweeter Protection
YES
YES
YES
YES
YES
n/a
Magnetic Shielding
NO
NO
YES
NO
NO
NO
Colours
Matt White
Matt White
Matt White
Matt White
Matt White
Hi Gloss Black /
White
Outer Dimensions: mm
243 mm diam.
238 x 294
420 x 200
311 x 208
380 x 260
460(H)x 277(W)x
313(D)
Outer Dimensions: inches
9.6" diam.
9.4" x 11.6"
16.5" x 7.9"
12.2" x 8.2"
15" x 10.2"
18" x 10.9" x 12.3"
Cut-out Dimensions: mm
Cut-out Dimensions: inches
210mm
8.3"
212 x 269 Oval
8.3" x 10.6" Oval
388 x 167mm
15.3" x 6.6"
274 x 171mm
10.8" x 6.7"
341 x 221mm
13.4" x 8.7"
n/a
Warranty
3 Years
3 Years
3 Years
3 Years
3 Years
3 Years
All EDGE Speakers are made with highest grade magnets & components for Hi-Power and Premium performance.
-
 1
1
-
 2
2
-
 3
3
-
 4
4
-
 5
5
-
 6
6


Edge EDGE-8 Installationsanleitung
- Typ
- Installationsanleitung
in anderen Sprachen
- English: Edge EDGE-8 Installation guide
- français: Edge EDGE-8 Guide d'installation
Andere Dokumente
-
JBL JBL C-6ICDT Bedienungsanleitung
-
Elac Debut IW-DC51-W Bedienungsanleitung
-
Mitek H615C Benutzerhandbuch
-
Dali PHANTOM E-80 Bedienungsanleitung
-
Polk Audio LCi-RTS100 Benutzerhandbuch
-
Yamaha NS-IC600 Benutzerhandbuch
-
Boston Acoustics HSI N8430 Bedienungsanleitung
-
Boston VSI H470T2 Benutzerhandbuch
-