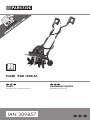
Parkside PGK 1400 A1 Translation Of The Original Instructions
- Kategorie
- Spielzeuge
- Typ
- Translation Of The Original Instructions

TILLER PGK 1400 A1
GARTENKULTIVATOR
Originalbetriebsanleitung
TILLER
Translation of the original instructions
IAN 309857

Before reading, unfold the page containing the illustrations and familiarise yourself with all functions
of the device.
Klappen Sie vor dem Lesen die Seite mit den Abbildungen aus und machen Sie sich anschließend mit
allen Funktionen des Gerätes vertraut.
GB / IE / NI Translation of the original instructions Page 4
DE / AT / CH Originalbetriebsanleitung Seite 16

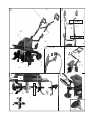
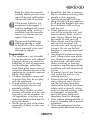
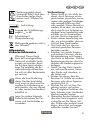
A
D
E
B
8
9
10
7
4
4
5
6
3
3
11
11
10
2
1
1 2
C
2
13 14
11
11
11
11
1517
9
16 7 7
18
19
20
3

4
GB IE NI
Introduction
Congratulations on the purchase of your
new device. With it, you have chosen a
high quality product.
During production, this equipment has
been checked for quality and subjected to
equipment is therefore guaranteed.
-
-
tain important information on safety, use
and disposal.
Before using the product, familiarise your-
self with all of the operating and safety
instructions. Use the product only as de-
Keep this manual safely and in the event that
the product is passed on, hand over all docu-
ments to the third party.
Intended purpose
tilling coarse soil for the purpose of mixing
in fertiliser, peat and compost in domestic
areas.
in this manual may lead to damage to the
tool and represents a serious injury hazard
for the operator.
-
sible for any damage or injury caused to
other persons or property.
Children and persons unfamiliar with the
manual must not be allowed to use the
tool. Do not use the tool in rain or damp
surroundings.
for damage arising from improper use or
incorrect operation of the tool.
Contents
Introduction .................................4
Intended purpose ......................... 4
General description ......................5
Scope of delivery ...........................5
Functional description .....................5
Overview ......................................5
Technical data ..............................5
Safety precautions .......................6
Symbols used in the manual .............6
Symbols on the implement ...............6
General notes on safety ..................6
Residual risks ...............................10
Assembly instructions .................10
Mounting the handlebars ...............10
Operation ..................................10
Switching on and off .....................11
Operating instructions ...................11
Cleaning/Maintenance ...............11
General cleaning
and maintenance work ..................12
Changing the tines .......................12
Transport ...................................13
Storage ...................................... 13
Disposal, environmental
protection ..................................13
Spare Parts/Accessories .............13
Guarantee .................................14
Repair Service ............................15
Service-Center ............................15
Importer ....................................15
Translation of the original
EC declaration of conformity ......31
Exploded Drawing ............... 32/33

5
NIIEGB
General description
shown on the foldout page.
Scope of delivery
Carefully remove the tool from the packag-
ing and check that the following parts are
complete:
• Appliance
• Cable clamp
• Instructions for use
Functional description
Your hand-operated garden tiller is
equipped with a maintenance free electric
motor and a gearbox with sump lubrication.
wheels that automatically dig themselves
into the ground.
storage.
Please refer to the following descriptions
for the function of the controls.
Overview
A
1 Handlebar
2 Mains connection cable
3 Central bar
4 Lower bar
5 Chassis
6 Wheel
7 Chopper
8 Gears
9 Engine housing
10 Cable clamp
B
11 Screw, quick-release lever, washer
C
13 Release button
14 Start handle
15 Bolt with securing clip
16 Drive shaft
17 Nut (self-securing),
hexagonal bolt
18 Chassis lock
20 Working position
Technical data
Tiller ...................................PGK 1400 A1
Motor power input (P) ................ 1400 W
Rated input voltage (U) .....230 V~, 50 Hz
Leerlaufdrehzahl (n
0
) ..................400 min
-1
Safety class ......................................
II
Degree of protection .........................IPX4
Working width .....................max. 40 cm
Max working depth ...............max. 20 cm
Number of tine wheels ..........................4
Weight (m) ................................ 13.7 kg
Acoustic pressure level
(L
pA
) ............... 83.4 dB(A), K
pA
= 2.5 dB
Sound power level (L
WA
)
Measured .. 89.01 dB(A), K
WA
= 1.64 dB
Guaranteed ...........................93 dB(A)
Vibration at hand grip (a
h
) .....2.525 m/s
2
K = 1.5 m/s
2
Noise and vibration values have been
determined according to the standards and
regulations named in the declaration of
conformity.
measured in accordance with a standard
testing procedure and may be used to com-
vibration emission value may also be used
for a preliminary exposure assessment.
Warning:
differ during actual use of the

6
GB IE NI
power tool from the stated value
depending on the manner in which
the power tool is used.
Safety precautions aimed at protect-
ing the user should be based on
estimated exposure under actual
usage conditions (all parts of the
operating cycle are to be consid-
ered, including, for example, times
during which the power tool is
turned off and times when the tool
is turned on but is running idle).
Safety precautions
lations while working with the electric tiller.
Symbols used in the manual
Warning symbols with
information on damage
and injury prevention.
Risk of burns!
Instruction symbols with infor-
mation on preventing damage.
Unplug the machine.
Wear protective gloves when
carrying out maintenance
and cleaning work on the
tool to avoid injury from cuts.
Help symbols with informa-
tion on improving tool han-
dling.
Symbols on the implement
Caution!
Read the user manual.
Caution! Protect from rain
and damp.
Wear safety gloves.
Wear safety shoes.
Wear safety goggles.
Danger of injury from ob-
jects spinning off! Keep
surrounding persons away
form the hazard area.
Caution! Switch off the tool
and disconnect it from the
mains before carrying out
any cleaning or mainte-
nance work.
Danger from damaged
mains cable! Keep mains
cables away from tines.
Danger of injury from rotat-
tinue to rotate after the tool
has been switched off. Wait
for them to stop moving.
Run direction
dB
L
WA
Sound power level L
WA
in dB
Safety class II
(Double insulation)
Do not dispose of electrical
equipment in household waste.
General notes on safety
Warning! Improper use of this
tool may lead to serious injury.

7
NIIEGB
Read this instruction manual
carefully before you start work-
ing with the tool, and familiar-
ise yourself with its controls.
If the power cable for this
equipment is damaged, it
must be replaced with a spe-
cial power cable, which is
available from the manufac-
turer or a customer service
agent of the same.
Please read the following
safety guidelines in order
shock, personal injury and
damage to objects:
Preparation:
for use by persons with reduced
physical, sensory or mental ca-
pabilities, or lack of experience
and knowledge, unless they
have been given supervision or
instruction concerning use of the
appliance by a person responsi-
ble for their safety.
• Children should be supervised
to ensure that they do not play
with the appliance.
only by people who are ad-
equately trained.
• Never allow children or other
persons unfamiliar with the user
manual to use the shredder. Lo-
cal regulations or bylaws may
determine the minimum age for
using the device.
• Never use the tool while others,
especially children or pets, are
close by.
• Remember: the user is responsi-
ble for accidents involving other
people or their property.
• Familiarise yourself with han-
dling the tool and pay attention
to all possible dangers that may
be overheard while working
with the tool.
• Check the terrain on which
you will be using the tool, and
remove stones, sticks, wires or
other foreign objects that may
be caught up and spun off.
• Wear proper working clothes,
non-slip soles and strong long
trousers. Do not use the tool
barefoot or wearing open-toed
sandals.
• Use personal protective equip-
ment. Always wear eye protec-
tion. Protective equipment such
as dust mask, non-skid safety
shoes, hard hat, or hearing
protection used for appropriate
conditions will reduce personal
injuries.
only switch the tool on in its
working position.
• Examine the tool beforehand
every time you use it. Do not
use the tool when the safety
components (such as the power
safety catch or guard), cutting
parts or bolts are missing, worn
or damaged. In particular,
check the mains cable and
dead-man lever for damage.
• Only replace damaged bolts or
tines in complete sets to prevent
imbalance.
• Only use replacement and ac-
cessory parts delivered and rec-

8
GB IE NI
ommended by the manufacturer.
Using foreign parts will immedi-
ately lead to loss of guarantee.
Working with the tool:
Keep your hands and feet
away from the tines while
working, especially when start-
ing up the tool – injury hazard!
• Observe any noise-prevention
regulations and local by-laws.
• Do not use the tool to chop up
stones or till lawn soil, as such
use may damage the tool.
• Do not use the tool in rain, foul
weather or damp surroundings
(such as near garden ponds or
swimming pools). Only use in
daylight or good lighting condi-
tions.
• Be sensible. Do not use the tool
if you are tired or easily dis-
tracted, or after the use of alco-
as soon as you need one.
• Make sure that you are stand-
especially on slopes. If work-
ing on a slope, work along the
slope, not upwards or down-
wards. Be particularly careful
when changing direction on the
slope. Do not use the tool on
excessively steep slopes.
• If there is any danger of slipping
on sloped ground, have a sec-
ond person secure the tool with
-
son should stand up the slope at
a safe distance from the tool.
• Always hold the tool securely in
both hands while working with it.
• Make sure that the grips are
dry and clean. Be careful while
moving backwards – danger of
tripping over!
-
ing or raising the machine.
• If the chopping knife is blocked
by a foreign body, switch off
the equipment and disconnect
at the plug. Remove the foreign
body (e.g. root) before restart-
ing the equipment.
• Do not use the tool if it is dam-
aged, incomplete or altered
without the approval of the manu-
facturer. In particular, do not work
with the tool if guards or protection
• Do not overload the tool. Only
work in the performance range
stated. Do not use tools that do
heavy jobs. Do not use the tool
for any use other than that in-
tended by the manufacturer.
• Avoid damage to the tool. Do
not apply extra weight and do
not drag the tool over hard sur-
faces such as tiles or steps.
• Remove plants and root remains
regularly in the area of the drive
-
load and damage the appliance.
• Watch out for special haz-
(Rocky, hard or similar) soil.
Stopping work:
-
tinue to turn for a few seconds
after you switch the tool off.
Wait until they have stopped
moving – injury hazard!

9
NIIEGB
• Do not lift or transport the tool
the tool off and wait for the
tines to stop moving, then dis-
connect the tool from the mains
before changing the area you
are working on.
• Never leave the tool unattended
where you were using it.
• Switch the tool off, wait for the
tines to stop moving and discon-
nect the tool from the mains un-
der the following circumstances:
- Always before leaving the tool.
- Before removing remnants of
soil and plants.
- When the tool is not in use.
- Before you conduct mainte-
nance or cleaning work on
the tool.
- If the mains cable is damaged
or caught up.
- If the tool collides with an ob-
stacle or starts to vibrate in an
unusual manner. In this case,
examine the tool for damage,
and have it repaired if neces-
sary.
-
-
sion.
Maintenance and storage:
• Make sure that all nuts, bolts
and screws are tight and that the
tool is in safe working order.
• Do not attempt to repair the tool
to do so. Return the tool to our ser-
vice centre to carry out any work
not listed in the user manual.
• Keep the tool in a dry place out
of children’s reach.
• Be careful in handling the tool.
Keep the tines sharp and clean
to improve its working safety
and effectiveness.
• Follow the maintenance regula-
tions.
Electrical safety:
Warning! Do not use the tool
if the mains or extension ca-
ble is damaged – danger of
electrical shock.
• Keep the mains cable away
from the tines. Always trail the
mains cable behind you or the
person operating the tool. If the
cable becomes damaged dur-
ing use, immediately disconnect
it from the mains. Never touch
the mains cable before unplug-
ging it from the mains.
• Make sure that the mains volt-
age matches the data on the
tool’s rating label.
• Avoid skin contact with earthed
objects such as metal fences
and posts.
• Make sure that the connector on
the extension cable is protected
from splash water, and is made
of rubber or has a rubber cover-
ing. Only use extension cables
that are intended for outdoor use
and are labelled as such. Use ex-
tension cables with a cable core
diameter of at least one square
millimetre. Always completely
unwind the cable reel before use.
Check the cable for damage.
the purpose when using an ex-
tension cable.

10
GB IE NI
• Do not carry the tool by the cable.
Do not unplug the cable by tug-
ging on it. Keep the cable away
from heat, oil and sharp edges.
• Connect the appliance to a pow-
er socket with a residual current
circuit breaker of rated residual
current no more than 30 mA.
Residual risks
Even if properly operating and han-
dling this electric tool, some residual
risks will remain. Due to its construc-
tion and build, this electric tool may
present the following hazards:
a) Cuts
b) Ear damage if working without
ear protection.
c) Damage to your health caused
by swinging your hands and
arms when operating the appli-
ance for longer periods of time
or if the unit is not held or main-
tained properly.
Warning! During operation,
this electric tool generates an
under certain circumstances,
may impair the functionality
of active or passive medical
serious or lethal injuries, we
recommend that persons with
medical implants consult their
doctor and the manufacturer
of their medical implant before
operating the machine.
Assembly instructions
Always disconnect the tool
from the mains before con-
ducting any work on it.
While assembling the tool,
make sure that the mains
cable (2) does not become
caught and has enough slack.
Mounting the handlebars
(pre-mounted)
B
1. Fasten the central bar (3) onto
the lower bar (4). Use a screw,
quick-release lever and washer
(11) to fasten.
2. Attach the handlebar (1) to the
central bar (3). Use a screw,
quick-release lever and washer
(11) to fasten.
When properly mounted, the ends
of the handlebar will point away
from the front of the appliance (see
illustration
A
).
3. Fasten the mains cable (2) with
the cable clip supplied (10).
Position the cable clamp (10) on
the upper end of the centre spar
(3). Press the cable clamp (10)
onto the centre spar (3) and slide
the cable clamp (10) onto the
round part of the centre spar (3).
Operation
Observe noise-abatement laws and
local by-laws.

11
NIIEGB
Switching on and off
Before starting up, fold open the bars (
A
1+3) and fasten them using the quick-
release lever (
A
11).
You must place the
chassis (
A
5) into work-
ing position before
starting up.
See Chapter “Transport”.
Before switching the tool on,
make sure that the tool is not
touching any other objects and
C
1. Plug the tool into the extension
cable.
2. Plug the tool into the mains.
-
lease catch (13) and then squeeze
the dead-man lever (14). Release
the safety release catch (13).
A
7) will begin to ro-
tate and dig themselves into the
earth.
man lever (14).
Warning! The tines (7)
will continue to turn for
a few seconds after the
tool has been switched
off. Do not touch the ro-
tating tines (7) – injury
hazard!
Operating instructions
grip on the tool with
booth hands and watch
your feet. The tines (7)
may cause an accident.
Be careful while moving
backwards – danger of
tripping!
Do not touch the gear-
box, as it may become
hot during operation –
danger of burns!
Switch the tool off after work-
ing with it and for transport;
disconnect from the mains
and wait for the tines (7) to
stop moving.
To avoid damage to
the tool:
• Never lift or drag the tool
with the motor running.
• Lift the tool while moving it
over hard surfaces such as
tiles or steps.
• Walk the tool through the
soil at normal pace and in
a line as straight as
possible.
• Always work away from
the mains socket. Make
sure that the cable is kept
well away from the working
area.
Overload protection:
will cut out immediately if overload-
has completely cooled down again.
Cleaning/Maintenance
Always return the tool to the
service centre for work not
described in the manual.
Only use original parts.

12
GB IE NI
Switch the tool off, unplug
it from the mains, and wait
for the tines (7) to stop mov-
ing before carrying out any
maintenance or cleaning
work on the tool.
Perform regular maintenance and
sure long, reliable service.
General cleaning and
maintenance work
Do not spray the tool
down with water (es-
pecially not under pres-
sure), and do not clean
it under running water.
Wear protective gloves when
carrying out maintenance
and cleaning work on the
tool to avoid injury from cuts.
Always clean the tool thoroughly after
each use. Always keep the tool clean. Do
• Remove any soil and dirt residues stuck
to the tines (7), driveshaft (
16), tool
surface and vents with a brush or dry
cloth.
• Spray or rub biodegradable oil into the
tines (7).
• Clean soiled grips with a damp cloth.
• Always check the tool for obvious dam-
age such as loose, worn or damaged
parts before using it. Check that all nuts,
bolts, and screws are tight.
• Check the covers and guards for damage
Changing the tines
can easily be changed in pairs.
Always change both
tine pairs at the same
time to avoid damage
to the tool from imbal-
ance.
Switch the tool off, unplug it
and wait for the tines (7) to
stop turning.
E
1. Pull the securing clip from the
bolt (15) and pull the outer sec-
tion of the chopper (7) from the
drive shaft (16).
2. Loosen the self-securing nut from
the hexagonal bolt (17) (AF 13)
and pull the inner section of the
chopper (7) away from the drive
shaft (16).
3. Clean the driveshaft (16) with
biological oil.
4. Slide the new chopper (7) onto
the drive shaft (16) in such a
way that the holes on the blade
axis line up with the holes on the
drive shaft (16).
Make sure that the tines are set
to their proper turning direc-
tion. The bevelled edge of the
chopper (7) must point in the
direction of travel of the chop-
per (7) towards the ground.
The direction of travel is
marked on the appliance
housing (9) with an arrow.
5. Slide the hexagonal bolt (17)
through the hole situated close

13
NIIEGB
to the gears (8) and screw in a
new self-securing nut (contained
within the delivery scope of a
new chopper).
6. Slide the bolt (15) through the
outer hole and fasten in place
using the safety clip.
Mount the bolt’s safety clip
(15) in such a way that it
closes against the travel of
direction of the chopper.
Transport
position and three working positions.
1. Firmly hold the appliance with one
hand on the central bar (3).
on the chassis by pulling on the ring (18).
3. Select the transport position (19).
working positions (20).
Storage
• Leave the motor to cool down before
you put the tool into a closed space.
• Keep the tool clean, dry and out of the
reach of children.
• Do not cover the tool in plastic bags as
moisture may form.
Loosen the quick-release lever (11)
and fold the handlebars together as
illustrated.
Make sure that the cable does not
become jammed.
Do not use the tool
with the handle folded
closed. There is a risk of
injury!
Disposal, environmental
protection
Be environmentally friendly. Return the tool,
accessories and packaging to a recycling
Do not dispose of electrical appli-
ances in household waste.
plastic and metal parts used can be sepa-
rated and sorted for recycling. Ask our
service centre for details.
Spare Parts/Accessories
Spare parts and accessories can be obtained at www.grizzly-service.eu
If you do not have internet access, please contact the Service Centre via telephone (see
“Sercice-Center” Page 15). Please have the order number mentioned below ready.
Set of tines Right/left ...................................................................... Order No. 91105174
Bolt with securing clip .............................................................................. 91105175
Wheel (x2) ............................................................................................. 91105172
Quick-release lever .................................................................................. 91105171

14
GB IE NI
Guarantee
Dear Customer,
guarantee from the date of purchase.
In case of defects, you have statutory rights
statutory rights are not restricted by our
guarantee presented below.
Terms of Guarantee
date of purchase. Please retain the original
of purchase.
If a material or manufacturing defect
occurs within three years of the date of
purchase of this product, we will repair or
replace – at our choice – the product for
the defective equipment and proof of pur-
chase to be presented within the three-year
period with a brief written description of
what constitutes the defect and when it oc-
curred.
If the defect is covered by our guarantee,
you will receive either the repaired product
or a new product. No new guarantee pe-
riod begins on repair or replacement of the
product.
Guarantee Period and Statutory
Claims for Defects
replaced or repaired parts. Any damages
and defects already present at the time of
purchase must be reported immediately af-
ter unpacking. Repairs arising after expiry
of the guarantee period are chargeable.
Guarantee Cover
-
duced in accordance with strict quality
guidelines and conscientiously checked
prior to delivery.
does not extend to cover product parts that
are subject to normal wear and may there-
fore be considered as wearing parts (e.g.
Set of tines) or to cover damage to break-
able parts (e.g. switches).
-
uct has been damaged, used incorrectly or
not maintained. Precise adherence to all of
manual is required for proper use of the
product. Intended uses and actions against
which the operating manual advises or
warns must be categorically avoided.
will be invalidated in case of misuse or
improper handling, use of force, or inter-
ventions not undertaken by our authorised
service branch.
Processing in Case of Guarantee
please follow the following directions:
-
tion number (IAN 309857) ready as
proof of purchase for all enquiries.
-
ing plate.
• Should functional errors or other de-
fects occur, please initially contact the
telephone or by e-mail. You will then
receive further information on the pro-
cessing of your complaint.

15
NIIEGB
• After consultation with our customer
service, a product recorded as defec-
tive can be sent postage paid to the
service address communicated to you,
with the proof of purchase (receipt)
the defect and when it occurred. In or-
der to avoid acceptance problems and
additional costs, please be sure to use
only the address communicated to you.
Ensure that the consignment is not sent
carriage forward or by bulky goods,
express or other special freight. Please
send the equipment inc. all accessories
supplied at the time of purchase and
ensure adequate, safe transport pack-
aging.
Repair Service
For a charge, repairs not covered by the
guarantee can be carried out by our ser-
vice branch, which will be happy to issue
a cost estimate for you.
We can handle only equipment that has
been sent with adequate packaging and
postage.
Attention: Please send your equipment to
our service branch in clean condition and
with an indication of the defect.
Equipment sent carriage forward or by
bulky goods, express or other special
freight will not be accepted.
We will dispose of your defective devices
free of charge when you send them to us.
Service-Center
GB
Service Great Britain
E-Mail: [email protected]
IAN 309857
IE
Service Ireland
NI
Service Northern Ireland
(0,08 EUR/Min., (peak))
(0,06 EUR/Min., (off peak))
E-Mail: [email protected]
IAN 309857
Importer
Please note that the following address is
not a service address. Please initially con-
Grizzly Tools GmbH & Co. KG
Stockstädter Straße 20
63762 Großostheim
Germany
www.grizzly-service.eu

16
DE AT CH
Einleitung
Herzlichen Glückwunsch zum Kauf Ihres
neuen Gerätes. Sie haben sich damit für
ein hochwertiges Gerät entschieden. Die-
ses Gerät wurde während der Produktion
auf Qualität geprüft und einer Endkontrolle
unterzogen. Die Funktionsfähigkeit Ihres
Gerätes ist somit sichergestellt.
Die Betriebsanleitung ist Bestandteil
dieses Gerätes. Sie enthält wich-
tige Hinweise für Sicherheit, Gebrauch und
Entsorgung. Machen Sie sich vor der Be-
nutzung des Gerätes mit allen Bedien- und
Sicherheitshinweisen vertraut. Benutzen Sie
das Gerät nur wie beschrieben und für die
angegebenen Einsatzbereiche.
Bewahren Sie die Betriebsanleitung gut auf
und händigen Sie alle Unterlagen bei Wei-
tergabe des Gerätes an Dritte mit aus.
Bestimmungsgemäße
Verwendung
Das Gerät ist für das Hacken und Zerklei-
nern grobscholligen Bodens und für die
-
post im häuslichen Bereich bestimmt.
Jede andere Verwendung, die in dieser
Betriebsanleitung nicht ausdrücklich zuge-
lassen wird, kann zu Schäden am Gerät
führen und eine ernsthafte Gefahr für den
Benutzer darstellen. Der Benutzer ist für
Unfälle oder Schäden an anderen Men-
schen oder deren Eigentum verantwortlich.
Das Gerät ist zum Gebrauch durch Erwachse-
ne bestimmt. Kinder sowie Personen, die mit
dieser Betriebsanleitung nicht vertraut sind,
dürfen das Gerät nicht benutzen. Die Benut-
zung des Gerätes bei Regen oder feuchter
Umgebung ist verboten. Dieses Gerät ist
nicht zur gewerblichen Nutzung geeignet.
Bei gewerblichem Einsatz erlischt die Garantie.
Inhalt
Einleitung ................................... 16
Bestimmungsgemäße
Verwendung ..............................16
Allgemeine Beschreibung ...........17
Lieferumfang..................................17
Übersicht ......................................17
Funktionsbeschreibung .................... 17
Technische Daten ........................ 17
Sicherheitshinweise .................... 18
Symbole in der Betriebsanleitung .....18
Bildzeichen auf dem Gerät ..............18
Allgemeine Sicherheitshinweise .......19
Restrisiken .....................................23
Montageanleitung ...................... 23
Griffholme montieren ...................... 23
(bereits montiert) ............................23
Bedienung .................................23
Ein- und Ausschalten .......................23
Arbeitshinweise .............................24
Reinigung/Wartung ...................25
Allgemeine Reinigungs-
und Wartungsarbeiten .................... 25
Hackmesser austauschen.................25
Transport ...................................26
Lagerung ...................................26
Entsorgung/Umweltschutz ..........27
Ersatzteile/Zubehör ...................27
Garantie ....................................28
Reparatur-Service ......................29
Service-Center ............................29
Importeur ..................................29
Original EG-Konformitäts-
erklärung ..................................30
Explosionszeichnung ............ 32/33

17
CHDE AT
Der Hersteller haftet nicht für Schäden, die
durch bestimmungswidrigen Gebrauch
oder falsche Bedienung verursacht wurden.
Allgemeine Beschreibung
Die Abbildung der wichtigsten
der Ausklappseite.
Lieferumfang
Nehmen Sie das Gerät vorsichtig aus der
Packung und prüfen Sie, ob die nachfol-
• Gerät
• Kabelklemme
• Betriebsanleitung
Übersicht
A
1 Griffholm
2 Netzanschlussleitung
3 Mittelholm
4 Unterer Holm
5 Fahrgestell
6 Rad
7 Hackmesser
8 Getriebe
9 Motorgehäuse
10 Kabelklemme
B
11 Schraube, Schnellspanner,
Unterlegscheibe
C
13 Entriegelungsknopf
14 Starthebel
15 Bolzen mit Sicherungsbügel
16 Antriebswelle
17 Mutter (selbstsichernd),
Sechskantschraube
18 Verriegelung Fahrgestell
19
20 Arbeitsposition
Funktionsbeschreibung
Der handgeführte Gartenkultivator ist mit
einem wartungsfreien Elektromotor und
einem Getriebe mit Ölbadschmierung aus-
gestattet.
Als Schneideinrichtung besitzt das Gerät
die selbsttätig in den Boden eindringen.
Die Griffholme sind zur besseren Lagerung
klappbar.
Die Funktion der Bedienteile entnehmen
Sie bitte den nachfolgenden Beschrei-
bungen.
Technische Daten
Gartenkultivator ....... PGK 1400 A1
Aufnahmeleistung des Motors (P) 1400 W
Nenneingangs-
spannung (U) ................... 230 V~, 50 Hz
Leerlaufdrehzahl (n
0
) ................ 400 min
-1
Schutzklasse .....................................
II
Schutzart ........................................IPX4
Arbeitsbreite ....................... max. 40 cm
Arbeitstiefe ...........................max. 20 cm
Anzahl der Hackmesser ........................ 4
Gewicht (m)................................13,7 kg
Schalldruckpegel (L
pA
) ............. 83,4 dB(A)
K
pA
= 2,5 dB
Schallleistungspegel (L
WA
)
gemessen ......89,01 dB(A), K
WA
= 1,64 dB
garantiert .................................93 dB(A)
Vibration am Handgriff (a
h
) .....2,525 m/s
2
K = 1,5 m/s
2
Lärm- und Vibrationswerte wurden entspre-
chend den in der Konformitätserklärung
genannten Normen und Bestimmungen
ermittelt.

18
DE AT CH
Der angegebene Schwingungsemissions-
wert ist nach einem genormten Prüfverfah-
ren gemessen worden und kann zum Ver-
gleich eines Elektrowerkzeugs mit einem
anderen verwendet werden.
Der angegebene Schwingungsemissionswert
kann auch zu einer einleitenden Einschät-
zung der Aussetzung verwendet werden.
Warnung: Der Schwingungsemis-
sionswert kann sich während der
tatsächlichen Benutzung des Elek-
trowerkzeugs von dem Angabewert
unterscheiden, abhängig von der
Art und Weise, in der das Elektro-
werkzeug verwendet wird.
Es besteht die Notwendigkeit, Si-
cherheitsmaßnahmen zum Schutz des
Bedieners festzulegen, die auf einer
Abschätzung der Aussetzung während
der tatsächlichen Benutzungsbedin-
gungen beruhen (hierbei sind alle An-
teile des Betriebszyklus zu berücksich-
tigen, beispielsweise Zeiten, in denen
das Elektrowerkzeug abgeschaltet ist
und solche, in denen es zwar einge-
schaltet ist, aber ohne Belastung läuft).
Sicherheitshinweise
Dieser Abschnitt behandelt die grundle-
genden Sicherheitsvorschriften bei der
Arbeit mit dem Gartenkultivator.
Symbole in der
Betriebsanleitung
Gefahrenzeichen mit
Angaben zur Verhütung
von Personen- oder
Sachschäden.
Es besteht
Verbrennungsgefahr!
Gebotszeichen mit Angaben
zur Verhütung von Schäden.
Netzstecker ziehen.
und Wartungsarbeiten Schutz-
handschuhe, um Schnittverlet-
zungen zu vermeiden.
Hinweiszeichen mit Informati-
onen zum besseren Umgang
mit dem Gerät.
Bildzeichen auf dem Gerät
Achtung!
Betriebsanleitung lesen.
Achtung! Vor Regen und
Nässe schützen.
Schutzhandschuhe.
Sicherheitsschuhe.
Verletzungsgefahr durch
Umstehende Personen aus dem
Gefahrenbereich fernhalten.
Achtung! Vor Reinigungs-
und Wartungsarbeiten Gerät
ausschalten und Netzstecker
ziehen.
Gefahr durch beschädigte
Netzanschlussleitung! Netz-
anschlussleitung von den
Hackmessern fernhalten.

19
CHDE AT
Verletzungsgefahr durch
Ausschalten laufen Hack-
messer nach. Stillstand ab-
warten.
Laufrichtung
dB
L
WA
Angabe des Schallleistungs-
pegels L
WA
in dB.
Schutzklasse II
(Doppelisolierung)
Elektrogeräte gehören nicht in
den Hausmüll.
Allgemeine
Sicherheitshinweise
Warnung! Dieses Gerät
kann bei unsachgemäßem
Gebrauch ernsthafte Verlet-
zungen verursachen. Bevor
Sie mit dem Gerät arbeiten,
lesen Sie sorgfältig die Be-
triebsanleitung und machen
Sie sich mit allen Bedienteilen
gut vertraut.
Wenn die Anschlussleitung
dieses Gerätes beschädigt
wird, muss sie durch eine be-
sondere Anschlussleitung er-
setzt werden, die vom Herstel-
ler oder seinem Kundendienst
erhältlich ist.
Lesen Sie zudem folgende
Sicherheitshinweise, um Per-
sonen- und Sachschäden zu
vermeiden:
Vorbereitung:
• Dieses Gerät ist nicht dafür be-
stimmt, durch Personen mit ein-
geschränkten physischen, senso-
rischen oder geistigen Fähigkeiten
oder mangels Erfahrung und/
oder mangels Wissen benutzt zu
werden; es sei denn, sie werden
durch eine für ihre Sicherheit zu-
ständige Person beaufsichtigt oder
erhalten von ihr Anweisungen,
wie das Gerät zu benutzen ist.
• Kinder müssen beaufsichtigt wer-
den, um sicherzustellen, dass sie
nicht mit dem Gerät spielen.
• Das Gerät darf nur von aus-
reichend geschulten Personen
betrieben werden.
• Erlauben Sie niemals Kindern
und anderen Personen, die die
Betriebsanleitung nicht kennen,
das Gerät zu benutzen. Örtliche
Bestimmungen können das Min-
destalter der Bedienungsperson
festlegen.
• Setzen Sie das Gerät niemals
ein, während Personen, beson-
ders Kinder und Haustiere, in
der Nähe sind.
• Denken Sie daran, dass der
Benutzer für Unfälle mit anderen
Personen oder deren Eigentum
verantwortlich ist.
• Machen Sie sich mit Ihrer Um-
gebung vertraut und achten
Sie auf mögliche Gefahren, die
beim Arbeiten unter Umständen
überhört werden können.
• Überprüfen Sie das Gelände, auf
dem das Gerät eingesetzt wird,
und entfernen Sie Steine, Stö-
cke, Drähte oder andere Fremd-
körper, die erfasst und wegge-
schleudert werden können.

20
DE AT CH
-
kleidung wie festes Schuhwerk
mit rutschfester Sohle und eine
robuste, lange Hose. Benutzen
Sie das Gerät nicht, wenn Sie
barfuß gehen oder offene San-
dalen tragen.
-
rüstung und immer eine Schutz-
Schutzausrüstung, wie rutschfeste
Sicherheitsschuhe, Schutzhelm
oder Gehörschutz verringert das
Risiko von Verletzungen.
• Schalten Sie zur Vermeidung
von Schnittverletzungen das Ge-
rät nicht ein, wenn es sich nicht
• Führen Sie vor jeder Benutzung
eine Sichtprüfung des Gerätes
durch. Benutzen Sie das Gerät
nicht, wenn Sicherheitseinrich-
Schneideinrichtung oder Bolzen
fehlen, abgenutzt oder beschä-
digt sind. Prüfen Sie insbesondere
die Netzanschlussleitung und den
Starthebel auf Beschädigung.
• Zur Vermeidung einer Unwucht
dürfen beschädigte Werkzeuge
und Bolzen nur satzweise aus-
getauscht werden.
• Benutzen Sie nur Ersatz- und
Zubehörteile, die vom Hersteller
geliefert und empfohlen wer-
den. Der Einsatz von Fremdtei-
len führt zum sofortigen Verlust
des Garantieanspruches.
Arbeiten mit dem Gerät:
Halten Sie Füße und Hände
beim Arbeiten, insbesondere
bei der Inbetriebnahme, von
den Hackmessern fern. Es
besteht Verletzungsgefahr!
• Beachten Sie den Lärmschutz
und örtliche Vorschriften.
• Das Gerät darf nicht zum Zer-
kleinern von Steinen oder zum
verwendet werden. Es besteht
die Gefahr, das Gerät zu be-
schädigen.
• Benutzen Sie das Gerät nicht
bei Regen, bei schlechter Wit-
terung, in feuchter Umgebung
oder Schwimmbecken). Arbeiten
Beleuchtung.
• Gehen Sie mit Vernunft an die
Arbeit. Arbeiten Sie mit dem Ge-
rät nicht, wenn Sie müde oder
unkonzentriert sind oder nach
der Einnahme von Alkohol oder
-
zeitig eine Arbeitspause ein.
• Achten Sie beim Arbeiten auf
einen sicheren Stand, insbeson-
dere an Hängen. Arbeiten Sie
immer quer zum Hang, niemals
auf- oder abwärts. Seien Sie be-
sonders vorsichtig, wenn Sie die
Fahrtrichtung am Hang ändern.
Arbeiten Sie nicht an übermä-
ßig steilen Hängen.
• Besteht im abschüssigen Gelän-
de die Gefahr des Abrutschens,
so ist das Gerät von einer
Begleitperson mit einer Stan-
ge oder einem Seil zu halten.
Die Begleitperson muss sich
oberhalb des Gerätes in aus-
reichendem Abstand von den
Seite wird geladen ...
Seite wird geladen ...
Seite wird geladen ...
Seite wird geladen ...
Seite wird geladen ...
Seite wird geladen ...
Seite wird geladen ...
Seite wird geladen ...
Seite wird geladen ...
Seite wird geladen ...
Seite wird geladen ...
Seite wird geladen ...
Seite wird geladen ...
Seite wird geladen ...
-
 1
1
-
 2
2
-
 3
3
-
 4
4
-
 5
5
-
 6
6
-
 7
7
-
 8
8
-
 9
9
-
 10
10
-
 11
11
-
 12
12
-
 13
13
-
 14
14
-
 15
15
-
 16
16
-
 17
17
-
 18
18
-
 19
19
-
 20
20
-
 21
21
-
 22
22
-
 23
23
-
 24
24
-
 25
25
-
 26
26
-
 27
27
-
 28
28
-
 29
29
-
 30
30
-
 31
31
-
 32
32
-
 33
33
-
 34
34


Parkside PGK 1400 A1 Translation Of The Original Instructions
- Kategorie
- Spielzeuge
- Typ
- Translation Of The Original Instructions
in anderen Sprachen
- English: Parkside PGK 1400 A1
