
3-864-023-11 (1)
CCD-CR1E
Operating Instructions
EN
Mode d’emploi
F
Bedienungsanleitung
D
àÌÒÚ Û͈Ëfl ÔÓ ËÒÔÓθÁÓ‚‡Ì˲
RF
©1998 by Sony Corporation
Video Camera Recorder
CCD-CR1E
Video Camera
Recorder

2
EN
Table of contents
Congratulations on your purchase of this Sony camcorder. With your camcorder you
can capture life’s precious moments with superior picture and sound quality.
WARNING
To prevent fire or shock hazard, do not expose the unit to rain or moisture.
To avoid electrical shock, do not open the cabinet.
Refer servicing to qualified personnel only.
English
Welcome!
Before you begin ..................................... 3
Identifying the parts ............................... 5
Getting started ...................... 8
Installing the batteries ............................ 8
Using house current ............................. 10
Charging the battery pack ................... 11
Shooting............................... 12
Camera recording ................................. 12
Photo recording..................................... 14
Advanced operations ........................... 15
Playing back......................... 20
Playing back........................................... 20
Watching on a TV screen ..................... 23
Editing .................................. 24
Editing onto another tape .................... 24
Additional information....... 25
Resetting the date and time ................. 25
Tips for using batteries......................... 27
Precautions............................................. 30
Trouble check ........................................ 32
Warning indicators ............................... 34
Self-diagnosis display........................... 35
Using your camcorder abroad ............ 36
Specifications ......................................... 37
Index ....................................................... 38

3
EN
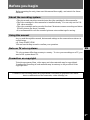
Before you begin
Before operating the unit, please read this manual thoroughly, and retain it for future
reference.
About the recording system
•The picture and sound are recorded onto the video cartridge for this camcorder.
•The video cartridge for this camcorder is installed already. You can only use the VD-
CR1 video cartridge.
•The video cartridge can be recorded for about 30 minutes camera recording and about
350 still pictures per about 5 seconds.
•It is recommended to edit the recorded pictures onto another tape for saving.
Using this manual
As you read through this manual, buttons and settings on the camcorder are shown in
capital letters.
e.g., Press START/STOP.
You can hear the beep sound to confirm your operation.
Note on TV color systems
TV color systems differ from country to country. To view your recordings on a TV, you
need a PAL system-based TV.
Precaution on copyright
Television programs, films, video tapes, and other materials may be copyrighted.
Unauthorized recording of such materials may be contrary to the provision of the
copyright laws.
Contents of the recording cannot be compensated if recording or playback is not made
due to a malfunction of the camcorder, video cartridge, etc.
EN
3
EN

4
EN
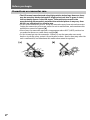
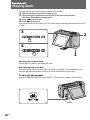
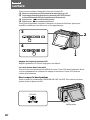
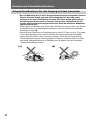
[a] [b]
Before you begin
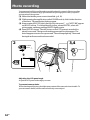
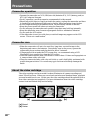
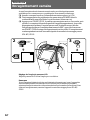
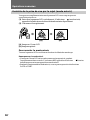
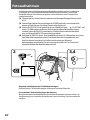
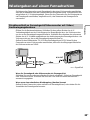
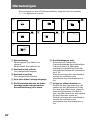
Precautions on camcorder care
•The LCD screen is manufactured using high-precision technology. However, there
may be some tiny black points and/or bright points (red, blue or green in color)
that constantly appear on the LCD screen. These points are normal in the
manufacturing process and do not affect the recorded picture in any way. Over
99.99% are operational for effective use.
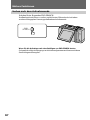
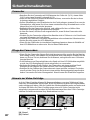
•Do not let the camcorder get wet. Keep the camcorder away from rain and sea water.
Letting the camcorder get wet may cause the unit to malfunction, and sometimes this
malfunction cannot be repaired [a].
•Never leave the camcorder exposed to temperatures above 60°C (140°F), such as in a
car parked in the sun or under direct sunlight [b].
•Do not let sand get into the camcorder. When you use the camcorder on a sandy
beach or in a dusty place, protect it from the sand or dust. Sand or dust may cause the
unit to malfunction, and sometimes this malfunction cannot be repaired.

5
EN
START/STOP
MODE
BACK
LIGHT
5SEC
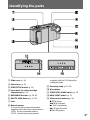
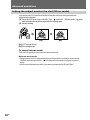
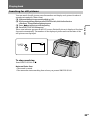
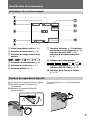
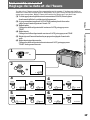
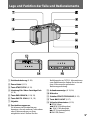
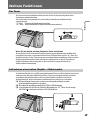
Identifying the parts
1 Slide cover (p. 20)
2 Zoom lever (p. 15)
3 START/STOP button (p. 12)
4 Open knob for video cartridge
compartment (p. 31)
5 END SEARCH button (p. 18, 22)
6 PHOTO SCAN button (p. 21, 22)
7 Lens
8 Remote sensor
You can use the remote commander
supplied with other Sony camcorders or
VCRs. Set the command mode to
VTR 2. See the instruction manual
supplied with the VCR about the
command mode.
9 Recording lamp (p. 12, 14)
0 Microphone
!¡ START/STOP MODE switch (p. 13)
!™ BACK LIGHT button (p. 17)
!£ Video control buttons (p. 22)
p STOP (stop)
0 REW (rewind)
( PLAY (playback)
) FF (fast-forward)
P PAUSE (pause)

6
EN
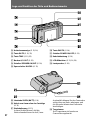
Identifying the parts
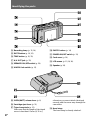
!¢ Recording lamp (p. 12, 14)
!∞ DATE button (p. 19, 25)
!§ TIME button (p. 19, 25)
!¶ A/V OUT jack (p. 23)
!• SPEAKER ON/OFF switch (p. 20)
!ª MACRO lock switch (p. 15)
@º PHOTO button (p. 14)
@¡ POWER ON/OFF switch (p. 12)
@™ Cord cover (p. 10)
@£ LCD screen (p. 12, 14, 20)
@¢ Speaker (p. 20)
otherwise you cannot attach the tripod
securely and the screw may damage the
camcorder.
@• Hand strap
The hand strap is already attached.
@∞ OPEN (BATT) release lever (p. 8)
@§ Cartridge eject lever (p. 31)
@¶ Tripod receptacle (p. 15)
Make sure that the length of the tripod
screw is less than 6.5 mm (9/32 in.),

7
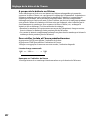
EN
12
40min
MACRO
REC
END
SEARCH
0:00:00
4 7 1998
12:00:00
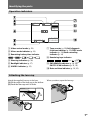
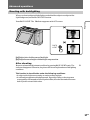
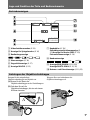
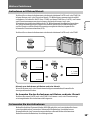
Operation indicators
Identifying the parts
7 Tape counter (p. 12)/Self-diagnosis
functions indicator (p. 35)/5SEC mode
indicator (p. 13)/Photo recording
indicator (p. 14)
8 Remaining tape indicator
9 END SEARCH indicator (p. 18, 22)/
PHOTO SCAN indicator (p. 21, 22)
0 Date and time indicator (p. 19, 25)
1 Video control mode (p. 22)
2 Mirror mode indicator (p. 16)
3 Remaining battery time indicator
4 Warning indicators (p. 34)
5 Backlight indicator (p. 17)
6 MACRO indicator (p. 15)
5min 0min
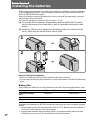
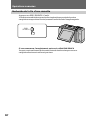
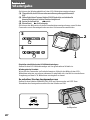
Attaching the lens cap
Attach the supplied lens cap to the lens.
(1) Fit the edge of the lens cap to the hollow.
(2) Push the lens cap until it clicks.
When you shoot, open the lens cap.

8
EN
1
2
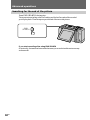
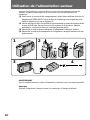
Getting started
Installing the batteries
Before using your camcorder, you first need to install two LR6 (size AA) Sony batteries
or the charged battery pack. Use the supplied LR6 (size AA) Sony batteries or the NP-
F10 "InfoLITHIUM" battery pack.
When you install or remove the batteries, be sure to turn off the camcorder to prevent
misoperation of the camcorder.
You can also use house current as a power source. (P. 10)
(1) To open the lid of the battery compartment, slide the OPEN (BATT) release
lever at the bottom of the camcorder to the left, then slide it toward you and
release.
(2) Install two LR6 (size AA) batteries or the battery pack in the direction of the
arrow. Then close the lid and slide it until it clicks.
Note on LR6 (size AA) batteries
•Be sure to install two LR6 (size AA) batteries with correct polarity.
•You can not use LR6 (size AA) batteries in a cold environment. Use the NP-F10 battery
pack .
Battery life
When using two LR6 (size AA) Sony batteries or the NP-F10 rechargeable battery pack:
Battery LR6 (size AA) batteries NP-F10
Continuous recording 60 minutes 90 (80) minutes
time*
Typical recording time** 30 minutes 50 (45) minutes
Playing time on LCD 60 minutes 90 (80) minutes
Numbers in parentheses of NP-F10 indicate the time when you use a normally charged
battery.
* Approximate continuous recording time at 25°C (77°F). Battery life will be shorter if
you use the camcorder in a cold environment.
** Approximate minutes when recording while you repeat recording start/stop and
turning the power on/off. The actual battery life may be shorter.

Getting started
9
EN
Installing the batteries
Note on remaining battery time indication during recording
When using the "InfoLITHIUM" battery, remaining battery time is displayed on the
LCD screen. However, the indication may not be displayed properly, depending on the
conditions and circumstances of use.
To remove batteries
Open the lid of the battery compartment and remove the batteries.
When removing batteries
Always turn the camcorder upside down so that batteries do not fall out when you
open the lid.

10
EN
12
34
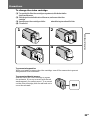
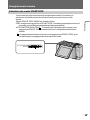
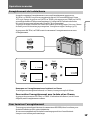
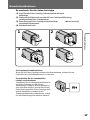
Using house current
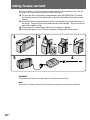
When you install or remove the battery shaped block of the connecting cord, turn off
the camcorder to prevent misoperation of the camcorder.
(1) To open the lid of the battery compartment, slide the OPEN (BATT) release
lever at the bottom of the camcorder to the left, then slide it toward you and
release.
(2) Install the battery shaped block of the DC connecting cord in the direction of
the arrow. Open the cord cover and pass the cord through. Then close the lid
and slide it until it clicks.
(3) Connect the DC connecting cord to the AC adaptor/charger.
(4) Connect the power cord to the AC adaptor/charger and a wall outlet.
WARNING
The power cord must be changed only at a qualified service shop.
Note
Keep the AC adaptor/charger away from the camcorder if the picture is affected.

Getting started
11
EN
12
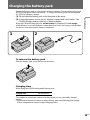
Charge the battery pack on a flat surface without vibration. The supplied battery pack
NP-F10 is charged a little at the factory. To charge the battery pack, use the supplied
AC-VF10 AC adaptor/charger.
(1) Fit and slide the battery pack in the direction of the arrow.
(2) Connect the power cord to the AC adaptor/charger and a wall outlet. The
CHARGE lamp (orange) lights up. Charging begins.
When the CHARGE lamp goes out, normal charge is completed. For full charge,
which allows you to use the battery longer than usual, leave the battery pack attached
for about 1 hour after normal charge is completed.
To remove the battery pack
Slide the battery pack in the direction of the arrow.
Charging time
When using the NP-F10 rechargeable battery pack:
Charging time* 145 (85) minutes
The number in parentheses indicates the time when you use a normally charged
battery.
* Approximate minutes to charge an empty battery pack using the supplied charger.
(Lower temperatures require a longer charging time.)
Charging the battery pack

12
EN
1
32
POWER
ON/OFF
40min
0:00:01
5s
40min REC
5s
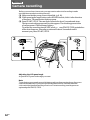
Shooting
Camera recording
Before you record one-time events, you may want to make a trial recording to make
sure that the camcorder is working correctly.
(1) Make sure that the power source is installed. (p. 8, 10)
(2) While pressing the small button on the POWER switch, slide it in the direction
of the arrow. The small button lights up green.
(3) Press START/STOP. The camcorder records for about 5 seconds and stops.
The tape counter disappears and five dots appear. The dots disappear at a rate
of one per second. The red lamps light up.
To extend the recording time in 5SEC mode, p ress START/STOP again before
all the dots disappear. Recording continues for about 5 seconds from the
moment you press START/STOP.
Adjusting the LCD panel angle
Adjust the LCD panel to the angle you want.
Note
To save battery power and prevent the battery and tape from wearing down, the power
turns off automatically if you do not operate the camcorder for 5 minutes while the
video cartridge is inserted and the power is on. To start recording, turn the power on
again and press START/STOP.

Shooting
13
EN
START/STOP
MODE
5SEC
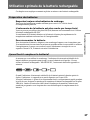
Selecting the START/STOP mode
Your camcorder has three camera recording modes. These modes enable you to take a
series of quick shots resulting in a lively video.
Set START/STOP MODE to the desired mode.
5SEC: When you press START/STOP, the camcorder records for about 5 seconds
and then stops automatically (factory setting).
ANTI GROUND SHOOTING
: The camcorder records only while you press
down START/STOP so that you can avoid recording unnecessary scenes.
: Recording starts when you press START/STOP, and stops when you press it
again.
Camera recording

14
EN
1
3,42
POWER
ON/OFF
PHOTO
40min
0:00:01
5s
Photo recording
You can record a still picture like a photograph for about five seconds. Photo recording
is useful when you want to enjoy a picture such as a photograph or when you print a
picture using a video printer.
(1) Make sure that the power source is installed. (p. 8, 10)
(2) While pressing the small button on the POWER switch, slide it in the direction
of the arrow. The small button lights up green.
(3) Keep pressing PHOTO lightly until a still picture and "
CAPTURE" appear
on the LCD screen. To change the still picture, release PHOTO, select still
picture again, and keep pressing PHOTO lightly again.
(4) Press PHOTO deeper. The still picture on the LCD screen is recorded for
about five seconds. The tape counter disappears and five dots appear. The
dots disappear at a rate of one per second. The red lamps light up. The sound
during those five seconds is also recorded.
Adjusting the LCD panel angle
Adjust the LCD panel to the angle you want.
To prevent camera-shake
When shooting a still picture, the slightest movement of the camcorder is noticeable. To
prevent camera-shake, hold the camcorder firmly or use a tripod.

Shooting
15
EN
3
2
Using the zoom feature
Zooming is a recording technique that lets you change the size of the subject in the
scene.
For more professional-looking recordings, use the zoom function sparingly.
“T” side: for telephoto (subject appears closer)
“W” side: for wide-angle (subject appears farther away)
When you shoot a subject using the telephoto zoom
If you cannot get a sharp focus while in extreme telephoto zoom, move the zoom lever
to the “W” side until the focus is sharp. You can shoot a subject that is at least about
140 cm (55 1/8 in.) away from the lens surface in the telephoto position, or about 40 cm
(15 3/4 in.) away in the wide-angle position. When you shoot a subject closer than
about 40 cm (15 3/4 in.), we recommend you shoot in macro.
Shooting a subject closer – Macro
Even small subjects, such as flowers, insects, and images in photographs, can literally
fill the screen in macro. You can shoot a subject that is at least about 10 cm (4 in.) away
from the lens surface in macro.
We recommend you to use a tripod when shooting in macro.
(1) Bring the camcorder as close as necessary to obtain the desired subject size.
(2) Slide the MACRO lock switch in the direction of the arrow.
(3) Move the zoom lever to the “W” side end. The MACRO
indicator appears
on the LCD screen.
Advanced operations

16
EN
[a] [b]
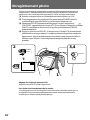
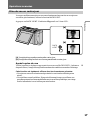
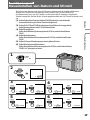
Letting the subject monitor the shot (Mirror mode)
You can turn the LCD panel over so that it faces the other way and you can let the
subject monitor the shot.
(1) Turn the LCD panel up vertically. The indicator (Mirror mode) appears
and the date and remaining tape indicators disappear.
(2) Start recording.
[a] LCD screen image.
[b] Recording image.
To cancel mirror mode
Turn the LCD panel down toward the camcorder body.
Notes on mirror mode
• The picture on the LCD appears as a mirror-image while recording in mirror mode.
The REC indicator appears as r. The other indicators may not appear in mirror
mode.
• While recording in mirror mode, you cannot operate the DATE and TIME.
Advanced operations

Shooting
17
EN
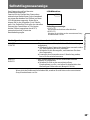
BACK
LIGHT
[a]
[b]
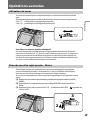
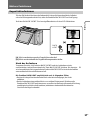
Shooting with backlighting
When you shoot a subject with the light source behind the subject or a subject with a
light background, use the BACK LIGHT function.
Press BACK LIGHT. The c indicator appears on the LCD screen.
[a] Subject is too dark because of backlight.
[b] Subject becomes bright with backlight compensation.
After shooting
Be sure to release this adjustment condition by pressing BACK LIGHT again. The c
indicator disappears. Otherwise, the picture will be too bright under normal lighting
conditions.
This function is also effective under the following conditions:
• A subject with a light source nearby or a mirror reflecting light.
• A white subject against a white background. Especially when you shoot a person
wearing shiny clothes made of silk or synthetic fiber, his or her face tends to become
dark if you do not use this function.
Advanced operations

18
EN
END
SEARCH
Searching for the end of the picture
Press END SEARCH during stop.
The tape starts rewinding or fast-forwarding and the last 5 seconds of the recorded
portion play back. Then the tape stops at the end of the recorded picture.
If you start recording after using END SEARCH
Occasionally, the transition between the last scene you recorded and the next scene may
not be smooth.
Advanced operations

Shooting
19
EN
DATE
TIME
DATE
TIME
4. 7.1998
4. 7.1998
10:30:00
TIME
DATE
10:30:00
Recording with the date/time
Before you start recording or during recording, press DATE and/or TIME. You can
record the date and/or time displayed on the LCD screen with the picture. Press DATE
(or TIME), then press TIME (or DATE) to display the date and time together. Except for
the date and/or time indicator, no indicator on the LCD screen is recorded.
The clock is set at the factory to London time for the United Kingdom and Paris time for
the other European countries. You can reset the clock. (p.25)
Press DATE and/or TIME before you start recording or during recording.
Note on recording with the date and/or time
Once you record the date and/or time, you cannot erase it.
To stop recording with the date and/or time
Press DATE and/or TIME again. The date and/or time indicator disappears. The
recording continues.
To finish recording
While pressing the small button on the POWER switch, slide it to turn off the
camcorder. And remove the batteries.
We recommend you turn off the camcorder to prevent wearing down the battery while
you do not use the camcorder.
Advanced operations

20
EN
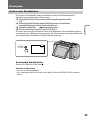
SPEAKER
OFF ON
2
1
3
4
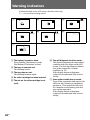
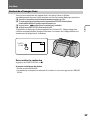
You can monitor the playback picture on the LCD screen.
(1) Make sure that the power source is installed. (p. 8, 10)
(2) While pressing the small button on the POWER switch, slide it in the direction
of the arrow. The small button lights up green.
(3) Press 0 to rewind the tape.
(4) Press ( to start playback.
You can also monitor the picture on a TV screen, after connecting the camcorder to a TV
or VCR.
Adjusting the LCD panel angle
Adjust the LCD panel to the angle you want.
When playing back in the dark
You may find it difficult to view the LCD screen in the dark. We recommend you to
monitor the playback picture on the LCD screen where there is more light.
To turn off the speaker
Slide the SPEAKER ON/OFF switch to OFF. To turn on the speaker, slide it to ON.
Playing back
Playing back
Speaker
Seite laden ...
Seite laden ...
Seite laden ...
Seite laden ...
Seite laden ...
Seite laden ...
Seite laden ...
Seite laden ...
Seite laden ...
Seite laden ...
Seite laden ...
Seite laden ...
Seite laden ...
Seite laden ...
Seite laden ...
Seite laden ...
Seite laden ...
Seite laden ...
Seite laden ...
Seite laden ...
Seite laden ...
Seite laden ...
Seite laden ...
Seite laden ...
Seite laden ...
Seite laden ...
Seite laden ...
Seite laden ...
Seite laden ...
Seite laden ...
Seite laden ...
Seite laden ...
Seite laden ...
Seite laden ...
Seite laden ...
Seite laden ...
Seite laden ...
Seite laden ...
Seite laden ...
Seite laden ...
Seite laden ...
Seite laden ...
Seite laden ...
Seite laden ...
Seite laden ...
Seite laden ...
Seite laden ...
Seite laden ...
Seite laden ...
Seite laden ...
Seite laden ...
Seite laden ...
Seite laden ...
Seite laden ...
Seite laden ...
Seite laden ...
Seite laden ...
Seite laden ...
Seite laden ...
Seite laden ...
Seite laden ...
Seite laden ...
Seite laden ...
Seite laden ...
Seite laden ...
Seite laden ...
Seite laden ...
Seite laden ...
Seite laden ...
Seite laden ...
Seite laden ...
Seite laden ...
Seite laden ...
Seite laden ...
Seite laden ...
Seite laden ...
Seite laden ...
Seite laden ...
Seite laden ...
Seite laden ...
Seite laden ...
Seite laden ...
Seite laden ...
Seite laden ...
Seite laden ...
Seite laden ...
Seite laden ...
Seite laden ...
Seite laden ...
Seite laden ...
Seite laden ...
Seite laden ...
Seite laden ...
Seite laden ...
Seite laden ...
-
 1
1
-
 2
2
-
 3
3
-
 4
4
-
 5
5
-
 6
6
-
 7
7
-
 8
8
-
 9
9
-
 10
10
-
 11
11
-
 12
12
-
 13
13
-
 14
14
-
 15
15
-
 16
16
-
 17
17
-
 18
18
-
 19
19
-
 20
20
-
 21
21
-
 22
22
-
 23
23
-
 24
24
-
 25
25
-
 26
26
-
 27
27
-
 28
28
-
 29
29
-
 30
30
-
 31
31
-
 32
32
-
 33
33
-
 34
34
-
 35
35
-
 36
36
-
 37
37
-
 38
38
-
 39
39
-
 40
40
-
 41
41
-
 42
42
-
 43
43
-
 44
44
-
 45
45
-
 46
46
-
 47
47
-
 48
48
-
 49
49
-
 50
50
-
 51
51
-
 52
52
-
 53
53
-
 54
54
-
 55
55
-
 56
56
-
 57
57
-
 58
58
-
 59
59
-
 60
60
-
 61
61
-
 62
62
-
 63
63
-
 64
64
-
 65
65
-
 66
66
-
 67
67
-
 68
68
-
 69
69
-
 70
70
-
 71
71
-
 72
72
-
 73
73
-
 74
74
-
 75
75
-
 76
76
-
 77
77
-
 78
78
-
 79
79
-
 80
80
-
 81
81
-
 82
82
-
 83
83
-
 84
84
-
 85
85
-
 86
86
-
 87
87
-
 88
88
-
 89
89
-
 90
90
-
 91
91
-
 92
92
-
 93
93
-
 94
94
-
 95
95
-
 96
96
-
 97
97
-
 98
98
-
 99
99
-
 100
100
-
 101
101
-
 102
102
-
 103
103
-
 104
104
-
 105
105
-
 106
106
-
 107
107
-
 108
108
-
 109
109
-
 110
110
-
 111
111
-
 112
112
-
 113
113
-
 114
114
-
 115
115


in anderen Sprachen
- English: Sony CCD-CR1E User manual
- français: Sony CCD-CR1E Manuel utilisateur
Verwandte Papiere
Sonstige Unterlagen
-
Samsung VP-D63 Benutzerhandbuch
-
-
Samsung VP-D372 Benutzerhandbuch
-
Samsung VP-L850 Benutzerhandbuch
-
-
-
-
-
Panasonic VWCTR1E Bedienungsanleitung
-
NightStick XPR-5568 Benutzerhandbuch