Parkside PDM 600 A1 Operating And Safety Instructions Manual
- Kategorie
- Drehmaschinen
- Typ
- Operating And Safety Instructions Manual

IAN 322988_1901
WOODTURNING LATHE PDM 600 A1
CHAT
DRECHSELMASCHINE
Bedienungs- und Sicherheitshinweise
Originalbetriebsanleitung
DEIE NI
WOODTURNING LATHE
Operating and Safety Instructions
Translation of Original Operating Manual
GB
NIIE

GB / IE / NI Operating and Safety Instructions Page 01
DE / AT / CH Bedienungs- und Sicherheitshinweise Seite 11
Klappen Sie vor dem Lesen die Seite mit den Abbildungen aus und machen Sie sich anschließend mit allen Funktionen des Gerätes vertraut.
DE AT CH
Before reading, unfold the page containing the illustrations and familiarise yourself with all functions of the device.
GB IE NI

A ( 1 : 1 )
A
1
1
2
2
3
3
4
4
5
5
6
6
7
7
8
8
9
9
10
10
11
11
12
12
13
13
14
14
15
15
16
16
A A
B B
C C
D D
E E
F F
G G
H H
I I
J J
K K
L L
Zust. Änderungen Datum
Name
Datum Name
Bearb.
Gepr.
Abmessung:
Werkstoff:
Maßstab:
Roh-Gew.:
Blatt
EDV-Nr:
14.06.2019
phg
1
A0
Günzburger Str. 69, 89335 Ichenhausen
Fabrikation von Holzbearbeitungsmaschinen GmbH
Prof.-Nr.:
Rohteil-Nr.:
Fert.-Nr.:
Fert.-Gew.:
DIN:
Oberfl.:
Bermerkung:
Toleranz:
ZNr.:
-
A ( 1 : 1 )
A
1
1
2
2
3
3
4
4
5
5
6
6
7
7
8
8
A A
B B
C C
D D
E E
F F
4 5
3
1 15
A ( 1:1 )
A
1
1
2
2
3
3
4
4
5
5
6
6
7
7
8
8
A A
B B
C C
D D
E E
F F
2
1 4
A ( 1 : 1 )
A
1
1
2
2
3
3
4
4
5
5
6
6
7
7
8
8
A A
B B
C C
D D
E E
F F
6 13
11
10
9
1
1
2
2
3
3
4
4
5
5
6
6
7
7
8
8
9
9
10
10
11
11
12
12
13
13
14
14
15
15
16
16
A A
B B
C C
D D
E E
F F
G G
H H
I I
J J
K K
L L
1
1
10
12
2
3
4
5 6 7
8
9
11
1314
AAAA BBBB

6
14

1GB/IE/NI
Table of contents: Page:
1. Explanation of the symbols on the equipment ..................................................................................................................................................2
2. Introduction ..........................................................................................................................................................................................................3
3. Device description ...............................................................................................................................................................................................3
4. Scope of delivery ................................................................................................................................................................................................3
5. Intended use ........................................................................................................................................................................................................ 3
6. Safety information ............................................................................................................................................................................................... 4
7. Remaining hazards .............................................................................................................................................................................................5
8. Technical data ..................................................................................................................................................................................................... 6
9. Before putting into operation..............................................................................................................................................................................6
10. Attachment and operation .................................................................................................................................................................................6
11. Transport .............................................................................................................................................................................................................8
12. Cleaning and maintenance ................................................................................................................................................................................ 8
13. Storage ................................................................................................................................................................................................................8
14. Electrical connection ...........................................................................................................................................................................................8
15. Disposal and recycling .......................................................................................................................................................................................8
16. Troubleshooting ..................................................................................................................................................................................................9
17. Warranty certificate ..........................................................................................................................................................................................10
18. Declaration of conformity .................................................................................................................................................................................23

2 GB/IE/NI
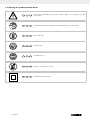
1. Explanation of the symbols on the equipment
GB IE NI
Warning! Danger to life, risk of injury or damage to the tool are possible by ignoring!
GB IE NI
Read instruction manual and safety instructions before starting up and pay attention!
GB IE NI
Wear ear-muffs!
GB IE NI
Wear a hair net!
GB IE NI
Wear safety goggles!
GB IE NI
The use of gloves is prohibited!
GB IE NI
Protection class II (double shielded)

3GB/IE/NI
2. Introduction
Manufacturer:
scheppach
Fabrikation von Holzbearbeitungsmaschinen GmbH
Günzburger Straße 69
D-89335 Ichenhausen
Dear Customer,
we hope your new tool brings you much enjoyment and suc-
cess.
Note:
According to the applicable product liability laws, the manu-
facturer of the device does not assume liability for damages
to the product or damages caused by the product that occurs
due to:
• Improper handling
• Non-compliance of the operating instructions
• Repairs by third parties, not by authorized service techni-
cians
• Installation and replacement of non-original spare parts
• Application other than specified
• A breakdown of the electrical system that occurs due to the
non-compliance of the electric regulations and VDE regula-
tions 0100, DIN 57113 / VDE0113.
We recommend:
Read through the complete text in the operating instructions be-
fore installing and commissioning the device.
The operating instructions are intended to help the user to be-
come familiar with the machine and take advantage of its ap-
plication possibilities in accordance with the recommendations.
The operating instructions contain important information on
how to operate the machine safely, professionally and econom-
ically, how to avoid danger, costly repairs, reduce downtimes
and how to increase reliability and service life of the machine.
In addition to the safety regulations in the operating instruc-
tions, you have to meet the applicable regulations that apply
for the operation of the machine in your country.
Keep the operating instructions package with the machine at
all times and store it in a plastic cover to protect it from dirt
and moisture. Read the instruction manual each time before
operating the machine and carefully follow its information.
The machine can only be operated by persons who were in-
structed concerning the operation of the machine and who are
informed about the associated dangers.
In addition to the safety notes contained in the present oper-
ating instructions and the special regulations of your country,
the generally recognized technical rules for the operation of
woodworking machines must be observed.
We accept no liability for damage or accidents which arise
due to non-observance of these instructions and the safety in-
formation.
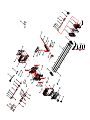
3. Device description
1. Motor unit
2. On/Off switch
3. Speed control
4. Headstock drive centre
5. Tool support
6. Tool rest
7. Centering pin
8. Counternut
9. Tailstock
10. Handwheel
11. Clamping lever tailstock
12. Machine bed
13. Locking screw
14. Clamping lever tool rest
15. Face plate
4. Scope of delivery
• 1 Motor unit
• 1 Headstock drive centre
• 1 Tool rest
• 1 Tool support
• 1 Centering pin
• 1 Tailstock
• 1 Machine bed
• 1 Face plate
• 2 Wrench SW24
• 1 Wood turning chisel, flat/angular
• 1 Wood turning chisel, hollow
• 1 Clamping lever tool rest
• 8 Fastening screws (B)
• 1 Instruction manual
5. Intended use
The machine is only designed for working on wood using a
suitable turning tool.
The machine meets the currently valid EU machine directive.
The manufacturer’s safety, operation and maintenance instruc-
tions as well as the technical data given in the calibrations and
dimensions must be adhered to.
Relevant accident prevention regulations and other generally
recognized safety and technical rules must also be adhered to.
The machine may only be used, maintained or repaired by
trained persons who are familiar with the machine and have
been informed about the dangers. Unauthorized modifications
of the machine exclude a liability of the manufacturer for dam-
ages resulting from the modifications.
The machine is intended for use only with original spare parts
and original tools from the producer.
Any other use is considered to be not intended. The manufac-
turer excludes any liability for resulting damages, the risk is ex-
clusively borne by the user.
m Please note that our equipment has not been designed for
use in commercial, trade or industrial applications. Our war-
ranty will be voided if the equipment is used in commercial,
trade or industrial businesses or for equivalent purposes.

4 GB/IE/NI
6. Safety information
m CAUTION! The following basic safety precau-
tions must be observed while using electric tools
to protect against electric shock, injury and risk of
ire. Please read all instructions before using this
electric tool and keep the safety instructions in a
safe place.
Safe operation
1. Keep work area clear
- Cluttered areas and benches invite injuries.
2. Consider work area environment
- Do not expose tools to rain.
- Do not use tools in damp or wet locations.
- Keep work area well lit.
- Do not use tools in the presence of flammable liquids
or gases.
3. Guard against electric shock
- Avoid body contact with earthed or grounded surfac-
es (e. g. pipes, radiators, ranges, refrigerators).
4. Keep other people away!
- Do not let other people — especially children — touch
the electric tool or its cable. Keep them clear of the
work area.
5. Store idle tools
- When not in use, tools should be stored in a dry
locked- up place, out of the reach of children.
6. Do not force the tool
- It will do the job better and safer at the rate for which
it was intended.
7. Use the right tool
- Do not force small tools to do the job of a heavy tool.
- Do not use the electric tool for purposes for which it is
not intended. For example, do not use handheld circu-
lar saws for the cutting of branches or logs.
8. Wear suitable clothing
- Do not wear wide clothing or jewellery, which can
become entangled in moving parts.
- When working outdoors, anti-slip footwear is recom-
mended.
- Tie long hair back in a hair net.
9. Use protective equipment
- Wear protective goggles.
- Wear a mask when carrying out dust-creating work.
10. Connect the dust extraction device
- If connections for dust extraction and a collecting de-
vice are present, make sure that they are connected
and used properly.
- Operation in enclosed spaces is only permitted with
the use of a suitable extraction system.
11. Do not abuse the cord.
- Never yank the cord do disconnect it from the socket.
Keep the cord away from heat, oil and sham edges.
12. Secure work
- For long workpieces, an additional supporting sur-
face (table, trestles, etc.) is required in order to pre-
vent tipping of the machine.
- Always press the workpiece firmly against the work-
ing surface and stop in order to prevent wobbling or
twisting of the workpiece.
13. Do not overreach
- Keep proper footing and balance at all times.
- Avoid awkward hand positions in which one or both
hands could touch the saw blade as the result of a
sudden slip.
14. Maintain tools with care
- Keep cutting tools sharp and clean for better and
safer performance.
- Follow instruction for lubricating and changing acces-
sories.
- Inspect tool cords periodically and if damaged have
them repaired by an authorized service facility.
- Inspect extension cords periodically and replace if
damaged.
- Keep handles dry, clean and free from oil and grease.
15. Disconnect tools
- Never remove loose splinters, chips or jammed pieces
of wood when the saw blade is running.
- When the electric tool is not in use, before mainte-
nance and when changing tools such as the saw
blade, drill bit, milling cutter.
16. Remove adjusting keys and wrenches
- Form the habit of checking to see that keys and adjust-
ing wrenches are removed from the tool before turn-
ing it on.
17. Avoid unintentional starting
- Ensure switch is in “off” position when plugging in.
18. Use outdoor extension leads
- When the tool is used outdoors, use only extension
cords intended for outdoor use and so marked.
- Use the cable drum only in the unrolled state.
19. Stay alert
- m Watch what you are doing, use common sense
and do not operate the tool when you are tired.
20. Check damaged parts
- Before further use of tool, it should be carefully
checked to determine that it will operate properly and
perform its intended function.
- Check whether the moving parts are working properly
and are not becoming jammed or whether parts are dam-
aged. All parts must be correctly fitted and satisfy all con-
ditions to ensure the proper operation of the power tool.
- A guard or other part that is damaged should be
properly repaired or replaced by an authorized ser-
vice centre unless otherwise indicated in this instruc-
tion manual.
- Have defective switches replaced by an authorized
service centre.
- Do not use any faulty or damaged connection cables.
- Do not use the tool if the switch does not turn it on
and off.
21. Warning!
- The use of any accessory or attachment other than
one recommended in this instruction manual may pre-
sent a risk of personal injury.
22. Have your tool repaired by a qualified person
- This electric tool complies with the relevant safety
rules. Repairs should only be carried out by qualified
persons using original spare parts, otherwise this may
result in considerable danger to the user.

5GB/IE/NI
Warning! During operation, this power tool produces an
electromagnetic field. Under certain circumstances, this field
may negatively affect active or passive medical implants. In
order to reduce the danger of serious or fatal injuries, we rec-
ommend that individuals who wear medical implants should
consult their doctor and the manufacturer of the implant before
operating the power tool.
Operational Safety Instructions for the Wood Turn-
ing Lathe
• Familiarise yourself with the machine’s features and wood-
turning techniques before using the machine.
• Examine all workpieces for splits or knots. Glued joints must
set completely before turning.
• Ensure that the workpiece is securely locked in position and
all attachments are secured.
• Before turning the machine ON ensure that the workpiece
can rotate freely by rotating it by hand.
• Keep your hands and fingers away from the rotating work-
piece.
• Switch the machine OFF and wait until it has come to a full
stop before making any adjustments on the workpiece, tail-
stock, or tool rest.
• Maintenance, adjustment, calibration and cleaning may
only be performed with the motor turned off.
• The machine is designed for use with wood-turning chisels
only.
• Always store away the wood-turning chisels safely before
you leave the workplace.
• Do not run the lathe without its covers and guards in place.
• Keep cutting tools sharp.
• Use the lowest speed when starting a new workpiece.
• Always stop the lathe at its slowest speed. If the lathe is run
so fast that it vibrates, there is a risk that the workpiece will
be thrown or the cutting tool jerked from your hands.
• Do not allow cutting tools to bite into the workpiece. The
wood could be split or thrown from the lathe.
• Always position the tool rest above the centre line of the
lathe when shaping a piece of stock.
• Before attaching a workpiece to the face plate, always rough
it out to make it as round as possible. This minimizes the vi-
brations while the piece is being turned. Always fasten the
workpiece securely to the faceplate. Failure to do so could
result in the workpiece being thrown away from the lathe.
• Use a brush or compressed air to remove wood shavings;
never your hands. The wood shavings will be sharp.
• The cutting tool must always be tight within the chuck and
adjusted to limit projection from the post. This will reduce the
possibility of the tool breaking or bending.
• Do not reach a cross the lathe while it is running.
• Only feed workpiece into a cutting tool against the direction
of rotation. The workpiece must always be rotating toward
you.
• Do not leave the tool unattended when it is plugged into an
electrical outlet. Turn off the tool, and unplug it from its electri-
cal outlet before leaving.
• This product is not a toy. Keep it out of reach of children.
• Some dust created by power sanding, sawing, grinding,
drilling, and other construction activities, contains chemicals
known to cause cancer, birth defects or other reproductive
harm. Some examples of these chemicals are:
- Lead from lead-based paints
- Crystalline silica from bricks and cement or other ma-
sonry products
- Arsenic and chromium from chemically treated lumber
• Your risk from these exposures varies, depending on how
often you do this type of work. To reduce your exposure to
these chemicals: work in a well ventilated area, and work
with approved safety equipment ,such as those dust masks
that are specially designed to filter out microscopic particles.
• People with pacemakers should consult their physician(s)
before use. Electromagnetic fields inclose proximity to heart
pacemaker could cause pacemaker interference or pace-
maker failure. In addition, people with pacemakers should:
- Avoid operating alone.
• Properly maintain and inspect to avoid electrical shock.
• The warnings, precautions, and instructions discussed in this
user manual cannot cover all possible conditions and situa-
tions that may occur. It must be understood by the operator
that common sense and caution are factors which cannot be
built into this product, but must be supplied by the operator.
Additional safety instructions for the use of face-
plates
• Ensure that the faceplate is the appropriate size to support
the workpiece.
• Ensure that the workpiece is securely fastened to the face-
plate.
• Rough cut the workpiece as close as possible to the final
shape before mounting onto a faceplate.
• Only use scraping chisels for faceplate turning. Cutting chis-
els can easily be torn out of your hands.
• Pay attention that the woodturning chisel cannot interfere
with the holding screws at the finished dimensions of the
workpiece.
7. Remaining hazards
The machine has been built using modern technol-
ogy in accordance with recognized safety rules.
Some remaining hazards, however, may still exist.
• Only process selected woods without defects such as:
Branch knots, edge cracks, surface cracks. Wood with such
defects is prone to splintering and hazardous.
• Wood which is not correctly glued can explode when being
processed due to centrifugal force.
• Trim work piece to a rectangular shape, center and correctly
secure before processing. Unbalanced work pieces can be
hazardous.
• Injuries can occur when feeding work pieces if tool supports
are not correctly adjusted or if turning tools are blunt. Sharp
turning tools which are free of defects are necessary for pro-
fessional turning.
• Long hair and loose clothing can be hazardous when the
work piece is rotating. Wear personal protective gear such
as a hair net and tight fitting work clothes.
• Saw dust and wood chips can be hazardous. Wear person-
al protective gear such as safety goggles and a dust mask.

6 GB/IE/NI
• The use of incorrect or damaged mains cables can lead to
injuries caused by electricity.
• Even when all safety measures are taken, some remaining
hazards which are not yet evident may still be present.
• Remaining hazards can be minimized by following the in-
structions in „Safety Precautions“, „Proper Use“ and in the
entire operating manual.
• Before carrying out any adjustment or maintenance work,
switch off the device and disconnect the mains plug.
8. Technical data
AC motor 220 - 240 V
~
50Hz
Power 550 Watt
Operating mode S1 *
Spindel speed 800 - 3000 min
-1
Max. workpiece length 600 mm
Max. workpiece diameter 25 cm
Headstock thread M 18 x 1,5
Weight 6,7 kg
Dimensions L x W x H mm 1010x154x215
* Operating mode S1, continuous operation
Noise
Total vibration values determined in accordance with EN
61029.
Sound pressure level L
pA
86,6 dB(A)
Uncertainty K
pA
3 dB
Sound power level L
WA
99,6 dB(A)
Uncertainty K
WA
3 dB
Wear hearing protection.
The effects of noise can cause a loss of hearing. Total vibration
values (vector sum - three directions) determined in accordance
with EN 61029.
9. Before putting into operation
• Open the packaging and remove the device carefully.
• Remove the packaging material as well as the packaging
and transport bracing (if available).
• Check that the delivery is complete.
• Check the device and accessory parts for trans - port dam-
age.
• If possible, store the packaging until the warranty period has
expired.
ATTENTION
The device and packaging materials are not toys!
Children must not be allowed to play with plastic
bags, film and small parts! There is a risk of swal-
lowing and suffocation!
• The machine must be securely installed, i.e. bolted down on
a workbench, base frame or similar.
• Before the machine is put into operation, all covers and safe-
ty devices must be properly attached.
• In the case of wood which has already been worked with,
check for foreign bodies such as nails or screws etc.
• Before connecting the machine, check that the data on the
type plate matches those of the mains system.
• The machine must only be connected to a properly installed
safety socket which is protected by a fuse of at least 16A.
10. Attachment and operation
m Warning! Risk of injury!
Prepare the workplace where you intend to place the electrical
power tool. Provide enough space to ensure safe and trouble-
free operation. The power tool is designed for working in en-
closed rooms and has to be installed on level and firm ground.
m Important! Pull out the power plug before car-
rying out any maintenance, resetting or assembly
work on the device!
Fixation of the machine (Fig. 1)
Before operation, the device must be screwed to a workbench,
undercarriage or similar. Use the slotted holes (A) for this pur-
pose.
Installing the tool rest (Fig. 1; 4)
1. Fit the clamping lever for the tool rest (14) as shown in
figure 6.
1. Plug the tool rest (6) into the hole in the tool support (5).
2. Fasten the tool rest (6) at the desired height using the
locking screw (13).
Setting the tool rest (Fig. 1; 4)
1. The height of the tool rest (6) can be set by loosening the
locking screw (13).
2. In order to set the length of the tool rest (6), loosen the
clamping lever for tool rest (14). The tool rest (6) must
be driven as close as possible to the workpiece without
touching it.
3. Retighten the clamping lever for the tool rest (14).
Adjustment of the tailstock (Fig. 1; 5)
1. Loosen the clamping lever (11) for the tailstock (9) in or-
der to set the distance between the tailstock (9) and the
headstock drive centre (4).
2. To adjust the clamping pressure use the handwheel (10)
and secure it with the counternut (8).
Warning! Make sure that the tool rest (6) is tight-
ened securely and cannot turn in towards the
workpiece.
Securing the workpiece on the headstock drive
centre (Fig. 1)
1. Locate the centre of the workpiece by accurately draw-
ing diagonal lines on each end. The intersection point of
these two lines will indicate the centre of the workpiece.

7GB/IE/NI
2. At the end of the workpiece, produce an approx. 2mm
deep saw cut along the diagonal, in order to receive the
headstock drive centre (4).
3. Use a wood mallet (not supplied) to drive the headstock
drive centre (4) into the point where the diagonal cuts
across the end of the workpiece. Take care to protect the
threaded end of the headstock drive centre (4) so that no
object damages the thread.
4. Cut the corners off the workpiece if the diameter of the
ends is greater than 5 cm x 5 cm to make turning easier
and safer.
5. Measure the combined total length of the workpiece with
the headstock drive centre (4) and centering pin (7) on
each end.
6. Loosen the clamping lever for the tailstock (9) and set
the distance between the headstock drive centre (4) and
the centring pin (7), such that a slightly greater distance
is obtained than the measured total length of the work-
piece.
7. Tightly screw the headstock drive centre (4) with work-
piece onto the centering pin (7) by the hand wheel (10).
8. Once positioned fasten the counternut (8) against the tail
stock (9).
9. Set the tool support (5) with tool rest (6) approx. 3 mm
away from the workpiece.
Caution: Before starting the machine test the setup
by rotating the workpiece by hand to ensure that
there is enough clearance all the way around and
that it does not come into contact with the tool sup-
port (6).
Using the face plate: (Fig. 3)
To use the faceplate:
• The faceplate (15) offers solid and secure support for a
variety of turned objects such as platters, bowls, pots and
round pieces.
Installing the faceplate:
1. Loosen the headstock drive centre (4) and remove from
the spindle.
2. Thread the faceplate (15) onto the headstock spindle
and tighten by hand and the wrench.
Securing workpiece on the faceplate:
Workpieces that cannot be worked using the headstock drive
centre (4), instead must be mounted on a faceplate (15) or a
backing piece, such as a chuck or block of wood.
1. Rough cut the workpiece as close as possible to the final
shape before mounting onto the faceplate (15).
2. Firmly attach the faceplate (15) to the workpiece. De-
pending on the workpiece, this can be done with wood
screws (not supplied) driven directly into the workpiece.
Where the intended cutting dimensions do not allow for
screws, a backing piece might be required. A backing
piece can be made from a piece of scrap wood cube
with two flat and parallel opposite faces. Identify and
mark the centre of the backing piece.
It may be necessary to bond the carrier part (wooden
block) with the workpiece and attach it to the carrier part,
before fastening it to the face plate (15) using screws (not
included in the scope of delivery). In this case, clamp the
backing piece to the workpiece and wait for the glue to
dry according to the glue manufacturer’s recommenda-
tion. Where the use of screws into the workpieceis not
permissible, the workpiece can be glued onto a backing
piece with a piece of paper placed in between the joint.
This allows for later separation without damage caused
to the workpiece. Use only non-tapered head wood
screws. Do not use tapered head wood screws.
Caution: Pay attention to the wood turning chisel
so that it does not interfere with the holding screws
at the finished dimensions of the workpiece.
Switching on and off (Fig. 1)
• Press the On switch (2/„I“)to start the machine.
• Press the Off switch (2/“0“) to stop the machine.
Caution: The device starts running immediately at
the set speed.
Speed adjustment (Fig. 1)
The correct speed must be set to suit the workpiece to be pro-
cessed.
Electronic speed control:
Use the electronic speed control to steplessly set the speed:
Set the speed with the help of the speed control (3).
Important information for operation
• We recommend that you refer to specialised literature on
wood-turning techniques.
• Look out for knots and shrinkage shakes when selecting the
wood for your turning work. Only use wood which is free
of cracks and large knots (where there are small knots, take
appropriate care with the pressure applied with the turning
tool).
• Always check that the shaped item is securely held by check-
ing it by hand. Warning! Pull out the power plug!
• Use only an original turning tool which is sharp.
• Do not stand in the flight path of the workpiece when turning
wooden disks.
• Please cut large and imbalanced shaped items to size as
best as possible using a bandsaw or fretsaw. If the shaped
items are very imbalanced they will pose a risk to your health
and to the service life of the machine.
• Always start with the lowest possible speed for new work-
pieces being turned and increase it with increasing massive-
ness of the workpiece being turned.
• Do not use wooden disks with contraction cracks, since they
pose a high risk of bursting under the impact of centrifugal
forces.
• Do not exceed the maximum workpiece sizes.
• In case of tools which get blocked: Pull out the power plug
first before starting troubleshooting.

8 GB/IE/NI
• To do your turning work, position yourself at the machine so
that you can guide the cutting tools effectively on the tool
support.
• Only use cutting tools, which are recommended for wood
turning works.
11. Transport
1. Turn the power tool off before it is transported and dis-
connect it from the power supply.
2. Always carry the electric tool with at least one other per-
son. Carry the power tool to the machine bed (12).
3. Protect the power tool against knocks, jolts and strong
vibrations, e. g. when it is transported in motor vehicles.
4. Secure the power tool against tilting and sliding.
5. Never use the protective devices for handling or trans-
port.
12. Cleaning and maintenance
m Warning!
Prior to any adjustment, maintenance or service work discon-
nect the mains power plug!
General maintenance measures
Wipe chips and dust off the machine from time to time using a
cloth. In order to extend the service life of the tool, oil the rotary
parts once monthly. Do not oil the motor.
When cleaning the plastic do not use corrosive product.
Maintenance
There are no parts inside the machine which require additional
maintenance.
Service information
Please note that the following parts of this product are sub-
ject to normal or natural wear and that the following parts are
therefore also required for use as consumables.
Wear parts*: wood turning chisel
* Not necessarily included in the scope of delivery!
13. Storage
Store the device and its accessories in a dark, dry and frost-
proof place that is inaccessible to children. The optimum stor-
age temperature is between 5 and 30˚C.
Store the electrical tool in its original packaging.
Cover the electrical tool in order to protect it from dust and
moisture.
Store the operating manual with the electrical tool.
14. Electrical connection
The installed electric motor is connected and is ready to work.
The connection complies with the relevant VDE and DIN regula-
tions. The customer-side mains supply and the used extension
line must meet these regulations.
Defective electric connection lines
Often, insulation damages occur on electrical connection lines.
Causes are:
• Drag marks if connection lines are led through window or
door clearances.
• Kinks due to improper attachment or routing of the connec-
tion line.
• Cuts caused by running over the connection line.
• Insulation damages caused by pulling the connection line
out of the wall socket.
• Fissures caused by the ageing of the insulation.
Such defective electric connection lines must not be used and
are hazardous due to the insulation damages.
Regularly check the electrical connection lines for damages.
Please make sure that the connection lines are disconnected
from the mains supply during the check.
Electrical connection lines must comply with the relevant VDE
and DIN regulations. Only use connection lines labelled with
H05VV-F.
The labelling of the connection cable with the type specifica-
tion is required.
AC motor
• The mains voltage must be 220 - 240 V
~
.
• Extension cables up to 25 m in length must have a cross-
section of 1.5 mm².
Connections and repairs to the electrical equipment may only
be performed by a qualified electrician.
If you have any queries, please provide the follow-
ing information:
• Current type of the engine
• Data from the machine type plate
• Data from the motor type plate
15. Disposal and recycling
The equipment is supplied in packaging to prevent it from being
damaged in transit.
The raw materials in this packaging can be reused or recycled.
The equipment and its accessories are made of various types
of material, such as metal and plastic.
Defective components must be disposed of as special waste.
Ask your dealer or your local council!
The packaging is wholly composed of
environmentally-friendly materials that can be
disposed of at a local recycling centre.
Contact your local refuse disposal authority for
more details of how to dispose of your worn-out
electrical devices.

9GB/IE/NI
Old devices must not be disposed of with household waste!
This symbol indicates that this product must not be disposed of together with domestic waste in compliance with the Directive (2012/19/
EU) pertaining to waste electrical and electronic equipment (WEEE). This product must be disposed of at a designated collection point.
This can occur, for example, by handing it in at an authorised collecting point for the recycling of waste electrical and electronic equip-
ment. Improper handling of waste equipment may have negative consequences for the environment and human health due to poten-
tially hazardous substances that are often contained in electrical and electronic equipment. By properly disposing of this product, you are also
contributing to the effective use of natural resources. You can obtain information on collection points for waste equipment from your municipal
administration, public waste disposal authority, an authorised body for the disposal of waste electrical and electronic equipment or your waste
disposal company.
16. Troubleshooting
Trouble Possible cause Solution
Quality of cut is poor. Cutting tool is dull. Sharpen or replace cutting tool.
Cutting too aggressive cut. Reduce the working pressure.
Cutting tool is positioned below workpiece
center line.
Lower cutting tool to maximum 3mm above the centre line of
workpiece.
Lathe speed too slow Increase lathe speed
Excessive vibration when
turning thin workpieces.
Cutting tool is positioned below workpiece
centre line.
Raise cutting tool to centerline of workpiece.
Cutting to aggressively. Use a lighter touch.
Excessive vibration when
turning large workpieces or
bowls.
Headstock and/or tailstock improperly
located at ends of workpiece.
Check for proper workpiece centres at headstock and/or
tailstock.
Workpiece is unbalanced. Trim end of workpiece until workpiece is more balanced.
Lathe will not turn on. Cord not connected into electrical outlet. Connect to electrical outlet.
Lathe will not turn off. Damaged or faulty power switch and/or
internal wiring.
Unplug the lathe from its electrical outlet immediately. Do not
operate lathe until it is repaired by a qualified service technician.

10 GB/IE/NI
17. Warranty certificate
Dear Customer,
All of our products undergo strict quality checks to ensure that they reach you in perfect condition. In the unlikely event that your device
develops a fault, please contact our service department at the address shown on this guarantee card. Of course, if you would prefer to
call us then we are also happy to offer our assistance under the service number printed below. Please note the following terms under which
guarantee claims can be made:
• These guarantee terms cover additional guarantee rights and do not affect your statutory warranty rights. We do not charge you for
this guarantee.
• Our guarantee only covers problems caused by material or manufacturing defects, and it is restricted to the rectification of these
defects or replacement of the device. Please note that our devices have not been designed for use in commercial, trade or industrial
applications. Consequently, the guarantee is invalidated if the equipment is used in commercial, trade or industrial applications or
for other equivalent activities. The following are also excluded from our guarantee: compensation for transport damage, damage
caused by failure to comply with the installation/assembly instructions or damage caused by unprofessional installation, failure to
comply with the operating instructions (e.g. connection to the wrong mains voltage or current type), misuse or inappropriate use
(such as overloading of the device or use of non-approved tools or accessories), failure to comply with the maintenance and safety
regulations, ingress of foreign bodies into the device (e.g. sand, stones or dust), effects of force or external influences (e.g. damage
caused by the device being dropped) and normal wear resulting from proper operation of the device.
The guarantee is rendered null and void if any attempt is made to tamper with the device.
• The guarantee is valid for a period of 3 years starting from the purchase date of the device. Guarantee claims should be submitted
before the end of the guarantee period within two weeks of the defect being noticed. No guarantee claims will be accepted after
the end of the guarantee period. The original guarantee period remains applicable to the device even if repairs are carried out or
parts are replaced. In such cases, the work performed or parts fitted will not result in an extension of the guarantee period, and no
new guarantee will become active for the work performed or parts fitted. This also applies when an on-site service is used.
• In order to assert your guarantee claim, please send your defective device postage-free to the address shown below. Please enclose
either the original or a copy of your sales receipt or another dated proof of purchase. Please keep your sales receipt in a safe place,
as it is your proof of purchase. It would help us if you could describe the nature of the problem in as much detail as possible. If the
defect is covered by our guarantee then your device will either be repaired immediately and returned to you, or we will send you a
new device.
Of course, we are also happy offer a chargeable repair service for any defects which are not covered by the scope of this guarantee or for
units which are no longer covered. To take advantage of this service, please send the device to our service address.
Service-Hotline (GB/IE/NI):
+800 4003 4003
(0,00 EUR/Min.)
Service-Email (GB):
service.[email protected]
Service-Email (IE/NI):
service.IE@scheppach.com
Service Address (GB/IE/NI):
Doyles Wholesale
Dublind Road
Castlecomer, Co. Kilkenny R95AP6F
At www.lidl-service.com you can download this and many more manuals, product videos plus installation
software.
The QR code takes you directly to the Lidl service page (www.lidl-service.com) and you can open your
operating manual by entering the article number (IAN) 322988_1901.

11DE/AT/CH
Inhalt: Seite:
1. Erklärung der Symbole auf dem Gerät............................................................................................................................................................12
2. Einleitung ...........................................................................................................................................................................................................13
3. Gerätebeschreibung .........................................................................................................................................................................................13
4. Lieferumfang .....................................................................................................................................................................................................13
5. Bestimmungsgemäße Verwendung ..................................................................................................................................................................13
6. Sicherheitshinweise ...........................................................................................................................................................................................14
7. Restrisiken ..........................................................................................................................................................................................................16
8. Technische Daten ..............................................................................................................................................................................................16
9. Vor Inbetriebnahme ..........................................................................................................................................................................................16
10. Aufbau und Bedienung ....................................................................................................................................................................................17
11. Transport ...........................................................................................................................................................................................................18
12. Reinigung und Wartung ...................................................................................................................................................................................18
13. Lagerung ............................................................................................................................................................................................................18
14. Elektrischer Anschluss........................................................................................................................................................................................19
15. Entsorgung und Wiederverwertung .................................................................................................................................................................19
16. Störungsabhilfe .................................................................................................................................................................................................20
17. Garantieurkunde ...............................................................................................................................................................................................21
18. Konformitätserklärung .......................................................................................................................................................................................23

12 DE/AT/CH
1. Erklärung der Symbole auf dem Gerät
DE AT CH
Warnung! Bei Nichteinhaltung Lebensgefahr, Verletzungsgefahr oder Beschädigung des Werk-
zeugs möglich!
DE AT CH
Vor Inbetriebnahme Bedienungsanleitung und Sicherheitshinweise lesen und beachten!
DE AT CH
Gehörschutz tragen!
DE AT CH
Haarnetz tragen!
DE AT CH
Schutzbrille tragen!
DE AT CH
Benutzen von Handschuhen verboten!
DE AT CH
Schutzklasse II (Doppelisolierung)

13DE/AT/CH
2. Einleitung
Hersteller:
scheppach
Fabrikation von Holzbearbeitungsmaschinen GmbH
Günzburger Straße 69
D-89335 Ichenhausen
Verehrter Kunde,
wir wünschen Ihnen viel Freude und Erfolg beim Arbeiten mit
Ihrem neuen Gerät.
Hinweis:
Der Hersteller dieses Gerätes haftet nach dem geltenden Pro-
dukthaftungsgesetz nicht für Schäden, die an diesem Gerät
oder durch dieses Gerät entstehen bei:
• unsachgemäßer Behandlung,
• Nichtbeachtung der Bedienungsanweisung,
• Reparaturen durch Dritte, nicht autorisierte Fach kräfte,
• Einbau und Austausch von nicht originalen Ersatz teilen,
• nicht bestimmungsgemäßer Verwendung,
• Ausfällen der elektrischen Anlage bei Nichtbeachtung der
elektrischen Vorschriften und VDE-Bestimmungen 0100, DIN
57113 / VDE0113.
Beachten Sie:
Lesen Sie vor der Montage und vor Inbetriebnahme den ge-
samten Text der Bedienungsanleitung durch.
Diese Bedienungsanleitung soll es Ihnen erleichtern, Ihr Elektro-
werkzeug kennenzulernen und dessen bestimmungsgemäßen
Einsatzmöglichkeiten zu nutzen.
Die Bedienungsanleitung enthält wichtige Hinweise, wie Sie
mit dem Elektrowerkzeug sicher, fachgerecht und wirt schaft lich
arbeiten, und wie Sie Gefahren vermeiden, Reparaturkosten
sparen, Ausfallzeiten verringern und die Zuverlässigkeit und
Lebensdauer des Elektrowerkzeugs erhöhen.
Zusätzlich zu den Sicherheitsbestimmungen dieser Bedienungs-
anleitung müssen Sie unbedingt die für den Be trieb des Elektro-
werkzeugs geltenden Vorschriften Ihres Landes beachten.
Bewahren Sie die Bedienungsanleitung, in einer Plas tik hülle ge-
schützt vor Schmutz und Feuchtigkeit, bei dem Elektrowerkzeug
auf. Sie muss von jeder Bedienungsperson vor Aufnahme der
Arbeit gelesen und sorgfältig beachtet wer den. An dem Elektro-
werkzeug dürfen nur Personen arbeiten, die im Gebrauch des
Elektrowerkzeugs unterwiesen und über die damit verbunde-
nen Gefahren unterrichtet sind.
Neben den in dieser Bedienungsanleitung enthaltenen Si-
cherheitshinweisen und den besonderen Vorschriften Ih res Lan-
des sind die für den Betrieb von Holzbearbeitungs maschinen
allgemein anerkannten technischen Regeln zu beachten.
Wir übernehmen keine Haftung für Unfälle oder Schäden, die
durch Nichtbeachten dieser Anleitung und den Sicherheitshin-
weisen entstehen.
3. Gerätebeschreibung
1. Motoreinheit
2. Ein/Aus-Schalter
3. Drehzahlregler
4. Spindelstock-Antriebszentrum
5. Werkzeugunterstützung
6. Werkzeugauflage
7. Zentrierspitze
8. Kontermutter
9. Reitstock
10. Handrad
11. Spannhebel Reitstock
12. Maschinenbett
13. Feststellschraube
14. Spannhebel Werkzeugauflage
15. Planscheibe
4. Lieferumfang
• 1 Motoreinheit
• 1 Spindelstock-Antriebszentrum
• 1 Werkzeugauflage
• 1 Werkzeugunterstützung
• 1 Zentrierspitze
• 1 Reitstock
• 1 Maschinenbett
• 1 Planscheibe
• 2 Schraubenschlüssel SW 24
• 1 Drechslerbeitel, flach/schräg
• 1 Drechslerbeitel, hohl
• 1 Spannhebel Werkzeugauflage
• 8 Befestigungsschrauben (B)
• 1 Bedienungsanleitung
5. Bestimmungsgemäße Verwendung
Die Drechselbank dient nur zum Bearbeiten von Holz mittels
geeignetem Drechseleisen.
Die Maschine entspricht der gültigen EG-Maschinenricht linie.
Die Sicherheits-, Arbeits- und Wartungsvorschriften des Herstel-
lers sowie die in den technischen Daten angege benen Abmes-
sungen müssen eingehalten werden.
Die zutreffenden Unfallverhütungsvorschriften und die sons-
tigen, allgemein anerkannten sicherheitstechnischen Re geln
müssen beachtet werden.
Die Maschine darf nur von sachkundigen Personen gewartet
oder repariert werden, die damit vertraut und über die Gefah-
ren unterrichtet sind. Eigenmächtige Veränderungen an der
Maschine schließen eine Haftung des Herstellers für daraus
resultierende Schäden aus.
Die Maschine darf nur mit Originalzubehör und Original-
Werkzeugen des Herstellers genutzt werden.
Jeder darüber hinausgehende Gebrauch gilt als nicht bestim-
mungsgemäß. Für daraus resultierende Schäden haftet der
Hersteller nicht, das Risiko dafür trägt allein der Benutzer.

14 DE/AT/CH
m Bitte beachten Sie, dass unsere Geräte bestimmungsgemäß
nicht für den gewerblichen, handwerklichen oder industriellen Ein-
satz konstruiert wurden. Wir übernehmen keine Gewährleistung,
wenn das Gerät in Gewerbe-, Handwerks- oder Industriebetrieben
sowie bei gleichzusetzenden Tätigkeiten eingesetzt wird.
6. Sicherheitshinweise
m Achtung! Beim Gebrauch von Elektrowerkzeu-
gen sind zum Schutz gegen elektrischen Schlag,
Verletzungs- und Brandgefahr folgende grund-
sätzliche Sicherheitsmaßnahmen zu beachten.
Lesen Sie alle diese Hinweise, bevor Sie dieses
Elektrowerkzeug benutzen, und bewahren Sie die
Sicherheitshinweise gut auf.
Sicheres Arbeiten
1. Halten Sie Ihren Arbeitsbereich in Ordnung
- Unordnung im Arbeitsbereich kann Unfälle zur Folge
haben.
2. Berücksichtigen Sie Umgebungseinflüsse
- Setzen Sie Elektrowerkzeuge nicht dem Regen aus.
- Benutzen Sie Elektrowerkzeuge nicht in feuchter oder
nasser Umgebung.
- Sorgen Sie für gute Beleuchtung des Arbeitsbereichs.
- Benutzen Sie Elektrowerkzeuge nicht, wo Brand- oder
Explosionsgefahr besteht.
3. Schützen Sie sich vor elektrischem Schlag
- Vermeiden Sie Körperberührung mit geerdeten Teilen
(z. B. Rohren, Radiatoren, Elektroherden, Kühlgerä-
ten).
4. Halten Sie andere Personen fern!
- Lassen Sie andere Personen, insbesondere Kinder,
nicht das Werkzeug oder das Kabel berühren. Hal-
ten Sie sie von Ihrem Arbeitsbereich fern.
5. Bewahren Sie unbenutzte Elektrowerkzeuge
sicher auf
- Unbenutzte Elektrowerkzeuge sollten an einem tro-
ckenen, hochgelegenen oder abgeschlossenen Ort,
außerhalb der Reichweite von Kindern, abgelegt wer-
den.
6. Überlasten Sie Ihr Elektrowerkzeug nicht
- Sie arbeiten besser und sicherer im angegebenen
Leistungsbereich.
7. Benutzen Sie das richtige Elektrowerkzeug
- Verwenden Sie keine leistungsschwachen Elektro-
werkzeuge für schwere Arbeiten.
- Benutzen Sie das Elektrowerkzeug nicht für solche
Zwecke, für die es nicht vorgesehen ist. Benutzen Sie
zum Beispiel keine Handkreissäge zum Schneiden
von Baumästen oder Holzscheiten.
8. Tragen Sie geeignete Kleidung
- Tragen Sie keine weite Kleidung oder Schmuck, sie
könnten von beweglichen Teilen erfasst werden.
- Bei Arbeiten im Freien ist rutschfestes Schuhwerk emp-
fehlenswert.
- Tragen Sie bei langen Haaren ein Haarnetz.
9. Benutzen Sie Schutzausrüstung
- Tragen Sie eine Schutzbrille.
- Verwenden Sie bei stauberzeugenden Arbeiten eine
Atemmaske.
10. Schließen Sie die Staubabsaug-Einrichtung an
- Falls Anschlüsse zur Staubabsaugung und Auffang-
einrichtung vorhanden sind, überzeugen Sie sich,
dass diese angeschlossen und richtig benutzt werden.
- Der Betrieb in geschlossenen Räumen ist nur mit einer
geeigneten Absauganlage zulässig.
11. Verwenden Sie das Kabel nicht für Zwecke,
für die es nicht bestimmt ist.
- Benutzen Sie das Kabel nicht, um den Stecker aus der
Steckdose zu ziehen. Schützen Sie das Kabel vor Hit-
ze, Öl und scharfen Kanten.
12. Sichern Sie das Werkstück
- Bei langen Werkstücken ist eine zusätzliche Auflage
(Tisch, Böcke, etc.) erforderlich, um ein Kippen der
Maschine zu vermeiden.
- Drücken Sie das Werkstück immer fest gegen Arbeits-
platte und Anschlag, um ein Wackeln bzw. Verdrehen
des Werkstückes zu verhindern.
13. Vermeiden Sie abnormale Körperhaltung
- Sorgen Sie für sicheren Stand und halten Sie jederzeit
das Gleichgewicht.
- Vermeiden Sie ungeschickte Handpositionen, bei de-
nen durch ein plötzliches Abrutschen eine oder beide
Hände das Werkzeug berühren könnten.
14. Pflegen Sie Ihre Werkzeuge mit Sorgfalt
- Halten Sie die Schneidwerkzeuge scharf und sauber,
um besser und sicherer arbeiten zu können.
- Befolgen Sie die Hinweise zur Schmierung und zum
Werkzeugwechsel.
- Kontrollieren Sie regelmäßig die Anschlussleitung des
Elektrowerkzeugs und lassen Sie diese bei Beschädi-
gung von einem anerkannten Fachmann erneuern.
- Kontrollieren Sie Verlängerungsleitungen regelmäßig
und ersetzen Sie diese, wenn sie beschädigt sind.
- Halten Sie Handgriffe trocken, sauber und frei von Öl
und Fett.
15. Ziehen Sie den Stecker aus der Steckdose
- Entfernen Sie nie lose Splitter, Späne oder einge-
klemmte Holzteile bei laufendem Elektrowerkzeug.
- Bei Nichtgebrauch des Elektrowerkzeugs, vor der
Wartung und beim Wechsel von Werkzeugen wie z.
B. Sägeblatt, Bohrer, Fräser.
16. Lassen Sie keine Werkzeugschlüssel stecken
- Überprüfen Sie vor dem Einschalten, dass Schlüssel
und Einstellwerkzeuge entfernt sind.
17. Vermeiden Sie unbeabsichtigten Anlauf
- Vergewissern Sie sich, dass der Schalter beim Einste-
cken des Steckers in die Steckdose ausgeschaltet ist.
18. Benutzen Sie Verlängerungskabel für den Au-
ßenbereich
- Verwenden Sie im Freien nur dafür zugelassene und
entsprechend gekennzeichnete Verlängerungskabel.
- Verwenden Sie die Kabeltrommel nur im abgerollten
Zustand.
19. Seien Sie stets aufmerksam
- m Achten Sie darauf, was Sie tun. Gehen Sie mit
Vernunft an die Arbeit. Benutzen Sie das Elektrowerk-
zeug nicht, wenn Sie unkonzentriert sind.

15DE/AT/CH
20. Überprüfen Sie das Elektrowerkzeug auf
eventuelle Beschädigungen
- Vor weiterem Gebrauch des Elektrowerkzeugs müs-
sen Schutzvorrichtungen oder leicht beschädigte Teile
sorgfältig auf ihre einwandfreie und bestimmungsge-
mäße Funktion untersucht werden.
- Überprüfen Sie, ob die beweglichen Teile einwandfrei
funktionieren und nicht klemmen oder ob Teile be-
schädigt sind. Sämtliche Teile müssen richtig montiert
sein und alle Bedingungen erfüllen, um den einwand-
freien Betrieb des Elektrowerkzeugs zu gewährleisten.
- Beschädigte Schutzvorrichtungen und Teile müssen
bestimmungsgemäß durch eine anerkannte Fachwerk-
statt repariert oder ausgewechselt werden, soweit
nichts anderes in der Bedienungsanleitung angege-
ben ist.
- Beschädigte Schalter müssen bei einer Kundendienst-
werkstatt ersetzt werden.
- Benutzen Sie keine fehlerhaften oder beschädigten
Anschlussleitungen.
- Benutzen Sie keine Elektrowerkzeuge, bei denen sich
der Schalter nicht ein- und ausschalten lässt.
21. ACHTUNG!
- Der Gebrauch anderer Einsatzwerkzeuge und an-
deren Zubehörs kann eine Verletzungsgefahr für Sie
bedeuten.
22. Lassen Sie Ihr Elektrowerkzeug durch eine
Elektrofachkraft reparieren
- Dieses Elektrowerkzeug entspricht den einschlägigen
Sicherheitsbestimmungen. Reparaturen dürfen nur
von einer Elektrofachkraft ausgeführt werden, indem
Originalersatzteile verwendet werden; anderenfalls
können Unfälle für den Benutzer entstehen.
Warnung! Dieses Elektrowerkzeug erzeugt während des
Betriebs ein elektromagnetisches Feld. Dieses Feld kann unter
bestimmten Umständen aktive oder passive medizinische Im-
plantate beeinträchtigen. Um die Gefahr von ernsthaften oder
tödlichen Verletzungen zu verringern, empfehlen wir Personen
mit medizinischen Implantaten ihren Arzt und den Hersteller
vom medizinischen Implantat zu konsultieren, bevor das Elek-
trowerkzeug bedient wird.
Sicherheitshinweise für die Drechselbank
• Machen Sie sich mit den Eigenschaften der Maschine und
der Drechseltechnik vertraut, bevor Sie die Maschine in Be-
trieb nehmen.
• Prüfen Sie alle Werkstücke auf Risse oder Äste. Klebeverbin-
dungen müssen vor dem Wenden vollständig ausgehärtet
sein.
• Vergewissern Sie sich, dass das Werkstück sicher verriegelt
ist und alle Aufsätze gesichert sind.
• Vor dem Einschalten der Maschine sicherstellen, dass sich
das Werkstück durch Drehen von Hand frei drehen kann.
• Halten Sie Ihre Hände und Finger vom rotierenden Werk-
stück fern.
• Schalten Sie die Maschine aus und warten Sie, bis sie zum
Stillstand gekommen ist, bevor Sie Einstellungen an Werk-
stück, Reitstock oder Werkzeugauflage vornehmen.
• Wartung, Einstellung, Kalibrierung und Reinigung dürfen nur
bei ausgeschaltetem Motor durchgeführt werden.
• Die Maschine ist nur für den Einsatz mit Drechselmeißeln
vorgesehen.
• Bewahren Sie die Drechselmeißel immer sicher auf, bevor
Sie den Arbeitsplatz verlassen.
• Betreiben Sie die Drechselmaschine nicht ohne Abdeckun-
gen und Schutzvorrichtungen.
• Schneidwerkzeuge scharf halten.
• Verwenden Sie die niedrigste Geschwindigkeit, wenn Sie ein
neues Werkstück starten.
• Halten Sie die Drechselmaschine immer mit der langsamsten
Geschwindigkeit an. Wenn die Drechselmaschine so schnell
läuft, dass sie vibriert, besteht die Gefahr, dass das Werk-
stück geworfen oder das Schneidwerkzeug aus den Händen
gerissen wird.
• Lassen Sie keine Schneidwerkzeuge in das Werkstück bei-
ßen. Das Holz kann gespalten oder von der Drehbank ge-
worfen werden.
• Positionieren Sie die Werkzeugauflage immer über der Mittel-
linie der Drechselmaschine, wenn Sie ein Werkstück formen.
• Bevor Sie ein Werkstück an der Frontplatte befestigen, soll-
ten Sie es immer so grob wie möglich ausarbeiten, um es so
rund wie möglich zu machen. Dadurch werden die Vibrati-
onen beim Drehen des Werkstücks minimiert. Befestigen Sie
das Werkstück immer sicher an der Frontplatte. Andernfalls
kann das Werkstück von der Drechselmaschine weggewor-
fen werden.
• Verwenden Sie eine Bürste oder Druckluft, um Holzspäne
zu entfernen; niemals Ihre Hände. Die Späne werden scharf
sein.
• Das Schneidwerkzeug muss immer fest im Spannfutter sitzen
und so eingestellt sein, dass der Überstand vom Holzstück
begrenzt wird. Dies reduziert die Möglichkeit, dass das
Werkzeug bricht oder sich verbiegt.
• Die Drechselmaschine darf nicht im laufenden Betrieb über-
quert werden.
• Werkstück nur gegen die Drehrichtung in ein Schneidwerk-
zeug einführen. Das Werkstück muss sich immer zu Ihnen
hin drehen.
• Lassen Sie das Gerät nicht unbeaufsichtigt, wenn es an eine
Steckdose angeschlossen ist, schalten Sie es aus und ziehen
Sie es aus der Steckdose, bevor Sie es verlassen.
• Dieses Produkt ist kein Spielzeug. Außerhalb der Reichweite
von Kindern aufbewahren.
• Einige Stäube, die beim Schleifen, Sägen, Schleifen, Bohren
und anderen Bauarbeiten entstehen, enthalten Chemikalien,
von denen bekannt ist, dass sie Krebs, Geburtsfehler oder
andere reproduktive Schäden verursachen. Einige Beispiele
für diese Chemikalien sind:
- Blei aus Bleifarben
- Kristalline Kieselsäure aus Ziegeln und Zement oder
anderen Mauerwerksprodukten
- Arsen und Chrom aus chemisch behandeltem Holz
• Je nachdem, wie oft Sie diese Arbeit verrichten, variiert Ihr
Risiko. Um Ihre Exposition gegenüber diesen Chemikalien zu
reduzieren: Arbeiten Sie in einem gut belüfteten Bereich und
arbeiten Sie mit zugelassenen Sicherheitseinrichtungen, wie
z.B. Staubmasken, die speziell dafür entwickelt wurden, mik-
roskopisch kleine Partikel herauszufiltern.

16 DE/AT/CH
• Personen mit Herzschrittmachern sollten vor der Anwendung
ihren Arzt konsultieren. Elektromagnetische Felder in der Nähe
des Herzschrittmachers können zu Störungen des Herzschritt-
machers oder zum Ausfall des Herzschrittmachers führen.
Darüber hinaus sollten Menschen mit Herzschrittmachern:
- Vermeiden Sie es, allein zu arbeiten.
• Richtig warten und prüfen, um einen elektrischen Schlag zu
vermeiden.
• Die in diesem Benutzerhandbuch beschriebenen Warnun-
gen, Vorsichtsmaßnahmen und Anweisungen können nicht
alle möglichen Bedingungen und Situationen abdecken.
Der Betreiber muss verstehen, dass gesunder Menschenver-
stand und Vorsicht Faktoren sind, die nicht in dieses Produkt
eingebaut werden können, sondern vom Betreiber geliefert
werden müssen.
Zusätzliche Sicherheitshinweise für die Verwen-
dung von Planscheiben
• Stellen Sie sicher, dass die Planscheibe die richtige Größe
hat, um das Werkstück zu stützen.
• Stellen Sie sicher, dass das Werkstück sicher an der Plan-
scheibe befestigt ist.
• Schneiden Sie das Werkstück vor der Montage auf eine
Planscheibe so nah wie möglich an die endgültige Form.
• Zum Drehen der Planscheibe nur Schabemeißel verwenden.
Schneidemeißel können leicht aus den Händen gerissen werden.
• Achten Sie darauf, dass der Drechselmeißel die Halteschrau-
ben an den Fertigmaßen des Werkstücks nicht stören kann.
7. Restrisiken
Das Elektrowerkzeug ist nach dem Stand der Tech-
nik und den anerkannten sicherheitstechnischen
Regeln gebaut. Dennoch können beim Arbeiten
einzelne Restrisiken auftreten.
• Verarbeiten Sie nur ausgesuchte Hölzer ohne Fehler wie:
Ast stellen, Querrisse, Oberflächenrisse. Fehlerhaftes Holz
neigt zum Splittern und wird zum Risiko beim Arbeiten.
• Nicht sorgfältig verleimte Hölzer können aufgrund der Zent-
rifugalkraft beim Bearbeiten explodieren.
• Vor dem Einspannen das rohe Werkstück auf Quadrat form
zuschneiden, zentrieren und auf sichere Einspan nung ach-
ten. Umwucht im Werkstück führt zu Verlet zungs gefahr.
• Verletzungsgefahr durch unsichere Werkzeugführung bei
nicht exakt angestellter Werkzeugauflage und stumpfem
Drechselwerkzeug. Voraussetzung für fachgerechtes Drech-
seln ist einwandfreies, scharf geschliffenes Drech sel werkzeug.
• Gefährdung der Gesundheit durch das rotierende Werkstück
bei langem Kopfhaar und loser Kleidung. Per sönliche Schutz-
ausrüstung wie Haarnetz und eng anliegende Kleidung tragen.
• Gefährdung der Gesundheit durch Holzstäube oder Holz-
späne. Persönliche Schutzausrüstungen wie Augenschutz
und Staubmaske tragen.
• Gefährdung der Gesundheit durch Strom bei Verwendung
nicht ordnungsgemäßer Elektro-Anschlussleitungen.
• Desweiteren können trotz aller getroffener Vorkehrungen
nicht offensichtliche Restrisiken bestehen.
• Restrisiken können minimiert werden, wenn die „Si-
cherheitshinweise“ und die „Bestimmungsgemäße Ver-
wendung“, sowie die Bedienungsanweisung insge samt be-
achtet werden..
• Bevor Sie Einstell- oder Wartungsarbeiten vornehmen, schal-
ten Sie das Gerät ab und ziehen den Netzstecker.
8. Technische Daten
Wechselstrommotor 220 - 240 V
~
50 Hz
Leistung 550 Watt
Betriebsart S1 *
Leerlaufdrehzahl 800 - 3000 min
-1
max. Werkstücklänge 600 mm
max. Ø Werkstück 25 cm
Spindelkopfgewinde M 18 x 1,5
Gewicht ca. 6,7 kg
Baumaße LxBxH mm 1010x154x215
* Betriebsart S1, Dauerbetrieb
Geräuschwerte
Die Geräuschwerte wurden entsprechend EN 61029 ermittelt.
Schalldruckpegel L
pA
86,6 dB(A)
Unsicherheit K
pA
3 dB
Schallleistungspegel L
WA
99,6 dB(A)
Unsicherheit K
WA
3 dB
Tragen Sie einen Gehörschutz.
Die Einwirkung von Lärm kann Gehörverlust bewirken. Schwin-
gungsgesamtwerte (Vektorsumme dreier Richtungen) ermittelt
entsprechend EN 61029.
9. Vor Inbetriebnahme
• Öffnen Sie die Verpackung und nehmen Sie das Gerät vor-
sichtig heraus.
• Entfernen Sie das Verpackungsmaterial sowie Verpackungs-/
und Transportsicherungen (falls vorhanden).
• Überprüfen Sie, ob der Lieferumfang vollständig ist.
• Kontrollieren Sie das Gerät und die Zubehörteile auf Trans-
portschäden.
• Bewahren Sie die Verpackung nach Möglichkeit bis zum Ab-
lauf der Garantiezeit auf.
ACHTUNG
Gerät und Verpackungsmaterialien sind kein Kin-
derspielzeug! Kinder dürfen nicht mit Kunststoff-
beuteln, Folien und Kleinteilen spielen! Es besteht
Verschluckungs- und Erstickungsgefahr!
• Die Maschine muss standsicher aufgestellt werden, d.h. auf
einer Werkbank, dem Untergestell o. ä. festschrauben.
• Vor Inbetriebnahme müssen alle Abdeckungen und Sicher-
heitsvorrichtungen ordnungsgemäß montiert sein.
• Bei bereits bearbeitetem Holz auf Fremdkörper, wie z.B. Nä-
gel oder Schrauben, usw. achten.
• Überzeugen Sie sich vor dem Anschließen der Maschine,
dass die Daten auf dem Typenschild mit den Netzdaten
übereinstimmen.
Seite wird geladen ...
Seite wird geladen ...
Seite wird geladen ...
Seite wird geladen ...
Seite wird geladen ...
Seite wird geladen ...
Seite wird geladen ...
Seite wird geladen ...
Seite wird geladen ...
Seite wird geladen ...
Seite wird geladen ...
Seite wird geladen ...
-
 1
1
-
 2
2
-
 3
3
-
 4
4
-
 5
5
-
 6
6
-
 7
7
-
 8
8
-
 9
9
-
 10
10
-
 11
11
-
 12
12
-
 13
13
-
 14
14
-
 15
15
-
 16
16
-
 17
17
-
 18
18
-
 19
19
-
 20
20
-
 21
21
-
 22
22
-
 23
23
-
 24
24
-
 25
25
-
 26
26
-
 27
27
-
 28
28
-
 29
29
-
 30
30
-
 31
31
-
 32
32


Parkside PDM 600 A1 Operating And Safety Instructions Manual
- Kategorie
- Drehmaschinen
- Typ
- Operating And Safety Instructions Manual
in anderen Sprachen
- English: Parkside PDM 600 A1
Andere Dokumente
-
Scheppach 5902305901 Translation Of Original Instruction Manual
-
Scheppach DM460T Benutzerhandbuch
-
Scheppach DM500T Benutzerhandbuch
-
-
-
-
Ferm WLM1001 Benutzerhandbuch
-
Holzmann D 300F Benutzerhandbuch
-
-